PSA 2023 R3.0 - Product Enhancements
Below is a summary of the features included in 2023 R3.0.
- API/SDK
- Budget
- Integration
- Invoicing
- Leave Request
- Organization Breakdown Structure (OBS)
- Rate Cards
- Resource Management
- Reporting
- Upland Analytics
- User Experience Enhancements
- Work Breakdown Structure (WBS)
- Work Item Manager
- Deprecated/Unsupported Functionality
2023.10.18.2023R3.0.V1.EB
Note: This page may be updated as new information becomes available. Visit regularly for the latest updates.
API/SDK
It is now possible to:
- GET/POST/DELETE/PUT/PATCH Budgets (applicable to Project, Task, Assignment)
- GET/ POST/DELETE/PUT/PATCH Budget Settings (applicable to Project, Task, Assignment)
- GET/POST/DELETE Budget Entries (applicable to Project, Task, Assignment)
Caution: It is highly encouraged to use a Security Profile with Administrative privileges when working with the API. However, if you need to use a less privileged Security Profile, please ensure that all required permissions are granted.
Benefit: This enables technical clients to build tools for their user base to edit the Task/Assignment/Project Budget and automate processes that currently require manual intervention. Moreover, the API will enable the development of seamless integrations to 3rd party systems by connecting endpoints together for data exchange.
Click here for more information on how to access the REST API documentation.
Budget
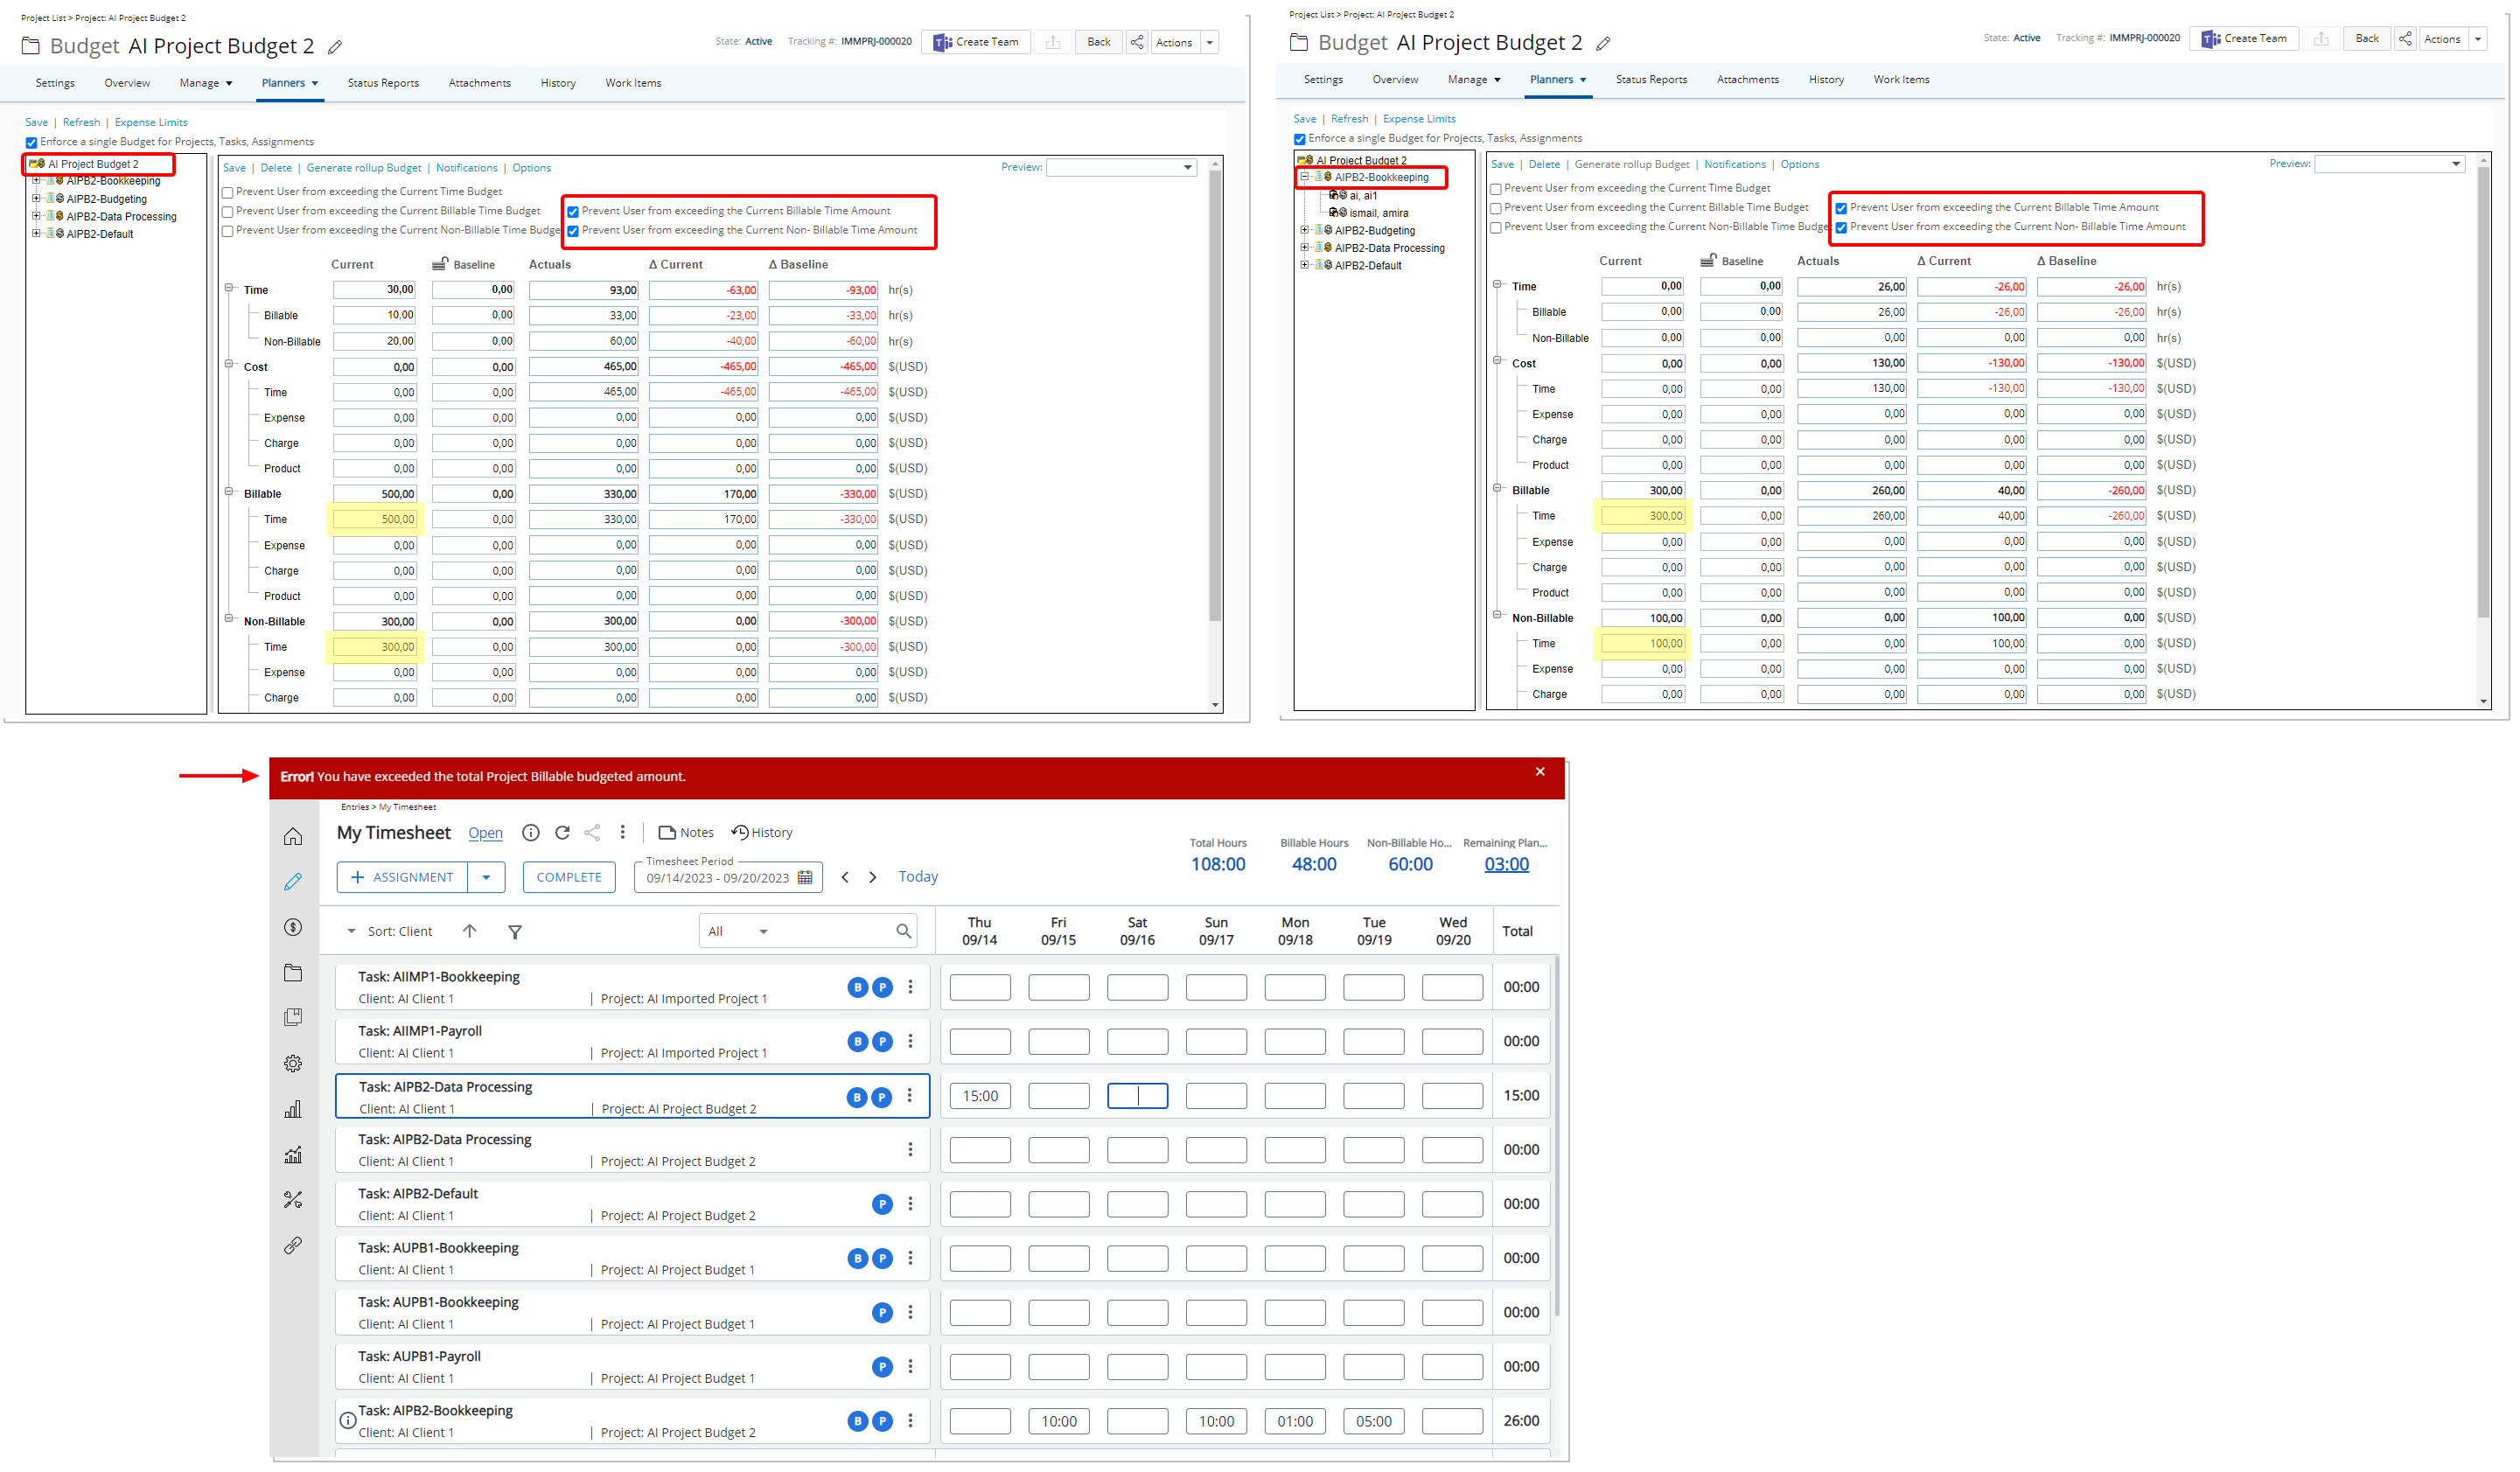
Description: The following options are available when creating/managing Project and/or Task Budgets (Project list > Edit project > Manage > Budget):
- Prevent Users from exceeding the Current Billable Time Amount Budget
- Prevent Users from exceeding the Current Non-billable Time Amount Budget
Upon selecting these option(s), Users are then prevented from entering time exceeding the Current Billable /Non-Billable Time Amount Budget(s) as defined for a specified Project/Task within a date range.
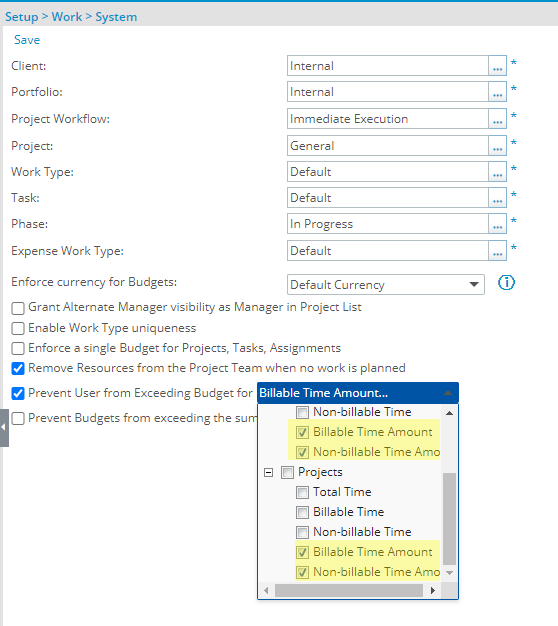
Administrators can also set a default value for these two settings from Work System setup page (Setup > Work > System) where two new options are added to Tasks and Projects section of the Prevent User from Exceeding Budget for selection box. When selected at the System level, these settings are then inherited by default when creating new Projects.
Benefit: With this addition you can now have better control of your Budget at the Project and Task level.
For further details refer to:
- Available configuration settings within the System level Work Setup page
- Preventing Users from Exceeding Budget
- Creating Project Budget Rules
- Creating a New Task Budget
Integration
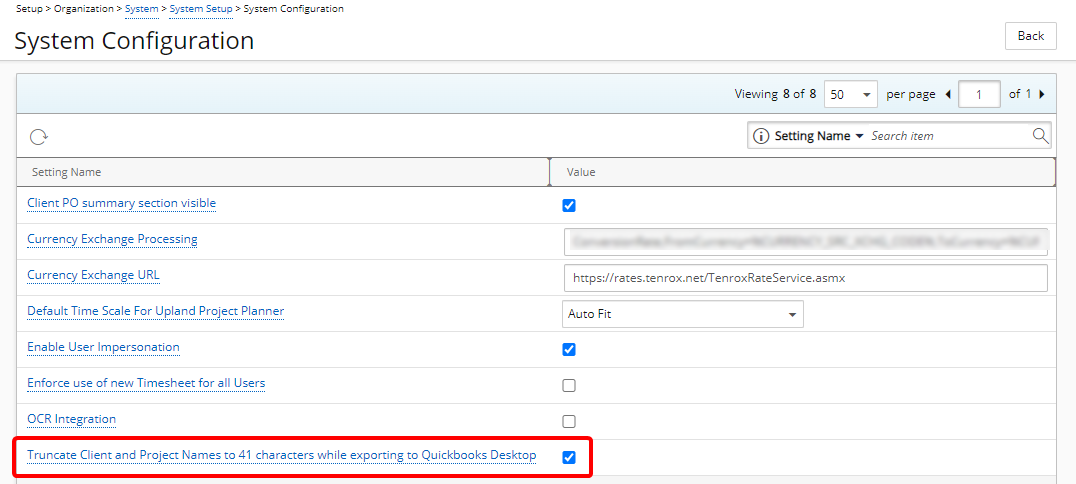
Description: The option Truncate Client and Project Names to 41 characters while exporting to QuickBooks Desktop is now available from the System Configuration page (Setup > Organization > System > System Setup) accessible only by the Master Administrator User Profile.
Note:
- By default, Truncate Client and Project Names to 41 characters while exporting to QuickBooks Desktop is unchecked.
- Duplication of Client names is not supported in QuickBooks Desktop, therefore when exporting clients having identical first 41 characters in their names will result in an error. In this case only one client will be exported. Similarly having two projects with the identical first 41 characters in their names, under the same client will result in an error. In this case only one project will be exported.
Benefit: Seamlessly export clients and projects to QuickBooks Desktop by truncating Names to 41 characters.
For further details refer to: System Configuration page
Invoicing
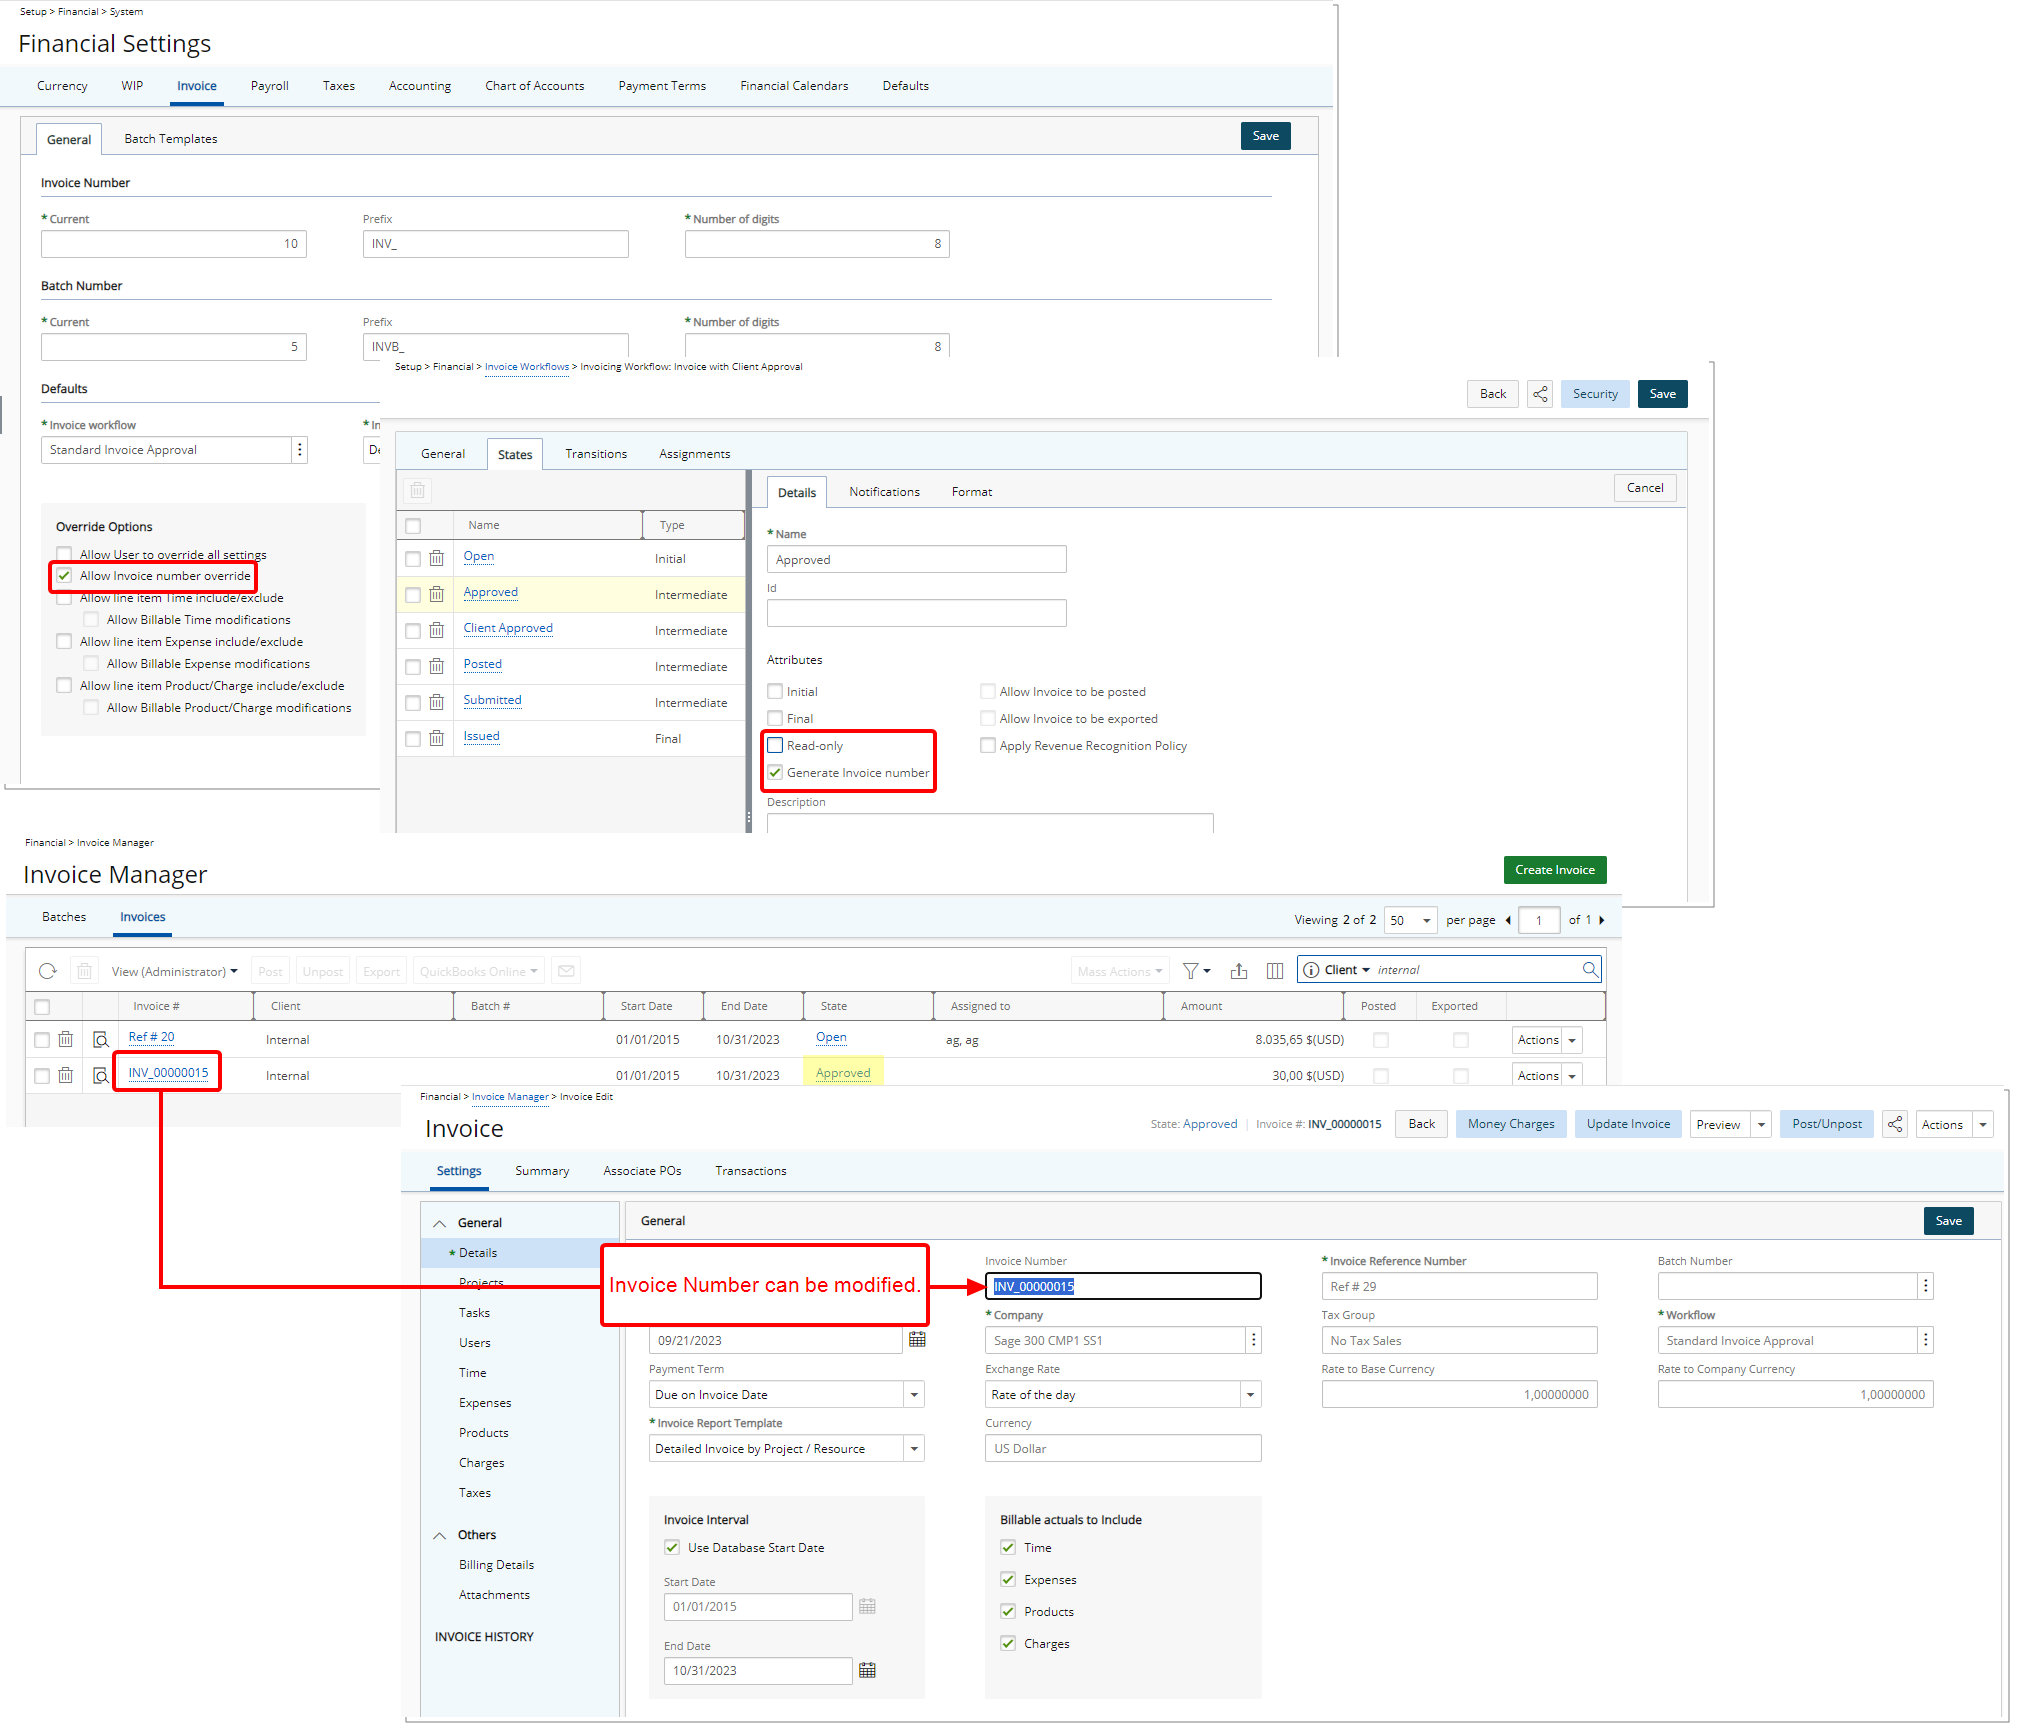
Description: In past releases, users were allowed to modify the Number field during the creation of an Invoice when the Allow Invoice number override option was selected within the Override Options section of Financial Settings Invoice tab (Setup > Financial > System > Invoice tab > General sub-tab), .
As of this release when the Allow Invoice number override option is selected, the auto-generated Invoice Number will be editable, when:
- The Allow Invoice number override is selected.
- The Invoice is in a modifiable State (Read-only State Attribute is unchecked).
- The Generate Invoice Number State Attribute is selected.
Note: When the Allow Invoice number override is unchecked, the Invoice Number will remain non-modifiable regardless of the Read-only State Attribute.
Benefit: With this improvement, your finance team can modify the auto-generated invoice numbers and add concise annotations to the Invoice Number. These annotations can serve to quickly identify or draw attention to specific invoice status and business need.
For further details refer to: Invoice Setup
Leave Request
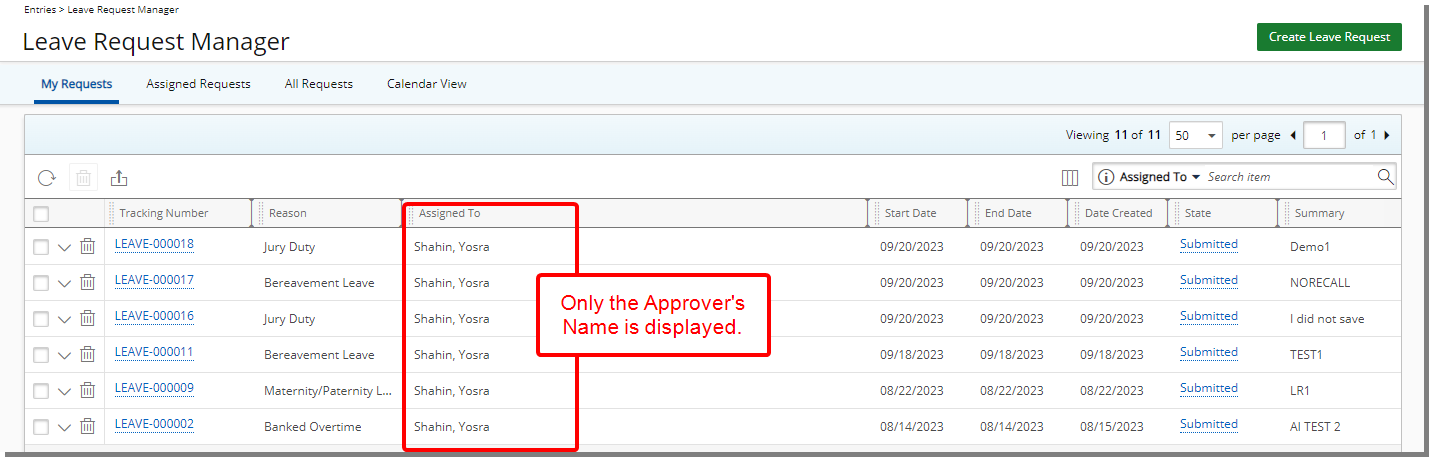
Description: In past releases, both the Leave Request Originator and Approver Names were displayed within the Assigned To column of the Leave Request Manager page when the Leave Request was in a State that could be recalled. As of this release, modifications have been made to only show the Approver’s Name.
Benefit: This improvement enables users to easily identify who should act on Leave Requests, enhancing clarity and accountability.
For further details refer to: Column Selection Options | Leave Request Manager
Organization Breakdown Structure (OBS)
Description: In past releases, a user’s Cost or Billing Rule Start and End Dates were tied with their Termination Date. As of this release, modifications were made to allow the Cost and Billing Rate Rules to extend beyond a user’s Termination Date.
Benefit: This enhancement enables Administrators to have finer control and adaptability in managing users within the system.
For further details refer to:
- Associating Cost Rule(s) to a User
- Associating Billing Rule(s) to a User
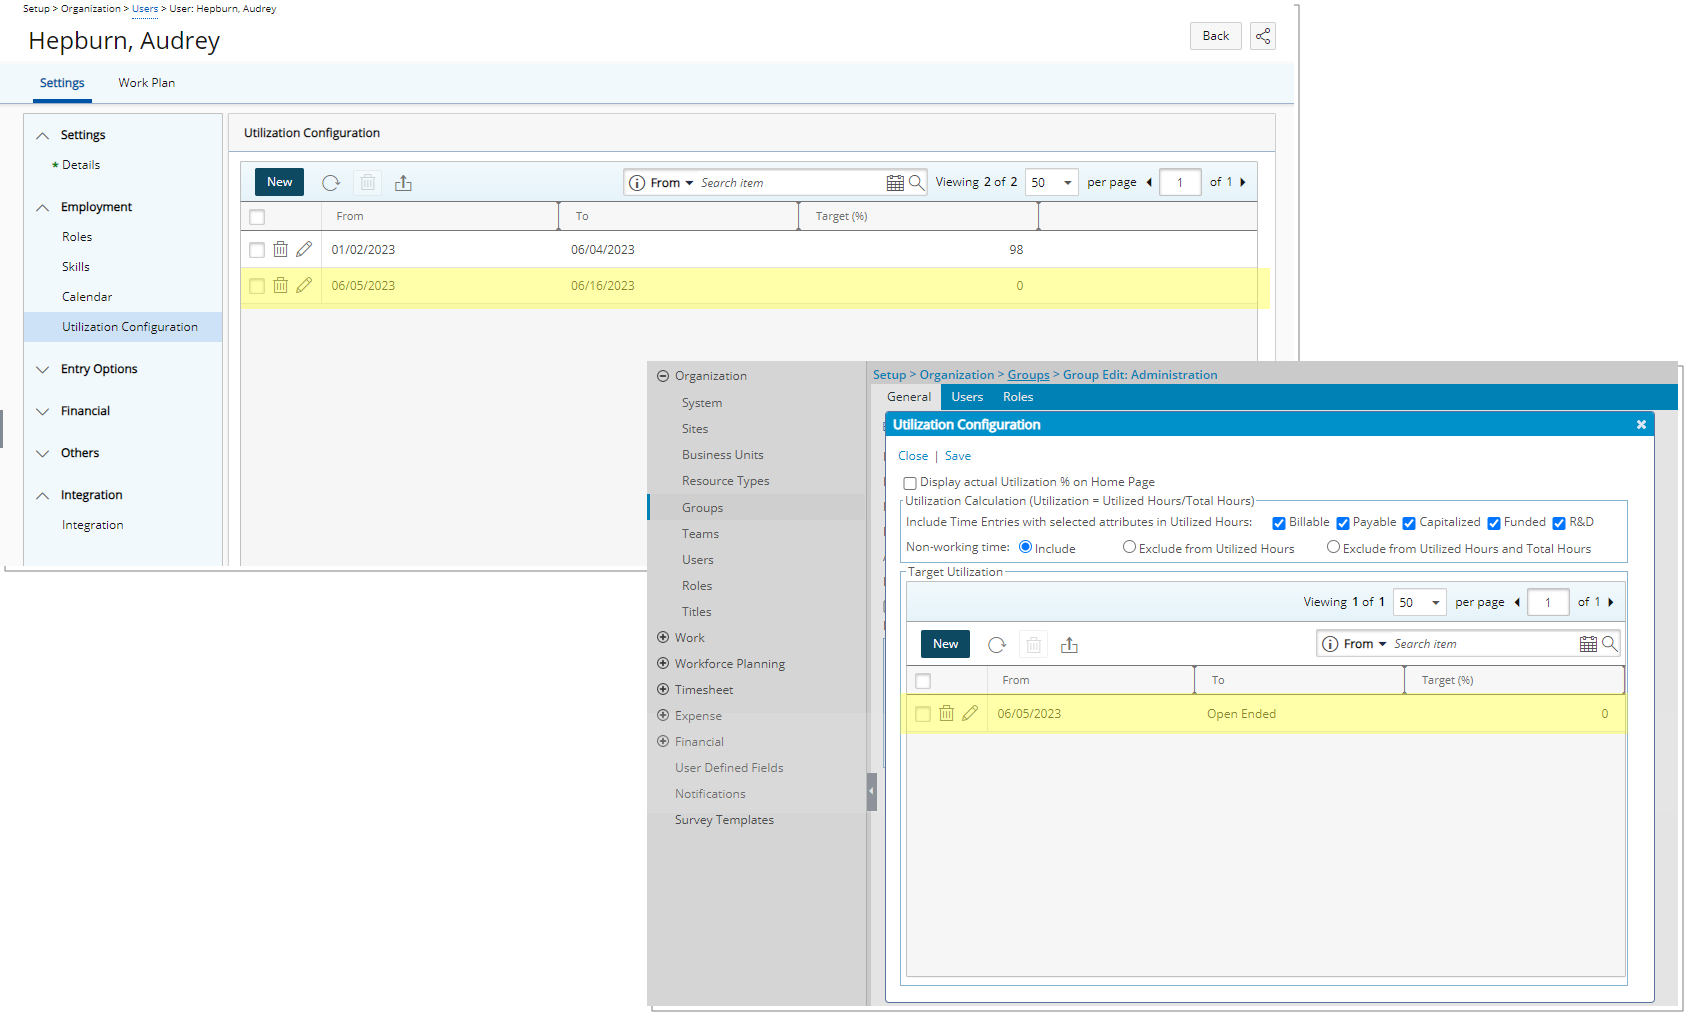
Description: You can now set a User or Group Target Utilization% to 0, allowing for greater flexibility when managing resource allocations during periods of non-work, such as leaves or absences.
Benefit: This allows you to accurately reflect periods when certain Users or Groups are not expected to work, such as when they are on leave. By doing so, you can ensure that your resource planning aligns with real-world scenarios, optimizing resource allocation and project management efficiency.
For further details refer to:
- Setting Target Utilization for a User
- Setting Target Utilization for a Group
Rate Cards
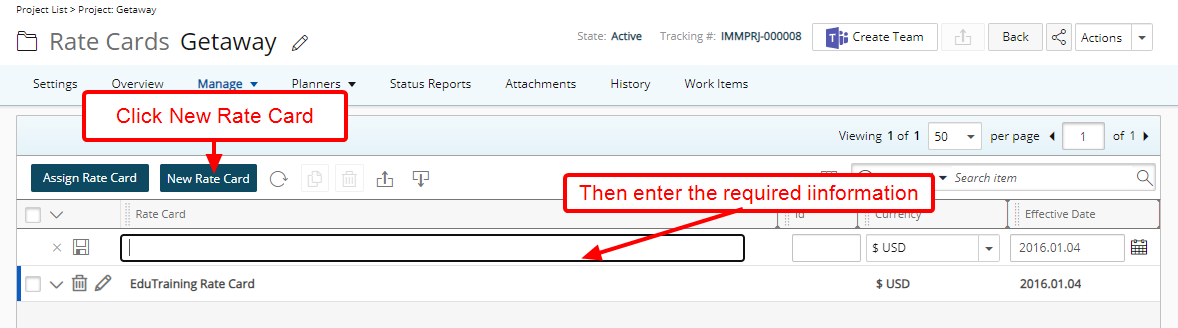
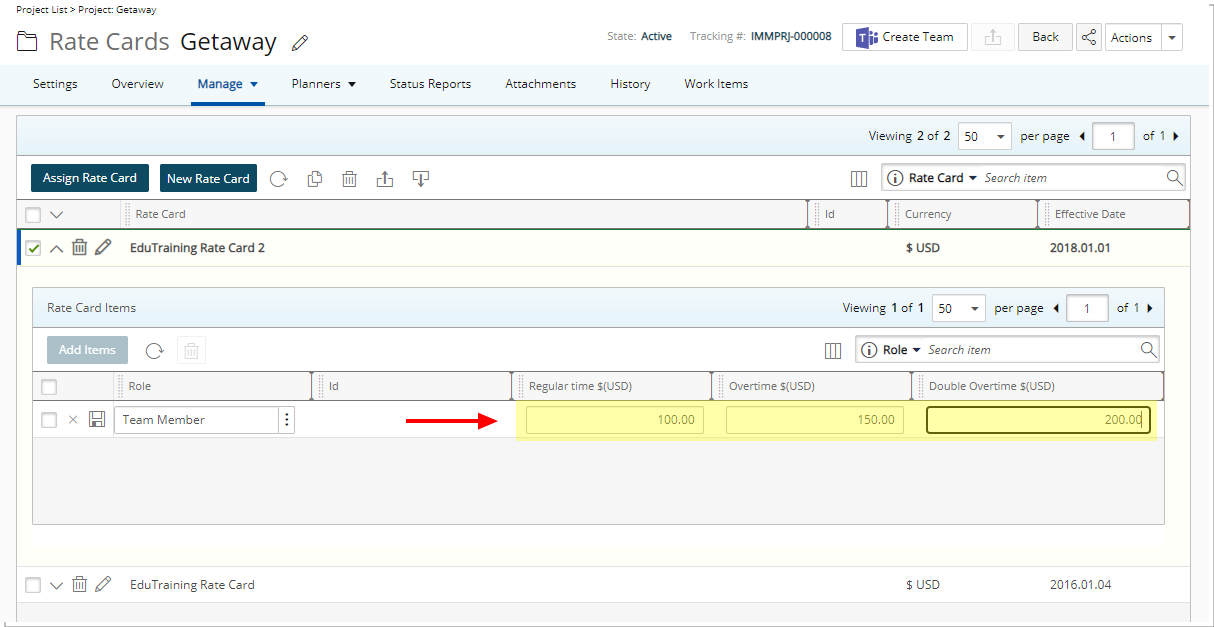
Description: You can now create a Rate Card from Project edit.
Note: A Rate card created at the Project level can only be seen within the specific Project it originated from.
- From the Project Rate Cards page, click the newly added New Rate Card button.
- A new line item is added allowing you to define the Name, Id and Currency.
Note: Currency cannot be changed once a Rate Card is saved.
- Upon saving you can then expand the Card Items drawer and Add Items.
- Select the required Roles from the left table and click the add button to add them to the selected items on the right.
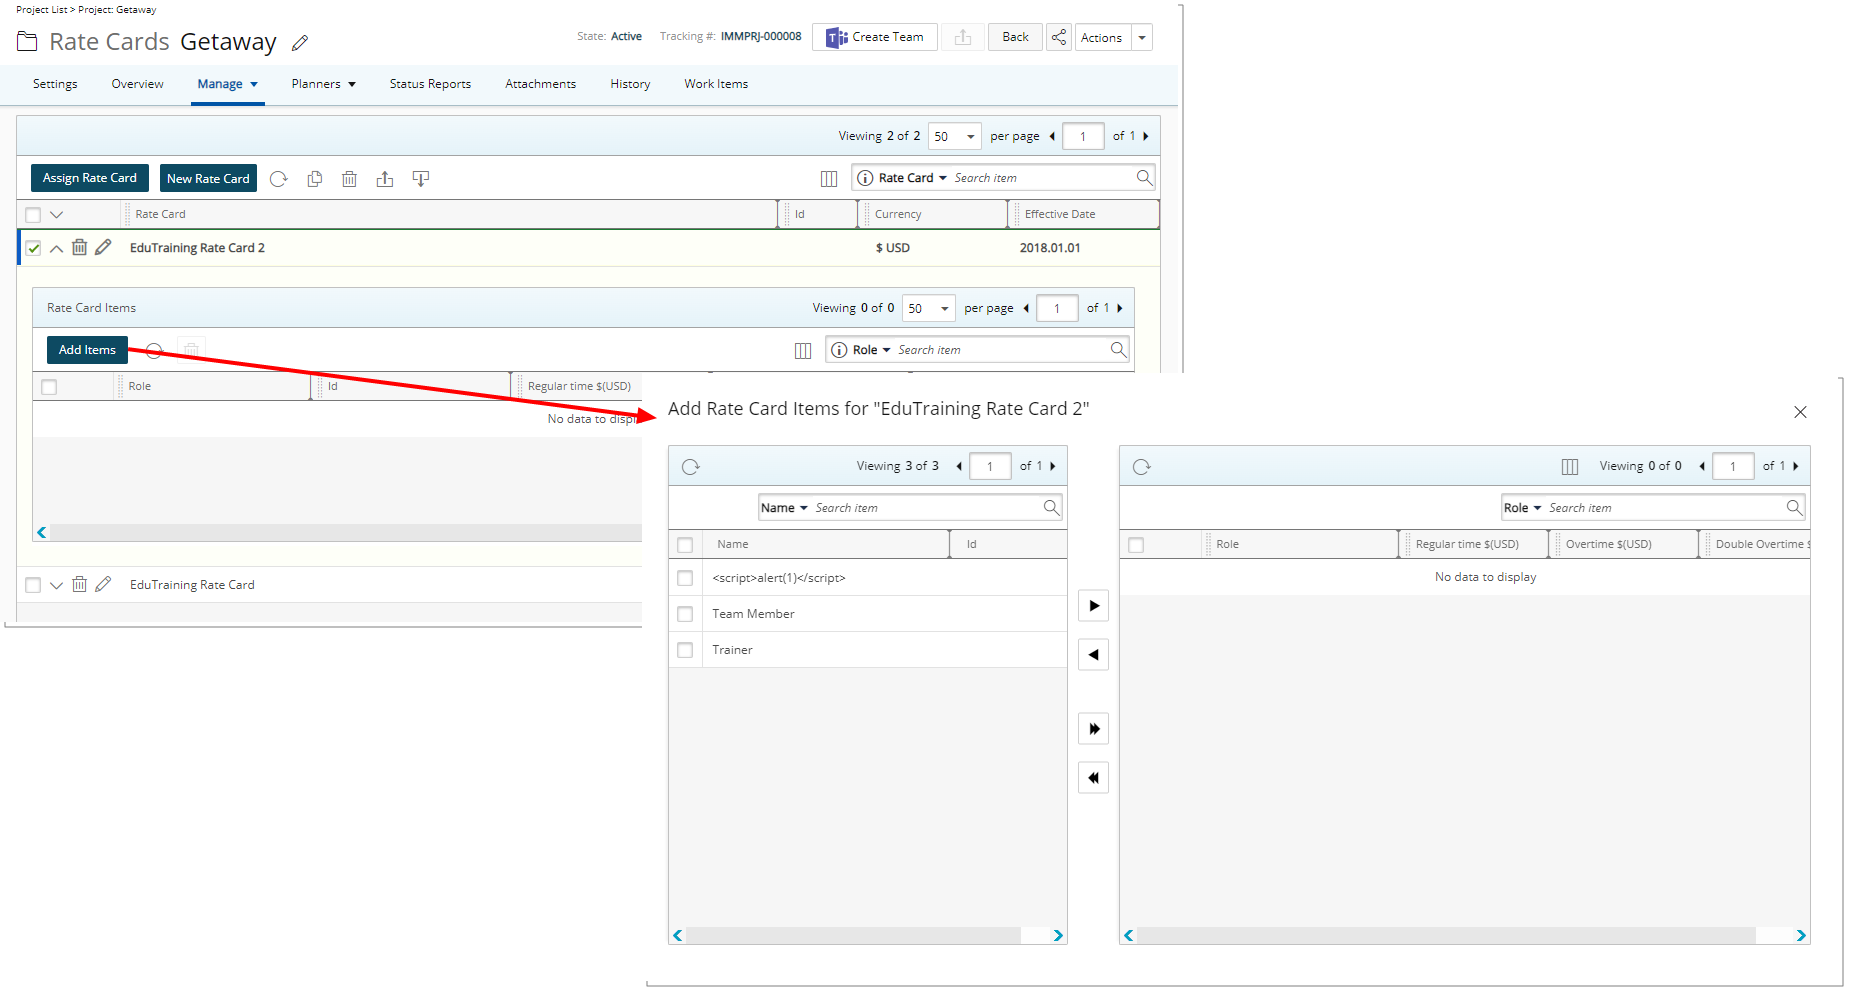
- Enter the Regular time, Overtime and Double overtime amounts for each Role. Then close the dialog box to return to the list page where you will see your Rate Card Items in the drawer.
Note: You cannot:
- Use the same Role for multiple Rate Items.
- Suspend/delete a Role if it is used in Project Rate Card associations.
For further details refer to: Creating Project Rate Cards
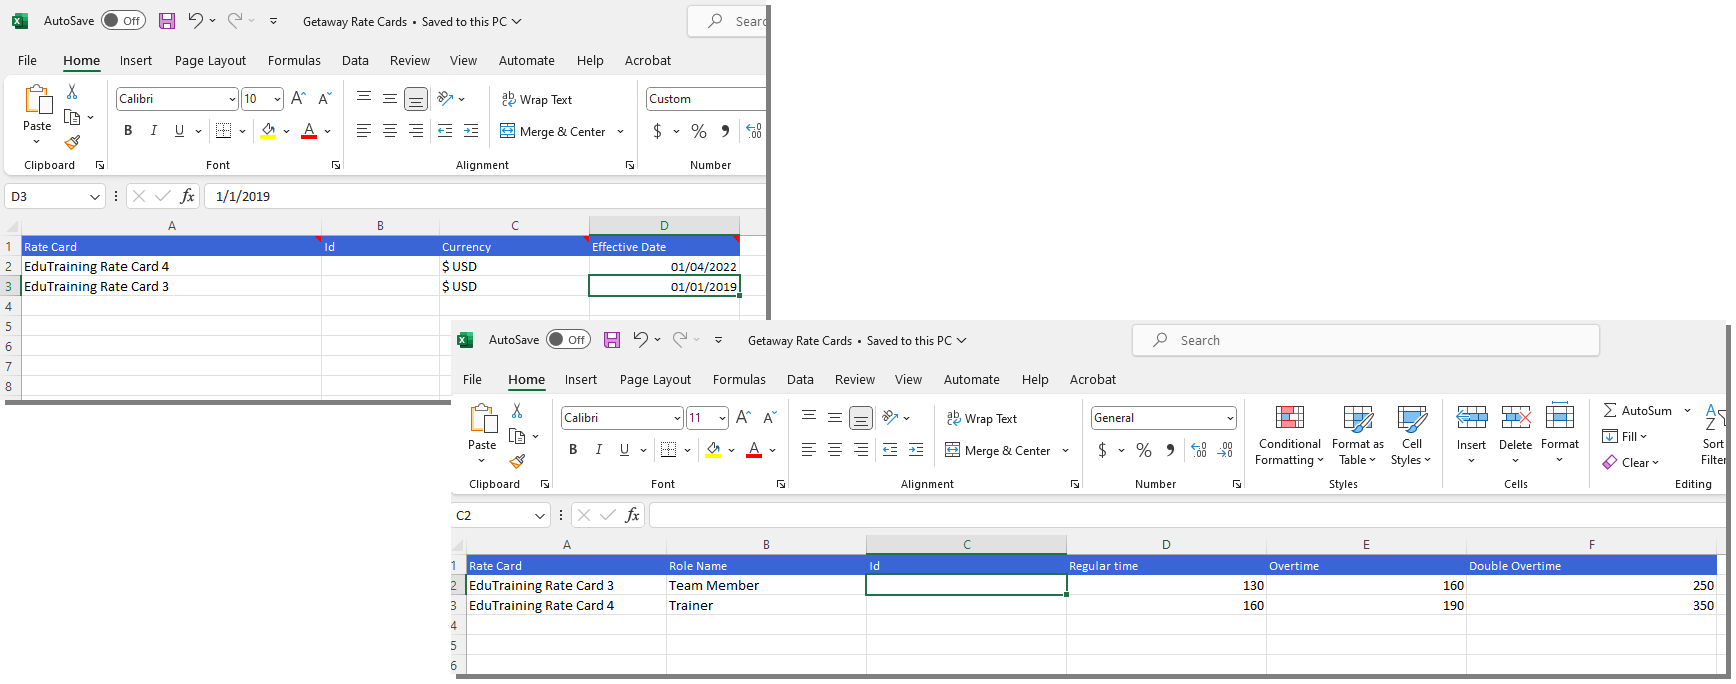
Description: Rate Cards can now also be imported from a predefined Excel Template at the Project level. You can download the PSA Rate Card Import template that includes the RateCards and RateCardsItems sheet tabs where you define the Rate Cards and associated Rate Card Items that can then be imported into PSA using the Excel Import tool.
Define the Name, Id and Currency of the Rate Card(s). Then within the RateCardsItems sheet tab define the Role Name, Regular, Overtime and Double Overtime amounts for each Rate Card.
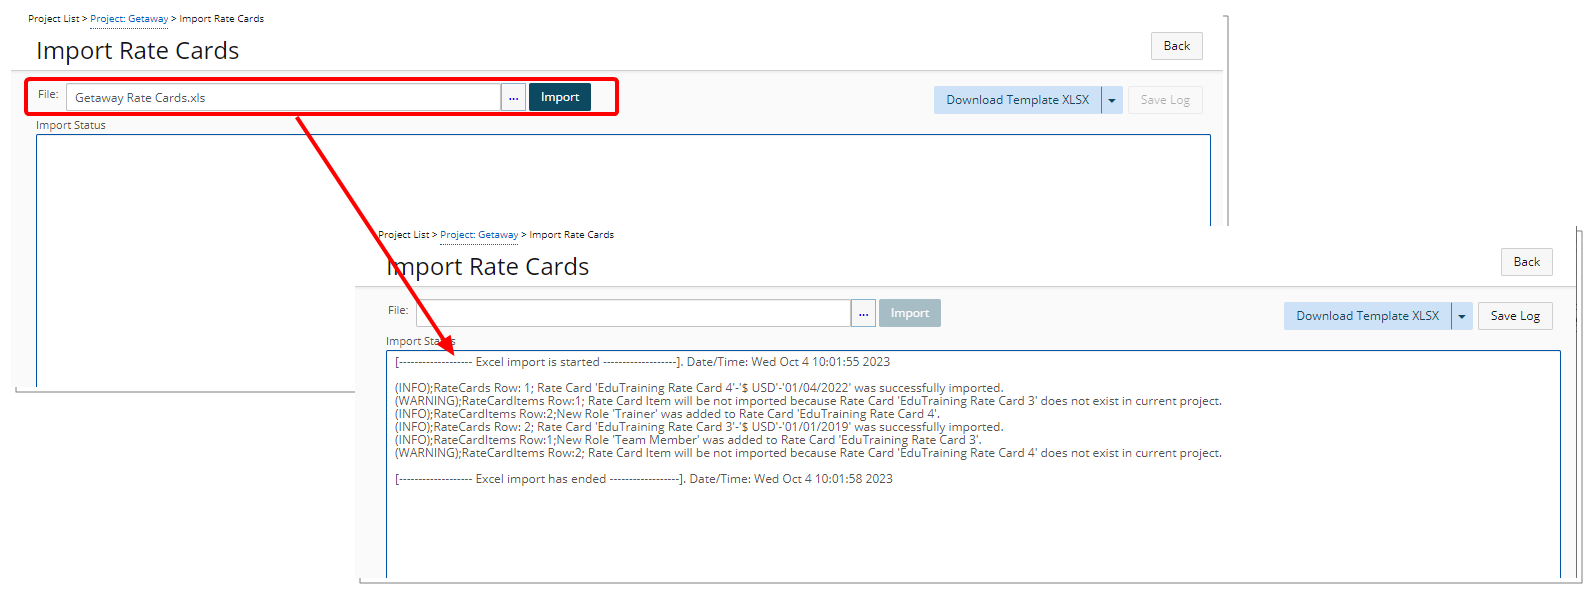
Select the Excel file and then Import the Rate Cards. Note that within the Import Status box you will see the status of your import.
Note: Currently Spreadsheets (.xls) and Excel Workbooks (.xlsx) are supported when importing Rate Cards. You can download the PSA Rate Card Import template in either .xls or.xlsx formats.
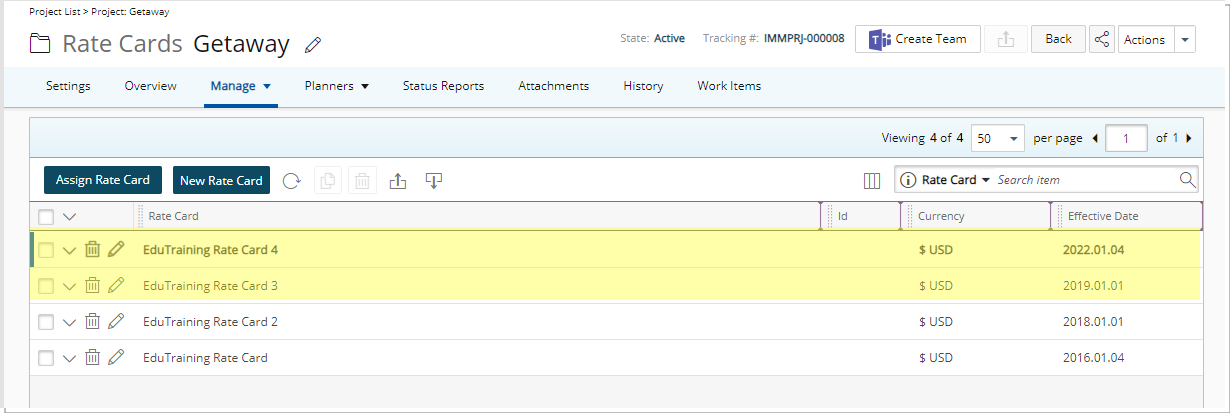
Click Back to return to the Project Rate Cards list page where the imported Rate Cards and Rate Card Items will be displayed.
Note: You can import a Rate Card from one Project into another. Just export the Rate Card from a specific Project and then import it into another.
For further details refer to:
- Importing Project Rate Cards
- Exporting/Importing Project Rate Cards
Description: The following improvements are made:
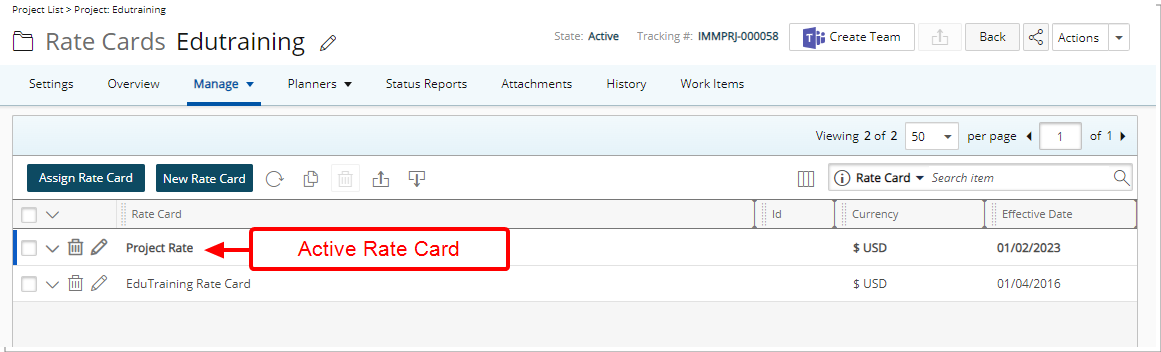
- The active Rate Card based on the Effective date is now displayed in bold within the Project Rate Cards page.
- The active Team Members Role is now displayed in bold within the User Role History.
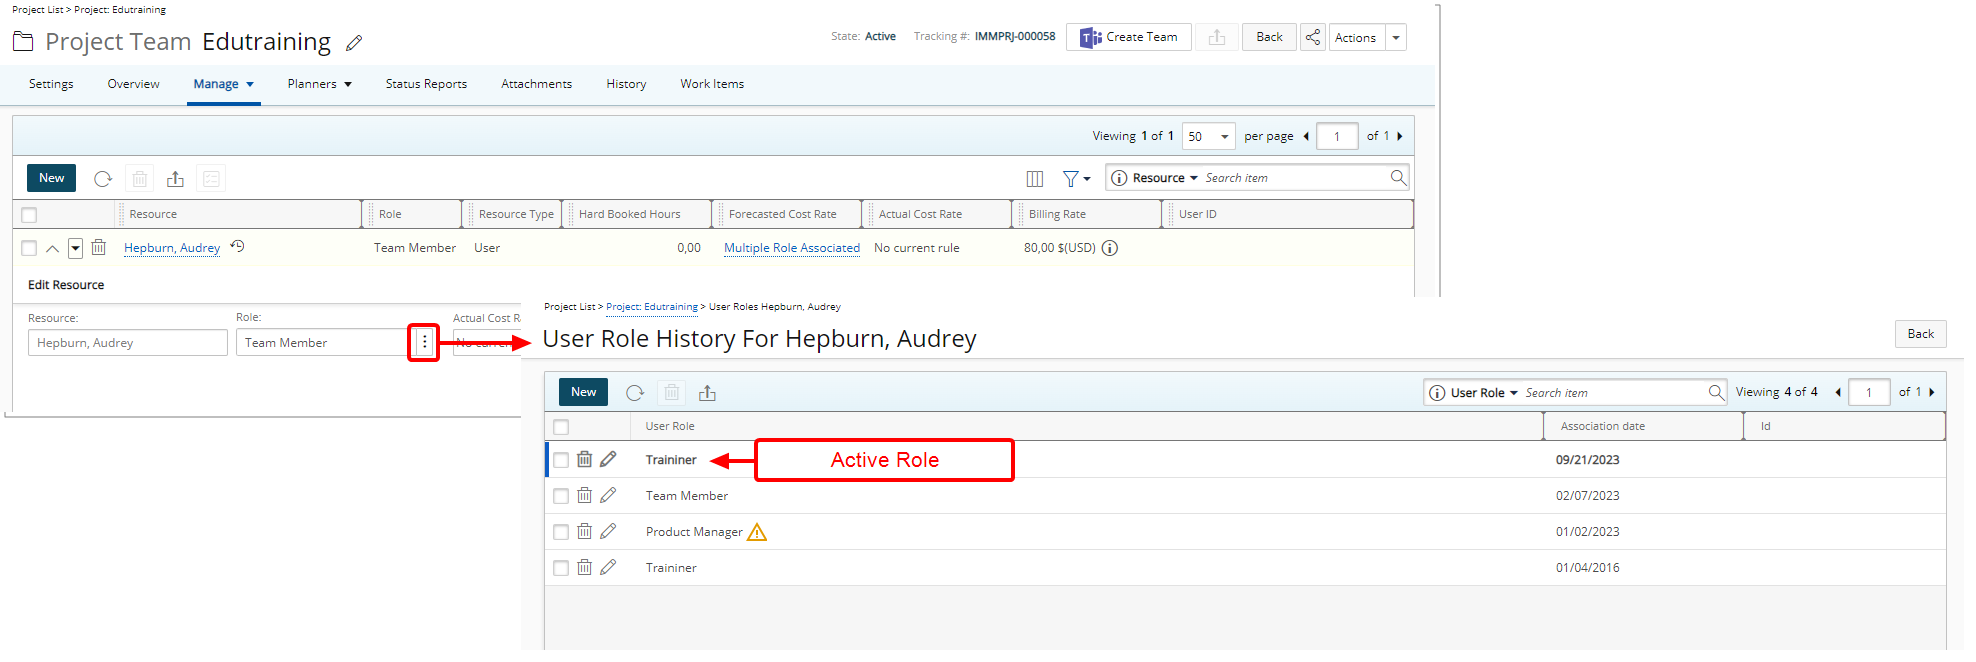
Benefit: With these improvements there is now a visual cue allowing you to distinguish the active Rate Card and the active Role at a glance.
For further details refer to:
- Project Rate Cards
- The Project Team page
- Resource Rates History
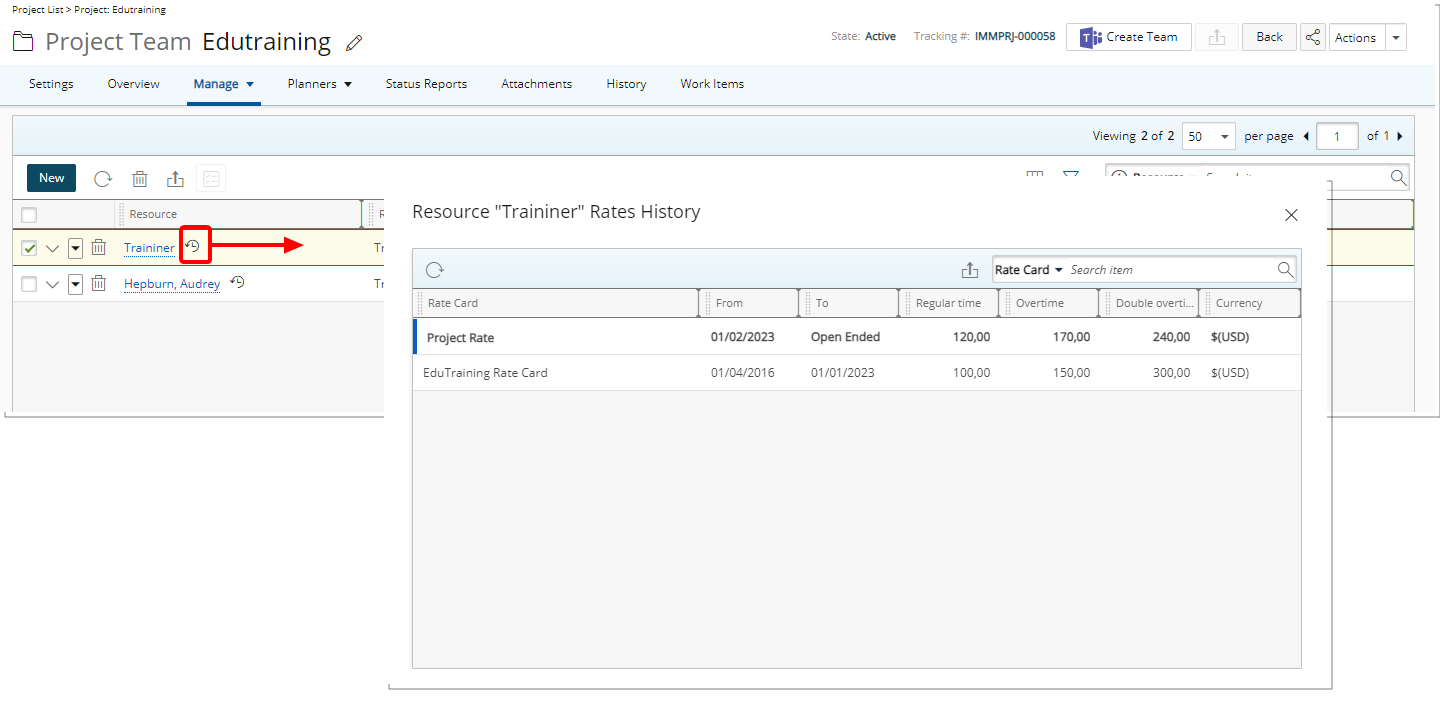
Description: A Rates History icon is now available against a Role from the Project Team page. The Resource Rates History table displays the history of all associated Rate Cards based on the From field in ascending order.
From the Resource Rates History dialog box you can:
- Click the Refresh
 button to refresh the list.
 - Click the Export
 button to export the list to Excel.
 - Click the Search down arrow (
 ), select a criterion and then enter the corresponding value. Then either click the Search
  button or the [Enter] key. The following criteria are available: Rate Card, From, To, Regular Time, Overtime, Double overtime and Currency.
 - From the table header:
- You can easily sort the columns by ascending or descending order simply by clicking a column header. Note that an arrow indicates the descending (
 ) or ascending (
 ) order applied to the column.
 - Click
 and move a column to the desired position.
 - You can now dynamically resize column(s), to your preferred width. Simply move your cursor to the column boundary (
 ) you want to resize. When the cursor becomes a resize cursor, click and drag the column accordingly.
- You can easily sort the columns by ascending or descending order simply by clicking a column header. Note that an arrow indicates the descending (
For further details refer to: Resource Rates History
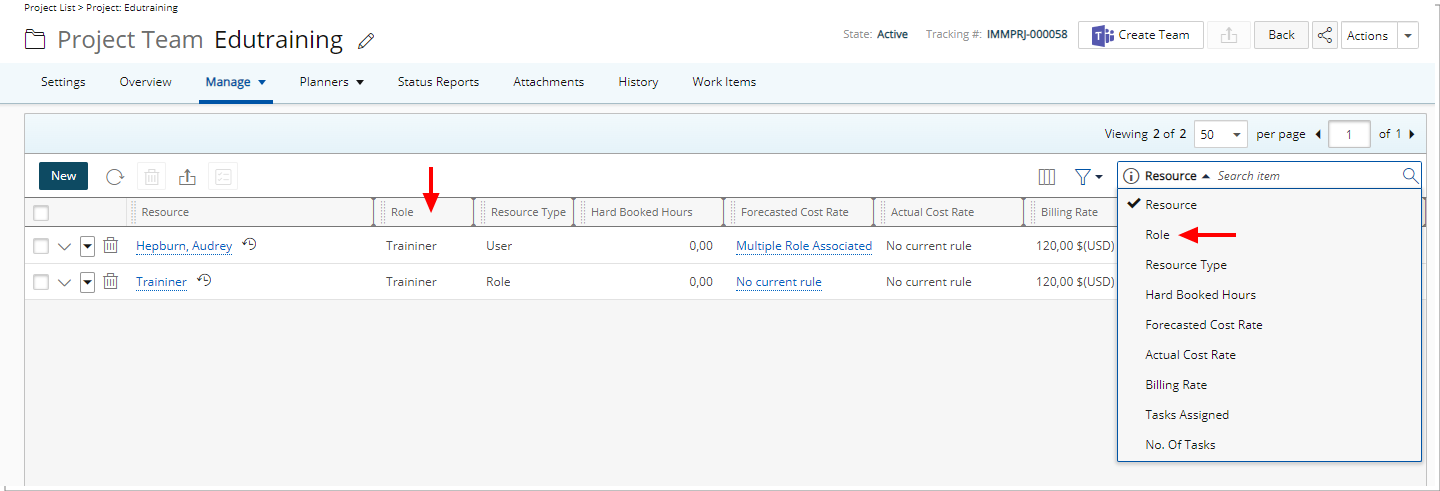
Description: The Role column is now displayed by default within the Project Team page. You can choose to remove this column from Column Selection ![]() .
.
Furthermore, it is also available by default as a Search criterion, you can hide this search criterion from Column selection ![]() .
.
Benefit: This addition allows you to easily view the roles of Project Team members.
For further details refer to: Project Team page

Description: In past releases, the Hourly Billing Rate for a Role when the Project had a Rate Card association would not be displayed in the Project Team table. As of this release the Billing Rate column now displays the Hourly Billing Rate of the respective Role as defined in the active Rate Card.
Benefit: Project managers can now readily view Role rates on their Project Team page when the Project is linked to a Rate Card. This empowers them with real-time insights into role-specific rates, aiding in resource allocation and budget management.
For further details refer to: Project Team page
Resource Management
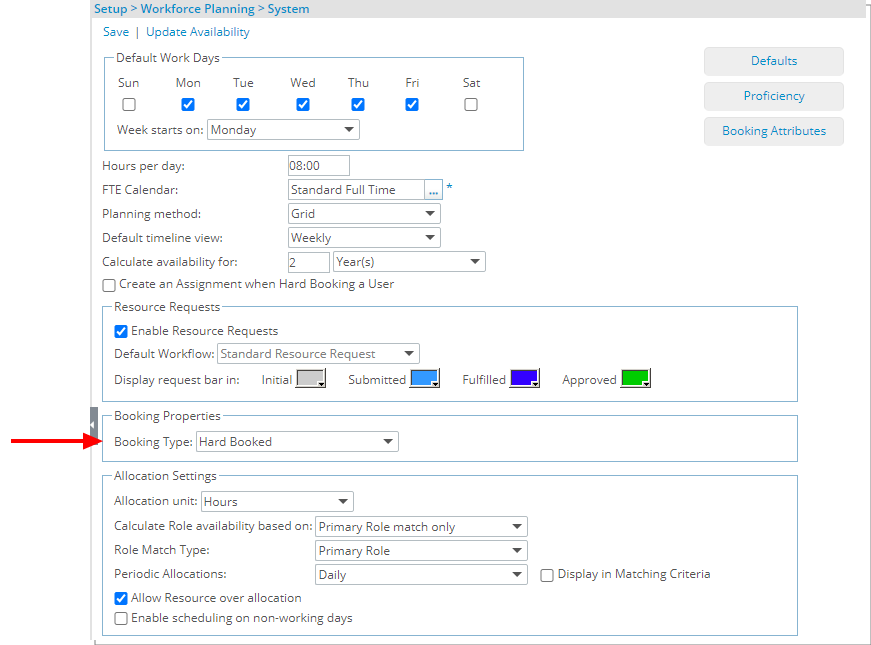
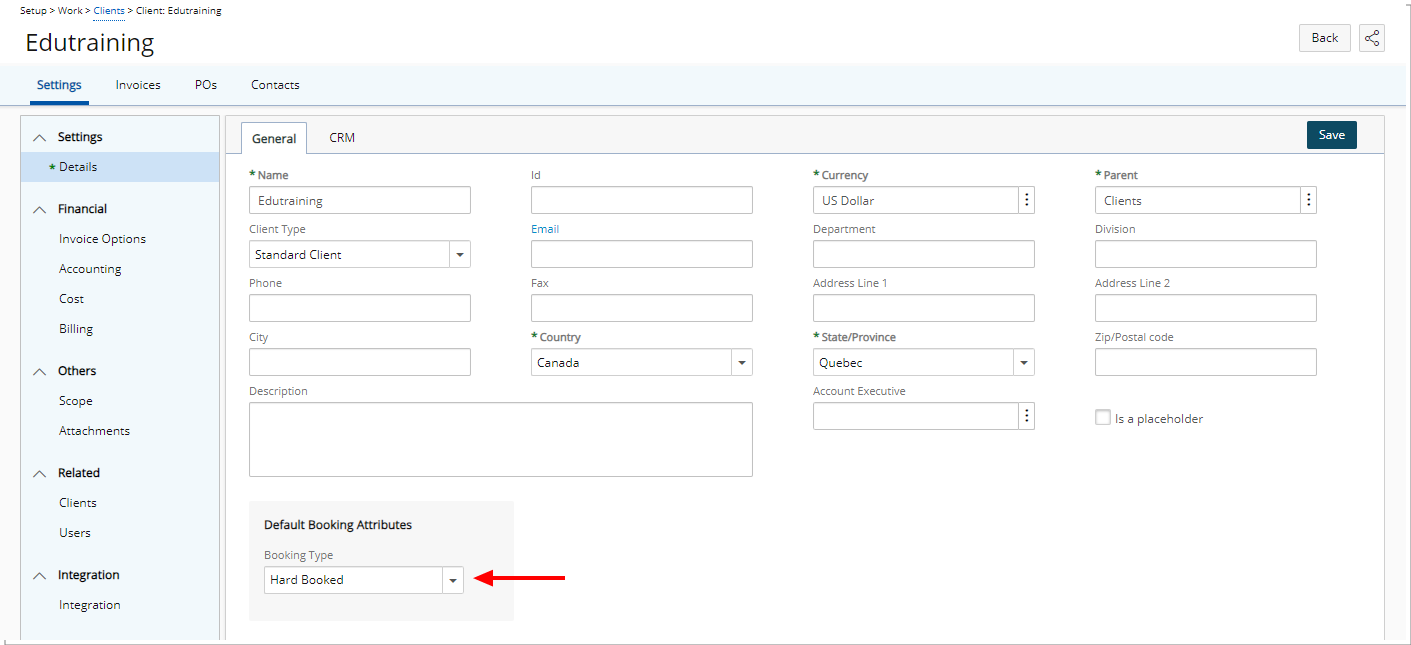
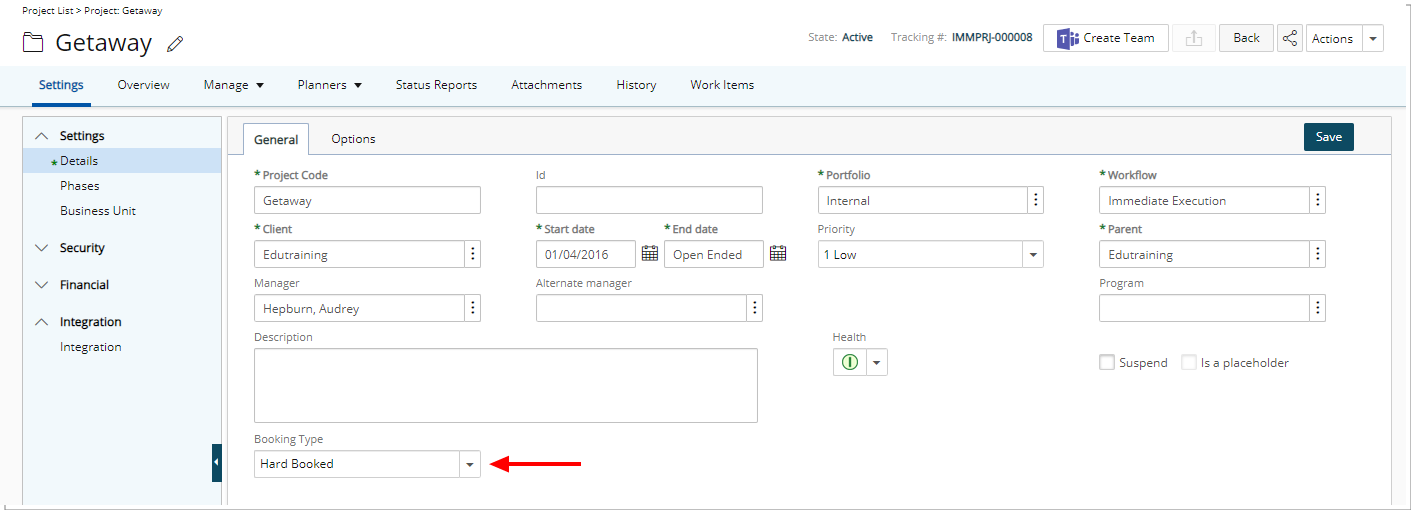
Description: You can now choose to select a default Booking Type (Hard Booked or Soft Booked) at the System, Client, and Project levels:
- Workforce Planning System (Setup > Workforce Planning > System). By default, Hard Booked is selected. When modifying this setting, your change will be applied to all future Clients/Projects/Bookings that are created.
- Client (Setup > Work > Clients > Client edit >Settings tab > General Details sub-tab). By default, Hard Booked is selected. When modifying this setting, your change will be applied to all future Projects/Bookings that are created for this Client.
- Project (Project List > Project edit >Settings tab) By default, Hard Booked is selected. When modifying this setting, your change will be applied to all future Bookings that are created against this Project.
When creating a Booking from the Work Plans, the Default Booking Type is selected automatically based on the order of precedence as follows:
- Project
- Client
- System
Benefit: This improvement streamlines the booking process for Project Managers. You can now set the Default Booking Type to Soft Booked, aligning it with the typical workflow of initially reserving resources as soft bookings before making them hard bookings. It also helps to reduce errors and confusion by preventing unnecessary notifications linked to Hard Bookings, ensuring a smoother and more efficient user experience.
For further details refer to:
- Setting the Default Booking Type at the Project level
- Setting the Default Booking Type at the Client level
- Setting the Default Booking Type at the System level
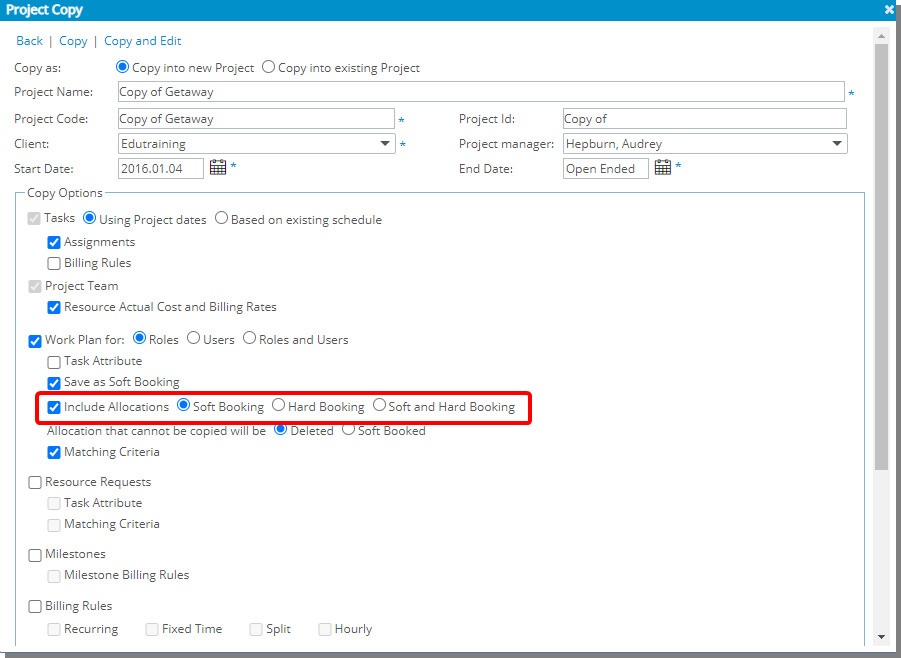
Description: When copying a Project, you can now choose to Include Allocations then select Soft Booking/Hard Booking or Soft and Hard Booking.
In addition, Bookings as Soft Booked option is renamed to Save as soft Bookings.
Benefit: This addition allows you to copy the Bookings without copying the Allocations.
Use case: Adam is tasked to create several new Projects by maintaining the source project’s Bookings only. He can now unselect Include Allocations, copy the Project and add Allocations as required.
For further details refer to: Excluding Allocations when copying a Project
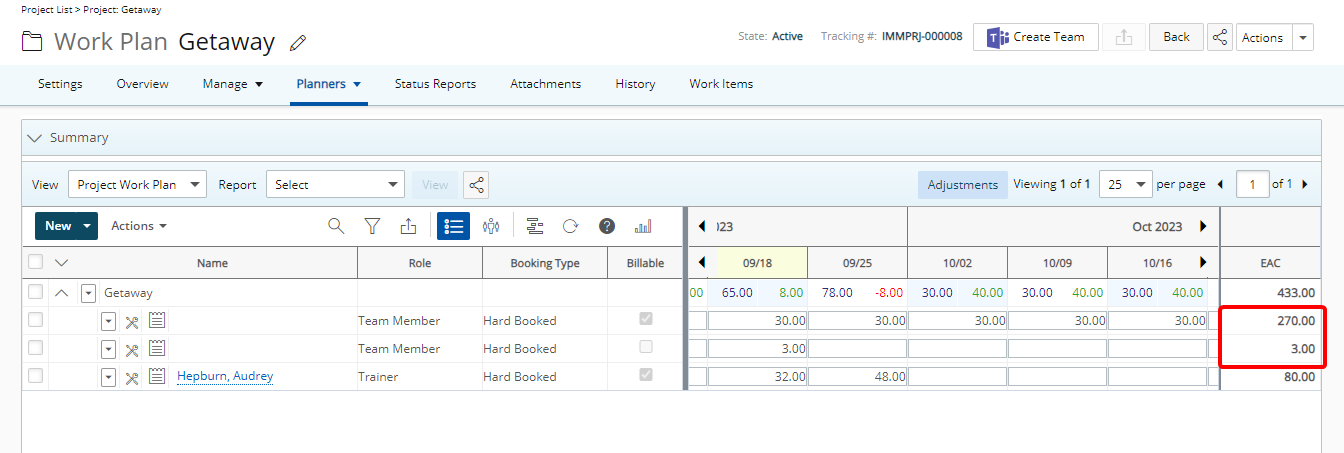
Description: The Estimate at Completion (EAC) is also shown at the Role level when Group by Project is selected from the Project Work Plan.
The Estimate at Completion at the Role level is calculated as: Total hours in Work Plan in the future.
Benefit: If the EAC and Grand Total values don't match, Project Managers are proactively informed that modifications are needed in their plan to ensure that their resources are performing as intended.
For further details refer to: Estimate at Completion (EAC) column - Project Work Plan
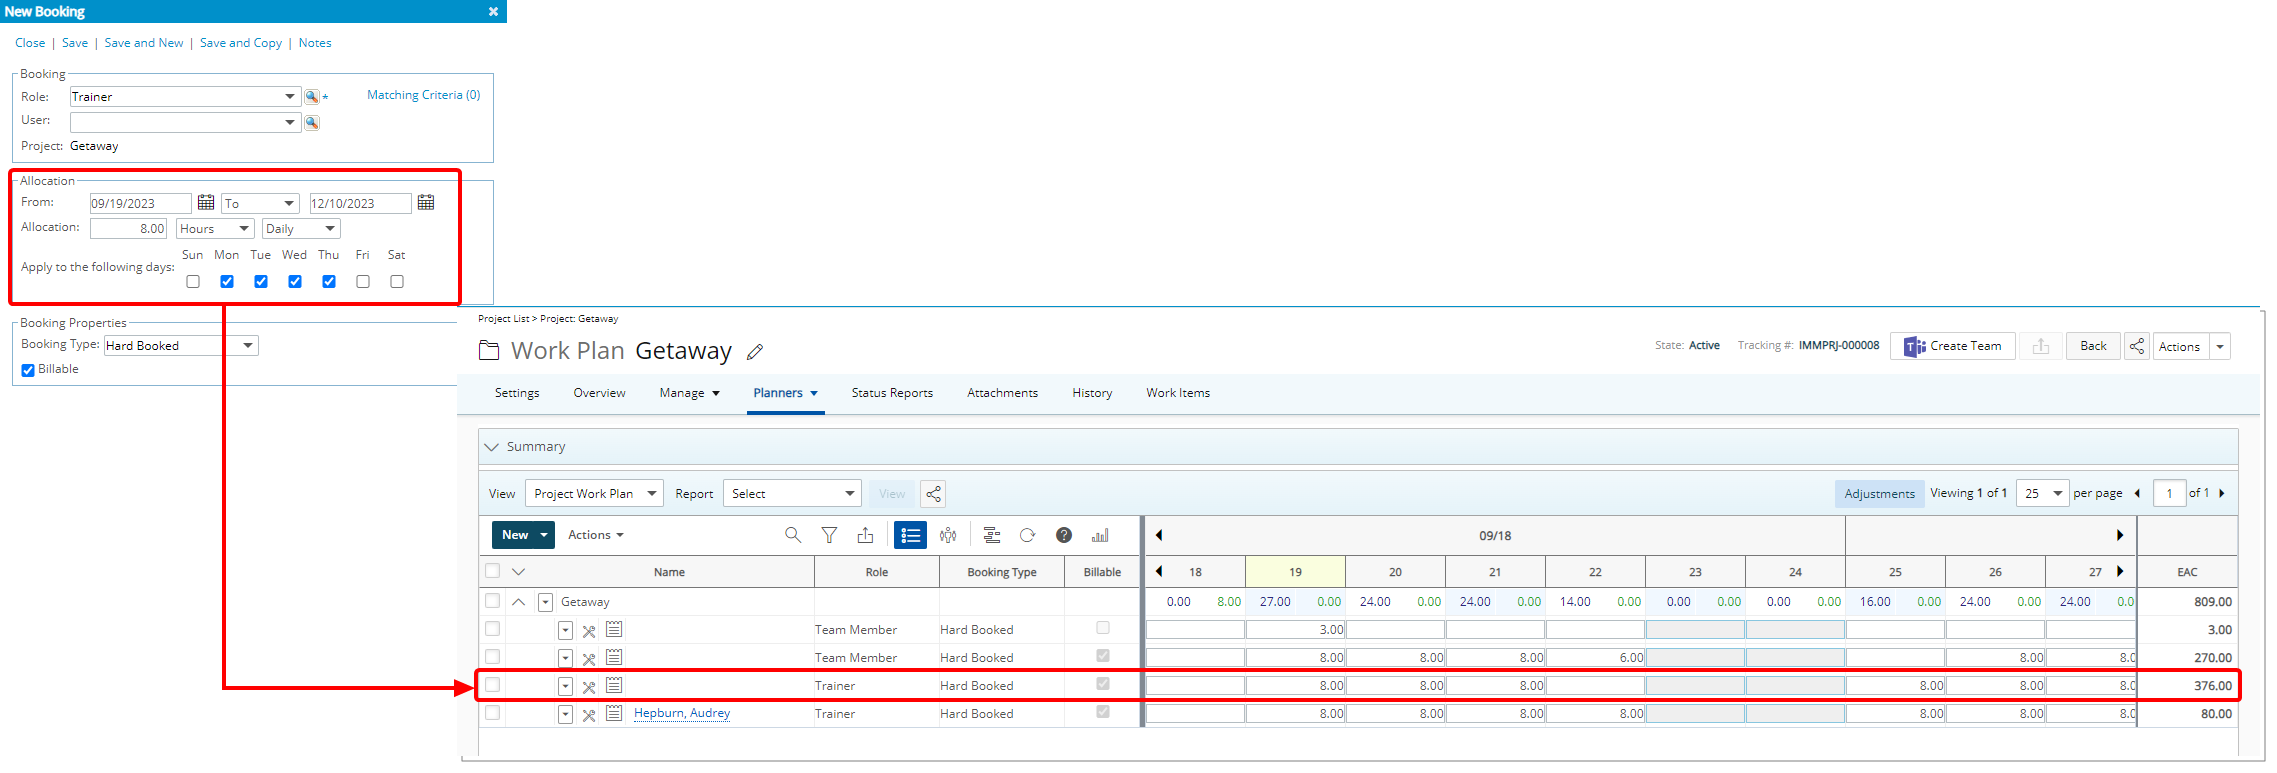
Description: When creating a new Booking you can now choose Daily Allocation and then select the specific weekdays. The Allocation Hours will be distributed based on the selected days.
Note: By default, the selected weekdays are set within the Default Work Days section of the Workforce Planning System page (Setup > Workforce Planning > System).
Benefit: This addition allows you to precisely schedule work on specific weekday(s), enhancing your ability to efficiently manage your projects.
For further details refer to: Allocating time and selecting the Booking Properties of a new Booking
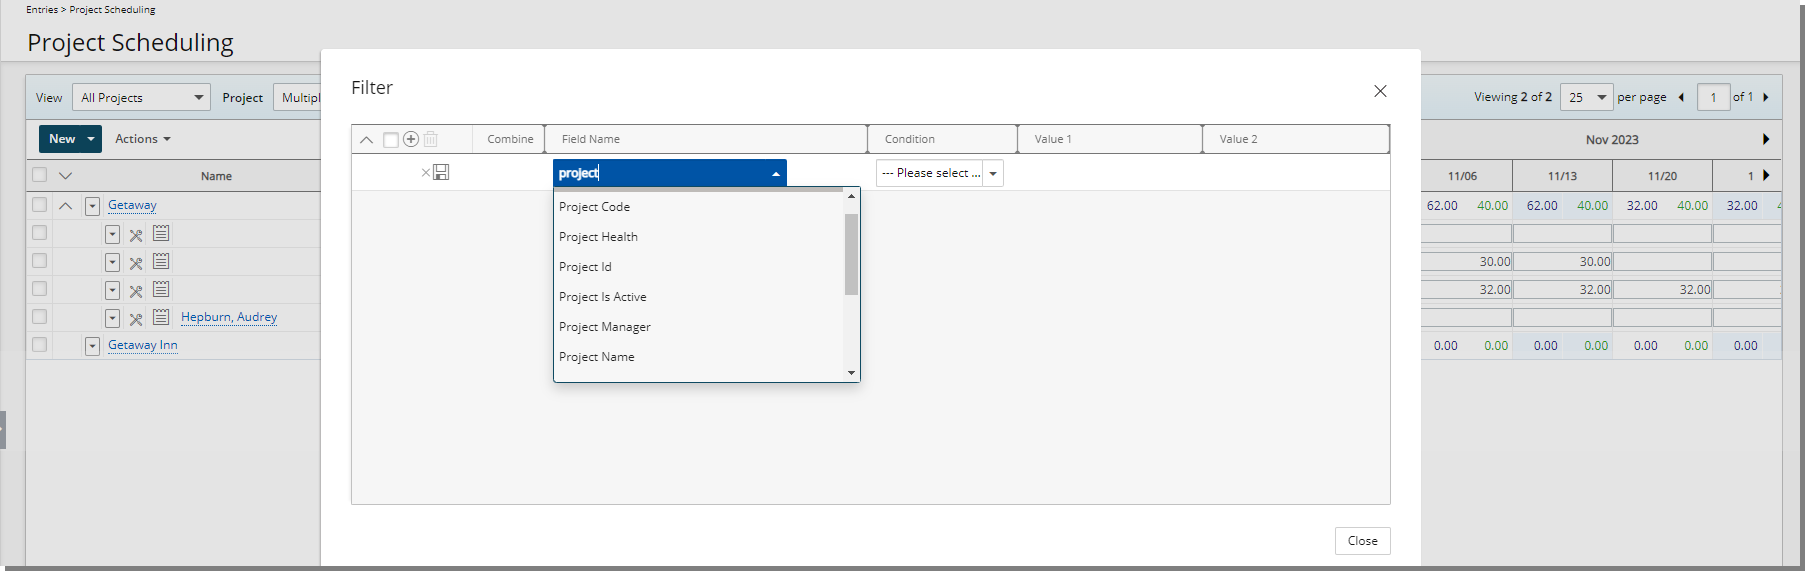
Description: In addition to any User Defined Fields associated to the Project, you can now Filter the Project Scheduling Work Plan based on any of the following Project properties: Project End, Project Code, Project Health, Project Id, Project Is Active, Project Manager, Project Name, Project Parent, Project Priority, Project Start, Project State Attribute, Project State Name and Project Tracking #.
Benefit: Being able to filter the Project Scheduling Work Plan using these project properties offers project managers the benefit of efficiently sorting through a large list of projects by applying precise filter criteria. This capability streamlines the process of identifying and focusing on specific projects or groups of projects, facilitating better resource allocation, timely decision-making, and ultimately improving overall project management efficiency.
For further details refer to:
- Available Filter Options | Project Scheduling Work Plan
- Applying a Filter to the Project Scheduling Work Plan
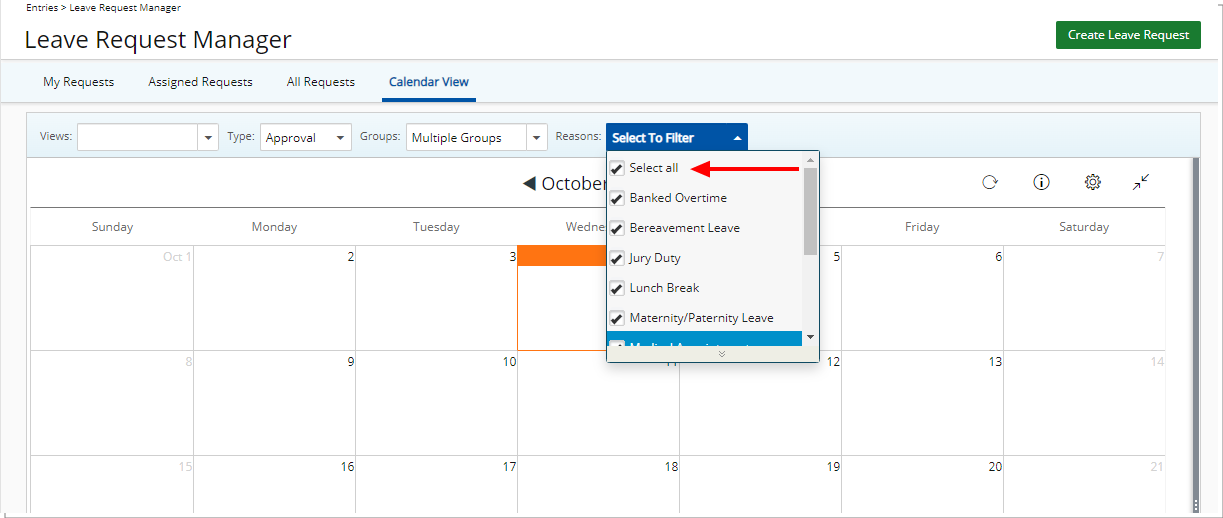
Description: The option Select All is now available from the Reasons selection box when viewing the Group Leave Time Calendar (Entries > Leave Request Manager > Calendar View tab) and when creating/modifying a View.
Benefit: The new Select All Reasons in the Group Leave Time Calendar streamlines administrative tasks by allowing administrators to effortlessly choose all reasons at once. This enhancement saves valuable time and minimizes the risk of overlooking any reasons, ensuring a more efficient and error-free management of leave requests.
For further details refer to: Available options within the Leave Request Calendar View
Reporting
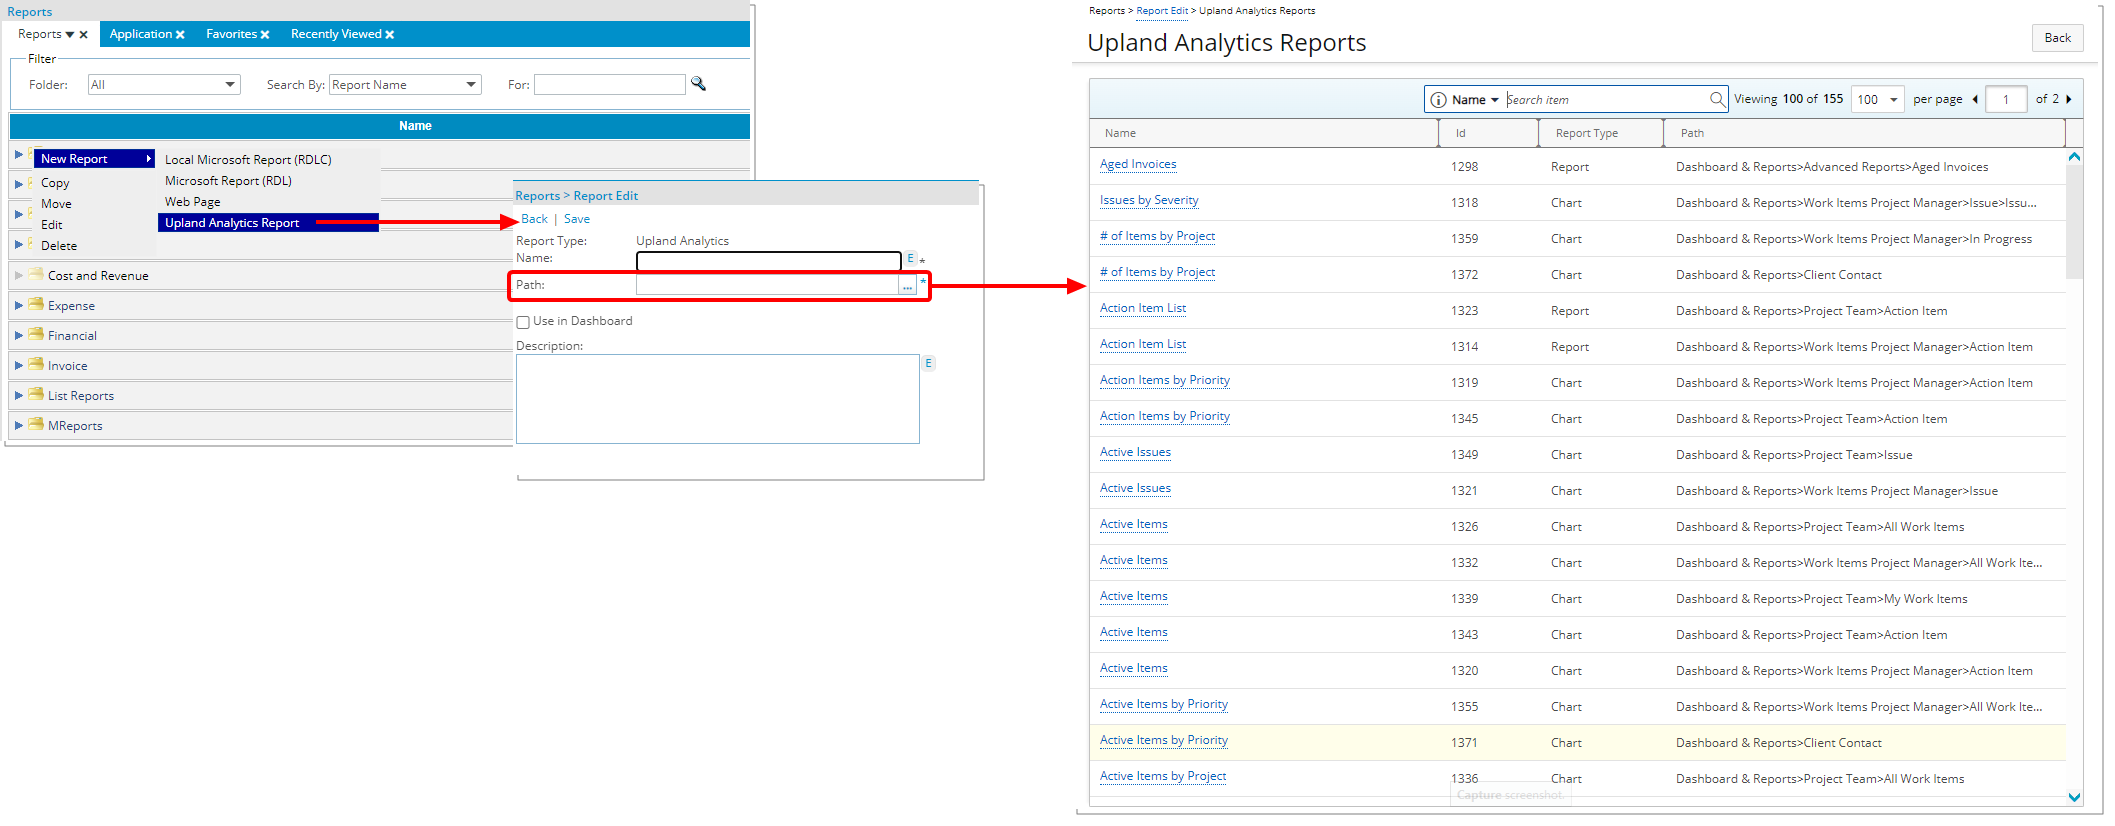
Description: From the PSA Reports tab you can now choose the newly added Upland Analytics Report option when adding a New Report to a folder.

Upon choosing the Path of the Upland Analytics Report, it will be available from the PSA report center.
Benefit: The Upland Analytics Reports can now be accessed seamlessly from PSA report center which streamlines and expands your reporting capabilities within PSA.
For further details refer to: Access Upland Analytics reports from PSA Report Center
Upland Analytics
Description: Selection Type User Defined Field associated to a Timesheet Template are now available through the Time Entry Basic View of the Timesheet Data Source.
Note: One of the UDF options must be marked as Default.
Benefit: With this addition you can now have visibility to Selection Type User Defined Fields associated to Timesheet Templates through your Upland Analytics Reports.
For further details refer to: The Timesheet Data Source and related views
Description: The new Expense Report Assigned to User Field is now available from the Expense Summary View of the Expense Data Source.
Benefit: With this addition you can now have visibility to the specific User Name(s) to whom the Expense Report is assigned to.
For further details refer to: The Expense Data Source and related views
Description: Addition of a new Invoice & Associated POs Data Source with these Views: Alternate Project Manager, Client, Company Currency, Invoice Currency, Invoice PO Association, Invoice Summary, Project and Project Manager.
Scoping is available for: All Projects, Available Projects and My Projects.
Benefit: The Invoice & PO Associations Data Source provides you with the ability to distinguish between invoiced and non-invoiced purchase orders (POs). This in turn allows you to ensure that every invoice recorded in the application accurately deducts from the client's PO balance.
For further details refer to: The Invoice & PO Associations Data Source and related views
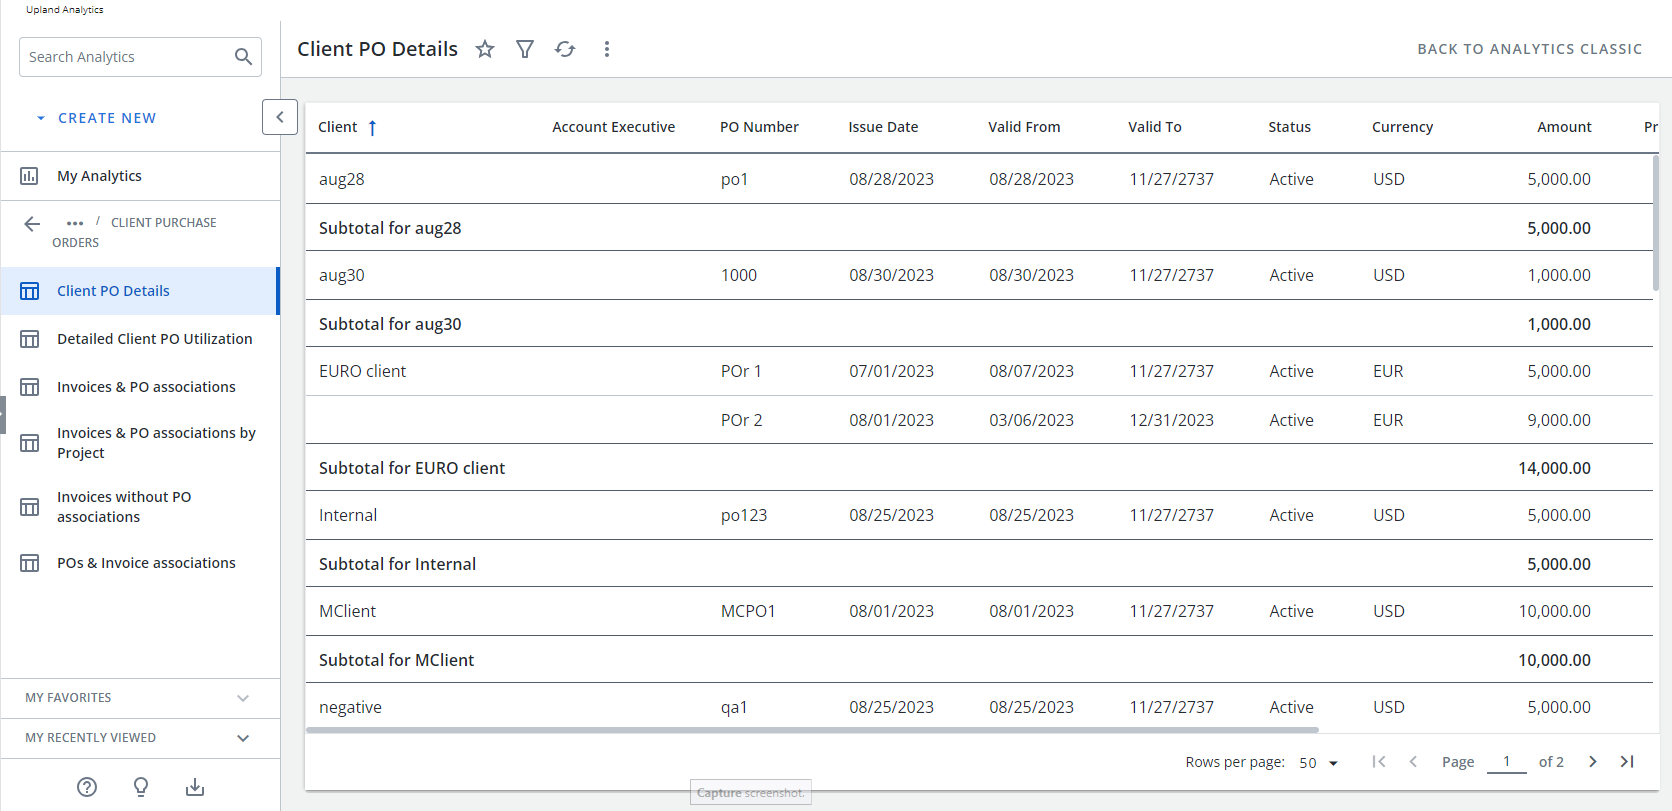
Description: The newly added out-of-the-box Invoice and PO Association reports in Upland Analytics (Upland Analytics > Dashboard & Reports > Client Purchase Orders) allow you to have insight on invoiced and non-invoiced purchase orders. The following out-of-the-box reports are now available under the Client Purchase Orders folder in Upland Analytics Dashboards and Reports.
- Client PO Details: A Report detailing the Client name, Account Executive, PO Number, PO Issue Date, PO Valid From Date, PO Valid To Date, PO Status, Client Currency Code, PO Amount, PO Prepaid Amount, PO Invoiced Amount, PO Recognized Amount and the PO Remaining Amount.
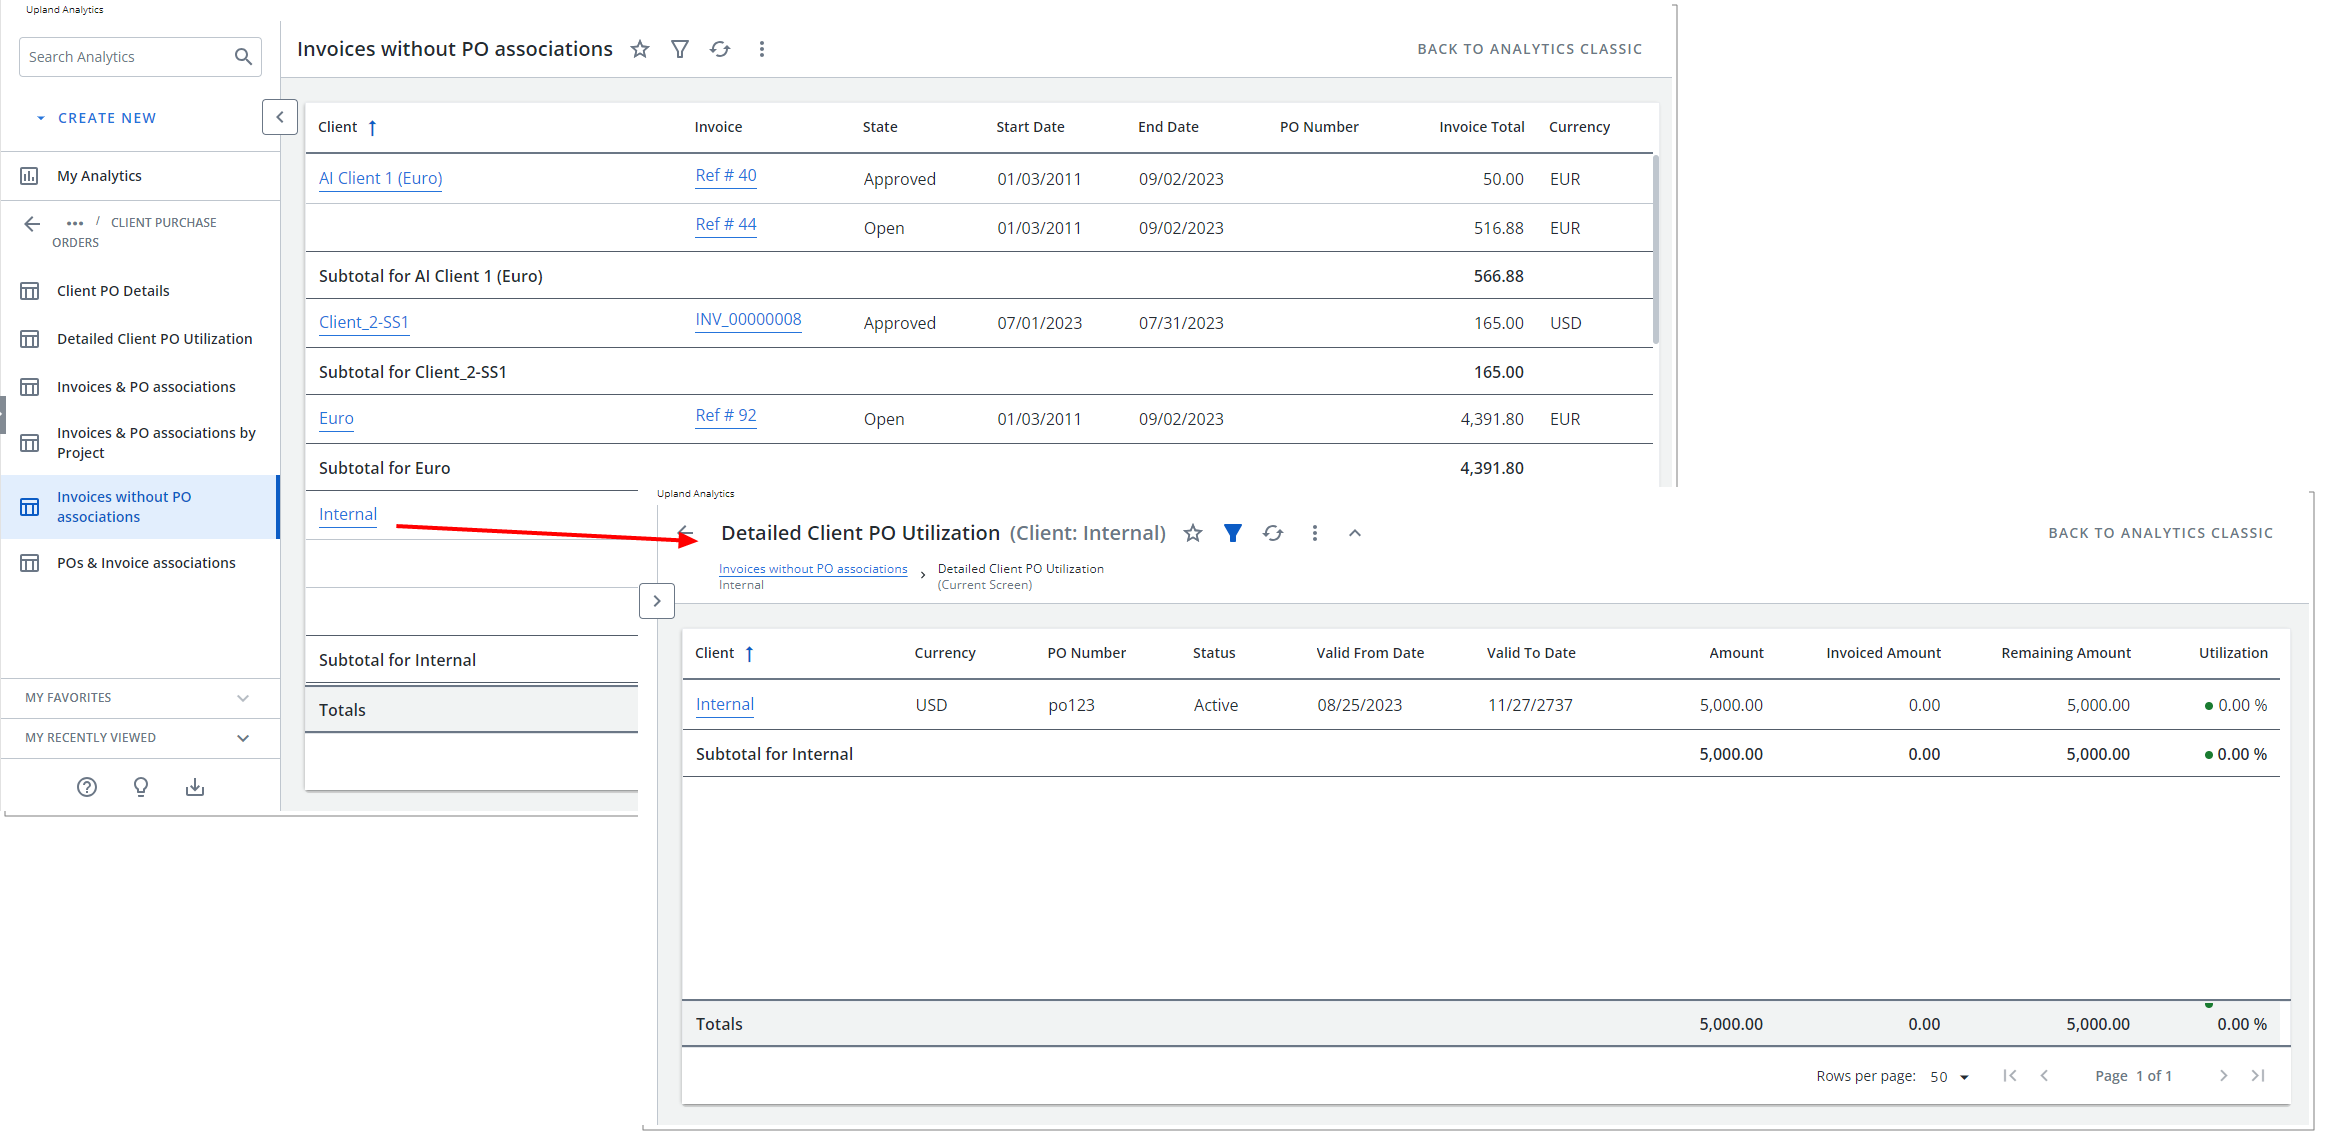
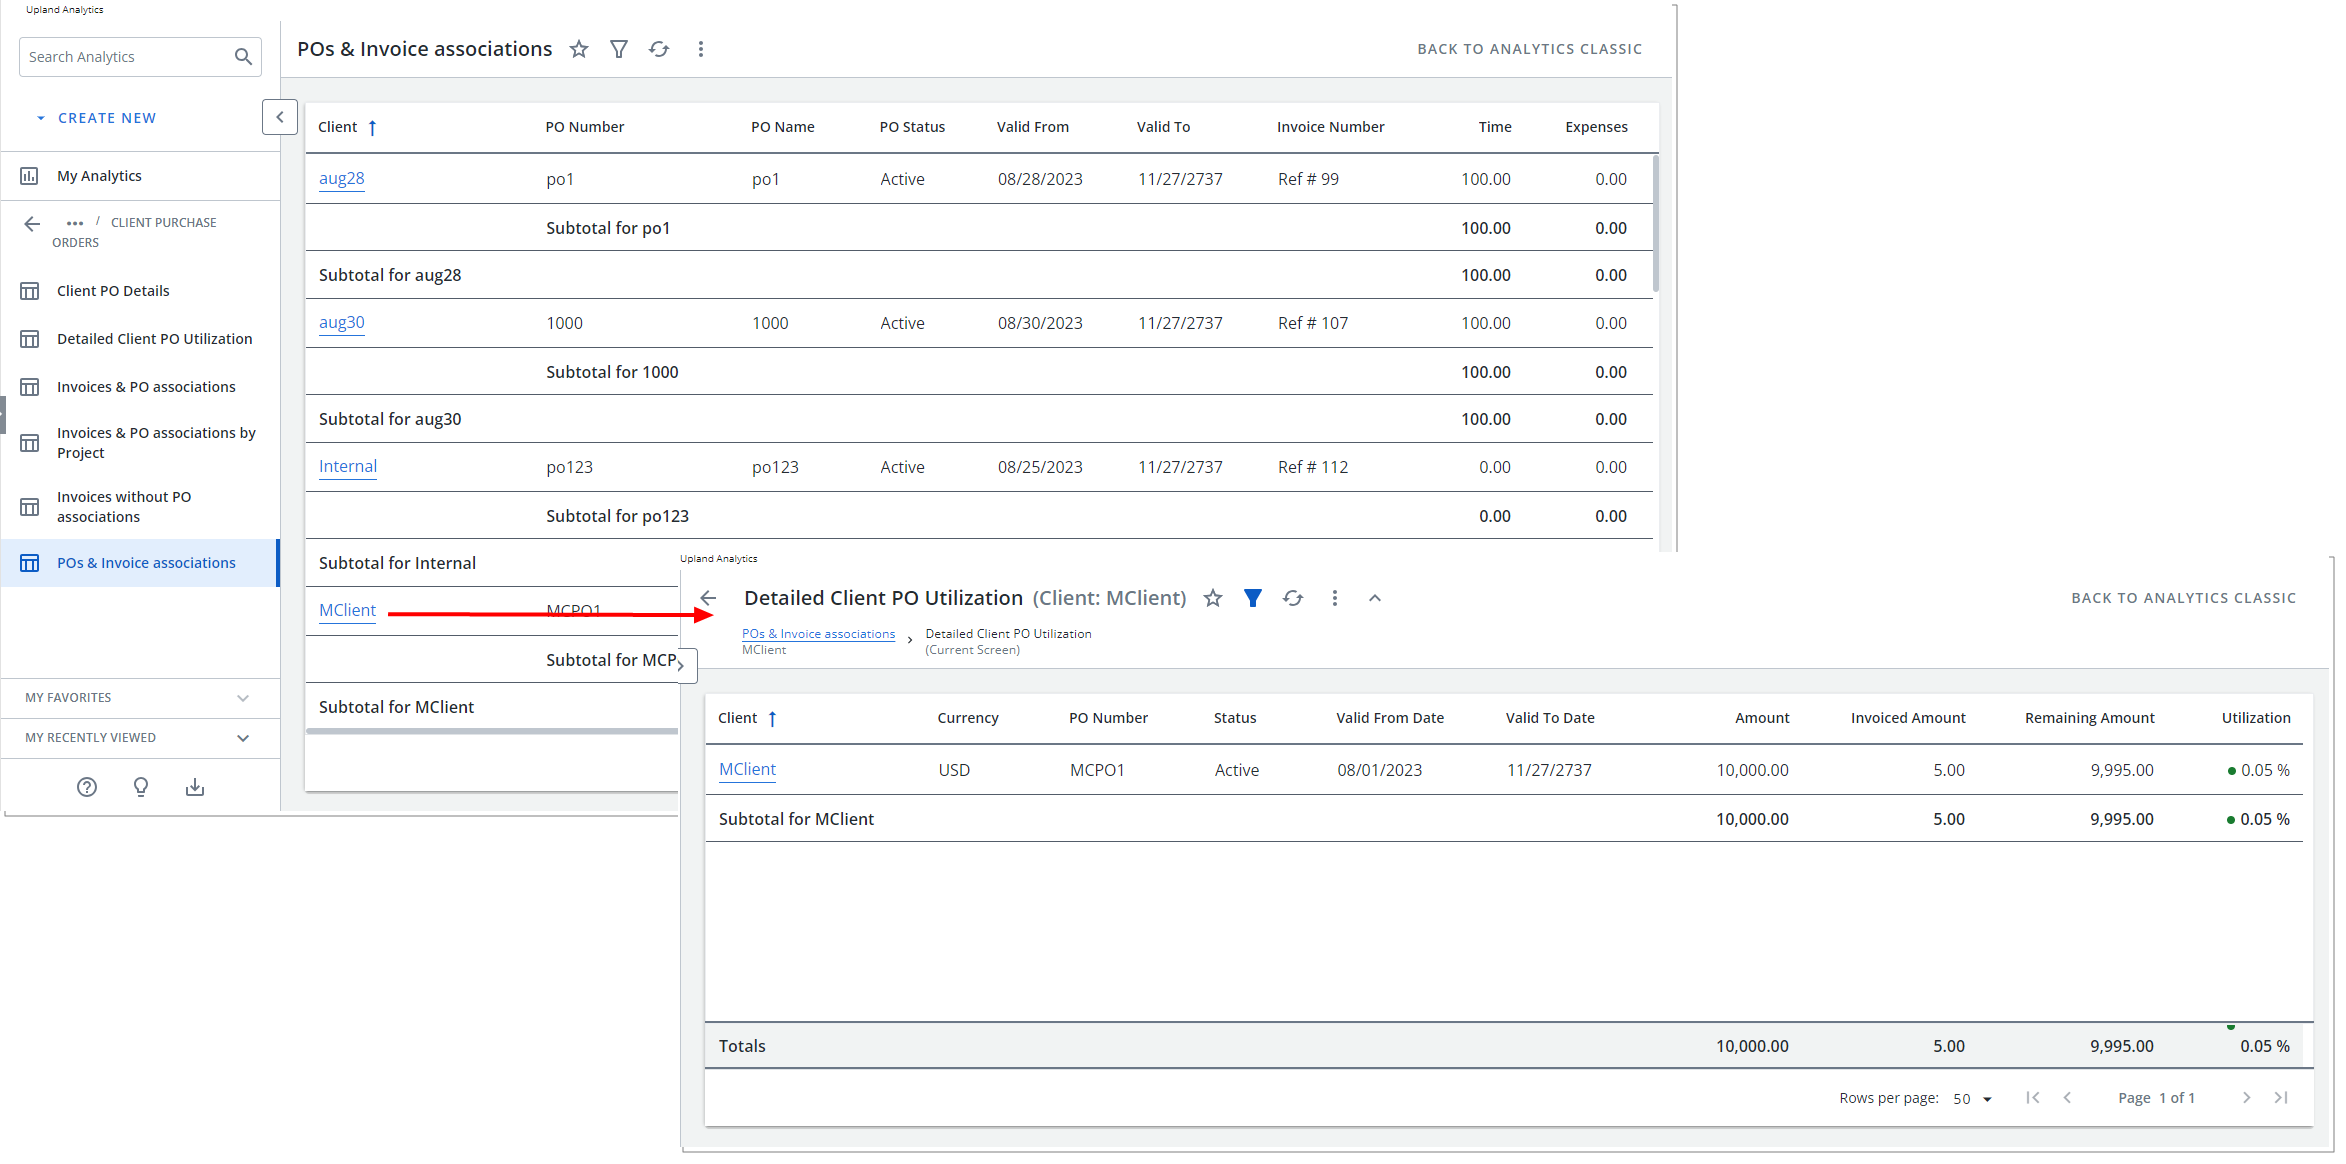
- Detailed Client PO Utilization: A Report detailing the Client name, Currency, PO Number, Status, Valid From Date, Valid To Date, Amount, Invoiced Amount, Remaining Amount and Utilization. Clicking on a Client allows you to drill into the Invoices & PO associations report which shows the Clients and their corresponding Invoices where the Invoice # is a link to the corresponding PSA Invoice.
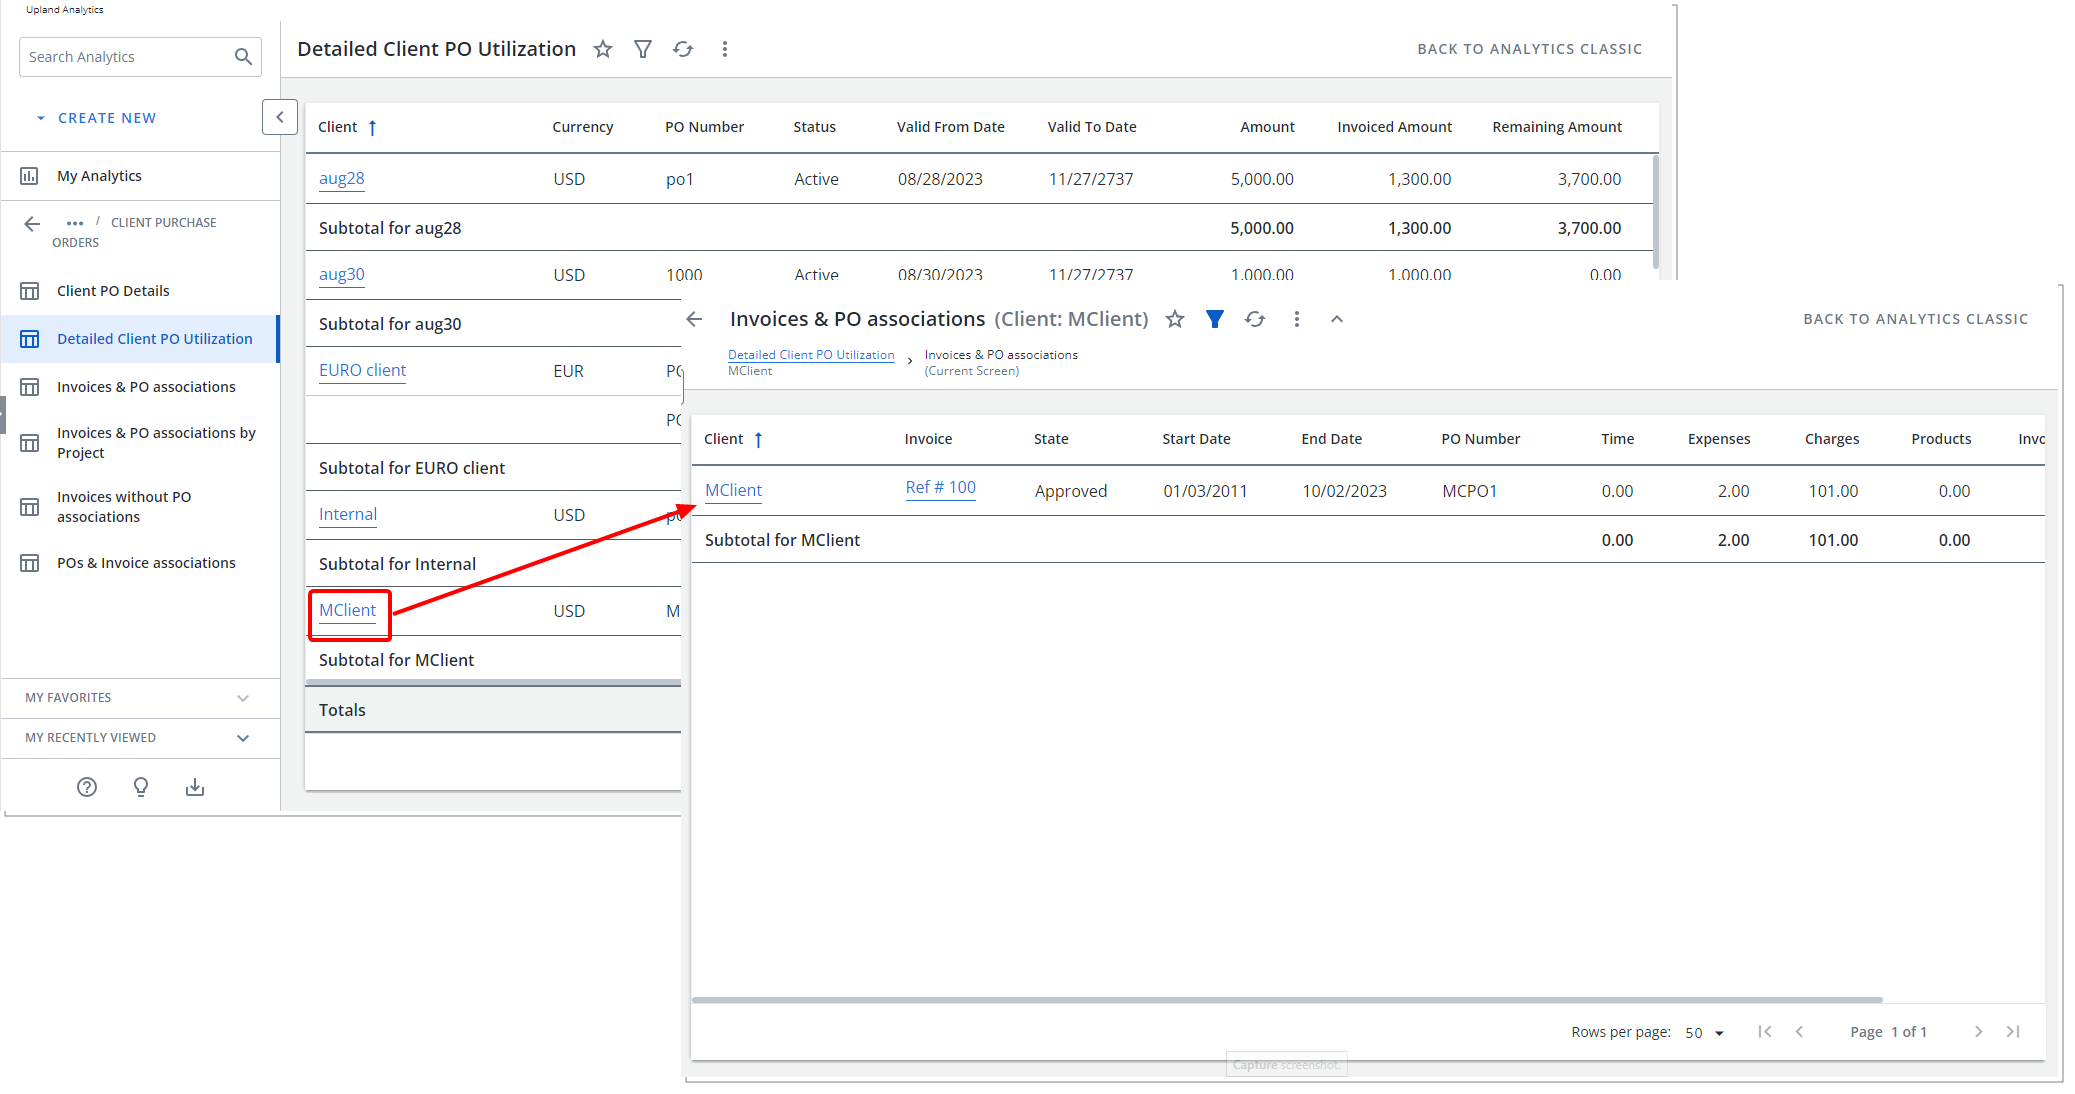
- Invoices & PO associations: A Report detailing the Client name, Invoice, State, Start Date, End Date, PO Number, Time, Expenses, Charges, Products, Invoice Total and the Currency. Clicking on a Client allows you access the Detailed Client PO Utilization or the Client PO Details reports. Clicking on an Invoice # will open the corresponding PSA Invoice.

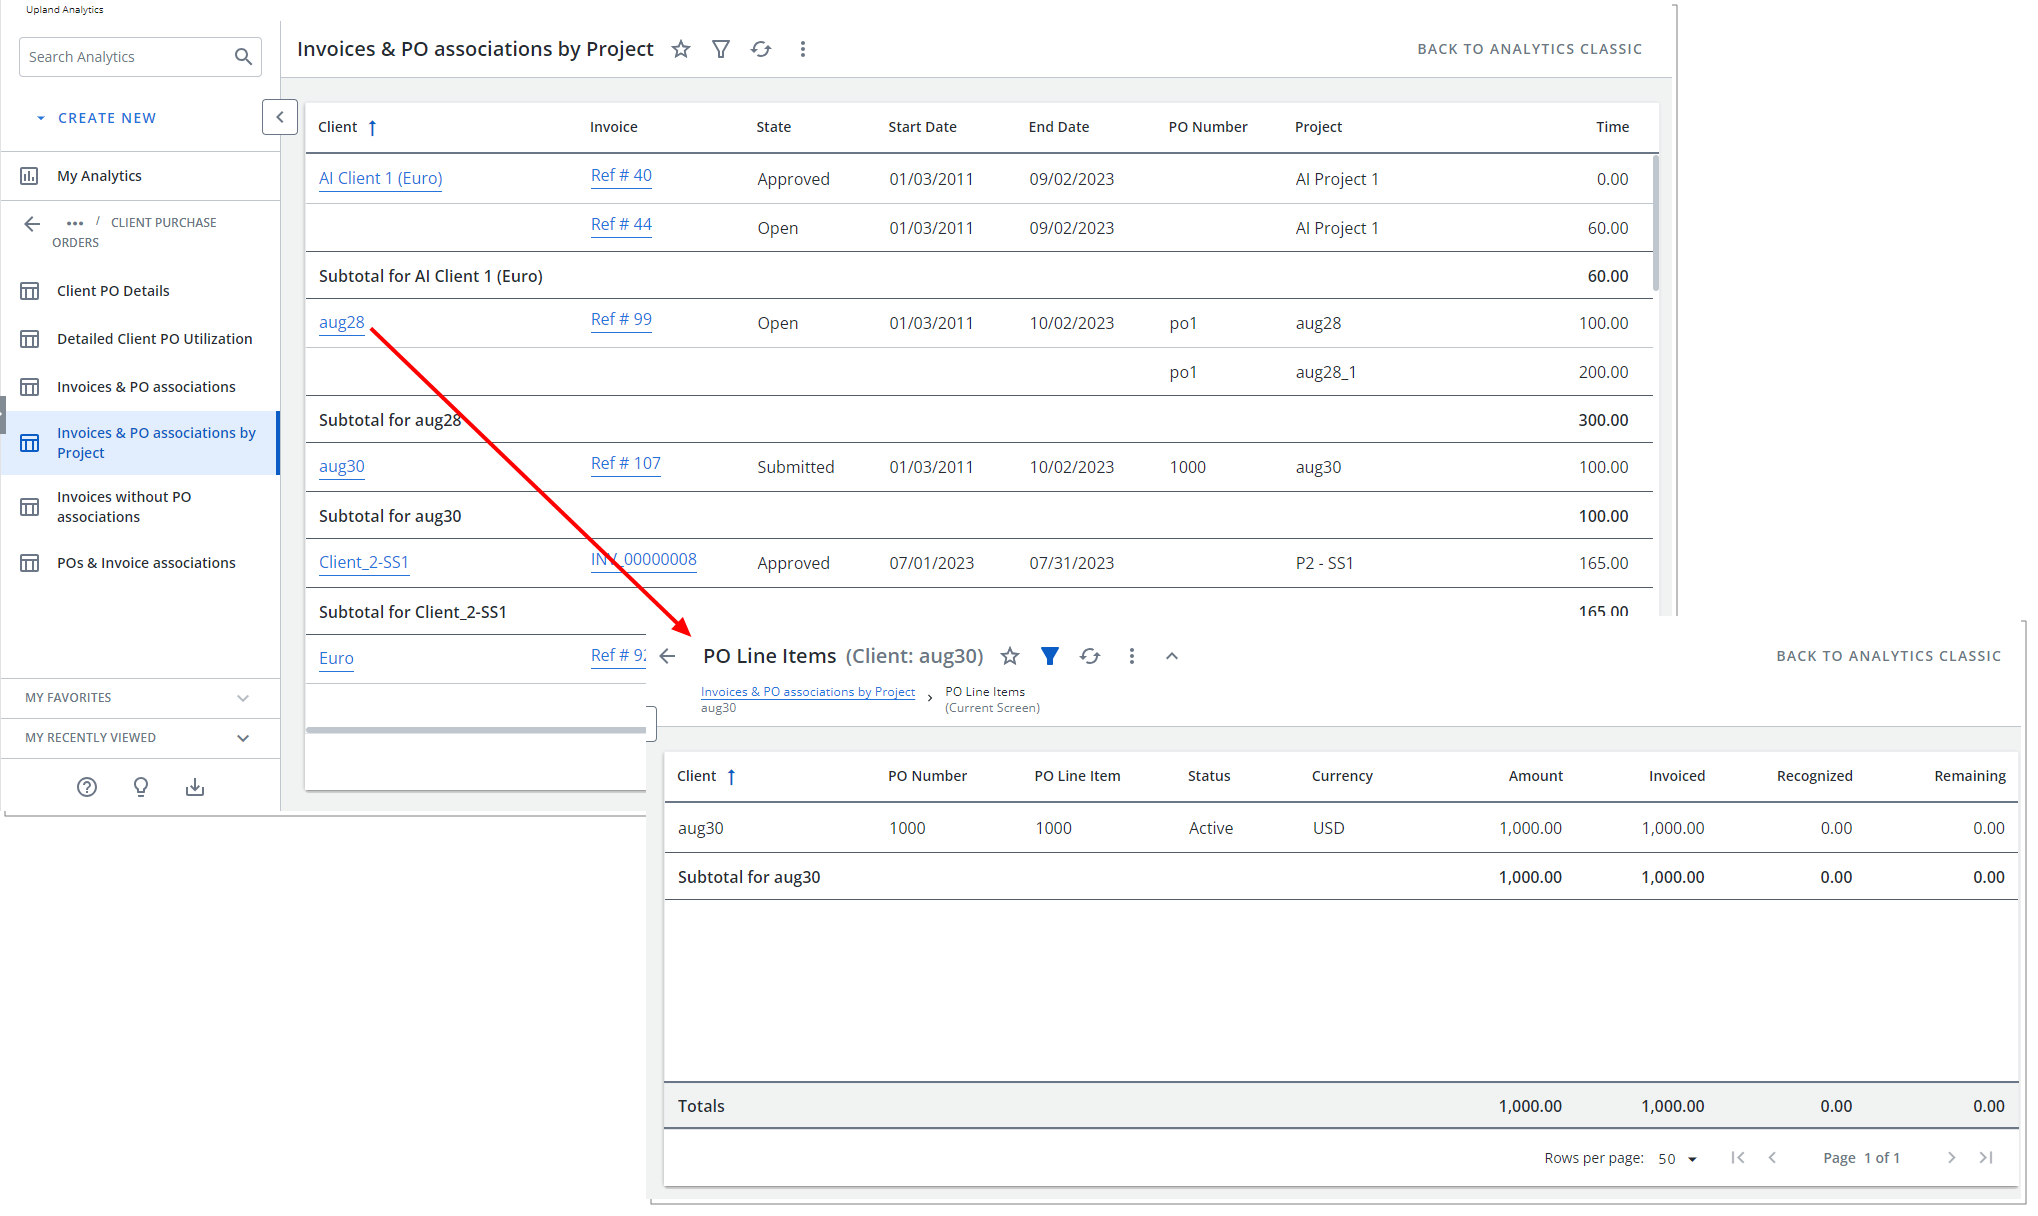
- Invoices & PO associations by Project: A Report which is grouped by Project and details the Client name, Invoice, State, Start Date, End Date, PO Number, Project, Time, Expenses, Charges, Products, Invoice Total and the Currency. Clicking on a Client allows you access the Details Client PO Utilization or the Client PO Details reports. Clicking on an Invoice # will open the corresponding PSA Invoice.
- Invoices without PO associations: A Report which is grouped by Project and details the Invoices which have no PO associations. The displayed columns are Client name, Invoice, State, Start Date, End Date, PO Number, Project, Time, Expenses, Charges, Products, Invoice Total and the Currency. Clicking on a Client allows you access the Detailed Client PO Utilization report. Clicking on an Invoice # will open the corresponding PSA Invoice.
- POs & Invoice associations: A Report which is grouped by Project and details the POs and their respective Invoice associations. The displayed columns are Client, PO Number, PO Name, PO Status, Valid From, Valid To, Invoice Number, Time, Expenses, Charges, Products, Invoice Total and the Currency. Clicking on a Client allows you access the Detailed Client PO Utilization report.
For further details refer to: Upland Analytics Out-of-the-Box Client PO Association Reports
User Experience Enhancements
The improved tables, buttons, options, Dialog Boxes, Icons and Search all fall in line with the upgraded standards that have already been applied on several pages during the recent releases to enhance user experience and establish consistency across the application.
Although most of the features remain the same, the appearance and usability have been significantly improved to enhance your overall experience.
Financial - Expense Payable Batch
The Payable Batch edit pages are now structured in the same familiar format already in use in other areas of the application. Although most of the features remain the same, the appearance and usability have been significantly improved to enhance your overall experience.
For further details refer to: the Expense Payable Manager section of the help center
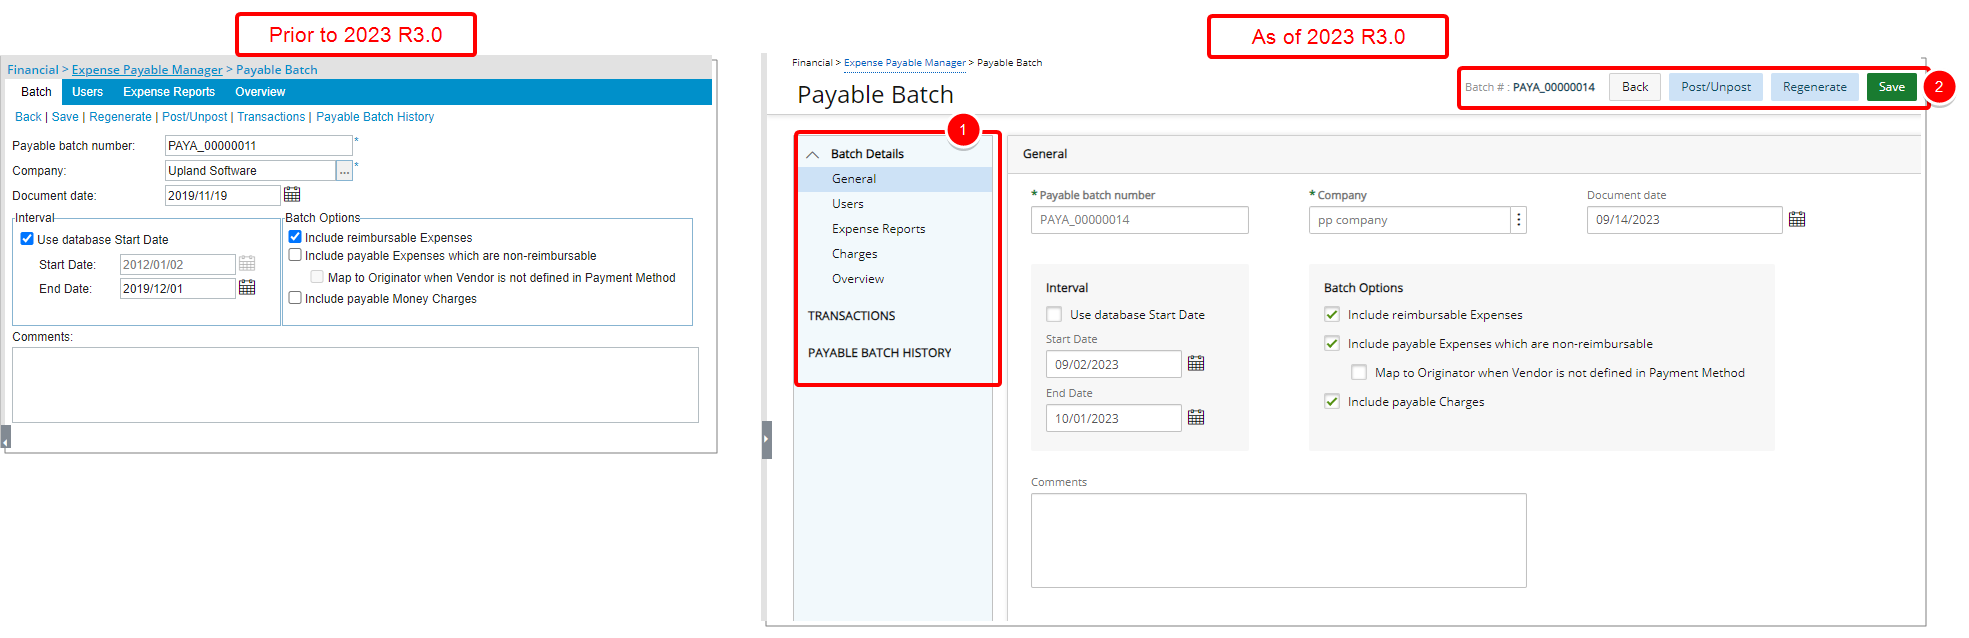
- The new left hand side navigation is broken down into three major sections; Batch Details, Transactions and Payable Batch History each of which are further broken down into components:
- Under Batch Details, you can find the General, Users, Expense Reports, Charges and Overview.
- From Transactions you can view the list of Transactions included in the Payable Batch.
- From Payable Batch History, you can view the history of changes made to the Payable Batch.
- From the top right corner of the page you can:
- Refer the Batch #.
- Click Back to return to the previous page.
- Post/Unpost the Batch.
- Regenerate the Batch.
- Save your changes.
With these overall modifications, the look and feel are further improved and the layout of various elements within the page supports the unified experience across PSA further elevating the user experience.
When creating a new Payable Batch, the only visible navigation item is General. Once the minimum required information for creating a Payable Batch is entered, upon clicking Save, the page will refresh and show all the other elements that can be completed.
Furthermore, improvements have also been made to the following pages:
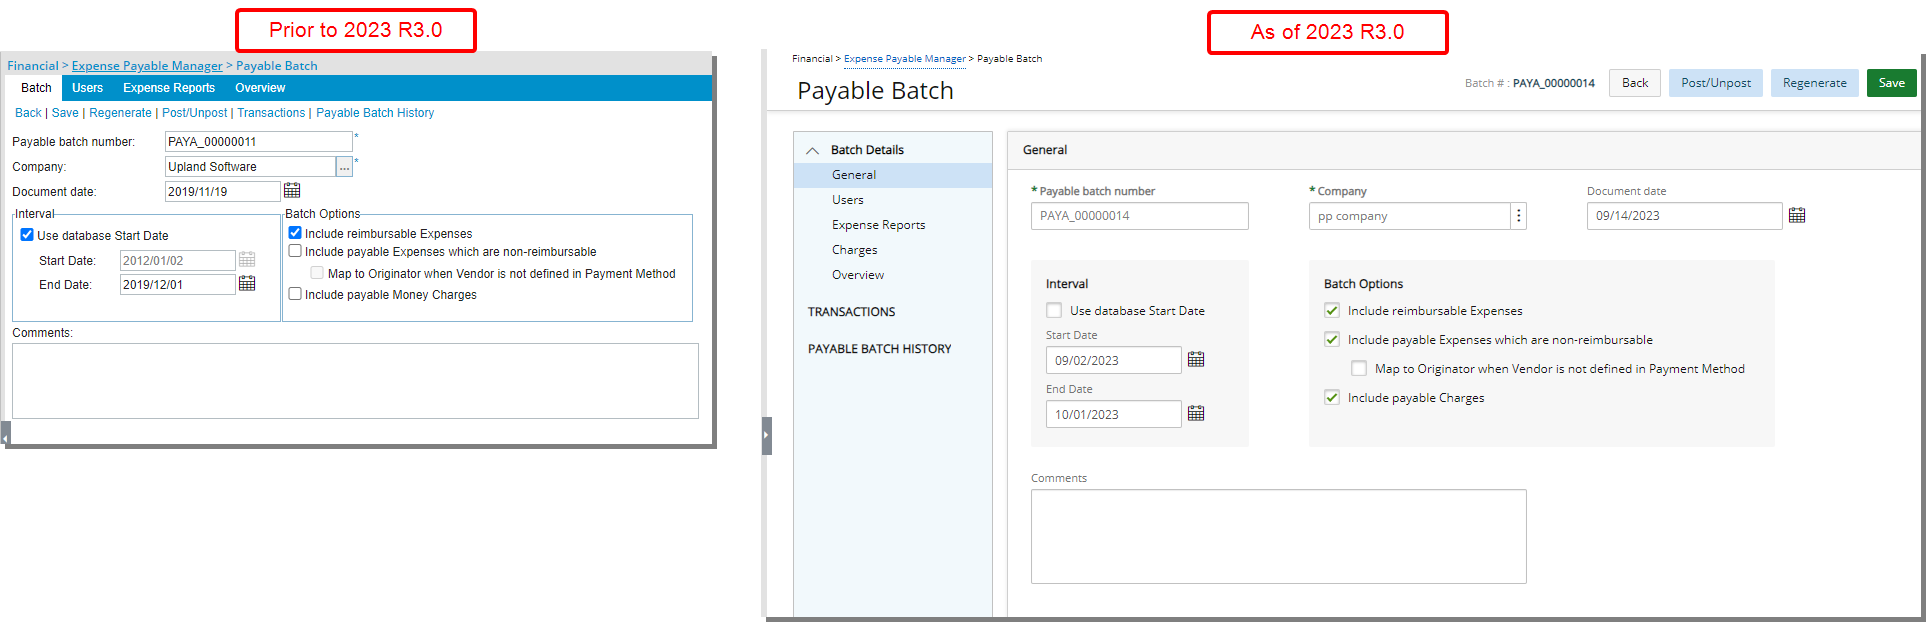
The General page (previously known as the Batch tab) has been redesigned for a better user experience and is now located under the Batch Details. Most of the features remain the same, however the look and feel have been renovated to enhance the overall user experience.

The user interface of the Users page has been improved for better user experience and consistency with the other updates that have been made thus far.
The following enhancements have also been made:
- A collapsible Summary section is now available on top of the page. Upon expanding it you can view the Total Expenses, Total Charges and the Total amount.
- Addition of Refresh button allowing you to reload the page.
- Addition of a Filter
 button allowing you to filter the list of Users based on User Name, User Id, Functional Group, Active Site, Approval Group, Hire Date, Master Site, Primary Role, Resource Group, Security Role and Title.
 - By default, the following columns are displayed: User Name, User Id and Functional Group. From the Columns Selection you can choose to display the following columns: Active Site, Approval Group, Hire Date, Master Site, Primary Role, Resource Group, Security Role and Title.
- By default, you can search for Users based on User Name, User Id and Functional Group. From the Columns Selection you can choose to include the following search criteria: Active Site, Approval Group, Hire Date, Master Site, Primary Role, Resource Group, Security Role and Title.
- Pagination is available at the top right corner to facilitate easy navigation across pages.
- From the table header:
- You can easily sort the columns by ascending or descending order simply by clicking a column header. Note that an arrow indicates the descending () or ascending () order applied to the column.
- Click and move a column to the desired position.
- You can now dynamically resize column(s), to your preferred width. Simply move your cursor to the column boundary () you want to resize. When the cursor becomes a resize cursor, click and drag the column accordingly.
- You can easily sort the columns by ascending or descending order simply by clicking a column header. Note that an arrow indicates the descending (

The user interface of the Expense Reports page has been improved for better user experience and consistency with the other updates that have been made thus far.
The following enhancements have also been made:
- Addition of Refresh button allowing you to reload the page.
- By default, the following columns are displayed: Tracking #, User Name, User Id, Start Date, End Date, Reimbursable Amount, Payable Amount and Cash Advance. From the Columns Selection
 you can choose to display the following columns: Approval Group, Functional Group and Title.
 - By default, you can search for Expense Reports based on Tracking #, User Name, User Id, Start Date and End Date. From the Columns Selection you can choose to include the following search criteria: Approval Group, Functional Group and Title.
- Pagination is available at the top right corner to facilitate easy navigation across pages.
- From the table header:
- You can easily sort the columns by ascending or descending order simply by clicking a column header. Note that an arrow indicates the descending () or ascending () order applied to the column.
- Click and move a column to the desired position.
- You can now dynamically resize column(s), to your preferred width. Simply move your cursor to the column boundary () you want to resize. When the cursor becomes a resize cursor, click and drag the column accordingly.
- You can easily sort the columns by ascending or descending order simply by clicking a column header. Note that an arrow indicates the descending (

The user interface of the Charges page (formerly known as Money Charges) has been improved for better user experience and consistency with the other updates that have been made thus far.
The following enhancements have also been made:
- Addition of Refresh button allowing you to reload the page.
- By default, the following columns are displayed: User Name, User Id, Task, Charge, Project and Amount.
- By default, you can search for Charges based on User Name, User Id, Task, Charge and Project.
- Pagination is available at the top right corner to facilitate easy navigation across pages.
- From the table header:
- You can easily sort the columns by ascending or descending order simply by clicking a column header. Note that an arrow indicates the descending () or ascending () order applied to the column.
- Click and move a column to the desired position.
- You can now dynamically resize column(s), to your preferred width. Simply move your cursor to the column boundary () you want to resize. When the cursor becomes a resize cursor, click and drag the column accordingly.
- You can easily sort the columns by ascending or descending order simply by clicking a column header. Note that an arrow indicates the descending (
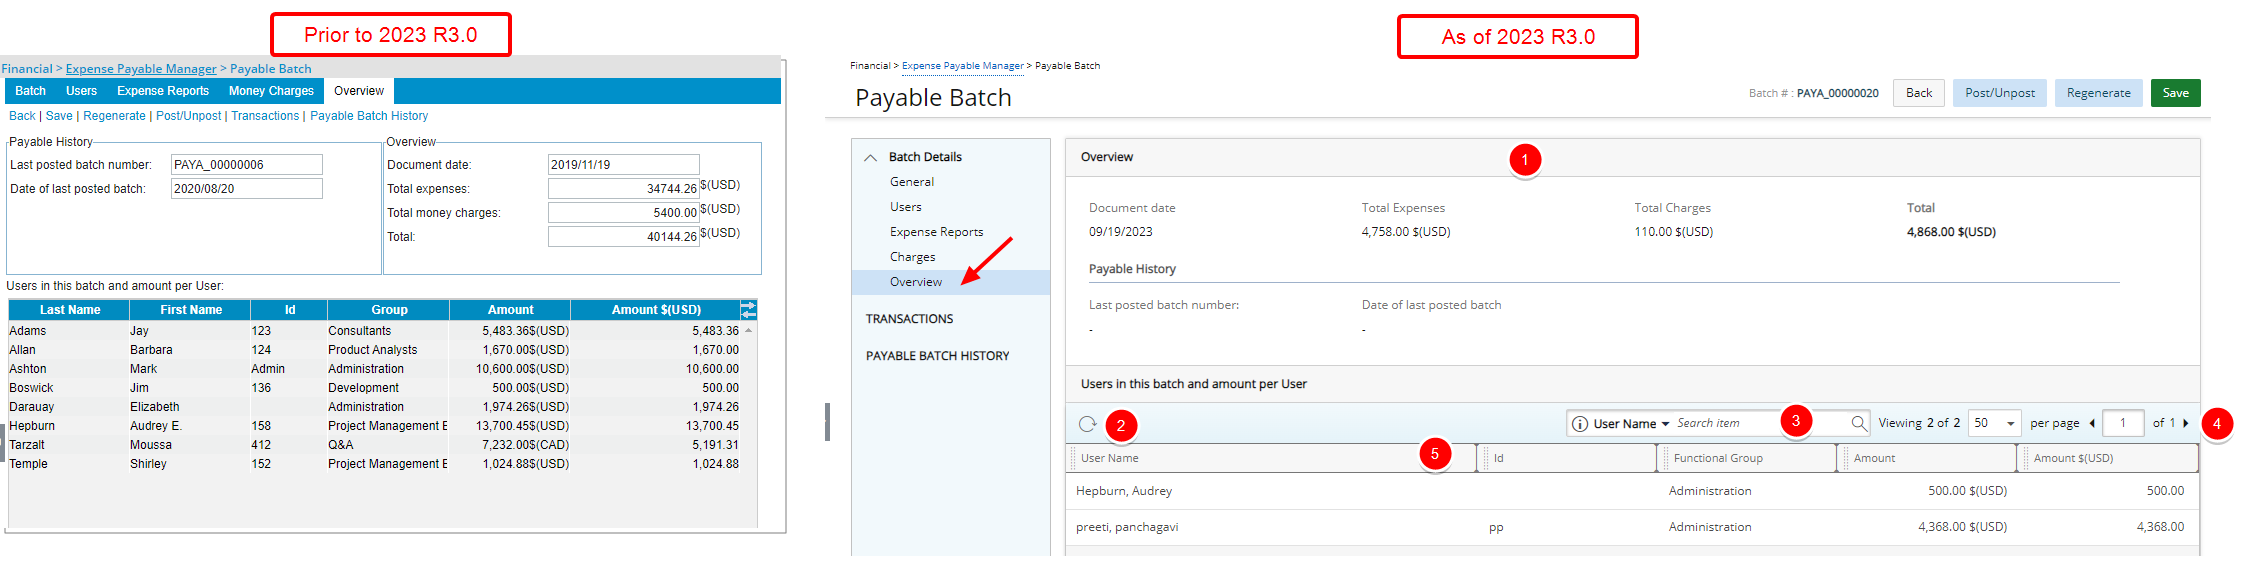
The user interface of the Overview page has been improved for better user experience and consistency with the other updates that have been made thus far.
The following enhancements have also been made:
- The Overview section is now clearly defined on top of the page followed by the Payable History.
Note: In the Overview section, Total Money Charges was renamed to Total Charges.
- Addition of Refresh button allowing you to reload the table.
- By default, you can search for Users based on User Name, User Id and Functional Group.
- Pagination is available at the top right corner to facilitate easy navigation across pages.
- From the table header:
- You can easily sort the columns by ascending or descending order simply by clicking a column header. Note that an arrow indicates the descending () or ascending () order applied to the column.
- Click and move a column to the desired position.
- You can now dynamically resize column(s), to your preferred width. Simply move your cursor to the column boundary () you want to resize. When the cursor becomes a resize cursor, click and drag the column accordingly.
- You can easily sort the columns by ascending or descending order simply by clicking a column header. Note that an arrow indicates the descending (
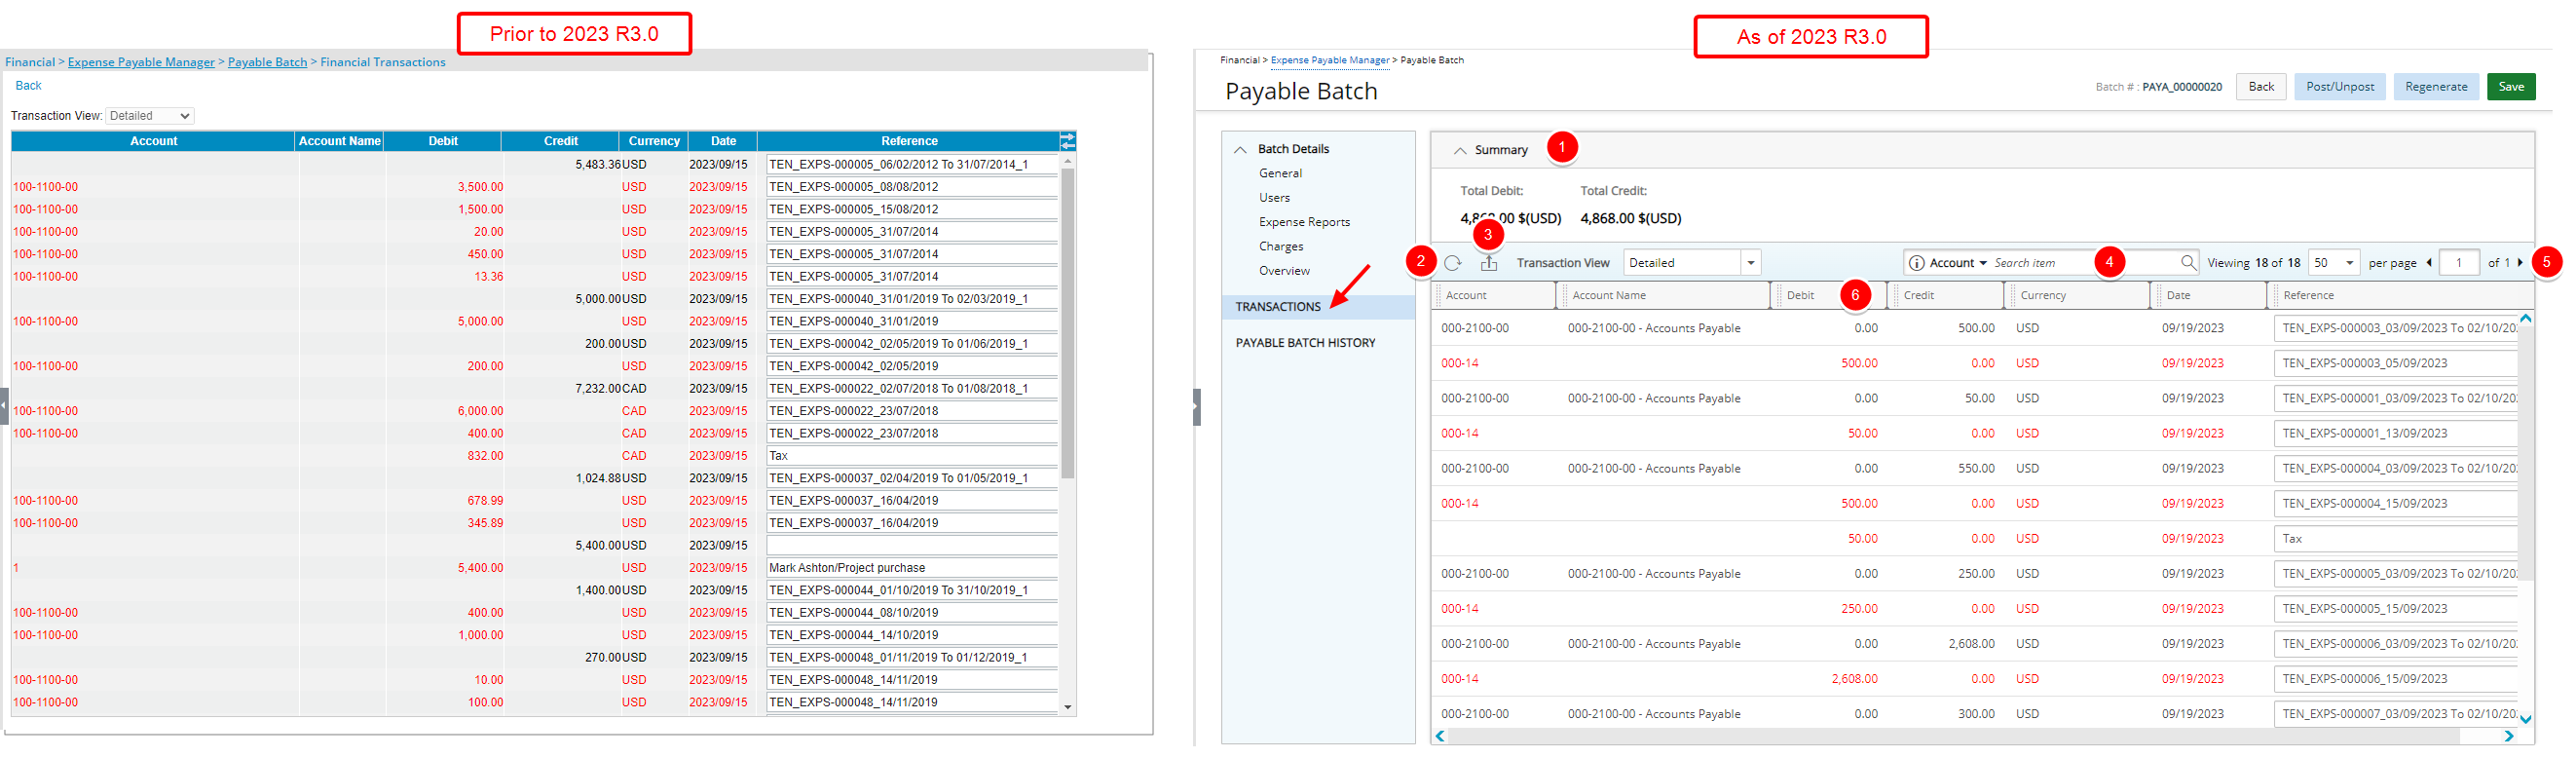
The user interface of the Transactions page has been improved for better user experience and consistency with the other updates that have been made thus far.
The following enhancements have also been made:
- Addition of a collapsible Summary section from where you can readily view the Total Debit and Total Credit amounts.
- Addition of Refresh button allowing you to reload the page.
- Addition of an Export button allowing you to export the list to Excel.
- Addition of Search capability allowing you to search for Transactions based on Account, Account Name and Currency.
- Pagination is available at the top right corner to facilitate easy navigation across pages.
- From the table header:
- You can easily sort the columns by ascending or descending order simply by clicking a column header. Note that an arrow indicates the descending () or ascending () order applied to the column.
- Click and move a column to the desired position.
- You can now dynamically resize column(s), to your preferred width. Simply move your cursor to the column boundary () you want to resize. When the cursor becomes a resize cursor, click and drag the column accordingly.
- You can easily sort the columns by ascending or descending order simply by clicking a column header. Note that an arrow indicates the descending (

The Payable Batch History page which was redesigned in a previous release can now be accessed through the side navigation.
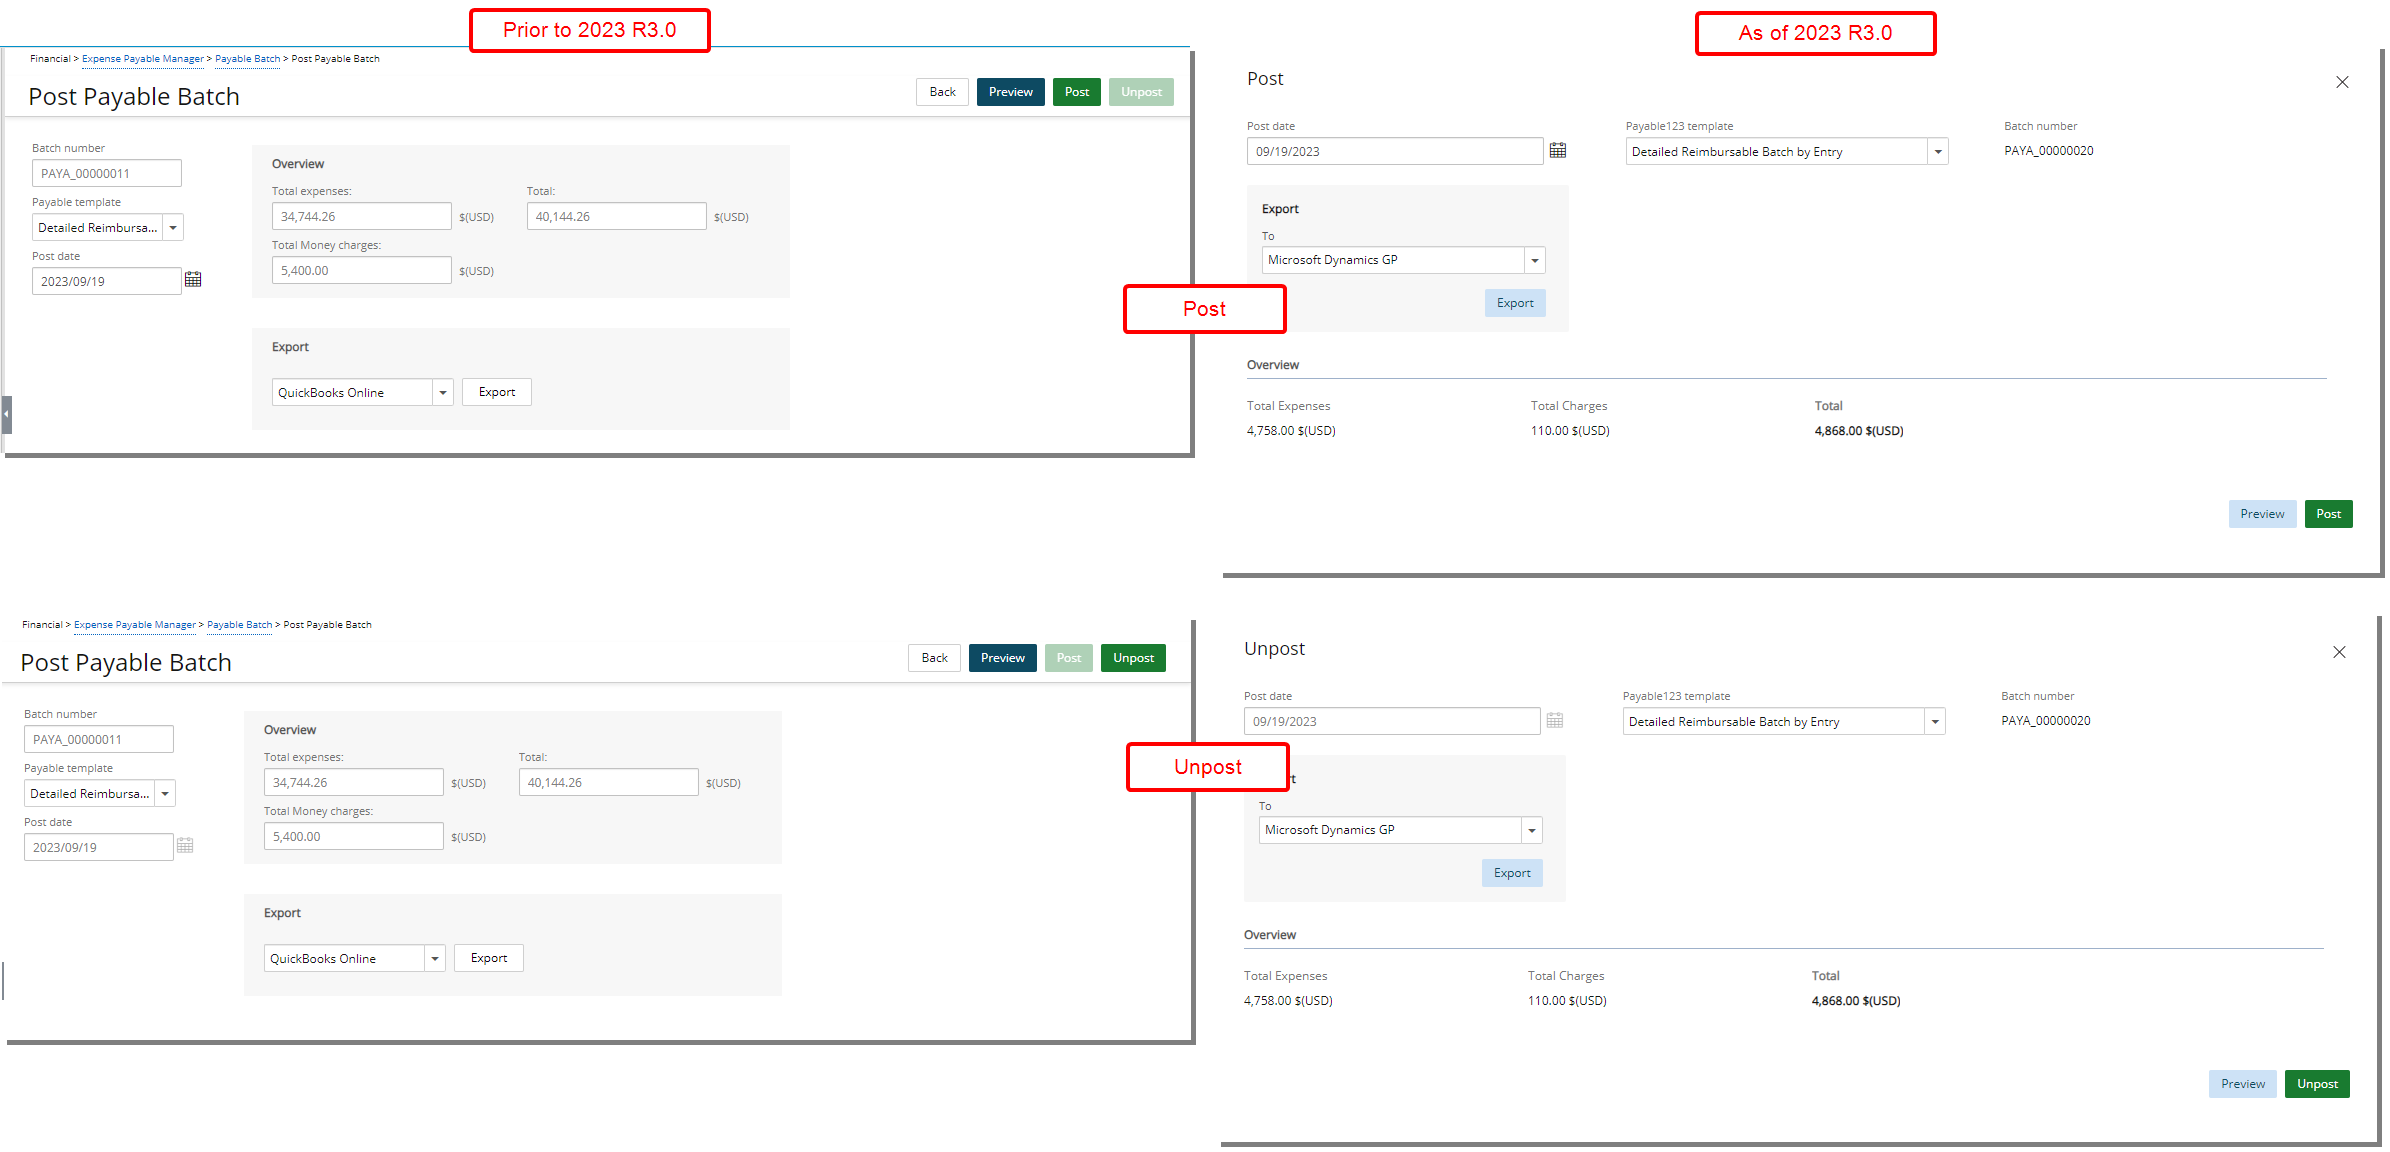
The Post/Unport Expense Payable Batch pages which were accessed when clicking the Post/Unpost link respectively are now converted to a dialog box and redesigned for a better user experience. Most of the features remain the same, however the look and feel have been renovated to enhance the overall user experience.
Financial - Invoice Edit
The Invoice Edit pages are now structured in the same familiar format already in use in other areas of the application. Although most of the features remain the same, the appearance and usability have been significantly improved to enhance your overall experience.
For further details refer to: Managing Invoices section of the help center
The interface for creating and editing an Invoice has been revamped with an upgraded look and a new navigation.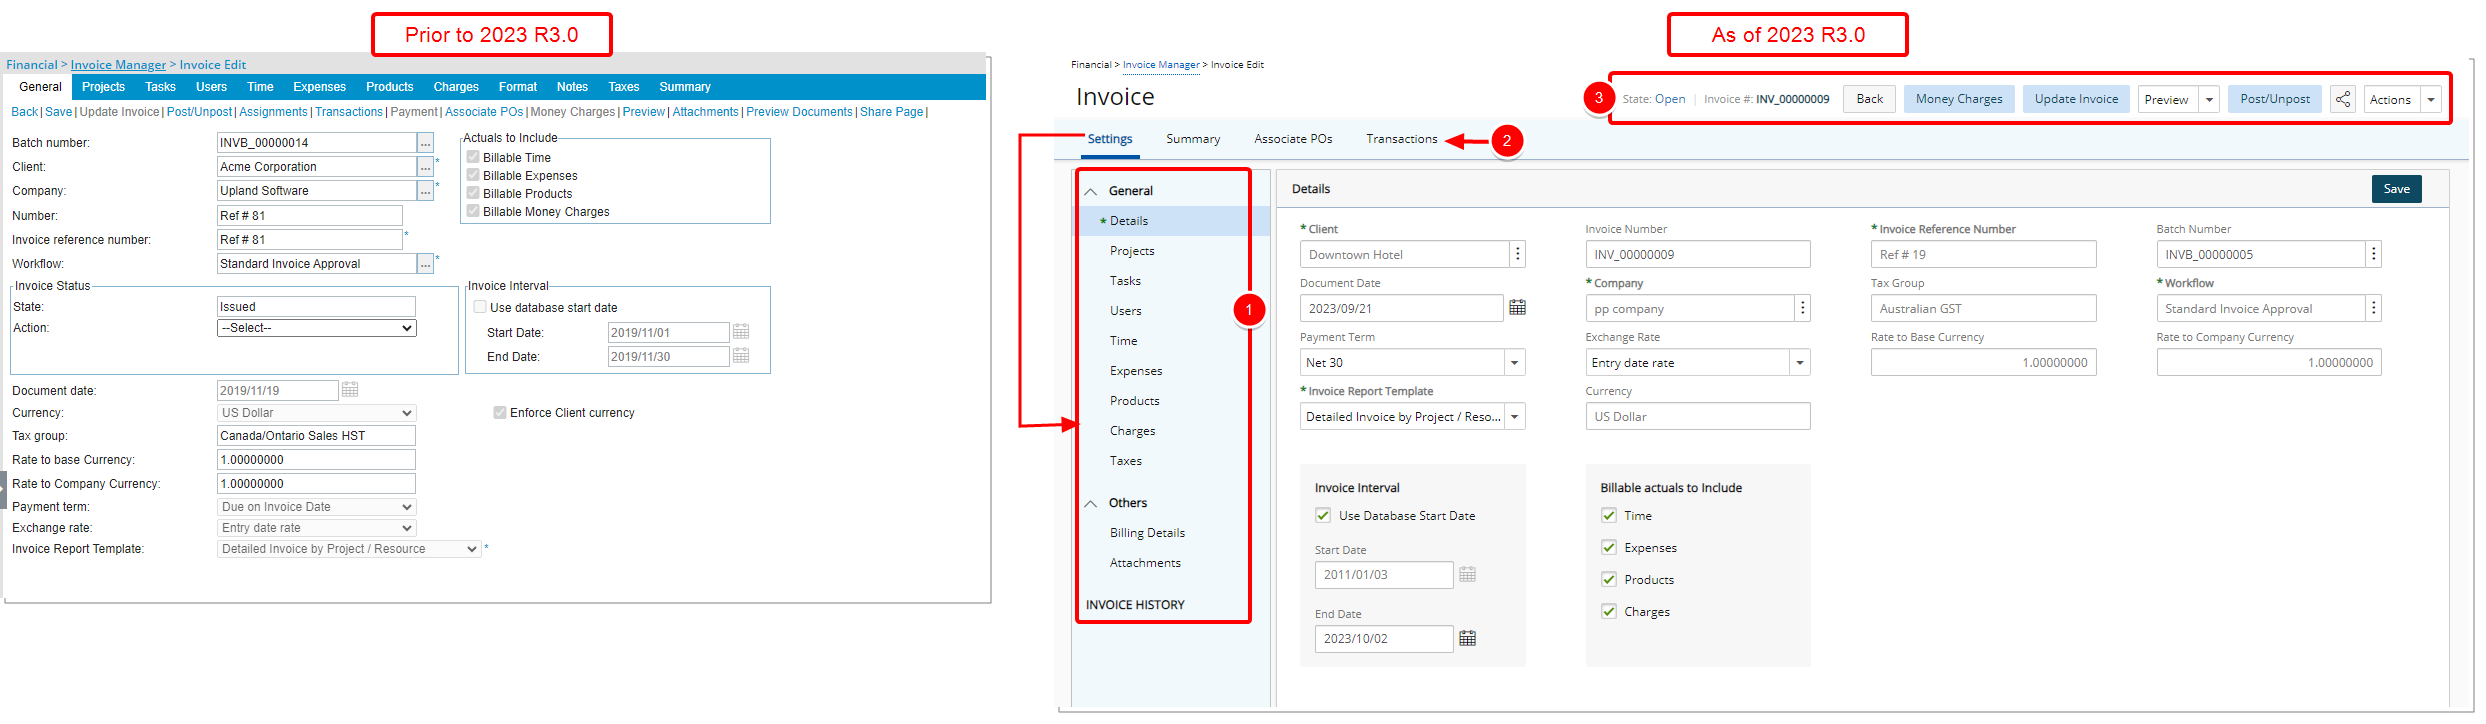
- The new Settings left hand side navigation is broken down into three major sections; General, Others and Invoice History each of which are further broken down into components.
- From the tab navigation you can access and view the invoice Summary, Associate POs, view the Transactions as well as Payments.
- From the top right corner of the page you can:
- View Invoice State and access the Invoice Workflow graphical representation as well as the Assignments.
- Refer the Invoice Number.
- Click Back to return to the previous page.
- Create Money Charges.
- Update Invoice.
- The Preview selection box allows you to preview the Invoice and/or Document.
- Post/Unpost the Invoice.
- Share the page with a colleague.
- Action on the Invoice.
With these overall modifications, the look and feel are further improved and the layout of various elements within the page supports the unified experience across PSA further elevating the user experience.
When creating a new invoice, the only visible navigation item is Details. Once the minimum required information for creating an invoice is entered, upon clicking Save, the page will refresh and show all the other invoice elements that can be completed.
The Settings left hand side navigation is broken down into three major sections; General, Others and Invoice History each of which are further broken down into components:
- Under General, you can find the Details, Projects, Tasks, Users, Time, Expenses, Products, Charges and Taxes.
- Under Others, you can find the Billing Details and Attachments.
- From Invoice History, you can view the history of changes made to the invoice.
Furthermore, improvements have also been made to the following pages:
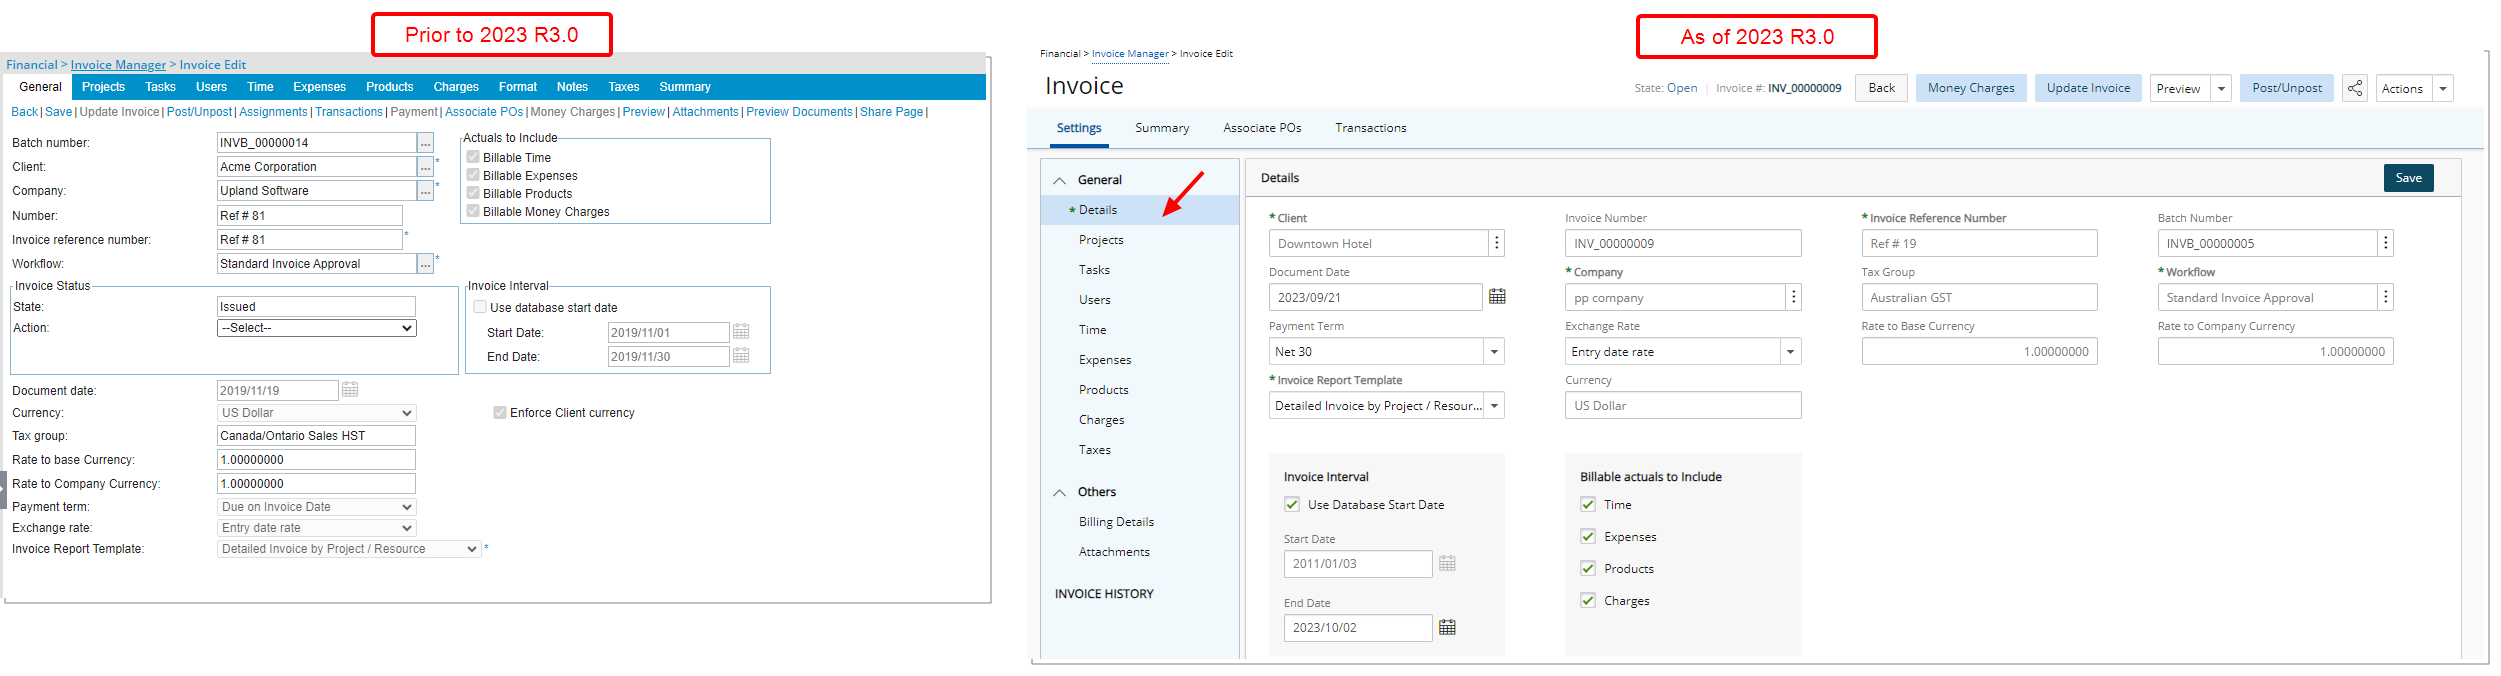
The Details page (previously known as the General tab) is redesigned for a better user experience. Most of the features remain the same, however the look and feel have been renovated to enhance the overall user experience. In addition:
- The Actuals to Include section was renamed to Billable Actuals to Include and moved to the bottom of the page.
- The Invoice Interval was moved to the bottom of the page.
- Number field is now renamed to Invoice Number.
The following fields are deprecated and no longer available:
- Pre-Billing Workflow
- Pre-Billing Report Template
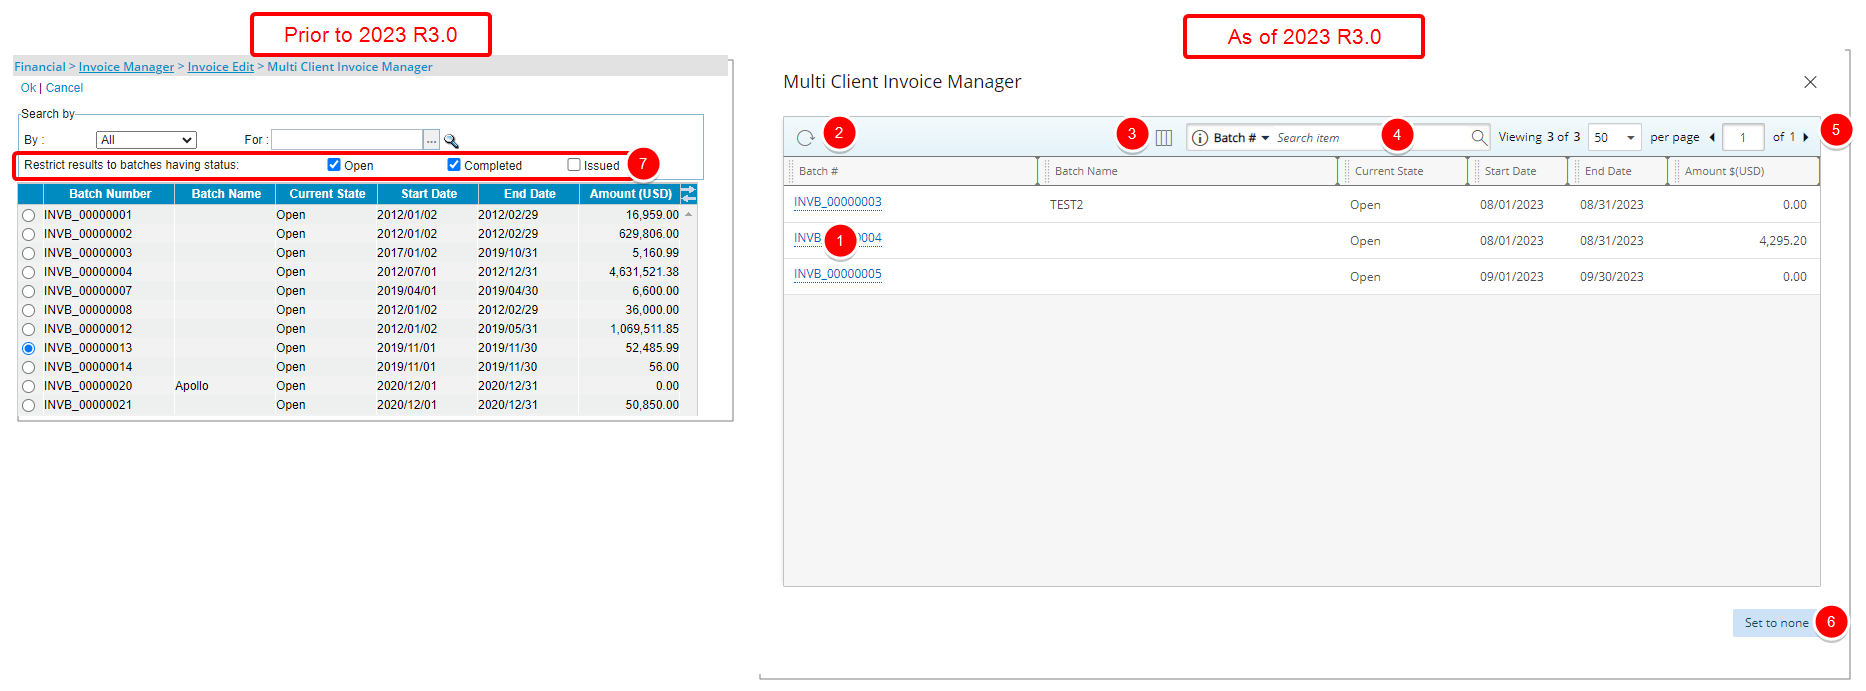
The Multi Client Invoice Manager page which is accessed when browsing for a Batch Number from an Invoice is converted to a dialog box and redesigned for a better user experience. Most of the features remain the same, however the look and feel have been renovated to enhance the overall user experience.
The following enhancements have also been made:
- The selection boxes are removed. You can now associate the invoice simply by clicking the Batch Number.
- Addition of Refresh button allowing you to reload the page.
- The following columns are displayed by default: Batch #, Batch Name, Current State, Start Date, End Date and Amount. You can choose to include the following search criteria: Company, Created by and Created on from Column Selection .
- You can now Search for a Batch by Batch #, Batch Name, Start Date, End Date, Client and Project. In addition, you can choose to include the Company and Created On criteria from Column Selection .
- Pagination is available at the top right corner to facilitate easy navigation across pages.
- You can choose to remove the association by clicking Set to None.
- Restrict results to batches having status: Open/Completed/Issued is deprecated and no longer available.
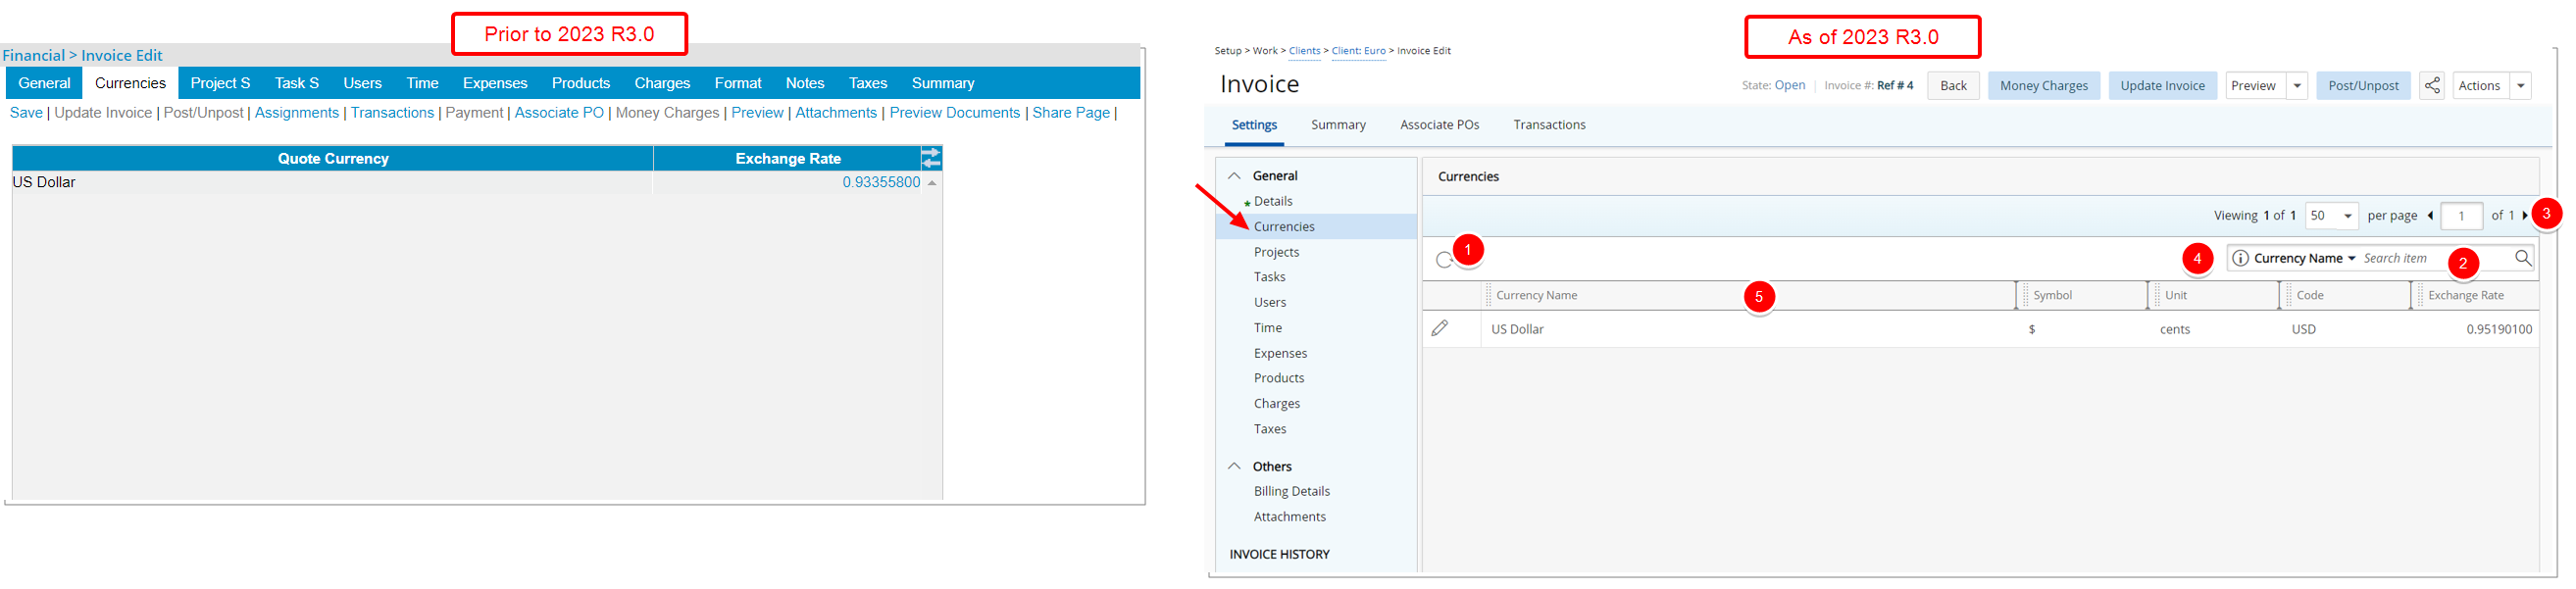
As in previous releases the Currencies link is available under the General navigation menu item when the Client Currency is different from System Currency and the Exchange Rate is set to User-defined.
The Currencies page has been redesigned for a better user experience. It is now accessible from the Invoice Settings navigation menu. Most of the features remain the same, however the look and feel have been renovated to enhance the overall user experience.
The following enhancements have also been made:
- Addition of Refresh button allowing you to reload the page.
- Addition of Search capability. You can search based on Currency Name and Code.
- Pagination is available at the top right corner to facilitate easy navigation across pages.
- Easily modify the Exchange Rate then click Save.
- The following columns are displayed: Currency Name, Symbol, Unit, Code and Exchange Rate.
- From the table header:
- You can easily sort the columns by ascending or descending order simply by clicking a column header. Note that an arrow indicates the descending () or ascending () order applied to the column.
- Click and move a column to the desired position.
- You can now dynamically resize column(s), to your preferred width. Simply move your cursor to the column boundary () you want to resize. When the cursor becomes a resize cursor, click and drag the column accordingly.
- You can easily sort the columns by ascending or descending order simply by clicking a column header. Note that an arrow indicates the descending (
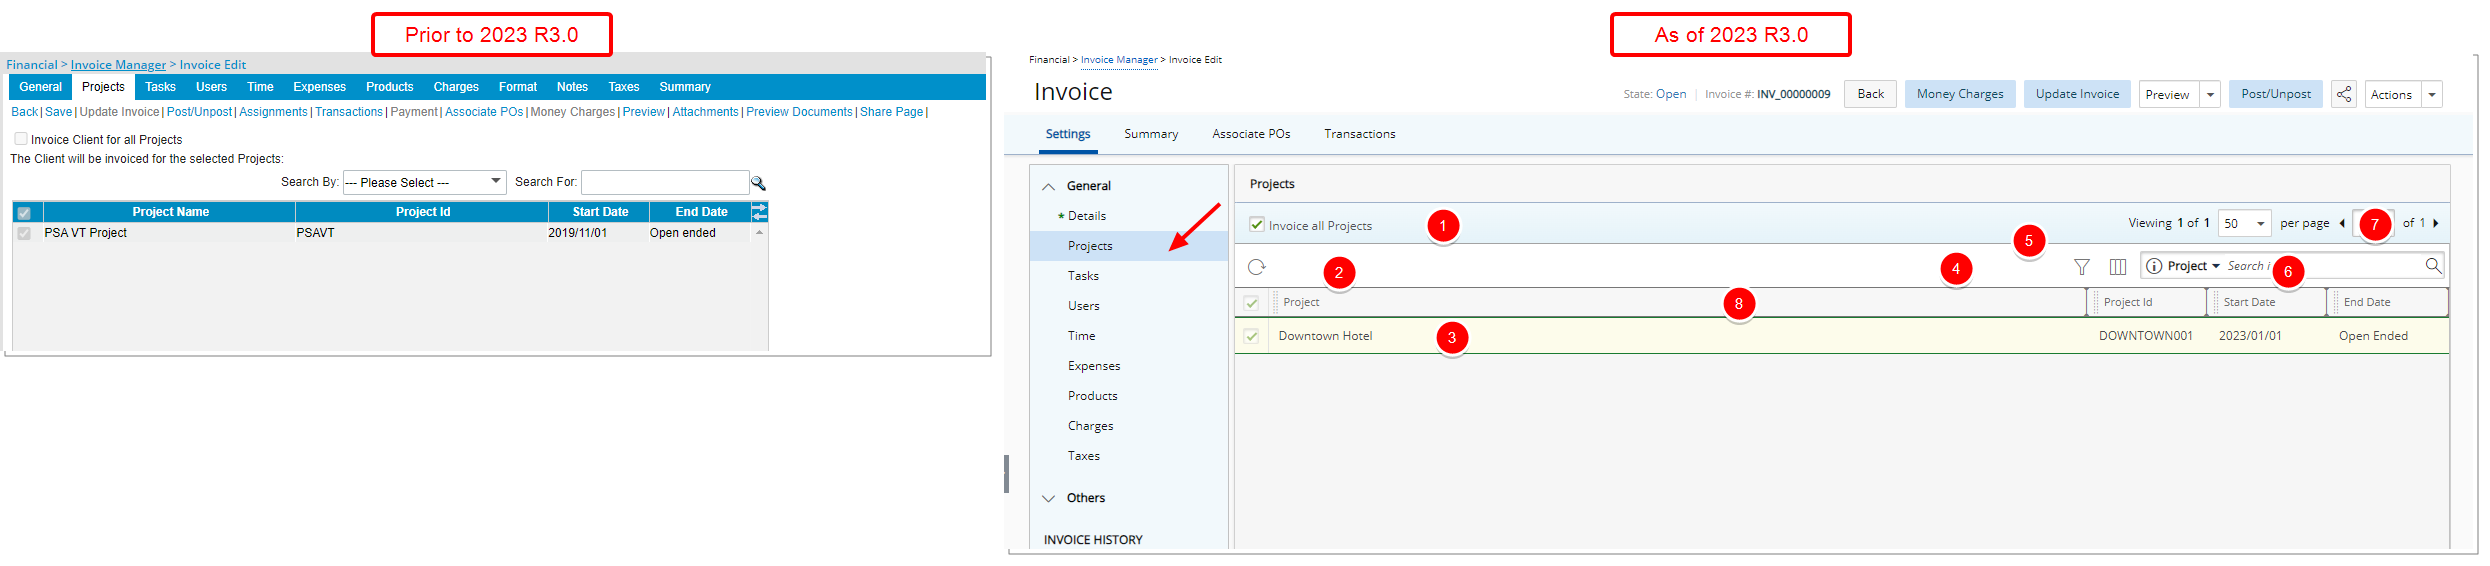
The user interface of the Projects page has been improved for better user experience and consistency with the other updates that have been made thus far.
The following enhancements have also been made:
- Invoice Client for all Projects was renamed to Invoice all Projects.
- Addition of Refresh button allowing you to reload the page.
- The page displays the list of all included Projects in alphabetical order.
- Addition of an on-page Filter allowing you to filter the list based on Portfolio Name, Program, Project, Project End, Project Code, Project Id, Project Manager, Project Start, Project State Attribute and Project Tracking #.
Note: The on-page Filter is reset upon navigating away from the Invoice Edit page.
- The following columns are displayed by default: Project, Project Id, Start Date and End Date. You can manage these columns from Column Selection .
- Search for Projects based on Project, Project Id, Start Date and End Date. You can manage the search criteria from Column Selection .
- Pagination is available at the top right corner to facilitate easy navigation across pages.
- From the table header:
- You can easily sort the columns by ascending or descending order simply by clicking a column header. Note that an arrow indicates the descending () or ascending () order applied to the column.
- Click and move a column to the desired position.
- You can now dynamically resize column(s), to your preferred width. Simply move your cursor to the column boundary () you want to resize. When the cursor becomes a resize cursor, click and drag the column accordingly.
- You can easily sort the columns by ascending or descending order simply by clicking a column header. Note that an arrow indicates the descending (
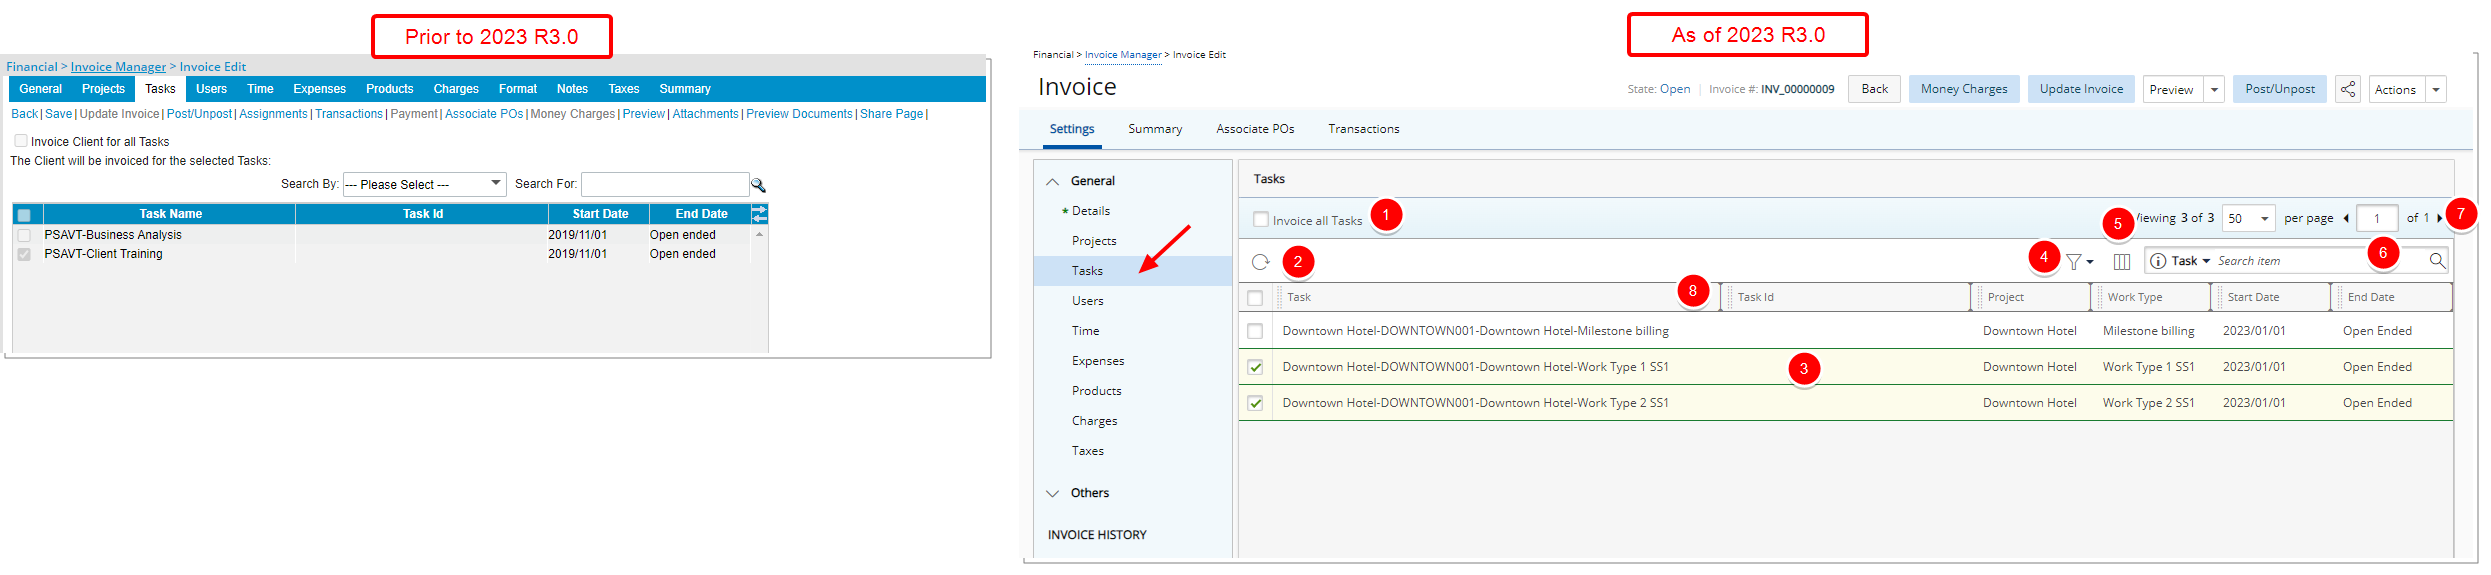
The user interface of the Tasks page has been improved for better user experience and consistency with the other updates that have been made thus far.
The following enhancements have also been made:
- Invoice Client for all Tasks was renamed to Invoice all Tasks.
- Addition of Refresh button allowing you to reload the page.
- The page displays the list of all included Tasks in alphabetical order.
- Filter the page based on Active, Suspended and Decommissioned Tasks. By default, all options are selected.
- The following columns are displayed by default: Task, Task Id, Project, Work Type, Start Date and End Date. You can manage these columns from Column Selection .
- Search for Tasks based on Task, Task Id, Project, Work Type, Start Date and End Date. You can manage the search criteria from Column Selection .
- Pagination is available at the top right corner to facilitate easy navigation across pages.
- From the table header:
- You can easily sort the columns by ascending or descending order simply by clicking a column header. Note that an arrow indicates the descending () or ascending () order applied to the column.
- Click and move a column to the desired position.
- You can now dynamically resize column(s), to your preferred width. Simply move your cursor to the column boundary () you want to resize. When the cursor becomes a resize cursor, click and drag the column accordingly.
- You can easily sort the columns by ascending or descending order simply by clicking a column header. Note that an arrow indicates the descending (
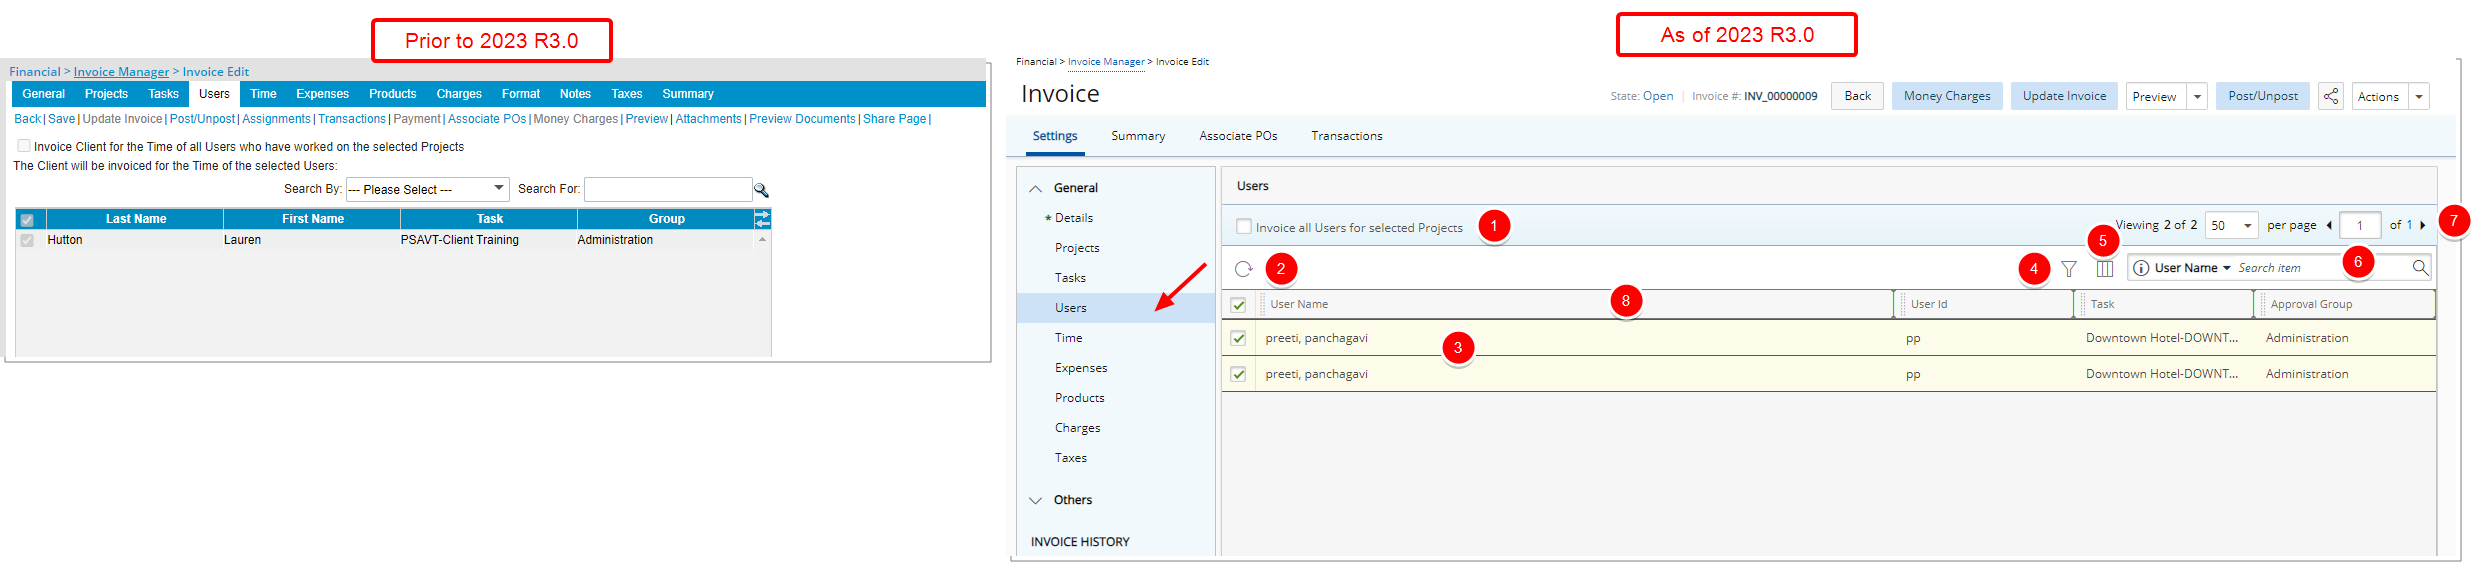
The user interface of the Users page has been improved for better user experience and consistency with the other updates that have been made thus far.
The following enhancements have also been made:
- Invoice Client for the Time of all Users who have worked on the selected Projects was renamed to Invoice all Users for selected Projects.
- Addition of Refresh button allowing you to reload the page.
- The page displays the list of all included Users in alphabetical order.
- Addition of an on-page Filter allowing you to filter the list based on Active Site, Approval Group, Company, Master Site, Primary Role, Resource Group, Security Role, Task, Title, User Id, User name and User Type.
Note: The on-page Filter is reset upon navigating away from the Invoice Edit page.
- The following columns are displayed by default: User Name, User Id, Task and Approval Group. In addition, you can choose to include the Active Site, Hire Date, Master Site, Primary Role, Resource Group, Security Role, and Title from Column Selection .
- Search for Tasks based on Task, Task Id, Project, Work Type, Start Date and End Date. You can choose to include the following search criteria from Column Selection : Active Site, Hire Date, Master Site, Primary Role, Resource Group, Security Role, and Title .
- Pagination is available at the top right corner to facilitate easy navigation across pages.
- From the table header:
- You can easily sort the columns by ascending or descending order simply by clicking a column header. Note that an arrow indicates the descending () or ascending () order applied to the column.
- Click and move a column to the desired position.
- You can now dynamically resize column(s), to your preferred width. Simply move your cursor to the column boundary () you want to resize. When the cursor becomes a resize cursor, click and drag the column accordingly.
- You can easily sort the columns by ascending or descending order simply by clicking a column header. Note that an arrow indicates the descending (
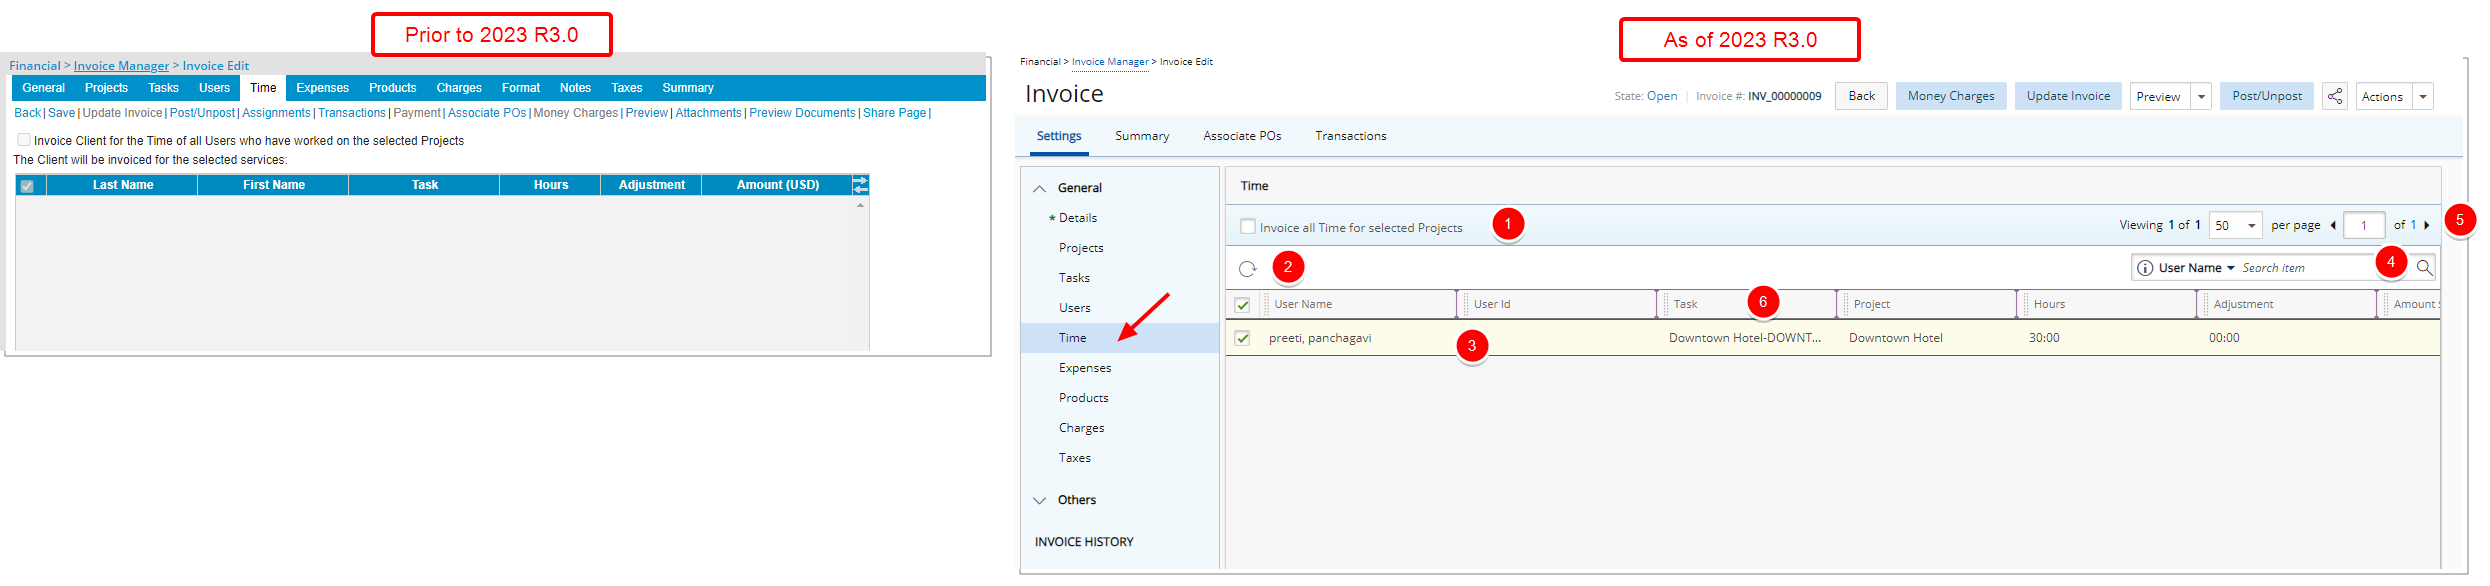
The user interface of the Time page has been improved for better user experience and consistency with the other updates that have been made thus far.
The following enhancements have also been made:
- Invoice Client for the Time of all Users who have worked on the selected Projects has been renamed to Invoice all Time for selected Projects.
- Addition of Refresh button allowing you to reload the page.
- The page displays the list of all included Users in alphabetical order.
- Search for Users based on User Name, User Id, Task and Project.
- Pagination is available at the top right corner to facilitate easy navigation across pages.
- From the table header:
- You can easily sort the columns by ascending or descending order simply by clicking a column header. Note that an arrow indicates the descending () or ascending () order applied to the column.
- Click and move a column to the desired position.
- You can now dynamically resize column(s), to your preferred width. Simply move your cursor to the column boundary () you want to resize. When the cursor becomes a resize cursor, click and drag the column accordingly.
- You can easily sort the columns by ascending or descending order simply by clicking a column header. Note that an arrow indicates the descending (
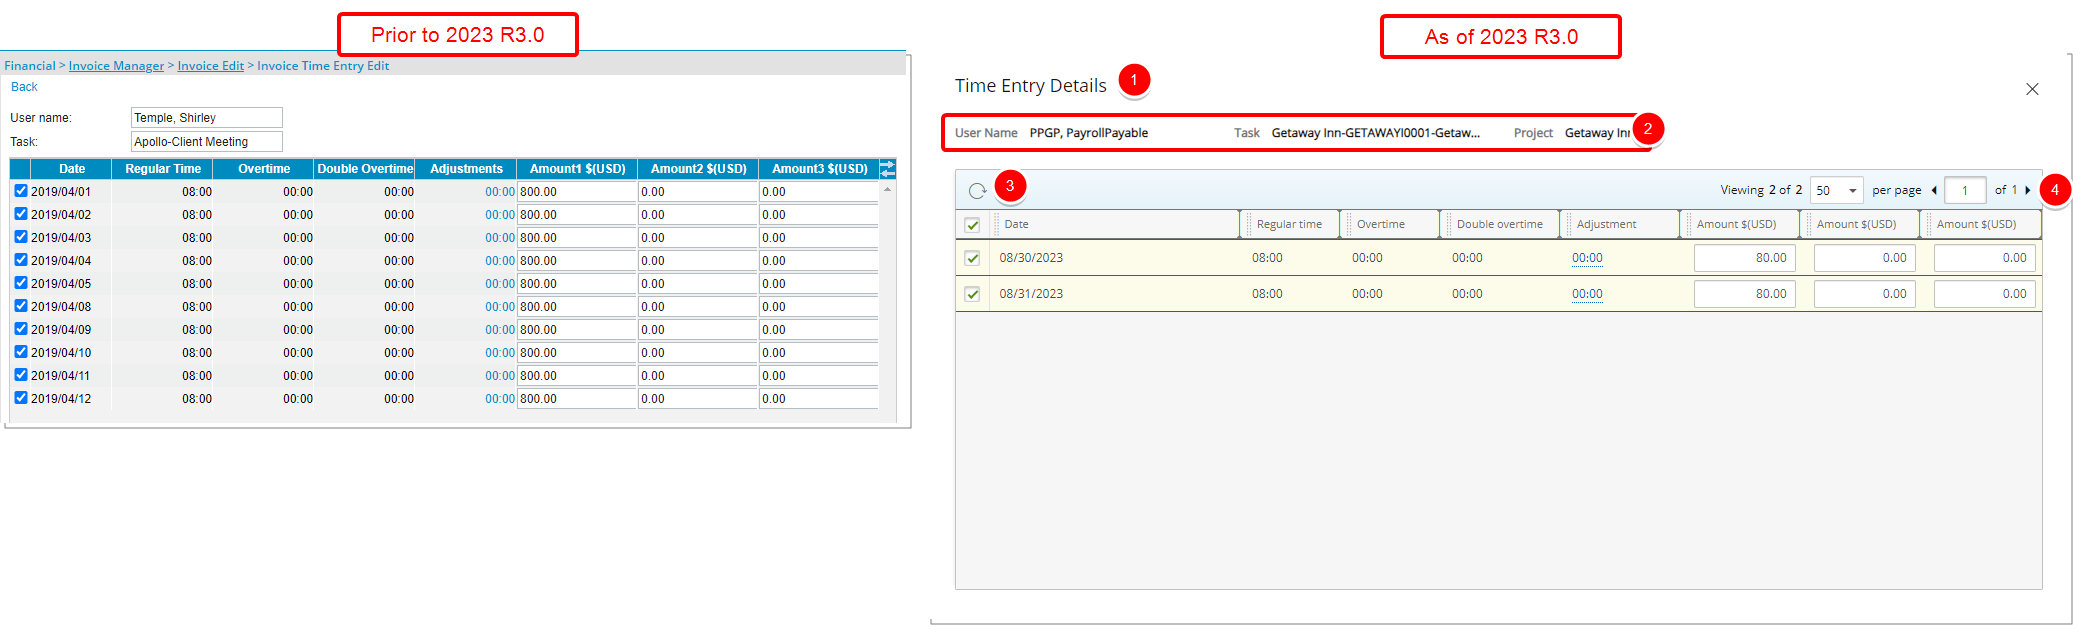
In addition, to the user interface improvements for the Invoice Time Entry Edit page the following enhancement are also made:
- The title of the page is renamed from Invoice Time Entry Edit to Time Entry Details and the page is now a dialog box.
- You can readily view the User Name, Task and Project name just above the table.
- Addition of a Refresh button allowing you to reload the page.
- Pagination is available at the top right corner to facilitate easy navigation across pages.

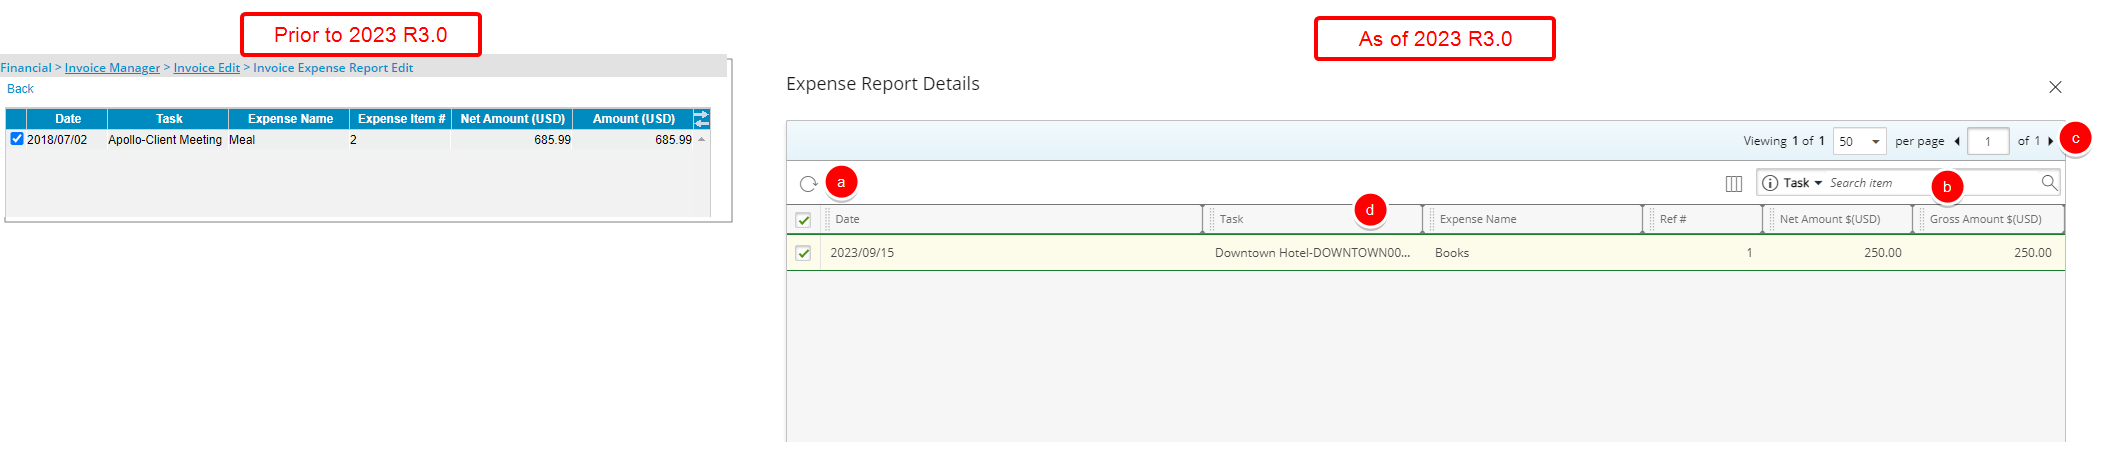
The user interface of the Expenses page has been improved for better user experience and consistency with the other updates that have been made thus far.
The following enhancements have also been made:
- Invoice Client for the Expenses incurred by all selected Users who have declared Expenses on the selected Projects was renamed to Invoice all Expenses for selected Projects.
- Addition of Refresh button allowing you to reload the page.
- The page displays the list of all included Expense Tracking #s by Originator in ascending order.
- The following columns are displayed by default: Tracking #, Originator, Title, Start Date, End Date, Net Amount and Total Amount. In addition, you can choose to include the Approval Group, and Originator’s Id columns from Column Selection .
- Search for Expense Reports based on Tracking #, Originator, Title, Start Date, Approval Group and Originator’s Id. You can manage the search criteria from Column Selection .
- Pagination is available at the top right corner to facilitate easy navigation across pages.
- From the table header:
- You can easily sort the columns by ascending or descending order simply by clicking a column header. Note that an arrow indicates the descending () or ascending () order applied to the column.
- Click and move a column to the desired position.
- You can now dynamically resize column(s), to your preferred width. Simply move your cursor to the column boundary () you want to resize. When the cursor becomes a resize cursor, click and drag the column accordingly.
- You can easily sort the columns by ascending or descending order simply by clicking a column header. Note that an arrow indicates the descending (
- Clicking on a Total Amount will open the redesigned Expense Report Details dialog box.
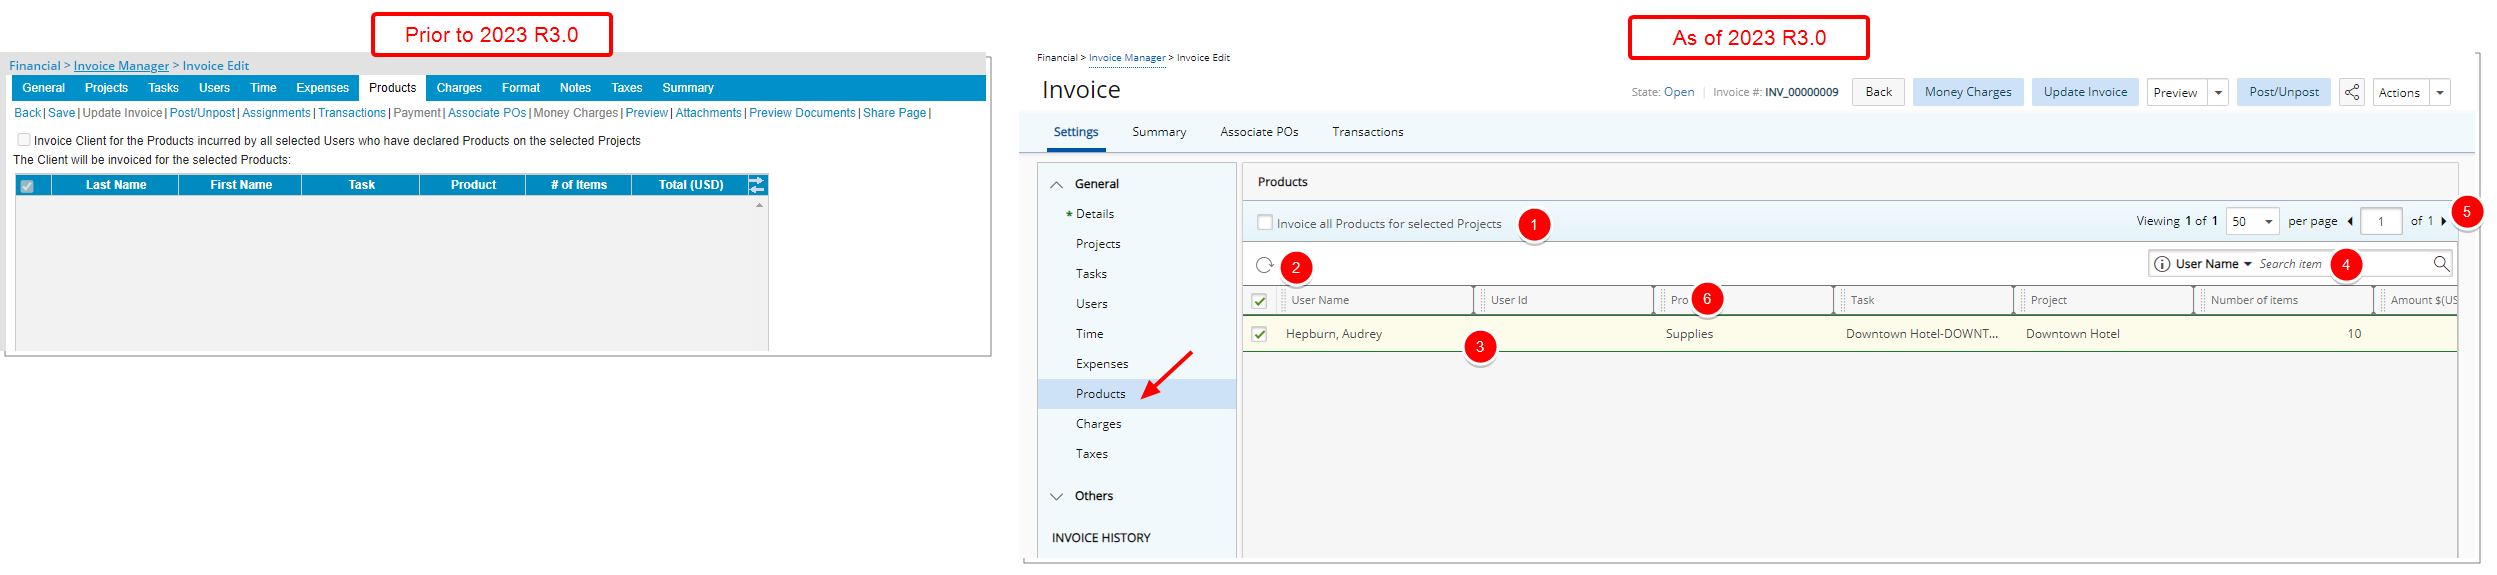
The user interface of the Products page has been improved for better user experience and consistency with the other updates that have been made thus far.
The following enhancements have also been made:
- Invoice Client for the Products incurred by all selected Users who have declared Products on the selected Projects was renamed to Invoice all Products for selected Projects.
- Addition of Refresh button allowing you to reload the page.
- The page displays the list of all included Users in alphabetical order.
- Search for Users based on User Name, User Id, Product, Task and Project.
- Pagination is available at the top right corner to facilitate easy navigation across pages.
- From the table header:
- You can easily sort the columns by ascending or descending order simply by clicking a column header. Note that an arrow indicates the descending () or ascending () order applied to the column.
- Click and move a column to the desired position.
- You can now dynamically resize column(s), to your preferred width. Simply move your cursor to the column boundary () you want to resize. When the cursor becomes a resize cursor, click and drag the column accordingly.
- You can easily sort the columns by ascending or descending order simply by clicking a column header. Note that an arrow indicates the descending (
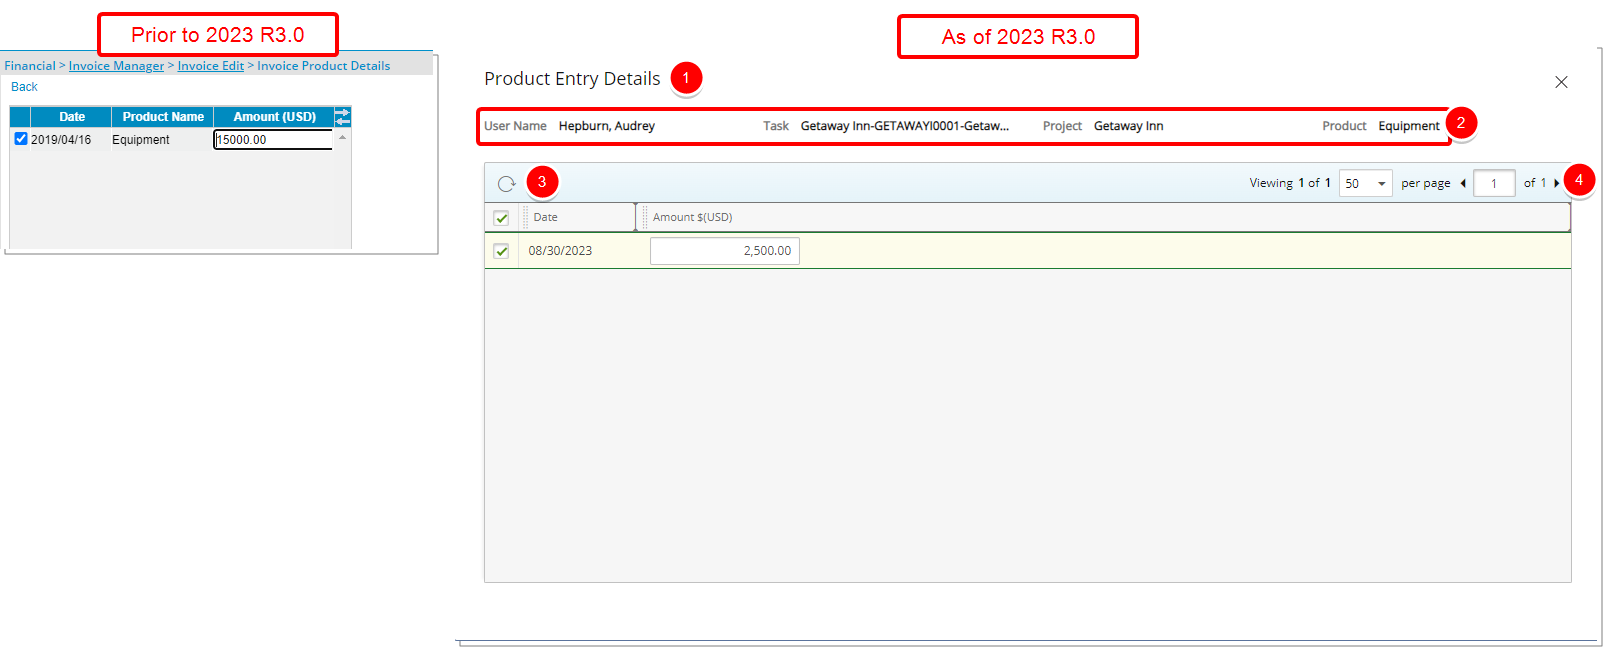
In addition, to the user interface improvements for the Invoice Product Details page the following enhancement are also made:
- The title of the page is renamed from Invoice Product Details to Product Entry Details and the page is now a dialog box.
- You can readily view the User Name, Task, Project and Charge type just above the table.
- Addition of a Refresh button allowing you to reload the page.
- Pagination is available at the top right corner to facilitate easy navigation across pages.
The user interface of the Charges page has been improved for better user experience and consistency with the other updates that have been made thus far.
The following enhancements have also been made:
- Invoice Client for the Money Charges incurred by all selected Users who have declared Charges on the selected Projects was renamed to Invoice all Charges for selected Projects.
- Addition of Refresh button allowing you to reload the page.
- The page displays the list of all included Users in alphabetical order.
- Search for Users based on User Name, User Id, Charge, Task and Project.
- Pagination is available at the top right corner to facilitate easy navigation across pages.
- From the table header:
- You can easily sort the columns by ascending or descending order simply by clicking a column header. Note that an arrow indicates the descending () or ascending () order applied to the column.
- Click and move a column to the desired position.
- You can now dynamically resize column(s), to your preferred width. Simply move your cursor to the column boundary () you want to resize. When the cursor becomes a resize cursor, click and drag the column accordingly.
- You can easily sort the columns by ascending or descending order simply by clicking a column header. Note that an arrow indicates the descending (
In addition, to the user interface improvements for the Invoice Money Charge Details dialog box the following enhancement are also made:
- The title of the page was renamed from Invoice Money Charge Details to Charge Entry Details and the page is now a dialog box.
- You can readily view the User Name, Task, Project and Charge type just above the table.
- Addition of a Refresh button allowing you to reload the page.
- Pagination is available at the top right corner to facilitate easy navigation across pages.
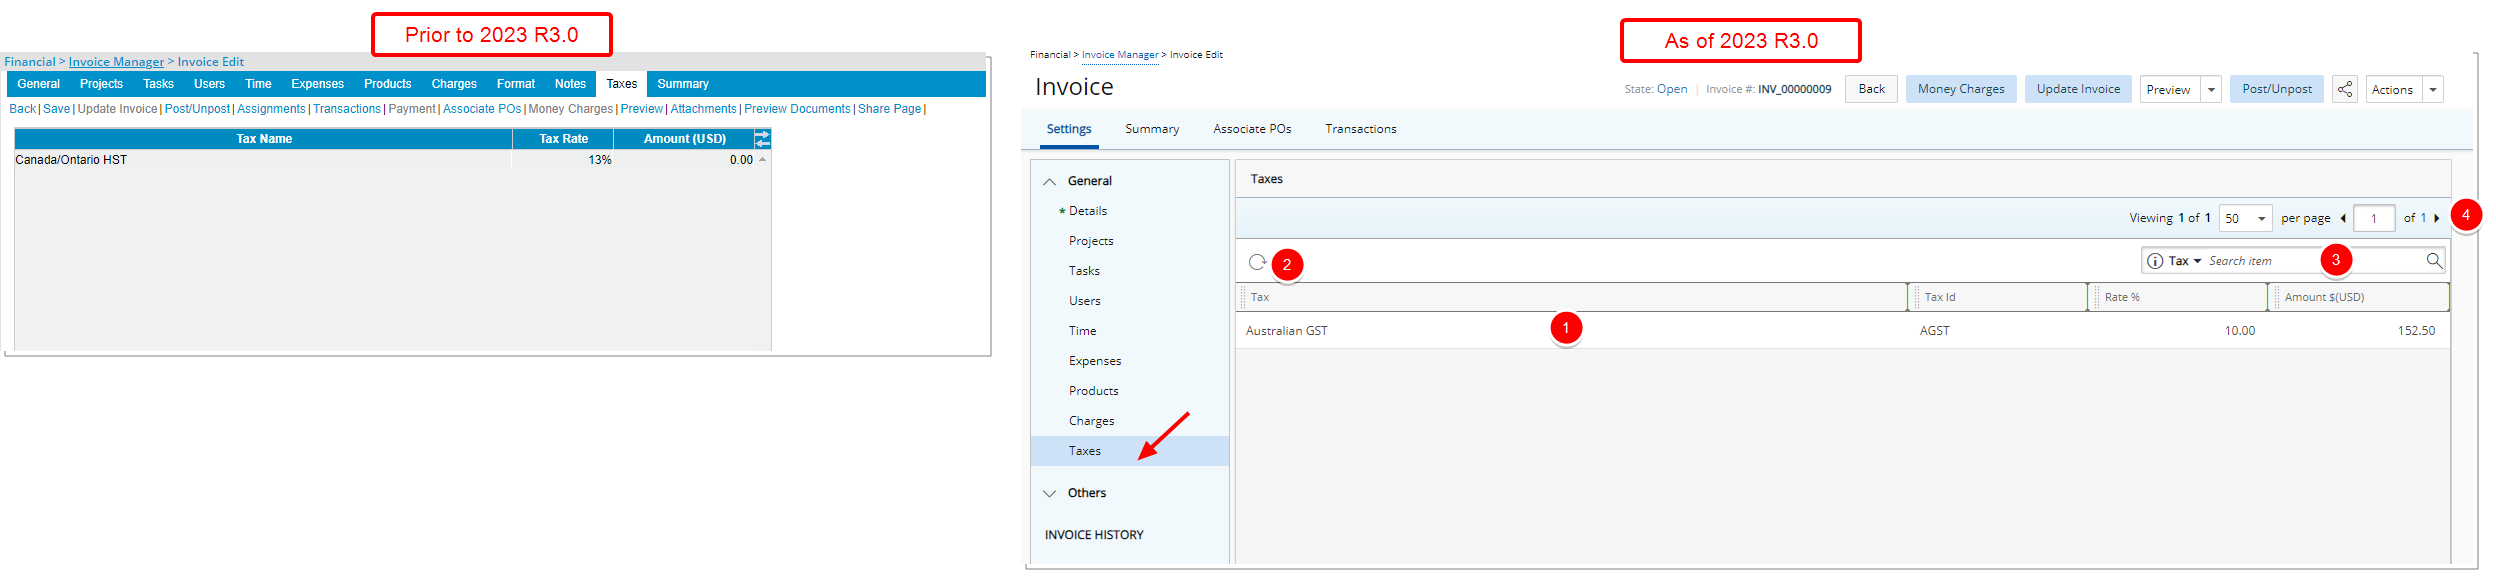
The user interface of the Taxes page has been improved for better user experience and consistency with the other updates that have been made thus far.
The following enhancements have also been made:
- Addition of Refresh button allowing you to reload the page.
- The page displays the list of all included Taxes in alphabetical order.
- Search for Taxes based on Tax name or Tax Id.
- Pagination is available at the top right corner to facilitate easy navigation across pages.
- From the table header:
- You can easily sort the columns by ascending or descending order simply by clicking a column header. Note that an arrow indicates the descending () or ascending () order applied to the column.
- Click and move a column to the desired position.
- You can now dynamically resize column(s), to your preferred width. Simply move your cursor to the column boundary () you want to resize. When the cursor becomes a resize cursor, click and drag the column accordingly.
- You can easily sort the columns by ascending or descending order simply by clicking a column header. Note that an arrow indicates the descending (
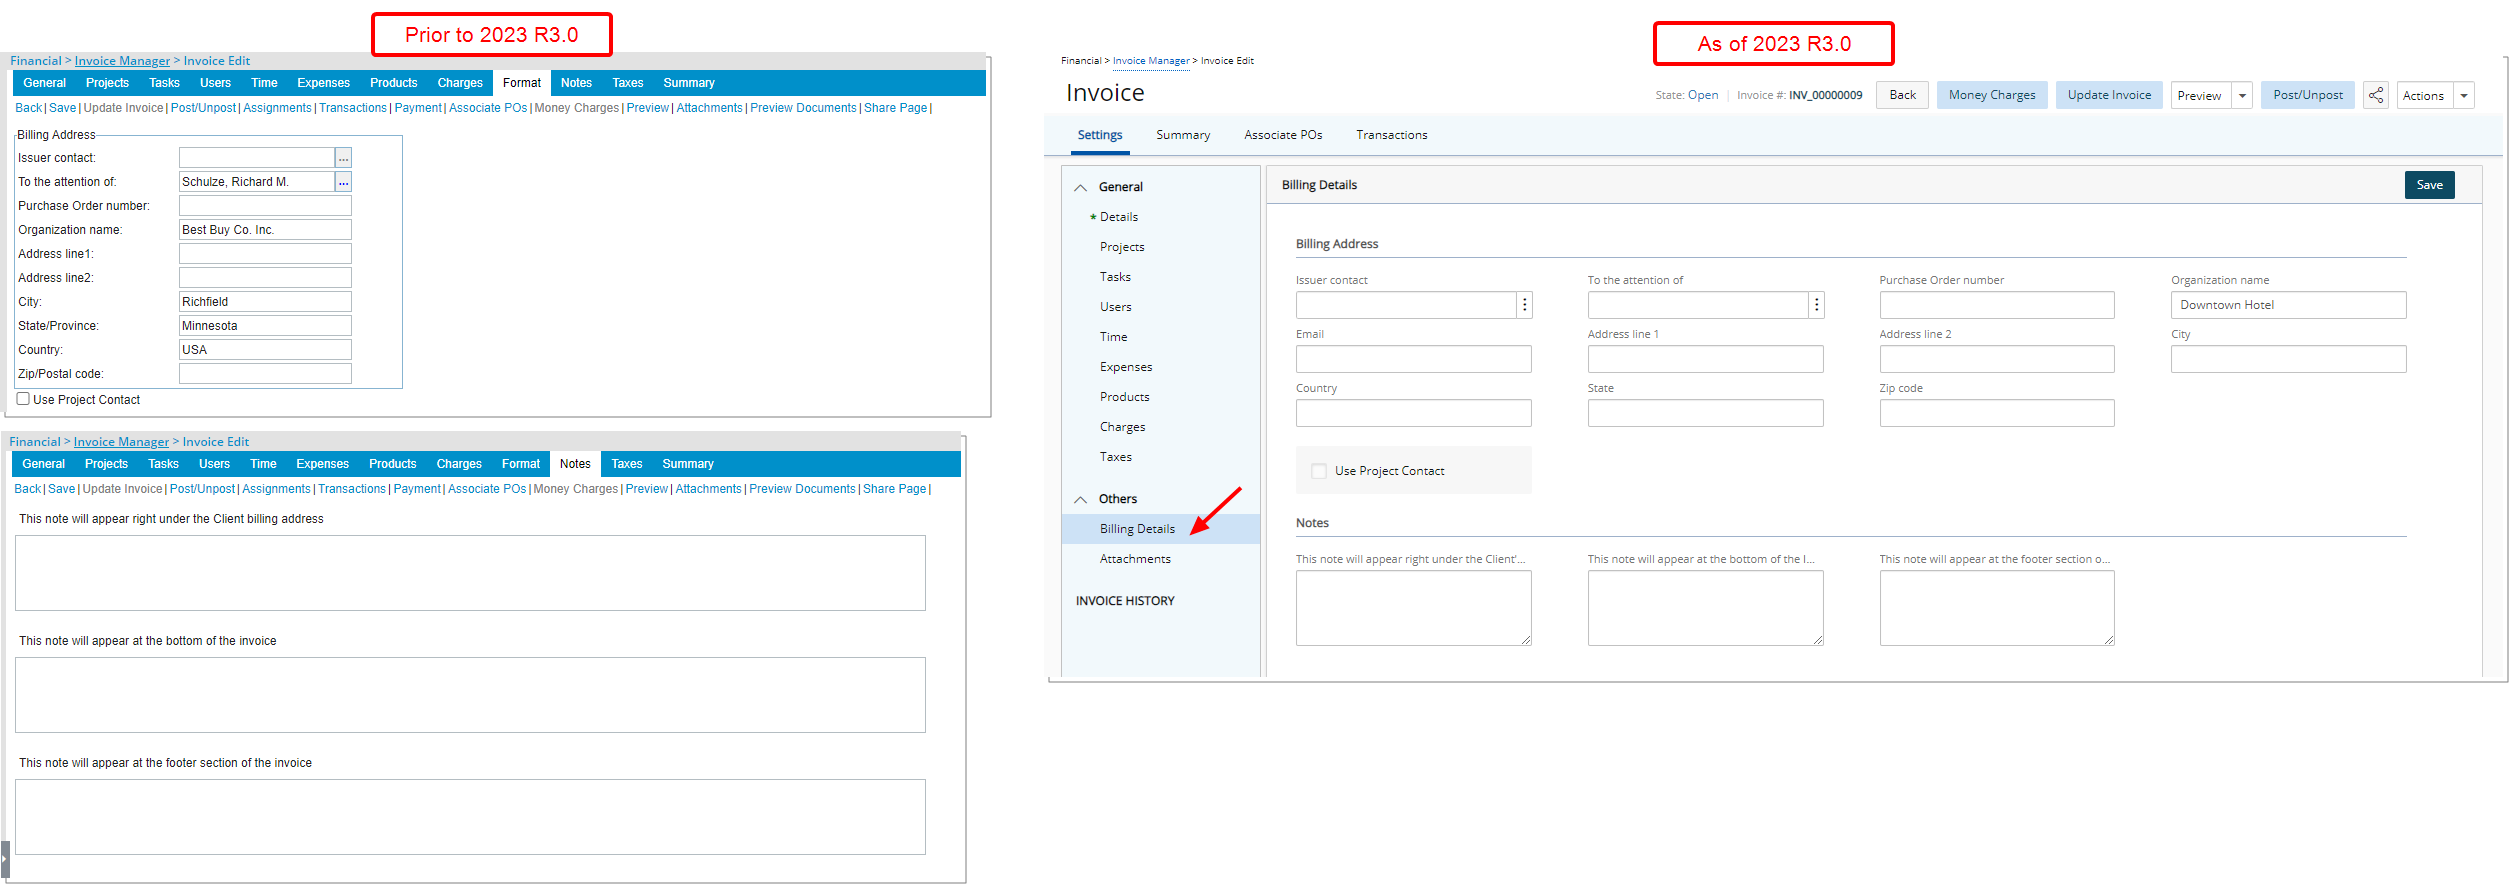
The Format and Notes tabs are now combined in the Billing Details page. Upon accessing the Billing Details page, you will see most of the same functionality, with an improved look and feel. The page is divided into two sections:
- Format
- Notes
Furthermore, a read-only Email field is now displayed, allowing you to see the Email address of the chosen Client Contact (To the attention of field).
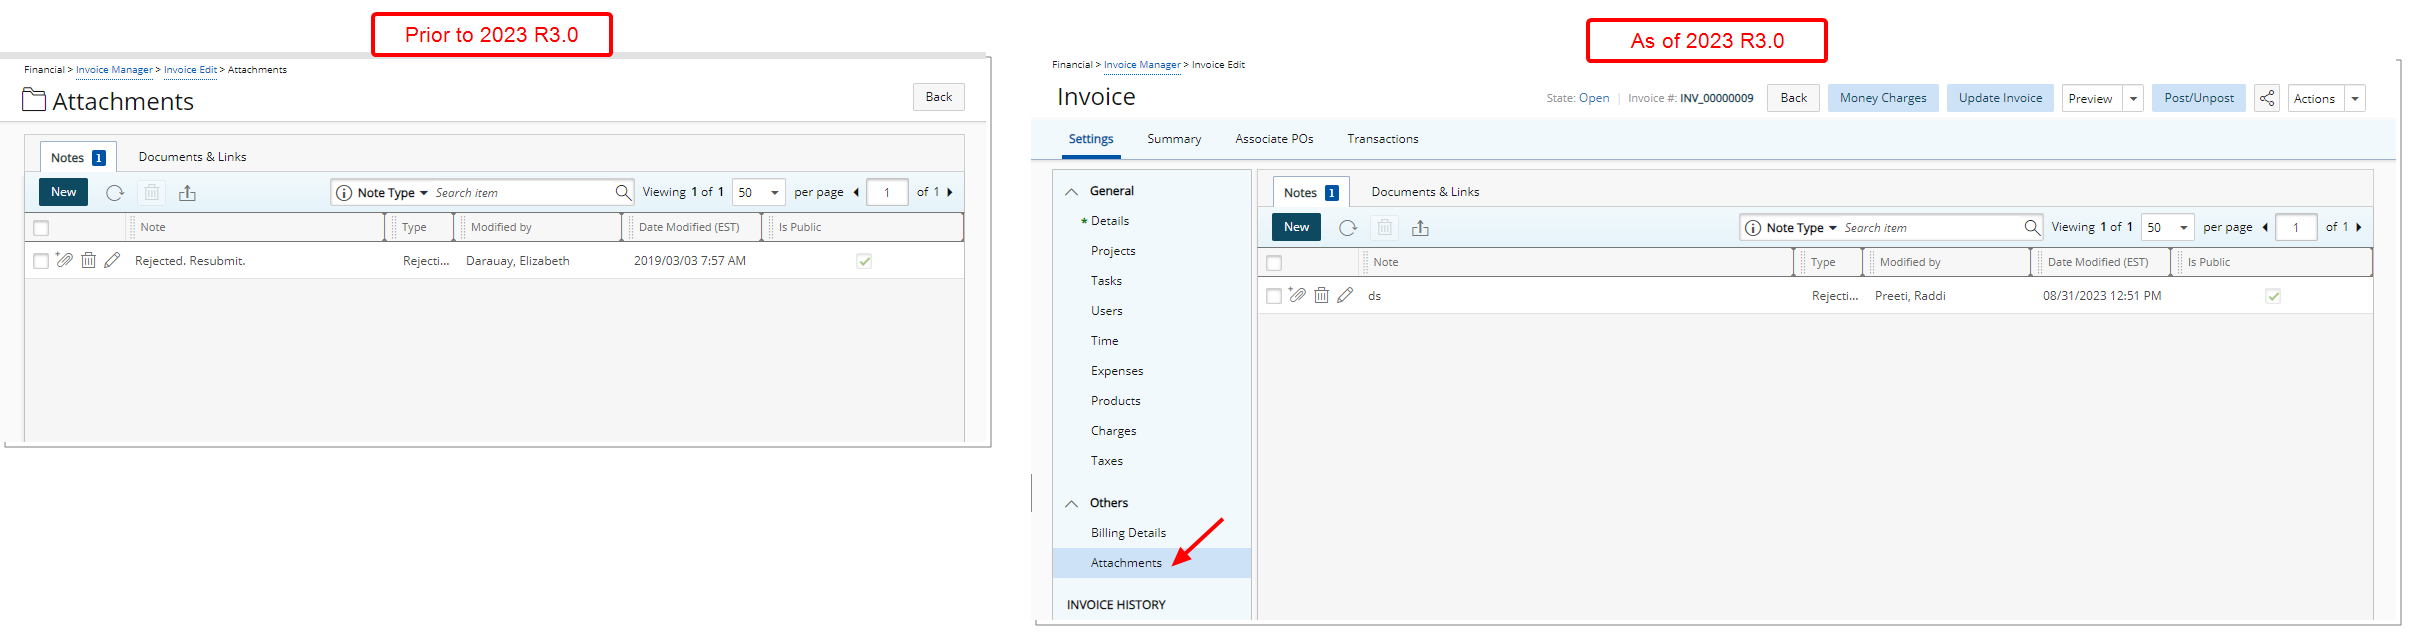
The familiar Attachments page which was redesigned in a previous release can now be accessed through the Others section of the Invoice Settings side navigation.
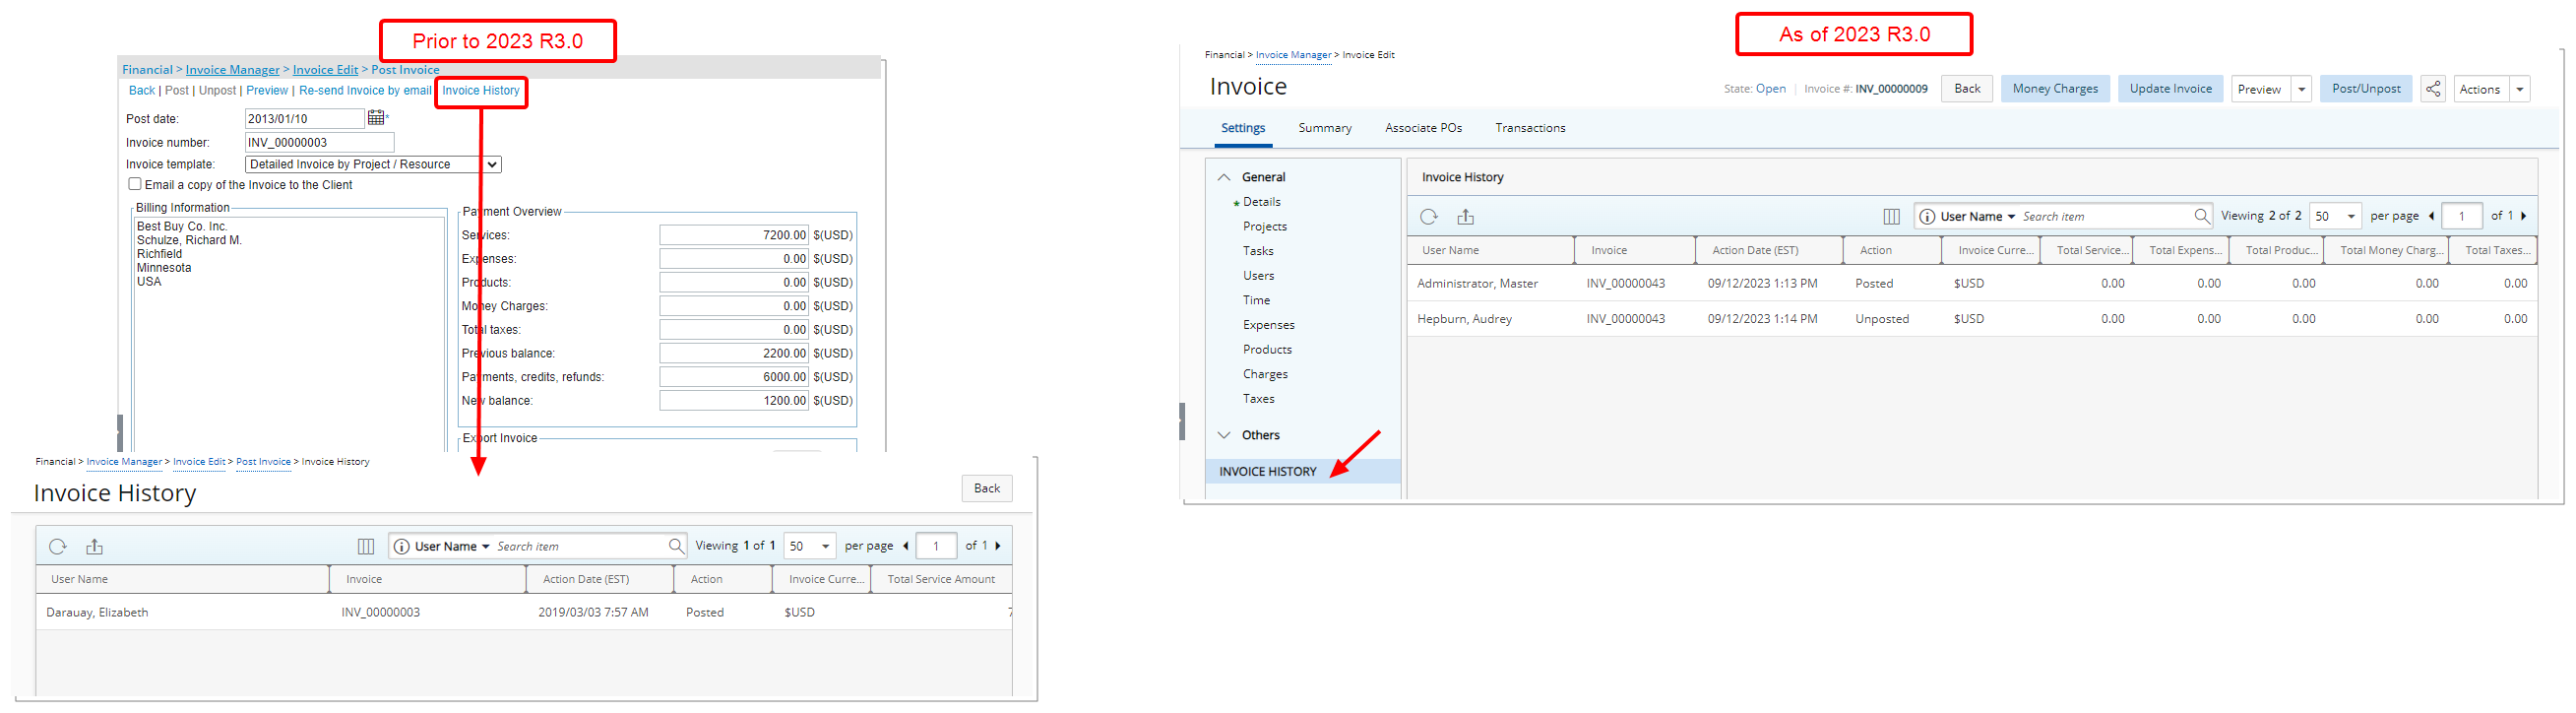
The Invoice History page is now accessible through the Invoice Settings navigation menu and is no longer available from the Post/Unpost Invoice page.
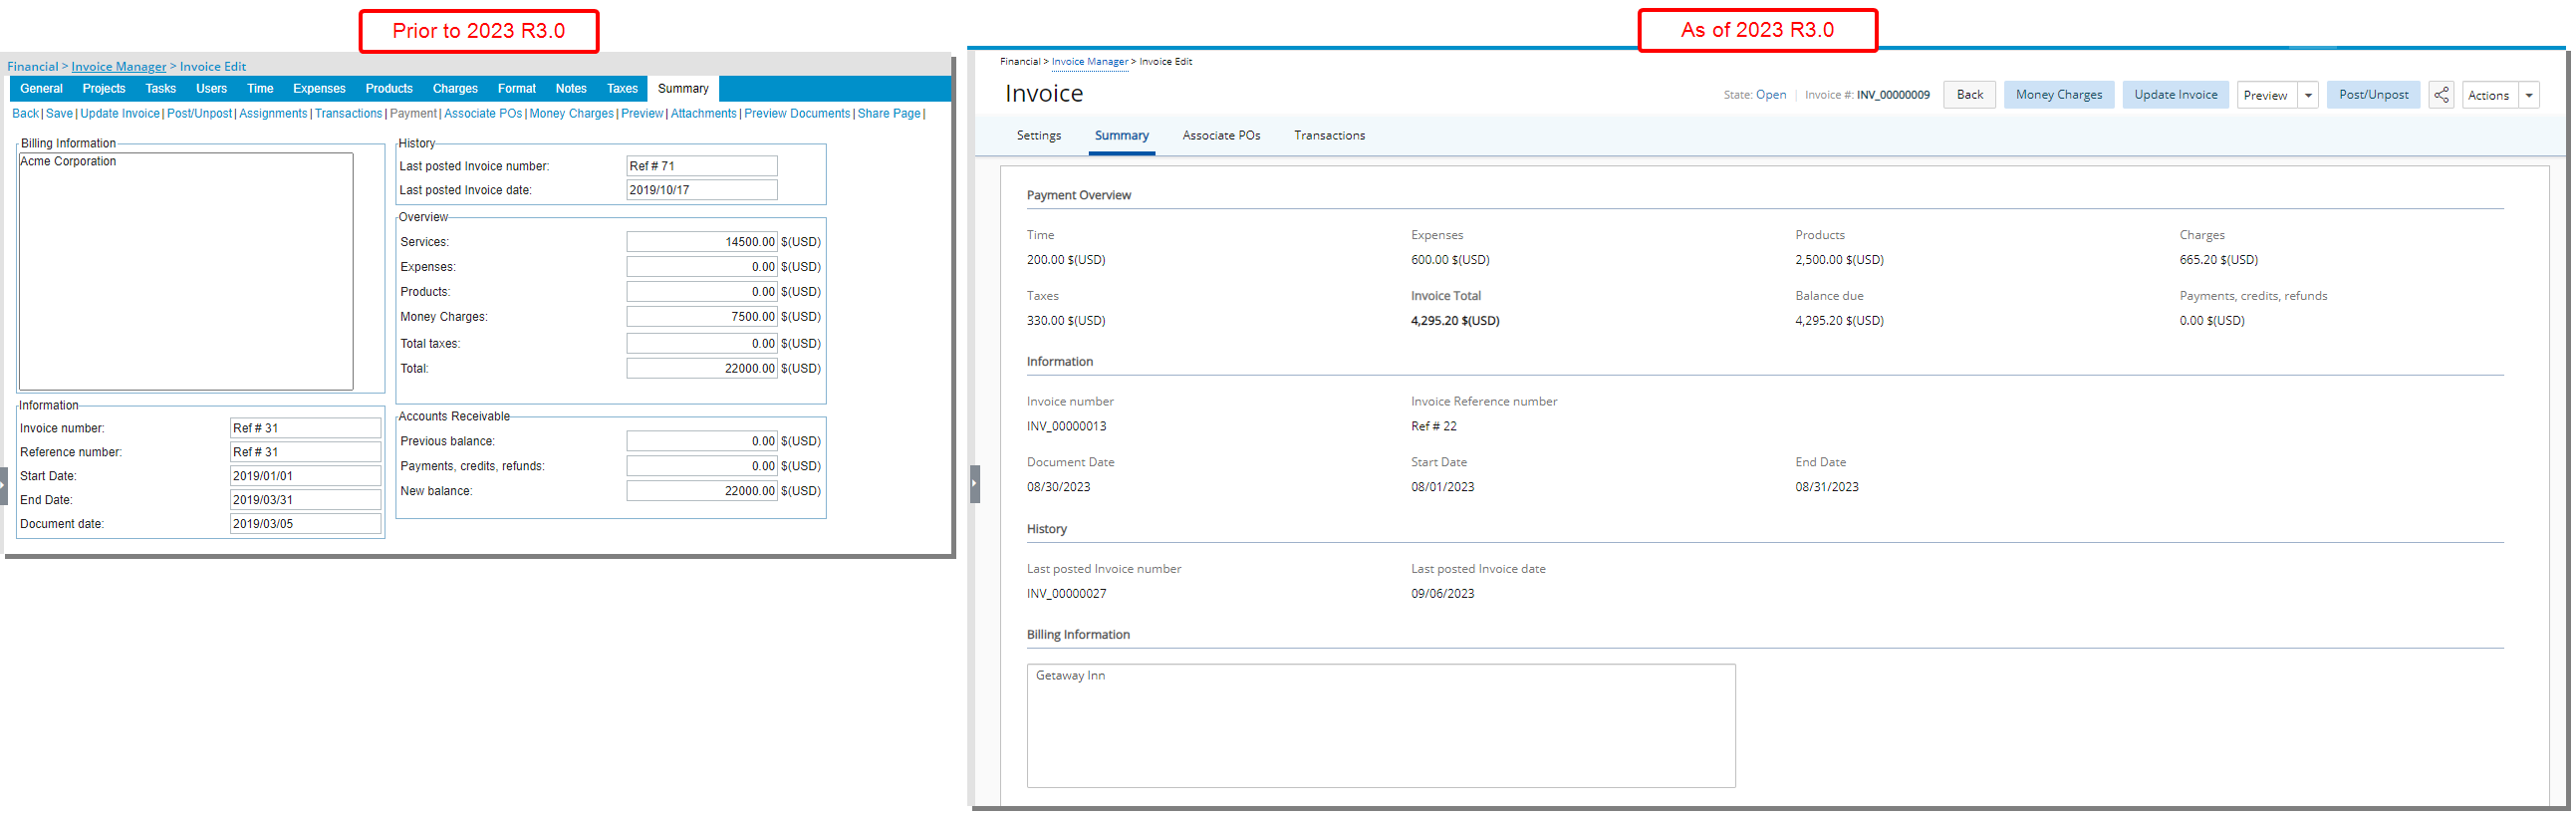
The Summary tab is redesigned for a better user experience. Most of the features remain the same, however the look and feel have been renovated to enhance the overall user experience.
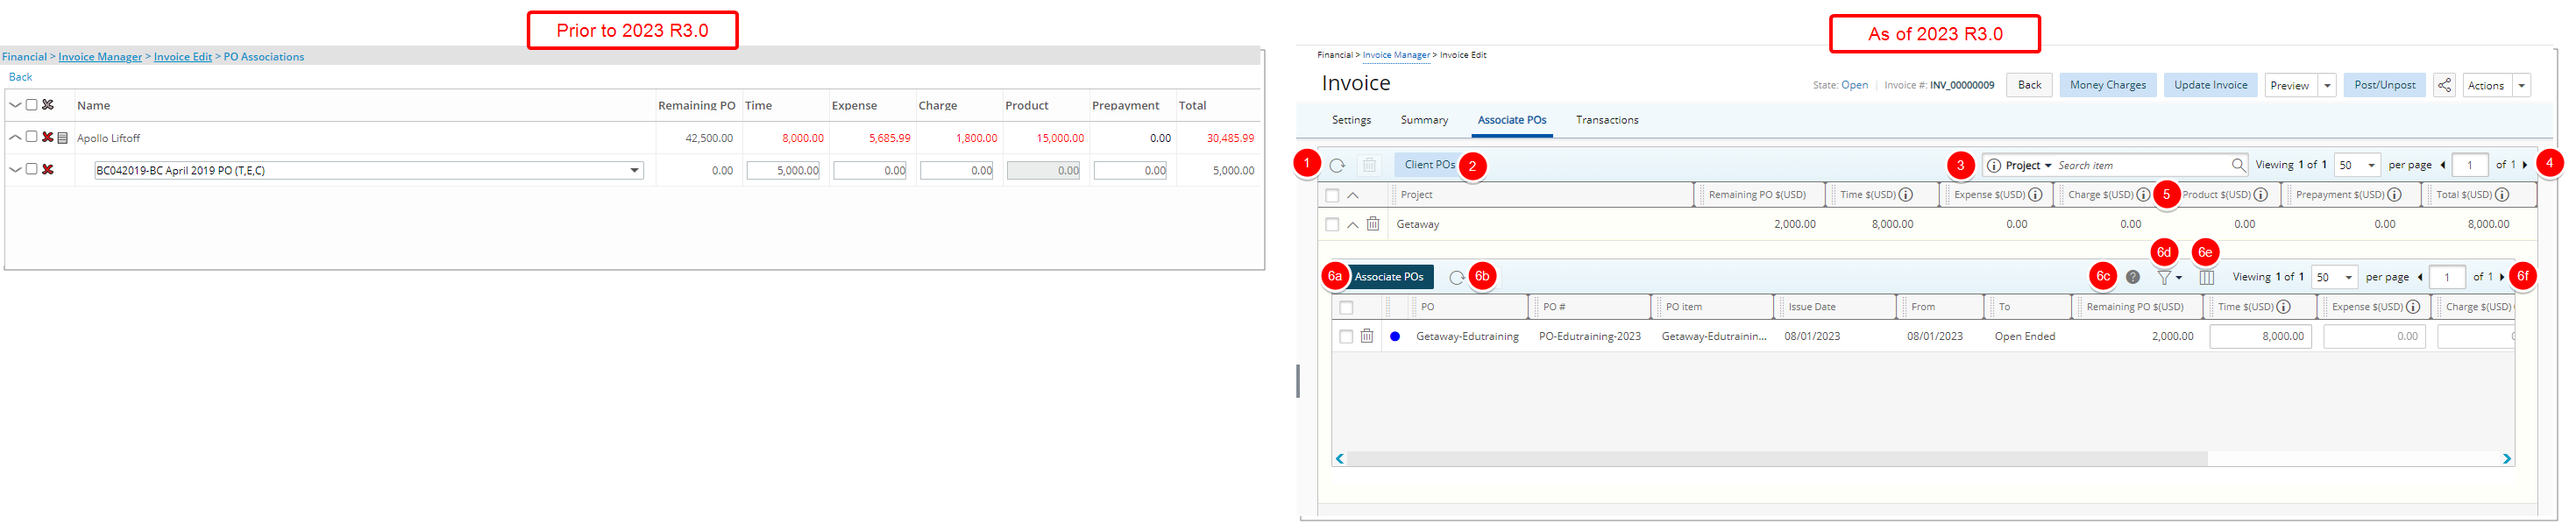
The user interface of the Associate POs page has been improved for better user experience and consistency with the other updates that have been made thus far. You will see most of the same functionality, with an improved look and feel.
The following enhancements have also been made:
- Addition of Refresh button allowing you to reload the list.
- You can now easily access Client POs.
- Search the list by Project.
- Pagination is available at the top right corner to facilitate easy navigation across pages.
- Hover your mouse over the Information icon for more details.
- From the drawer:
- Easily Associate POs.
- Addition of Refresh button allowing you to reload the list.
- Conveniently consult the Legend.
- Filter the list based on Has no Project Association and/or Has Project Association criteria.
- You can manage table columns from Columns Selection . By default, the following columns are displayed: Row Color, PO, PO #, PO item, Issue Date, From, To, Remaining PO, Time, Expense, Charge, Product, Prepayment, Total.
- Pagination is available at the top right corner to facilitate easy navigation across pages.
- From the table header:
- You can easily sort the columns by ascending or descending order simply by clicking a column header. Note that an arrow indicates the descending () or ascending () order applied to the column.
- Click and move a column to the desired position.
- You can now dynamically resize column(s), to your preferred width. Simply move your cursor to the column boundary () you want to resize. When the cursor becomes a resize cursor, click and drag the column accordingly.
- You can easily sort the columns by ascending or descending order simply by clicking a column header. Note that an arrow indicates the descending (
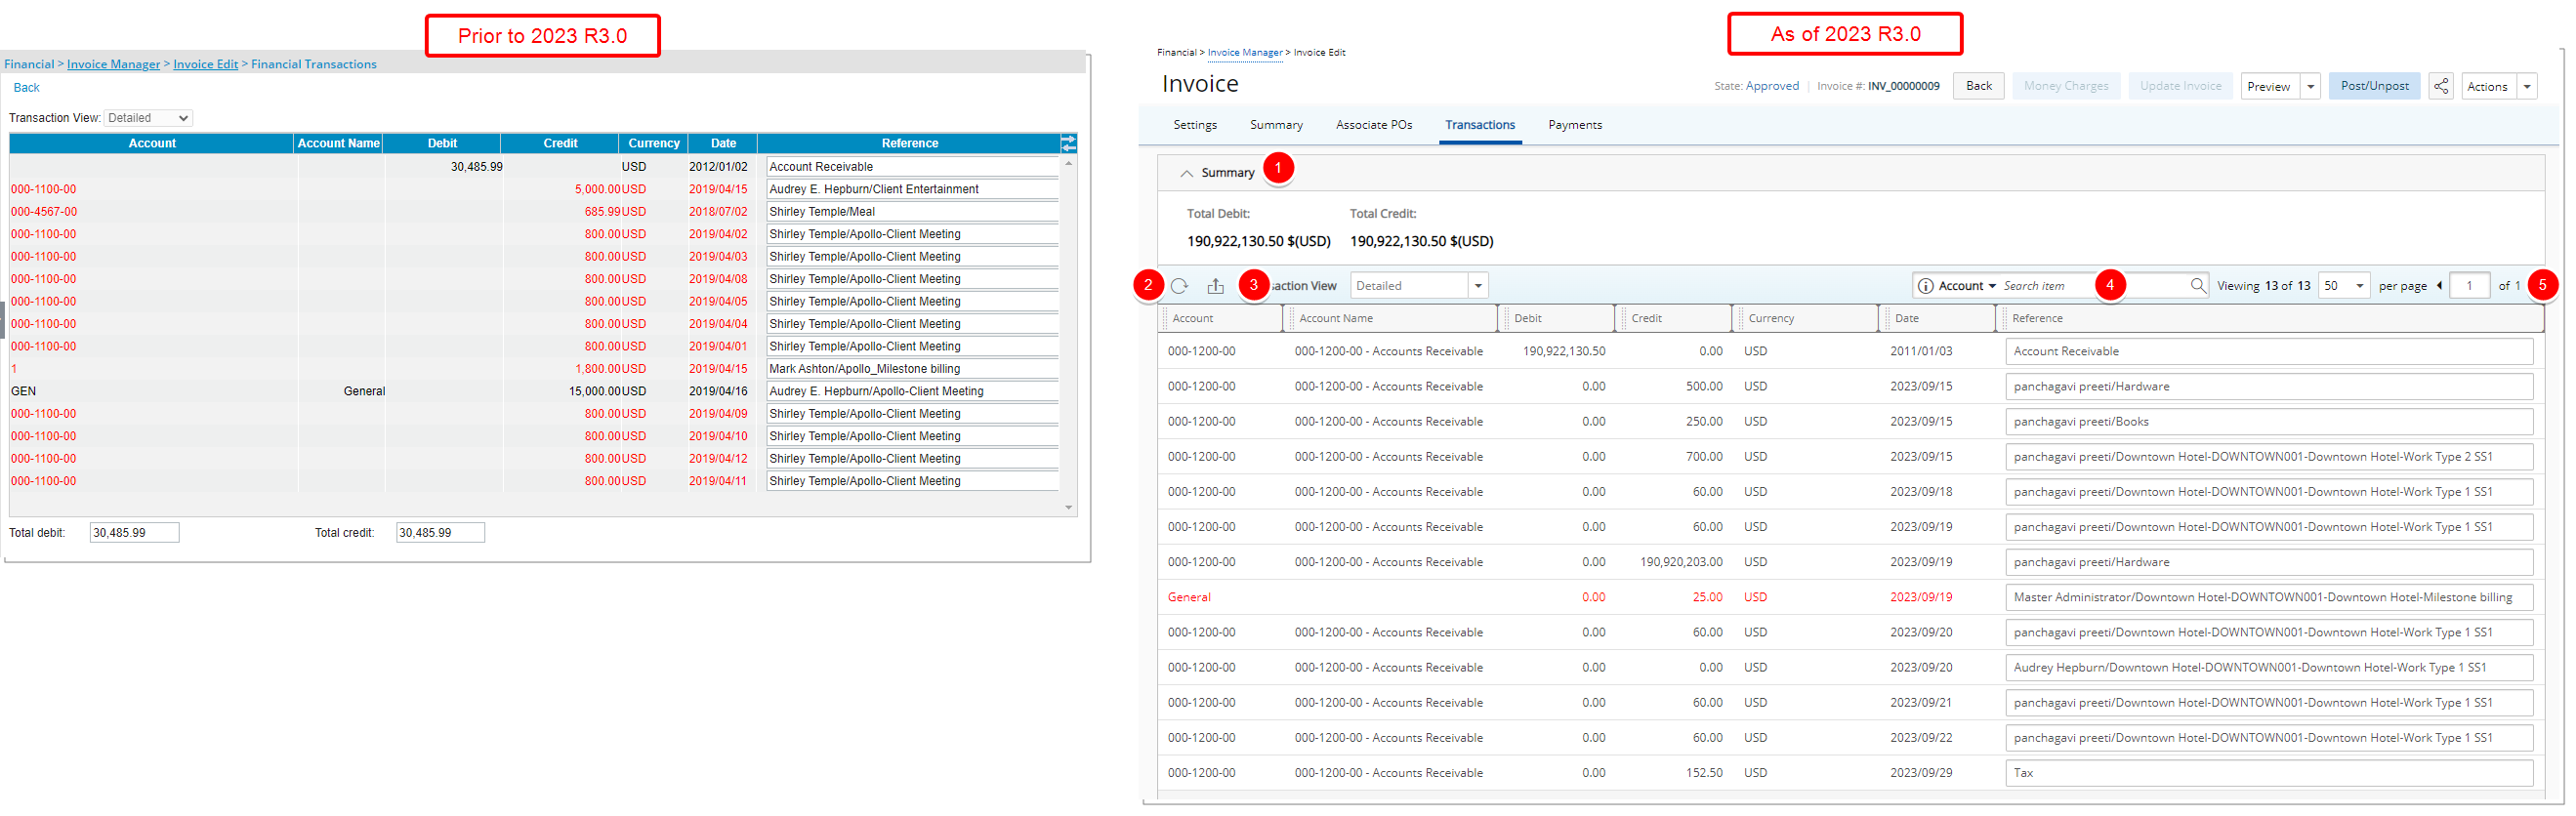
The user interface of the Transactions page has been improved for better user experience and consistency with the other updates that have been made thus far. You will see most of the same functionality, with an improved look and feel.
The following enhancements have also been made:
- The Total Debit and Total Credit amounts are now shown on top of the page with the collapsible Summary section.
- Addition of Refresh button allowing you to reload the page.
- Addition of an Export button allowing you to export the list to Excel.
- Addition of Search capability. You can now search the list based on Account or Account Name.
- Pagination is available at the top right corner to facilitate easy navigation across pages.
- From the table header:
- You can easily sort the columns by ascending or descending order simply by clicking a column header. Note that an arrow indicates the descending () or ascending () order applied to the column.
- Click and move a column to the desired position.
- You can now dynamically resize column(s), to your preferred width. Simply move your cursor to the column boundary () you want to resize. When the cursor becomes a resize cursor, click and drag the column accordingly.
- You can easily sort the columns by ascending or descending order simply by clicking a column header. Note that an arrow indicates the descending (
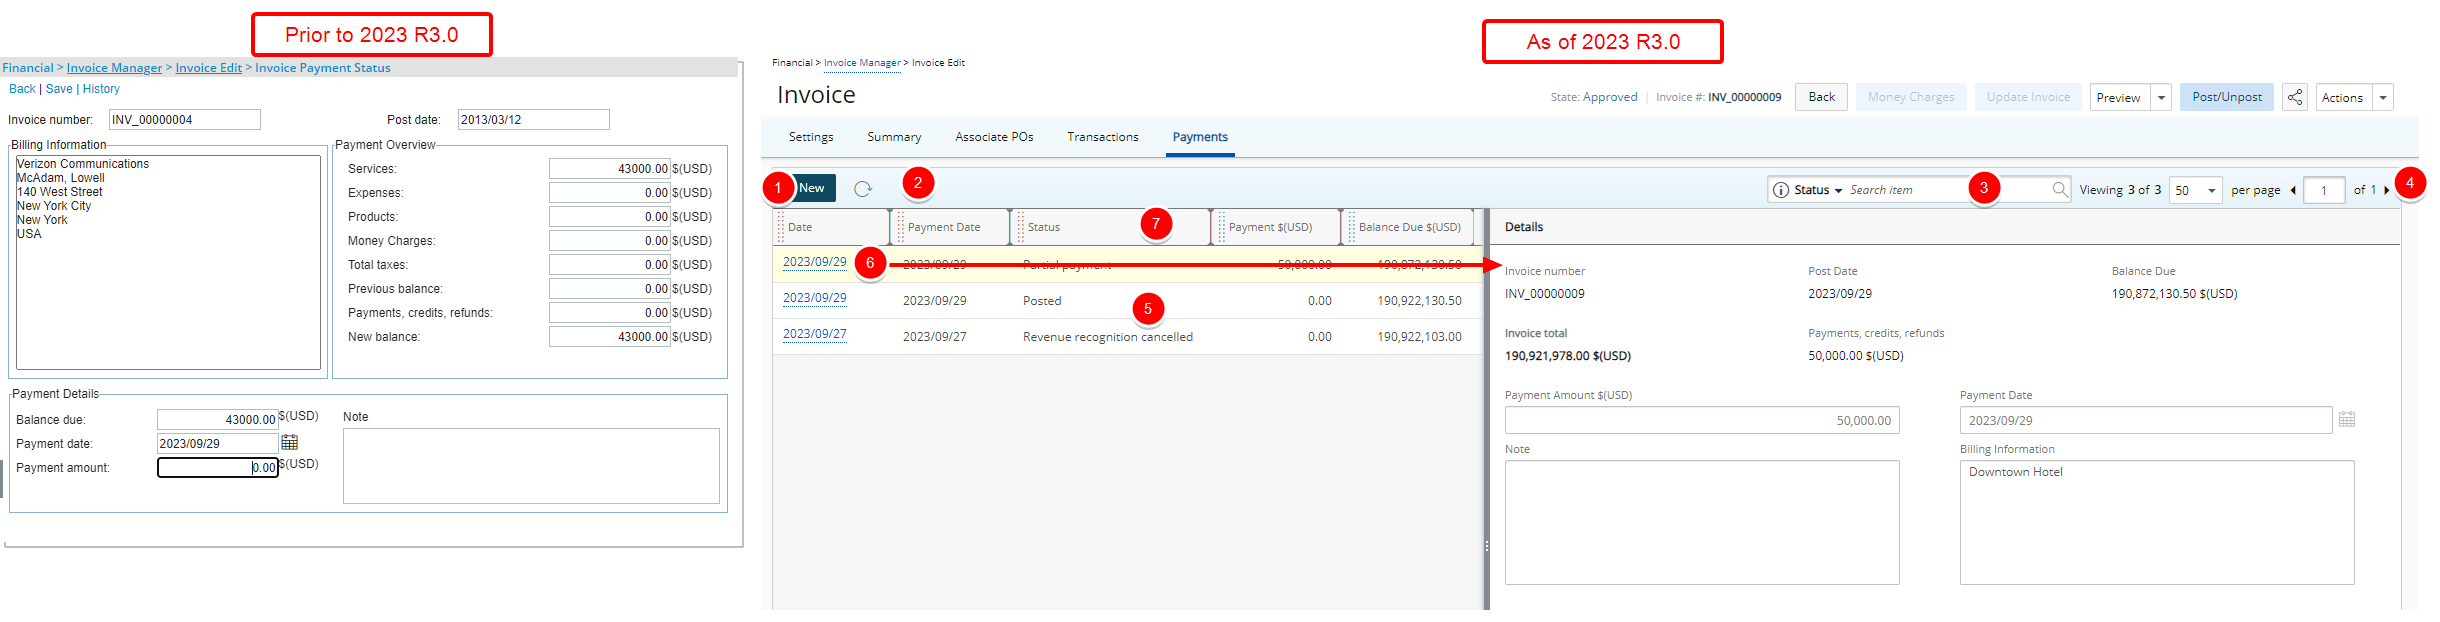
The user interface of the Transactions page has been improved for better user experience and consistency with the other updates that have been made thus far.
Upon accessing the page, note that it is separated into two panels. The right panel displays the Details where you can create a new entry. From the left panel you can click a Date to view the corresponding Details.
- Click New to create a new Payment by entering the Details (Payment Amount, Payment Date and Note) on the right panel then click Save.
- Addition of a Refresh button allowing you to reload the page.
- Addition of Search capability allowing you to search by Status.
- Pagination is available at the top right corner to facilitate easy navigation across multiple pages.
- The following columns are displayed within the left pane: Date, Payment Date, Status, Payment $ and Balance Due $
- Click a Date to view the Payment Details on the right panel. Note that when viewing the Details of a Payment, the Save button is unavailable.
- From the table header:
- You can easily sort the columns by ascending or descending order simply by clicking a column header. Note that an arrow indicates the descending () or ascending () order applied to the column.
- Click and move a column to the desired position.
- You can now dynamically resize column(s), to your preferred width. Simply move your cursor to the column boundary () you want to resize. When the cursor becomes a resize cursor, click and drag the column accordingly.
- You can easily sort the columns by ascending or descending order simply by clicking a column header. Note that an arrow indicates the descending (
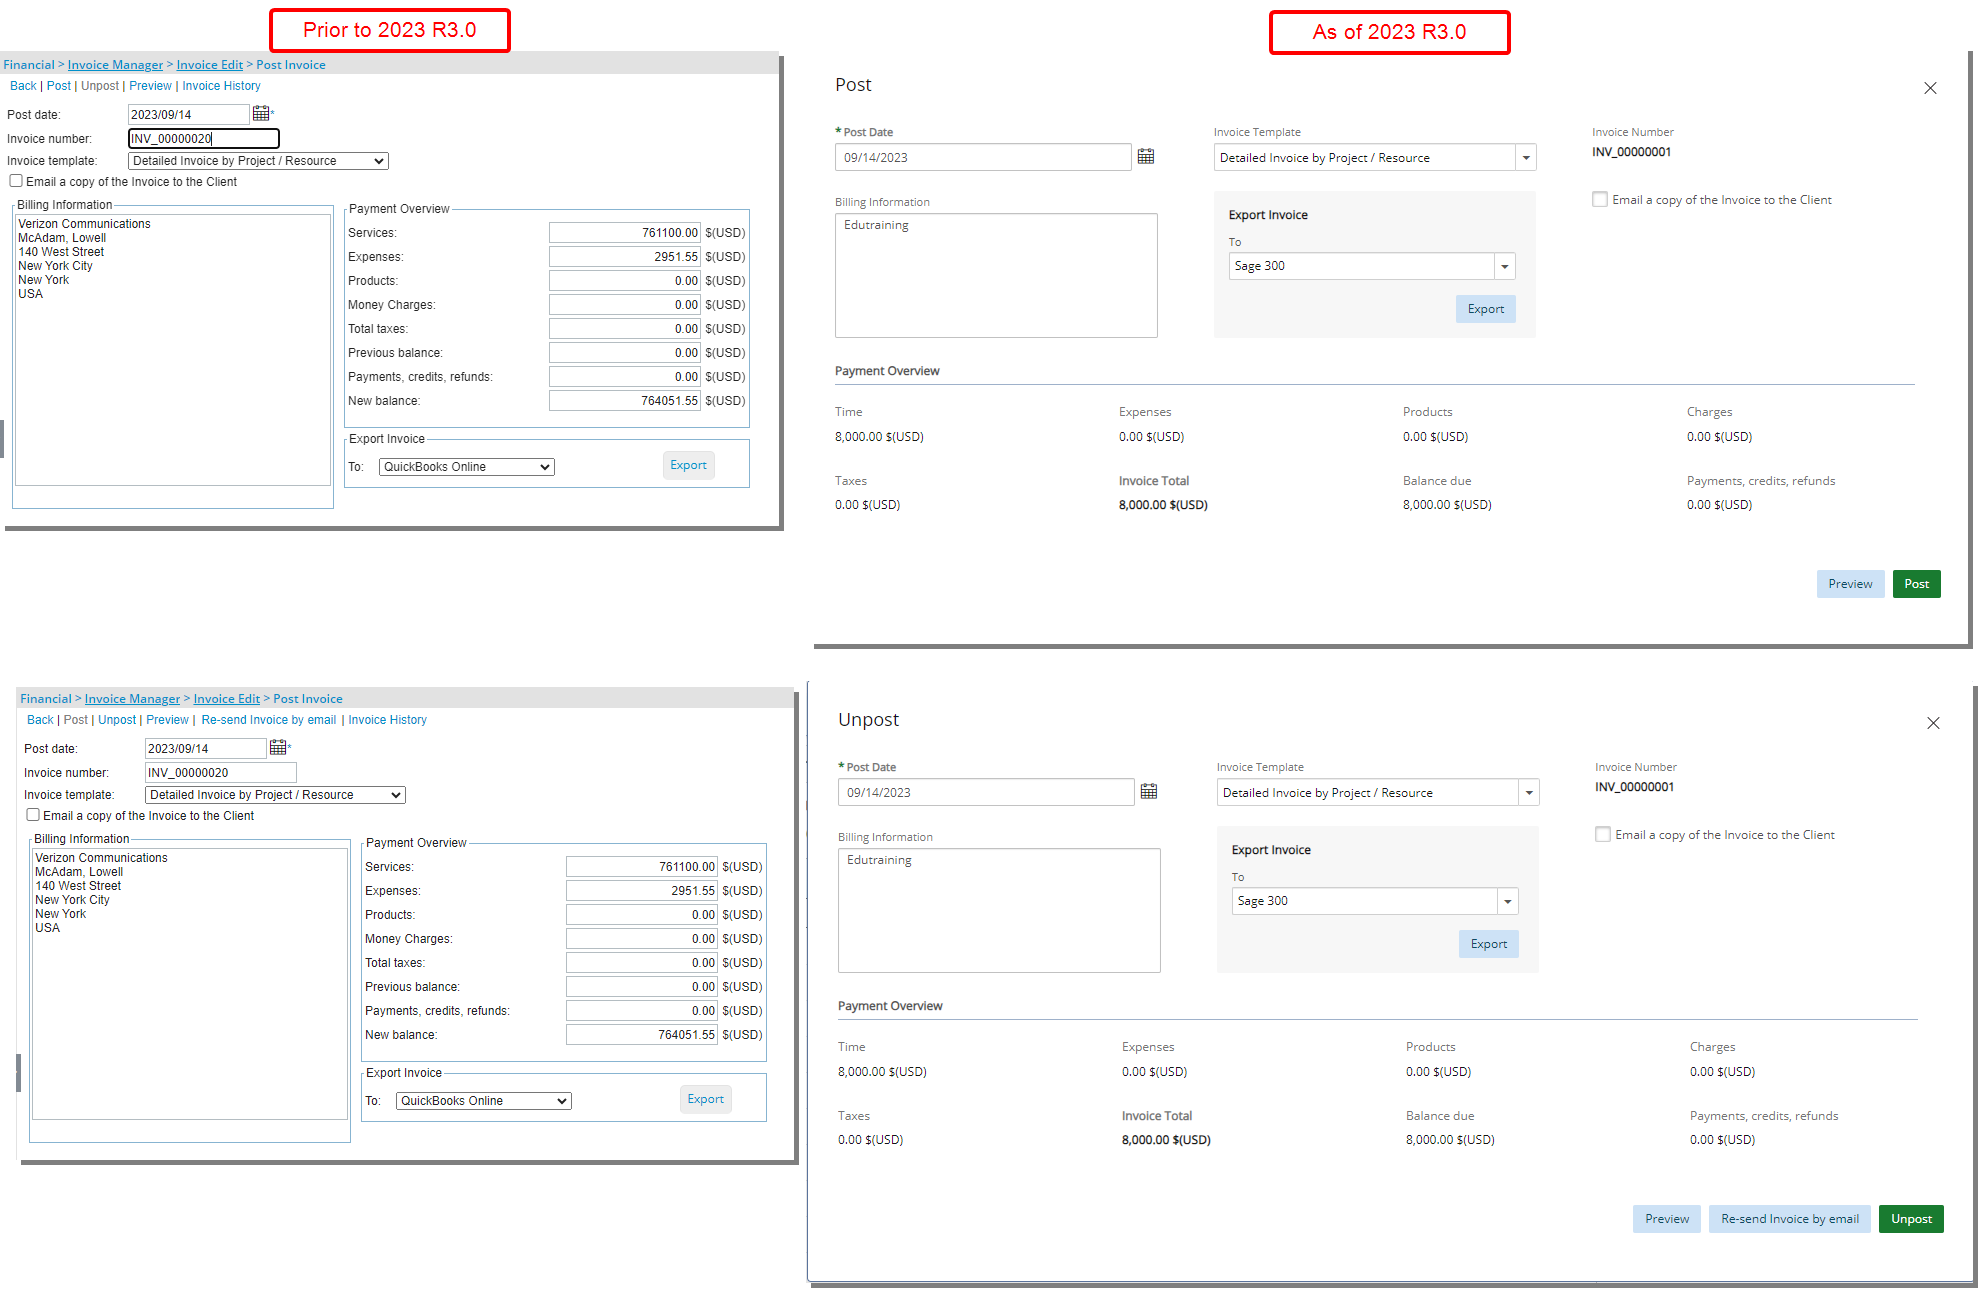
The Post/Unport Invoice pages which were accessed when clicking the Post/Unpost link respectively are now converted to a dialog box and redesigned for a better user experience. Most of the features remain the same, however the look and feel have been renovated to enhance the overall user experience.
Note:
- The Invoice History link is no longer available when posting an Invoice. You can access the invoice History from the Invoice Settings navigation.
- The Invoice Number is now read-only.
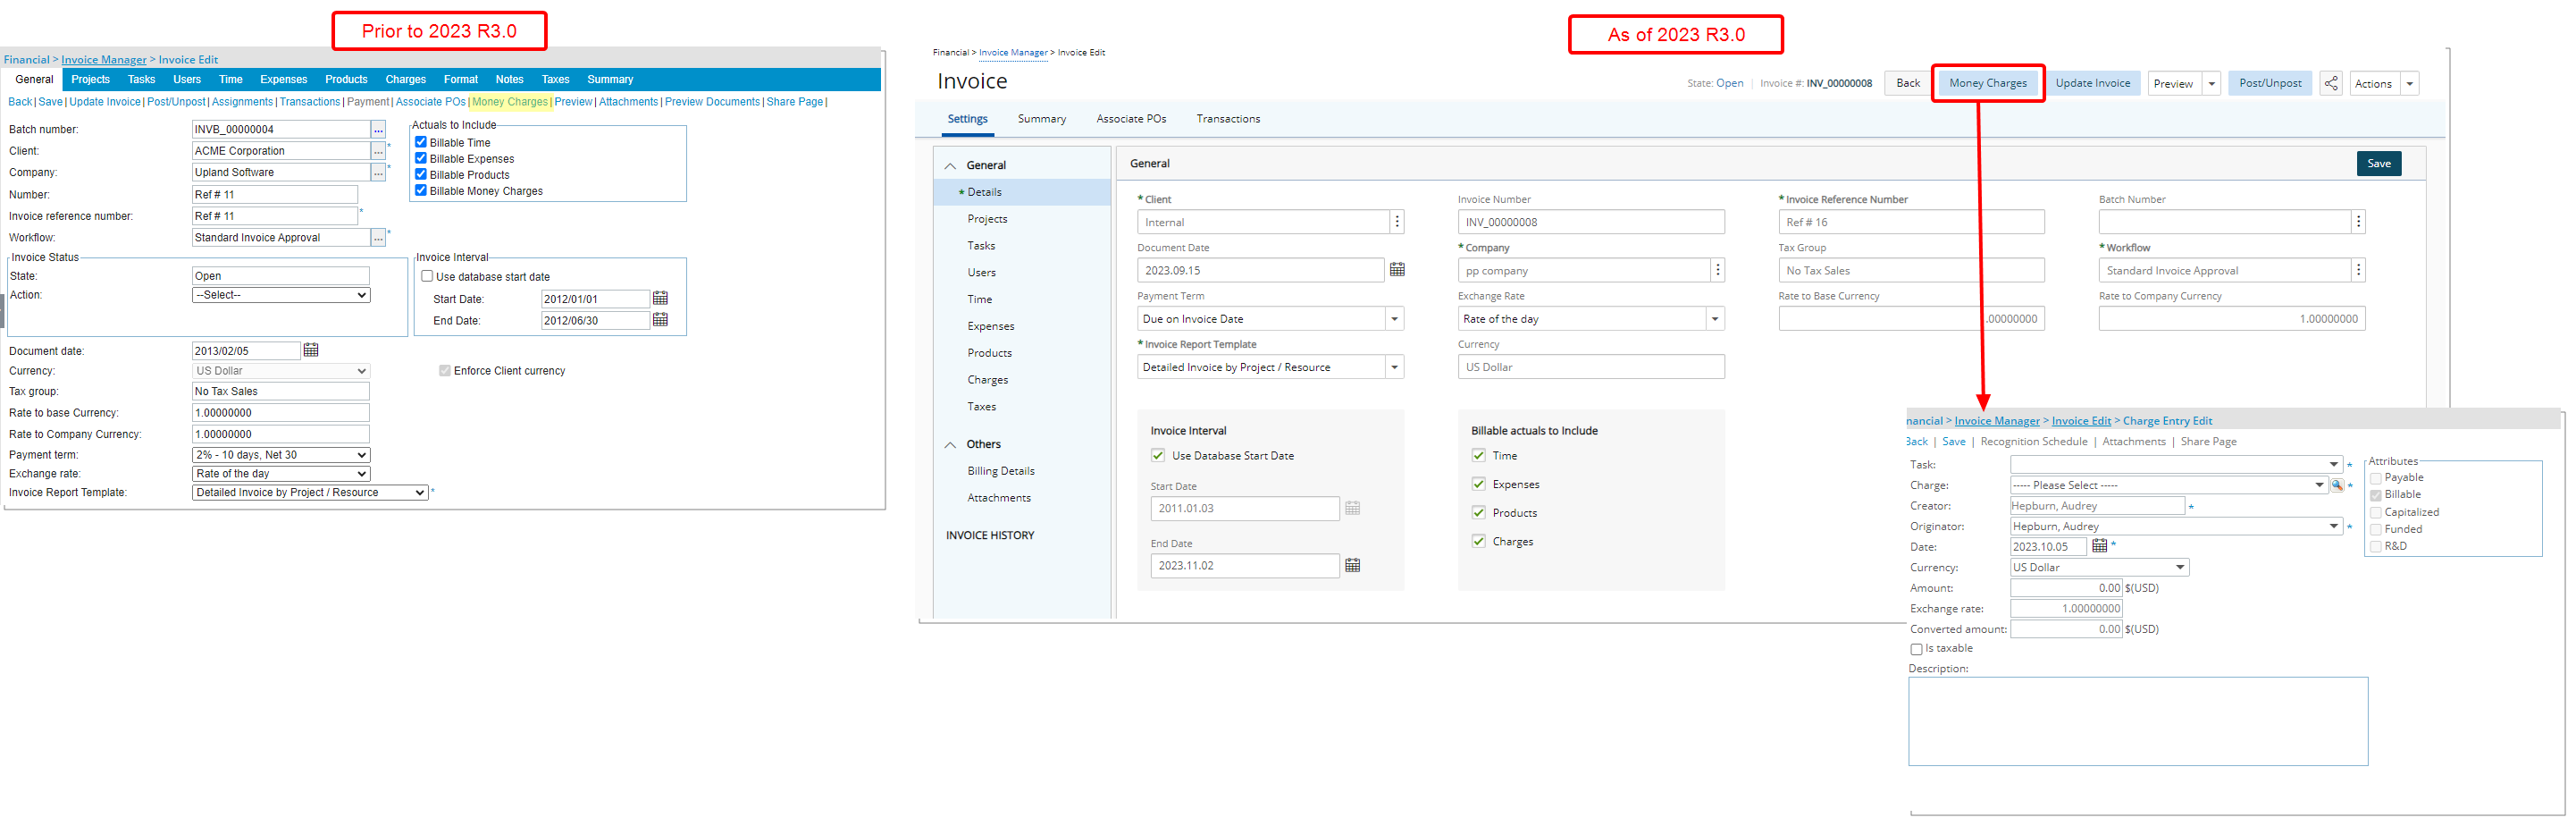
The Money Charges link, previously available from the Invoice edit, is now located on top of the page, and converted to a button. The interface of the Charge Entry Edit remains the same as in previous releases.
Financial - Payroll Batch

Description: The following two modifications are made to the Payroll Batch edit page:
- The Post button was renamed to Post/Unpost.
- The Regenerate button color was modified.
Benefit: Although the fundamental features remain the same, these improvements provide you with a consistent interface.
For further details refer to: Managing Payroll
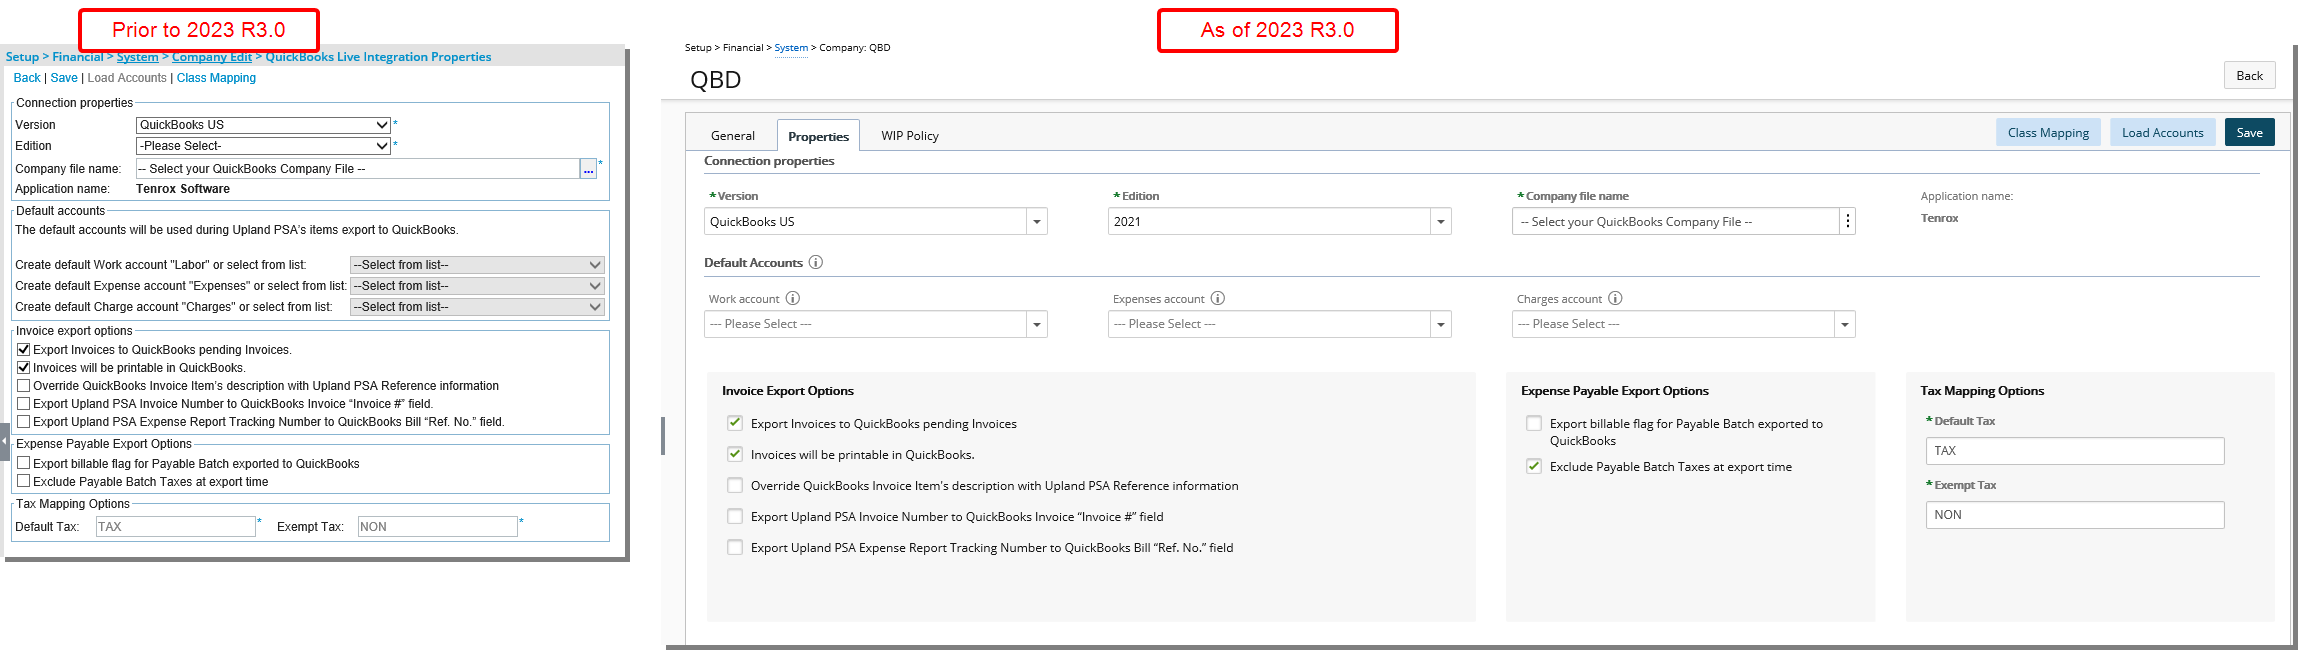
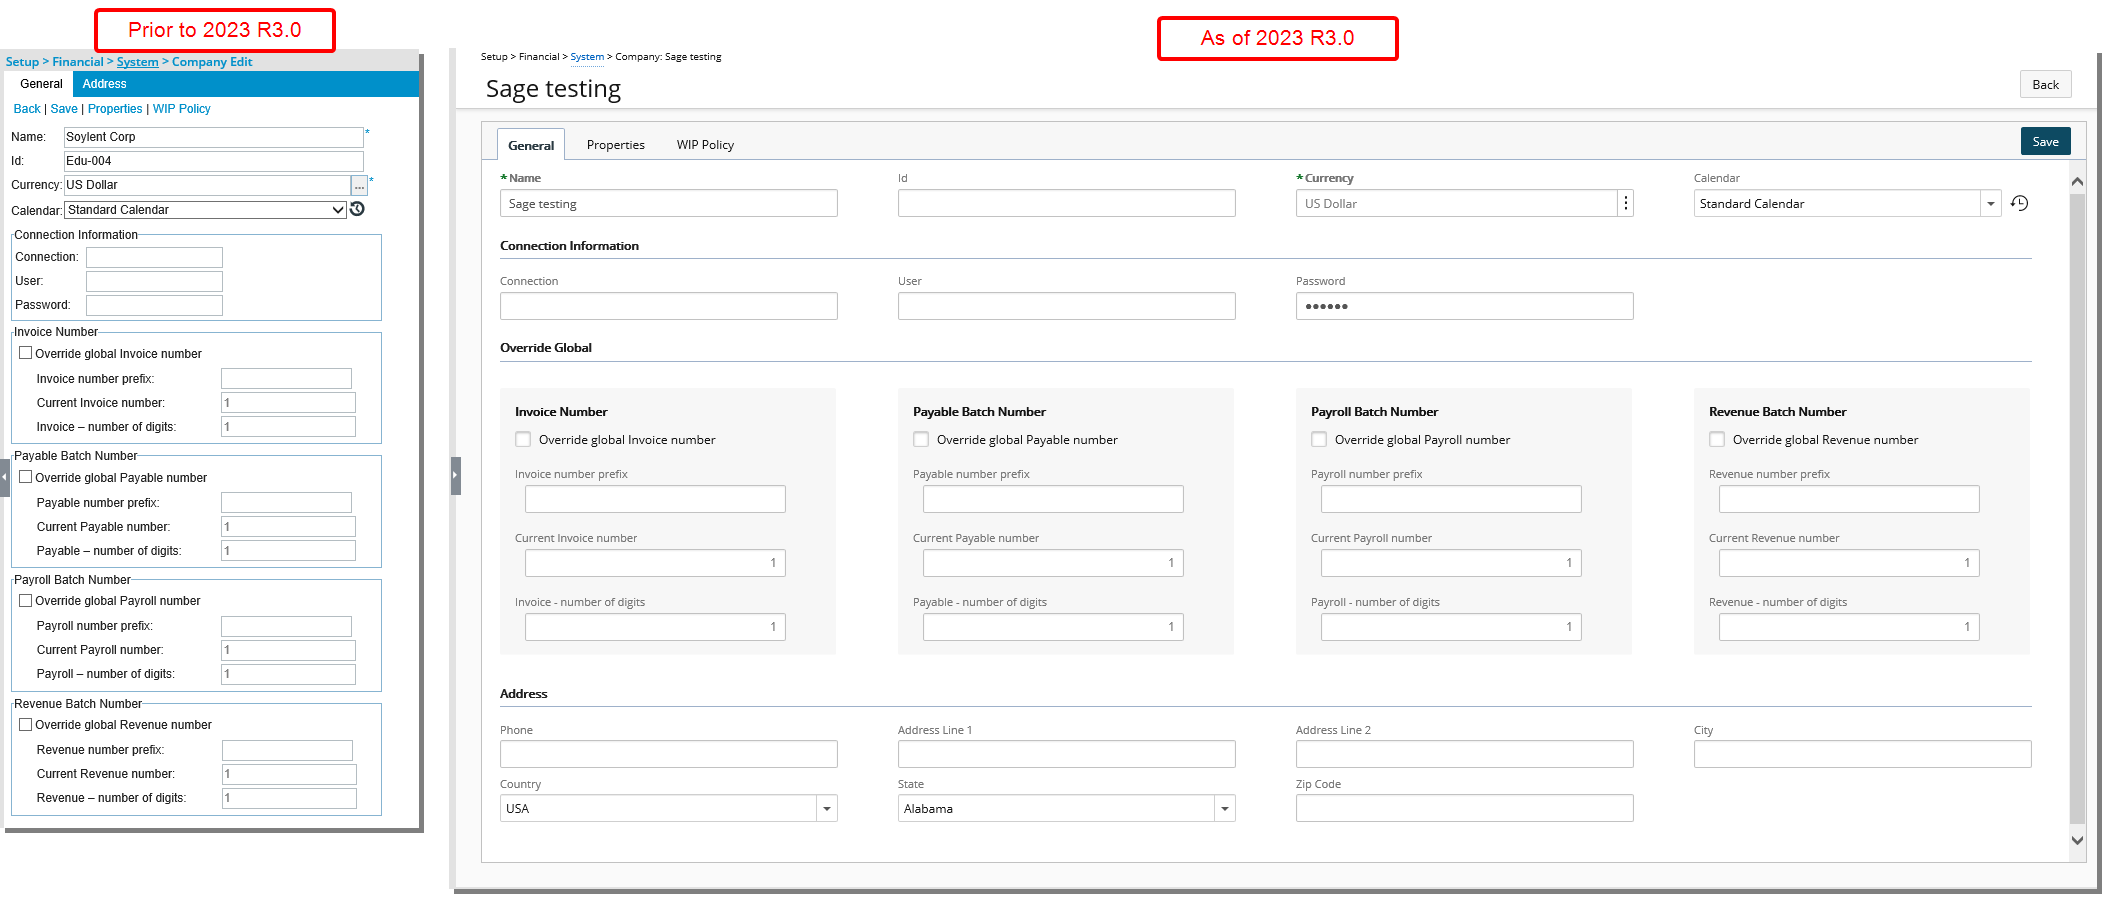
Financial System Setup - Companies
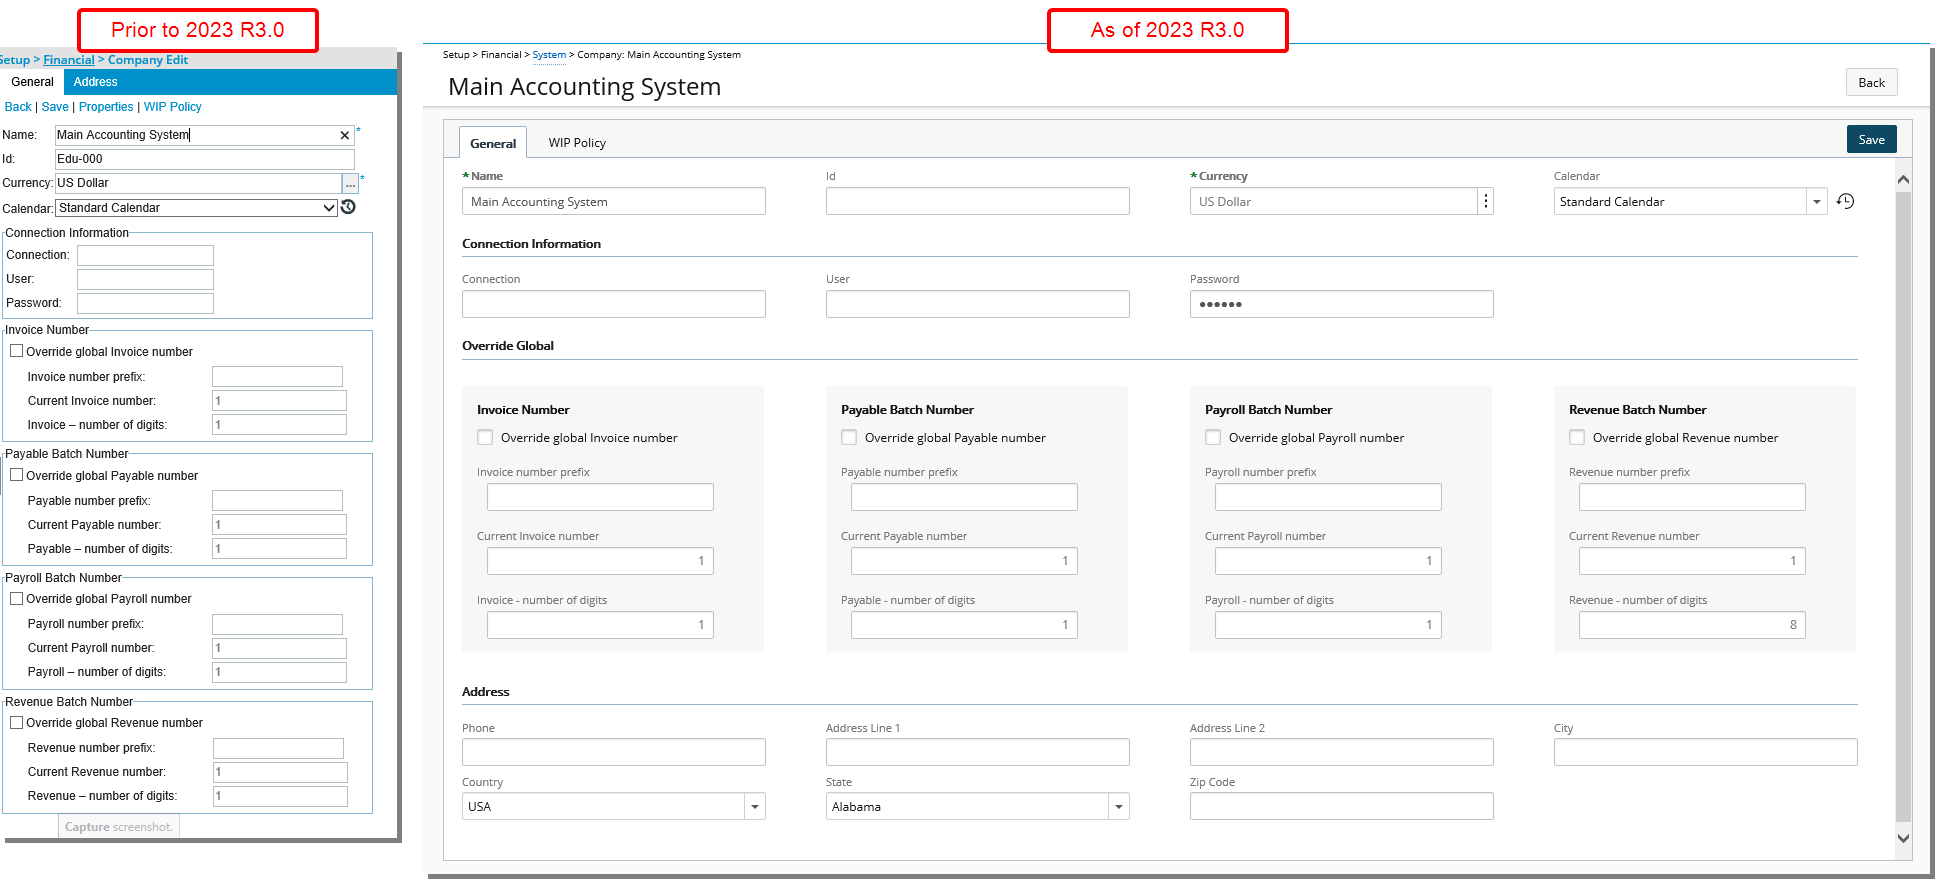
For QuickBooks Desktop, QuickBooks Online, Sage 300 and Paychex Accounting Systems the Company Edit page has been redesigned for a better user experience. Most of the features remain the same, however the look and feel have been renovated to enhance the overall user experience.
- The General and Address tabs are now merged into one.

- The look and feel of the Properties tab have been renovated to enhance the overall user experience. Furthermore, the Load Accounts and Class Mapping links were converted to buttons and are now located on the top right corner of the page.
- The WIP Policy page which was redesigned in a previous release is now converted to a tab.

- The General and Address tabs are now merged into one.
- The look and feel of the Properties tab have been renovated to enhance the overall user experience. The
- The Disconnect and Class Mapping links were converted to buttons and are now located on the top right corner of the page.
- The option names under Default Accounts were renamed:
- From Create Work Type Product/Service in QuickBooks using account to Work Type
- From Create Expense Product/Service in QuickBooks using account to Expense
- From Create Charge Product/Service in QuickBooks using account to Charge
- Hovering your mouse over the information icon will display the corresponding tool-tips.
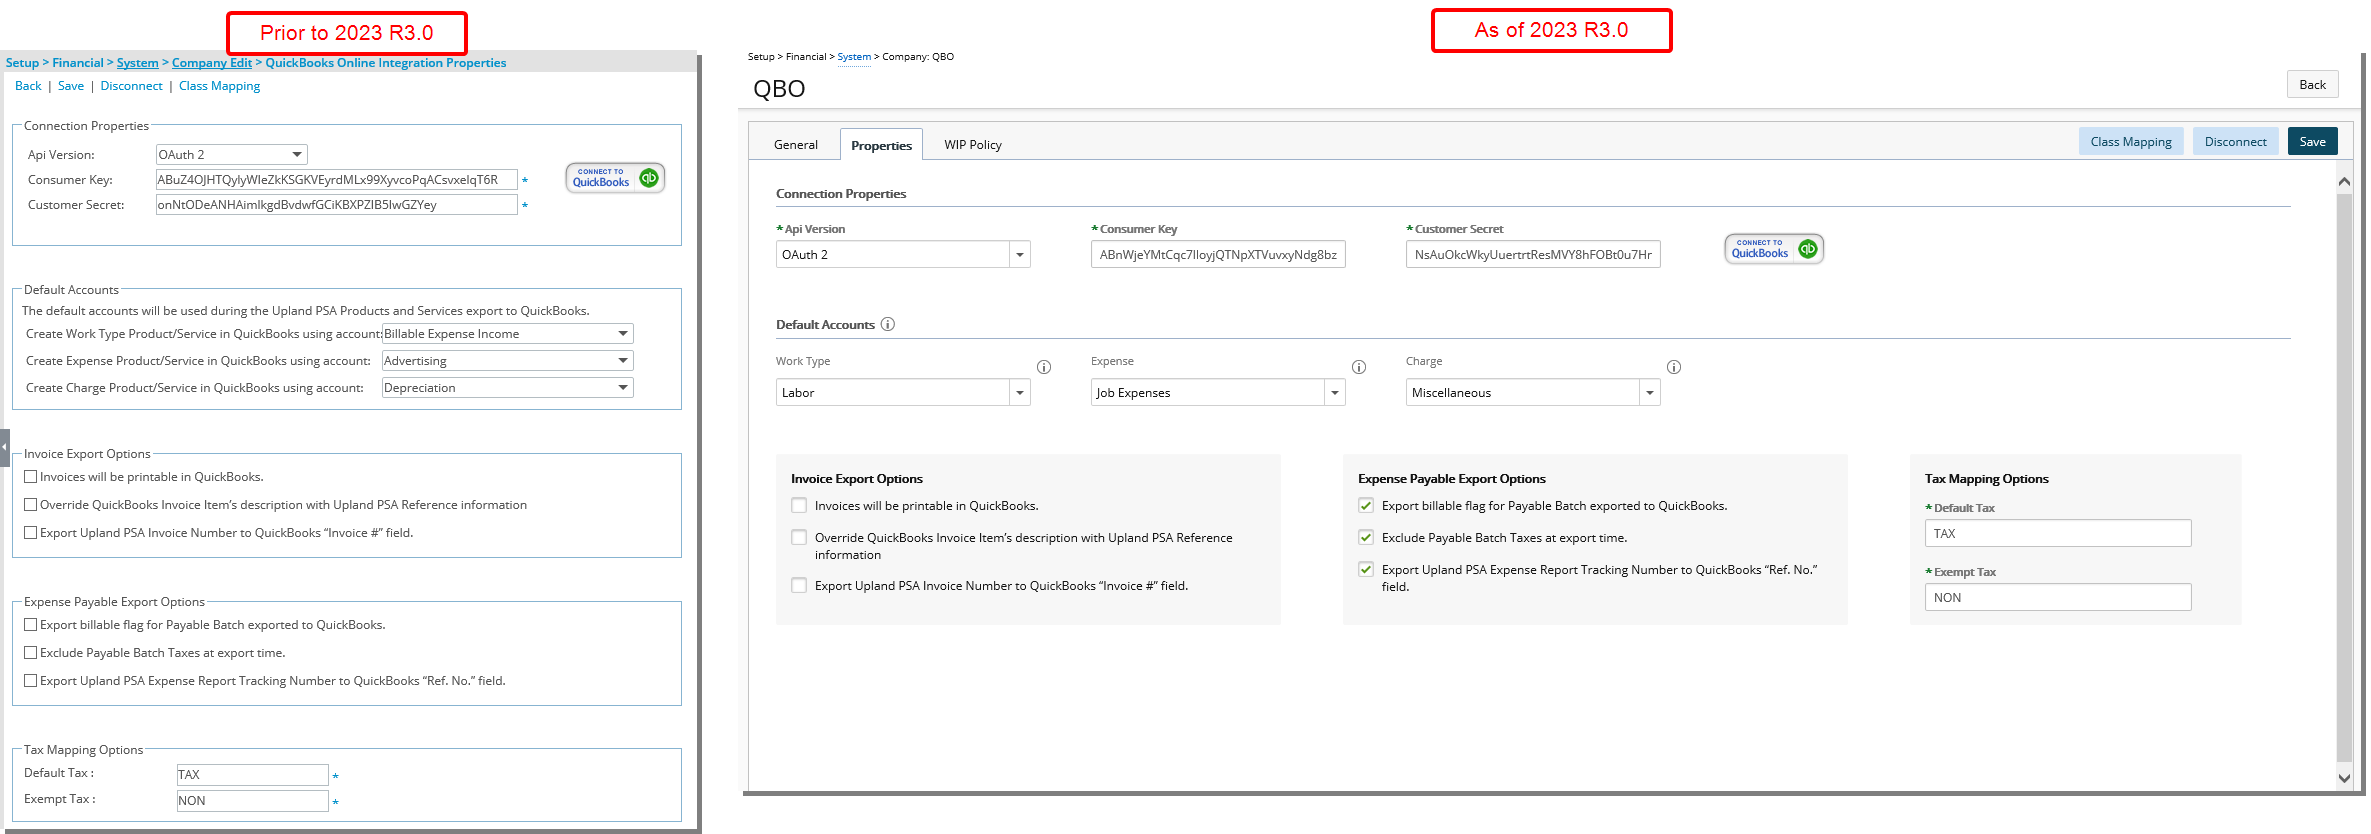
- The WIP Policy page which was redesigned in a previous release is now converted to a tab.
- The General and Address tabs are now merged into one.
- The Properties page was revamped and converted into a tab.

- The WIP Policy page which was redesigned in a previous release is now converted to a tab.
- The General and Address tabs are now merged into one.
- The WIP Policy page which was redesigned in a previous release is now converted to a tab.
Financial System Setup - Connection
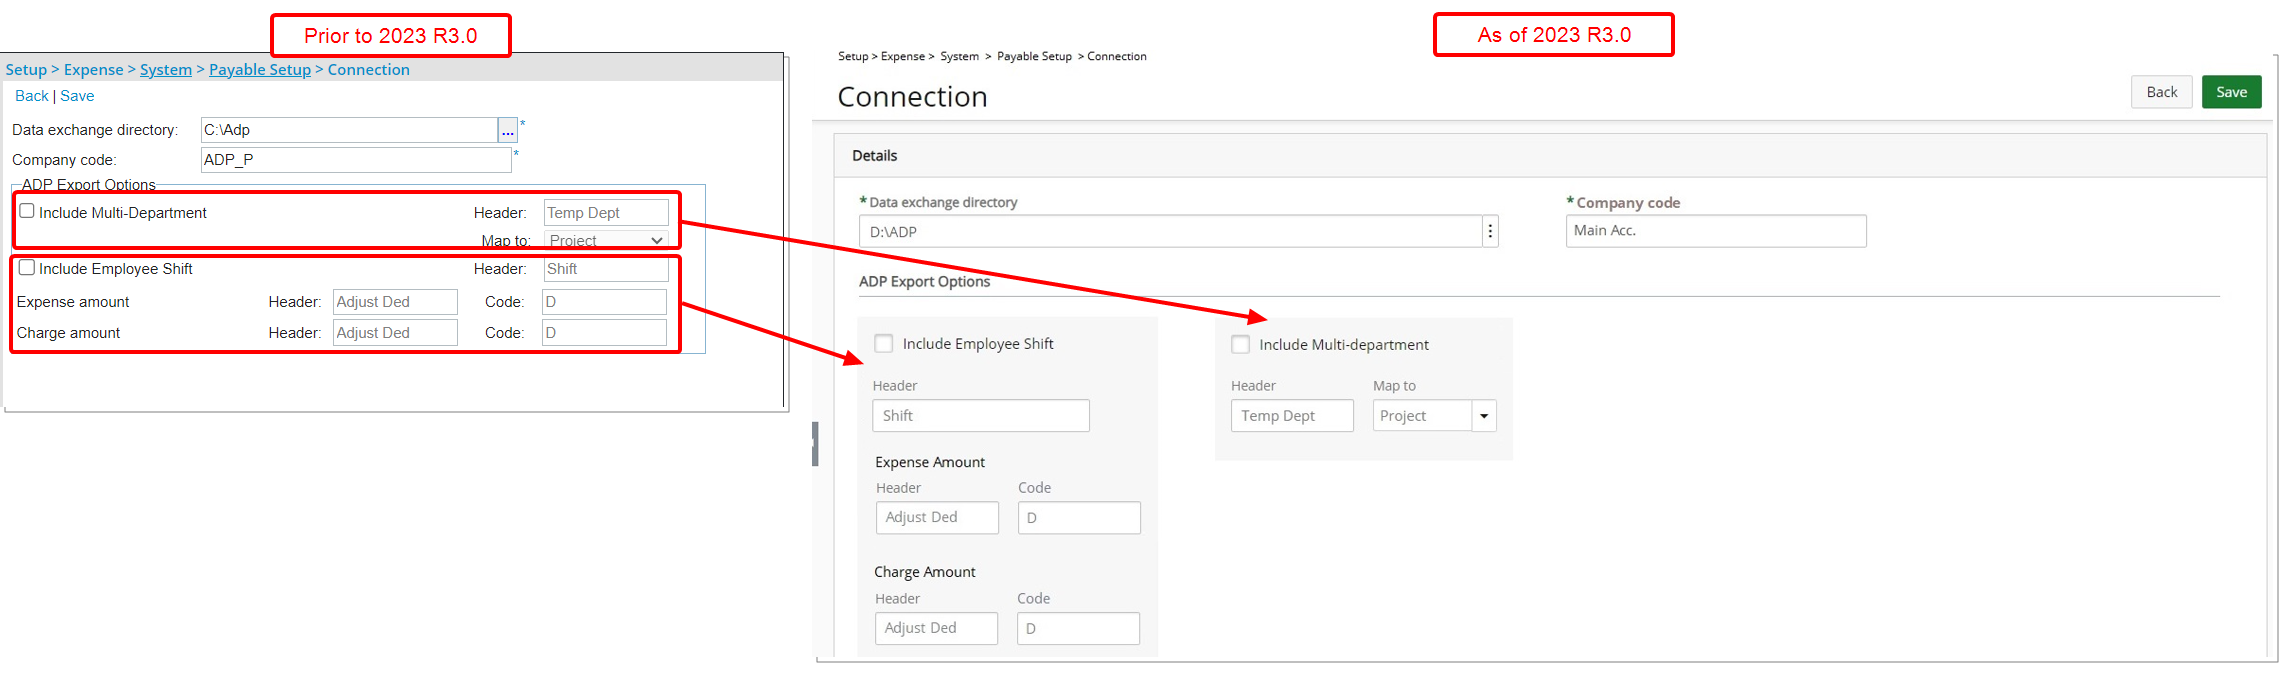
The look and feel of the ADP Connection page has been renovated to enhance the overall user experience.
In addition, the sections under ADP Export Options were reorganized. The grouped fields for Include Employee Shift are displayed first followed by those for Include Multi-department.
Integration
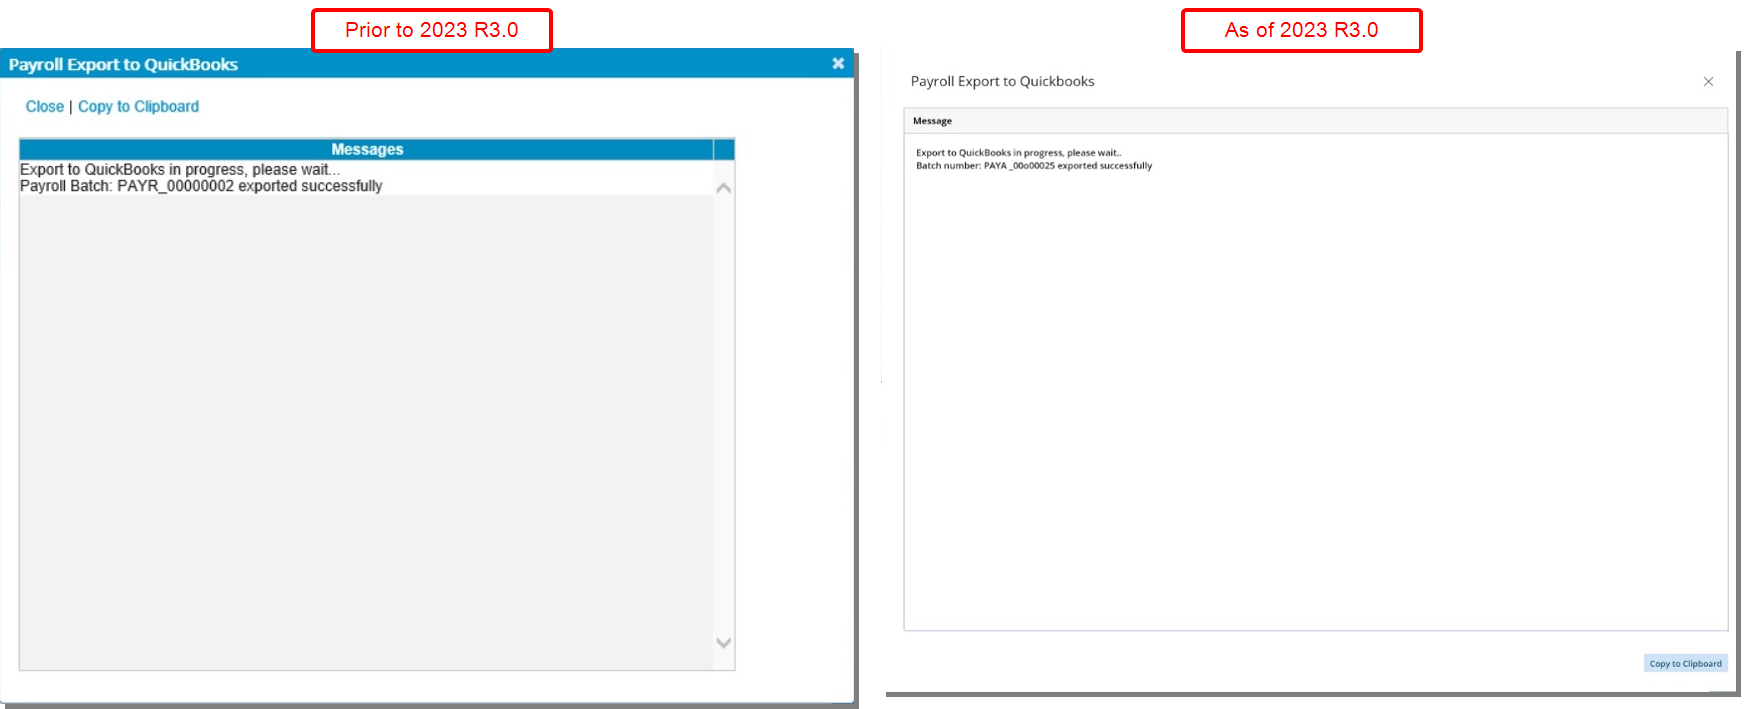
The Payroll Export dialog box (ADP, QuickBooks, ACCPAC, Microsoft Dynamics Great Plains) has undergone a redesign focused on enhancing the visual aspects and user interface, ensuring a more appealing and user-friendly experience while retaining its core functionality.
In addition, the Copy to Clipboard link had been converted to a button and available for all above mentioned Payroll Export dialog boxes.
Description: The Export to Excel button is now available from the Transactions tab of:
- Invoices
- Payable Batches
As a result of this:
- The Export button is disabled, when Posting an Invoice, Payable or Payroll Batch, upon selecting Export Invoice/Payable/Payroll To Excel file.
- From the Invoice Manager page (Batches or Invoices tabs) the Export button is now disabled upon selecting Internal.
Benefit: You can now easily export data to Excel from the Transactions tab for Invoices and Payable Batches simplifying data analysis and reporting for increased efficiency.

The Export GL Transactions and Export A/P Payable page accessed by clicking the Export button when posting an Expense Payable Batch (Financial > Expense Payable Manager > Payable Batch > Post Payable Batch) has been redesigned for a better user experience. The following modifications were made:
- The New button has been converted and is now located in the table header. Upon clicking New, a new line item is inserted in the list with inline editing from where you can create a new Batch. By entering or selecting the following fields: Number, Posting Date and Description.
- Addition of a Refresh button allowing you to reload the page.
- Addition of Search capability. You can search for a batch Number, Posting Date and Description.
- Pagination is now available to facilitate easy navigation across multiple pages.
- In previous releases upon clicking Export, you would see a page where you could modify the Term and PO number. As of this release these two fields are available in the Details pane of the page. Modify them as needed, then click the Export button.
- Click the Export button to export the Payable Batch to Microsoft Dynamics GP. You will then be taken to the Log page automatically.
- Click the Log button to access your previously exported Log data.
- Furthermore, the following fields/columns have been renamed:
- Date has been renamed to Posting Date.
- Batch Id has been renamed to Number.
- Comment has been renamed to Description.
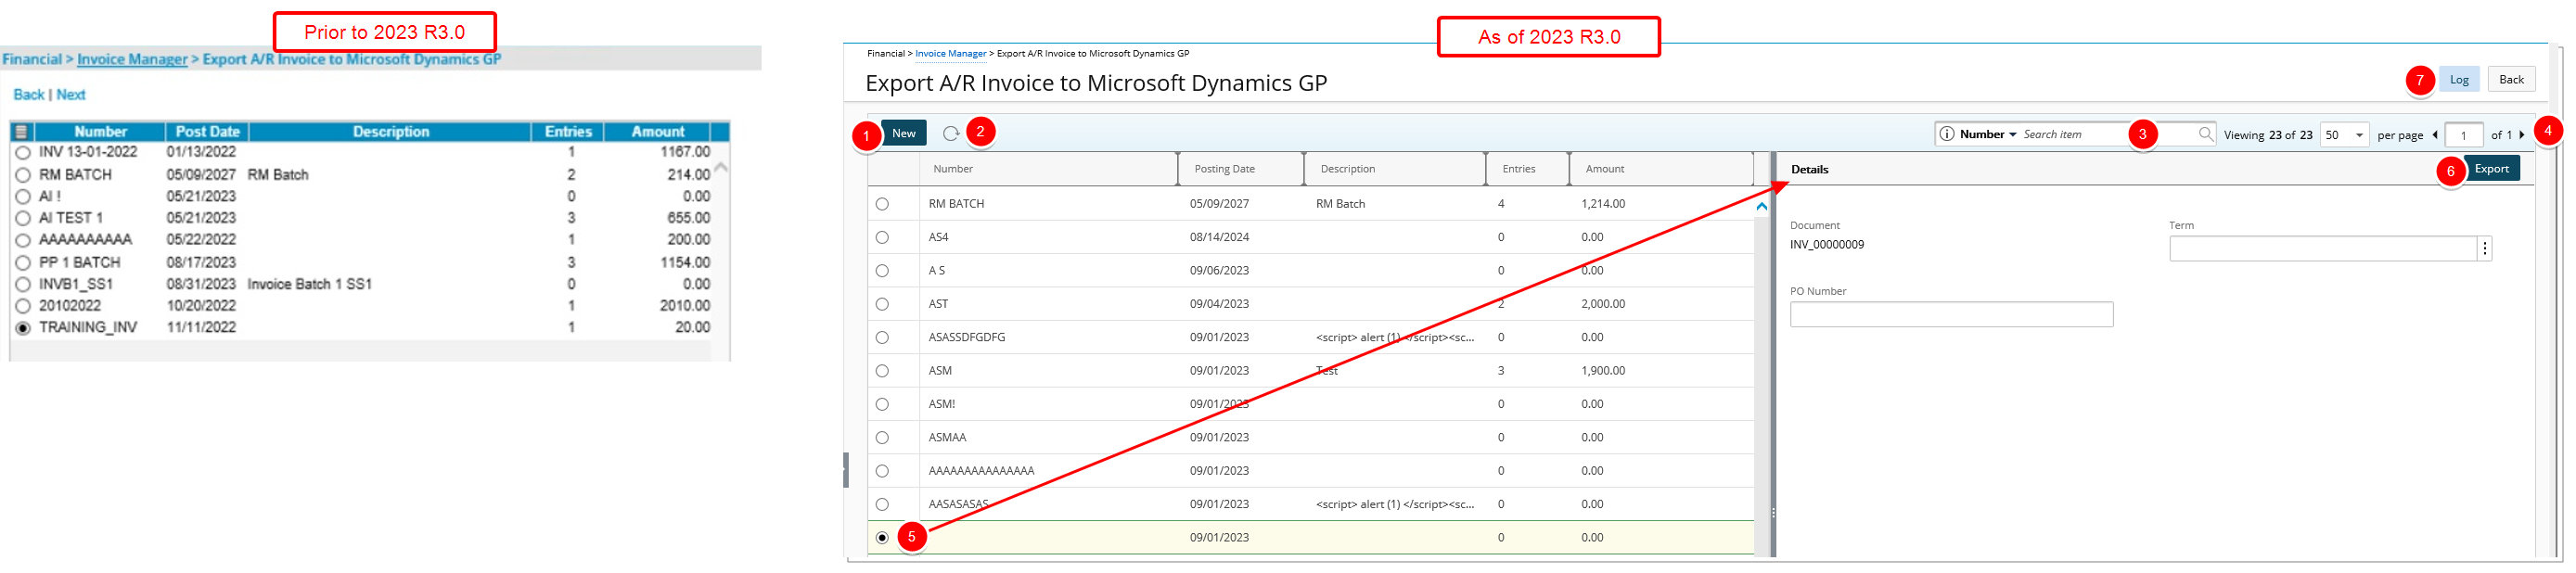
The Export A/P Invoice page (Financial > Invoice Manager > Invoice Edit > Post Invoice) accessed by clicking the Export button when posting an Invoice or from the Invoice Manager (Financial > Invoice Manager), has been redesigned for a better user experience. The following modifications were made:
- The New button has been converted and is now located in the table header. Upon clicking New, a new line item is inserted in the list with inline editing from where you can create a new Batch. By entering or selecting the following fields: Number, Posting Date and Description.
- Addition of a Refresh button allowing you to reload the page.
- Addition of Search capability. You can search for a batch by Number, Posting Date and Description.
- Pagination is now available to facilitate easy navigation across multiple pages.
- In previous releases upon clicking Export, you would see a page where you could modify the Term, PO number and view the Document. As of this release these fields are available in the Details pane of the page. Modify the Term and PO number as needed, then click the Export button to export the Invoice to Microsoft Dynamics GP. You will then be taken to the Log page automatically.
- Click the Log button to access your previously exported Log data.
- Furthermore, the following fields/columns have been renamed:
- Date has been renamed to Posting Date.
- Batch Id has been renamed to Number.
- Comment has been renamed to Description.
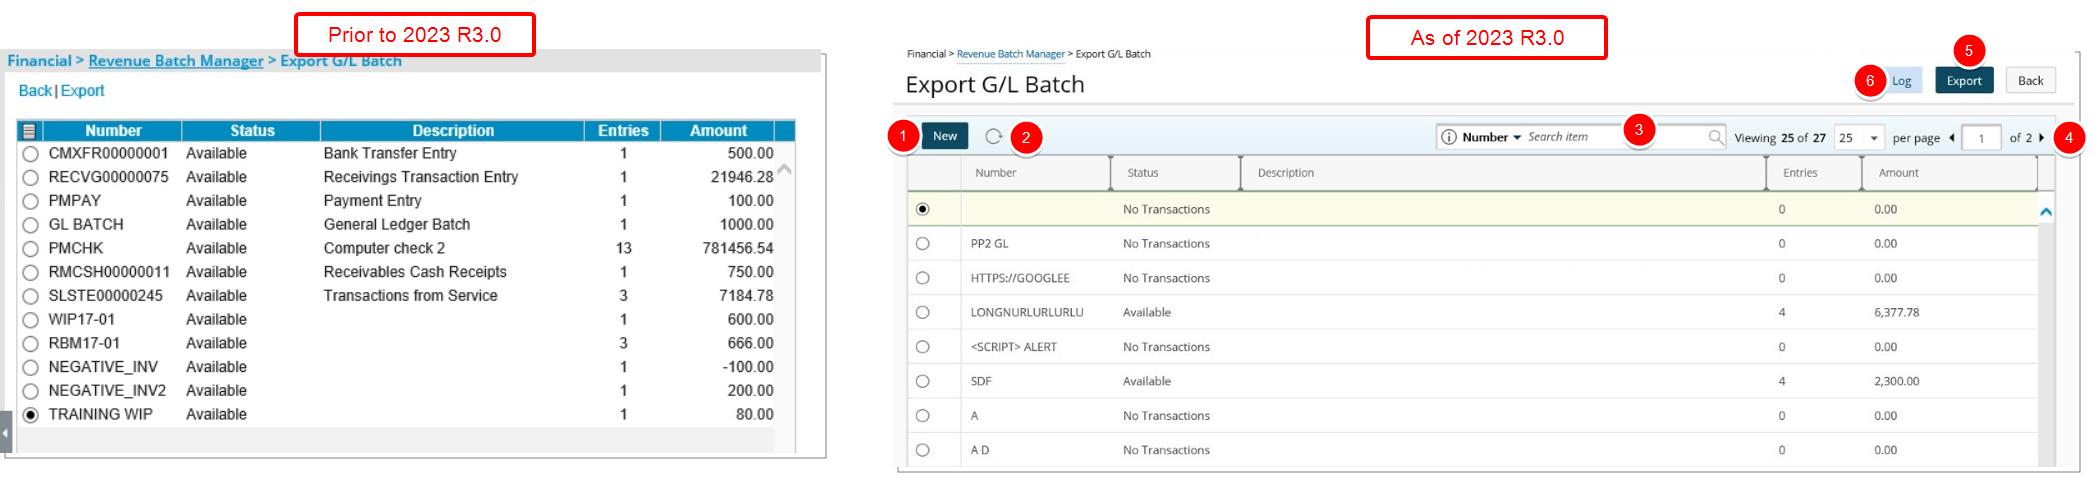
The Export G/L Batch page (Financial > Revenue Batch Manager > Export) accessed by clicking the Export button from Revenue Batch Manager or from the Financial Transactions tab when modifying a Revenue Batch has been redesigned for a better user experience. The following modifications were made:
- The New button has been converted and is now located in the table header. Upon clicking New, a new line item is inserted in the list with inline editing from where you can create a new Batch by entering or selecting the following fields: Number and Description.
- Addition of a Refresh button allowing you to reload the page.
- Addition of Search capability. You can search for a batch by Number, Status and Description.
- Pagination is now available to facilitate easy navigation across multiple pages.
- Select a Batch then click the Export button to export the Revenue Batch to Microsoft Dynamics GP. You will then be taken to the Log page automatically.
- Click the Log button to access your previously exported Log data.
- Furthermore, the Batch Id field/column has been renamed to Number.
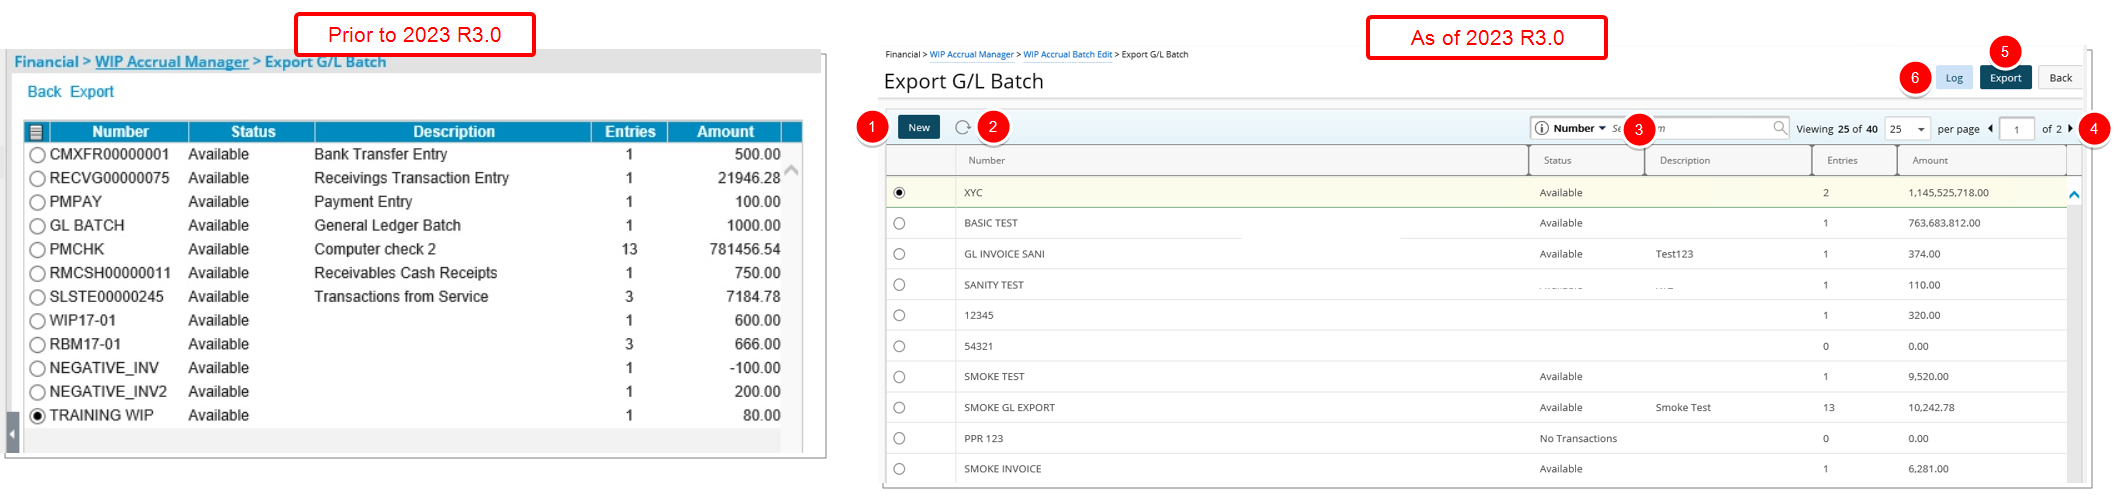
The Export G/L Batch page (Financial > WIP Accrual Manager > Export) accessed by clicking the Export button from WIP Accrual Manager or the Transactions tab when modifying a WIP Accrual Batch has been redesigned for a better user experience. The following modifications were made:
- The New button has been converted and is now located in the table header. Upon clicking New, a new line item is inserted in the list with inline editing from where you can create a new Batch by entering or selecting the following fields: Number and Description.
- Addition of a Refresh button allowing you to reload the page.
- Addition of Search capability. You can search for a batch by Number, Status and Description.
- Pagination is now available to facilitate easy navigation across multiple pages.
- Select a Batch then click the Export button to export the Batch to Microsoft Dynamics GP. You will then be taken to the Log page automatically.
- Click the Log button to access your previously exported Log data.
- Furthermore, the Batch Id field/column has been renamed to Number.
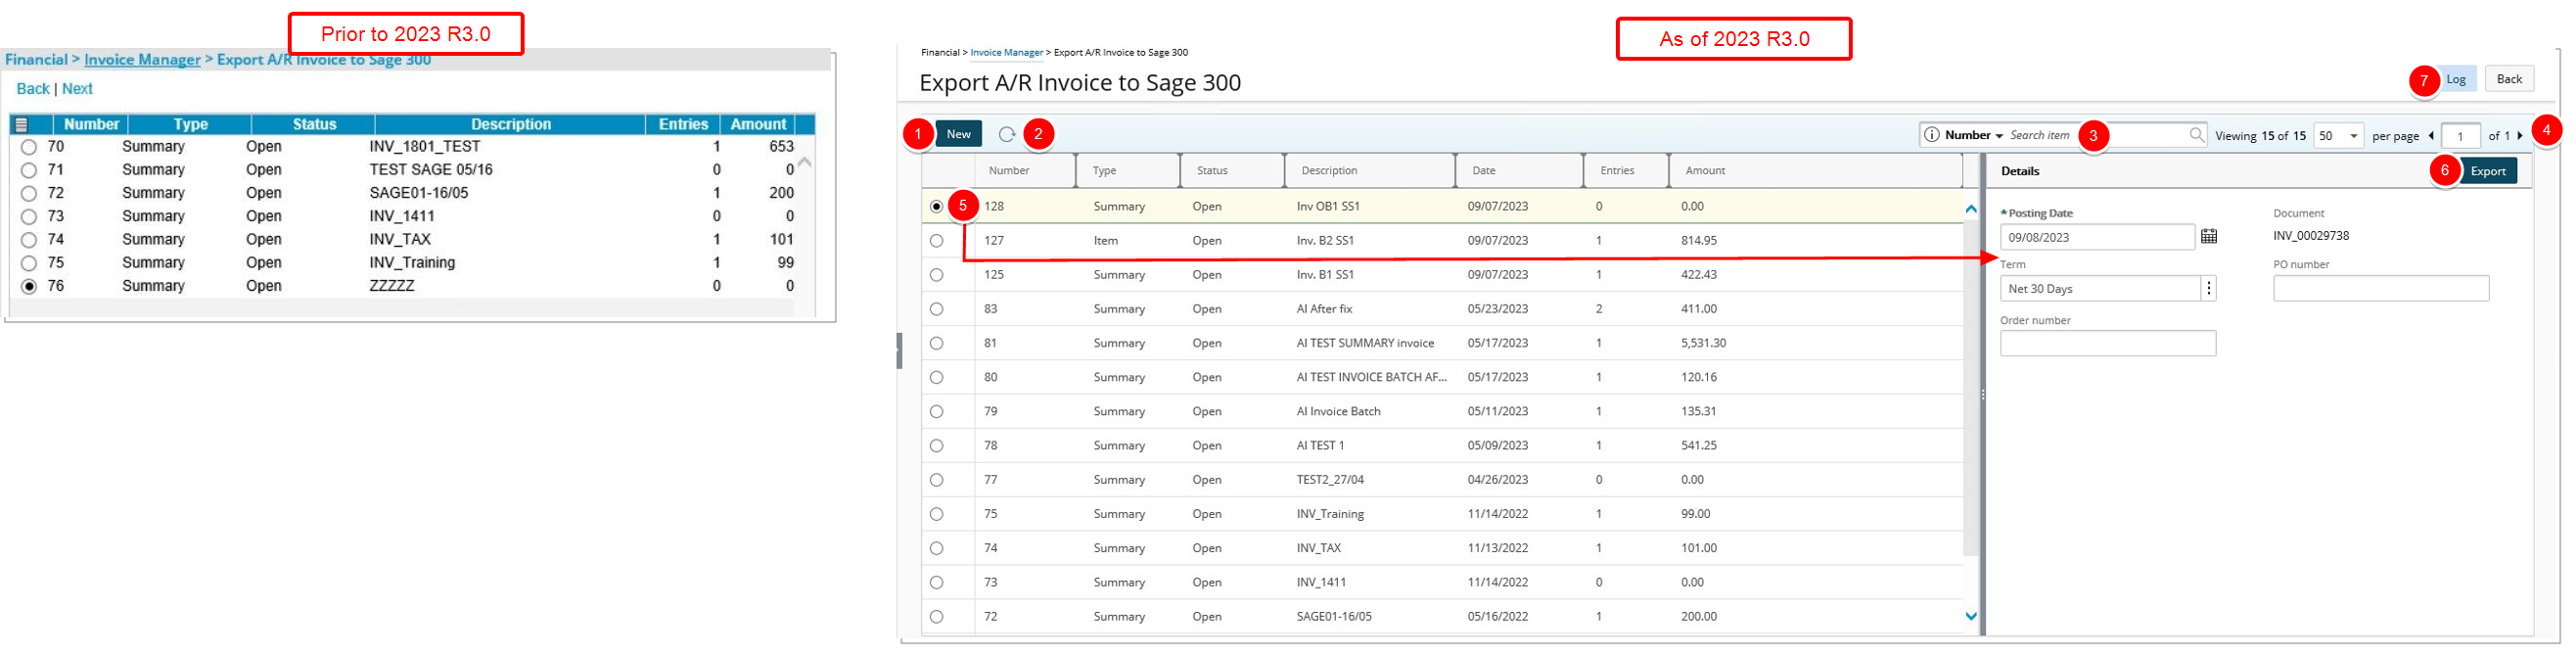
The Export A/P Invoice page (Financial > Invoice Manager > Invoice Edit > Post Invoice) accessed by clicking the Export button when posting an Invoice to Sage 300 or from the Invoice Manager (Financial > Invoice Manager), has been redesigned for a better user experience. The following modifications were made:
- The New button has been converted and is now located in the table header. Upon clicking New, a new line item is inserted in the list with inline editing from where you can create a new Batch by entering or selecting the following fields: Type, Description and Date.
- Addition of a Refresh button allowing you to reload the page.
- Addition of Search capability. You can search for a batch by Number, Type, Description and Date.
- Pagination is now available to facilitate easy navigation across multiple pages.
- In previous releases upon clicking Export, you would see a page where you could modify the Posting Date, Term, PO number and Order number as well as view the Document. As of this release these fields are available in the Details pane of the page. Modify the Posting Date, Term, PO number and Order number as needed, then click the Export button to export the Invoice to Sage 300. You will then be taken to the Log page automatically.
- Click the Log button to access your previously exported Log data.
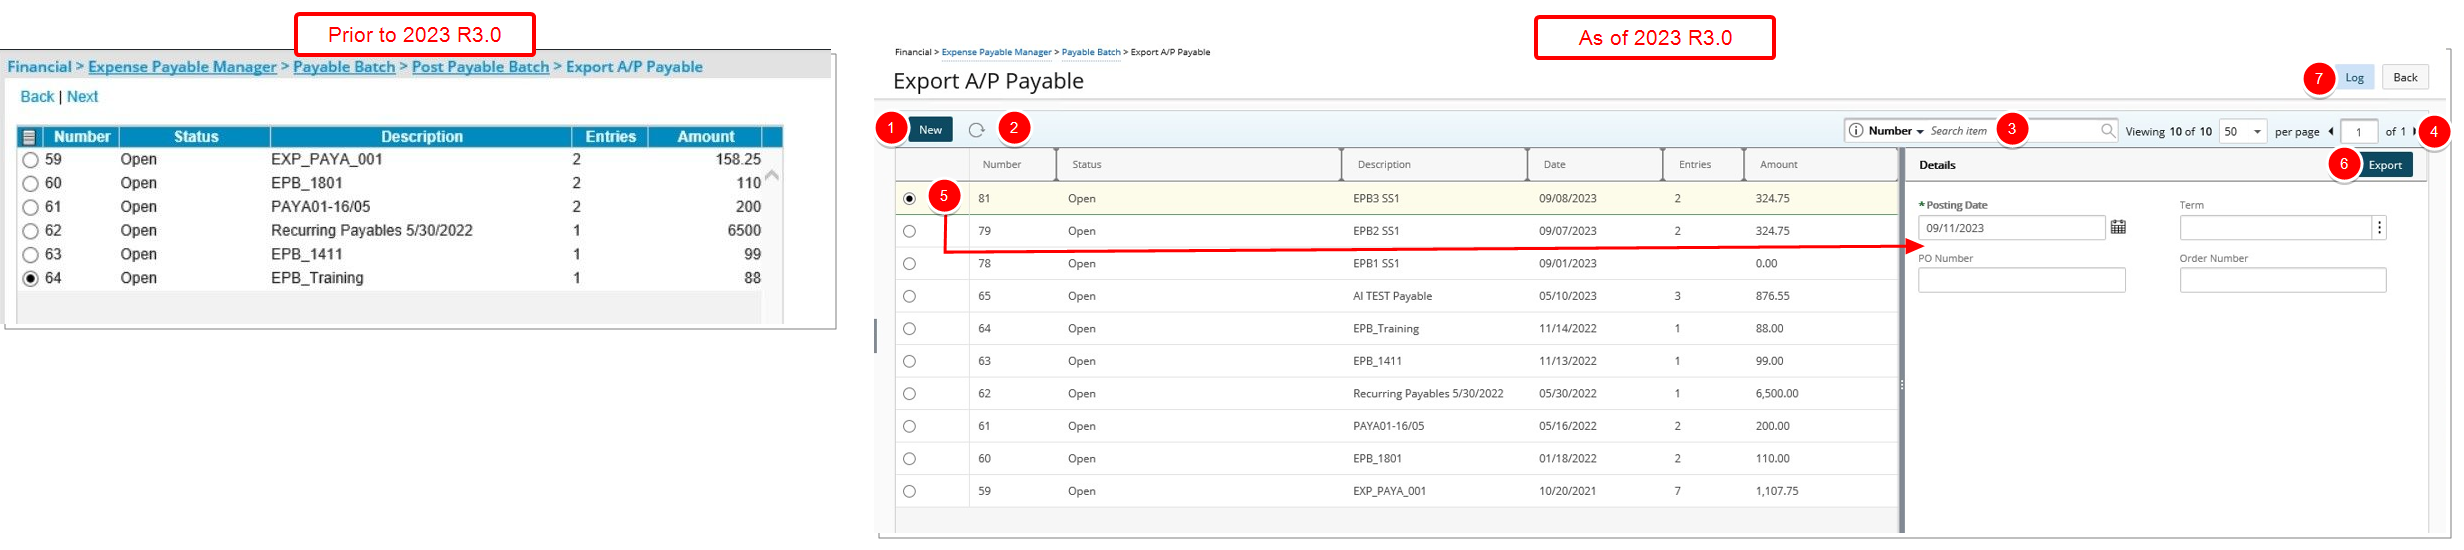
The Export A/P Payable page accessed by clicking the Export button for Sage 300 when posting an Expense Payable Batch (Financial > Expense Payable Manager > Payable Batch > Post Payable Batch) has been redesigned for a better user experience. The following modifications were made:
- The New button has been converted and is now located in the table header. Upon clicking New, a new line item is inserted in the list with inline editing from where you can create a new Batch. By entering or selecting the following fields: Description and Date.
- Addition of a Refresh button allowing you to reload the page.
- Addition of Search capability. You can search for a batch by Number, Status and Description.
- Pagination is now available to facilitate easy navigation across multiple pages.
- In previous releases upon clicking Export, you would see a page where you could modify the Posting Date, Term, PO number and Order number. As of this release these fields are available in the Details pane of the page. Modify the Posting Date, Term, PO number and Order number as needed, then click the Export button to export the Invoice to Sage 300. You will then be taken to the Log page automatically.
- Click the Log button to access your previously exported Log data.

The Export G/L Batch page (Financial > WIP Accrual Manager > Export) accessed by clicking the Export button from WIP Accrual Manager or the Transactions tab when modifying a WIP Accrual Batch has been redesigned for a better user experience. The following modifications were made:
- The New button has been converted and is now located in the table header. Upon clicking New, a new line item is inserted in the list with inline editing from where you can create a new Batch. By entering the Description.
- Addition of a Refresh button allowing you to reload the page.
- Addition of Search capability. You can search for a batch by Number, Status and Description.
- Pagination is now available to facilitate easy navigation across multiple pages.
- Select a Batch then click the Export button to export the Batch to Sage 300. You will then be taken to the Log page automatically.
- Click the Log button to access your previously exported Log data.
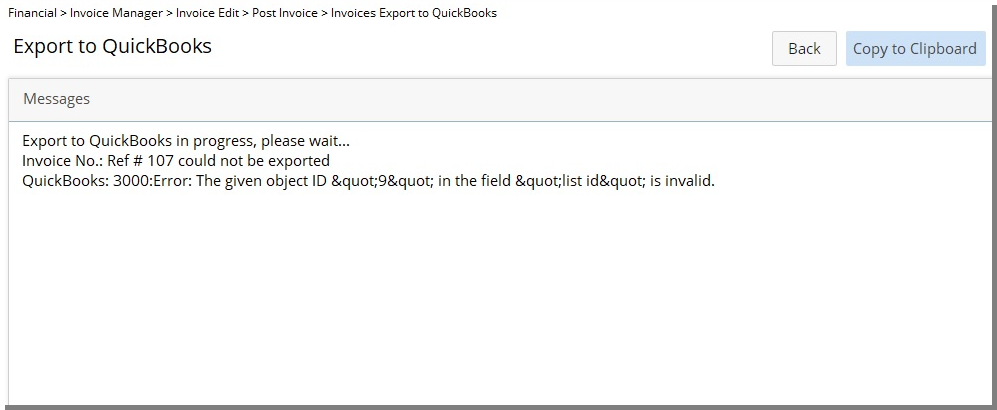
The log pages for Sage 300, QuickBooks Desktop, QuickBooks Online and Microsoft Dynamics GP have been redesigned. The improvements focus on enhancing the visual aspects and user interface, ensuring a more appealing and user-friendly experience while retaining the functionality of the export feature.
As examples the logs can be accessed from these entry points:
- Financial > Expense Payable Manager > Payable Batch > Post Payable Batch > Payable Batch Export to QuickBooks
- Financial > Invoice Manager > Invoices > Edit an Approved Invoice > Post > Export to Export to QuickBooks
- Financial > Invoice Manager > Select one Invoice or more > Export
- Financial > Invoice Manager > Invoice Batches > Select Invoice Batch > Export
- Financial > Expense Payable Manager > Payable Batch > Post Payable Batch > Export Payable Batch
- Financial > Invoice Manager > Invoice Edit > QuickBooks Online Import/Export Status
- Financial > Invoice Manager > QuickBooks Online Import/Export Status
- Financial > Expense Payable Manager > Payable Batch > QuickBooks Online Import/Export Status
Tools - Import/Export
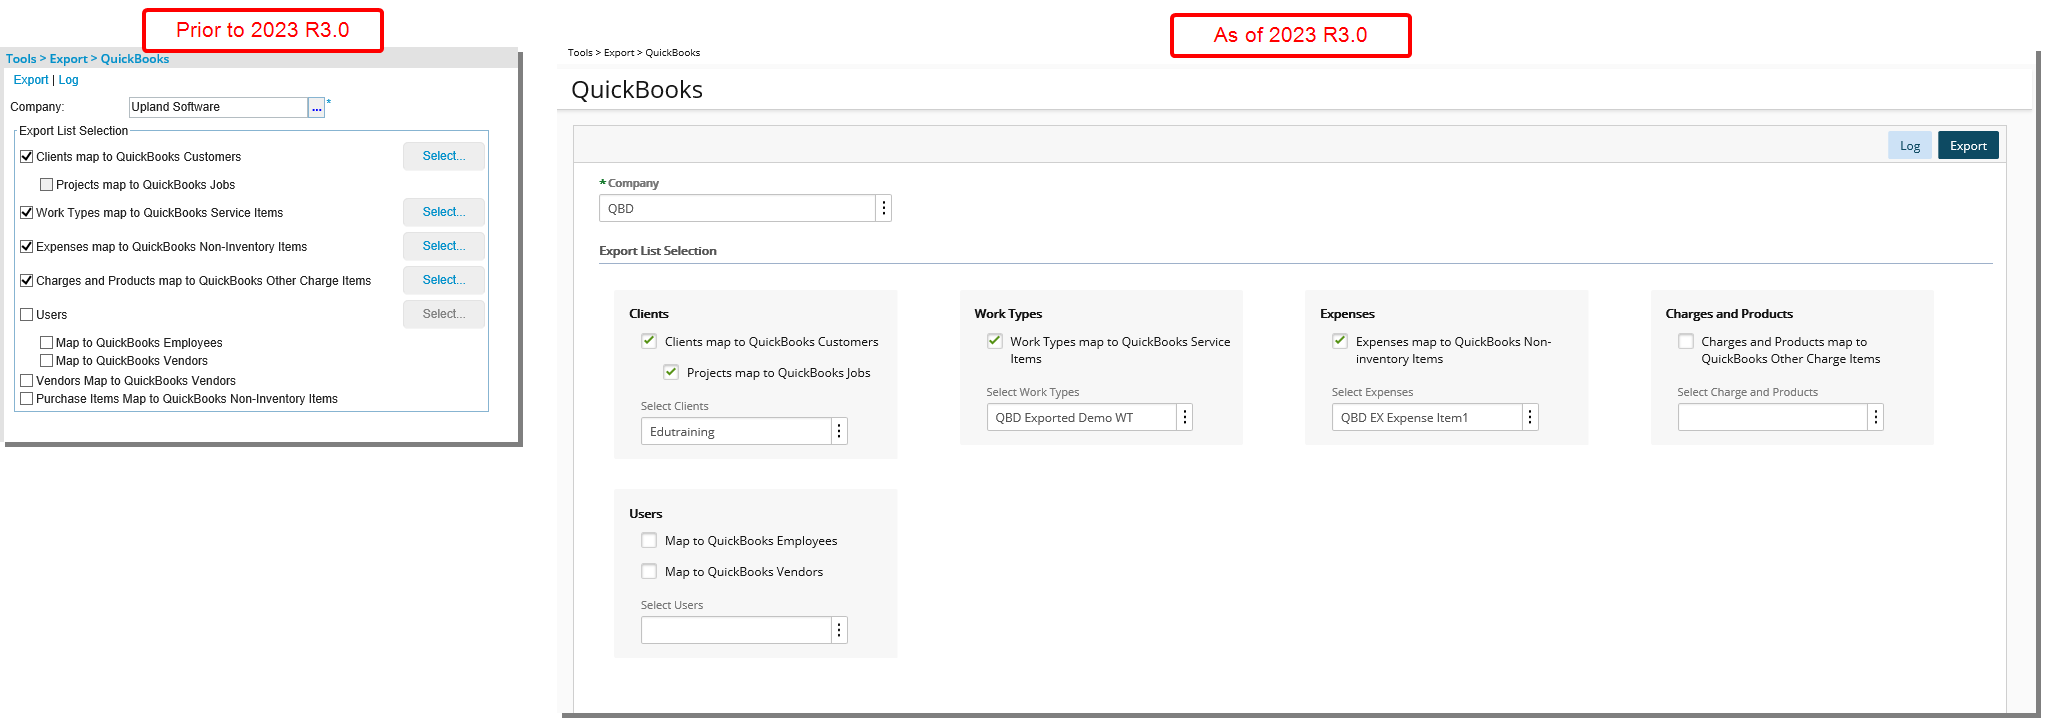
The Export (Tools > Export) pages and corresponding Log pages for Sage 300, QuickBooks, QuickBooks Online and Microsoft Dynamics GP have been redesigned. The improvements focus on enhancing the visual aspects and user interface, ensuring a more appealing and user-friendly experience while retaining the functionality of the export feature.
Note: The functionality of exporting purchase items has been deprecated and no longer available.
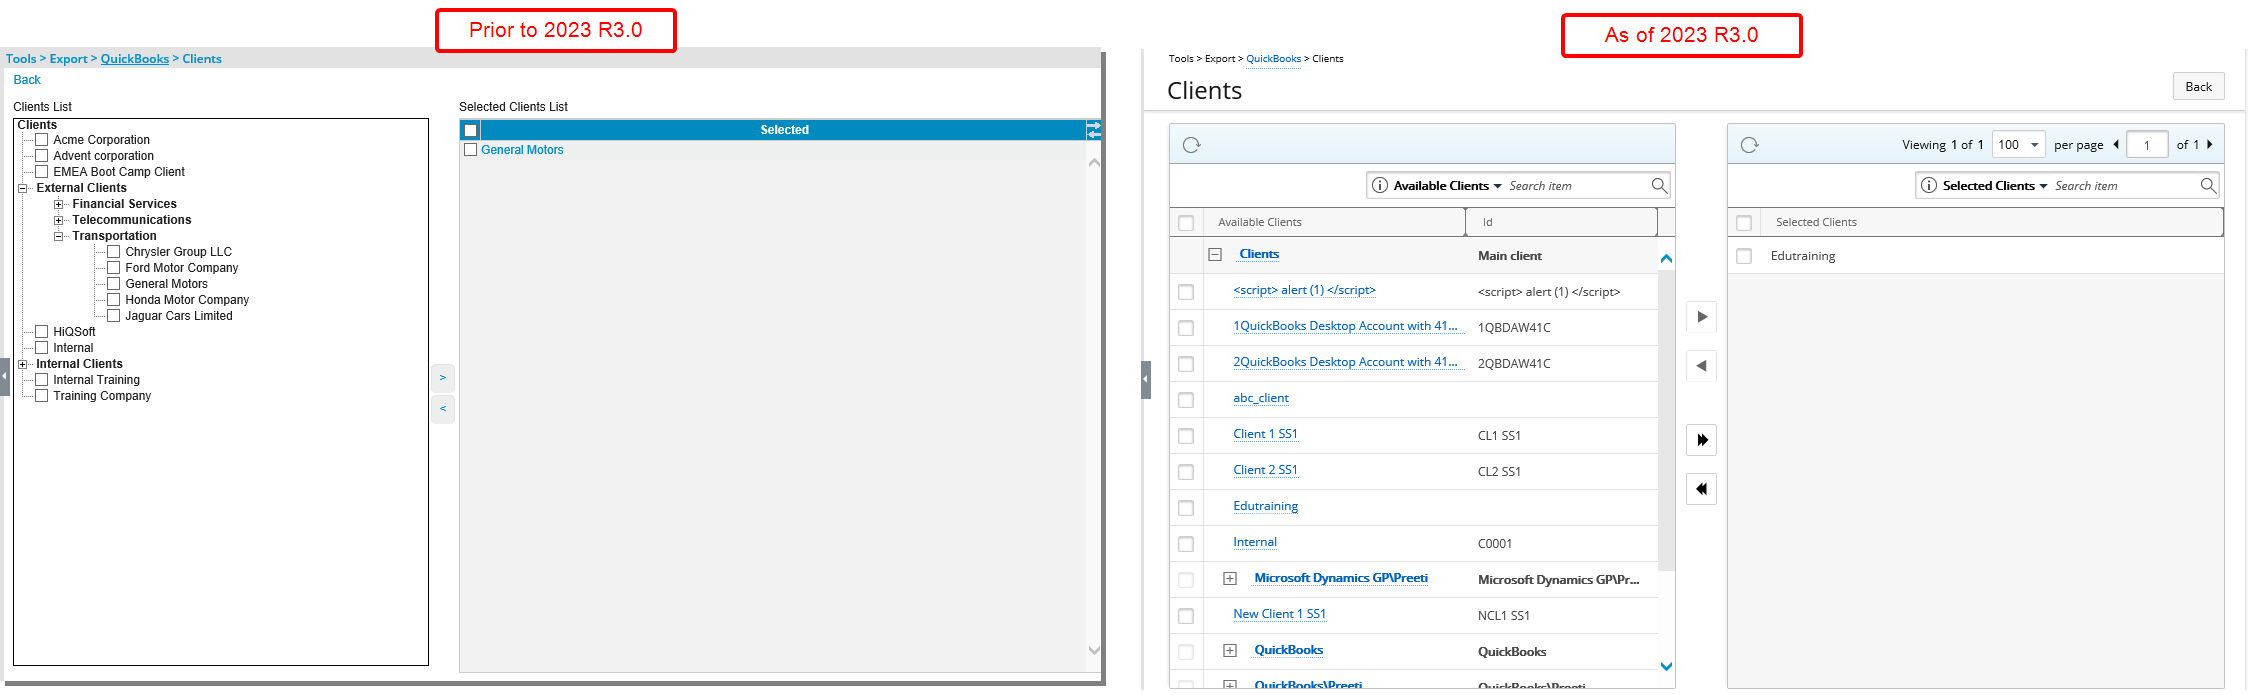
The list pages which are accessed when selecting an item such as Clients, Users, Work Types etc. have also been redesigned in the same format already in use in other areas of the application. The following improvements were also made:
- Addition of Refresh button allowing you to reload the available/selected tables.
- Addition of Search capability within the available/selected tables.
- Pagination to facilitate easy navigation across multiple pages.
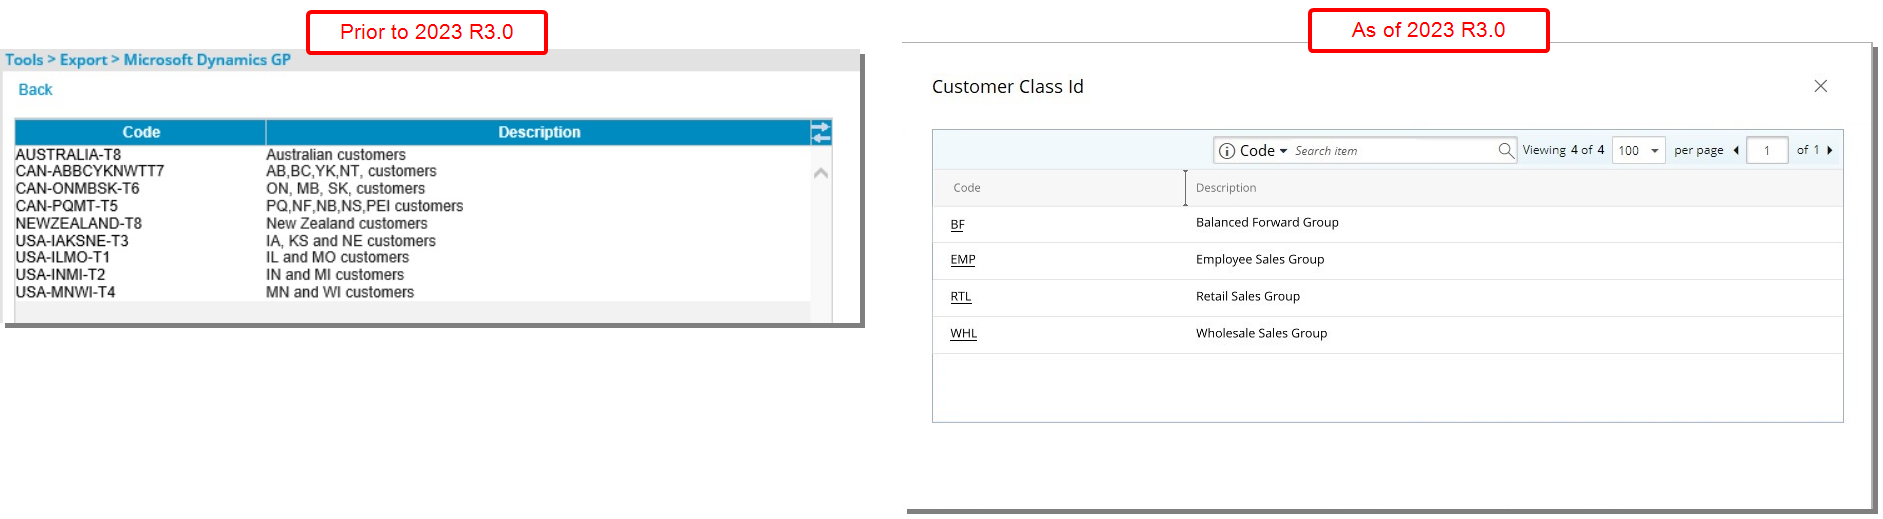
Furthermore, the browse for Customer Class ID and Vendor Class ID when exporting to Sage 300 and Microsoft Dynamics GP (Tools > Export) has also been redesigned for a better user experience. The following improvements were also made:
- Addition of Search capability.
- Addition of Pagination to facilitate easy navigation across multiple pages.
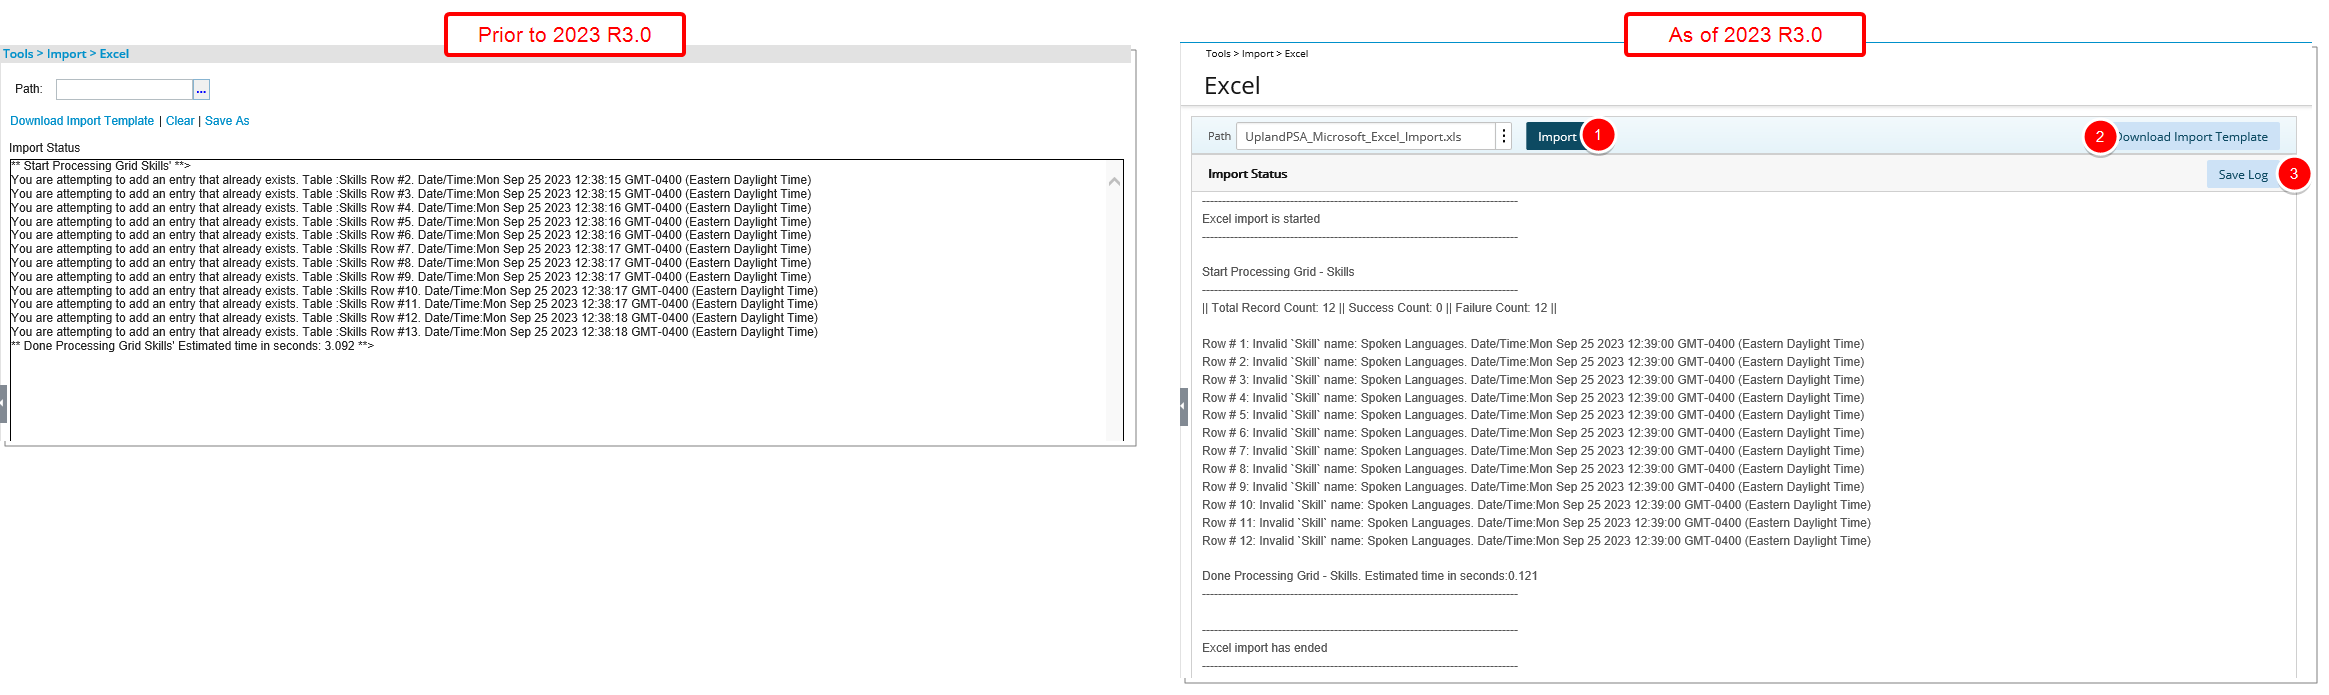
The Excel Import page (Tools > Import > Excel) has also been redesigned. The improvements focus on enhancing the visual aspects and user interface, ensuring a more appealing and user-friendly experience while retaining the functionality of the Excel Import feature.
- Upon choosing the file to import, you must click the Import button.
- The Download Import Template link is now a button located on the top right corner of the page.
- The Save As link was renamed to Save Log and converted to a button. It is now located just below Download Import Template button.
Workflow Designer - Workflow Edit
Description: As part of progressive improvements being made to the PSA appearance, the user interface of the Workflow Edit page has been revamped, giving it a new, clean look, making it more aesthetically pleasing with modernized tabs and easier-to-view text formatting and tables.
Benefit: These improvements are intended to further enhance and update the overall look and elevate the user's experience.
For further details refer to: Workflow Setup section of the help center
In addition to the improvements made to the overall look and feel of the Workflow Edit page, the following enhancements have also been made:
- The Back, Setup, Security, Rules and Save links have been moved to the top right corner of the page and converted to buttons.
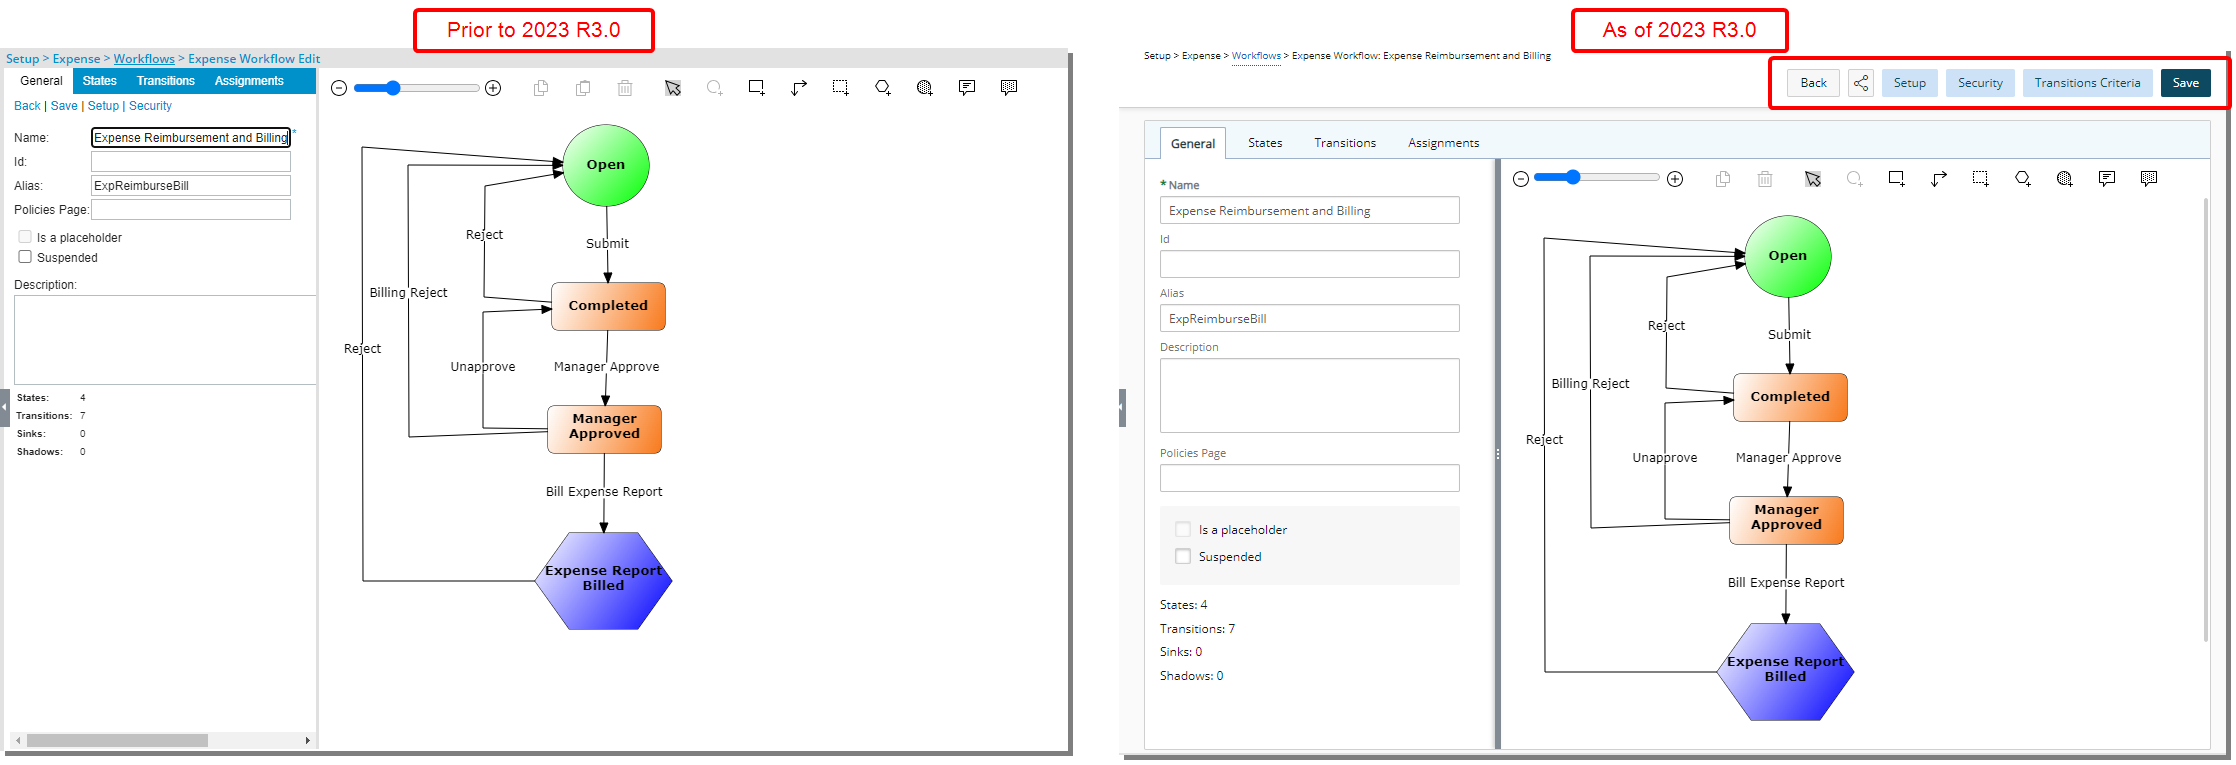
- Whenever modifications are made to a Workflow, whether within the design interface or across the various tabs, sub-tabs, and dialog boxes (excluding the Setup and New/Edit Notifications dialog boxes) your changes will be immediately reflected on the user interface without the necessity to click Save. You can continue refining the workflow and are required to click the Save button only once to save your modifications.
- You can navigate to the General tab anytime to view the graphical workflow interface.
- Addition of Share button allowing you to share the page with colleagues.
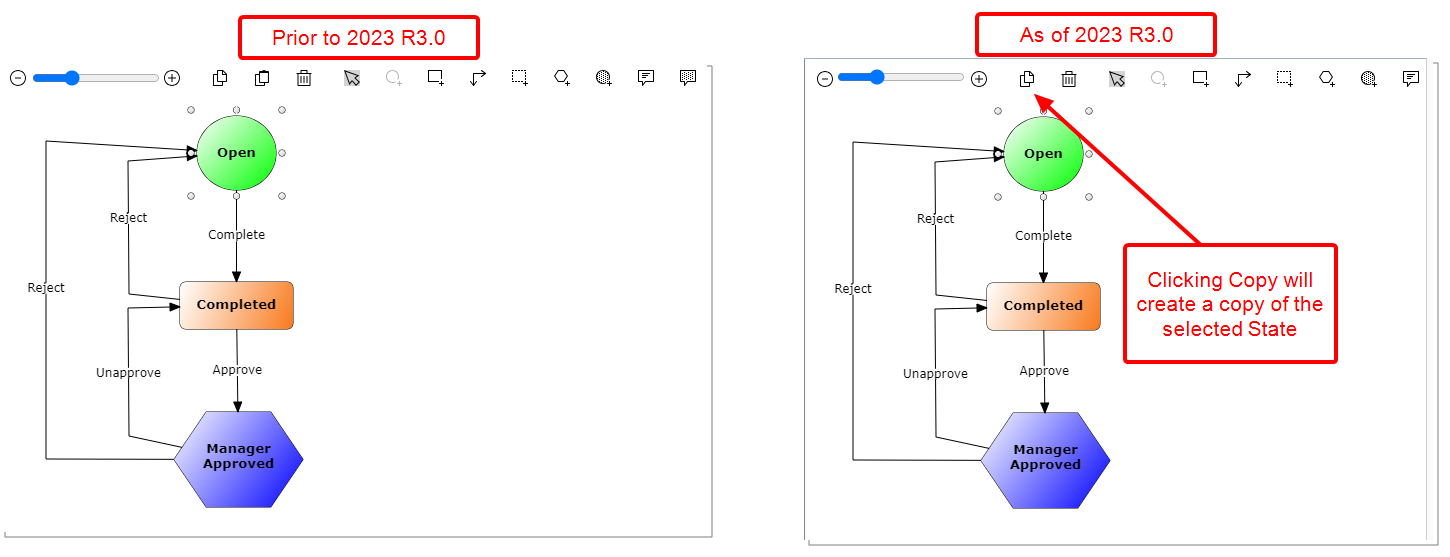
In past releases copying a State was a two-click process. As of this release clicking the Copy button will immediately create a copy of the selected State.
As a result of this modification, the Paste button is deprecated and no longer available.
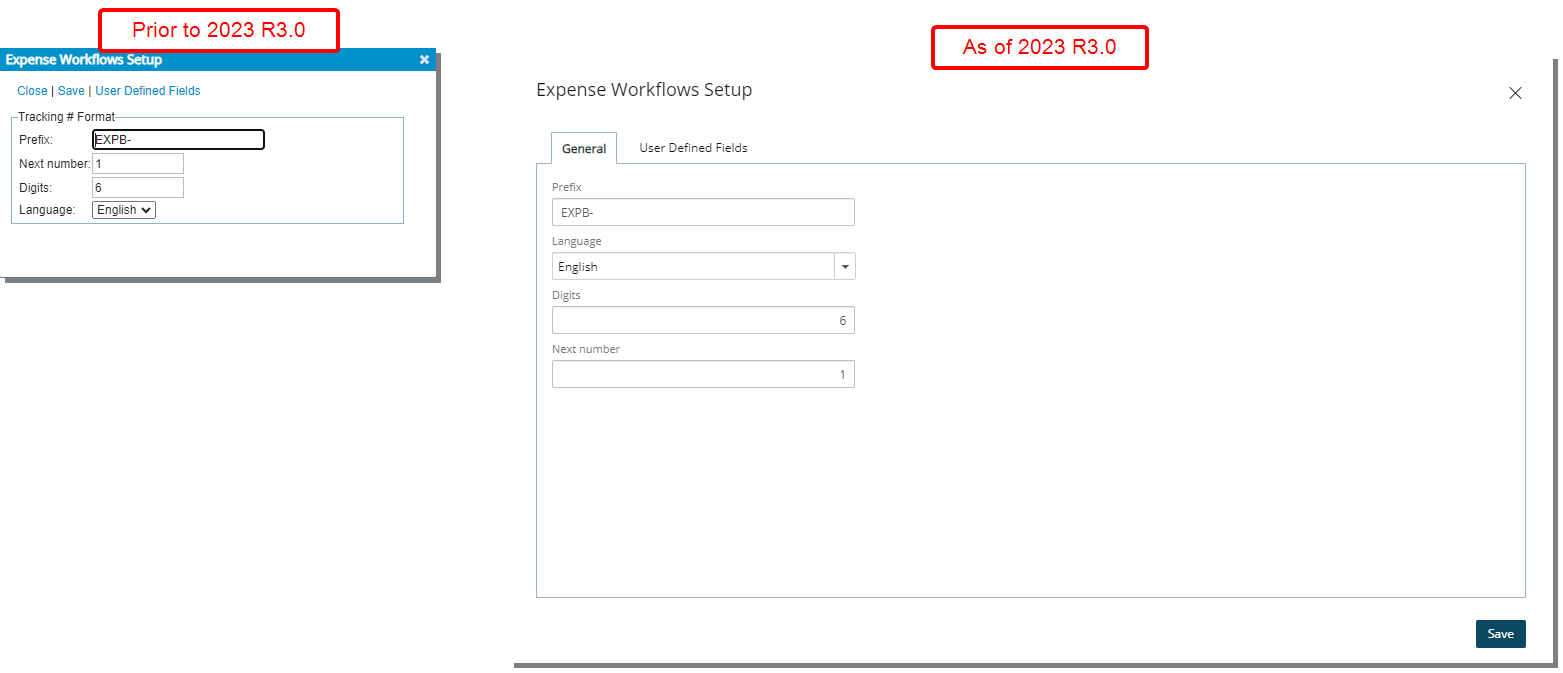
The Setup dialog box available from the following workflows has been revamped with a new, clean look:
- Setup > Timesheet > Leave Request Workflows
- Setup > Workforce Planning > Resource Request Workflows
- Setup > Work > Project Workflows
- Setup > Expense > Workflows
Furthermore, in previous releases, when clicking on the User Defined Fields a new dialog box would appear. As of this release the User Defined Fields is a tab within the Workflow Setup dialog box.
Note: You can no longer rename the User Defined Fields tab.
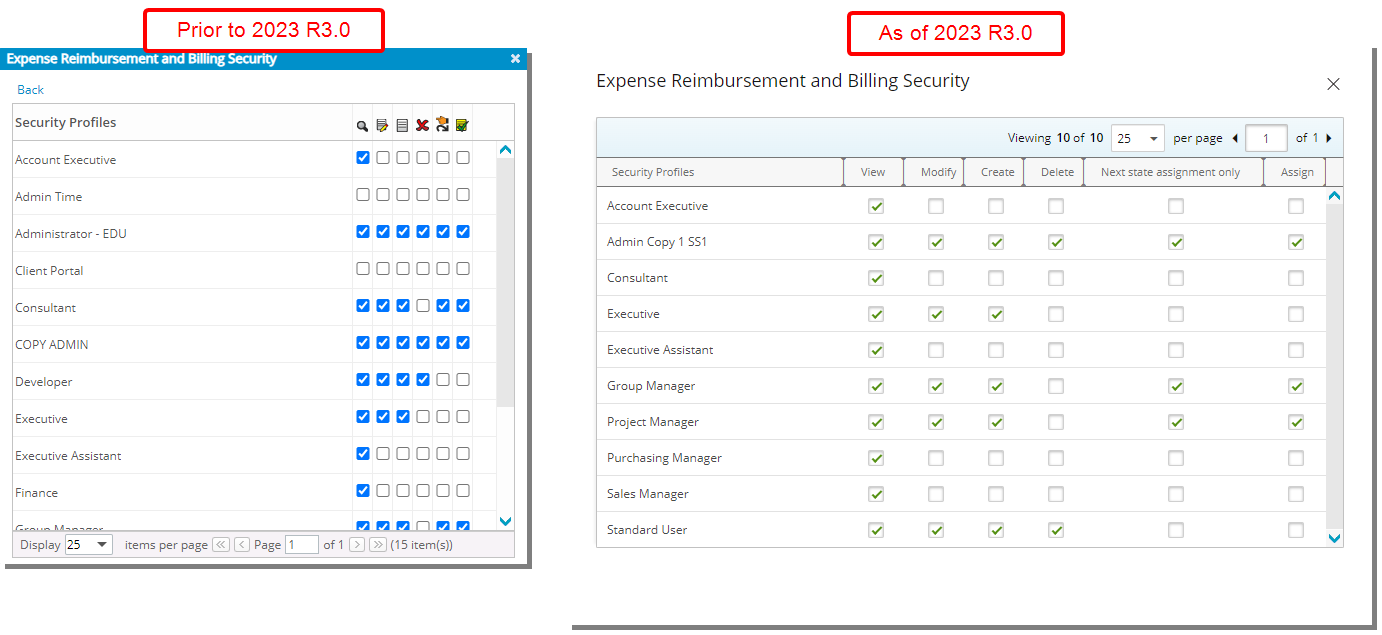
The Security dialog box has been revamped with a new, clean look. Furthermore, the following improvements were also made:
- The icons located on the table headers have been replaced with words.
- Pagination is moved above the table.
Note: Where applicable, all empty columns have been removed.
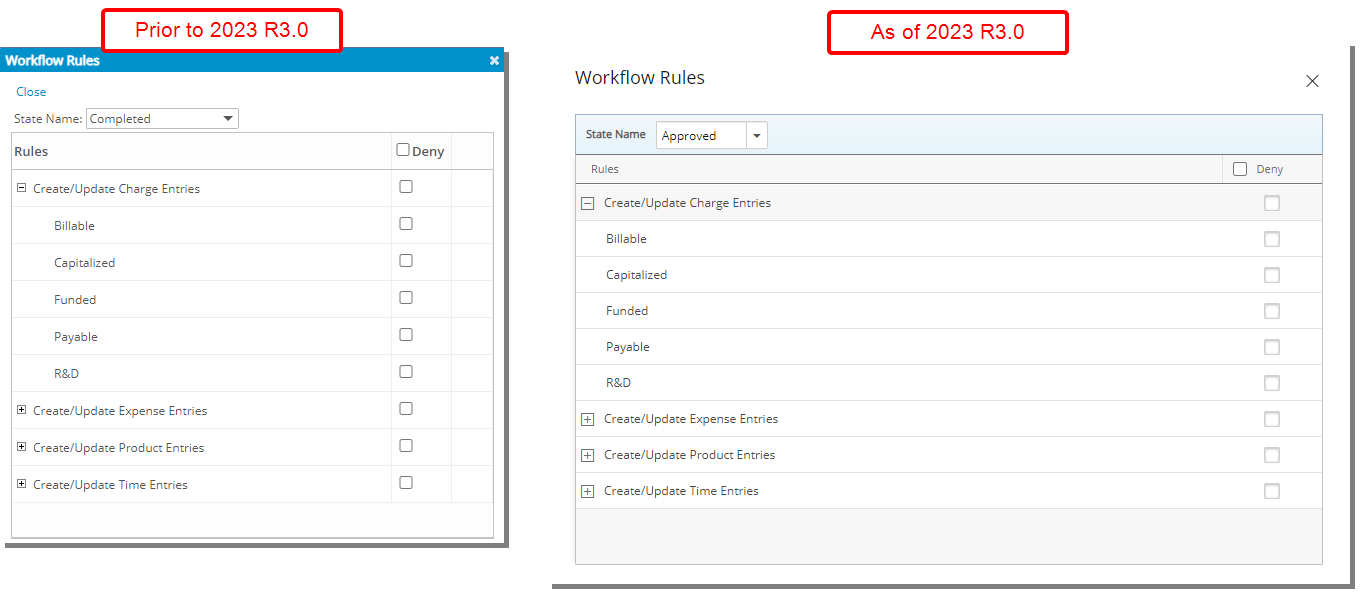
The Rules dialog box has been revamped with a new, clean look.
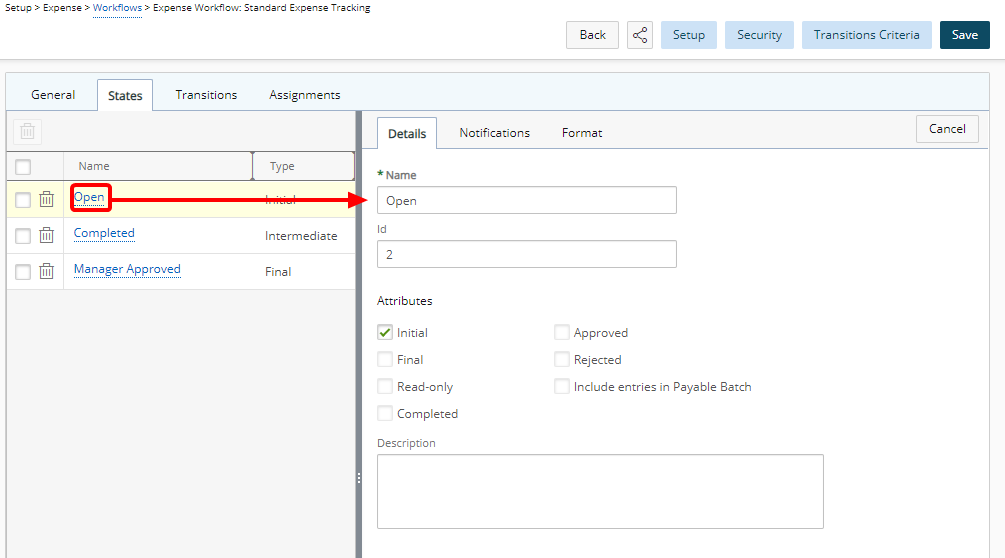
Upon navigating to the States tab, you must first click on a State to access the Details, Notifications and Format sub-tabs on the right-hand pane.
Note:
- The Transitions and Assignments sub-tabs are no longer available when modifying a State.
- The Processing tab is no longer available when modifying a Timesheet Workflow State.
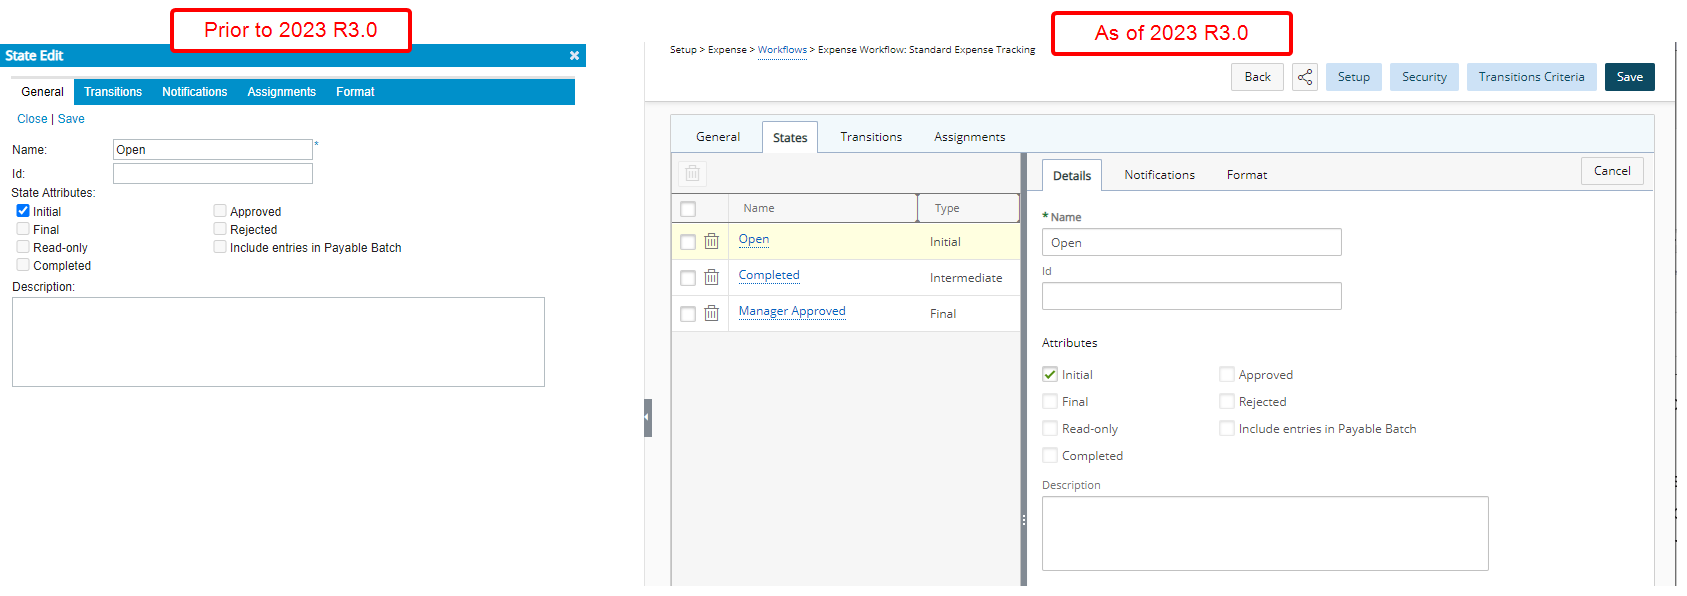
The Details sub-tab has been revamped with a new, clean look. Furthermore, the following improvements were also made:
- When making modifications in the Details tab you no longer have to click the Save. You can still navigate to other tabs and view your recent changes on the graphical interface. Click Save only once you are finished with all your modifications.
- Clicking the Cancel button will display the graphical representation of the workflow within the right pane. Any changes made in the Details and Format tabs will be lost unless saved.
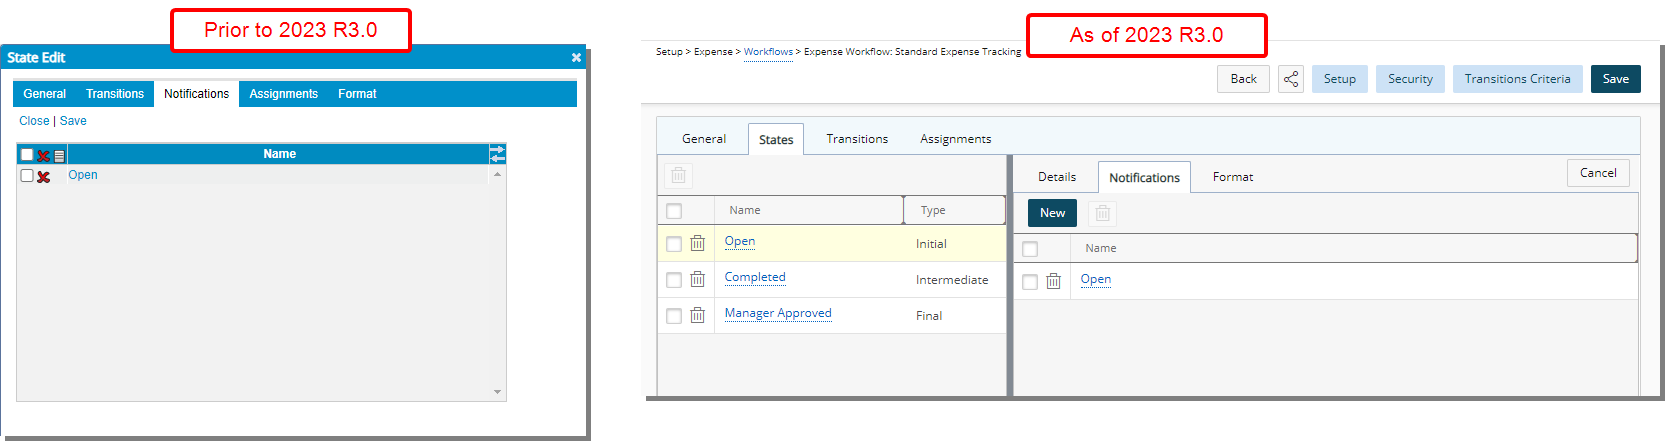
The interface and process of creating/modifying a Notification has been redesigned to reduce the number of click-throughs. In past releases, it was necessary to click through a structured sequence of screens to create a Notification.
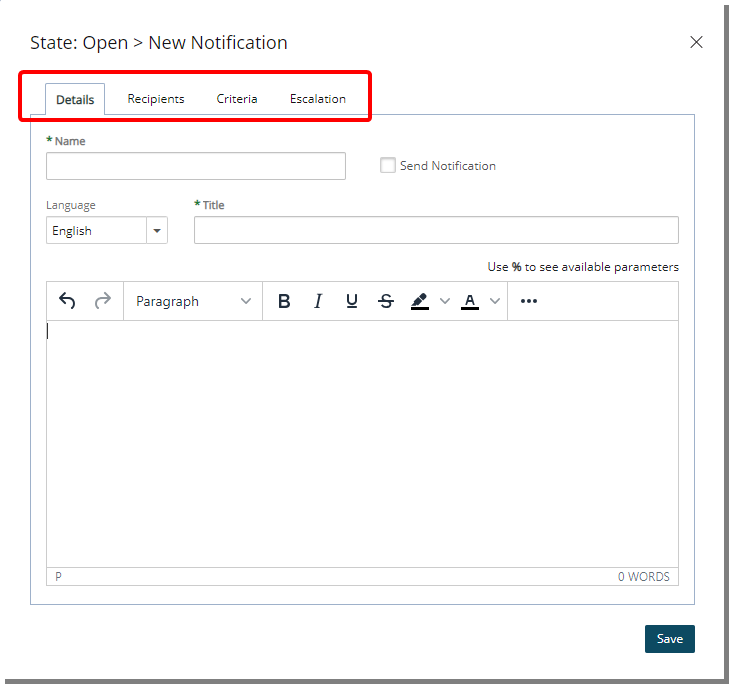
As of this release you can access all the necessary information related to the Notification you are creating/editing from one dialog box by navigating to the Details, Recipients, Criteria and Escalation tabs. Enter/select the required information and then click Save.
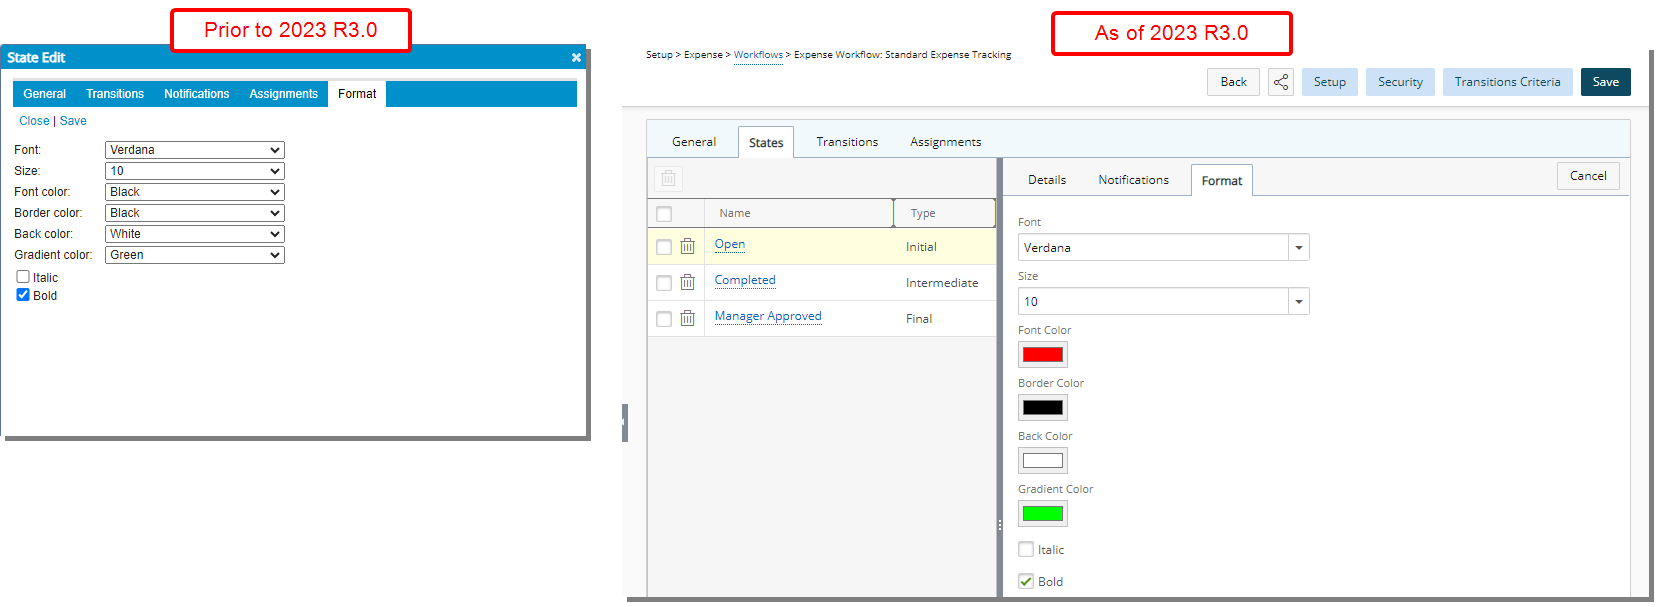
The Format sub-tab has been revamped with a new, clean look. Furthermore, the following improvement was also made:
- When making modifications in the Format sub tab you no longer have to click the Save button. You can still navigate to other tabs and view your changes on the graphical interface. Click Save only once you are finished with all your modifications.
- Clicking the Cancel button will display the graphical representation of the workflow within the right pane. Any changes made in the Details and Format tabs will be lost unless saved.
- The color picker located under the Format sub-tab was redesigned so that you can now choose a color for Font color, Border color and Back Color from a color wheel or by entering the required RGB/HEX/HSL color value.
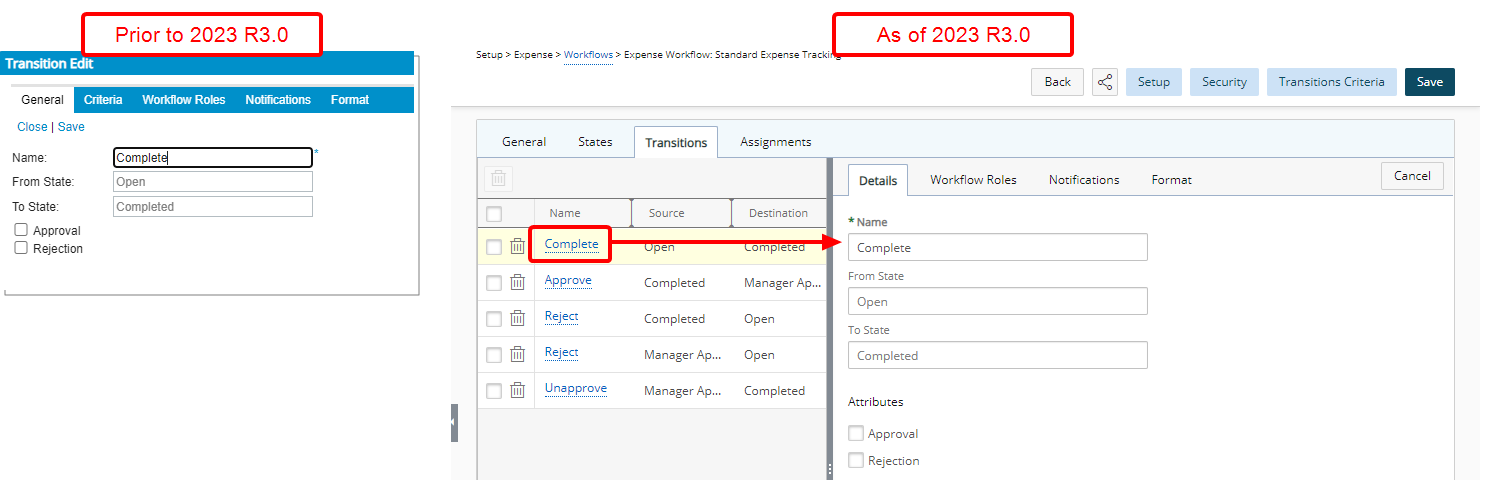
The Details sub-tab (formerly known as General) has been revamped with a new, clean look. Furthermore, the following improvement was also made:
- When making modifications in the Details sub-tab you no longer have to click the Save button. You can still navigate to other tabs and view your changes on the graphical interface. Click Save only once you are finished with all your modifications.
- Clicking the Cancel button will display the graphical representation of the workflow within the right pane. Any changes made in the Details and Format tabs will be lost unless saved.
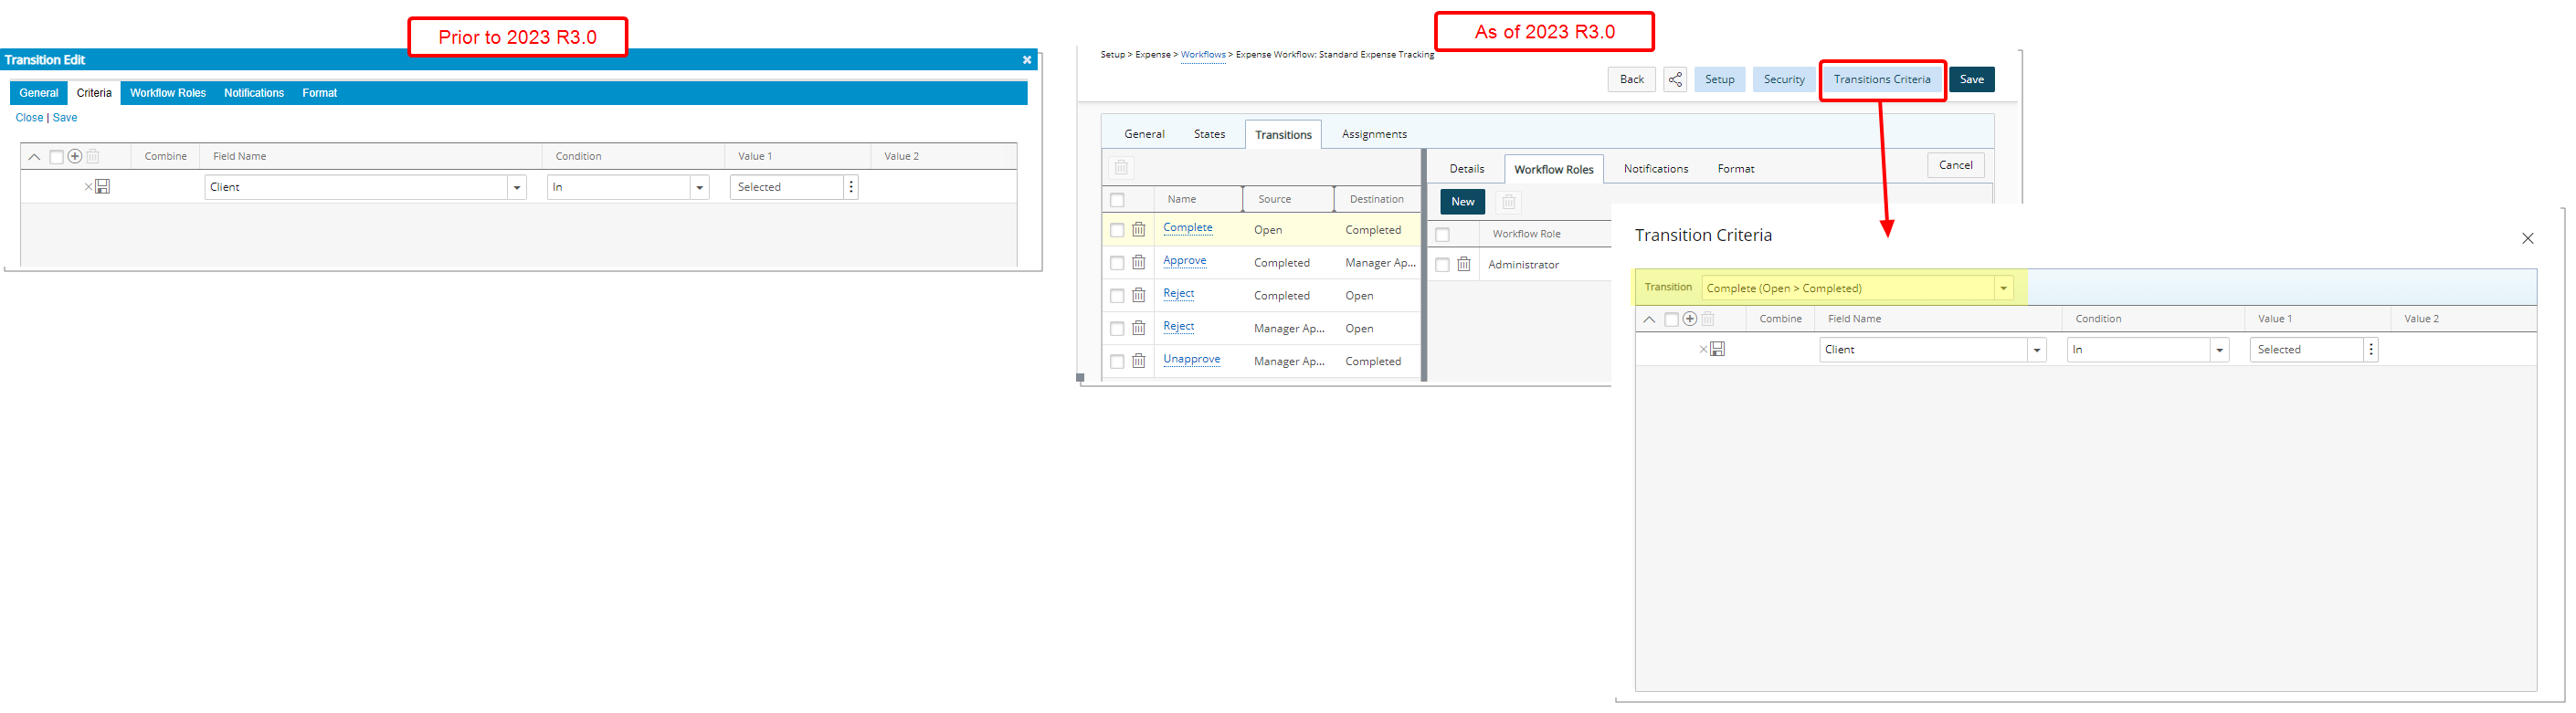
The former Criteria sub-tab available only for Expense Workflows is now accessible by clicking the Transitions Criteria button located on top of the page.
From the Transition Criteria dialog box you can conveniently select the required transition from the list of available Transition located on top of the table and make any necessary modifications.
This improvement allows you to have easy access to manage all transitions from a central location.
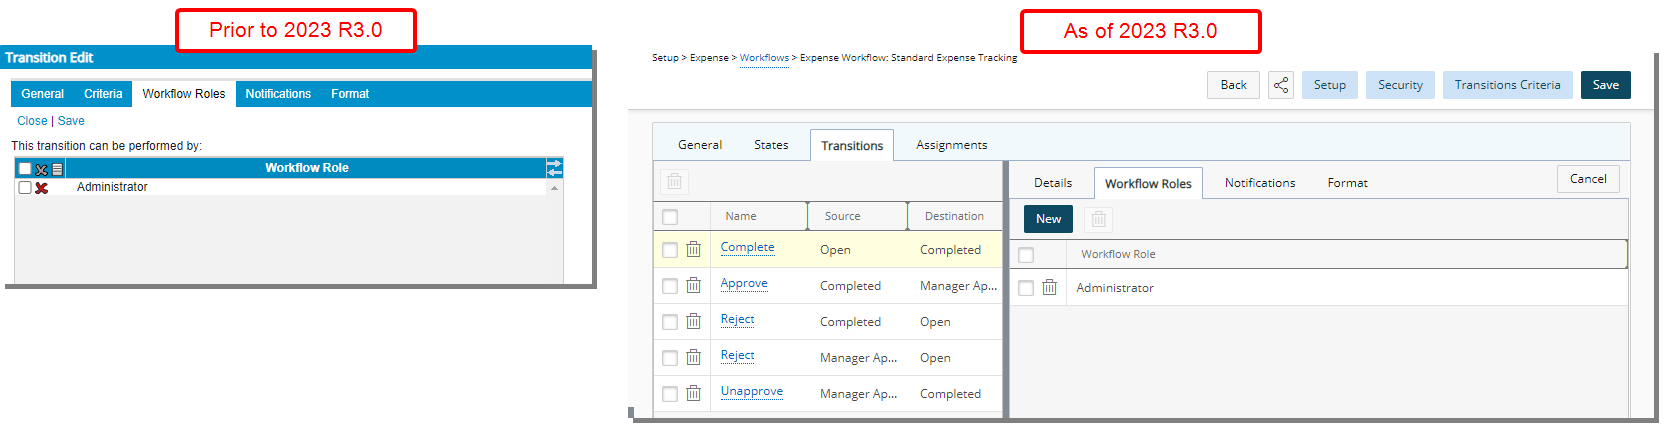
The Workflow Roles sub-tab has been revamped with a new, clean look. Furthermore, the following improvement was also made:
- When making modifications in the Workflow Roles sub-tab you no longer have to click the Save button. You can still navigate to other tabs and view your changes on the graphical interface. Click Save only once you are finished with all your modifications.
- Clicking the Cancel button will display the graphical representation of the workflow within the right pane.
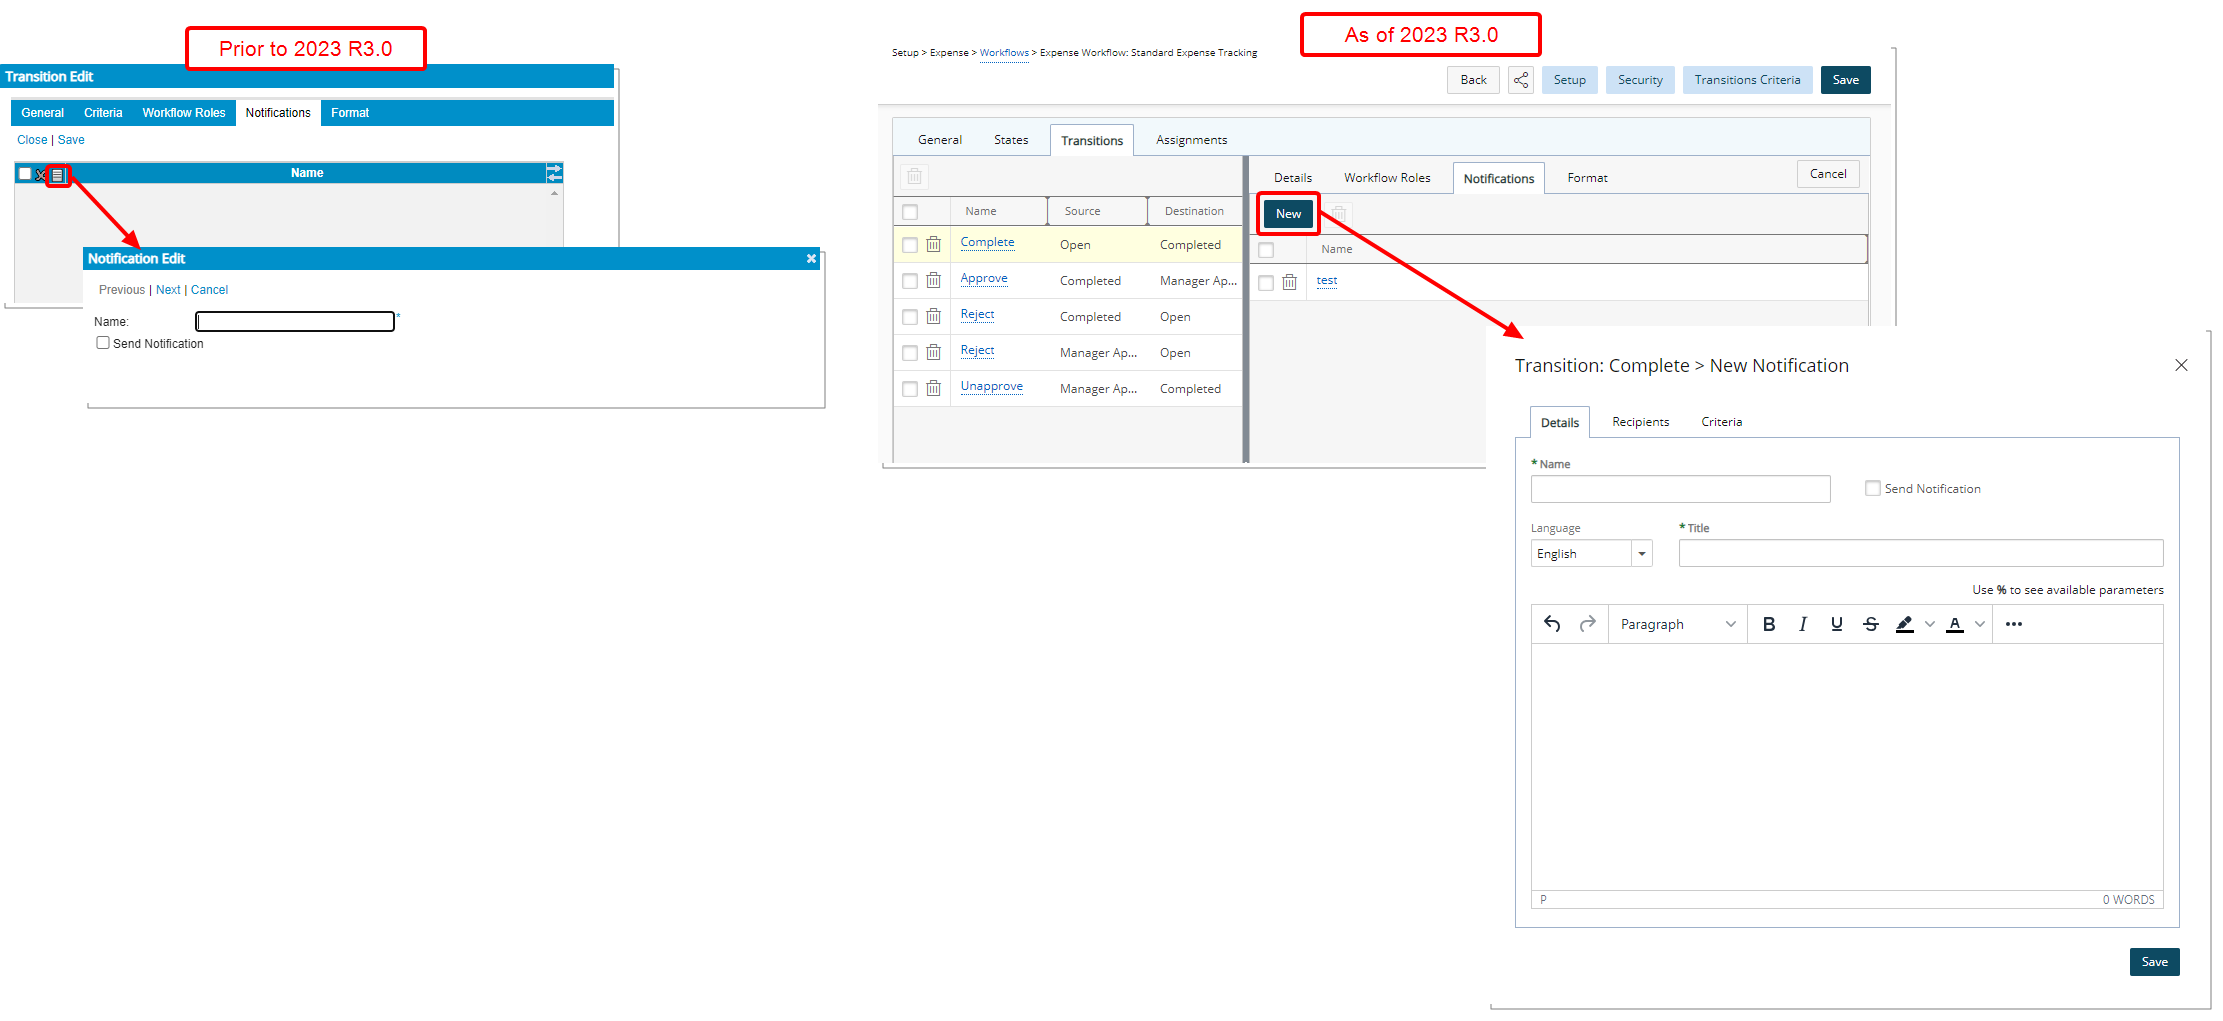
The interface and process of creating/modifying a Notification has been redesigned to reduce the number of click-through. In past releases, it was necessary to click through a structured sequence of screens to create a Notification.
As of this release you can access all the necessary information related to the Notification you are creating/editing from one dialog box by navigating to the Details, Recipients, Criteria and Escalation tabs. Enter/select the required information and then click Save.
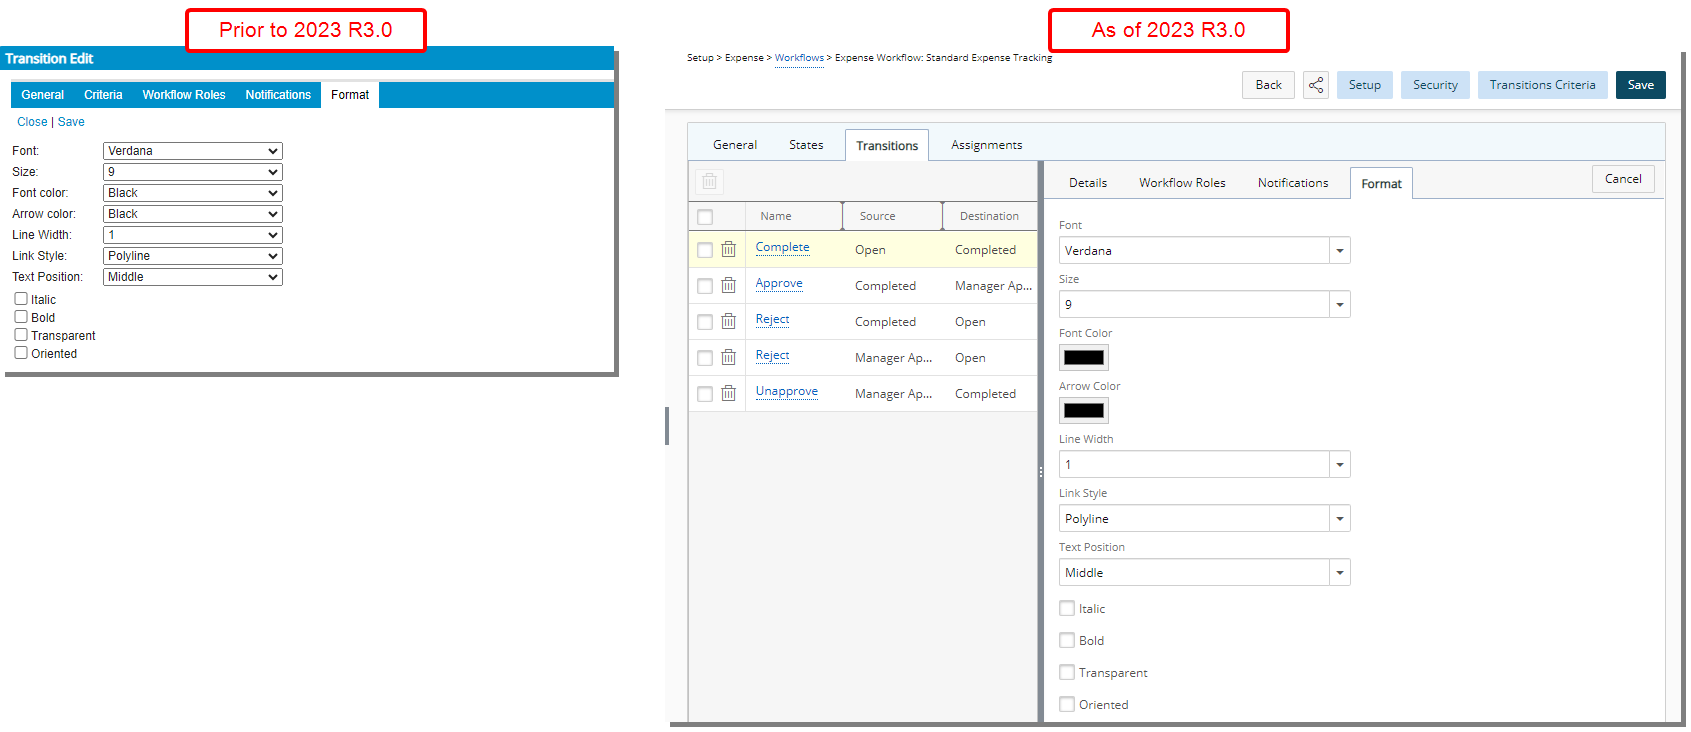
The Format sub-tab has been revamped with a new, clean look. Furthermore, the following improvement was also made:
- When making modifications in the Format sub tab you no longer have to click the Save button. You can still navigate to other tabs and view your changes on the graphical interface. Click Save only once you are finished with all your modifications.
- Clicking the Cancel button will display the graphical representation of the workflow within the right pane. Any changes made in the Details and Format tabs will be lost unless saved.
- The color picker located under the Format sub-tab was redesigned so that you can now choose a color for Font color, Border color and Back color from a color wheel or by entering the required RGB/HEX/HSL color value.
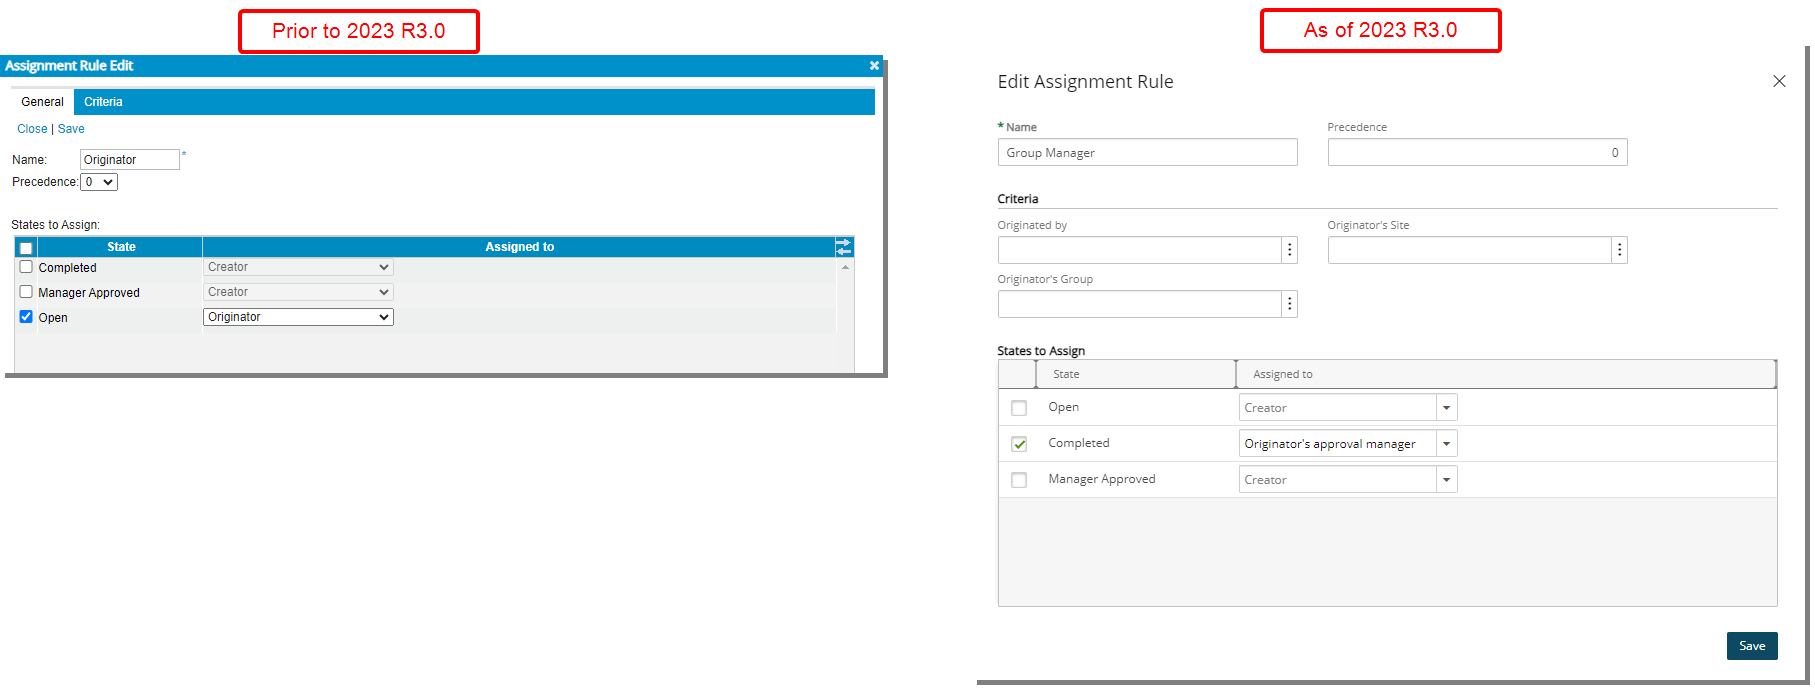
The Assignment Rule Edit dialog box has been redesigned and renamed to Edit Assignment Rule. All Workflow States and their respective Assignments can now be accessed from the Assignment Rule Edit dialog box.
The Criteria sub-tab is now a section within the Edit Assignment Rule instead of a sub-tab as in previous releases.
These improvements allow you to create/modify an Assignment Rule without significant click-through.
Work Breakdown Structure (WBS)
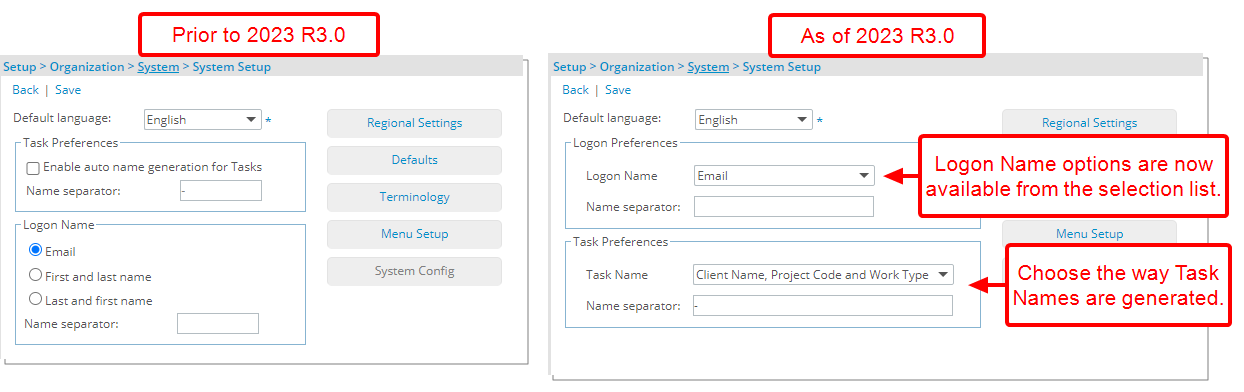
Description: From the Task Preferences section located within the Organization System Setup page, administrators can now choose the way Task Names are generated. The available options are:
- Client Name, Project Code and Work Type
- Client Name, Work Type and Project Code
- Project Code and Work Type
- Work Type and Project Code
Note: When modifying the Task Name preference, your modification will affect all future Tasks that are created.
Furthermore, the Logon Name section was renamed to Logon Preferences and moved above the Task Preferences section. The previous selection boxes for Email, First and last name and Last and first name are now available from the Logon Name selection list.
Benefit: This new improvement offers administrators the freedom to customize how Task Names are created. Users can organize and identify Tasks more efficiently within the Work Plans. This results in better task/resource management and a reduced likelihood of errors or confusion.
For further details refer to: Configuring Task Name Preferences
Description: Two improvements are now available through the Project List:
- Addition of a new Is a placeholder Filter option which allows you to filter the list and view Projects which are marked as Placeholder.
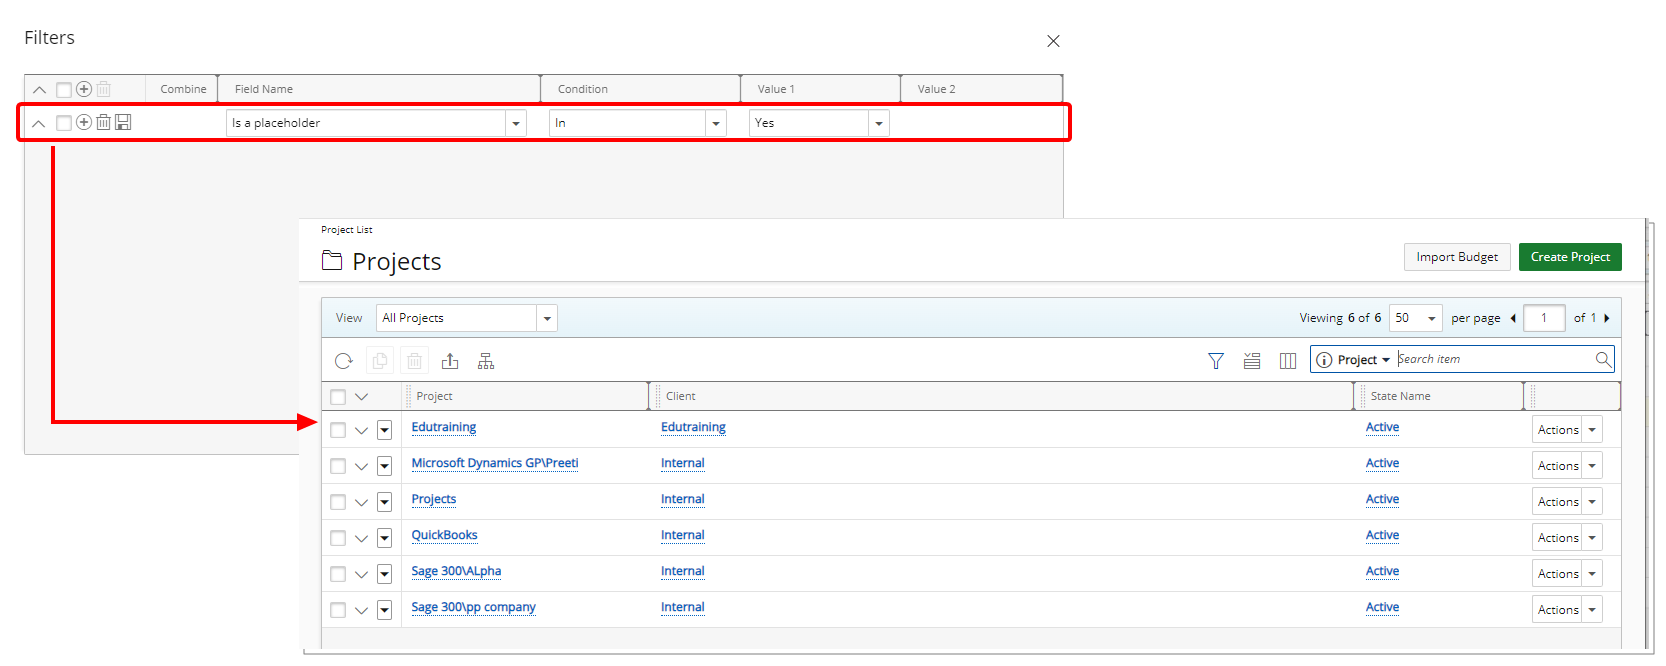
- The name of a Parent Project listed within the Parent column is now linked to its respective Project edit page.
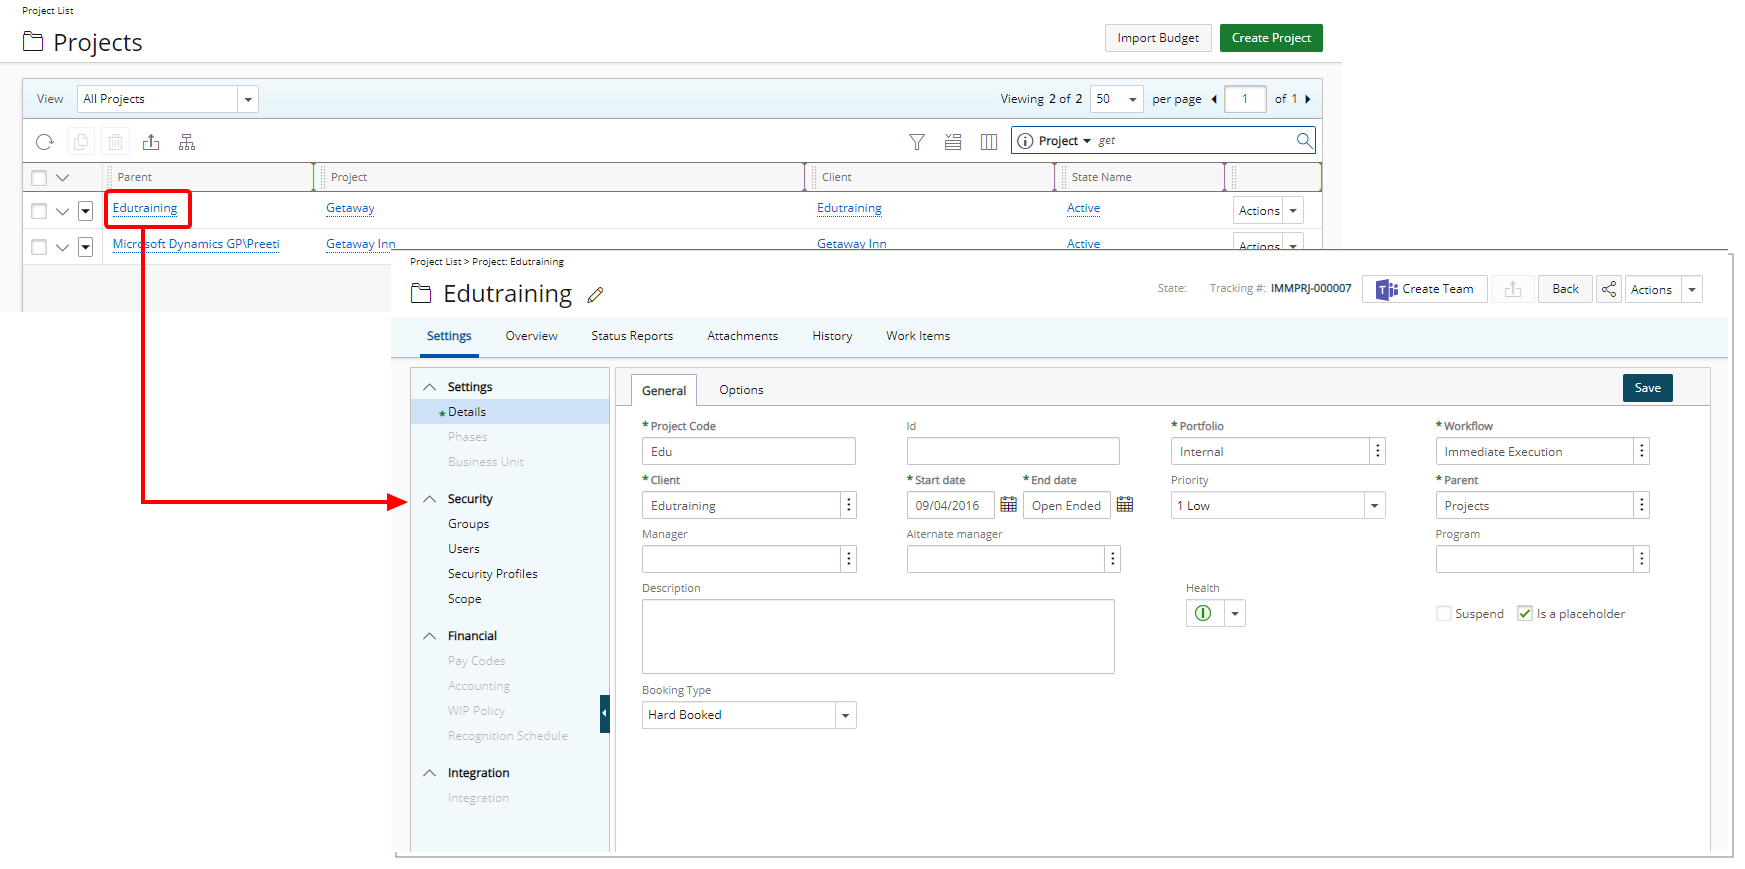
Note: An error message is displayed if the Parent Project is out of the logged user’s scope.
Benefit: With these improvements you can now filter the list to include or exclude Placeholder projects and easily access a Parent Project.
For further details refer to: Out-Of-The-Box Column Selection options | Project List
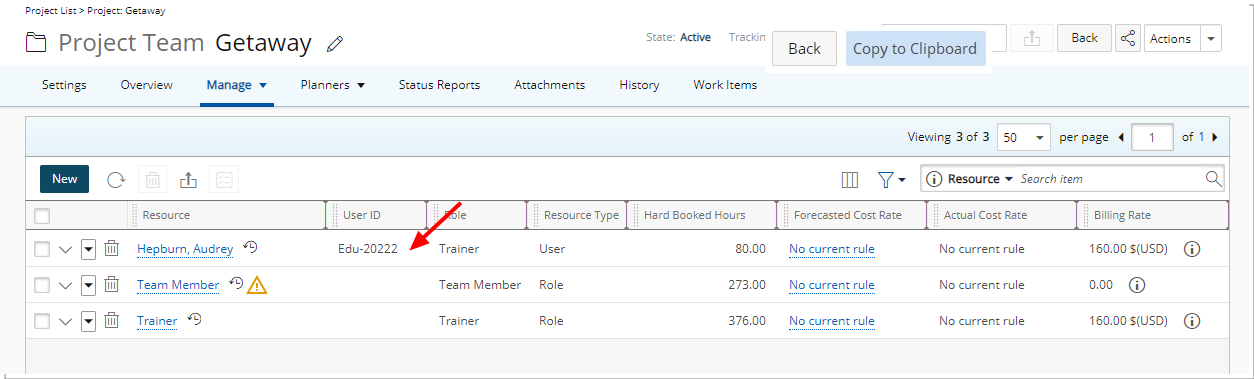
Description: The new User Id column is now displayed by default within the Project Team page.
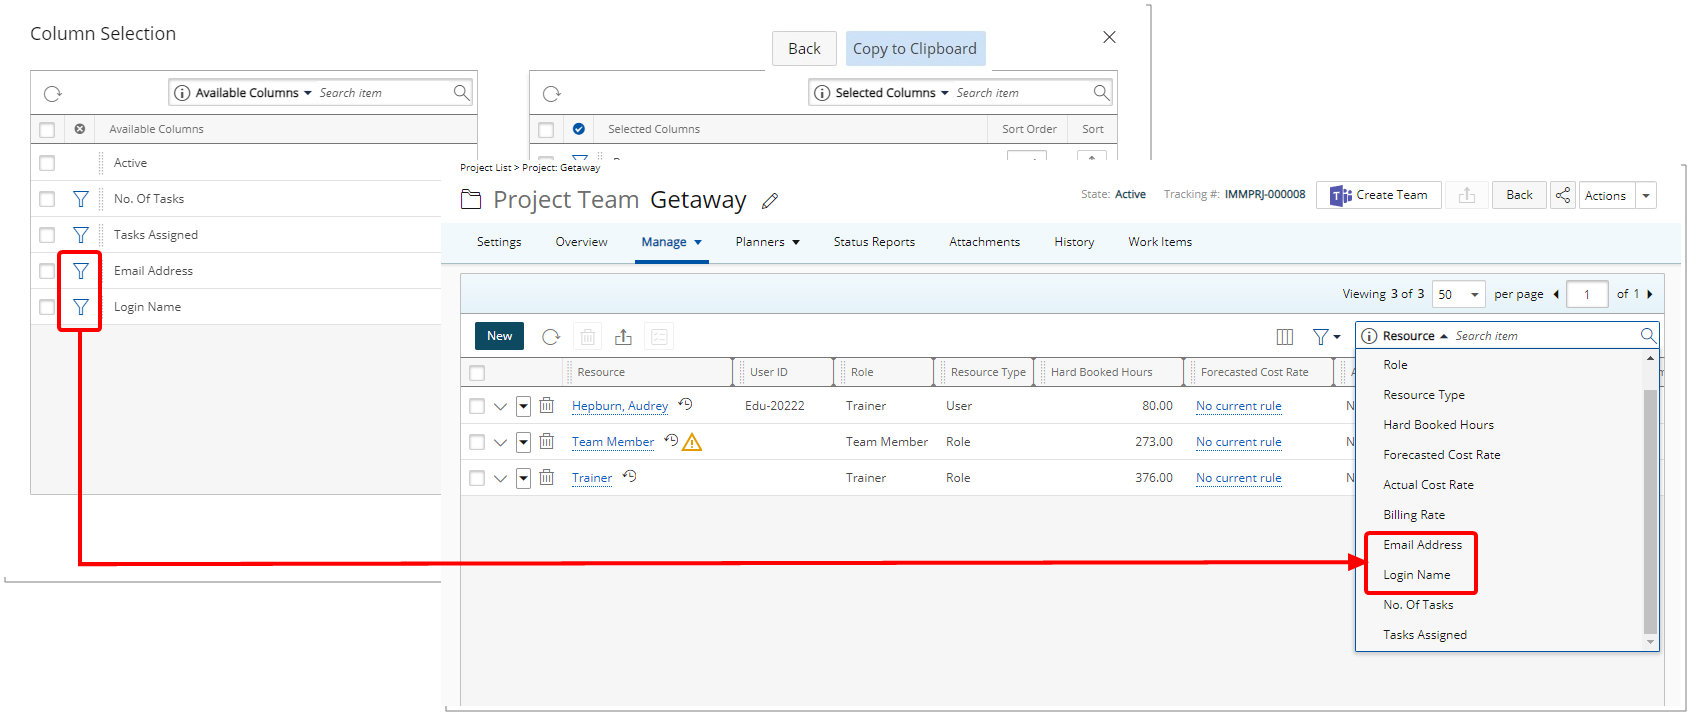
Furthermore, from Column Selection ![]() , you can now also choose to include Email and Login Name as columns and Search criteria.
, you can now also choose to include Email and Login Name as columns and Search criteria.
Benefit: You can now easily identify users by their ID, Email and/or Login Name.
For further details refer to: The Project Team page
Work Item Manager
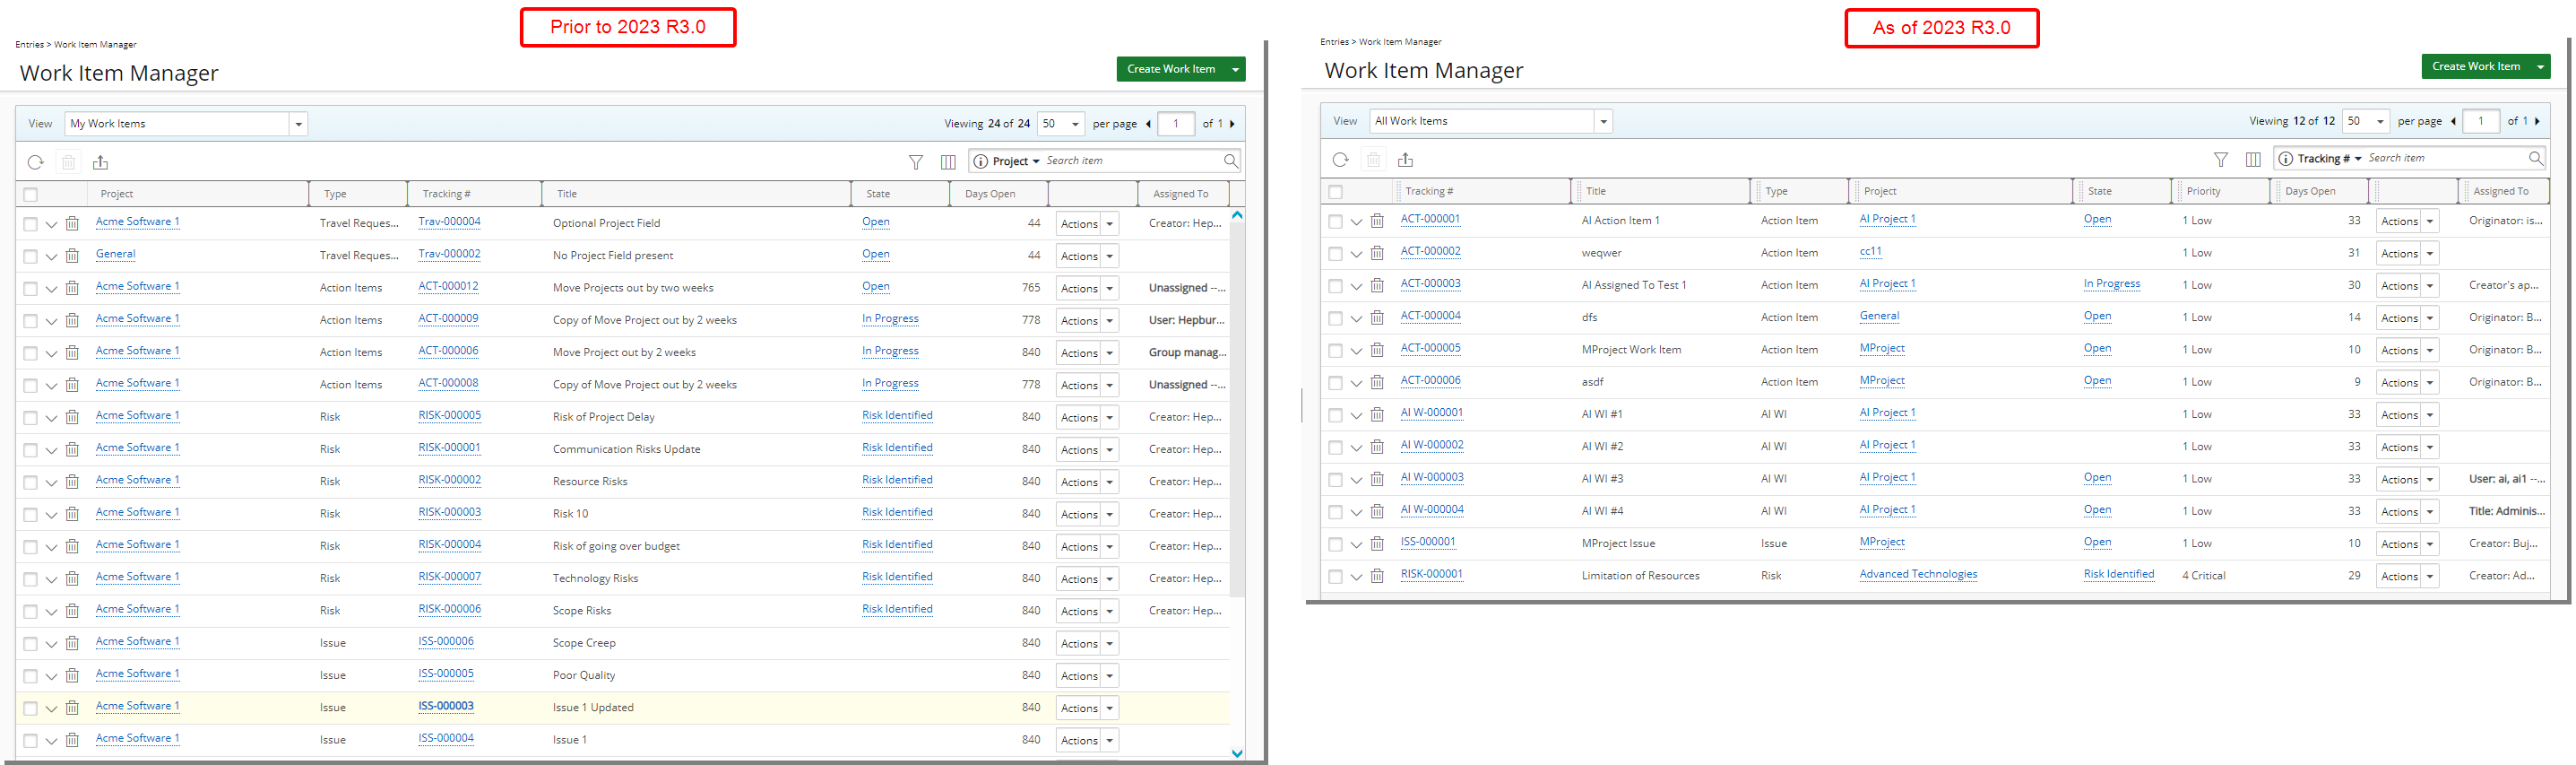
The following two improvements have been made to the Work Item Manager:
- The default column order is now as follows: Tracking#, Title, Type, Project, State, Priority, Days Open, Actions and Assigned To.
- From the table header:
- You can easily sort the columns by ascending or descending order simply by clicking a column header. Note that an arrow indicates the descending () or ascending () order applied to the column.
- Click and move a column to the desired position.
- You can now dynamically resize column(s), to your preferred width. Simply move your cursor to the column boundary () you want to resize. When the cursor becomes a resize cursor, click and drag the column accordingly.
- You can easily sort the columns by ascending or descending order simply by clicking a column header. Note that an arrow indicates the descending (
For further details refer to: Work Item Manager Views
Deprecated/Unsupported Functionality
This strategic refinement aims to enhance user experience by simplifying processes. The following areas and fields have been gracefully retired:
- The following fields were removed from Invoice Setup (Setup > Financial > System > Invoice):
- Default Pre-Billing Workflow
- Pre-Billing Report Template
- The Pre-Billing Approval parent and child workflows were removed from Work Processes (Setup > Work Processes).
- The Create Pre-Billing Entry selection was removed from Financial Workflows (Setup > Financial > Workflows > Workflow edit).
- Pre-Billing section on the left menu was removed from Work Processes.
- Pre-Billing options at the bottom of Entry Statistics page of Work Processes was removed.
- The following fields were removed from Invoice Edit (Financial > Invoice Manager):
- Pre-Billing Workflow
- Pre-Billing Report Template
- The term Pre-Billing was removed from the Terminology (Setup > Organization > System > System Setup)
- The Pre-Billing workflow is no longer available from the Work Processes in Security Profile.
- WP Pre-Billing Approval Project KPI was removed from:
- Setup > Work > Project Status Templates > Project KPIs
- Setup > Work > Project Overview > Layout
- Project list > Column selection
- Program > Project list > Column selection
- From API - api/v2/Invoices the following has been removed:
PreBillingRepTemplateId(integer)PreBillingWorkflowId(integer)
The following integrations are no longer supported and removed from PSA:
- SAP R/3 Accounting System
- SAP Business One Accounting System
- Intacct Accounting System
The Client Central, Resource Central and Document Central are deprecated and no longer available in PSA.
Note: The Portals section will appear in the left navigation only when there is at least one Dashboard accessible.
As of this release Work Processes are deprecated and no longer available in PSA:
- All Work Process related links and pages are removed.
- All RDLC reports related to Work Processes are removed.
- Work Process data will be available only through Upland Analytics Reports.
Tip: It is recommended that you use the Work Items going forward.
As of this release the Purchase & Requisition module is deprecated and no longer available in PSA.