PSA 2024 R1.0 - Product Enhancements
Below is a summary of the features included in PSA 2024 R1.0.
- API/SDK
- Charge/Product Entries
- Expense
- Integration
- Invoicing
- Notifications
- Organization Breakdown Structure (OBS)
- Reporting
- Resource Management
- Security
- Timesheet
- Timesheet Manager
- Timesheet Templates
- Upland Analytics
- Work Breakdown Structure (WBS)
- Work Items
- General
2024.01.16.2024R1.0.V1.EB, 2024.02.09.2024R1.0.V2.EB
Note: This page may be updated as new information becomes available. Visit regularly for the latest updates.
API/SDK
Description: You can now suspend a Group through the API, provided there are no active Users or Roles associated with it. Additionally, you can perform the following actions:
- Create a new child Group under a suspended Group.
- Modify a suspended Group.
- Modify the Group field of an object from a suspended Group to an active one.
However, there are limitations:
- You cannot create or modify a dependent object with a Suspended Group.
- It is not possible to Suspend a Group that serves as a Placeholder; the Suspend and Placeholder settings are mutually exclusive.
Caution: It is highly encouraged to use a Security Profile with Administrative privileges when working with the API. However, if you need to use a less privileged Security Profile, please ensure that all required permissions are granted.
Description: You can now suspend a Work Type through the API, provided there are no active Tasks associated with it. Additionally, you can perform the following actions:
- Modify a suspended Work Type.
- Modify the Work Type field of an object from a suspended Work Type to an active one.
However, there are limitations:
- You cannot create or modify a dependent object with a suspended Work Type.
- It is not possible to Suspend a Work Type that serves as a Placeholder; the Suspend and Placeholder settings are mutually exclusive.
Caution: It is highly encouraged to use a Security Profile with Administrative privileges when working with the API. However, if you need to use a less privileged Security Profile, please ensure that all required permissions are granted.
Description: You can now suspend a Client through the API, provided there are no active Projects associated with it. Additionally, you can perform the following actions:
- Create a new child Client under a suspended Client.
- Modify a suspended Client.
However, there are limitations:
- You cannot create or modify a dependent object with a suspended Client.
- It is not possible to Suspend a Client that serves as a Placeholder; the Suspend and Placeholder settings are mutually exclusive.
Caution: It is highly encouraged to use a Security Profile with Administrative privileges when working with the API. However, if you need to use a less privileged Security Profile, please ensure that all required permissions are granted.
Charge/Product Entries
Description: When the Convert Attachments to Image is turned on, any new multi-page PDF Receipt/Attachment to a Charge or Product Entry is now converted to individual JPG files (each PDF page is converted to an individual JPG file) according to the set resolution (DPI).
Please contact PSA Support for the exact location of your files and usage examples.
Benefit: With this improvement, the converted Receipt/Attachment can now be referenced and included in your custom RDLC reports.
Note: The (PDF) Convert Attachments to Image setting must be turned on. If you are interested in using this functionality, contact PSA Support to discuss your specific business requirements.
Expense

Description: The Title of an Expense Report is now updated automatically to reflect modifications made to its Originator, Start Date, and/or End Date values.
Upon modifying the Date or Originator values, a confirmation message is displayed that reads: The Originator, Start Date, and/or End Date have been changed, do you want to regenerate the Expense Report Title?
Selecting Yes will lead to an automatic update of the Expense Report Title with the new values. Conversely, clicking No will maintain the Expense Report Title as is, without any updates.
Benefit: This new feature eliminates the need for manual Title adjustments, enhancing efficiency and reducing the margin for error in Expense Reporting.
For further details refer to:
- Creating an Expense Report
- Renaming an Expense Report
Integration

Description: The new Export Negative Debits as Positive Credits and Negative Credits as Positive Debits option is now available from the Accounting tab of Financial Settings page (Setup > Financial > System) for exporting to Microsoft Dynamics GP Accounting System.
This option provides you with the ability to customize the Export settings for a more tailored experience when exporting to Microsoft Dynamics GP. When selected, all Negative Debits will be exported as Positive Credits and all Negative Credits will be exported as Positive Debits.

The results of this enhancement will be visible only in Microsoft Dynamics GP. There will be no changes to any values in PSA ensuring that current Negative Debits and Negative Credits in PSA remain unchanged.
Note: The Export Negative Invoices as Credit Notes and Export Negative Debits as Positive Credits and Negative Credits as Positive Debits options are mutually exclusive.
Benefit: By aligning with established accounting standards, this ensures that General Ledger entries maintain conformity with the convention of exclusively having positive values for Credits and Debits. This enhances clarity and consistency in financial reporting, facilitating a more straightforward and compliant accounting practice.
For further details refer to PSA- Great Plains Integration
Invoicing

Description: The selected date-based Search Filter within the Invoices tab (Financial > Invoice Manager) is now remembered and loaded upon subsequent visits by the same User and same browser.
Note: When choosing a Filter such as This Week, This Month, Last Month, This Quarter, Last Quarter, This Year, Year to Date, This Fiscal Month and Last Fiscal Month, your selection is remembered as a reference relative to the current date.
Benefit: When navigating away from the Invoices tab (Financial > Invoice Manager), you no longer need to reapply a date-based Search Filter, making for a smoother transition and a more streamlined user experience.
For further details refer to Working with Invoice Manager.
Notifications

Description: A newly introduced System Notification titled Project Manager Notification on Timesheet Resubmission is now available from System Notifications page (Setup > Notifications). This notification will only be triggered when the Partial Rejection selection box is selected within the applicable Project Manager assigned State. The Notification will only be sent to Project Managers who rejected certain Time Entries, and subsequently, the User resubmitted these Entries.
If a user receives a partial rejection on their Time Entries and adds a new Assignment before resubmitting the Timesheet, the assigned Project Manager for the new Assignment will receive the system notification. This notification will also be sent to project managers for any other resubmitted entries.
In cases where the same Project Manager rejects Entries for different Projects managed within the same period, a single notification containing information on all the Projects will be sent to that Project Manager.
Note: Available only when using New Timesheet.
Benefit: The new Project Manager Notification on Timesheet Resubmission System Notification ensures that Project Managers receive prompt alerts upon the resubmission and reassignment of timesheets, enabling them to stay well-informed about pending approvals.
For further details refer to
- Available out-of-the-box System Notifications
- System Notification Parameters
Organization Breakdown Structure (OBS)

Description: A new Suspend selection box is now available from the General tab of Group Edit page. Please note that a Group cannot be suspended if there are active Users/Roles associated with the Group either as Functional, Approval and/or Resource.
Suspended Groups are:
- Visually highlighted in red within the Groups list.
- Presented in red and are non-selectable in browse-for-item list pages.
- Hidden in selection lists.
- Available for selection in Filters and reporting
- Available from the Resource Scheduling Work Plan

A new Filter button is available from the Groups list page, offering Active and Suspended options. By default, both options are selected, and the filter icon is grey. If either or both selection boxes are unchecked, the Filter button turns blue, and the View switches to a flat list.
Note that any existing and active actuals such as Invoices, Users, Projects, Tasks, Work Types or Timesheet Templates associated with a suspended Group are allowed and stay as such in the system.
A new Parent Field is now also available from the Group list Column Selection ![]() . When included in the table, the parent group names within this column are hyperlinked to their respective edit pages. By default you can also Search for groups based on their Parent Group name. Note that you can choose to hide this search option from Column Selection
. When included in the table, the parent group names within this column are hyperlinked to their respective edit pages. By default you can also Search for groups based on their Parent Group name. Note that you can choose to hide this search option from Column Selection ![]() .
.
Furthermore, a new Is_Suspended column is now available from the Excel Import Template under the Groups sheet.
Note:
- Deletion of a User’s current Group is not allowed when the next-to-be current Group is already suspended.
- The System Default Group cannot be Suspended.
- The Is a placeholder and Suspend settings are mutually exclusive.
- A suspended Group can be selected in a Custom User Defined Field.
For further details refer to:
- Suspending a Group
- Groups list page

Description: The following two new options are now available from the properties dialog box of User Defined Fields associated to Users allowing you to have an insight on the modified values:
- Keep History
- Count of records
Select the Keep History option to keep a history of the modified values, then enter the number of records you would like to keep for each User Defined Field in the Count of records box.
Note: By default, 10 records are kept.
You can then access the User Edit page and click the History button to view the detailed History page.

From the User Defined History page you can:
- Refresh
 the list.
 - Export
 the list to Excel.
 - Search
 the list based on Value, Date Modified and Changed by criteria.
 - Pagination is available at the top right corner to facilitate easy navigation across multiple pages.
- From the table header:
- You can easily sort the columns by ascending or descending order simply by clicking a column header. Note that an arrow indicates the descending (
 ) or ascending (
 ) order applied to the column.
 - You can now dynamically resize column(s), to your preferred width. Simply move your cursor to the column boundary (
 ) you want to resize. When the cursor becomes a resize cursor (
 ), click and drag the column accordingly.
- You can easily sort the columns by ascending or descending order simply by clicking a column header. Note that an arrow indicates the descending (
Note:
- All dates and time stamps are displayed in the logged Users Active Site Time Zone.
- Default User Defined Field values are not considered in the History.
Upon removing the Keep History option from a User Defined Field, the following confirmation message is displayed “Do you want to keep existing historical records?”
- Choosing Yes will retain the already existing historical data for the User Defined Field. This historical data will remain accessible from the User Edit page. However, no new records will be kept.
- Opting for No will lead to the removal of both the historical data and the History button.
For further details refer to Keeping the historical values of User Defined Field associated to Users.

Description: When a user is terminated, the system now automatically removes all future Entries which are in a State that allows removal.
Upon modifying the Termination date to an earlier date, a confirmation dialog is displayed informing you of the number of Entries that will be deleted.
Clicking No will cancel the process. The Termination date will not change, and no data will be deleted.
Upon clicking Yes, the system will remove all Entries that are in a State that allows deletion. Any Entries that are not deleted will be listed within the Errors dialog box which gives you an insight on the following information:
- Entry Type: Type of the Entry such as Time/Leave Request/Expense/Charge/Product.
- Entry Date: Date when the entry was created.
- Entry Amount: The amount associated with the Entry.
- Task: Task associated with the Entry.
- Reason: Reason why the Entry could not be deleted.

From the Errors dialog box, you can easily copy the information to your clipboard for future reference. You must proceed to delete these Entries manually before attempting to modify the Termination date.
Benefit: This improvement simplifies user termination procedures, reducing manual effort and potential oversight by automatically removing future entries.
For further details refer to Updating a user's Hire or Termination Date.

Description: You can now use decimal values when specifying the % Target Utilization for Users and Groups.
Note: The Number of decimal places as well as the Decimal separator is based on your Regional Settings.
Benefit: This allows Project Managers to precisely set the Target Utilization to accurate values, enhancing the precision and flexibility in managing Project resources.
For further details refer to:
- Setting Target Utilization for a User
- Setting Target Utilization for a Group
Reporting

Description: In past releases, the Excel 2003 and Word 2003 options were available when saving RDLC reports. These two options are now hidden by default and are no longer available for selection.

However, the option Enable RDLC reports to export to Excel/Word 2003 is now available from the System Configuration page (Setup > Organization > System > System Setup) accessible only by the Master Administrator User Profile. You can enable this setting if you still require your users to save RDLC reports in Excel/Word 2003 format.
Benefit: This improvement removes any uncertainty during the saving process, providing a more straightforward experience and eliminating the need to choose between different versions. Additionally, the inclusion of the Enable RDLC reports to export to Excel/Word 2003 in the System Configuration page provides a tailored solution for users who still require the legacy Excel and Word formats.
For further details refer to:
- System Configuration page
- Enable RDLC reports to export to Excel/Word 2003
Resource Management

Description: In past releases all Time fields within the Summary section of the Project Work Plan displayed the values in time format. As of this release, modifications have been made to display the values of the following fields in decimal format:
- Time (hrs)
- Billable Time (hrs)
- Non-billable Time (hrs)
- Work Plan (hrs)
- Billable Work Plan (hrs)
- Non-Billable Work Plan (hrs)
- EAC (hrs)
- Billable EAC (hrs)
- Non-billable EAC (hrs)
Benefit: This improvement ensures a consistent time format across the Summary, Work Plan grid as well as the Financial Planner.
For further details refer to Summary section | Project Work Plan.

Description: You can now choose Show Non-working days from the Details tab when modifying a Work Plan View.

When selected, a yellow bar located at the bottom of the cell will be displayed when using the Group By Resource View (Weekly, Monthly or Quarterly timeline views only), visually distinguishing Non-working days.
Clicking on this bar will show a tooltip displaying the Details of the Non-working day. The details will include the following information:
- Approved Leave Requests created by a User.
- Days designated as Holidays.
- Custom Non-working Days from the System Calendar (with and without notes).
- Custom Non-working Days from the User Calendar (with and without notes).
Note: A Holiday flagged as Can be a working day will not be shown as a Non-working day, and it will be excluded from the Non-working days tooltip.
You can choose to have this indicator displayed on the following Work Plans:
- My Work Plan
- Resource Scheduling
- Project Scheduling
- Project Work Plan
- Group Work Plan
- User Work Plan
Benefit: This visual indicator streamlines resource management, making it easier for you to identify and manage Non-working days within your Work Plans. Additionally, the ability to access detailed information by clicking on the bar provides a quick and convenient way to view the specifics of Non-working days.
For further details refer to Non-Working Day Indicator.

Description: In past releases, an On-Page Filter applied to a Read-only Public View was inadvertently available to all users of the system with access to the View.
As of this release, modifications have been implemented to ensure that On-Page Filters are now exclusively available to the User creating them and applied upon subsequent visits by the same User across all browsers.
This improvement will be available from all Work Plans:
- My Work Plan
- Resource Scheduling
- Project Scheduling
- Project Work Plan
- Group Work Plan
- User Work Plan
Caution: Upon upgrading, any existing On-Page Filter for a Read-only Public View will be applied to the View definition itself.
For further details refer to Applying an On-Page Filter to a Work Plan.
Security

Description: The following three new security permissions are now available from Setup > Organization > System > Security > Security Profile > Management > Central with Yes/No access rights:
- Users List with All Users View: When enabled, users will have access to the All Users View.
- Users List with Everyone who reports to me View: When enabled, users will have access to the Everyone who reports to me View and see all Users who report to them directly or indirectly.
- Users List with My direct reports View: When enabled, users will have access to the My direct reports View and see all Users falling under any Group for which they are the named Manager.
Note:
- At a minimum, the View right to the User must be granted (Setup > Organization > System > Security > Security Profile > Setup > Organization) to access the Users list page.
- By default, these permissions are selected, and all three Views are available to the Administrator Security Profile.
- Upon upgrading, the Users List with All Users View will also be available to any Security Profile with the rights to the Users list.
Benefit: This improvement aims to grant Group Managers access to the Users List, enabling them to effortlessly view all users assigned to their respective Groups. This functionality establishes a user-friendly homepage tailored to the needs of Group Managers.
For further details refer to Granting the right to the Users list Views.

Description: The following two new security permissions are now available from Setup > Organization > System > Security > Security Profile > Setup > Financial with Yes/No access rights:
- Can associate Billing Rules to non-Project Team members
- Can associate Cost Rules to non-Project Team members
When the options are selected (behavior in previous releases):
- Upon modifying a Project Team Member Cost/Billing Association, the page will list all resources (within/outside) the current Project that are associated with the Rate Rule.

- Upon creating a new Rate Rule Association:
- Depends on is set to None and can be modified.
- Name field is disabled by default. It will be modifiable as soon as a selection is made for Depends on.
- For any of the selections made for Depends on (Task, Project, Work Type, Client), the corresponding list page will show all items within the system.
Note: By default, both options are selected for the Administrator Security Profile.
When the options are un-selected:
- The Rate Rule Associations table contains only Resources belonging to the Project Team. The column Depends On displays two types of dependencies: Project and Tasks belonging to the current project.

- Upon creating a new Rate Rule Association:
- Only Resources belonging to the Project Team are listed.

- Only two options are available for the Depends On field:
- When Project is selected as Depends On option, the corresponding Project will automatically be populated and read-only.
- When Tasks is selected as Depends On option, the corresponding Task List will only contain the Tasks associated to the current Project.
- Only Resources belonging to the Project Team are listed.
Benefit: Administrators now can finely tune access rights related to Project Team Cost and Billing rate Rule associations. These security permissions provide a granular control mechanism, empowering administrators to tailor permissions according to specific organizational needs.
For further details refer to Granting the right to associate Billing and/or Cost Rules to non-project Team members.

Description: The security permission Can create Work Items on behalf of others is now available from Setup > Organization > System > Security > Security Profile > Entry > Work Item with Yes/No access rights.
Note: By default, Can create Work Items on behalf of others security permission is turned on only for the Administrator Security Profile.
Benefit: This security permission provides more precise control over who can create Work Item Entries on behalf of other users by allowing administrators to specify which Security Profiles have this ability.
For further details refer to Granting the right to create Work Items on behalf of others.

Description: The new Rejection Notes are optional security permission is now available from the User Security Profile page (Setup > Organization > System > Security > Management > Time).

When selected, entering a Note is optional for users with this security permission upon rejecting a Timesheet.
Note:
- By default, Rejection Notes are optional security permission is turned on only for the Administrator Security Profile.
- Not applicable in the mobile version of PSA.
Benefit: This new permission allows users assigned to the specific Security Profile to reject a Timesheet without providing a Rejection Note.
For further details refer to Granting the right for Optional Rejection Notes.

Description: A new option, Can create adjustments, is now available from the User Security Profile (Setup > Organization > System > Security > Entry > Time) with Yes/No access rights.
This option specifically governs the New Timesheet end user's ability to access and modify Adjustments, but only when both Show Adjustments and Can Enter Adjustments options are enabled at their Timesheet Template level.
Note: By default, Can create adjustments security permission is turned on for all Security Profiles.
The table below illustrates the specifics of various cases.
| Can Create Adjustments (Security Profile) | Can Enter Adjustments (Timesheet Template) | Show Adjustments (Timesheet Template) | Can enter Adjustments on My Timesheet |
|---|---|---|---|
| Turned on | Turned on | Turned on | Yes |
| Turned on | Turned on | Turned off | No |
| Turned on | Turned off | Turned on | No |
| Turned on | Turned off | Turned off | No |
| Turned off | Turned on | Turned on | No |
| Turned off | Turned on | Turned off | No |
| Turned off | Turned off | Turned on | No |
| Turned off | Turned off | Turned off | No |
This new Security option is interlinked with the existing Can enter adjustments on behalf of others option (Setup > Organization > System > Security > Management > Time), with the new option serving as the parent of the latter.
The table below illustrates the specifics of various cases.
| Can Create Adjustments | Can Create Adjustments on behalf of others | Logged user can create/modify Adjustment for him/herself | Logged user can create/modify Adjustment for others |
|---|---|---|---|
| Turned off | Turned off | No | No |
| Turned off | Turned on | No | No |
| Turned on | Turned off | Yes | No |
| Turned on | Turned on | Yes | Yes |
Benefit: This granular control ensures that adjustments are made only by authorized users of New Timesheet, promoting data accuracy and integrity.
For further details refer to Can create adjustments security permission for New Timesheet.
Timesheet

Description: In the legacy Timesheet, Users of a Monthly Template were able to view the entire month without horizontal scrolling. Improvements have been made to the Density settings of New Timesheet to allow for the same user experience.

From the Display Settings menu you can now choose Compact or Comfortable from the newly added Horizontal Density option. This new Density is available only for non-weekly Timesheet Templates. By default, the compact setting is selected for a Monthly Timesheet Template.
Note that the Density option has been renamed to Vertical Density. It functions in the same familiar way as in previous releases.
Furthermore, the font size within the right panel has been specifically adjusted to better align with the Compact view, resulting in a more cohesive and visually consistent look and feel across the entire page.
Note: Available only for New Timesheet.
Benefit: You can now view the entire month on your screen, eliminating the need for tedious scrolling or zooming. This enhancement ensures a seamless transition from the legacy Monthly Timesheet, providing you with a user-friendly interface and reducing the learning curve associated with the New Timesheet.
For further details refer to My Timesheet Display Settings.
Description: When creating an Adjustment through your Timesheet, Task Attributes such as Payable, Billable, Capitalized, Funded and/or R&D are now automatically applied to the Adjustment.
The inheritance of these Attributes is dependent on the Charge AND Task Attributes.
For the Adjustment Attribute to be Billable both Charge and Task Attributes must be Billable. Any other combination will result in a Non-Billable Adjustment as illustrated in the table below.
| Charge | Task | Adjustment |
|---|---|---|
| Billable | Billable | Billable |
| Billable | Non- Billable | Non- Billable |
| Non- Billable | Billable | Non- Billable |
| Non- Billable | Non- Billable | Non- Billable |
Note:
- If there is no Task Field included in the Timesheet Template, the Task Attributes are inherited from the System Default Task defined first at the User level (Setup > Organization > Users > edit User) and then WBS (Setup > Work > System) level respectively.
- Overrides to the inherited Adjustment Attributes occur when Attributes are specifically selected at the Project level.
- Available only for New Timesheet.
Benefit: This improvement ensures that Adjustments now inherit the Task Attributes accurately.
For further details refer to:
- Entering Adjustments in My Timesheet
- Automatically apply Adjustment Attributes

Description: Long notes are now wrapped within the Notes dialog box. By default, the first 3 lines of text are displayed. You can click the Show More/Show less links to view more/less lines.

Furthermore, when entering or modifying a note from the Timesheet tab, the entered text now wraps within the box dimensions, eliminating the need to scroll vertically.
Note: Available only for New Timesheet.
Benefit: Wrapping long Timesheet notes not only ensures improved readability and clarity but also eliminates the need for vertical scrolling, enhancing the overall user experience.
For further details refer to Timesheet Notes.

Description: The new Client, Project and Project Manager columns are now displayed by default within the Timesheet Notes dialog box.
Filtering and Column Selection are available through the ellipsis button located on each table column. You can choose to display the information in ascending or descending order.
Furthermore, you can:
- Rearrange the column position by drag/dropping the column to a new location.
- Adjust the column widths by dragging the column boundary.
Note: Available only for New Timesheet.
Benefit: This enhancement provides Timesheet approvers with improved insights while reviewing Notes, aiding in the decision-making process of approving, or rejecting Entries.
For further details refer to Timesheet Notes.

Description: In previous releases, choosing a Reason for Non-Working Time followed the same process as Assignment selection, necessitating the saving of your choice to include the Reason in the Non-Working Time section.
As of this release the process has been simplified, requiring fewer clicks. Once a Reason is selected, it is immediately displayed within the Non-Working Time section of your Timesheet.
Note: Available only for New Timesheet.
Benefit: This improvement reduces clicks and simplifies the process of selecting a Reason for Non-Working Time.
For further details refer to Entering Non-Working Time.

Description: The Timesheet Template Name is now prominently displayed after the breadcrumbs at the top of Timesheet page.
Note: Available only for New Timesheet.
Benefit: This enhancement guarantees effortless identification of the Timesheet Template being used, providing a convenient reference point. It allows for quick access to comprehend the total required hours needed to submit or complete the designated timesheet period, especially when such information is integrated into the Template Name.
For further details refer to Available options through My Timesheet.

Description: In past releases there were discrepancies displaying the rejection indicators when a Project Manager approved one Time Entry but rejected the Timesheet (rejecting one or more Time Entries). The system omitted the rejection indicator(s) from the Time Entry(ies) that were rejected by the Timesheet rejection.
As of this release, improvements have been made to show all rejection indicators for partially rejected Timesheets.
Note: Available only for New Timesheet.
Benefit: This improvement provides users with immediate and precise feedback on the status of their time entries allowing them to quickly identify and address any issues, facilitating efficient corrections and promoting a smoother approval process.

Description: The expanded or collapsed state of the Totals section in the new Timesheet is now remembered upon subsequent visits to the page by the same user and browser either through Entries or Timesheet Manager.
Note: Available only for New Timesheet.
Benefit: By maintaining your chosen state, the system accommodates individual preferences and promotes a more user-friendly experience allowing you to focus more on your tasks rather than repetitive manual adjustments.
Description: Improvements have been made to the handling of exceptions when Display Time Entries not created/updated by Timesheet owner as exception is enabled in a Timesheet Template. In this case, the exception message “Time Entry is not updated by Timesheet owner.” will no longer be displayed when a Timesheet approver is actioning on the Timesheet.
Note: Available only for New Timesheet.
Benefit: This improvement ensures that the exception is no longer triggered for the Timesheet approver, contributing to a smoother and more streamlined Timesheet approval process.
Description: When using In/Out Timesheet, Time Entries entered as 12:00 are automatically converted to 12:00 PM (noon) likewise Time Entries entered as 00.00 are automatically converted to 12:00 AM. Note that this conversion is at the database level.
Note: Available only for New Timesheet.
Benefit: This enhancement ensures that the entered time accurately reflects the user's intended input for improved clarity and convenience.
For further details refer to Entering Regular Time (Day In/Out Time).
Timesheet Manager

Description: By default, the Project Manager, Action Status, Approver, and Date Modified columns are now displayed in the Projects drawer of Timesheet Manager.
Note: The Projects drawer is available from the following out-of-the-box Timesheet Manager Views or any custom views based on: Assigned Timesheets, Everyone who reports to me, My direct reports, My Timesheets and Timesheet Administrator.
By default, you can now also search the list based on the above-mentioned criteria.
These columns and the available search criteria can be managed from Column Selection ![]() .
.
Benefit: This update ensures that essential information is readily available and that key project details can quickly be accessed.
For further details refer to
- Timesheet Manager page | Available Views
- Timesheet Administrator View

Description: The Termination Date field is now available for selection from the Column Selection ![]() of Timesheet Manager.
of Timesheet Manager.
The Termination Date column is not displayed by default, you can choose to have it displayed from any of the Timesheet Manager Views. Moreover, it is searchable, allowing for efficient retrieval of specific termination dates.
Benefit: This new addition allows you to easily filter and view Termination dates within the Timesheet Manager providing you quick access to crucial information for approving or rejecting timesheets.
For further details refer to
- Timesheet Manager page | Available Views
- Timesheet Administrator View
Timesheet Templates

Description: A new Non-working Time selection box is now available from the Show Totals section of a Timesheet Template.
When selected in a Template, the Non-Working Time will be displayed within the Totals section of the New Timesheet.
Furthermore, the options within the Show Totals section of the Timesheet Template have been rearranged and/or renamed in the following order:
- Regular Time was renamed to Regular.
- Adjustments was renamed to Adjustment.
- Overtime
- Double overtime
- Billable Total
- Non-working Time
Note: The Non-working Time option is selected by default for Timesheet Templates where the Show Non-working Time is turned on.
Benefit: The Non-Working Time now displays as a distinct row and is separated from the Regular time total. This ensures clarity, eliminating any confusion caused by inadvertently adding non-paid time to Regular Time. With this separation, the payable time accurately reflects the true working hours without including Non-Working Time, enhancing precision in the review process.
For further details refer to:
- Timesheet Template Edit page - Setup tab
- Show Non-working Time
Upland Analytics
Description: When removing a User Defined Field association in PSA, the corresponding Field will be removed from related Upland Analytics View(s) and from any report(s) built with this Field prior to the removal.
Note that upon running a report containing this Field, you will get the following error message: One of the fields in this report is not configured properly or is no longer available for reporting. (UA_DT_USERFUNCTIONALGROUPLIST_Astazi_Selection)
This is the expected behavior in Upland Analytics. You must Edit the report and click Save (no changes in report designer are required).
For further details refer to
- Auto removal of User Defined Fields in Upland Analytics Data Views upon disassociation in PSA
- Automatic synching of newly associated or disassociated User Defined Fields to Upland Analytics views
Description: The following Views are now available through the Organization Data Source:
- User Functional Group Associations allowing you to report on the following Fields:
- User Association Functional Group
- User Association Functional Group Id
- User Functional Group Association End
- User Functional Group Association Start
- User Title Associations allowing you to report on the following Fields:
- User Association Title
- User Association Title Id
- User Title Association End
- User Title Association Start
Benefit: This addition empowers administrators with the ability to generate comprehensive reports on both current and past Titles and Functional Groups assigned to the user, facilitating more robust user management and historical tracking.
For further details refer to The Organization Data Source and related views.
Description: The following Fields are now available through the Resource Utilization Summary View located in User Scheduling Data Source:
- Resource Actual Capitalized Hours
- Resource Actual Non-Capitalized Hours
- Resource Actual Payable Hours
- Resource Actual Non-Payable Hours
- Resource Actual Funded Hours
- Resource Actual Non-Funded Hours
- Resource Actual R&D Hours
- Resource Actual Non-R&D Hours
Benefit: The addition of fields displaying Actual hours categorized as R&D, Capitalized, Payable, and Funded offers the advantage of creating diverse target utilization metrics.
For further details refer to The User Scheduling Data Source and related views.
Description: You now have the capability to easily identify the status of a Functional/Approval/Resource Group as suspended or active. The following Fields are now available through each respective Data Source/View:
| Data Source | View | Field |
|---|---|---|
| Cost & Billing Rule Association | User Functional Group | Functional Group Is Active |
| Enhanced Resource Request | User Resource Group | Resource Group Is Active |
| Role Resource Group | Resource Group Is Active | |
| Expense | User Approval Group | Approval Group Is Active |
| Expense Workflow History | User Approval Group | Approval Group Is Active |
| Financial | User Approval Group | Approval Group Is Active |
| User Functional Group | Functional Group Is Active | |
| In/Out Timesheet | User Approval Group | Approval Group Is Active |
| Leave Request | Originator Approval Group | Group Is Active |
| Originator Resource Group | Group Is Active | |
| Originator Functional Group | Group Is Active | |
| Leave Time History | User Resource Group | Resource Group Is Active |
| User Approval Group | Approval Group Is Active | |
| User Functional Group | Functional Group Is Active | |
| Organization | Role Resource Group | Resource Group Is Active |
| User Approval Group | Approval Group Is Active | |
| User Functional Group | Functional Group Is Active | |
| User Resource Group | Resource Group Is Active | |
| Project Scheduling | Role Resource Group | Resource Group Is Active |
| User Resource Group | Resource Group Is Active | |
| Resource Bookings | Role Resource Group | Resource Group Is Active |
| User Resource Group | Resource Group Is Active | |
| Resource Request | Role Resource Group | Resource Group Is Active |
| User Resource Group | Resource Group Is Active | |
| Role Scheduling | Role Resource Group | Resource Group Is Active |
| Skill Associations | User Approval Group | Approval Group Is Active |
| User Functional Group | Functional Group Is Active | |
| User Resource Group | Resource Group Is Active | |
| Task Scheduling | Role Resource Group | Resource Group Is Active |
| User Resource Group | Resource Group Is Active | |
| Timesheet | Time Entry Functional Group | Time Entry Functional Group Is Active |
| User Approval Group | Approval Group Is Active | |
| User Scheduling | User Resource Group | Resource Group Is Active |
| Role Resource Group | Resource Group Is Active |
Benefit: This enhancement empowers you with the ability to create reports exclusively on Active objects, streamlining data analysis and ensuring that suspended entities are automatically excluded, leading to more accurate and focused reporting.
Description: You now have the capability to easily identify the Suspended or Active status of a Client. The Client Is Active Field is now available through the Client View located under these Data Sources:
- Assignment Budget
- Client Purchase Order
- Cost & Billing Rule Association
- Enhanced Resource Request
- Expense
- Expense Workflow History
- Financial
- Financial Planner
- Financial Planner Combined
- Invoice
- Invoice & PO Associations
- Invoice Entry Details
- Invoice Workflow History
- Milestone Task Association
- Money Charge
- Product
- Program Management
- Project Budget
- Project Entry Details
- Project Management
- Project Planning
- Project Rate Cards
- Project Scheduling
- Project Status Report Entry
- Resource Bookings
- Resource Request
- Revenue Batch
- Task Budget
- Task Scheduling
- Timesheet
- WIP
- Work
- Work Item Entry
Benefit: This enhancement empowers you with the ability to create reports exclusively on Active objects, streamlining data analysis and ensuring that suspended Clients are automatically excluded, leading to more accurate and focused reporting.
Description: You now have the capability to easily identify the Suspended or Active status of a Work Type. The Work Type Is Active Field is now available through the Work Type View located under these Data Sources:
- Cost & Billing Rule Association
- Expense
- Financial
- Invoice
- Invoice Entry Details
- Leave Time History
- Milestone Task Association
- Money Charge
- Product
- Project Entry Details
- Project Planning
- Timesheet
- Work
Benefit: This enhancement empowers you with the ability to create reports exclusively on Active Work Type(s), streamlining data analysis and ensuring that suspended entities are automatically excluded, leading to more accurate and focused reporting.
Description: Upon modifying the Display Name of a User Defined Field in PSA, the corresponding Field Name is now also automatically updated in Upland Analytics.
Benefit: This improvement not only prevents the creation of duplicate Fields but also ensures the smooth functioning of reports in Upland Analytics by eliminating potential failures due to outdated Field Names.
For further details refer to Automatic synching of newly associated or disassociated User Defined Fields to Upland Analytics views.
Description: New Database tables were added to measure the elapsed time between the creation of a Role Booking and the point at which it is assigned to a specific Resource.
The table below illustrates the different use cases:
| Use Case | Role assignment timestamp | User assignment timestamp | Difference (Time to Staff) |
|---|---|---|---|
| Create a booking without User Assignment | the earliest Role Assignment = creation time | Null | Null |
| Create a booking with User Assignment | the earliest Role Assignment = creation time | earliest User Assignment = creation time | Zero |
| Changing the Role after creation | the earliest Role Assignment | earliest User Assignment | Value |
| Changing the User after creation and setting it to none | the earliest Role Assignment | Null | Null |
| Changing the User after creation to another User having identical Role | the earliest Role Assignment | earliest User Assignment | Value |
| Changing a User after creation to another User having a different Role | the earliest Role Assignment | earliest User Assignment | Value |
| Changing a User after creation to same User having a different Role | the earliest Role Assignment | earliest User Assignment | Value |
Note: If you are interested to incorporate the Time to staff data in your Upland Analytics Reports, contact PSA Support to discuss your specific business requirements.
Benefit: Understanding the Time to Staff provides users with crucial insights into the efficiency of the resource allocation process, allowing for better optimization of workflow and resource management. This feature not only enhances transparency in project timelines but also empowers users to streamline their staffing procedures, ultimately contributing to a more agile and responsive project environment.
Description: The following Fields and Views are now available for reporting from the Work Data Source:
Two new Fields are available from the Task View:
- Task Date Created
- Task Date Modified
Moreover, the following Views with their respective Fields are now also available from the Work Data Source:
Task Created By User View with the following Fields:
- Task Created By User First Name
- Task Created By User Last Name
- Task Created By User Name
Task Modified By User View with the following Fields:
- Task Modified By User First Name
- Task Modified By User Last Name
- Task Modified By User Name
Benefit: This enhancement enables Project Managers to gain enhanced visibility into the lifecycle of tasks. This feature empowers them to track the chronological evolution of tasks, providing crucial insights into when tasks were created, who initiated them, and the most recent updates.
For further details refer to The Work Data Source and related views.
Description: The values for any Calculated User Defined Field associated to the following items in PSA is now correctly reflected in Upland Analytics Reports:
- Charges
- Client Contacts
- Groups
- Leave Request
- Milestones
- Roles
- Portfolios
- Products
- Programs
- Tasks
- Work Types
- Work Item Workflows
Benefit: This improvement ensures that the data in Upland Analytics Reports aligns seamlessly with the specific Calculated User Defined Fields in PSA, providing a more reliable basis for analytics and decision-making.
Work Breakdown Structure (WBS)

Description: A new Suspend selection box is now available from the General tab of Client Details page. Please note that Clients with associated active Projects cannot be suspended. However, any active and existing actuals such as Timesheets, Users, Expenses and/or Rates associated with a suspended Client are allowed and remain unchanged within the system.
Suspended Clients are:
- Visually highlighted in red within the Clients list.
- Presented in red and are non-selectable in browse for item list pages.
- Hidden in selection lists.
- Available for selection in Filters and reporting

A new Filter button is available from the Client list page, offering Active and Suspended options. By default, both options are selected, and the filter icon is grey. If either or both selection boxes are unchecked, the Filter button turns blue, and the View switches to a flat list.
Furthermore, a new Is_Suspended column is now available from the Excel Import Template under the Client sheet.
When working with Projects associated to a suspended Client, please note that:
- You cannot copy a Project associated with a suspended Client.
- You cannot activate a suspended Project if its associated Client is suspended.
Note: The Is a placeholder and Suspend settings are mutually exclusive.
For further details refer to:
- Suspending a Client
- The Clients list page

Description: The following two new options are now available from the properties dialog box of User Defined Fields associated to Clients allowing you to have an insight on the modified values:
- Keep History
- Count of records
Select the Keep History option to keep a history of the modified values, then enter the number of records you would like to keep for each User Defined Field in the Count of records box.
Note: By default, 10 records are kept.
You can then access the Client Edit page and click the History button to view the detailed History page.

From the User Defined History page you can:
- Refresh the list.
- Export the list to Excel.
- Search the list based on Value, Date Modified and Changed by criteria.
- Pagination is available at the top right corner to facilitate easy navigation across multiple pages.
- From the table header:
- You can easily sort the columns by ascending or descending order simply by clicking a column header. Note that an arrow indicates the descending () or ascending () order applied to the column.
- You can now dynamically resize column(s), to your preferred width. Simply move your cursor to the column boundary () you want to resize. When the cursor becomes a resize cursor (), click and drag the column accordingly.
- You can easily sort the columns by ascending or descending order simply by clicking a column header. Note that an arrow indicates the descending (
Note:
- All dates and time stamps are displayed in the logged Users Active Site Time Zone.
- Default User Defined Field values are not considered in the History.
Upon removing the Keep History option from a User Defined Field, the following confirmation message is displayed “Do you want to keep existing historical records?”
- Choosing Yes will retain the already existing historical data for the User Defined Field. This historical data will remain accessible from the User Edit page. However, no new records will be kept.
- Opting for No will lead to the removal of both the historical data and the History button.
For further details refer to Keeping the historical values of User Defined Field associated to Clients.

Description: A new Suspend selection box is now available from the Work Type edit page.
Work Types with associated active Tasks, Placeholder or Default Work Types cannot be suspended.
Note:
- A suspended Task can be activated when it’s associated Work Type is active.
- While copying a Project, any suspended Tasks associated with suspended Work Types are not copied. In this case a message is displayed informing you that Some Tasks were not created because their Work Types were suspended.

Suspended Work Types are:
- Visually highlighted in red within the Work Type list.
- Presented in red and are non-selectable in browse for item list pages.
- Hidden in selection lists.
- Available for selection in Filters and reporting

A new Filter button is available from the Work Type and Leave Time list pages, offering Active and Suspended options. By default, both options are selected, and the filter icon is grey. If either or both selection boxes are unchecked, the Filter button turns blue, and the View switches to a flat list.
A Parent column is now also available from the Work Types and Leave Time list pages. Items in this column are hyperlinked to their respective edit pages.
Furthermore, a new Is_Suspended column is now available from the Excel Import Template under the Work Type sheet.
Note: The Is a placeholder and Suspend settings are mutually exclusive.
For further details refer to:
- Work Types list page
- Suspending a Work Type

Description: The new Show Suspended Work Type/Leave Time selection box is now available from the respective Work Type or Leave Time list page accessed through the following areas:
- Selecting a Work Type when creating modifying a Milestone: Project List > Project Edit > Manage tab > Milestones
- Selecting a Work Type when creating modifying a Task: Setup > Work > Tasks > Task Edit
- When creating/modifying Rate Rule Associations with Work Type Dependency: Setup > Financial > Cost/Billing Rules > Rate Rule Edit > Rate Rule Associations > Associated Users
- When creating new Rate Rules from User edit: Setup > Organization > Users > User Edit > Financial > Cost/Billing
-
When browsing for a Leave Time Work Type (Browse for Item Data type) User Defined Field from an associated object page.
Benefit: This new option enables Project Managers to easily hide any Inactive Work Type/Leave Time from their respective list page, allowing for a clear and uncluttered list of options.

Description: The Forecasted Cost and Forecasted Billing columns are no longer available from Assigned Resources table when adding/removing Resources to the Project Team.
These options have also been removed from the Assigned Resources Column Selection ![]() .
.
Benefit: The removal of these options enhances the user experience by eliminating data inaccuracies.

Description: You can now also copy the Cost and Billing Rules associated with Fixed Tiered Rates across Hourly, Flat charge, and/or Users rate types at the Task and Project level.

Note: The Start and End dates of the Billing Rule must fall within the Project Start and End dates.
Benefit: This functionality enables seamless transferability from one Project to another, streamlining the process of replicating Fixed Tiered Cost and Billing rate configurations for enhanced efficiency.
For further details refer to Copying Billing Rules for Fixed Tiered Rates during Project copy.
Project On/Off Boarding
In this release, we are introducing the Project On/Off Boarding feature, providing Project Managers with enhanced control and clarity. With this feature, Project Managers can:
- Determine who can submit Entries on their Project.
- Restrict Users who have previously worked on their project from submitting new Entries.
- Gain improved visibility into Resources currently active on their Project.
Benefits:
- Simplified Onboarding and Offboarding – Easily manage your project team by onboarding or offboarding members as needed, ensuring that individuals not associated with your project cannot submit entries.
- Efficient Team Monitoring – Streamline project oversight by filtering the Project Team member list to display only those currently active today, providing a clear and concise view of your project's current workforce.
This section describes the improvements made to the Project edit page and the impact of the On/Off Boarding capability.
For further details refer to Project On/Off Boarding.

Description: You can now choose to include the Assignment Start Date and Assignment End Date from the Project Team Column Selection.
- Assignment Start date: The Start date of earliest assignment of the resource on the project.
- Assignment End date: The end date of latest assignment of the resource on the project
Example: John is working on Project XYZ. He is assigned to: “Office work” starting from 1st of October to 31st of October and “Team management” starting from 15th of October to 31st of December.
Based on above:
- Assignment Start date = 1st of October
- Assignment End date = 31st of December
Furthermore, these options are also available by default as Search criteria, you can hide them from Column Selection ![]() .
.
Benefit: This enhancement aims at streamlining project management processes, facilitating better decision-making, and improving overall efficiency in managing your resources.
For further details refer to:
- Including the Onboarding/Offboarding Date(s) within Project Team table
- Out-Of-The-Box Column Selection options | Project Team

Description: You can now choose to display the User Type and Resource Type columns within the available Users table when adding new Resources to the Project Team.
Furthermore, these options are also available by default as Search criteria, you can hide these search criteria from Column Selection ![]() .
.
Benefit: You can now easily filter Users by their User Type and/or Resource Type when adding resources to your Project Team.
For further details refer to Add New Resources page.

The following improvements have been made to the Project Team page:
- The Team Member drawer has been removed. All previously existing options and settings within the drawer can now be accessed directly from the table.
- Inline editing is enabled by clicking the Edit button.
- The Save and Cancel buttons, previously located under the drawer are now located within each row where applicable.
For further details refer to Managing Project Team.

Description: A new Column Terminology ![]() button located within the Project Team member page allows you to configure your preferred column Display Names.
button located within the Project Team member page allows you to configure your preferred column Display Names.
Benefit: This enables you to customize the column names based on your preferences.
For further details refer to Modifying the Project Team Column Terminology.

Description: The following new columns are now available from the Project Team Column Selection ![]() :
:
- Total Soft Booked Hours: Displays the sum of Soft Booked allocation for the Resource (User or Role) in hours for this Project.
- Billable Soft Booked Hours: Displays the sum of Billable Soft Booked allocation for the Resource (User or Role) in hours for this Project.
- Non-Billable Soft Booked Hours: Displays the sum of Non-Billable Soft Booked allocation for the Resource (User or Role) in hours for this Project.
- Billable Hard Booked Hours: Displays the sum of Billable Hard Booked allocation for the Resource (User or Role) in hours for this Project.
- Non-Billable Hard Booked Hours: Displays the sum of Non-Billable Hard Booked allocation for the Resource (User or Role) in hours for this Project.
- Total Actual Hours: Displays the sum of Actual allocation for the Resource (User or Role) in hours for this Project.
- Billable Actual Hours: Displays the sum of Billable Actual allocation for the Resource (User or Role) in hours for this Project.
- Non-Billable Actual Hours: Displays the sum of Non-Billable Actual allocation for the Resource (User or Role) in hours for this Project.
Note: The Total Actual Hours, Billable Actual Hours and Non-Billable Actual Hours display 0.0 for a Role Resource Type.

Some of the Column Selection ![]() have been renamed. Below you will find a list of the renamed items:
have been renamed. Below you will find a list of the renamed items:
- User ID was renamed to Resource ID
- Active was renamed to Resource is Active
- Hard Booked Hours was renamed to Total Hard Booked Hours
By default the following columns are displayed: Resource, Role, Resource Type, Hard Booked Hours, Forecasted Cost Rate, Forecasted Billing Rate, Actual Cost Rate, Actual Billing Rate and Resource ID,
You can choose to include the following columns from the Columns Selection: Assignment End Date, Assignment Start Date, Billable Actual Hours, Billable Hard Booked Hours, Email Address , Login Name , Non - Billable Actual Hours, Non - Billable Hard Booked Hours, Non - Billable Soft Booked Hours, Offboarding Date, Onboarding Date, Remove from Project Team when no work is planned, Resource in Active, Tasks, Total Actual Hours and Total Soft Booked Hours.
The following Search criteria are available by default: Resource, Role, Resource Type, Tasks, Actual Cost Rate, Actual Billing Rate, Resource ID, Billable Hard Booked Hours, Billable Soft Booked Hours, Billable Actual Hours, Forecasted Billing Rate and Forecasted Cost Rate. You can choose to include the Email Address, Login Name and Total Hard Booked Hours from Column Selection.
Moreover, inline editing is available for the following fields (when included in the columns):
- Actual Cost Rate (For User Resource Type)
- Actual Billing Rate (For User Resource Type)
- Onboarding Date (For User Resource Type)
- Offboarding Date (For User Resource Type)
- Role (For User Resource Type)
- Remove from Project Team when no work is planned (For Role/User Resource Type)
For further details refer to:
- The Project Team page
- Out-Of-The-Box Column Selection options | Project Team

Description: In previous releases, you could Filter the Team Member list based on Active, Suspended or Decommissioned status of Users/Roles.
As of this release the Filter options have been modified. You now have the following options:
- Active: Selecting Active will display a list of Onboarded Users and Active Roles
- Inactive: Selecting Inactive will display a list of Offboarded Users and Suspended Roles
For further details refer to The Project Team page

Onboarding and Offboarding Dates can be added from the Column Selection ![]() to the Project Team table.
to the Project Team table.
By default, these dates are set to the Project Start and End Dates respectfully for every Project Team Resource (User Type), whether they are added by the Project Manager or automatically.

To offboard a Resource, simply adjust the Offboarding Date to the required Date.
Following this modification, the Resource will no longer be able to create Entries against the Project. This includes:
- Entering Time against Tasks
- Creating Product/Charge Entries
- Creating Expenses
To schedule Team Members to work on the Project after a specific Phase, modify the Onboarding Date accordingly. This ensures Resources cannot submit Entries on the Project before the specified date.
When creating a new Assignment:
- The Start Date will be set to {latest Task Start Date or Onboarding Date}
- The End Date will be set to {earliest Task End Date or Offboarding Date}
Impact on Existing Projects:
The offboarding feature has no impact on existing projects unless the Project Manager chooses to modify the Onboarding or Offboarding Dates.
Entering time:
All Time Entry boxes outside of the date interval {latest Onboard Date or Assignment Start Date} & {earliest Offboard or Assignment End Date} in the Timesheet will be unmodifiable.
Only the Time Entry boxes within the interval will be modifiable.
Creating Charge/Product or Expense Entries:
If the entry date of the Charge/Product or Expense is outside of the Onboarding Date and Offboarding date interval, then an error message is displayed.
For further details refer to Project On/Off Boarding.
Description: You can modify the Onboarding/Offboarding Dates either from:

Simply click the Edit button against a Resource and modify the Dates using the Date Picker against the Onboarding/OffboardingDate.
For further details refer to these scenarios:
- If there are Time/Expense/Charge and/or Product Entries before the new Onboarding Date and/or after the new Offboarding Date interval:
- A message is displayed informing you that There are entries outside of the selected On/Offboarding Dates. The earliest Onboarding Date is {date of first entry} and the latest Offboarding Date is {date of last entry}. Do you want to continue with these dates?
- Selecting NO will cancel the process.
- Selecting YES will result in the offboarding and Onboarding date(s) to be updated to the date of the first and last entry respectively as shown in the message.
- A message is displayed informing you that There are entries outside of the selected On/Offboarding Dates. The earliest Onboarding Date is {date of first entry} and the latest Offboarding Date is {date of last entry}. Do you want to continue with these dates?
- If there are no Time/Expense/Charge and/or Product Entries outside of the new Onboarding / Offboarding Date interval (inclusive of the dates), then the new Onboarding / Offboarding dates are updated and a success message is displayed.
- If there are Time/Expense/Charge and/or Product Entries before the new Onboarding date:
- A message is displayed informing you that: There are entries outside of the selected On/Offboarding Dates. The earliest Onboarding Date is {date of first entry}. Do you want to continue with this date?
- Selecting NO will cancel the process.
- Selecting YES will result in the Onboarding date to be updated to the date of the first entry as shown in the message.
- A message is displayed informing you that: There are entries outside of the selected On/Offboarding Dates. The earliest Onboarding Date is {date of first entry}. Do you want to continue with this date?
- If there are no Time/Expense/Charge and/or Product Entries before the new Onboarding date then the new Onboarding date is updated and a success message is displayed.
- If there are Time/Expense/Charge and/or Product Entries after the new Offboarding date:
- A message is displayed informing you that: There are entries outside of the selected On/Offboarding Dates. The latest Offboarding Date is {date of last entry}. Do you want to continue with this date?
- Selecting NO will cancel the process.
- Selecting YES will result in the Offboarding date to be updated to the date of the last entry as shown in the message.
- A message is displayed informing you that: There are entries outside of the selected On/Offboarding Dates. The latest Offboarding Date is {date of last entry}. Do you want to continue with this date?

Select the Resources then click the Mass Update button. From the Mass Update dialog box, you can then select the On/Offboarding interval for the selected Resources (User Type).
The following scenarios will further explain how the different cases are addressed:
Scenario 1: None of the resources have any Time, Expense, Charge or Product Entries outside of the new Onboarding and offboarding Date interval.
In this case the new Onboarding and Offboarding Dates are updated, and the success message is displayed.
Scenario 2: All resources have Time, Expense, Charge or Product Entries outside of the new Onboarding and Offboarding Date interval.
In this case a dialog box is displayed informing you that: There are entries outside of the On/Offboarding Dates for some Resources. The earliest Onboarding Date and the latest Offboarding Date can be set as seen below. Do you want to continue with these dates?
- A table will display the Resource, Min Onboarding, and Max Offboarding dates.
- Selecting NO will cancel the process.
- Selecting YES will result in the Offboarding and Onboarding date(s) to be updated to the date of the first and last entry respectively as shown in the table.
Scenario 3: Some resources have Time, Expense, Charge or Product Entries outside of the new Onboarding and Offboarding Date interval.
In this case a dialog box is displayed informing you that: There are entries outside of the On/Offboarding Dates for some Resources. The earliest Onboarding Date and the latest Offboarding Date can be set as seen below. Do you want to continue with these dates?
- A table will display the Resource, Min Onboarding, and Max Offboarding dates.
- Selecting NO will cancel the process.
- Selecting YES will result in the Offboarding and Onboarding date(s):
- To be updated to the date of the first and last entry respectively as shown in the table for resources that have Entries outside of the selected Offboarding and Onboarding date(s).
- To be updated to your selected Offboarding and Onboarding date(s) for the resource with no Entries outside of the selected Offboarding and Onboarding date(s).
Scenario 1: None of the resources have any Time, Expense, Charge or Product Entries before the new Onboarding date.
In this case the new Onboarding Date is updated, and the success message is displayed.
Scenario 2: All resources have Time, Expense, Charge or Product Entries before new Onboarding Date.
In this case a dialog box is displayed informing you that: There are entries outside of the selected On/Offboarding Dates for some Resources. The earliest Onboarding Date can be set as seen below. Do you want to continue with these dates?
- A table will display the Resource and Min Onboarding date.
- Selecting NO will cancel the process.
- Selecting YES will result in the Onboarding date to be updated to the date of the first entry as shown in the table.
Scenario 3: Some resources have Time, Expense, Charge or Product Entries before new Onboarding Date.
In this case a dialog box is displayed informing you that: There are entries outside of the selected On/Offboarding Dates for some Resources. earliest Onboarding Date can be set as seen below. Do you want to continue with these dates?
- A table will display the Resource and Min Onboarding date.
- Selecting NO will cancel the process.
- Selecting YES will result in the Onboarding date(s):
- To be updated to the date of the first entry as shown in the table for resources that have Entries before the selected Onboarding date,
- To be updated to your selected Onboarding date for the resource with no Entries before the selected Onboarding date.
Scenario 1: None of the resources have any Time, Expense, Charge or Product Entries after the new Offboarding date.
In this case the new Offboarding Date is updated, and the success message is displayed.
Scenario 2: All resources have Time, Expense, Charge or Product Entries after the Offboarding Date.
In this case a dialog box is displayed informing you that: There are entries outside of the selected On/Offboarding Dates for some Resources. The latest Offboarding Date can be set as seen below. Do you want to continue with these dates?
- A table will display the Resource and Max Offboarding date.
- Selecting NO will cancel the process.
- Selecting YES will result in the Offboarding date to be updated to the date of the last entry as shown in the table.
Scenario 3: Some resources have Time, Expense, Charge or Product Entries after new Offboarding Date.
In this case a dialog box is displayed informing you that: There are entries outside of the selected On/Offboarding Dates for some Resources. The latest Offboarding Date can be set as seen below. Do you want to continue with these dates?
- A table will display the Resource and Min Offboarding date.
- Selecting NO will cancel the process.
- Selecting YES will result in the Offboarding date:
- To be updated to the date of the last entry as shown in the table for resources that have Entries after the selected offboarding date,
- To be updated to your selected Offboarding date for the resource with no Entries after the selected offboarding date.
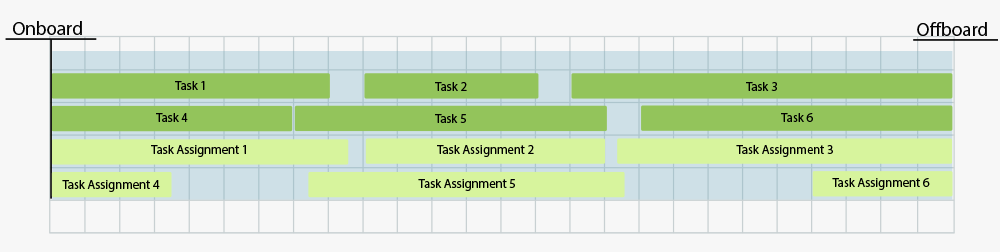
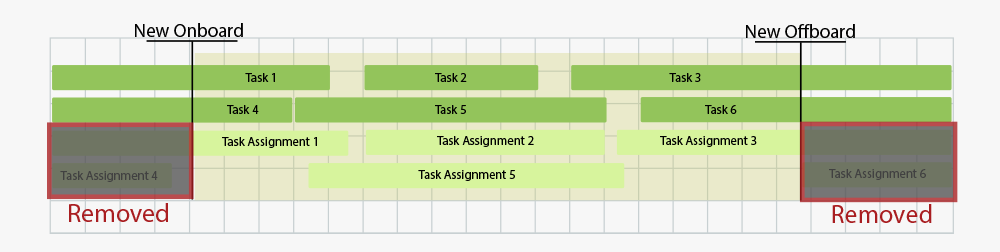
Impact on Task Assignment Dates:
As a result of the above cases of updating the onboarding and/or offboarding dates, the Task Assignment Dates will be automatically updated as follows:
- New Task Assignment Start Date = latest (Task Start Date, previous Task Assignment Start Date, new Onboarding Date)
(new Onboarding Date = first entry date) - New Task Assignment End Date = earliest (Task End Date, previous Task Assignment End Date, new Offboarding Date)
(new Offboarding Date = last entry date) - Any Task Assignment that ends before the new Onboarding Date or any Task Assignment that ends after new Offboarding Date will be deleted.
The diagrams below summarizes the cases and examples we have seen earlier in Updating On/Offboarding Dates section and in regards to the Task Assignment Dates and modifications made to the On/Off Boarding Dates.
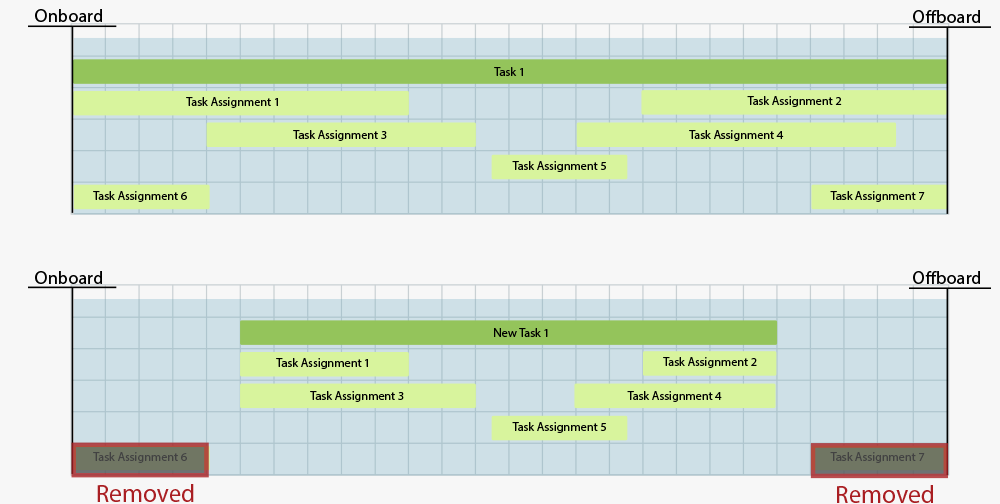
Modifying the Project Start and End Dates
Modifying the Project Start and End Dates will automatically set the On and Off Boarding Dates for all Resources:
- If the old Onboarding and/or Offboarding dates Match the old Project Dates, then the new On/Offboarding Dates follow the new Project Dates.
The following illustrates a scenario where the Project Start and end Dates were both shifted to an earlier date:

- If the old Onboarding Date and/or Offboarding dates do not match the old Project Dates and
- Are within the new Project Dates, then the new On/Offboarding Dates do not change. The following illustrates this scenario:

- Are outside of the new Project Dates, then new On/Offboarding Dates follow new Project Dates. The following illustrates this scenario:

- Are within the new Project Dates, then the new On/Offboarding Dates do not change. The following illustrates this scenario:
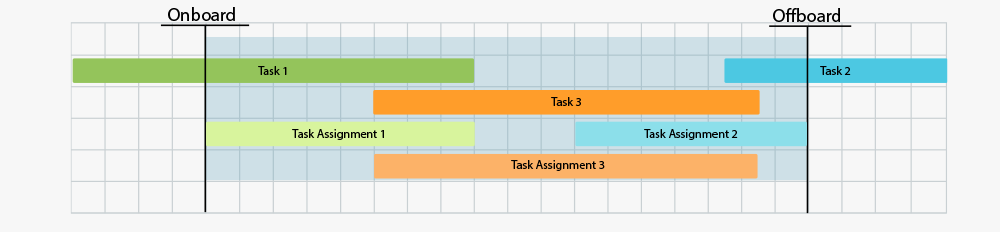
Modifying Task dates for resources in the Project team
The Task Assignment Dates for all the resources are updated as follows:
Scenario 1: If the resource has a Task Assignment that ends before the new Task Start Date or starts after the new Task End Date, then an error message will be displayed informing you that This Task cannot be assigned as the Task Assignment Dates are outside of the Onboarding & Offboarding Date interval of the assigned user(s).
Scenario 2: Resource has a Task Assignment that conflicts with new Task Dates:
- If the new Task Start Date is after the Onboarding Date, and the Task Start Date = prev Task Assignment Start Date:
- Then the new Task Assignment Start Date = new Task Start Date. Otherwise, the new Task Assignment Start Date = max(new Task Start Date, prev Task Assignment Start Date, Onboarding Date)
- If the new Task Start Date is before the Onboarding Date:
- Then new Task Assignment Start Date = max(new Task Start Date, prev Task Assignment Start Date, Onboarding Date)
- If the new Task End Date is before the Offboarding Date, and Task End Date = prev Task Assignment End Date:
- then Task Assignment End Date = new Task End Date. Otherwise, the new Task Assignment End Date = min(new Task End Date, prev Task Assignment End Date, Offboarding Date)
- If the new Task End Date is after the Offboarding Date:
- Then the new Task Assignment End Date = min(new Task End Date, prev Task Assignment End Date, Offboarding Date)
The following illustrates these scenarios:
- Assigning Tasks to Resources with On/Offboarding:
- If the Task End Date is before the Onboarding Date or the Task Start Date is after the Offboarding Date, then the following error message is displayed: “This Task cannot be assigned as the Task Assignment Dates are outside of the Onboarding & Offboarding Date interval of the assigned user(s)”
- If the Task(s) Start and End Dates overlap with the Onboarding and Offboarding date of the user(s), then:
- The new Task Assignment Start Date = Latest Task Start Date or Onboarding Date
- The new Task Assignment End Date = Earliest Task End Date or Offboarding Date
The following illustrates these scenarios:
Error messages are displayed upon attempting to modify Task Assignment dates beyond the resource's onboarding/offboarding dates.
- If there are Entries, then existing validations are displayed accordingly.
- If there are no Entries before the new Task Assignment Start Date and the Task Assignment Start Date is before the Onboarding Date and/or before the Task Start Date or after the Offboarding Date and/or after the Task End Date then the following message is displayed: The selected date cannot be set as it is outside of either the Task or On/Offboarding Dates. The Task Assignment Start Date can be set to the {latest (Task Start Date, Onboarding Date)}, the latest of Task Start/Onboarding Dates for this User. Do you want to continue?
- Selecting NO will cancel the process.
- Selecting YES will result in the Task Assignment Start Date to be updated to {Latest Task Start Date or Onboarding Date}
- If the new Task Assignment Start Date is within {Latest Task Start Date or Onboarding Date} and {Earliest Task End Date or Offboarding Date}, the new Task Assignment Start Date is saved successfully.
- If there are Entries, then existing validations are displayed accordingly.
- If there are no Entries after the new Task Assignment End Date, and the new Task Assignment End Date is before the Onboarding Date and/or before the Task Start Date or after the Offboarding Date and/or after the Task End Date then the following message is displayed: The specific date cannot be set as it is outside of either Task Dates or On/Offboarding Dates. The Task Assignment End Date can be set to the {Earliest Task End Date or Offboarding Date}, the earliest of Task End/Offboarding Date for this User. Do you want to continue?
- Selecting NO will cancel the process.
- Selecting YES will result in the Task Assignment End Date to be updated to {Earliest Task End Date or Offboarding Date}
- If the new Task Assignment End Date is within {Latest Task Start Date or Onboarding Date} and {Earliest Task End Date or Offboarding Date}, the new Task Assignment End Date is saved successfully.
- If there are Entries, then existing validations are displayed accordingly.
- If there are NO entries outside of the new Task Assignment Dates and If both the Task Assignment Start and end dates overlap with either the Onboarding and Offboarding date interval or Task Start & End Dates or are completely outside of the Onboarding and Offboarding date interval or Task Start & End Dates, then a pop-up message is displayed: The selected dates cannot be set as they are outside of either the Task or On/Offboarding Dates. The Task Assignment Start Date can be set to {Latest Task Start Date or Onboarding Date}, the latest of Task Start/Onboarding Date, and the Task Assignment End Date can be set to {Earliest Task End Date or Offboarding Date}, the earliest of Task End/Offboarding Date for this User. Do you want to continue?
- Selecting NO will cancel the process.
- Selecting YES will result in the Task Assignment Start Date to be updated to updated to {Latest Task Start Date or Onboarding Date} and the Task Assignment End Date is updated to {Earliest Task End Date or Offboarding Date}.
- If the new Task Assignment Start and end dates are within the {Latest Task Start Date or Onboarding Date} and {Earliest Task End Date or Offboarding Date} interval (inclusive of date) of the user, then it is saved successfully.
Benefit: This ensures proactive alerts, empowering power users to promptly rectify any date discrepancies and maintain precision in project planning.
Work Items

Description: Portfolio and Portfolio Manager on-page and View Filter options are now available from the following out-of-the-box Work Item Manager Views:
- All Work Items
- Assigned Work Items
- My Available Projects Work Items
- My Work Items
Benefit: This enhancement allows you to effortlessly filter, and view Work Items assigned to you as a Portfolio Manager, ensuring a more targeted experience.
For further details refer to:
- Work Item Manager
- Available Filter criteria - Work Item Manager Views

Description: User Defined Fields associated both to a Work Item Workflow and Projects can now inherit their set values from the Project to the Work Item Entry.
The Update From option located within the field properties dialog box when modifying a User Defined Field associated to a Work Item Workflow with prior Project association, allows you to choose if the field should be updated with its set values from the Project.
Upon modifying User Defined Field value from Project edit and then accessing a Work Item Entry which is in a modifiable State, a confirmation message is displayed, allowing you to choose to update the Work Item Entry with the Project User Defined Field value or not.
Benefit: This improvement enhances your user experience by ensuring seamless data consistency across Projects and Work Item Entries.
For further details refer to:
- Creating a Work Item Workflow
- Setting a Work Item User Defined Field (UDF) to inherit it's value(s) from corresponding Project
")
Description: In past releases any User could edit fields in a Work Item Entry. As of this release, enhancements in this feature provide exclusive editing access based on assigned User(s) to the current State of the Work Item.
Note that if you require your Project Team members to be able to modify Work Item Entries in a given State you can create a new Assignment Rule and assign the State to Project team members as illustrated in the screenshot below.

Benefit: This improvement ensures that only the assigned User(s) to the current State can modify the Work Item Entry. Users not assigned to the State will be restricted from editing the Work Item Entry.
For further details refer to Creating a Work Item Workflow.

Description: When modifying a Work Item Workflow, you can now choose to include the Originator Field in your Layout.
Benefit: This allows users with the newly added Can create Work Items on behalf of others security permission to create a Work Item Entry on behalf of another user while accurately designating them as the Originator. This functionality empowers the designated user to take appropriate actions on the Work Item, especially when it progresses to a State assigned to them as the Originator.
For further details refer to Out-Of-The-Box Regular and User Defined Fields in PSA.

Description: When creating or managing Work Item Workflows, you can now choose to send State/Transition Notifications to the Portfolio Manager.
Benefit: This enhancement fosters improved communication and collaboration by ensuring that key stakeholders, such as Portfolio Managers, receive timely updates on State/Transition changes.
For further details refer to Notify List Recipient Options.
General
Description: In previous releases, the on-page basic Filter icon remained unchanged, when modifications were made to the selections to display a subset of data. As of this release, the icon itself now features a blue background specifically in such cases (![]() ).
).
Below is a list of areas wherein the on-page basic Filter (Simple Filter) is available:
- Setup > Organization > Users
- Setup > Organization > Groups
- Setup > Work > Clients
- Setup > Work > Work Types
- Setup > Work > Tasks
- Setup > Timesheet > Leave Time
- Setup > Timesheet > Timesheet Templates
- Setup > Expense > System > Credit Card Transactions
- Setup > Financial > System > Financial Settings > WIP tab
- Setup > Financial > Cost Rules
- Setup > Financial > Billing Rules
- Notifications > Go to my notifications
- Setup > Notifications > Announcement Notifications
- Entries > Expense Manager > My Reports
- Entries > Expense Manager > All Reports
- Financial > Invoice Manager > Batches
- Financial > Invoice Manager > Invoices
- Financial > Payroll Manager
- Project List > Project Edit > Manage > Task
- Project List > Project Edit > Manage > Project Team
Benefit: This improvement enhances user experience by ensuring that you can easily discern when a Filter is active and refining the data set.
For further details refer to On-page basic Filter (Simple Filter).
Description: The behavior of buttons, selection boxes and messages across the following pages has been standardized:
- Entries > My timesheet > Assign task
- Setup > Timesheet > Timesheet Templates > Click Tools Icon > New Timesheet> Add User
- Setup > Work > Tasks > Task Edit > Assign > Assign Users
- Setup > Expense > System > select Prevent Submission of Expense Entries Older than > Exclude Users
- Projects List > Project Edit > Manage > Tasks > Select few tasks > Assign Users
- Financial > Revenue Batch Manager > Revenue Batch Edit > General > Select/Unselect Projects
- Projects List > Project Edit > Manage > Rate Cards > Rate Card Edit > Rate Card Items > Add Items
- Setup > Notifications > Announcement Notifications > Notification edit > Recipients > New User
- Setup > Organization > Use r> User Edit > Employment > Skills
- Setup > Organization > Titles > Title Edit > Skills
- Setup > Organization > Roles > Skills
- Projects List > Project Edit > Settings > Security > Groups
- Projects List > Project Edit > Settings > Security > Security Profile
- User profile > Settings > Dashboards
- User Profile > Settings > Skills
- Home > Configure > Dashboards
- Home > Configure > Skills
In summary:
- The Add
 and Remove
  buttons are disabled by default.
 - The Add all
 button is always enabled by default.
 - The Remove all
 button is enabled only when there are items within the right panel.
 - Upon selecting items on the left panel:
- The Add
 button is enabled and the Add all
  button is disabled.
 - If there are items on the right panel, then Remove all is enabled.
- The Add
- Upon selecting items on the right panel:
- Only the Add button is disabled.
- Remove
 and Add all are enabled.
- Only the Add
- Upon selecting items on both panels:
- The Add and Remove buttons are enabled.
- While all other buttons are disabled.
- The Add
- Upon selecting all items from the left panel:
- If the left panel is a flat list, all the items are selected.
Note: Suspended and Placeholder items will not be shown on the left grid when the purpose is to select items (Ex. Assign Tasks). However, these Suspended or Placeholder items are shown on the left table for reporting or filtering puposes.
- If the left panel is a tree structure:
- If an active (non-suspended/non-placeholder) parent item is selected:
- All active children will be selected.
- Any Suspended/placeholder children will not be selected.
- If a suspended/placeholder parent item is either collapsed or expanded, then neither the parent nor any of its suspended children will be selected.
- If an active (non-suspended/non-placeholder) parent item is selected:
- If the left panel is a flat list, all the items are selected.
- When the Add all button is clicked, a pop up is shown with a warning message:
- For a flat list structure: This action will be performed on {number} item(s) and may take several minutes. Do you wish to continue?
- For a tree structure: You are about to Add all {object name}. This operation may take several minutes. Do you wish to continue?
- Upon clicking Yes, if there are any errors while adding the items, an Error dialog box is displayed allowing you to copy the list of errors to your clipboard.
Benefit: This improvement ensures consistent button, selection box, and message behavior across pages, enhancing user experience and making interactions more intuitive.
For further details refer to Standardized grid to grid functionality.
Description: Enhancements have been implemented in the Attachments capability, allowing you to effortlessly select and attach files with the .jpeg extension.
Benefit: This enhancement provides you with the convenience of attaching .jpeg files.
For further details refer to Accepted attachment file types.