PSA 2024 R2.0 - Product Enhancements
PSA 2024 R2.0 is set to be deployed to your staging sites on June 19, 2024. While production sites are set to be upgraded on July 21, 2024. The listed enhancements will become available to you upon upgrading to 2024 R2.0.
Below is a summary of new/improved features in PSA 2024 R2.0.
2024.05.28.2024R2.0.V1.EB,
API/SDK
Description: A new controller has been introduced to enhance the functionality for managing Leave Time for the following objects: User, Resource Type, Site and Group. This addition includes a comprehensive Leave Request API that enables various operations such as GET, POST, DELETE, PUT and PATCH.
Caution: It is highly encouraged to use a Security Profile with Administrative privileges when working with the API. However, if you need to use a less privileged Security Profile, please ensure that all required permissions are granted.
Benefit: This enables technical clients to build tools for their user base to edit the Leave Time and automate processes that currently require manual intervention. Moreover, the API will enable the development of seamless integrations to 3rd party systems by connecting endpoints together for data exchange.
Click here for more information on how to access the REST API documentation.
Description: A new controller has been introduced to enhance the functionality for managing Leave Request, including support for workflow transitions. This addition includes a comprehensive Leave Request API that enables various operations such as GET, POST, DELETE, PUT and PATCH.
Caution: It is highly encouraged to use a Security Profile with Administrative privileges when working with the API. However, if you need to use a less privileged Security Profile, please ensure that all required permissions are granted.
Benefit: This enables technical clients to build tools for their user base to edit Leave Requests and automate processes that currently require manual intervention. Moreover, the API will enable the development of seamless integrations to 3rd party systems by connecting endpoints together for data exchange.
Click here for more information on how to access the REST API documentation.
Description: A new controller has been introduced to enhance the functionality for managing work items, including support for workflow transitions. This addition includes a comprehensive Work Items API that enables various operations such as Create, Read, Update and Delete.
Caution: It is highly encouraged to use a Security Profile with Administrative privileges when working with the API. However, if you need to use a less privileged Security Profile, please ensure that all required permissions are granted.
Benefit: This enables technical clients to build tools for their user base to edit the Work Items and automate processes that currently require manual intervention. Moreover, the API will enable the development of seamless integrations to 3rd party systems by connecting endpoints together for data exchange.
Click here for more information on how to access the REST API documentation.
Expense Manager

Description: The new Amount to Approve option is now available from the Column Selection ![]() of Assigned Reports tab of the Expense Manager page.
of Assigned Reports tab of the Expense Manager page.
When added to the page, the Amount to Approve column displays the total amount of Expense Entries associated with projects/portfolios where the logged-in user is designated as the Project/Portfolio Manager.
Note: It is important to note that, as in previous releases, the Total Amount column continues to display the total Expense Report amount, which may include Expense Entries against Projects/Portfolios that do not belong to the logged in Project/Portfolio Manager.
")
Additionally, Project/Portfolio Managers now only see Expense Entries associated with their Projects/Portfolios when accessing the Expense Report, ensuring clarity and relevance.
Benefit: This improvement streamlines the approval process for project or portfolio managers while ensuring accurate tracking of expenses.
For further details refer to Amount to Approve Column in the Expense Manager for Project and Portfolio Managers.

Description: In previous releases, while the total number of attachments was shown in the Expense Manager, there were no indicators to display the count of Receipts or Documents within the expanded row.
As of this release, indicators are now displayed, showing the number of Receipts and Documents within the expanded row.

Moreover, during the export of this list to Excel, two additional columns have been introduced:
- Number of Entry Attachments: Indicates the total number of Receipts attached at the Expense Entry level.
- Number of Report Attachments: Indicates the total number of Documents attached at the Expense Report level.
Benefit: You can now easily track the total number of attachments at both the Expense Entry or Expense Report levels directly from the Expense Manager allowing you to efficiently assess document distribution and ensure comprehensive documentation within your expense management process.
For further details refer to:
- Expense Manager
- Attaching a Receipt to an Expense Entry
- Attaching a Document to an Expense Report
- Previewing receipts, notes, attachments for, and the history of an Expense Report
Expense Reports

Description: In previous releases, when copying an Expense Entry, its Site was not retained, causing it to default to the Originator’s Active Site. This resulted in additional manual steps to select the correct Site and prolonged the completion time for creating Expense Reports.
As of this release improvements were made so that:
- The Site field in the copied Entry defaults to the Originator's Active Site ONLY when the original Expense Entry is associated with a suspended or out-of-scope Site.
- Otherwise, the new Expense Entry mirrors the Site field of the original Expense Entry being copied.
Note: In this case the Site Exchange Rate is also maintained.
Benefit: This enhancement improves the efficiency of the copy process by maintaining the Site and Site Exchange Rate, provided that the Site field in the original Expense Entry is not suspended or out-of-scope. This eliminates the need for manual adjustments and reduces the risk of errors, resulting in increased accuracy and operational effectiveness.
For further details refer to Adding an Expense Entry under a newly created Expense Report.

Description: When updating the Site of an Expense Entry, the Expense Item remains unchanged, if it is associated with the newly selected Site.
However, if the chosen Expense Item is not associated to the new Site or is suspended, your previously selected Expense Item will be cleared.
Benefit: This improvement streamlines the process by automatically retaining the Expense Item when updating the Site of an Expense Entry, as long as it's associated with the newly selected Site. This eliminates the need for manual adjustments and reduces the risk of errors, resulting in increased accuracy and operational effectiveness.
For further details refer to Information that can be entered while creating an Expense Entry.
Export to Excel - General
Description: In previous releases, some numeric columns were exported to Excel as strings. As a result it was not possible to perform any calculations in Excel.
As of this release, numeric columns are formatted as number or currency in the exported Excel files, allowing you to perform calculations directly on the data.
The areas where the Export to Excel improvement was implemented are:
- Work List/Administrator views of Charges Approval (Entries > Charges > Approval)
- My Entries (Entries > Charges)
- Expense Report Entry (Entries > Expense Manager > Expense Report Edit > Entries tab)
- Import Transactions (Entries > Expense Manager)
- Manage Exceptions (Entries > Expense Manager)
- Work List/Administrator views of Products Approval (Entries > Products)
- My Reports, Assigned Reports, All Reports tabs of Expense Manager (Entries > Products > Approval)
- Work Item Manager (Entries > Work)
- Project List
- Timesheet Manager all Views (Entries)
- Invoice Batch (Financial)
- Payroll History (Financial)
- Revenue Batch Manager (Financial)
- Expense Payable Manager (Financial )
- Payroll Manager (Financial )
- WIP Accrual Manager (Financial > Invoice Manager)
- Programs (Programs List)
- Cost Rule (Project List > Project edit > Manage tab)
- Billing Rule (Project List > Project edit > Manage tab)
- Project Work Plan (Project List > Project edit > Planners tab)
- Financial Planner (Project List > Project edit > Planners tab)
- Project Status Reports (Project List > Project edit)
- Currency Exchange (Setup > Financial > System > Currency)
- Tax Details (Setup > Financial > System > Taxes)
- Client POs (Setup > Work > Clients > Client edit > POs tab)
- Cost Rule (Setup > Work > Clients > Client Edit)
- Billing Rule (Setup > Work > Clients > Client Edit)
- Portfolio Projects (Setup > Work > Portfolios > Portfolio Edit > Projects tab)
- Cost Rules (Setup > Work > Work Types > Work Type Edit)
- Billing Rules (Setup > Work > Work Types > Work Type Edit)
Benefit: You can now quickly perform calculations and analysis directly within Excel, streamlining the process and reducing the time spent on manual alterations or data manipulation.
For further details refer to Export to Excel.
Financial

Description: In previous releases the maximum allowable value in Cost/Billing Rules (Financial System, Project, Client, Work Type etc) was set to 999,999.99.
As of this release, improvements have been implemented to increase this limitation to $999,999,999.99.
This enhancement allows for greater flexibility in defining rates, consequently enabling other related actuals that rely on cost/billing rates to also accommodate values surpassing the previous limit such as: Invoices, Financial Planner, Project Work Plan, Project Team, Project Budget & Billing, Upland Analytics reports etc.
Benefit: This improvement ensures that you can easily implement and utilize Cost/Billing rates with extended value ranges to meet your project requirements effectively.
For further details refer to Cost and Billing Rules.

Description: You can now find the mandatory Invoice File Name selection box which is defaulted to Organization - Invoice Number option, on the Invoices tab of Financial Settings (Financial > System). This feature empowers you to customize the naming conventions when emailing a PDF copy of the invoice.
You have the following options available:
- Organization - Client ID - Invoice Number
- Organization - Client Name- Invoice Number
- Client Name - Invoice Number
- Client Id - Invoice Number
- Organization - Invoice Number (Default selection)
- Invoice number
- Invoice Number - Client Name
- Invoice Number - Client Id
- Invoice Number - Organization
Caution: During the invoice creation process, if the file name exceeds 255 characters, the system will truncate it to 255 characters when sending the attachment.
Benefit: This improvement allows you to tailor the naming conventions when emailing PDF copies of invoices to clients. With a variety of customizable options available, you can enhance and streamline communication, ensuring a personalized and organized approach to invoice management.
For further details refer to Invoice Setup.

Description: The Resource Type Search criteria is now available by default from the:
- Users tab of Payroll Manager (Financial).
- Users tab of Expense Payable Manager (Financial).
Furthermore, you can now also choose to include the Resource Type column from Columns Selection ![]() of the above mentioned pages.
of the above mentioned pages.
Note: The Resource Type column displays the currently assigned Resource Type of the User.

Moreover, you can also choose to Filter ![]() these list pages based on Resource Type.
these list pages based on Resource Type.
Benefit: These improvements, empower your with greater control and flexibility in managing and accessing resource-related data, enhancing your effectiveness and productivity when managing Payroll and Payable Batches.
for further details refer to:
- Creating a new Expense Payable Batch
- Creating a new Payroll Batch

Description: The Total Included Hours is now visible within the Time tab of Invoice Edit page. Providing you with an overview of the combined hours worked by all selected Users across the chosen Projects.
-
Total Included Hours: Total hours + adjustments of the selected users

Moreover, the Total Included Hours column is also displayed by default when accessing the Invoices tab of Invoice Manager. You can manage the displayed columns from Columns Selection ![]() .
.
Note: The Services column has been renamed and is now labeled as Time.
Benefit: This improvement allows you to gain a comprehensive overview of combined hours worked by selected Users across Projects directly within the Invoice Manager and the Time tab of Invoice edit page.
For further details refer to:
- Working with Invoice Manager
- Creating a new Invoice
Financial Planner

Description: In a past release we introduced the functionality to Rollup Entries Budget, Work Plan Hours, and Actuals in Financial Planner Templates. This allows you to create a parent project to act as the main contract where the budget is defined and distributed for all child projects (one level of child hierarchy). By doing so, you can effectively monitor financial aspects across the entire contract from the parent project, including actual costs and forecasts which facilitates comprehensive oversight and management of finances throughout the project lifecycle.
When the Rollup Entries for either Child Projects only or This Project and child Projects was active, there was an issue when the Forecast Rates were defined at the Team level of child Projects, wherein the Revenue & Cost rows for the parent Project displayed no data for the forecasted hours.

In this release, improvements have been made so that the values for Forecasted Cost/Billable Hour from child projects aggregate to the parent project.
Benefit: This enhancement ensures that users can conveniently access accurate billable values for forecasted hours directly within the financial planner of the parent project, eliminating the need to cross-reference values across individual child projects.
For further details refer to Rollup Entries.
Global Search

Description: The functionality of searching for Groups through the Global Search has been improved to only list the items which you have permissions to view.
Furthermore, you are now limited to searches using strings that are 50 characters or less.
Benefit: These enhancements refine your Global Search experience by ensuring that only relevant Group items appear in your search results and ensure smoother functionality.
For further details refer to:
- Global Search
- Global Search Logic
- Searching by Category
Homepage

Description: The Accumulated Leave Time section within the Home page is now renamed to Remaining Leave Time.
The values for Vacation, Sick Leave and Personal Day within this section are the same as in previous releases and are identical to the ones displayed within the Time Remaining for column located in Leave Time Summary (Entries > My Timesheet).
Benefit: This modification improves clarity for users by providing a more accurate heading of the information presented in this section.
For further details refer to My Home page.

Description: You can quickly see how many Work Items are assigned to you, and then access and review them through the My Assigned Items section on your Home Page.
Clicking on the link will take you to Work Item Manager page. It will display a View based on the following logic and order of precedence:
- Your defined Default View
- Your last accessed non-hidden View
- Non-hidden first available View that was created by you
- Non-hidden first available View
Note: The count excludes Work Items assigned to you exclusively via the Work Item Administrator Role.
Benefit: This improvement enhances efficiency by offering quick access to prioritize and manage tasks effectively. Additionally, it reduces the time spent searching for relevant tasks, thereby boosting overall productivity and efficiency within the PSA system.
For further details refer to My Home page.
Impersonation

Description: When attempting to Impersonate a User, the search criteria and columns for Last Name and First Name have been merged into a single criterion labeled User Name. Now, when you enter characters in the search box by choosing the User Name criterion, the results will include matches from both the First and Last name fields.
Benefit: This consolidation simplifies the user impersonation process, offering a more streamlined and comprehensive search experience by encompassing both First and Last names under a single search criterion.
For further details refer to Impersonating another User.
Integration
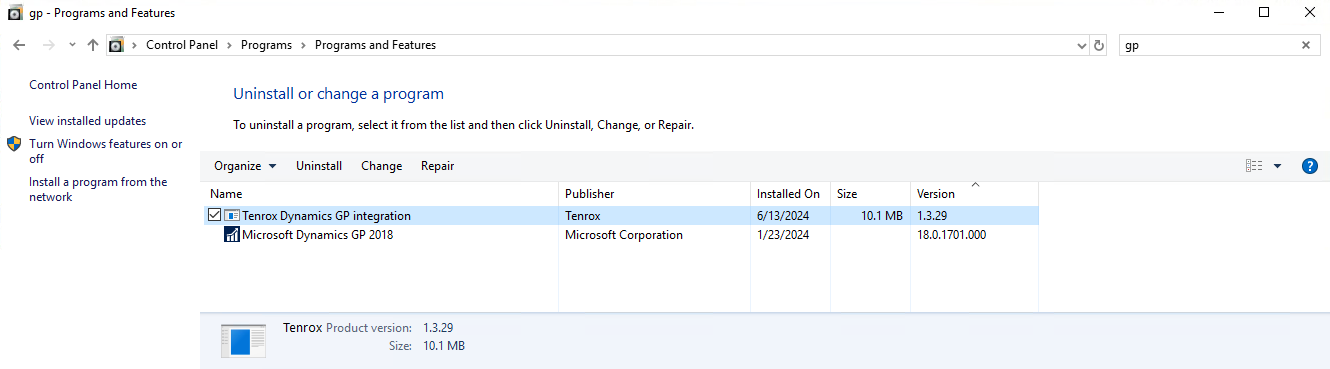
Upon upgrading to PSA 2024 R2.0 and accessing either the QuickBooks Desktop or Microsoft Dynamics GP Integration pages, you will be prompted to upgrade your Active-X Controls. Please ensure that you install the new Controls and that you have the following version depending on your integrated application:
- QuickBooks Desktop: 2.4.27 ActiveX Control
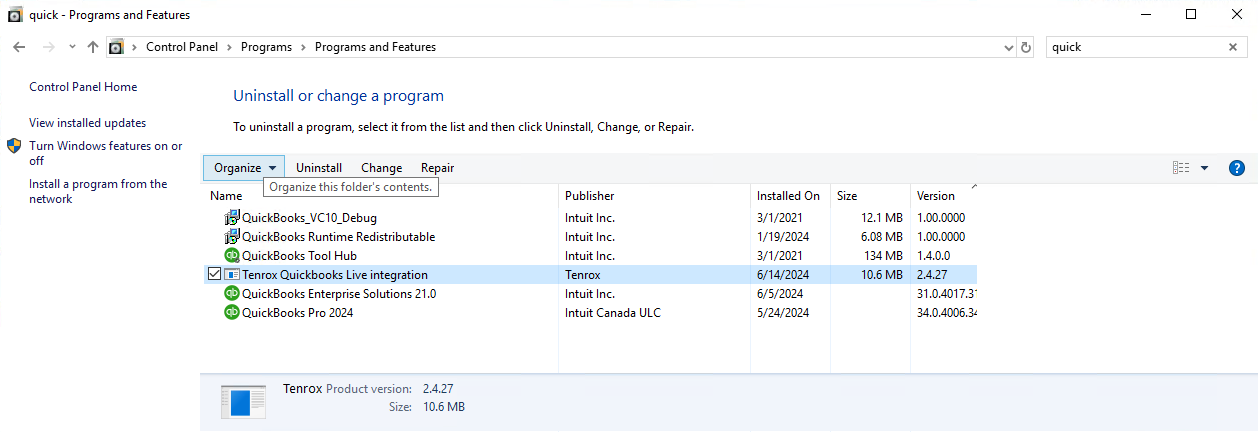
- Microsoft Dynamics GP: 1.3.29 ActiveX Control
Description: In this release, a framework was implemented to optimize the JSON file sent to QuickBooks Online. This framework consolidates transactions related to the same account, ensuring the file contains a more manageable (summarized) number of records. By doing so, it tackles the problem of encountering errors when sending large invoices with over 1000 transactions to QuickBooks Online.
Note: This functionality must be enabled by the PSA Technical Services Team. If you are interested in using this functionality, contact PSA Support to discuss your specific business requirements.
When the functionality is turned on, transactions will be exported in a summarized format. This means that records will be consolidated based on unique references, and the sums of amounts will be calculated for transactions sharing the same reference.
Additionally, during the export process, actual transaction dates will be disregarded, and the Transaction Date in QuickBooks Online is set with the PSA Invoice Document Date. It is crucial to ensure that the amounts between the Invoice Total amount in QuickBooks Online and PSA (Financial > Invoice Manager > Invoice Edit > Summary tab) match.
Benefit: The consolidation of transactions associated with the same Account helps streamline data handling, ensuring that the QuickBooks Online system can process the file successfully without any issues.
Leave Request Manager
Description: Leave request managers who at a minimum are granted the View right to User Work Plan (Setup > Organization > System > Security > Security Profile > Entry > Workforce Planning) can now access a User's Work Plan through the Leave Request Manager page.
Note: The rights to view/manage a User's Leave Request remain the same as in previous releases.
The new Work Plan button is available from the following tabs within the Leave Request Manager when the logged in User has access to User's :
- My Requests tab: General tab of an expanded Leave Request Entry row.

- Assigned Requests tab: General tab of an expanded Leave Request Entry row.

- All Requests tab: General tab of an expanded Leave Request Entry row.

- Calendar View tab: Click a Leave Request bar to access the General tab of a Leave Request


The Work Plan will be displayed in full-screen mode, with the time-line adjusted to the Start Date of the Leave Request, providing a focused view of the relevant period.
If required you can add/modify the user’s Bookings prior to approving the Leave Request. Clicking the Back button will take you back to where you originally accessed the Work Plan.
Benefit: This improvement allows you to view a user's Work Plan while approving their Leave Request, ensuring accurate resource allocation by enabling you to add or modify bookings as needed before finalizing the approval.
For further details refer to Access User Work Plan through Leave Request Manager.
Mobile
Description: In this latest release, the Upland Mobile app undergoes a rebranding process, marking a significant update. As a result, you can anticipate the availability of a fresh version of the PSA Mobile application, offering a renewed identity.
On July 14, while production sites are upgraded to PSA to 2024R2, a new PSA Mobile update will be available on Apple/Android app stores.
-
Please ensure that App Updates (for Apple devices) or Auto-update apps (for Android devices) is enabled, so you can receive the mobile update promptly and access PSA Mobile without delay.
- If your PSA has been updated to 2024R2 AND you have the updated mobile app - everything will work as expected and you will be able to resume your daily activities without interruption.
- If your PSA has been updated to 2024R2 AND you have not updated your mobile app - you will be prompted to and prevented from working until you update your mobile app.
- If your PSA has not been updated to 2024R2, you will not be able to use the mobile app (regardless of what version you have).
Although you can update the Upland Mobile app, it is highly recommended to delete it instead from your devices and install the new PSA Mobile application.
This can be accomplished by touching and holding the app icon, selecting "Delete App," and confirming the deletion.
Following this step, you can proceed to download the new PSA Mobile app from either the Apple App Store or the Google Play Store. Simply search for PSA Mobile to locate and download the updated application. The PSA Mobile app is recognizable by its new app icon:

- Tap the App Store icon
 .
. - Tap the Search icon (at the bottom right corner of your screen).
Tip: Click this link to access the Upland Mobile App Store page and skip to step 5.
- Enter the name of the app "PSA Mobile".
- Tap PSA Mobile in the search results.
- Tap GET. If prompted, sign in to the iTunes Store to complete the installation process.
- Tap the Play Store icon
 .
. - Tap the Search bar to enable the keyboard.
Tip: Click this link to access the Upland Mobile Play Store page and skip to step 5.
- Enter the name of the app "PSA Mobile".
- Tap PSA Mobile in the search results.
- Tap Install and follow the installation instructions.
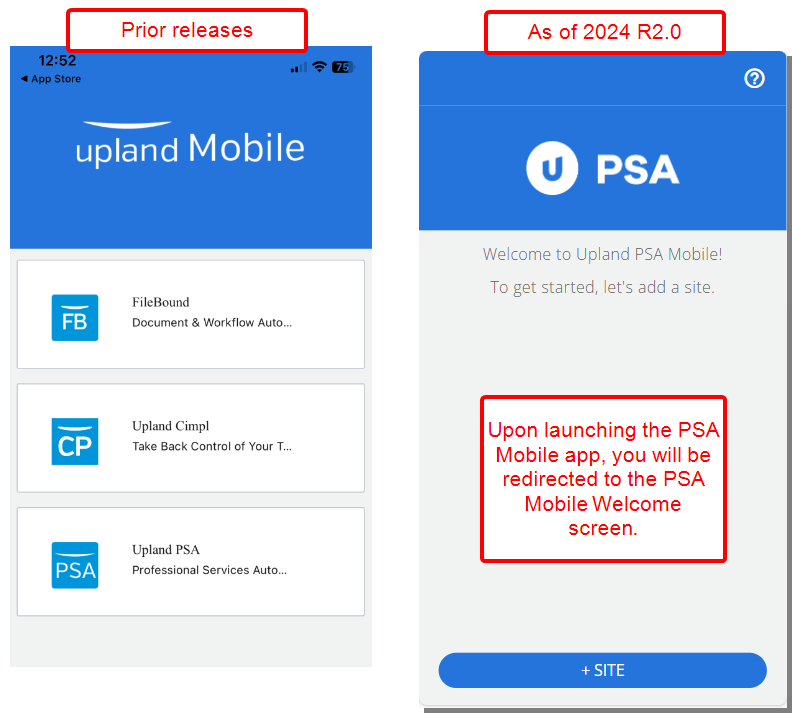
Upon launching the PSA Mobile app, you will notice a streamlined experience as you are no longer prompted to select a specific product line. Instead you will be redirected to the PSA Mobile Welcome screen.
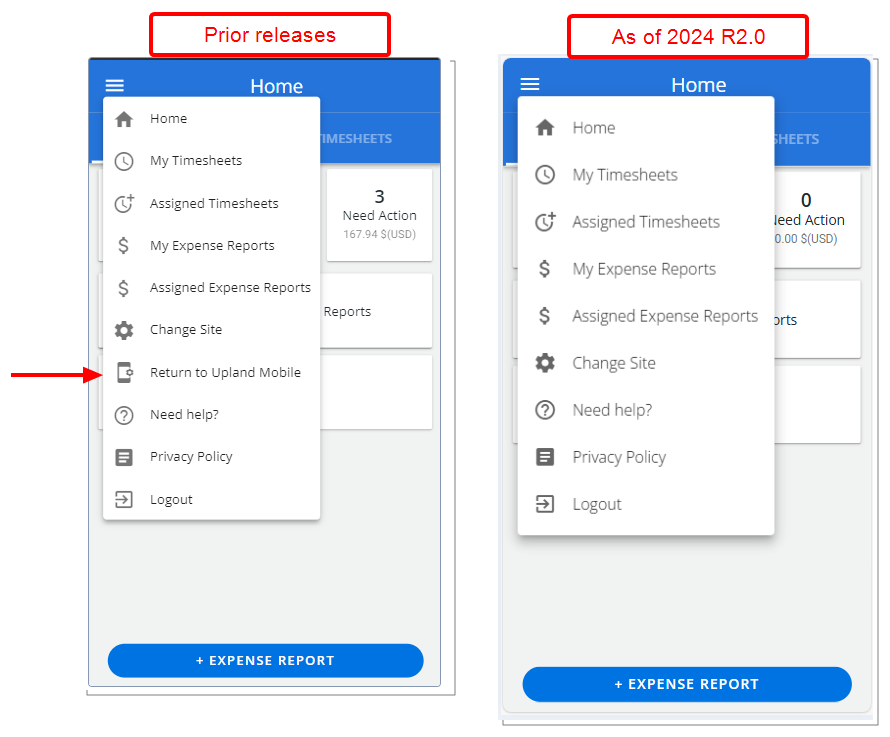
Furthermore, it is important to note that the option to Return to Upland Mobile will be removed from the app's menu. This change aligns with our transition to the new PSA Mobile application, consolidating access points and optimizing the user interface for improved usability.
Benefit: These updates aim to enhance user experience by reducing unnecessary steps and decluttering the app interface, ultimately enabling users to focus more on their tasks within the PSA Mobile environment.
For further details refer to the Mobile section of PSA help center.

Description: The option Enable Mobile push notifications is now available from the System Configuration page (Setup > Organization > System > System Setup) accessible only by the Master Administrator Security Profile.
Note: Enable Mobile push notifications is unchecked by default.

When the option is turned on, administrators can set up push notifications at the State/Transition level within the Time and Expense Workflows. Additionally, system-level notifications, such as Reminder to approve completed timesheets and Reminder to complete timesheet (Automation Service), are automatically pushed to the Users of PSA Mobile.

Push Notifications will be sent according to the schedule of the Notifications Delivery Automation Service. Upon tapping the Live Link you will navigate directly to the respective screen.
Note: Upon installing the new PSA Mobile application, please ensure to turn on push notifications on your mobile.
Benefit: By proactively alerting users about important events, such as pending approvals or upcoming submission deadlines, this feature boosts user productivity and encourages prompt action on tasks related to expenses and timesheets.
For further details refer to:
- Administrative functions:
- Enable mobile push notifications
- Automation Setup
- Installing the Mobile app
- Accessing PSA Mobile
- Enable Push Notifications on your device

Description: The Timesheet Disclaimer feature allows the customization of a disclaimer message when Transitioning a timesheet from one State to another (Setup > Timesheet > Workflows > Timesheet Workflow Edit).
In past releases this message would display when using the web application only. However, as of this release the Disclaimer Message is now also displayed when the Transition is triggered through the Mobile application. Tapping Agree will transition the Timesheet to the next State.
Note: When mass updating Timesheets through the Mobile app, you can only Agree or Disagree to the Disclaimer for all selected Timesheets. You can not Agree or Disagree for some Timesheets as is the case through the web interface.
Benefit: This clear confirmation mechanism minimizes accidental timesheet submissions, ensuring data accuracy, compliance, and user satisfaction when using the Mobile app.
For further details refer to Creating a timesheet disclaimer on transitioning a timesheet.
New Timesheet

Description: In previous releases, when copying a Timesheet, by default, the source period was set to the period from where you clicked the Copy Timesheet link, and the destination period was set to current period.
In this release, improvements have been made to the default From and To fields in the Copy Timesheet dialog box:
-
If the current period has NO Entries: The default value for the "From" field is set to the most recent period in the past that has Entries and the default value for the "To" field is set to the current period.
-
If the current period has Entries: The default value for the "From" field is set to the current selected period and the default value for the "To" field is set to the next empty Timesheet period that needs to be filled in.
Note: When setting the default periods for copying Timesheets, the system only takes into account the periods during which working hours were logged. This includes Regular Time, Overtime, Double Overtime, and any Adjustments. Non-working time, such as vacation or sick leave, are not considered. Therefore, the default periods provided for copying Timesheets reflect only the periods in which productive work activities were recorded.
Scenario 1: A user consistently engages in similar tasks or projects each week, the process of copying timesheets is streamlined to support their routine. Upon logging into the current week's empty Timesheet and initiating the timesheet copy function, the system defaults the "From" period to the previous week, where the user has previously logged hours. This ensures continuity in their time tracking process. Concurrently, the "To" period is set as the current week, allowing the user to seamlessly transition and continue recording their hours for ongoing tasks or projects.
Scenario 2: Let's assume a user whose weekly tasks vary, requiring unique time allocations, the Timesheet copying process is tailored to accommodate their dynamic workflow. In this scenario, the user navigates through previous Timesheets to locate one that closely resembles the tasks performed in the current week. Upon initiating the Timesheet copy function, the system sets the default "From" period as the current timesheet, aligning with the tasks recorded for the ongoing week. Simultaneously, the "To" period is set to the next open Timesheet, facilitating a seamless transition to the upcoming period.
Benefit: The enhanced Copy Timesheet functionality automatically suggests the most relevant starting period based on recorded hours in previous periods, greatly improving user experience. You no longer need to manually search for the appropriate starting period, saving valuable time.
For further details refer to Copying a Timesheet.

Description: In previous versions, when a word extended beyond the width of the available space in the Note column, it would break abruptly, splitting without hyphens and causing readability issues.
Improvements have now been made for the text wrapping to occur at the end of words instead of splitting them. This ensures that words remain intact and easily readable, enhancing the overall clarity of the note.
Benefit: This improvement eliminates abrupt breaks that split words without hyphens. By wrapping text at the end of words, readability is significantly enhanced, leading to a better user experience.
For further details refer to Timesheet Notes.

Description: Previously, the Add Assignment drawer would close automatically when navigating to another Timesheet Period, requiring users to reopen it to add Assignments for multiple periods.
As of this release, the Add Assignment drawer remains open when moving between open Timesheet periods. Additionally any selections made for Assignments and Adjustments are kept. However, the previously chosen Reason for Non-Working Time resets to the default value.
Note: The Add Assignment drawer is closed automatically when:
- Navigating to a read-only period
- Navigating to a period having a different Timesheet Template
Benefit: By maintaining the Add Assignment drawer open when moving between active Timesheet Periods you can seamlessly add Assignments and Adjustments without the need to reopen the drawer, enhancing efficiency and user experience.
For further details refer to Timesheet Assignments.
Notifications

Description: Announcement Notifications can now be scheduled for future delivery, giving you the flexibility to select the desired date, time, and timezone for sending.
The Announcement Notification will be sent according to the schedule of the Notifications Delivery Automation Service.
Caution: As a precautionary note, please be advised that delays might occur depending on the schedule settings of your Notifications Delivery Automation Service.
Example: If you have set an Announcement Notification to be sent at 13:30, and your Notifications Delivery Automation Service runs every 60 minutes, with the most recent operation at 13:00, your Announcement Notification will be dispatched at the next execution time of the Automation Service, which is 14:00.
- Scheduled Send Date: The date on which the Announcement Notification is scheduled to be sent.
Note: By default, this field is empty, allowing you to choose the desired date for sending the notification.
- Time: The specific time, represented in military format, at which the Announcement Notification is scheduled to be sent.
Note: By default, this field is set to 00:00.
- Time Zone: The geographic region or area where the scheduled time for sending the announcement notification is based.
Note: By default, this field is set to (GMT -05:00) Eastern Time (US and Canada).
- Hovering over the Tooltip
 icon next to Valid Until reveals that the Announcement Notification will not be sent after this specified date.
Note: By clicking Send, the Announcement Notification will be immediately sent to the designated recipients.
Benefit: This enhancement streamlines the process of publishing Announcement Notifications, thereby saving time and allowing you to focus on core tasks. Moreover, it extends the reach of businesses across various time zones, improving time management, enabling better coordination, and facilitating targeted communication to enhance engagement.
For further details refer to:
- Creating an Announcement Notification
- Modifying an Announcement Notification
Organization Breakdown Structure (OBS)

Description: A new Suspend selection box is now available from the Title Edit page. Please note that a Title cannot be suspended if there are active Users associated with it.
Suspended Titles are:
- Visually highlighted in red within the Titles list.
- Presented in red and are non-selectable in browse-for-item list pages.
- Hidden in selection lists.
- Available for selection in Filters and reporting
- Available for selection for the Parent field

A new Filter ![]() button is available from the Titles list page, offering Active and Suspended options. By default, both options are selected, and the filter icon is gray. If either or both selection boxes are unchecked, the Filter button turns blue, and the View switches to a flat list.
button is available from the Titles list page, offering Active and Suspended options. By default, both options are selected, and the filter icon is gray. If either or both selection boxes are unchecked, the Filter button turns blue, and the View switches to a flat list.
Note: Any existing and active actuals such as Users, Templates and/or Timesheet Entries associated with a suspended Title are allowed and stay as such in the system.
A new Parent field is now also available from the Titles list Column Selection ![]() . When included in the table, the parent title names within this column are hyperlinked to their respective edit pages. By default you can also Search for titles based on their Parent Title name. Note that you can choose to hide this search option from Column Selection
. When included in the table, the parent title names within this column are hyperlinked to their respective edit pages. By default you can also Search for titles based on their Parent Title name. Note that you can choose to hide this search option from Column Selection ![]() .
.
Furthermore, a new Is_Suspended column is now available from the Excel Import Template under the Titles sheet.
Note:
- Deletion of a User’s current Title is not allowed when the next-to-be current Title is already suspended.
- The System Default Title cannot be Suspended.
- Is a placeholder and Suspend settings are mutually exclusive.

Upon attempting to suspend a Title with current or future assignments the following error is displayed: This Title cannot be suspended as it has current or future assignments (Details). Clicking on Details from this error bar will display the User Associations of this Title dialog box which gives you an insight on the following information:
- User Name: Displays the User Name with the Title association.
- Start Date: Displays the association Start Date.
- End Date: Displays the association End Date.
- Reason: Displays a brief description of the reason why the Title could not be suspended.
- Click Copy to Clipboard to copy the list to your clipboard. You can then use an application of your choice for further review. The table column headings are copied as well. This option is useful when you want to paste the information into an application such as Microsoft Excel, enabling the list to be displayed in separate cells, as columns and rows.
Note: Restrictions preventing the creation or modification of objects using suspended Titles via API have also been implemented.
Benefit: This enhancement provides a powerful tool to mark Titles that are obsolete, preventing the creation of new associations to them. By maintaining data integrity within the system, administrators can effectively manage and organize Titles, streamlining operations and ensuring accurate data representation.
For further details refer to:
- Suspending a Title
- User's Title History
- Viewing a User's Title History
- Editing a User's Title
- Choosing a Future-Dated User Title

Description: The new Show Suspended Groups selection box is now available:
- When selecting a Group from:
- Setup > Organization> Users> Users Edit> Details> Approval Group/Resource Group
- Setup > Organization > System > System Setup > Defaults
- Setup > Organization > Roles > Role Edit > Resource Group
- When selecting a Parent Group from:
- Setup > Organization > Groups > Edit Group > Parent
- When choosing to notify a Group Manager:
- Setup > Work > Work Item Workflows > Edit workflow > Edit Workflow > State/Transition Notification > Recipients
- Setup > Workforce Planning > Resource Request Workflows > Edit Workflow > State/Transition Notification > Recipients
- Setup > Timesheet > Timesheet Workflows > Edit Workflow > State/Transition Notification > Recipients
- Setup > Timesheet > Leave Request Workflows > Edit Workflow > State/Transition Notification > Recipients
- Setup > Expense > Workflows > Edit Workflow > State/Transition Notification > Recipients
- Setup > Notifications > Notification Type : Budget Notifications > Edit Workflow > Recipients
- Setup > Notifications > Notification Type : Workforce Planning Notifications > Edit Workflow > Recipients > Notify : Group Manager
- Any Browse for Group User Defined Fields
Benefit: Hiding suspended Groups by default helps streamline and declutter the list, making it easier for you to focus on active Groups. However, with this improvement, you still have the option to display suspended Groups when needed, ensuring you have access to all necessary information without overwhelming the default view.
For further details refer to:
- Setting up the Defaults (OBS)
- User Membership Update
- Creating a New User
- Creating a new Group
- Creating a Role
- Editing a Workforce Planning Notification
- Creating a Budget Notification Template
- Available UDF Types

Description: The Logon Name selection list located within the Logon Preferences section of System Setup (Setup > Organization > System) page is now renamed to Default Logon Name.
Additionally, a new option None has been added to the Default Logon Name. When None is chosen, the Logon Name field for a new User will remain empty until manually edited.
Note: Selecting either None or Email clears and locks the Name Separator box.
Benefit: The inclusion of the new None option offers enhanced customization, allowing for more precise configuration of logon preferences tailored to individual organization and user needs.
For further details refer to:
- System Setup (OBS)
- Configuring Logon Preferences
- Creating a New User

Description: In previous releases, Logon Names were automatically generated based on the chosen Logon Name (Setup > Organization > System > System Setup), regardless of any manual entries made during User creation, thus overriding the user's input.
Improvements have been made so that in cases where the Logon Name is entered or modified manually from the User Edit page (Setup > Organization > Users), the system will NOT automatically override it upon entering an Email, Last Name, or First Name.
Benefit: This improvement ensures that your manual entries and customizations are respected.
For further details refer to:
- Creating a New User
- Configuring Logon Preferences.

Description: When creating a new User, the system verifies if Microsoft Teams is enabled on your environment. If the setup is complete, the Microsoft Teams notification option is now automatically set by default.
Caution: Henceforth, any users newly created in the system will automatically receive Microsoft Teams notifications by default if Microsoft Teams is enabled in your environment. You must be mindful to clear the Microsoft Teams selection box if you do not want a specific user to receive these notifications.
Note: If you are interested in enabling Microsoft Teams on your environment, contact PSA Support to discuss your specific business requirements.
Benefit: This enhancement simplifies the setup process of new Users. Additionally, it boosts end user communication effectiveness through Microsoft Teams.
For further details refer to Creating a New User.

Description: In past releases, a User's Title and Functional Group association could only start from current date. As of this release administrators can now update a user's Title and Functional Group by setting a future effective date.

Furthermore, a new Update User data Automation Service is now also available which processes Users' Title, Functional Groups, and Resource Types.
Note: By default, the Automation Service is checked and read-only.
Upon execution, the Update User data Automation Service will check for any Titles, Functional Groups, or Resource Types that should be updated for all Users in the system (Active, Suspended, and Decommissioned) and will update them accordingly. Moreover, if there are some Skills associated with the newly assigned Title, they will be associated with the User automatically.

Should the Automation Service fail, an email message is sent to the email address defined for the Master Administrator user containing the following details:
Title: Process Historical Properties service failed.
Message: "Update User data" automation service has failed, please check the attached log file which contains comprehensive information about the error.
The attached log file includes the following information: User Name and failed ObjectName (each object will appear on a separate line).
Note: The Functional Group column when included in the Timesheet Manager page displays the Users' current Group.
Benefit: This enhancement offers the flexibility to proactively assign Titles and Functional Groups to users for upcoming periods, streamlining operations and planning processes including:
- Optimized Resource Allocation: You can ensure that resources are allocated efficiently. This helps to match the right people with the right tasks, avoiding under-utilization or overloading of resources.
- Enhanced Role Clarity: It provides employees with a clear understanding of their roles and responsibilities in advance. This clarity minimizes confusion, improves accountability, and fosters a sense of ownership among team members.
- Improved Planning and Execution: You can plan and execute projects more effectively by anticipating resource needs, identifying potential skill gaps, and making adjustments early on to ensure successful project delivery.
- Aligned with Strategic Objectives: By ensuring that resources are allocated in alignment with strategic goals, you can accelerate progress toward their long-term vision.
- Enhanced Decision-Making: Clear assignment of titles and functional groups enables faster and more informed decision-making. Managers can easily identify key stakeholders, delegate authority, and allocate resources based on predefined roles and responsibilities.
- Increased Employee Engagement: Employees feel more engaged and motivated when they have a clear understanding of their roles and responsibilities.
- Improved Communication: Future assignments facilitate better communication within the organization. Employees can proactively collaborate with their peers, seek clarification on tasks, and address potential challenges early on, leading to smoother project execution.
For further details refer to:
- Assigning a Future-Dated User Functional Group
- Update User data Automation Service

Description: In addition to the UI/Ux enhancements, a new Details tab is now available from the user Settings dialog box allowing you to conveniently review your own data, including details such as:Master Site, Active Site, Approval Group, Approval Group Manager, Title, Resource Type, Functional Group, Functional Group Manager, Holiday set, User Type, Resource Group, Resource Group Manager, Company and Team.
Note: Information displayed on this tab is directly sourced from the User Setup page.
Benefit: This enhancement enables you to quickly access and review pertinent information, facilitating efficient resolution of any issues or inquiries.
For further details refer to:
- User Settings
- User Settings | Details tab

Description: Enhancements have been implemented in the error message bar and error handling process when attempting the suspend a Group with upcoming Assignments.
Clicking on Details from this error bar will display the Future Assignments of this Group dialog box which gives you an insight on essential details such as User Name, Start Date, and End Date for each Assignment.
You can click Copy to Clipboard to copy the list to your clipboard, then use an application of your choice for further review. The table column headings are copied as well. This option is useful when you want to paste the information into an application such as Microsoft Excel, enabling the list to be displayed in separate cells, as columns and rows.
Benefit: This improvement provides a clearer guidance when suspending a Group with future assignments, reducing confusion. Future assignments for the Group can easily be identified and addressed, streamlining error resolution.
For further details refer to Suspending a Group.

Description: Administrators can now use the newly added Add to Project button located within the Users list page to add Users to Projects in bulk:
- From Users list (Setup > Organization) select the required Users and click Add to Project.
Note: The Add to Project button is disabled/grayed out when:
- No Users are selected.
- One or more Suspended/Decommissioned Users are selected.
- From the Project List dialog box, search for the required Project(s). Select them and add them to the selected projects table on the right. Click Save.
Note: The list only includes active Projects. Suspended or Placeholder Projects are omitted.
Tip: Use the search function to find Projects by Name, Id, Code, Project Manager or Client.

Additionally, within the Users list Column Selection ![]() , you now have the option to add the Project column. Once included, this column displays the number of projects each user is assigned to. Clicking this number will open the Assigned Projects dialog box.
, you now have the option to add the Project column. Once included, this column displays the number of projects each user is assigned to. Clicking this number will open the Assigned Projects dialog box.

From the Assigned Projects dialog box you can:
- View the details of the user such as User Name and the User Id.
- Refresh
 the list.
 - By Default, the following columns are displayed: Name, Id, Code, Project Start and Project End. From the Column Selection
 you can choose to include the following columns in the table: Client, Offboarding Date, Onboarding Date and Project Manager.
 - By default you can Search
 for Projects based on: Name, Id, Code, Client and Project Manager. You can manage the availability of these search criteria through Column Selection .
 - Pagination is available at the top right corner to facilitate easy navigation across pages.
Use case: Lara, the administrator, has been assigned the task of adding ten users to PSA and assigning each user to five projects. With the latest enhancement, Lara can efficiently accomplish this task. By accessing the Users list, Lara can seamlessly create the users and directly assign them to the required projects without the need for excessive click-through actions.
Benefit: This new feature enhances user experience by allowing for swift and efficient mass assignment of one or more users to multiple projects from a single page. This streamlined process reduces errors, simplifies user management and improves overall efficiency.
For further details refer to:
- View Assigned Projects from Users list
- Bulk Assignment of Users to Projects
- Out-Of-The-Box Column Selection options | Users list
Project Management
Description: Within the Project Teams page, when a Resources' On/Off-boarding dates already conflict with their Hire or Termination dates, a warning icon is now displayed which serves as a visual cue to indicate this discrepancy.
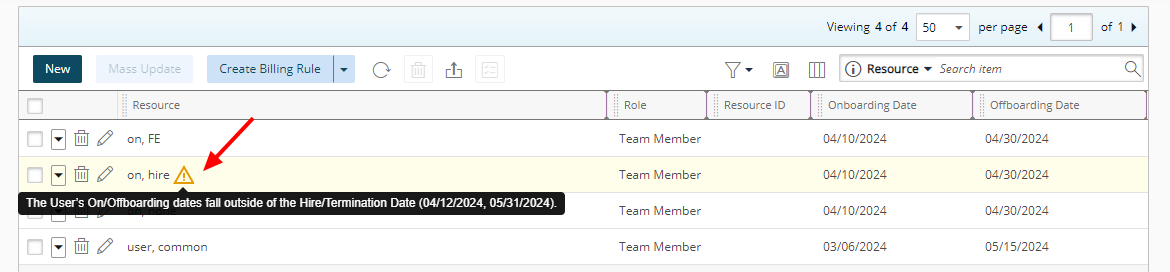
Hovering over this icon will display the details of the issue stating that "The User’s On/Offboarding dates fall outside of the Hire/Termination Date ({hire date}, {termination date})."
Note: In cases where a resource has multiple messages, they are listed for easier identification and comprehension.
Furthermore, a warning message is now displayed upon attempting to set the on/off Boarding dates beyond the Resource's Hire or Termination dates. Please refer to following scenarios for further details:
Updating On/Offboarding Dates (Project Team Inline Edit)
A message is displayed informing you that The Onboarding Date cannot be earlier than the Hire Date of the resource. The earliest Onboarding Date is {Hire date}. Do you want to continue with this date?
- Selecting NO will cancel the process.
- Selecting YES will result in the Onboarding date to be updated to the Hire Date.
A message is displayed informing you that The Offboarding Date cannot be later than the Termination Date of the resource. The latest Offboarding Date is {Termination date}. Do you want to continue with this date?
- Selecting NO will cancel the process.
- Selecting YES will result in the Offboarding Date to be updated to the Termination Date.
A message is displayed informing you that The On/Offboarding Dates cannot be outside of the Hire/Termination Date of the resource. The earliest Onboarding Date is {hire date} and the latest Offboarding Date is {Termination date}. Do you want to continue with these dates?”
- Selecting NO will cancel the process.
- Selecting YES will result in the:
- Onboarding date to be updated to the Hire Date.
- Offboarding Date to be updated to the Termination Date.
Mass Updating On/Offboarding Dates
In this case a dialog box is displayed informing you that: The selected On/Offboarding dates cannot be set for some Resources. The earliest Onboarding Date can be set as seen below. Do you want to continue with these dates?”
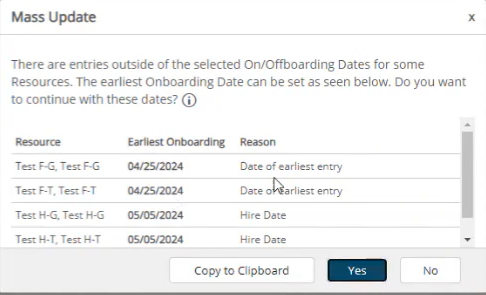
The table displays the Resource name, Earliest Onboarding and the Reason columns.
- Selecting NO will cancel the process.
- Selecting YES will result in the following scenarios:
- The Onboarding dates for the Resources with Entries conflicting with the Onboarding date will be updated the “Earliest Onboarding” as shown in the table.
- The Onboarding dates for the Resources with Hire date conflicting with the Onboarding date will be updated the “Earliest Onboarding” as shown in the table.
- The Onboarding dates for the Resources without Entries will be updated to the initial choice.
- Click Copy to Clipboard to copy the list to your clipboard. You can then use an application of your choice for further review. The table column headings are copied as well. This option is useful when you want to paste the information into an application such as Microsoft Excel, enabling the list to be displayed in separate cells, as columns and rows.
Note: Suggested dates for the earliest/latest Onboarding/Offboarding dates that conflict with your chosen On/Offboarding dates are highlighted in bold.
In this case a dialog box is displayed informing you that: The selected On/Offboarding dates cannot be set for some Resources. The latest Offboarding Date can be set as seen below. Do you want to continue with these dates?”
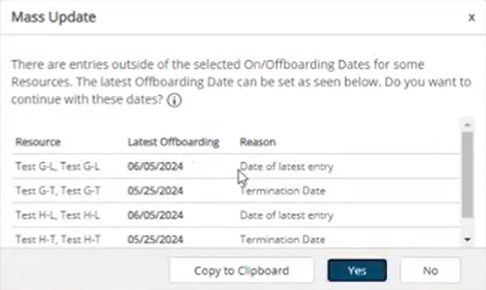
The table displays the Resource name, Latest Offboarding and the Reason columns.
- Selecting NO will cancel the process.
- Selecting YES will result in the following scenarios:
- The Offboarding dates for the Resources with Entries conflicting with the Offboarding date will be updated the “Latest Offboarding” as shown in the table.
- The Offboarding dates for the Resources with Termination date conflicting with the Offboarding date will be updated the “Latest Offboarding” as shown in the table.
- The Offboarding dates for the Resources without Entries will be updated to the initial choice.
- Click Copy to Clipboard to copy the list to your clipboard. You can then use an application of your choice for further review. The table column headings are copied as well. This option is useful when you want to paste the information into an application such as Microsoft Excel, enabling the list to be displayed in separate cells, as columns and rows.
Note: Suggested dates for the earliest/latest Onboarding/Offboarding dates that conflict with your chosen On/Offboarding dates are highlighted in bold.
In this case a dialog box is displayed informing you that: The selected On/Offboarding dates cannot be set for some Resources. The earliest Onboarding Date and the latest Offboarding Date can be set as seen below. Do you want to continue with these dates?
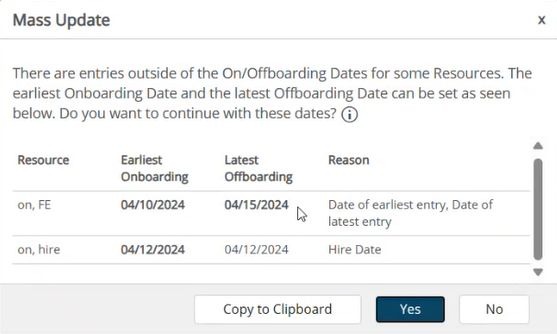
The table displays the Resource name, Earliest Onboarding, Latest Offboarding and the Reason columns.
- Selecting NO will cancel the process.
- Selecting YES will result in the following scenarios:
- The Offboarding and Onboarding dates for the Resources with Entries conflicting with the Onboarding or Offboardingdate, are updated to the date of the first & last entry respectively as shown in the dialog box.
- The Onboarding and Offboarding dates for the Resources with no Entries, are updated to the initial choice.
- The Onboarding and Offboarding dates for the Resources with Termination or Hire dates conflicting with the Onboarding and Offboarding dates will be updated the “Earliest Onboarding”or “Latest Offboarding” as shown in the table.
- Click Copy to Clipboard to copy the list to your clipboard. You can then use an application of your choice for further review. The table column headings are copied as well. This option is useful when you want to paste the information into an application such as Microsoft Excel, enabling the list to be displayed in separate cells, as columns and rows.
Note: Suggested dates for the earliest/latest Onboarding/Offboarding dates that conflict with your chosen On/Offboarding dates are highlighted in bold.
Benefit: This improvement ensures that resources maintain accurate assignments within their designated availability periods, promoting better resource management and project planning.
Note: Modifications were made to this improvement in 2024 R2.0.3 release. For further details, refer to PSA 2024 R2.0.3 - Release Update.

Description: Improvements were made to visually indicate Resources that have Hard Bookings that fall outside of the On/Offboarding dates.
In this case a warning icon is now displayed against the Resource name within the Project Team page. Hovering over this icon will display the following tooltip: Resource has Allocations ({allocation start date}, {allocation end date}) outside of the On/Offboarding Dates.

Likewise, a warning icon is now also displayed against the Resource name within the Work Plans. Hovering over this icon will display the following tooltip: Resource has Allocations outside of the On/Offboarding Dates ({onboarding date}, {offboarding date}).
Benefit: The warning icon provides Project and Resource Managers with a visual cue, indicating when Resources have Hard Bookings that fall outside of the On/Offboarding dates. This empowers them to proactively manage resources, ensuring bookings align with designated availability periods. Consequently, it minimizes scheduling conflicts and optimizes resource utilization, facilitating more effective project timelines and management.
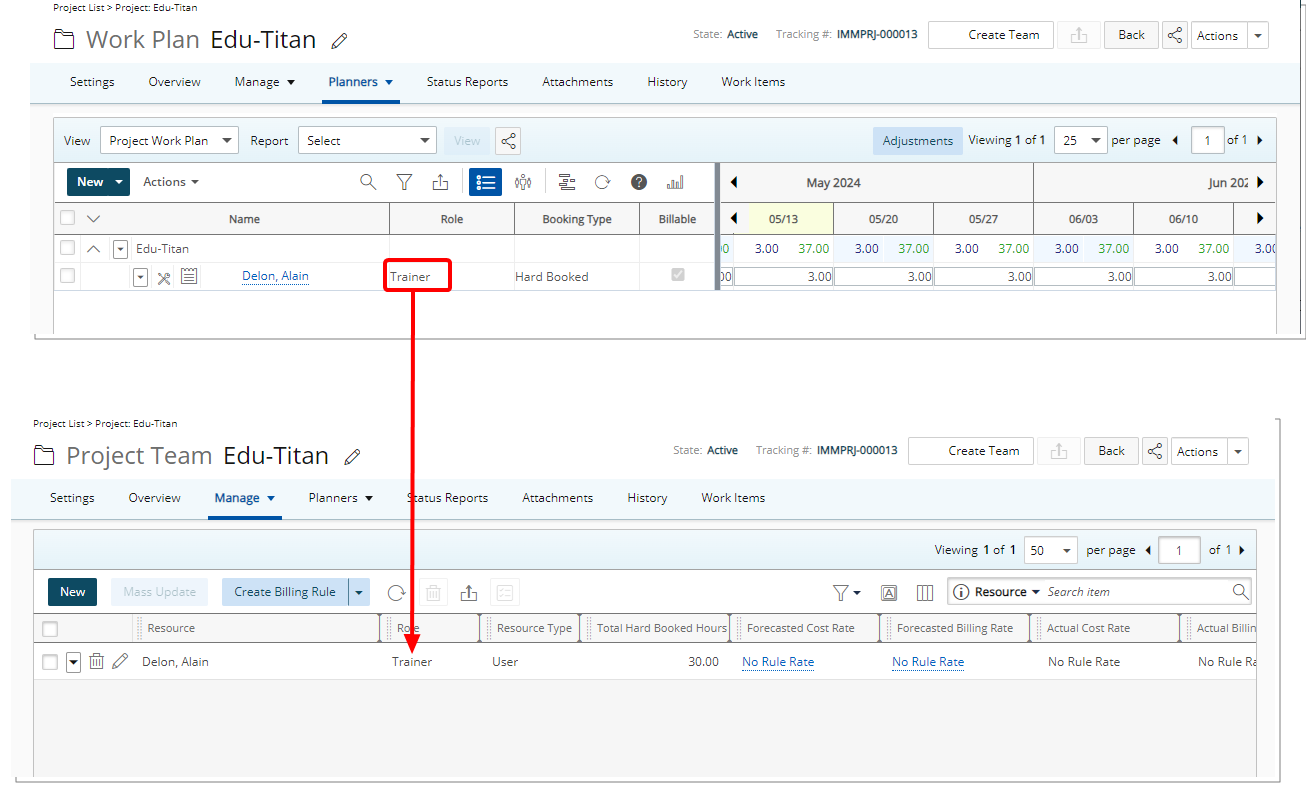
Description: In previous releases, when creating a Hard Booking for a Resource from any of the Work Plans, the Resource was automatically added to the Project Team with their Primary Role regardless of the Role that was assigned to them during the Hard Booking.
As of this release, when Resources are added to the Project Team during the creation of a Hard or Soft Booking, the system automatically assigns them the Role that was previously defined for them in the Work Plan. This means that the roles assigned to each team member in the Project Team now match those specified in the Work Plan, ensuring consistency throughout the project lifecycle.
When multiple Hard/Soft Bookings are made for the same Project Team member with different Roles, the Role assigned during the creation of the first Hard/Soft Booking will define the Role for that team member. Subsequent bookings for the same team member will not override or change the initially assigned Role.
Note: This enhancement specifically focuses on the automatic assignment of Roles for new Project Team members added during the creation of a Hard/Soft Booking. For existing members of the Project Team, their Roles remain unchanged. This means that any team members who were previously assigned Roles will retain those Roles, unaffected by the introduction of this improvement.
Benefit: This improvement streamlines the process, saving time and effort, as there is no longer a need for manual verification or adjustment of roles. As a result, project managers can have greater confidence in the accuracy and integrity of their project team's roles and responsibilities, leading to smoother project execution and improved outcomes.
for further details refer to Automatic assignment of Roles for new Project Team members added during the creation of a Hard/Soft Booking through the Work Plans.

Description: When copying a Project, you now have the option to also copy associated Work Item Entries.

Within the Project Copy dialog box, select the Work Items option and specify the desired Work Item Workflows to be included. During the copying process, the system will replicate all related Work Item Entries belonging to the selected Work Item Workflows.
When entries are copied, the new copies will automatically be set to an Open State, regardless of the original state of the source entries. This ensures that all newly copied entries start from a consistent state, simplifying the workflow and making it easier to track and manage these entries from a common starting point.
Tip: While optional, selecting the User Defined Field values option is crucial as it influences if User Defined Field values associated with Work Items will be copied during the process. This option affects the copying of User Defined Field values across Projects, Tasks, Milestones, and Work Items.
Note: The logged-in User must be granted the Create permission for the relevant Work Item Workflows (Setup > Organization > System > Security > Security Profile edit > Workflows). This permission enables the user to initiate the creation of copied Entries during the copy process. If the logged in user lacks the Create permission for a specific Work Item Workflow, the corresponding active/non-placeholder Workflow(s) will not appear in the table.
Use case: Lauren Hill, who is responsible for creating several new Projects, needs to maintain the source project's Work Item Entries, specifically those of type Action Item. With this enhancement, Lauren can easily select the Work Items option and then choose the relevant Action Item Workflow when copying the Project. This ensures that Action Item Entries are carried over seamlessly to the new Projects.
Benefit: Automatically copying over relevant Work Item Entries, can save time and effort, thereby streamlining project management processes. This leads to increased efficiency and accuracy in project replication, ultimately enhancing productivity and project outcomes.
For further details refer to
- Copying a Project
- Copying and Editing a Project
- Copying the Work Item Entries and associated User Defined fields to a new Project

Description: Two new options, Baseline Billable Budget in Project Curr. and ∆ Baseline Billable Budget in Project Curr. are now available for all Views within the Project List page.
- Baseline Billable Budget in Project Curr.: Displays the Sum of Baseline Billable Budgets of the Project in Project Currency.
- ∆ Baseline Billable Budget in Project Curr.: Displays the Difference between Baseline Billable Budget and Actual Billable in Project Currency.
You can choose to include them in:
- Project List Column Selection (Project list)
- On-page Filters (Project list)
- Expanded row (Project list > Expanded Row > Column Selection)
- View Filters (Project list > Modify View > Columns/Expanded Row/Filters)
The visibility of columns is dependent upon two factors.
- The Project Cost feature must be activated in the database.
- In the Enforce currency for Budgets setting under Setup > Work > System, the option for Project Cost must be selected.
Benefit: This enhancement empowers project managers with more comprehensive project insights, facilitating better financial monitoring and decision-making. With these columns readily accessible, project managers can efficiently track baseline billable budgets and identify any deviations, ensuring tighter financial control and project success.
For further details refer to
- Applying a Filter to the Project List
- Available Filter Options
- Overriding the Column Selection Defaults
- Out-Of-The-Box Column Selection options | Project List
- Key Performance Indicators in PSA

Description: In earlier releases, the Actual Cost Rate and Actual Billing Rate columns would only show data if an hourly rate for the specific project was set at the Resource level (Resource Hourly Rate with Project Dependency). This led to confusion, as any other defined rates would display as having "No current rule".
In this release, enhancements have been implemented to display the current Cost/Billing rate for each User. The data shown in the columns will follow the established Rate Precedence Rule Chart:

|
Resource Hourly Rate with Dependency (Project): A rate per hour for work done on a particular Project, configured at Resource level. | ||

|
Resource Hourly Rate with Dependency (Client): A rate per hour for work done on a particular Client, configured at Resource level. | ||

|
Project WBS Rate: A rate per hour for work done on a particular Project, configured at Project level. | ||

|
Client WBS Rate: A rate per hour for work done on a particular Client, configured at Client level. | ||

|
Resource Hourly Rate with no Dependency: A rate per hour for work done on a particular Task, configured at Resource level. | ||
This means that the system checks the rules in the order specified and displays the first one it finds.
Example: If you have rules defined as Project WBS Rate and Client WBS Rate, the system will display the Project WBS Rate in the table.
The format for values in this column is structured as follows: {Rule name} {regular amount}{Currency Symbol} ({Currency Code}) {Cost/Billing Type}. For instance: "American PMs 500$ (USD) Hourly" where the {Rule name} is labeled:
- As "Project Rate" if the rate originates from the Project
- As "Client Rate" if the rate originates from the Client
- {Rate Rule Name} defined at the User level
- {Rate Rule Name} defined at the organization level
Hovering over a value will reveal a tool-tip containing the following details:
- Start Date: Association Start date
- End Date: Association End date
- Overtime: Overtime value in the rate rule
- Double Overtime: Double Overtime value in the rate rule
Note: If there is no defined Cost/Billing Rule for the Resource, "No current rule" will be displayed
Caution: In conjunction with the improvements made in New Security Permissions for Forecast/Actual Rates on Project Team Page, some users may now see sensitive data instead of "No Rate Rule". If you would prefer to hide these fields at the time of upgrading to 2024 R2.0, please reach out to PSA Support.
Benefit: This enhancement brings clarity and efficiency to Project Cost and Billing Rate management by displaying the current rates for each Resource, eliminating confusion that arose from the previous system's limitations. Project Managers can now easily discern the applicable rate for each Resource with ease.
For further details refer to :
- Actual Cost Rate and Actual Billing Rate columns
- Security Permissions for Associating Actual Cost or Billing Rules from Project Team Page
- Security Permissions for Associating Forecast Cost or Billing Rules from Project Team Page
- Cost/Billing Rate Entry Security permissions
- Create Actual Cost/Billing Rules from Project Team

Description: You can now create Actual Cost/Billing Rule directly from the Project Team table header. The ability to create these Rules from the Project Team and the visibility of the Cost/Billing Rule button are directly tied to the Create right for the following permissions:
- Billing Rules (Setup > Financial)
- Cost Rules (Setup > Financial)
- Associate Actual Billing Rules from Project Team (Management > Financial)
- Associate Actual Cost Rules from Project Team (Management > Financial)
For further details refer to: New Security Permissions for Forecast/Actual Rates on Project Team Page
Please refer to the table below for various scenarios:
| Create Billing Rules | Create Cost Rules | Button availability |
|---|---|---|
| No | No | Button is hidden. |
| No | Yes | Only Add Cost Rule button is available provided the Create right for Associate Actual Cost Rules from Project Team is granted. Otherwise, the button will remain hidden. |
| Yes | No | Only Add Billing Rule button is available provided the Create right for Associate Actual Billing Rules from Project Team is granted. Otherwise, the button will remain hidden. |
| Yes | Yes | The Add Billing Rule button is displayed, you can access the Add Cost Rule option by clicking the down arrow. Note that the Create right to both Associate Actual Billing Rules from Project Team and Associate Actual Cost Rules from Project Team must be granted. |
To create and associate an Actual Billing/Cost rule for Resources in your Project Team:
- Select the Resources. Click either Create Cost Rule or Create Billing Rule.
- Upon the New Billing Rule displaying, enter the Name and ID for the rate rule.
- Select the Rule Type. Note that depending on your selection for the Rule Type, either the Recurring Rate or the Cost Plus section will be visible to you.
- Click New to create a Cost or Billing Rule Entry. Upon selecting/entering the required information, click Save. Your newly created Rule Entry will then be listed in the table and associated to your previously selected Resources.

- Click Save and then Back to return to the Project Team page.
- The display of the newly created Cost/Billing Rate for the Resource is dependent upon the current date. If the Start date falls on today or in the past, the rule will be visible. Otherwise, the current cost/billing rule will be shown.

Benefit: This improvement streamlines the process of creating Actual Cost/Billing Rules by allowing Project Managers to do so easily from the Project Team interface. Additionally, the visibility of the Cost/Billing Rule button is intricately linked to specific permissions, ensuring that only authorized users can create Cost/Billing Rules.
For further details refer to :
- Actual Cost Rate and Actual Billing Rate columns
- Security Permissions for Associating Actual Cost or Billing Rules from Project Team Page
- Security Permissions for Associating Forecast Cost or Billing Rules from Project Team Page
- Cost/Billing Rate Entry Security permissions
- Create Actual Cost/Billing Rules from Project Team
Description: When copying a Project, the Task names in the newly created Project adhere to the following format: NewlyCreatedProjectCode + <separator> + SourceTaskName.
As a result, when copying a Project the newly created Task names remain unaffected by any selected option for Default Task Name (Setup > Organization > System Setup > Task Preferences).
Tip: The Name Separator is defined in Setup > Organization > System Setup > Task Preferences.
Benefit: Enforcing a consistent and clear naming convention for tasks leads to improved efficiency and effectiveness in task management across projects.
For further details refer to Copying a project.

Description: In past releases, the Unique Id column was available from the Column Selection ![]() . However, it was not possible to include and use it as a Search criteria.
. However, it was not possible to include and use it as a Search criteria.
As of this release you can now also choose the Unique Id as an anchored Search criteria that will be available when searching for a Project. Simply click the Filter ![]() /
/![]() icon to either select/deselect the item as Search Criteria.
icon to either select/deselect the item as Search Criteria.

When searching for a Project by Unique Id, the returned result is an exact string match.
Example: If you search by Unique Id and enter 2. Only the project with a Unique Id=2 will be displayed.

Furthermore, you can now also create an on-page Filter based on Unique Id. The available options For this field are:
- Equal to (=)
- Not equal to (<>)
- Greater than or equal to (>=)
- Less than or equal to (<=)
- Less than (<)
- Greater than (>)
- Between
- Not between
Example: Filtering the list by selecting Less than(<) and then entering 10 in the Value 1 field will display only available Projects that have a Unique Id between 1 and 10.

Benefit: This improvement allows you to quickly locate specific projects with ease and accuracy, ultimately fostering a more efficient and streamlined project management experience.
For further details refer to Searching or Filtering by Project Unique Id.

Description: From the Project List Column Selection ![]() , you can now choose to include Current Cost Charge Budget In Project Cost Curr. column. In addition, you can also choose to include this information within the Expanded Row.
, you can now choose to include Current Cost Charge Budget In Project Cost Curr. column. In addition, you can also choose to include this information within the Expanded Row.

The value reflects the Current Cost Charge Budget as defined within the Project Budget (in project cost curr.).

Furthermore, you can also create an advanced Filter based on this criterion.
Benefit: This improvement allows you to quickly locate specific projects with ease and accuracy, ultimately fostering a more efficient and streamlined project management experience.
For further details refer to
- Applying a Filter to the Project List
- Available Filter Options
- Overriding the Column Selection Defaults
- Out-Of-The-Box Column Selection options | Project List

Description: You can now include the Logon Name and any User Defined Fields associated with Users to the available Users table, located on the left side of the Add New Resources dialog box.
By default, you can also search the available Users list based on their Logon Name. The search criteria as well as the displayed columns can be managed from the Column Selection ![]() .
.
Caution: Please note that you have the option to restrict user access to User Defined Fields (UDFs) associated with the User object. For instance, if certain sensitive user data is stored in a UDF and should not be visible to Project Manager Security Profile, you can hide this UDF by selecting the Hidden Access Control option. This ensures that the UDF will not be visible as a column or available for selection in Column Selection. For more information, refer to the Limit User Access to User Defined Field Associated With Users.
Benefit: This improvement allows you to gain a comprehensive view of resources directly within the Add New Resources dialog box by including the Logon Name and User Defined Fields in the available users table. This facilitates better decision-making and enables tailored resource selection to meet specific project requirements accurately.
For further details refer to Add New Resources page.
Resource Management

Description: The following new on-page Filter options are now available from all Work Plans (My Work Plan, Resource Scheduling, Project Scheduling, Project Work Plan, Group Work Plan and User Work Plan):
- Approval Group Id
- Approval Group Manager
- Approval Group Name
Benefit: This enhancement allows for more accurate planning with a targeted and granular focus on Approval Groups, making project management more efficient.
For further details refer to:
- Applying an On-Page Filter to a Project Work Plan View
- Applying a Filter to a Work Plan View
- Available Out-Of-The-Box Booking/Request Filter options
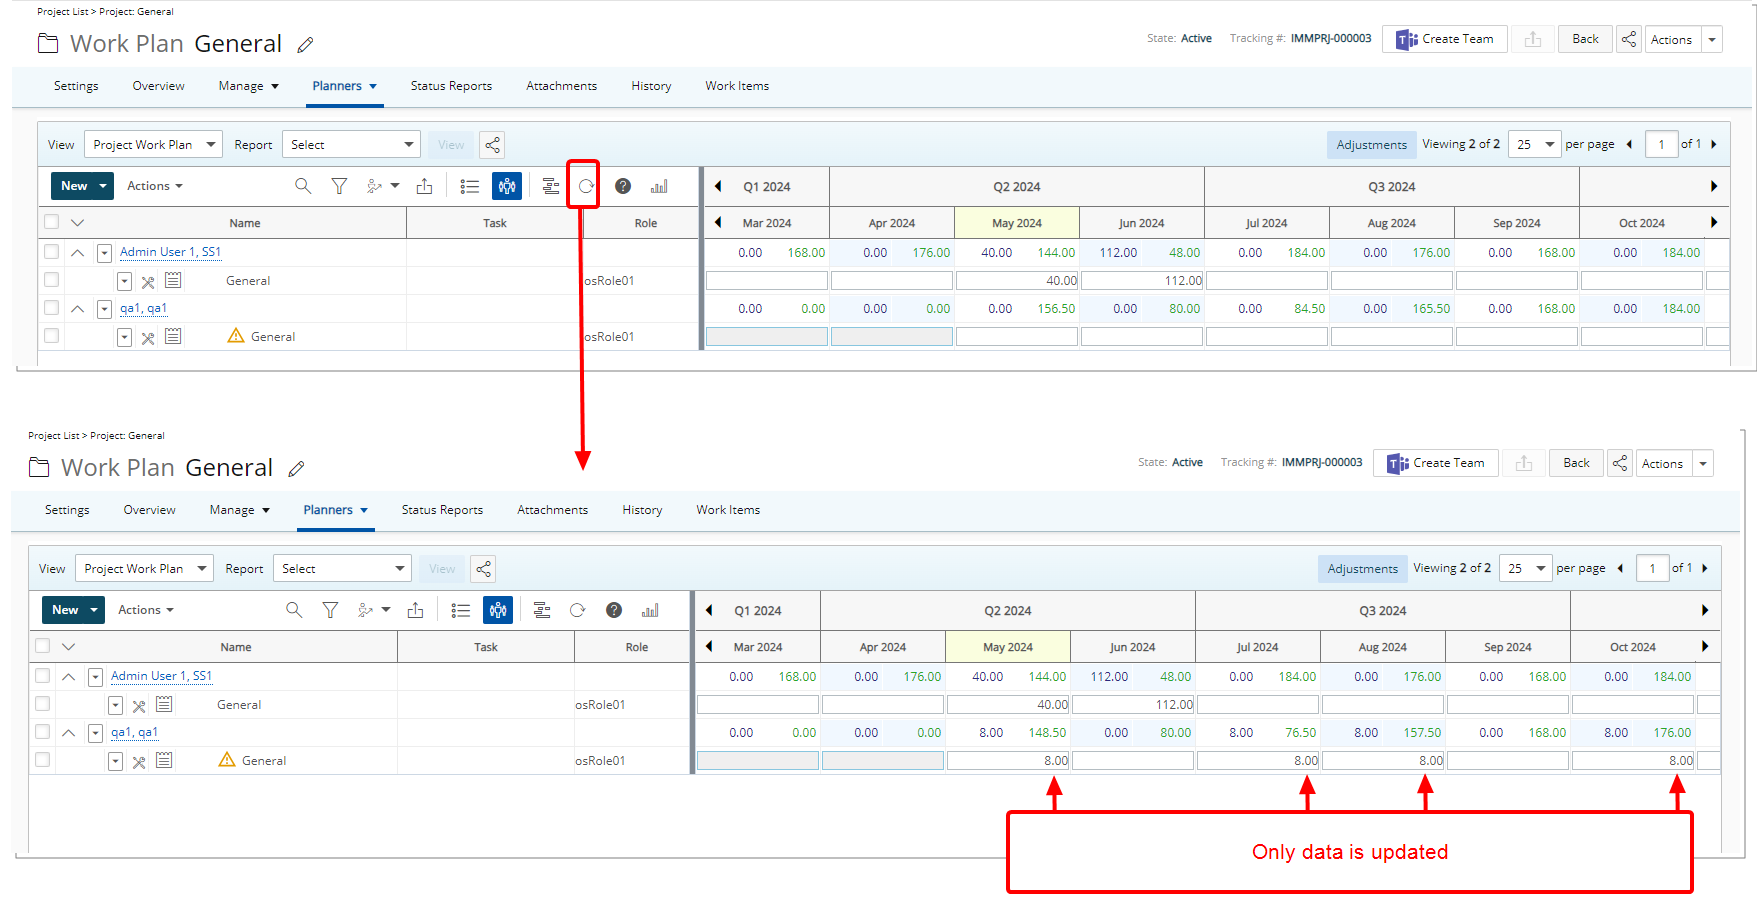
Description: Selections made within the Timeline, grouping options such as Group by Project/Group by Resource, Chart/Grid view formats or paging now remain unchanged while only the data is updated when refreshing any Work Plan.
Example: In our sample screenshot above, note that all selections made in the Timeline, such as the date range, quarterly view, and grouping by resource, are retained after a refresh. This means that your preferred view remains unchanged, preserving your chosen settings, while only the data is updated.
Benefit: By retaining the selections and configurations in the Work Plan View even after refreshing, project managers can seamlessly pick up where they left off, eliminating the need to navigate to specific periods, reset grouping options, adjust views or paging. This saves valuable time and ensures continuity in project planning and monitoring, leading to increased productivity as well as improved overall user experience.
For further details refer to Refreshing a Work Plan.
Description: When updating/shifting Project dates, zero-hour bookings within the Work Plans are now retained. This ensures accurate tracking and maintenance of resources specifically for the following two cases:
- If the Work Plan contains Hard and/or Soft Bookings with 0 Allocated hours only, these Bookings are retained even after shifting the project dates.
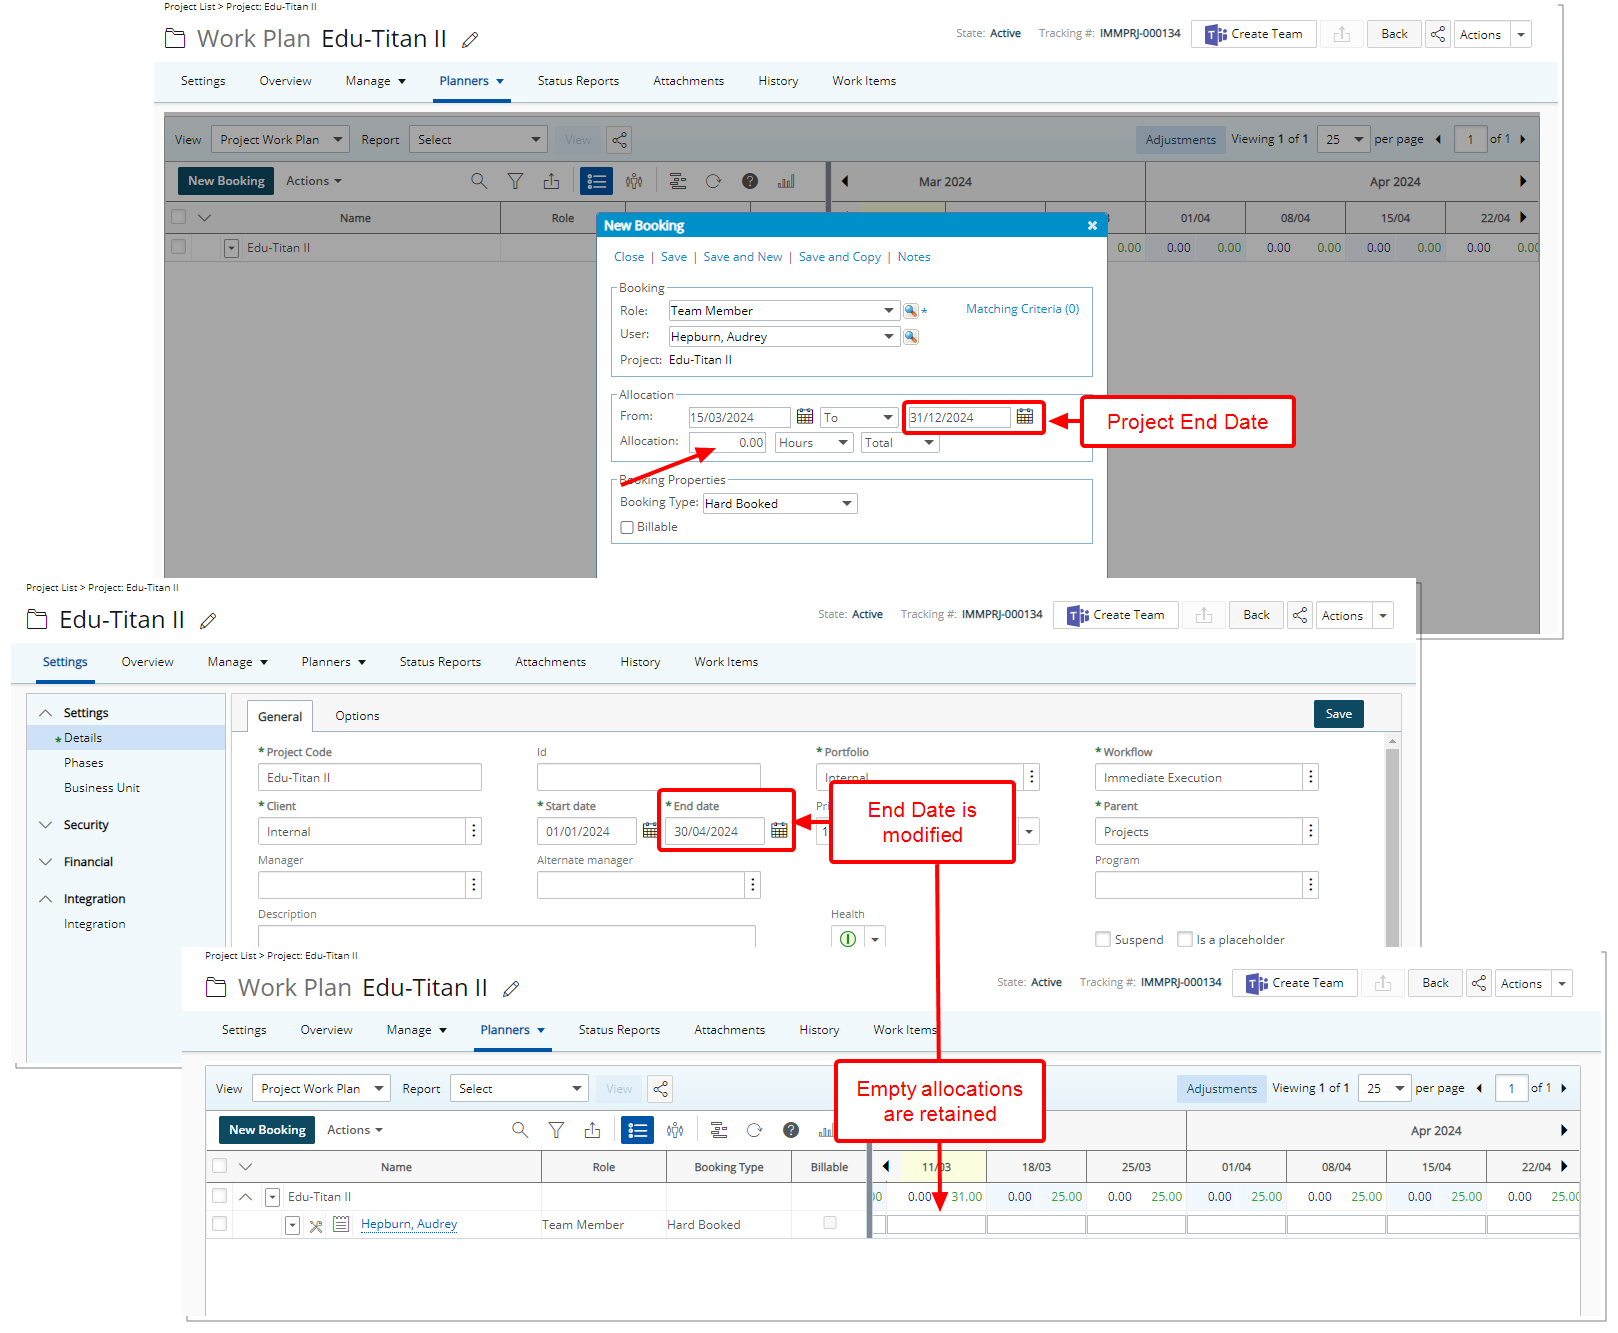
- When shifting project Start and End Dates, if the Work Plan includes Bookings with both non-zero and zero-hour Allocations, upon clicking Yes to update the Project dates and reschedule the Resource Bookings you now have the option to Retain empty bookings from the Shift Options dialog box.

Benefit: You now have the flexibility to retain empty Bookings when shifting the Project dates, facilitating your scheduling decisions while maintaining essential Resource Allocations.
For further details refer to Shifting Project Start/End Dates.

Description: The Select all option is now available for specific views in the Project Scheduling and Resource Scheduling Work Plans:
- In Project Scheduling, it is available when selecting a Project while using My available Projects or Projects I manage Views, along with any custom Views based on them.
- In Resource Scheduling, it is available when selecting a Group while using Resource Groups I Manage View, as well as any custom Views based on it.
Tip: The available options are limited to Groups managed by the logged-in user that have associated Roles or Users.
Benefit: This addition allows you to efficiently select all available Projects or Groups directly from the above-mentioned Views and their derivatives.
For further details refer to:
- Viewing the work plans for multiple projects simultaneously within Project Scheduling page
- Viewing the work plans for multiple Groups simultaneously within Resource Scheduling page
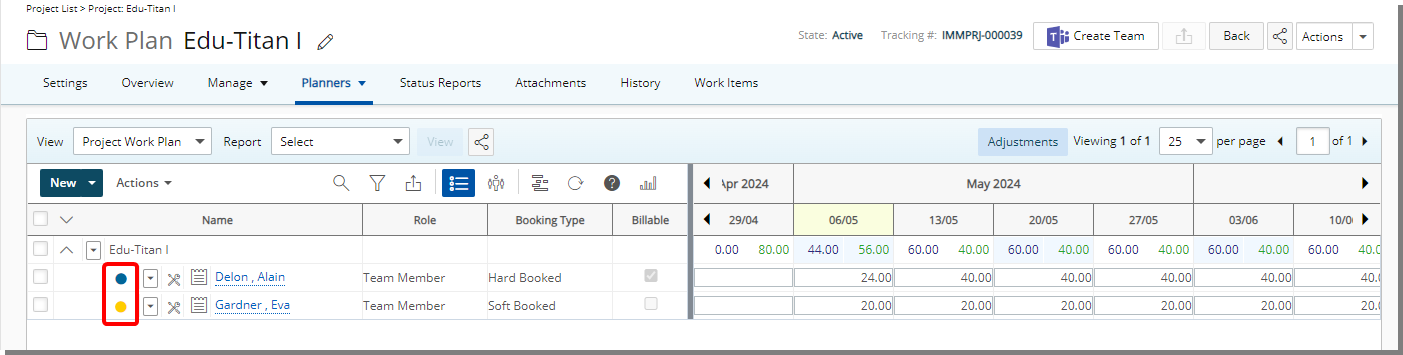
Description: You now have the option to add visual indicators to Booking lines in various Views within all Work Plans:
- Group Work Plan (Setup > Organization > Groups > Group Edit)
- User Work Plan (Setup > Organization > Users > User Edit)
- Role Work Plan (Setup > Organization > Roles > Role Edit)
- Project Work Plan (Project List > Project Edit > Planners) Or (Project List > Context Menu)
- Resource Scheduling Work Plan (Entries > Resource Scheduling)
- Project Scheduling Work Plan (Entries > Project Scheduling)
- My Work Plan (Entries > My Work Plan)
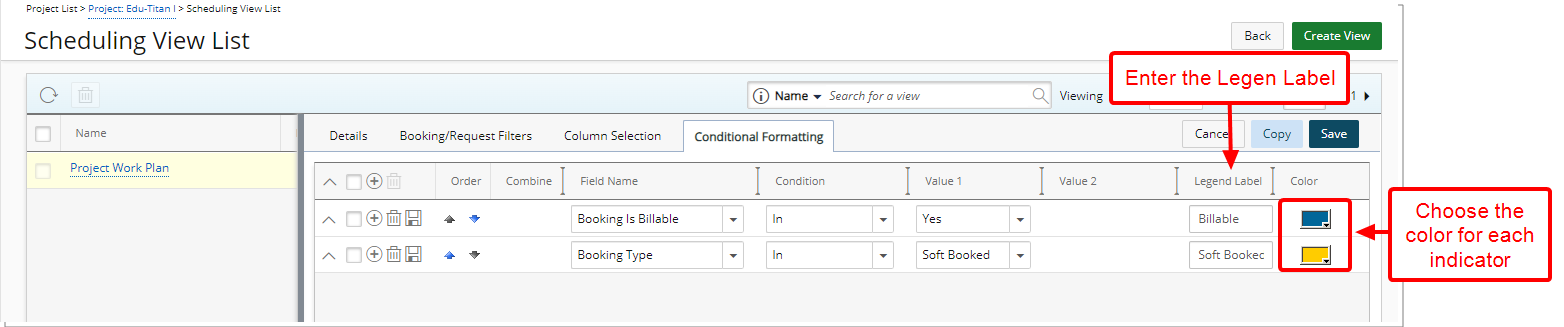
Define a Conditional Expression through the Conditional Formatting (former Chart Formatting) tab while editing a View. Enter the Legend Label and select the Color indicator of your choice.
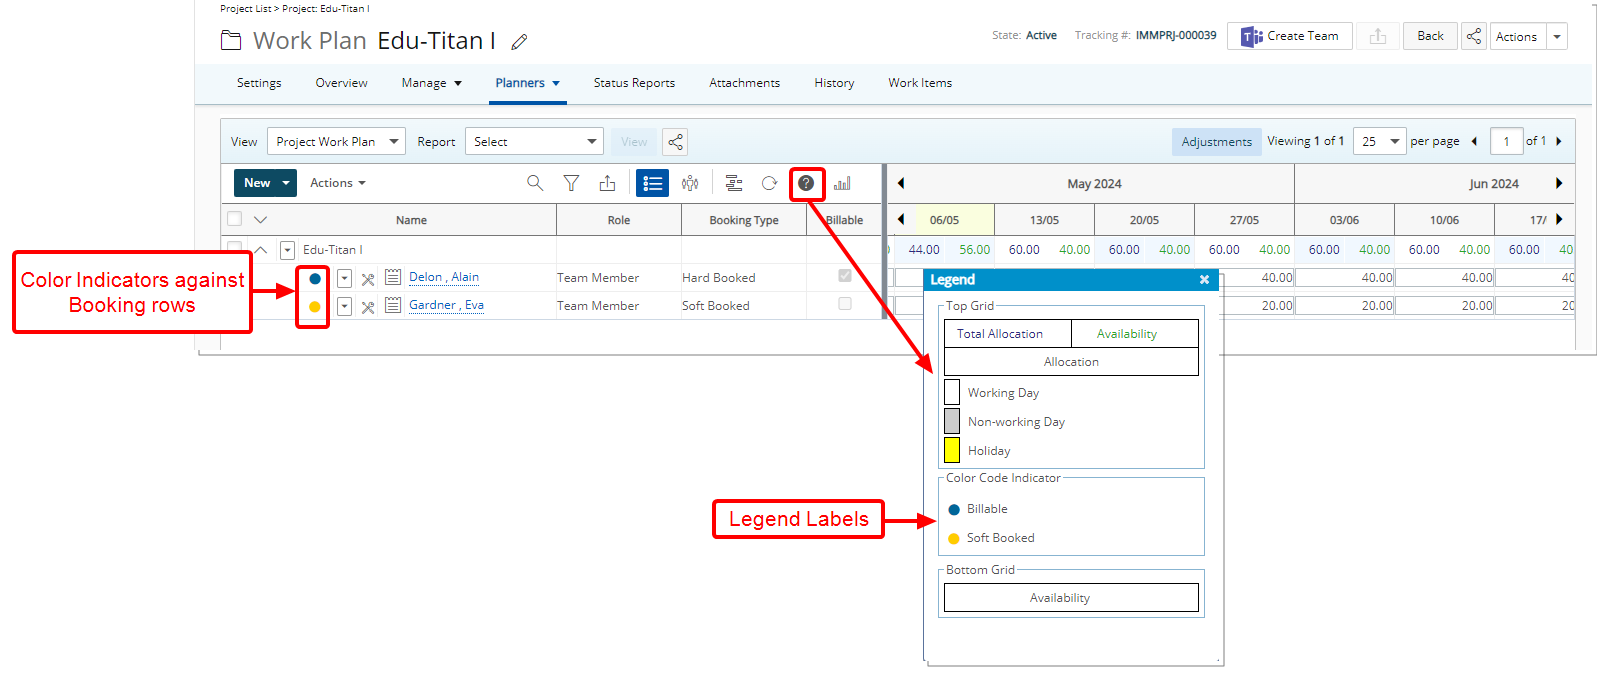
Upon saving and returning to the Work Plan, when the Conditional Expression is true, your defined indicators are displayed against the corresponding Booking lines.
Note: In cases where multiple conditions are met for a specific Booking line, the indicator associated with the first condition in the predefined order will be displayed, prioritizing it over others
Benefit: With this improvement, you can now quickly identify key Booking Attributes without the need to manually scan through rows.
For further details refer to Conditional Formatting.
Description: Improvements have been made to the messages that are displayed when modifying the Task dates for the following cases:
- Task Start Date is conflicting

If there are Entries that precede the new Task Start Date
The following confirmation message box is displayed: There are entries outside of the selected Task Dates. The earliest Task Start Date is {date of first entry}. Do you wish to proceed with this date?"- Upon clicking NO, the Task Start Date remains unsaved, with no further action.
- Upon clicking YES, the Task Start Date is adjusted to the earliest entry date and saved.
- Task End Date is conflicting

If there are entries after the new Task End Date, the following confirmation message box is displayed: There are entries outside of the selected Task Dates. The latest Task End Date is {date of last entry}. Do you want to continue with this date?- Upon clicking NO, the Task End Date won't be saved and no further action will be taken.
- Upon clicking YES, the Task End Date is updated to the date of the last entry and saved.
- Both Task Start and End Dates are conflicting

If there are entries before the new Task Start Date and after the new Task End Date, then, the following confirmation message box is displayed: There are entries outside of the selected Task Dates. The earliest Task Start Date is {date of first entry} and the latest Task End Date is {date of last entry}. Do you want to continue with these dates?- Upon clicking NO, both Task Start & End Dates won't be saved and no further action will be taken.
- Upon clicking YES, both Task Start & End Dates will be updated to the date of the first entry and date of the last entry.
Benefit: These enhancements provide clarity and transparency, guiding Project Managers through potential conflicts with Task Start/End Date and associated Entries.
For further details refer to Modifying Task Start/End Dates.
Security
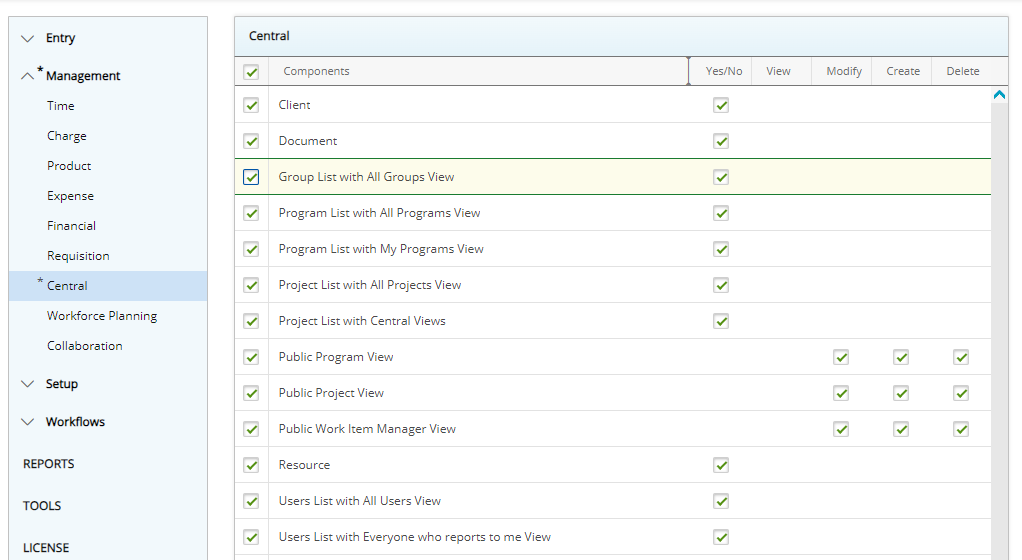
Description: In the past, Users with the View right to Groups (Setup > Organization > System > Security > Security Profile > Setup > Organization) were able to access the Groups list page and view all Groups in the system. However, there was no option to restrict their view to only the Groups they managed.
In this release we are introducing a new security permission available from Setup > Organization > System > Security > Security Profile > Management > Central with Yes/No access rights:
- Group List with All Groups View: When enabled for a Security Profile, users associated to it will have access to All Groups View and see all Groups in the system.
Moreover, a new My Groups View is available by default within the Groups list page. This View will list all Groups where the logged in User is the named Manager.
Upon upgrading to 2024 R2.0 the Group List with All Groups View Security permission will be enabled by default for Security Profiles with a minimum View right to Groups (Setup > Organization > System > Security > Security Profile > Setup > Organization). Users assigned to such Security Profiles will be able to see the Groups list page and access both My Groups and All Groups.
This ensures a smooth experience for your user base, ensuring they can seamlessly access the Groups list page as before, without any inconvenience or interruption.
With this enhancement, Administrators now have the ability to revoke the Group List with All Groups View permission, thereby removing the All Groups View. Consequently, users assigned to the Security profile will only be able to access the Groups they manage through My Groups View. This enables better delegation of responsibilities within the organization, allowing users to concentrate on managing their designated Groups without being inundated by irrelevant data.
Note: In cases where the Group Manager is set to Out Of Office in PSA, their Groups will be available to the named Alternate Group Manager through My Groups View.
Benefit: This improvement aims to reduce dependency on administrator support allowing Group Managers accomplish tasks autonomously, minimizing the need to reach out to administrators for assistance. This streamlining of processes enhances efficiency and productivity across the board, enabling users to focus on their core tasks.
For further details refer to Group List with All Groups View.

Description: The General tab can now be Locked based on Tab Security setting under Setup > Organization > System > Security > Security Profile. When the Lock option is turned on for a Security Profile, associated Users can only view the General tab.
Use case: Lauren, an PSA Administrator, is tasked to lock the General tab from Project Managers. He can now easily do so by navigating to the Tab Security page of the Project Manager Security Profile and selecting the Lock option for General.
Benefit: Administrator can now Lock the General tab of Project Edit, preventing Project Managers from altering the details of imported projects and protecting vital project details from unauthorized changes.
For further details refer to Setting the access rights to Project tabs.

Description: With the introduction of the following four new permissions, administrators can now have control over Billing Rules within the Project Team page.
- Associate Actual Billing Rules from Project Team
- Associate Actual Cost Rules from Project Team
- Associate Forecast Billing Rules from Project Team
- Associate Forecast Cost Rules from Project Team
- View permission
- For Actual: It manages Actual Cost Rule and Actual Billing Rule Columns/Column Selection options.
- For Forecast: It controls the display of the Cost and Billing tabs in the Forecast Rate Association dialog box which is displayed upon clicking a Forecast Rule.
- Modify permission
- For Actual: It determines whether the drop-down menu to change the rate is shown or hidden when clicking on the edit button to edit a rate. It also controls the ability to choose another existing rate.
- For Forecast: It manages the ability to choose another existing rate within the Forecast Rate Association dialog box which is displayed upon clicking a Forecast Rule.
- Create permission
- For Actual: It governs the visibility of the new Add Billing/Cost Rule button on the Project Team page. The visibility of this button is also tied with the Create right to Billing Rules/Cost Rules. Please refer to Create Actual Cost/Billing Rules from Project Team for further details.
- For Forecast: It controls the visibility of the New button within the Forecast Rate Association dialog box which is displayed upon clicking a Forecast Rule.
Caution: In Previous releases, the rates were visible to all. However, Actual Cost Rate and Actual Billing Rate columns would only show data if an hourly rate for the specific project was set at the Resource level (Resource Hourly Rate with Project Dependency). In conjunction with the improvements made in Resource Cost/Billing Rate Display, some users may now see sensitive data instead of "No Rate Rule". If you would prefer to hide these fields at the time of upgrading to 2024 R2.0, please reach out to PSA Support.
Benefit: These new permissions provide granular control over the access privileges for viewing, modifying, and creating Actual and/or Forecast Cost & Billing Rules.
For further details refer to:
- Security Permissions for Associating Actual Cost or Billing Rules from Project Team Page
- Security Permissions for Associating Forecast Cost or Billing Rules from Project Team Page

Description: The security permission Can Modify Task Attributes is now available from Setup > Organization > System > Security > Security Profile > Setup > Work with Yes/No access rights.
When this security permission is unchecked, the Attributes and Used By as well as the Project and Work Type selection boxes are locked for Users assigned to the Security Profile when modifying existing Tasks from the following areas:
- Task Edit page (Setup > Work > Tasks > Task Edit)
- Project Edit:
- Inline edit (Project List > Project Edit > Manage Tasks)
- Task Edit (Project List > Project Edit > Manage tab > Tasks)
- Tasks context menu (Project List > Project Edit> Manage Tasks)
By default, the Can Modify Task Attributes security permission is turned on for all Security Profiles.
Note: Disabling the ability to override Task Attributes from Timesheet and Expense modules remain unaffected by this enhancement. As in previous releases:
- To prevent an Attribute from being modified in Timesheet, you must designate it as Read-only at the Timesheet Template level.
- Overriding Task Attributes from the Timesheet module is regulated by the permissions Mark entries as payable and Mark entries as billable (Setup > Organization > System > Security > Security Profile > Entry > Time).
-
Overriding Task Attributes from the Expense module is regulated by the permissions Mark entries as payable and Mark entries as billable (Setup > Organization > System > Security > Security Profile > Entry > Expense).
Benefit: Administrators can now fine-tune permissions and allow Project Managers to edit Tasks while safeguarding critical Task Attributes generated from imports.
For further details refer to Can Modify Task Attributes Security Permission.
Timesheet Manager

Description: The new Tasks column is now shown by default when accessing the Projects drawer located within the following Timesheet Manager Views:
- Assigned Timesheets
- Everyone who reports to me
- My Direct reports
- My Timesheets
- Timesheet Administrator
This new column displays the number of Tasks that each user has logged time against for the Project. The number displayed in this column is hyperlinked, allowing you to easily access additional details about the Tasks associated with a particular Project.

Clicking on the hyperlink opens the newly added Project Tasks dialog box where you can review the Task Name, Total Time, Billable Time, Payable Time, Overtime, Double Overtime and Time Charge.
From the Project Tasks dialog box you can:
- Readily see the: Project Name, User Name and the Period you are viewing.
- Click the Refresh button to refresh the list.
- Click the Export
 button to export the list to Excel.
 - Manage the displayed columns from Columns Selection .
Note: All columns are displayed by default.
- Search the list by Task Name.
- Pagination is available at the top right corner to facilitate easy navigation across pages.
- From the table header:
- Sort the columns by ascending or descending order simply by clicking a column header. Note that an arrow indicates the descending (
 ) or ascending (
 ) order applied to the column.
 - Click
 and move a column to the desired position.
 - Dynamically resize column(s), to your preferred width. Simply move your cursor to the column boundary (
 ) you want to resize. When the cursor becomes a resize cursor, click and drag the column accordingly.
- Sort the columns by ascending or descending order simply by clicking a column header. Note that an arrow indicates the descending (
Benefit: The ability to seamlessly access detailed Task information enables supervisors, to have better insights into the users' Time Entries, facilitating informed decisions on whether to accept or reject the Timesheet.
For further details refer to:
- Timesheet Manager page | Available Views
- Timesheet Administrator View
- Accessing Timesheets for Viewing, Reviewing and/or Approval
- Detailed Task Information for Enhanced Decision-Making
Timesheet Templates
Description: In the 2022-R1.1 release, we introduced a feature enabling Timesheet Template Administrators to close or reopen periods based on selected Timesheet Template(s). Building on this functionality, the current release introduces the capability to restrict access to a Template based on specific Site.
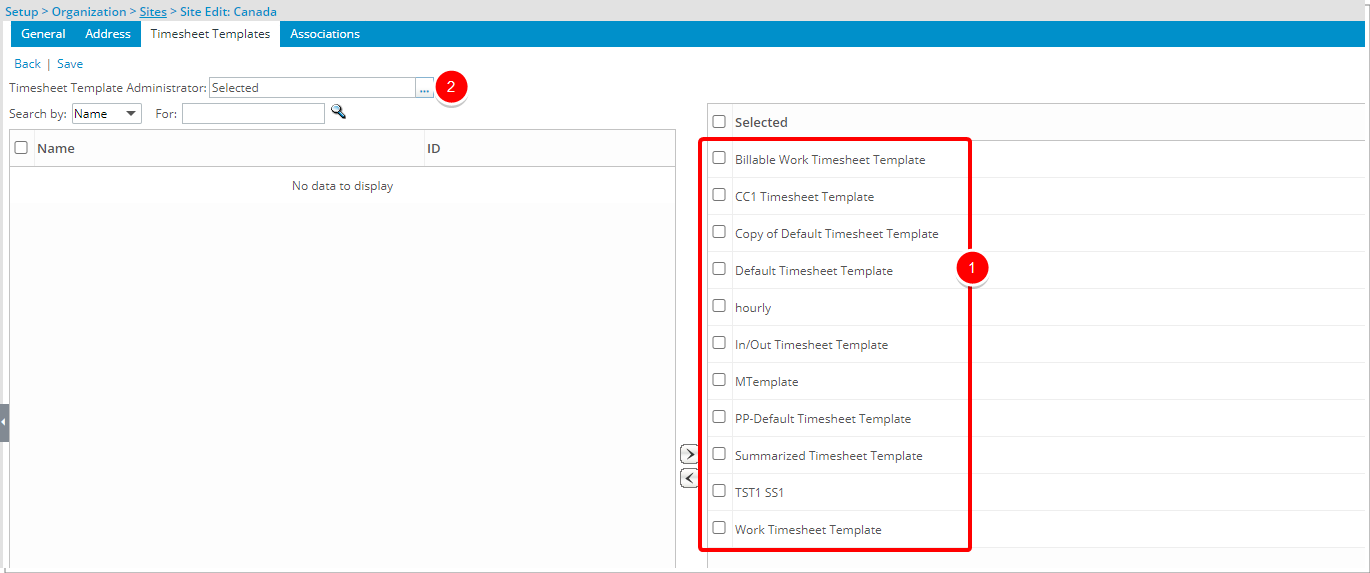
The creation process of a Timesheet Template Administrator remains the same as in previous releases:
- Associate a Timesheet Template to a Site from Setup > Organization > Sites > Timesheet Templates tab.
- Click Timesheet Template Administrator and choose the required User.

If one or more users are designated as Timesheet Template Administrators:
- From the Close/Reopen Period dialog box:
- You can choose Templates for which you are designated as the Timesheet Template Administrator.
- You can also choose Templates that have no designated Site. These are considered public Templates.
- Opening or Closing a period will exclusively impact the Timesheets linked with the selected Template(s).
- If no Templates are selected, Opening or Closing periods will impact all listed Templates (ie: All Templates falling within the 1a and 1b criteria).
Note:
- The Administrator Security Profile or any other security with similar settings have access to all Timesheet Templates regardless of Site association. Therefor, when using this feature, please ensure that designated Timesheet Template Administrators are not part of the Administrator Security Profile.
- A Timesheet Template that has no Timesheet Template Administrator but is associated to a Site will only be visible to the Master Administrator Security Profile.
The table below illustrates scenarios and expected outcomes:
| Templates | Template Administrator | Site Association | Expected Results |
|---|---|---|---|
| Template1 | Site1 | Master Administrator Security Profile | |
| Template2 | TemplateAdminUser1 | Site2 | Master Administrator Security Profile, TemplateAdminUser1 |
| Template3 | No associations | No associations | Master Administrator Security Profile TemplateAdminUser1 TemplateAdmin User2 |
If your organization is not utilizing this feature whereby there are no designated Timesheet Template Administrators for any templates in the system; users with permissions to Open or Close Periods can do so for all available Templates. Essentially in this case, all users with the relevant permissions will retain the ability to manage the opening and closing of Timesheet Periods for any Template in the system upon upgrading to 2024 R2.0.
Benefit: This enhancement allows System Administrators to limit Timesheet Administrator permissions for closing or reopening periods to only those Templates associated with their respective Sites. Consequently, providing greater control and security over timesheet management processes.
For further details refer to:
- Associating a Timesheet Template to a Site
- Selecting a User to Administer Timesheet Templates Associated to a Site
- Closing a Timesheet Period
- Reopening a Timesheet Period
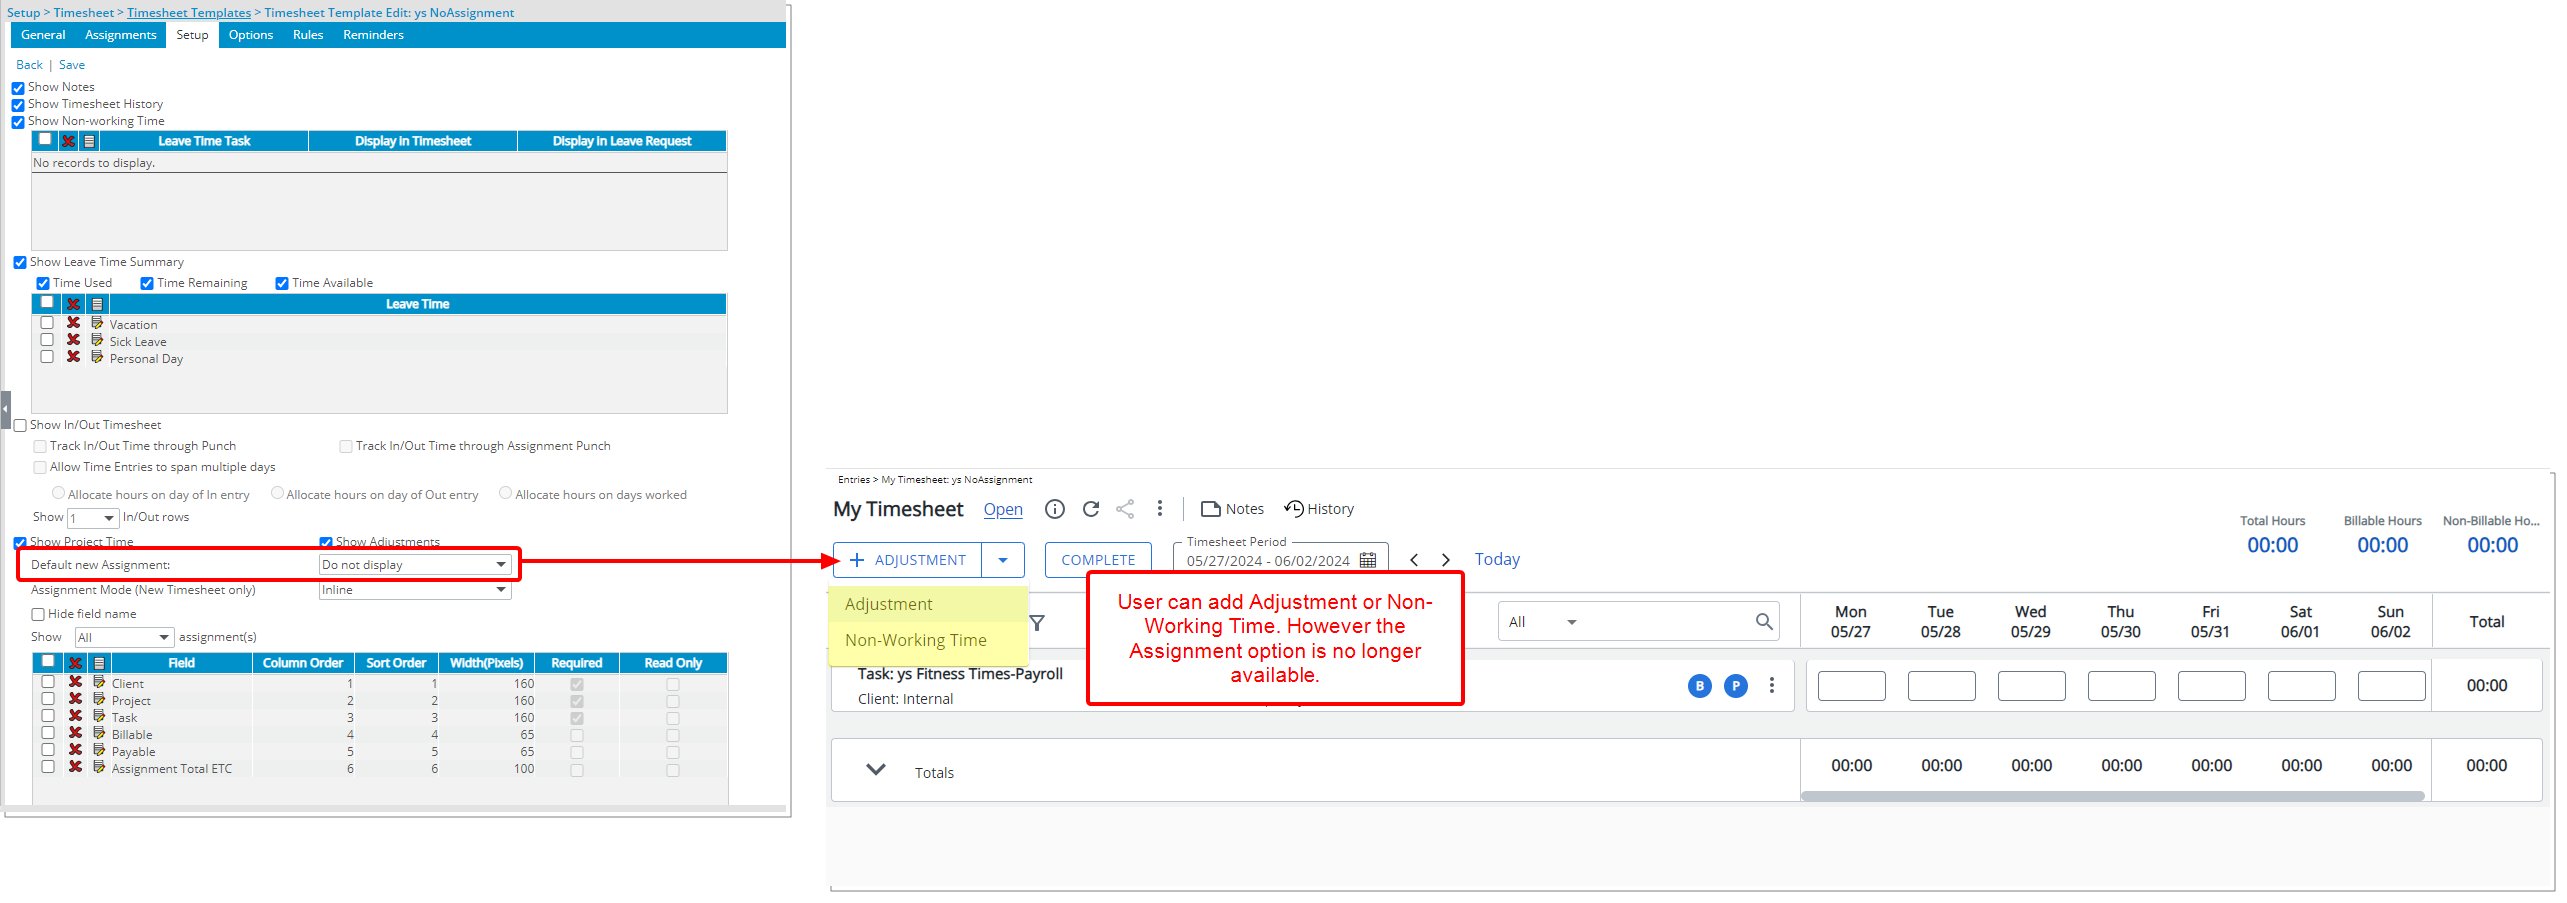
Description: In the legacy Timesheet, upon selecting the Do not display option for Default new Assignment field, Users associated with the Template were unable to add Assignment rows to their Timesheet. This functionality was lacking in the New Timesheet.
As of this release, improvements have been implemented when the Do not display option is chosen for the Default new Assignment field, the ability to add new Assignments via the + Assignment button is automatically removed for users.
Additionally, the options to Edit and Copy existing Assignment rows are also removed, ensuring that users cannot modify or add new Assignments to their Timesheets.
Notably, this improvement does not impact the ability to use + Adjustment and +Non-Working Time buttons which remain available to the User.
Caution: Timesheet users assigned to a Template where the Do not display option is chosen for the Default new Assignment field, will no longer be able to Assign Tasks from the New Timesheet upon upgrading to 2024 R2.0.
Benefit: This enhancement empowers administrators with granular control over assignment management in the New Timesheet, providing a robust framework for enforcing strict policies and ensuring seamless workflow. It ensures compliance with project requirements and prevents users from altering or adding new Assignments.
UI/UX Enhancements

Description: The user interface including spacing, colors, positioning, buttons, icons and fonts of the Expense Items list page (Setup > Expense > Expense Items) has been improved for better user experience and consistency with the other updates that have been made thus far.
The following improvements have also been made:
- The New link was renamed to Create Expense Item and converted to a button. It is now located in the upper right corner of the page.
- The Refresh and Delete
 links were converted to buttons and moved to the table header.
 - You can now Export the list to Excel.
- The Search box was revamped.
- The context menu, previously accessed by right clicking a row can now be accessed through the context menu
 button.
 - Click and move a row to a desired position.
Benefit: The UI/UX improvements aim to modernize the look and feel of the application, fostering uniformity and elevating user experience.
For further details refer to Expense Items list page.

Description: The user interface including spacing, colors, positioning, buttons, icons and fonts of the Client POs page (Setup > Organization > Clients > POs tab) has been improved for better user experience and consistency with the other updates that have been made thus far.
The following improvements have also been made:
- The New and Notifications links were converted to buttons.
- The Delete button was redesigned.
- The Tools context menu from where you could Export the list to excel has been replaced with the Export to Excel button.
- Prevent revenue accrual when entry amounts are not fully associated to POs option is moved to the table header.
- The Column Selection button was redesigned and moved to the left of the Search box.
- The Search box was redesigned however its functionality remains the same.
- Pagination is moved to the top right corner of the page to facilitate easy navigation across multiple pages.

The user interface including spacing, colors, positioning, buttons, icons and fonts of the PO Edit page (Setup > Organization > Clients > POs tab > Create/Edit PO) has been improved for better user experience and consistency with the other updates that have been made thus far.
- Addition of a collapsible Summary Section.
- Addition of a Refresh button allowing you to reload the page.
- The available Projects list box is now refreshed automatically upon accessing it.
- When creating a new Client PO line item, the name is defaulted to the current PO Name and the cursor is placed at the end of this name for easy edit
- An information icon (
 )is now displayed within empty required fields. Hovering over this fields empty required fields will also display a tooltip.
 - When adding a PO line item that is identical to an existing one, a confirmation message will now appear. This message informs you that the new item will be merged with an existing Association. You have the option to either cancel the action or proceed with the merge.

Moreover, in addition to the user interface improvements including spacing, colors, positioning, buttons, icons and fonts of the PO Consumption Order dialog box (Setup > Organization > Clients > POs tab > Create/Edit PO), a new Refresh ![]() button is now also available allowing you to reload the page. As in previous releases, you can easily drag and drop PO Line Items to change their consumption order.
button is now also available allowing you to reload the page. As in previous releases, you can easily drag and drop PO Line Items to change their consumption order.
Benefit: The UI/UX improvements aim to modernize the look and feel of the application, fostering uniformity and elevating user experience.
For further details refer to Client POs.

Description: The user interface including spacing, colors, positioning, buttons, icons and fonts of the User Defined Fields list page (Setup > Organization > System) has been improved for better user experience and consistency with the other updates that have been made thus far.
The following improvements have also been made:
- The New, Refresh and Delete buttons were redesigned and moved to the table header.
- The Export to Excel button is now located in the table header .
- Addition of Column Selection capability. By default, the following columns are displayed: Field Name, Id, Display Name (English), Display Name (French), Data Type (English) and Data Type (French).
- By default you can now Search for a User Defined Field based on the following criteria: Field Name, Id, Display Name (English), Display Name (French), Data Type (English) and Data Type (French).
- Pagination is moved to the top right corner of the page to facilitate easy navigation across multiple pages.
Benefit: The UI/UX improvements aim to modernize the look and feel of the application, fostering uniformity and elevating user experience.
For further details refer to Available Options from the User Defined Fields List Page.

Description: The user interface of the Cost/Billing Rule edit page has undergone enhancements, encompassing improvements in spacing, colors, positioning, buttons, icons, and fonts. These updates aim to enhance user experience and ensure consistency with previous interface enhancements.
Despite looking different, the functionality remains the same as in previous releases. The page can be accessed from the following areas in the application depending on the rights granted to you:
- Cost Rules: Setup > Financial
- Billing Rules:Setup > Financial
- User Forecast Rate: Setup > Organization > User Edit
- Project Team Actual Cost/Billing Rule Rate: Project List > Project Edit > Manage Team > New/Edit
- Project Team Forecast Cost/Billing Rule Rate: Project List > Project Edit > Manage Team > New/Edit
Note: The page layout of New Cost/Billing Rule, accessed through Project Team page when creating a Forecast Cost/Billing Rule Rate, differs from the other pages. Instead of the standard four columns, this layout has only three columns.
- Role Forecast Rate: Setup > Organization > Roles > Role Edit
Note: Although the appearance of the page has been enhanced, the functionality and available fields remain unchanged.
Benefit: The user interface of the Cost/Billing Rule edit page is improved for a better user experience and to establish consistency.
For further details refer to:
- Cost Rules
- Billing Rules

Description: The user interface including spacing, colors, positioning, buttons, icons and fonts of the Charges list page (Setup > Timesheet > Charges) has been improved for better user experience and consistency with the other updates that have been made thus far. The following improvements have also been made:
- The New link is converted to a button, renamed to Create Charge and moved to the top right corner of the page.
- TheRefresh and Delete links were redesigned and moved to the table header.
- Addition of the ability to Export the list to Excel.
- The Search box was revamped.
- The context menu, previously accessed by right clicking a row can now be accessed through the context menu button..
- Rearrange the tree structure by drag/dropping the row to a new location.
Tip: To enhance page performance, the initial display includes the first 25 child items under a parent, with the option to load more using the scroll bar.
Benefit: The user interface of the Charges page is improved for a better user experience and to establish consistency.
For further details refer to Configuring Time Charges.

Description: The user interface including spacing, colors, positioning, and fonts of the Settings dialog box accessed through the User Profile menu has been improved for better user experience and consistency with the other updates that have been made thus far.
In addition to the newly added Details tab, the Calendar link was converted to a tab for easy access.

The Quick Links control panel has been deprecated. As a result the Display Quick Links and Search selection boxes are no longer available from the newly designed QuickLinks tab of the user Settings dialog box.
Benefit: The user interface of the user Settings dialog box is improved for a better user experience and to establish consistency.
For further details refer to:
- User Settings
- User Settings | General tab
- User Settings | Calendar tab
- User Settings | Quick Links tab
- User Settings | Details tab
- User Settings | Skills tab
- User Settings | Dashboards tab
Upland Analytics
The following improvements have been made to Upland Analytics.

Description: You can now use non-English and special characters when creating/managing a Filter in New Analytics.
Benefit: This improvement enhances data filtering capabilities in New Analytics whereby special characters and non-English characters can be used in filters, improving data analysis accuracy, efficiency, and inclusivity.
For further details refer to the Upland Analytics help center.
Description: The Project Manager View with the following Fields is now available through the Work Item Entry Data Source:
- Project Manager First Name
- Project Manager Last Name
- Project Manager Id
Benefit: This improvement allows stakeholders to gain valuable insights into project ownership and accountability. It streamlines the identification of responsible parties for specific tasks or initiatives, eliminating ambiguity and enhancing overall project visibility.
For further details refer to Work Item Entry Data Source.
Description: The following Views are now available through the Organization Data Source:
- User Created by User View, allowing you to report on the following Fields:
- User Created By First Name: The First name of the User who created the User account.
- User Created By Last Name: The Last name of the User who created the User account.
- User Created By User Name: The Username of the user who created the user account.
- User Modified by User View, allowing you to report on the following Fields:
- User Modified By First Name: The First name of the User who last modified the User account.
- User Modified By Last Name: The Last name of the User who last modified the User account.
- User Modified By User Name: The Username of the User who last modified the User account.
- Furthermore, the following Fields were added to the existing User View.
- User Date Modified: The date and time when the User account was last modified.
- User Date Created: The date and time when the User account was created.
- User Last Login Date: The date and time when the User last logged into the system.
Caution: User Date Modified refers to the date when any changes are made to the User properties found in the Details tab, including its General, Personal, and Security sub-tabs. Modifications can include entering or selecting a new value for a field, updating, or deleting an existing value. This also covers changes made to associated User Defined Fields within the Details tab and its sub-tabs. It is noteworthy to mention that the User Date Modified fields are also triggered when a User Profile is saved without any modifications.
For further details refer to the Organization Data Source.

Description: Every Security Profile within PSA has a corresponding Key that facilitates user importation via the Import Tool. While the default Security Profile Keys are conveniently included in the Import Excel Template, newly created ones were previously only accessible in the database.
Now, with the introduction of the Security Profile Key Field in the Security Access Rights View of the Organization Data Source, you can generate a comprehensive report listing all available Security Profile Keys. This enables seamless user importation to PSA using the Import Tool, enhancing efficiency and ease of use.
Benefit: The new Security Profile Key Field streamlines user importation by providing easy access to all available Keys, simplifying the process and enhancing efficiency.
For further details refer to the Organization Data Source.
Description: Two new Fields were added to the existing Cost & Billing Rules View:
- Rule Date Created: Displays the creation date of the rule
- Rule Date Modified: Displays the last update date of the rule
In addition, the following new Views and their related Fields were also added:
- Cost & Billing Association View, allowing you to report on the following Fields:
- Rule Association Date Created: Displays the creation date of the association
- Rule Association Date Modified: Displays the last update date of the association
- Cost & Billing Rule Created By User View, allowing you to report on the following Fields:
- Rule Created By User First Name: Displays the First name of the User that created the Rule.
- Rule Created By User Last Name: Displays the Last name of the User that created the Rule.
- Rule Created By User Name: Displays the First User Name of the User that created the Rule.
- Cost & Billing Rule Modified By User View, allowing you to report on the following Fields:
- Rule Modified By User First Name: Displays the First name of the User that modified the Rule.
- Rule Modified By User Last Name: Displays the Last name of the User that modified the Rule.
- Rule Modified By User Name: Displays the First User Name of the User that modified the Rule.
- Cost & Billing Association Created By User View, allowing you to report on the following Fields:
- Rule Association Created By User First Name: Displays the First name of the User that Created the Rule Association.
- Rule Association Created By User Last Name: Displays the Last name of the User that Created the Rule Association.
- Rule Association Created By User Name: Displays the User Name of the User that Created the Rule Association.
- Cost & Billing Association Modified By User View, allowing you to report on the following Fields:
- Rule Association Modified By User First Name: Displays the First name of the User that Modified the Rule Association.
- Rule Association Modified By User Last Name: Displays the Last name of the User that Modified the Rule Association.
- Rule Association Modified By User Name: Displays the User Name of the User that Modified the Rule Association.
Note: The Recurring and Split rules created at the Project level are not covered by these Fields.
Benefit: The ability to generate reports that outline role details along with associated rate information, including the most recent update date and updater details, offers in-depth insights into billing and cost for each role empowering financial personnel to make well-informed decisions.
For further details refer to the Cost & Billing Rule Association Data Source.
Description: Two new Fields were added to the Expense Data Source:
- Expense Report Receipt Count field is located under the Expense Report Summary View. When included in a report, it is now a hyperlink to the corresponding Receipts tab.
- Expense Entry Receipt Count field is located in the Expense Entry Basic View. When included in a report, it is now a hyperlink to the corresponding Receipts tab.
Benefit: This improvement empowers users to efficiently track and manage expenses by providing insights into the number of receipts linked to each item, enabling them to easily access and review receipts as needed.
For further details refer to the Expense Data Source.
Description: In previous releases, there was no way to monitor the approval status of Expense Reports requiring approval from multiple Project or Portfolio Managers. Once a manager approved an Expense Report, they lost visibility of it, making it difficult to track pending approvals. This lack of visibility caused delays in final approval and expense posting.
The new Expense Report Approval Status and its related Views address this issue by providing a clear overview of who has and hasn't completed the approval process, even with multiple Project/Portfolio Managers involved. The following Fields are available from this View:
- Expense Report Approval Status Action: Lists the latest actions taken on each project related to expense entries.
- Expense Report Approval Status Approver: Lists the usernames of approvers assigned to take action on the entries.
- Expense Report Approval Status Portfolio Name: Lists portfolios used in the expense entries.
- Expense Report Approval Status Project: Lists projects used in the expense entries.
Note: Only expense reports with a state assigned to Project or Portfolio Managers will be displayed in this view.
Benefit: This improvement allows users to generate reports and identify Project or Portfolio Managers responsible for approving expenses. It also enables tracking of the approval status of expense reports, even when multiple approvers are involved, ensuring timely processing and preventing delays in expense posting.
For further details refer to the Expense Data Source.

Description: The Total Time POC Field is now available through the Financial Planner Combined Detail View of the Financial Planner Combined Data Source.
- Total Time POC: (Cumulative Hours till the period being calculated/EAC) * 100
Additionally, the new Financial Planner Detail View is accessible from the Financial Planner Data Source. This View includes the following Fields:
- Total - Combined - Time POC: (Cumulative Combined Hours till the period being calculated/EAC) * 100
- Total - Actual - Time POC: (Cumulative Actual Hours till the period being calculated/EAC) * 100
- Total - Forecast - Time POC: (Cumulative Forecast Hours till the period being calculated/EAC) * 100
When included in a report, these Fields reflect the data from the corresponding fields in the Project Financial Planner.
Note: Please ensure that the Project Financial Planner is refreshed to maintain accurate data alignment in Upland Analytics.
Benefit: By providing easy access to these key metrics you can gain deeper insights into project financials and make more informed decisions.
For further details refer to:
- Financial Planner Data Source
- Financial Planner Combined Data Source
Description: The Baseline Type Field is now available through the Financial Planner Summary View of the Financial Planner Data Source.
There are 4 types of Baselines: First Baseline, Last Baseline, Prior Baseline and Current Baseline. For the rest of the Baselines, the value is set to empty.
Benefit: This enhancement enables you to easily identify the oldest and newest baselines, as well as understand the sequence of items created in between, facilitating more informed decision-making and project analysis.
For further details refer to Financial Planner Data Source.
Description: The existing Attachment Name fields are now hyperlinks to the their corresponding items in PSA.
The table below illustrates where these existing Fields are located in Upland Analytics:
| Data Source | View | Field Name |
|---|---|---|
| Program Management | Program Attachment | Program Attachment Name |
| Project Management | Project Attachment | Project Attachment Name |
| Work | Project Attachment | Work Attachment Name |
| Work Item Entry | Work Item Entry Attachment | Work Item Entry Attachment Name |
Moreover, the following new Views are now also available through the Work Process Entry Data Source:
- Work Process Attachment
- Work Process Attachment Date Modified: Displays the date and time when the Attachment was created/modified.
- Work Process Attachment Description: Displays the Description of the link or attached document.
- Work Process Attachment File: Displays the attached file Name.
- Work Process Attachment Info: Displays the URL link or the size in Mb of the attached Document.
- Work Process Attachment Name: Displays the Name of the link/ attached Document. It is hyper-linked to the corresponding item in PSA.
- Work Process Attachment Type: Displays the type of the Attachment: Link or Document.
- Work Process Attachment Created By User View
- Work Process Attachment Created By User First Name: Displays the First name of the User that created the Work Process Attachment.
- Work Process Attachment Created By User Last Name: Displays the Last name of the User that created the Work Process Attachment.
- Work Process Attachment Created By User Name: Displays the User Name of the User that created the Work Process Attachment.
- Work Process Attachment Modified By User View
- Work Process Attachment Modified By User First Name:Displays the First name of the User that updated the Work Process Attachment.
- Work Process Attachment Modified By User Last Name: Displays the Last name of the User that updated the Work Process Attachment.
- Work Process Attachment Modified By User Name: Displays the User Name of the User that modified the Work Process Attachment.
Note: The availability of file name hyperlinks depends on the user's permission to object type in PSA.
For instance, if a user has permission to view Projects, the attachments within projects become clickable hyperlinks for download.
Benefit: With Attachment Name fields now serving as hyperlinks to corresponding items, you can swiftly access associated attachments from the Upland Analytics reports. This streamlined navigation saves time and effort, enhancing overall efficiency.
For further details refer to:
- Program Management Data Source
- Project Management Data Source
- Work Data Source
- Work Item Entry Data Source

Description: The following two new Fields are now available from the Milestone Task Association and Work Data Source:
- Milestone Is Parent: It determines whether the milestone is a main milestone or a sub-milestone
- Milestone Parent: It shows the name of the milestone that is a parent
Note: To ensure consistency between the Milestone page and Upland Analytics reports, we have adjusted the behavior of certain fields for sub-milestones. Specifically, the Milestone Total in Base Curr., Milestone Total in Client Curr., and Milestone Total in Milestone Curr. Fields will now be set to zero for sub-milestones. These values will only be displayed for Parent Milestones.
Example:
For UATestProject, if there is one main milestone and three sub-milestones:
- Parent milestones with an amount of 100
- A-sub-milestones with an amount of 50
- B-sub-milestones with an amount of 30
- C-sub-milestones with an amount of 20
When using the Milestone total in base curr. for a parent milestone will return the total for the parent milestone only. In our example the Milestone total in base curr. Field will return 100 for the main milestone only and 0 for the sub-milestones.
Benefit: This enhancement ensures seamless consistency between the Milestone page and reports, enabling more precise reporting and accurate tracking and analysis of project milestone progress.
For further details refer to:
- Milestone Task Association Data Source
- Work Data Source
User Defined Fields

Description: It is now possible to define access limitations to User Defined Fields associated with Users based on Security Roles. Within the new Access Control tab, you can now choose to either hide or bar users from editing/updating the associated User Defined Field(s).
From the Access Control tab, you can:
- Multi or single select rule(s).
- Select all rules.
- Delete selected rules: When one or more rules are selected, the multi-delete button becomes available.
- Mass Action on selected items: Change the visibility to Hidden or Read-only for multiple UDFs concurrently.
- Click Refresh to refresh the page.
- Click to Export the list to Excel.
- Change the visibility to Hidden or Read-only for a single User Defined Field.
- Use the contains-in logic search to search for items. The available criteria are: Security Roles and User Defined Fields. For further details refer to Searching for an item.
- Pagination: The Pagination facilitates moving to a new list page and to view the number of list items and pages.
- Create a New Access Control.
Caution: Please note that when adding new resources to the Project Team, User Defined Fields (UDFs) associated with the User object may be visible to project managers and other security profiles. If certain sensitive user data is stored in a UDF and should not be visible to a specific Security Profile, you can hide this UDF by selecting the Hidden Access Control option. This ensures that the UDF will not be visible as a column or available for selection through Column Selection.
Benefit: With this improvement, you gain better control over the visibility and usage of User Defined Fields associated with the User object.
For further details refer to:
- Available options from the Access Control tab of UDFs associated to Users
- Limiting user access to the User Defined Field associated with Users
- Auditing of changes to the User Defined Field Access Control settings at the User and Project level
Description: In 2020-R2 we introduced the ability to restrict user access to User Defined Fields associated with Projects. Administrators could choose to hide these fields or prevent users from editing/updating them through the Project Edit page.
In this release, we have extended these limitations to the Project list (including the expanded row) and Project Team pages. Consequently, the Hidden User Defined Fields associated with Projects will now also be hidden in the Project list and Project Team pages.
Caution: Please note that after upgrading, any User Defined Fields that are included as columns in the Project list (including the expanded row) or Project Team, with such access restriction, will no longer be visible to users within the affected Security Profiles.
Benefit: This enhancement ensures a consistent application of access controls across different parts of the system, further securing sensitive project data.
For further details refer to:
- Available options from the Access Control tab of UDFs associated to Projects
- Limiting user access to the User Defined Field associated with Projects
Work Breakdown Structure (WBS)

Description: The new Show Suspended Clients selection box is now available when selecting a Client from the following areas:
- When selecting a Client from:
- Setup > Work > System > Client
- Setup > Organization > Users > Users Edit/Create User > Entry Options > Defaults
- Financial > Invoice Manager > Invoices Tab > Create Invoice/Invoice Edit
- Projects List > create Project/Project Edit > Settings > Details > General tab
- Program List > Edit Program > Project tab > New/existing project > General tab
- Setup > Work > Portfolios > Portfolio Edit: General > Project
- When selecting a parent Client from: Setup > Work > Clients > Client Edit
- Any Browse for Client User Defined Fields
Benefit: Hiding suspended Clients by default helps streamline and declutter the list, making it easier for you to focus on active Clients. However, with this improvement, you still have the option to display suspended Clients when needed, ensuring you have access to all necessary information without overwhelming the default view.
For further details refer to:
- Creating a New Client
- Creating a new Invoice
- Creating a Multi Client Invoice Batch
- Base Information When Creating a Project
- Available UDF Types
- Available configuration settings within the System level Work Setup page
- Entry Options - Defaults

Description: In previous releases, Task Names were automatically generated based on the chosen Task Name (Setup > Organization > System > System Setup), regardless of any manual entries made during Task creation, thus overriding user input.
As of this release, improvements have been made so that in cases where the Task Name is entered or modified manually from the Task Edit page (Setup > Work > Tasks), the system will not automatically override it upon selecting a Project, or Work Type.

Furthermore, the Task Name field (Setup > Organization > System > System Setup) is now renamed to Default Task Name.
Benefit: This improvement ensures that your manual entries and customizations are respected.
For further details refer to:
- Creating a Task
- Configuring Task Name Preferences
Workflows
Description: In previous releases, under the below scenario, while Timesheets were assigned to the Approval Group Managers, the Notifications were wrongly sent to the Project or Portfolio Managers to approve their own Timesheet instead of their Approval Group Managers.
Scenario: The Timesheet is pushed to Workflow State where:
- The Prevent self-approval was enforced.
- State was assigned to the Project Manager/Portfolio Manager.
- Workflow Notification was setup and intended for either the Project Manager or Portfolio Manager.
As a result, Approval Group Managers were not alerted to Timesheets requiring their attention, leading to potential delays and compliance issues.
In this release, improvements were made so that in the above scenario, the Project Manager/Porfolio Manager's Approval Group Manager now receive the Notification as expected.
Note: If in this case, the Approval Group Manager is set Out Of Office in PSA, then the Notification is redirected to the respective Alternate Approval Group Manager.
Please be advised that, if the Project/Portfolio does not have a named Manager, the Notification is sent to the Timesheet Users Approval Group Manager instead.
Benefit: This improvement ensures that when Prevent Self-Approval is enabled for a State assigned to Project or Portfolio Managers, their Approval Group Managers receive the intended notifications instead. In this case, Approval Group Managers now receive timely notifications, allowing them to take appropriate action on Timesheets that require their approval.
For further details refer to:
- Preventing Portfolio Managers from approving their own Timesheet
- Preventing a Project Manager from approving their own Timesheet

Description: The option to Copy a Workflow is now available through the context menu located within the following list pages:
- Project Workflows (Setup > Work)
- Work Item Workflows (Setup > Work)
- Timesheet Workflows (Setup > Timesheet)
- Leave Request Workflows (Setup > Timesheet)
- Expense Workflows (Setup > Expense)
- Invoice Workflows (Setup > Financial)
Upon clicking Copy, a new workflow will be created with the name Copy of [original workflow name] and, if applicable, an ID of Copy of [original workflow ID]. This ensures clear identification and differentiation between the original and copied workflows.
All setting within the States, Transitions, and Assignments tabs will be duplicated exactly as they appear in the source workflow. This includes replicating the layout and all properties associated with States, Transitions, Assignments, and Notifications.
Benefit: This enhancement simplifies the process of duplicating workflows, enabling administrators to swiftly create duplicates with the same configurations and properties. They can easily make any necessary adjustments, thereby saving time when creating similar workflows.
For further details refer to Copying a Workflow.

Description: The option to Copy a Work Item Workflow is now also available from the context menu of the Work Item Workflows list page.
Upon clicking Copy, a new workflow will be created with the name Copy of [original workflow name] and, if applicable, an ID of Copy of [original workflow ID]. This ensures clear identification and differentiation between the original and copied workflows.

In addition to the workflow design, all settings within the Work Item Setup dialog box including the Setup, General and all UDF tabs will be duplicated exactly as they appear in the source workflow.
Benefit: This enhancement simplifies the process of duplicating Work Item Workflows, enabling administrators to swiftly create duplicates with the same configurations and properties. Administrators can easily make any necessary adjustments, thereby saving including associated User Defined Fields when creating similar Work Item Workflows
For further details refer to Copying a Work Item Workflow.
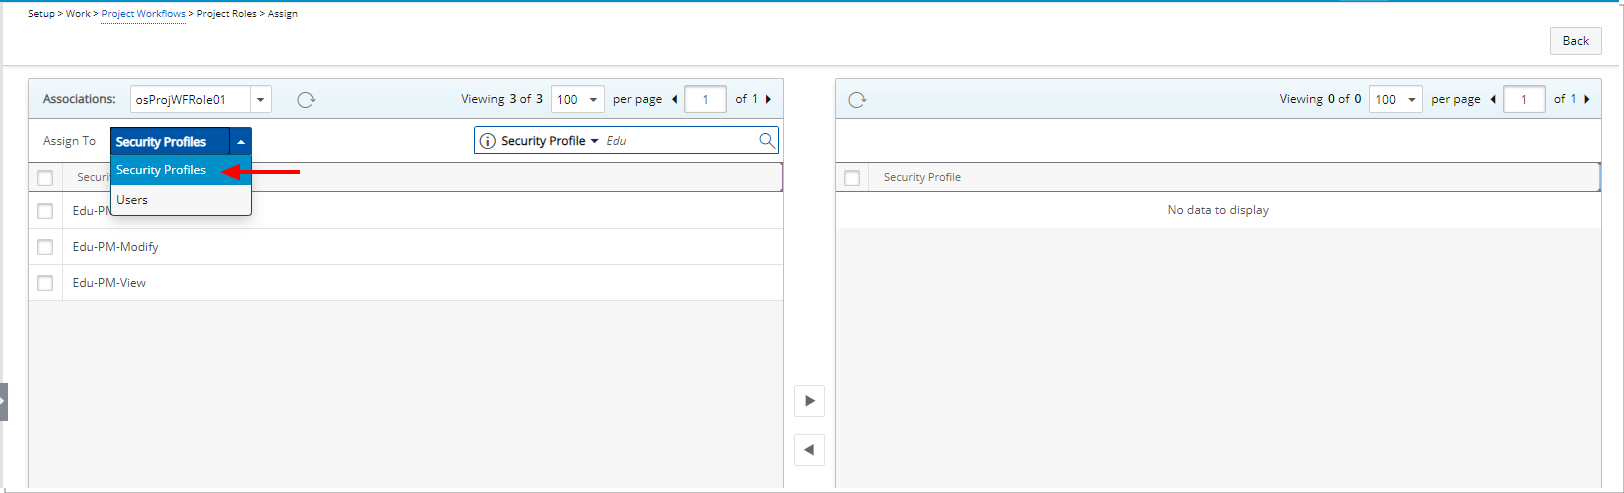
Description: In past releases, Workflow Roles could be associated to Users only. As of this release you can now also associate a Workflow Role to a Security Profile.
The option to choose a Security Profile is available from the following Associations pages:
- Expense Workflow Roles (Setup > Expense > System> Workflow Roles)
- Invoice Workflow Roles (Setup > Financial > Invoice Workflows > Workflow Roles)
- Leave Request Workflow Roles (Setup > Timesheet > Leave Request Workflows > Workflow Roles)
- Project Workflow Roles (Setup > Work > Project Workflows > Workflow Roles)
- Resource Request Workflow Roles (Setup > Workforce Planning > Resource Request Workflows > Workflow Roles)
- Timesheet Workflow Roles (Setup > Timesheet > Timesheet Workflows > Workflow Roles)
- Work Items Workflow Roles (Setup > Work > Work Item Workflows > Workflow Roles)
Benefit: This improvement guarantees that users are assigned roles that match their Security Profiles without the need for manual intervention, simplifying the process and ensuring alignment between users and their assigned workflow roles.
For further details refer to
- Workflow Roles
- Creating a Workflow Role
- Associating a Workflow Role to a Security Profile
Work Items
Description: In this release, we are excited to introduce a powerful new feature aimed at empowering users to manage their Skills and Proficiency effectively.
There are two main areas of the application where you will see changes:
- Administrators to manage the workflow settings
- Standard users to seamlessly add or update their skills and proficiency levels.
Please refer to these subsections for further details:

The feature is powered by the newly added out-of-the-box User Skill Update Work Item Workflow, available from the Work Item Workflows list page (Setup > Work).
The default General settings of this workflow are defined as follows:
- Name: User Skill Update
- Id: Empty by default
- Alias: SKILL
- Description: Empty by default
- Is Placeholder: (Unchecked and disabled by default)
- Suspended: (Unchecked by default)
- Enable Direct Assignment: (Unchecked by default)
The States, State Attributes, and respective Assignments are defined as follows:
| State | Type | Attribute | Assignment |
|---|---|---|---|
| Open | Initial | Initial | Originator |
| Submitted | Intermediate | Read Only, Completed | Originator’s approval manager |
| Approved | Final | Final, Read Only | Originator’s approval manager |
| Discarded | Final | Final, Read Only |
The Transitions of the Workflow are defined as follows:
| Transitions | Source | Destination | Attributes |
|---|---|---|---|
| Submit | Open | Submitted | None |
| Discard | Open | Discarded | None |
| Approve | Submitted | Approved | Approval |
| Discard | Submitted | Discarded | None |
| Reject | Submitted | Open | Rejection |
Furthermore, a new Post Process Stored Procedure (WORKITEMIUSKILLTRANS) is also implemented for the Approve Transition which:
- Can add or modify Skill attributes such as Proficiency, Interest and Expiry Date.
- Can add the entire Skill to Users' Skills.

The Layout for the entry is defined within the General tab of Work Item Setup dialog box. The table below illustrates the details of each newly created User Defined Fields (Setup > Organization > System) which are used in the Layout:
| Name | Setup | Values |
|---|---|---|
| Skill | Language: English
Name: PSA_Skill Id: Skill Display name: Skill Name Type: Edit field Data type: Browse for item Browse type: Skill Description: Please do not modify or delete this entry. |
|
| Proficiency | Language: English
Name: PSA_Proficiency Id: Proficiency Display name: Proficiency Type: Browse for item Browse type: Proficiency Description: Please do not modify or delete this entry. |
Not applicable: Sort Order 0 (Selected by Default)
Beginner: Sort Order 1 Basic: Sort Order 2 Intermediate: Sort Order 3 Informed: Sort Order 4 Expert: Sort Order 5 |
| Interest | Language: English
Name: PSA_Interest Id: Interest Display name: Interest Type: System Table Edit filed System Table:: Skill Interest Description: Please do not modify or delete this entry. |
Not specified: Sort Order: 0 (Selected by Default)
Not interested: Sort Order: 1 Ready to perform: Sort Order: 2 Somewhat interested: Sort Order: 3 Interested: Sort Order: 4 Very Interested: Sort Order: 5 Career goal: Sort Order: 6 |
| Expiry Date | Language: English
Name: PSA_Expiry Date Id: Expiry Date Display name: Expiry Date Type: Edit field Data type: Date Default: Specific date (Open Ended) Description: Please do not modify or delete this entry. |

The Submitted State of this Workflow will trigger a Notification where the following details will be sent to the Originator’s Approval Manager:
- Name: User Skill Update Request Submitted
- Send Notification: Checked
- Language: English
- Title: User Skill update request pending your approval
- Message:
%WORKFLOW_ORIGINATOR%has submitted a Skill update request and is pending your approval.%WORKFLOWENTRY_LINK% - Recipients: Originator’s approval manager
With this feature, you can now seamlessly add, or update your Skills and Proficiency levels, ensuring that your profile accurately reflects your expertise.

You can create and manage User Skill Update Entries from Work Item Manager (Entries).
- Click Create Work Item, then select User Skill Update.
- Enter/select the following information:
- Title: Enter a short descriptive title for your Entry.
- Originator: Defaults to creators' User Name. You can choose to create an Entry on behalf of another user provided you have the right to Can create Work Items on behalf of others permission (Setup > Organization > System > Security > Security Profile Edit > Entry > Work Item).
- Created On: Default to current date.
- Skill: Click to select the required Skill from the corresponding Skills list page.
- Proficiency: Click to select the required Proficiency from the corresponding Proficiency List page. By default the available options are: Not applicable, Beginner, Basic, Intermediate, Informed and Expert,
- Interest: Click and select one of the following options: Not specified, Not interested, Ready to perform, Somewhat interested, Interested, Very Interested and Career goal.
- Expiry Date: If applicable, click the Calendar
 button and choose an Expiry Date.
 - Description: Enter a brief description.
Upon saving and submitting the Entry, it will be assigned to the Originator's Approval Manager who will receive an automatic notification whenever you submit changes to your Skill through a User Skill Update Entry.
Your Approval Manager can Approve or Reject these Skill changes, ensuring alignment with team objectives and resource requirements.

If the Entry is approved your Skill will be updated accordingly. You can verify the updated/new Skill when navigating to the Skills tab of your Settings page.
Benefit: By facilitating better collaboration and resource allocation efficiency, this feature streamlines the process of managing skills within the organization. It promotes a more cohesive and well-aligned team, ultimately leading to improved productivity and effectiveness in achieving organizational goals.
For further details refer to:
- Creating a User Skill Update Work Item Entry
- Approving/Rejecting a User Skill Update Work Item Entry
- Out-of-the-box Work Item Workflows
- Out-of-the-box User Skill Update Workflow

Description: Project Manager is now available as a Column Selection option for all views within the Work Item Manager page. You can now also include it as a Search criteria from the Column Selection.
Additionally Project Manager on-page and View Filter options are now available from the following out-of-the-box Work Item Manager Views:
- All Work Items
- Assigned Work Items
- My Available Projects Work Items
- My Work Items
Benefit: This improvement in the Work Item Manager page allows for seamless searching by Project Manager, providing quick access to relevant Entries. Moreover, the inclusion of Project Manager as an on-page and Advanced Filter criteria across all Views enhances usability, enabling more precise filtering and organization of Work Items based on project managers.
For further details refer to:
- Work Item Manager
- Work Item Manager Views
- Available Filter criteria - Work Item Manager Views

Description: Improvements have been made to Work Items and Work Items Manager, allowing for easy access to detailed information by hovering over truncated fields.
Benefit: This update ensures that even if only partial text is displayed for a field, you can still view the full text details by simply hovering over it. This ensures complete visibility without constraints, fostering a more seamless experience for making informed decisions.

Description: Time stamps indicating the time of modification and the contributor's User Name are now prominently displayed within the Comments tab or Work Items edit page, fostering transparency and accountability.
Moreover, the addition of Time Zone (logged user active site) information ensures accuracy across different regions.
Note: Comments are by default organized based on newest modification date, facilitating streamlined discussions. You can choose to show Oldest first.
Benefit: The addition of time stamps to modified comments in the Work Items provides valuable insights into the time-line of changes made to work items and improves collaboration by offering clear context for discussions among team members.
For further details refer to:
- Work Item Entry - Comments tab
- Project Work Item Entry - Comments tab
Deprecated/Unsupported Functionality

In previous releases, the Quick Links control panel could be made visible within the navigation pane by selecting Display Quick Links from the User Settings dialog box. The Search functionality associated with the Quick Links could then be made visible by selecting the Search selection box.
As of this release the Quick Links control panel is no longer available and the above mentioned settings have been removed from the user Settings dialog box accessed through the User Profile menu.
As an alternative, you can use the Global Search which offers robust searching capabilities in PSA including several features such as indexed results, auto-complete as well as additional search categories.

As of this release, the PSA spellchecker feature previously available during the Note creation has been deprecated and will no longer be supported within the Bookings and Notes dialog boxes from the Work Plans.
Modern browsers such as Chrome and Edge already provide this capability for text areas.

- Open Chrome and click on the three vertical dots in the top-right corner to open the menu.
- Select Settings.
- Click on Languages in the left-hand menu.
- From the Spell check section toggle the spell check to On and choose one of the following options:
- Basic spell check
- Enhanced spell check
- Then select the languages you want to use for spell checking.

- Open Edge and click on the three horizontal dots in the top-right corner to open the menu.
- Select Settings.
- Click on Languages in the left-hand menu.
- Under the Writing assistance section, toggle the Enable grammar and spellcheck assistance to On and and choose one of the following options:
- Microsoft Editor
- Basic
- Select the required Writing assistance languages.
Note: Users who previously relied on the PSA spellchecker feature in the specified areas are encouraged to utilize external spell-check tools or applications to ensure accurate spelling and grammar. Additionally, proofreading notes before saving them can also help prevent errors.
The Customer Sentiment integration is no longer supported and removed from PSA. As a result, the following links/fields have been removed and no longer available/accessible:
- Survey Precipitants field in Project Edit page (Project List).
- Project Survey Column selection option in Project List
 and the corresponding Project Survey list page.
 - Survey Templates menu option (Setup) and the corresponding Survey Template List page.
The Purchasing module was deprecated in 2023R3.0 however, the Purchase license option remained in the User Security Profiles.
As of this release the Purchasing option is no longer available from the License page (Setup > Organization >System > Security > Security Profile).