This article details how to grant a Client Contact security access to Upland Analytics (UA).
- Granting a Client Contact security access to Upland Analytics
- Associate Upland Analytics Dartboard(s) to the Client Contact
- Run the Synchronize Integrations Service
Granting a Client Contact security access to Upland Analytics
- From the Icon Bar click Setup
 .
. - From the Navigation Menu click Organization.
- From the menu click System.
- From the System page click the Security button to access the Security setup page.
- Click the expand button (
 ) located against a Client Security Role Placeholder, if applicable to view the available Security Roles.
 - Upon the Security Profile page displaying, select Entry from the menu.
- From the available options select Reporting.
- Select Can Report on all Client’s Projects if you wish for the Client Contact to be able to report on all Client's Projects (optional). Otherwise they will only have permission to their associated projects.
- Choose the Upland Analytics option to allow the Client Contact to access Upland Analytics.
- Select Save.
Caution: To map the Client Security Profile as an Upland Analytics Role, you must run the Synchronize Integrations Automation Service. Once the synchronization is complete, Client Contacts can be created and associated with this Security Profile. They will be created as a Upland Analytics User and associated to the respective UA Role.
Associate Upland Analytics Dartboard(s) to the Client Contact
- From the Icon Bar click Setup .
- From the Navigation Menu click Organization.
- From the menu click System.
- From the System page click the Security button to access the Security setup page.
- Click the expand button () located against a Client Security Role Placeholder, if applicable to view the available Security Roles.
- Upon the Security Profile page displaying, click More... to access the available options.
- Select Associations.
- From the Available Dashboards table select the Dashboard(s) you wish to associate to this Client Security Profile.
- Click the Add
 button to add the chosen Dashboards to the Selected Dashboards list on the right. The selected Dashboards will be listed on the left hand side menu in alphabetical order when the Client logs into their Customer Portal.
 Note: The first Dashboard listed within this table is displayed as the default Client Contact Dashboard.
- To choose a different Dashboard as the default one, simply press the required Dashboard and drag it to the top of the Selected Dashboards table.
Note: Client Contacts can choose to overwrite their default Dashboard by selecting a different Dashboard from their User Settings (User Settings > Dashboards tab) and moving it to the top of the Selected Dashboard table. The first Dashboard listed within this table will overwrite the one set at the Security Profile level.
- Click Close.
Run the Synchronize Integrations Service
To create the Client Security Profile as a an Upland Analytics Role, you must run the Synchronize Integrations Automation Service:
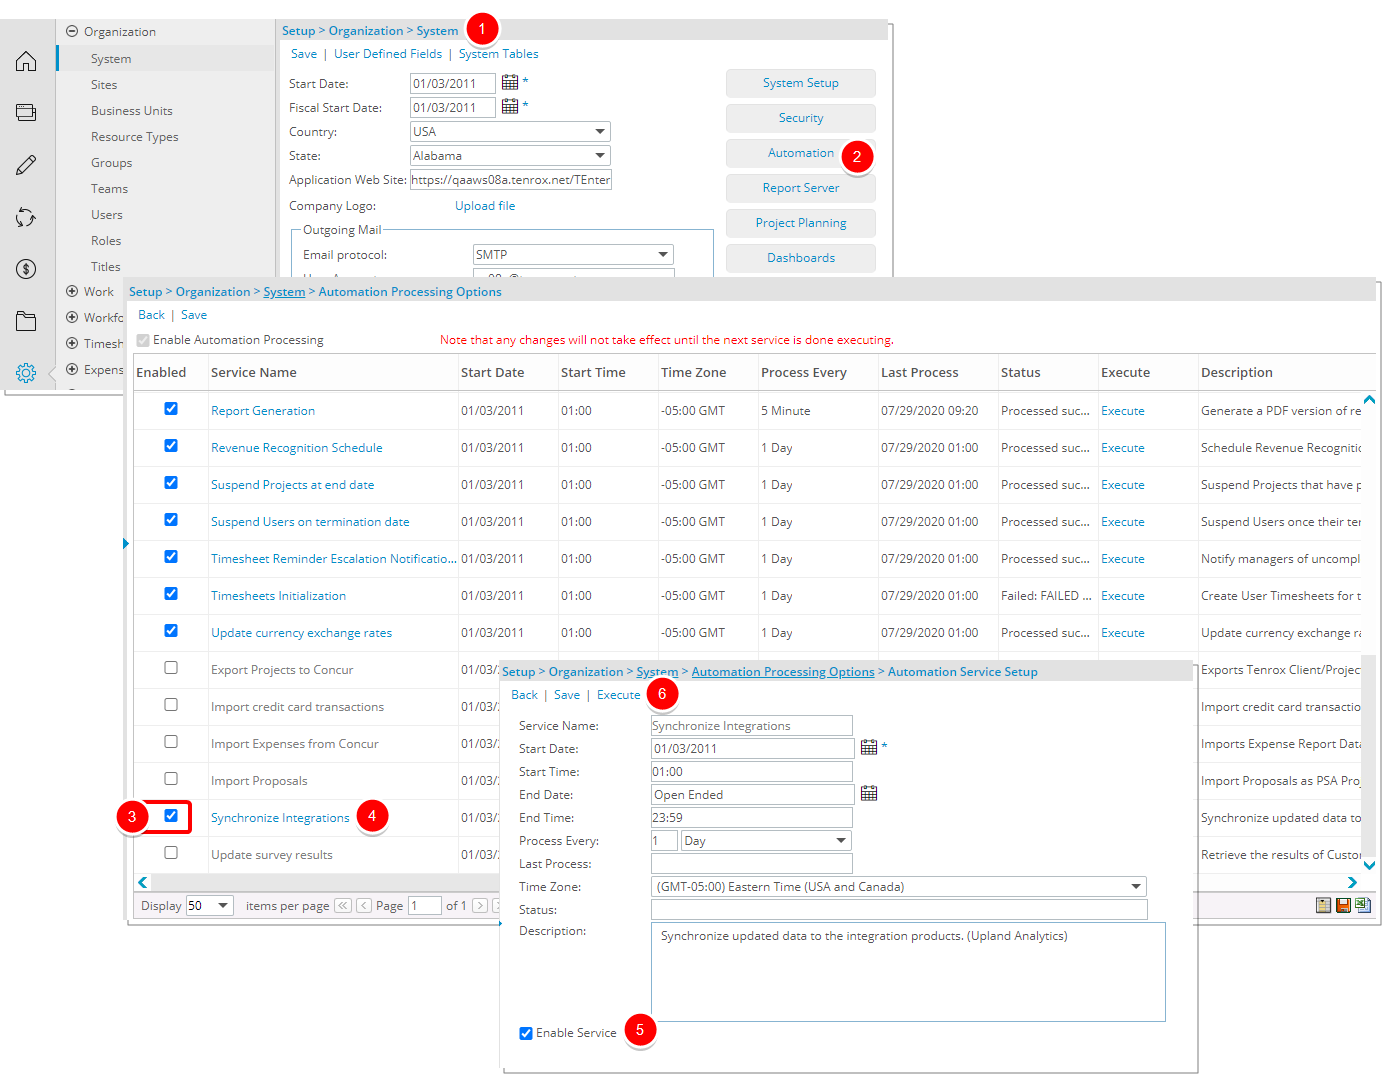
- Navigate to the Organization System setup page (Setup > Organization > System).
- Select Automation.
- Select the Synchronize Integrations Automation Service.
- Open the Automation Service Setup page by clicking the name of the Automation Service.
- Select Enable Service.
- Click Execute.
Note: Once the synchronization is complete, Client Contacts can be created and associated with this Security Profile. They will be created as a Upland Analytics Users and associated to the respective UA Role.