PSA - Automatic Data Processing (ADP) Connector
About this Guide
This guide explains how to set up integration between ADP and the PSA application. It also lists steps on how to set up payroll batches, export payroll, set up payable batches, and export payables to ADP.
PSA Technical Support is a team of Application Support Analysts trained to use, configure, and troubleshoot PSA in your specific enterprise environment.
If you have any questions, you can reach us by sending us an email.
The PSA Software license agreement was reviewed and accepted during the installation procedure of this software in your environment. Copyright © 2026 Upland Software. All rights reserved. You may not photocopy or share this document with any other party without express written permission from Upland Software Inc..
PSA and ADP Integration
Time and expense tracking is a critical component of PSA solutions. A good solution addresses the requirements for tracking time, charges, and expenses on specific projects. This can be accomplished by ADP integration with PSA.
PSA supports file-based integration with ADP (Automatic Data Processing). This type of integration with ADP reduces the manual overhead involved in re-entering all the information in a different system.
The following are the main tasks that must be accomplished to successfully export payroll and payable batches to ADP:
Note: For non-Internet Explorer browsers, the exported file will not be downloaded in the Data Exchange Directory, and it will follow browser default settings.
Pay Code Setup
The following must be performed in setting up pay codes.
- From the Icon Bar click Setup
 .
. - From the Navigation Menu click Financial to expand the corresponding menu.
- From the Financial menu items, click System.
- Upon the Financial Settings page displaying navigate to the Payroll tab.
- Click the Pay Codes sub-tab from where you can configure the global Pay Codes.
- Click New. Note that the right pane will display the required fields to create the new Pay Code by entering/selecting the following information:
- Enter a Name for the Pay Code.
- If there is an ID, enter it in the Id box.
- Click the browse button located against the Parent box, to select and designate, from the Pay Codes list page, under which the Pay Code is to be displayed.
- Select the Type from the following available options: Purchases, Other Income, Other Expense, Other Assets, Other, Long Liabilities, Income, Fixed Assets, Expense, Equity, Current Liabilities, Current Assets, Credit Card, Cost of Goods Sold, Bank, Accounts Receivable and Accounts Payable.
- Select the Normal balance from the available options: Credit/Debit
- Select if the Pay Code Is a placeholder.
- Enter a Description if any.
- Click Save to apply your changes.
- Upon saving, the newly created Pay Code will be listed on the left pane under the chosen Parent.
The mapping of the entries to ADP is as follows:
| Pay Code Priority | ADP |
|---|---|
| Regular Time | Regular Hours |
| Overtime | Overtime Hours |
| Double Overtime |
To be exported: As overtime, the Double Overtime Pay Code Priority fields should contain the same pay code as the Overtime Pay Code Priority. As Other hours, the appropriate pay code in the Charge Pay Code Priority field must be selected. |
| Charge |
If Double Overtime is to be exported as other hours, the appropriate pay code must be set up in these fields. |
| Leave Time | Should have the same pay code as Should have the same pay code as Regular Time. |
Payroll Batches Setup
Payroll Connection Setup
To set up a connection to ADP for payroll batches:
- From the Icon Bar click Setup .
- From the Navigation Menu click Financial to expand the corresponding menu.
- From the menu click System.
- Upon the Financial Settings page displaying navigate to the Payroll tab.
- From the Payroll system list, select the appropriate ADP application:
- ADP HR Partner (default)
- ADP HRizon
- ADP Pay eXpert
- ADP PC/Payroll
- ADP HR Partner (default)
-
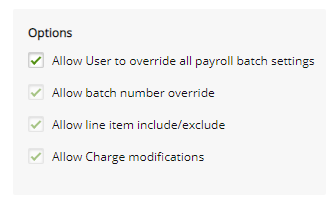
Under Options section, specify the following for the payroll batch:
- Select the Allow User to override all payroll batch settings box to allow users to modify the payroll batch settings from the Payroll Batch Edit page.
Note: If you select the Allow User to override all payroll batch settings box, the other options in this section will be automatically selected and cannot be changed. However, if you deselect the Allow User to override all payroll batch settings you will be able to choose any of the following options: Allow batch number override, Allow line item include/exclude and Allow Charge modifications.
- Select the Allow batch number override box to allow users to override the batch number automatically generated by the application for the payroll batch.
- Select the Allow line item include/exclude box to allow users to selectively include items in the payroll batch.
- Select the Allow Charge modifications box to allow users to modify the charge entries in the payroll batch.
- Select the Allow User to override all payroll batch settings box to allow users to modify the payroll batch settings from the Payroll Batch Edit page.
- Under Cycle section, specify the following for the payroll batch: Select the Start Date by clicking the calendar icon and then choose the date.
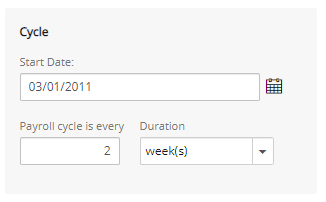
- In the Payroll cycle is every box, enter a number and then select from the list month(s), semi-month(s) or week(s)
Caution: On Save, if semi-month(s) is selected and the Start date is not set to the 1st day of the (selected) month, a message is displayed asking the you to correct this.
Note: If semi-month(s) is selected when creating a payroll batch, the payroll interval is set based on the cycle start date and the semi-monthly cycle defined.
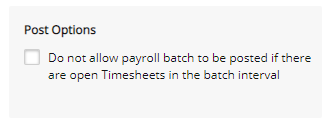
- Under Post Options, select the Do not allow payroll batch to be posted if there are open Timesheets in the batch interval box to prevent users from posting payroll batches with open timesheet periods in the payroll batch interval.
- Click the Connection button to set up a connection with the payroll system.
Make the entries and select the options as required:
- Data exchange directory *: Click the Browse button (...)to define where the ADP export file is to be saved.
- ADP Export Options: In this section, select which of the following fields or components are to be exported to the ADP file:
- Include Multi-Department: Select this option to map the department to the Project ID or the Functional Group ID
- Header: Enter a title for the column, if different from the default name, "Temp Dept", under which the Project ID or Functional Group ID is displayed.
- Map to: Select from the drop-down, where the department is to be mapped to:
- Group - Select this option to map to the Functional Group.
- Project - Select this option to map to the Project, which is the default selection.
See Sample ADP Export File, below, to view how the file appears.
- Group - Select this option to map to the Functional Group.
- Include Employee Shift: Select this option to export the Resource Type to the ADP export file
- Header: Enter a title for the column, if different from the default name, "Shift", under which the resource types appear.
Note: Employee Shift refers to Resource Type.
- Header: Enter a title for the column, if different from the default name, "Shift", under which the resource types appear.
- Include Double Overtime: Select this option to export Double Overtime entries to the ADP export file.
* Required field
- Include Multi-Department: Select this option to map the department to the Project ID or the Functional Group ID
- Data exchange directory *: Click the Browse button (...)to define where the ADP export file is to be saved.
- From Employee Matrix section, select the type of time entries to be exported for the different types of users. For example, if the regular time entries for the Consultant has to be exported, then select the check box under the Regular column.
- Click Save, and Back to return to the Payroll tab.
- Click Save.
Specify the integration link Ids:
- From the Icon Bar click Setup .
- .From the Navigation Menu click Organization.
- From the available options select Users.
- Click a User name to access the User Edit page.
- Upon the User Edit page displaying, click the Integration link located under the Integration navigation menu.
- In the ADP field, enter the corresponding Id.
Sample ADP Export File
Sample ADP Export File (In the sample table below, all values appearing under the File# column are the integration link Ids of users)
| CO Code | Batch ID | File# | TEMP DEP | SHIFT | Reg Hours | O/T Hours | Hours 4 Code | Hours 4 Amount | Hours 3 Code | Hours 3 Amount |
|---|---|---|---|---|---|---|---|---|---|---|
| ABC | 27 | 200 | A | 1 | 2 | 1 | D | 1 | S | 16 |
| ABC | 27 | 266 | B | 1 | 10 | 2 | ||||
| ABC | 27 | 282 | A | 1 | 6 | |||||
| ABC | 27 | 424 | A | 1 | 40 |
Note: For non-Internet Explorer browsers, the exported file will not be downloaded in the Data Exchange Directory, and it will follow browser default settings.
Leave Time Setup
When generating an ADP export file, any time entered against a leave time is exported under a different column header when a proper ID has been entered for the leave time's pay code. If no pay code is specified for the assigned leave time, the time entered for the leave time is considered as regular time.
To display leave time in a separate column, the following must be done:
- From the Icon Bar click Setup .
- From the Navigation Menu click Financial to expand the corresponding menu.
- From the Financial menu items, click System.
- Upon the Financial Settings page displaying, navigate to the Chart of Accounts tab.
- Click New.
- Expand the Pay Codes placeholder by clicking the Plus (+) sign to the left of it.
- If the required leave time work type is not already currently under this placeholder, a new pay code, such as Vacation, is created by right-clicking the Pay Codes placeholder.
- From the context menu that appears, select New.
- Enter/select the required settings from the right pane:
- Enter a Name and Id.
Note: To ensure clarity, it is strongly suggested that the name be identical to the designated leave time work type name. For example, enter Vacation.
- Select the Parent.
- Select the Type from the list of available options.
- Select the Normal balance type from the list of available options.
- Select if the account Is a placeholder.
- Enter a Description if any.
- Enter a Name and Id.
- Click Save to apply your changes.
| CO Code | Batch ID | File# | TEMP DEP | SHIFT | Reg Hours | O/T Hours | Hours 4 Code | Hours 4 Amount |
|---|---|---|---|---|---|---|---|---|
| ABC | 27 | 667 | 131 | 1 | 2 | V | 32 | |
| ABC | 27 | 772 | 131 | 1 | 44 |
- From the Icon Bar click Setup .
- From the Navigation Menu click Timesheet.
- From the available menu options select Leave Time.
- Select and click the applicable leave time from the list, in this example click Vacation from the list of leave times to open the Leave Time Edit page.
- On the Leave Time Edit page, click the Pay codes button to open the Pay Codes page.
- Click Browse (...) beside for the Pay Code for Leave Time field to open the Pay Code list page.
- Click the applicable corresponding pay code. In this example, click the new pay code previously created, "Vacation".
- The Pay Code for Leave Time field is automatically populated with the pay code selection.
- Click Save, and then Back to return to the Leave Time edit page.
- Click Save, and then Back again to return to the Leave Time page.
- When exporting, in this example, all vacation leave time appears under the Hours 4 code column and the letter "V" is displayed as the leave time code.
Generating a New Payroll Batch
The timesheets must first be completed and then submitted for approval before they can be included in the payroll batch.
Note: The Time Entries must be marked as Payable to appear in the Payroll Batch.
Creating a Company
- From the Icon Bar click Setup .
- From the Navigation Menu click Financial to expand the corresponding menu.
- From the Financial menu items, click System.
- Upon the Financial System page displaying, click the Accounting tab.
- If not already, select Internal from the Accounting System selection box.
- Click Save.
- Click the Companies sub-tab to access the Company list page.
- Click New to create a new Company.
- Complete the fields and select the options, as required, to create a new company.
- Upon creating the company, ensure that it is associated to the appropriate User or Site, through the User Edit or Site Edit pages, respectively.
Note:
- When a company is associated to various objects, based on the hierarchy of association rule, only the objects that are directly associated to the company selected for a Payroll Batch are included in the batch.
- The hierarchy of association rule defines the precedence order as User > Site > Default company, therefore the object with the highest precedence to the associated company is included in the payroll batch.
Generating Payroll Batches
- From the Icon Bar click Financial
 .
. - From the Navigation Menu click Payroll Manager.
Note: You must have the appropriate rights to access the Payroll.
- Click Create Batch and access the Payroll Batch page.
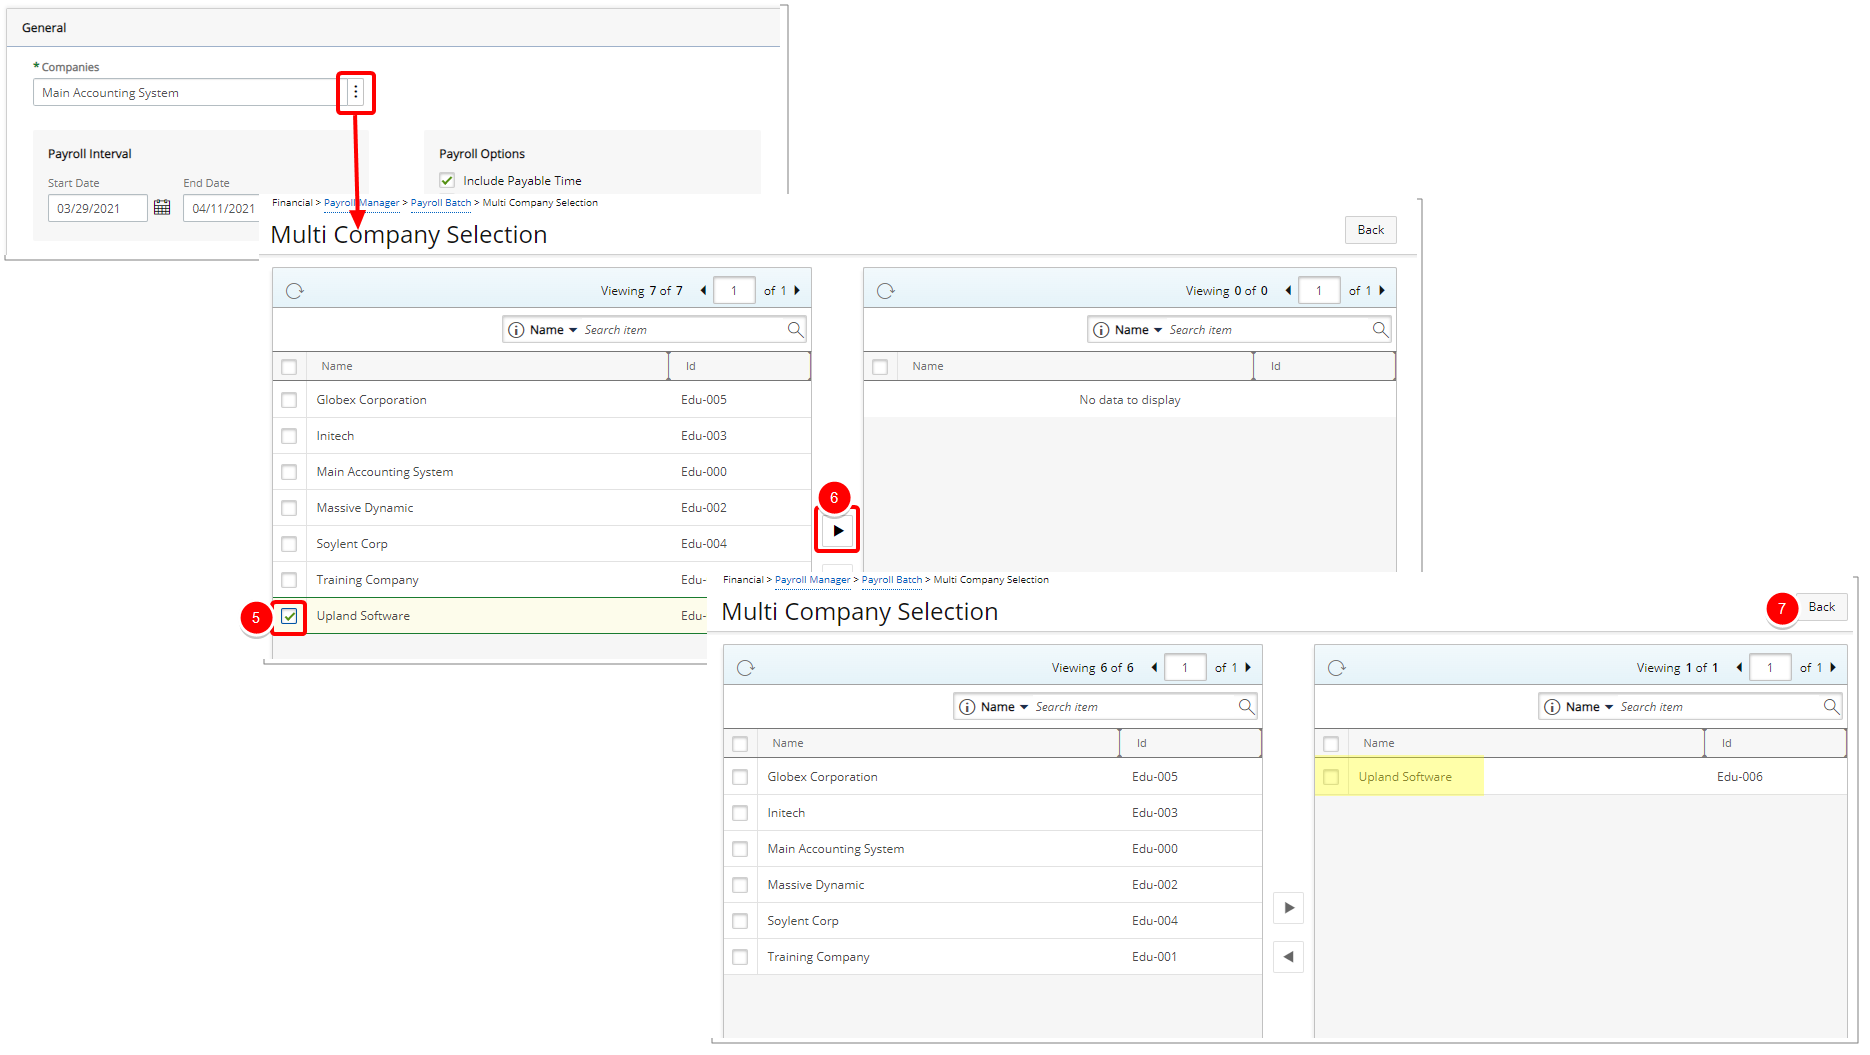
- Click the Browse icon to the right of the Companies box to access the Multi-Company Selection page where you can select the company(ies) for which the payroll batches are processed. The company concept filters the list of users associated to the selected company(ies). Companies can be associated to users and sites from the User Edit (under Invoice Options tab) and Site Edit pages respectively.
- Select the Company from the available list. When a single Company is selected upon clicking the Create Batch(es) button a Payroll is created for this single selected company and opened in edit mode.
Tip: You may wish to narrow your available Company list. Select either Name or Id from the available search criteria and then enter a corresponding value in the Search box. Click the search icon to narrow down the available items list.
- Click the arrow button to add them to the selected Items list.
Note:
- During the payroll generation process, once a Company is selected, the system displays only those users associated with the selected Company.
- If the selected Company is not associated with the User, then the system validates the Site.
- If the companies match, then the payroll for all users associated with that Site is processed.
- If no Users and Sites are associated with the selected Company, and if the selected Company is the Default Company (set under Setup > Financial > System > Defaults), then all other users in the application are processed in the Payroll Batch.
- Click the Back button to return to the Create Payroll Batch page.
- Select the payroll interval by Selecting the Start and End Dates
- Enter or select the Start Date of your Payroll Batch.
- Enter or select the End Date of your Payroll Batch.
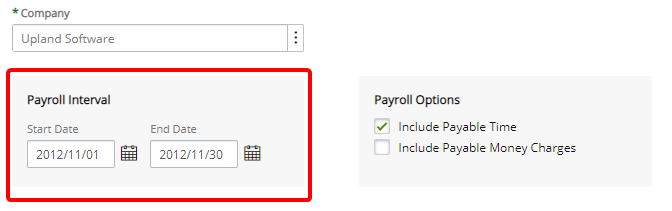
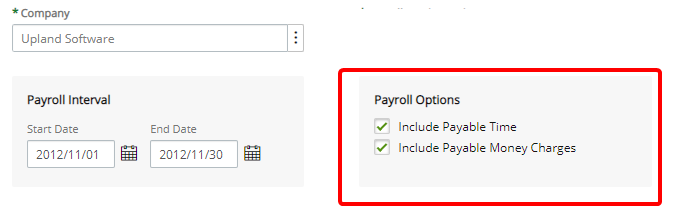
- In the Payroll options section, select any of the desired options:
- Include Payable time
- Include Payable Money Charges
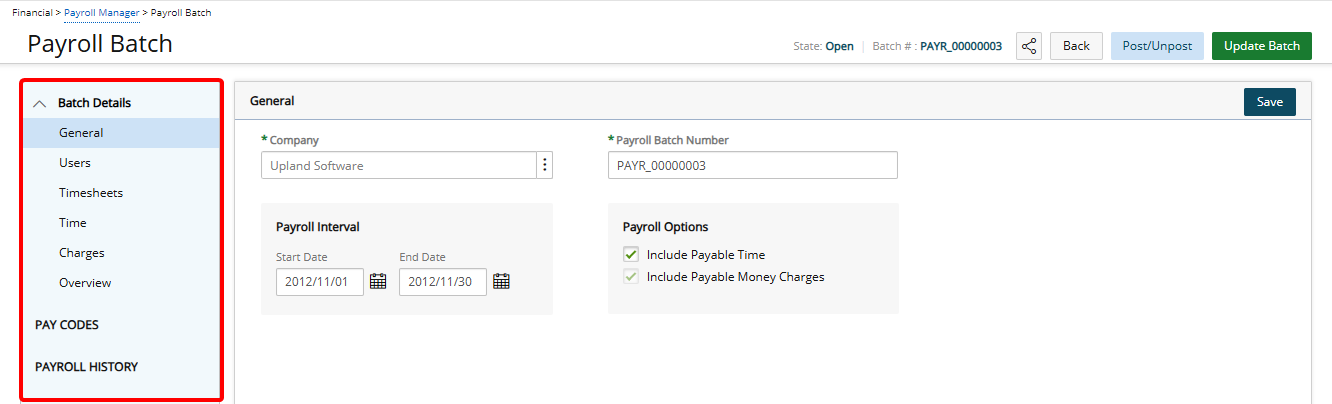
- Click Create Batch(es). When a single Company is selected, upon clicking the Create Batch(es) button a Payroll is created for this single selected company and opened in edit mode. Note that the Users, Timesheets, Time, Charges, Overview, Pay Codes and Payroll History links are available from the navigation:
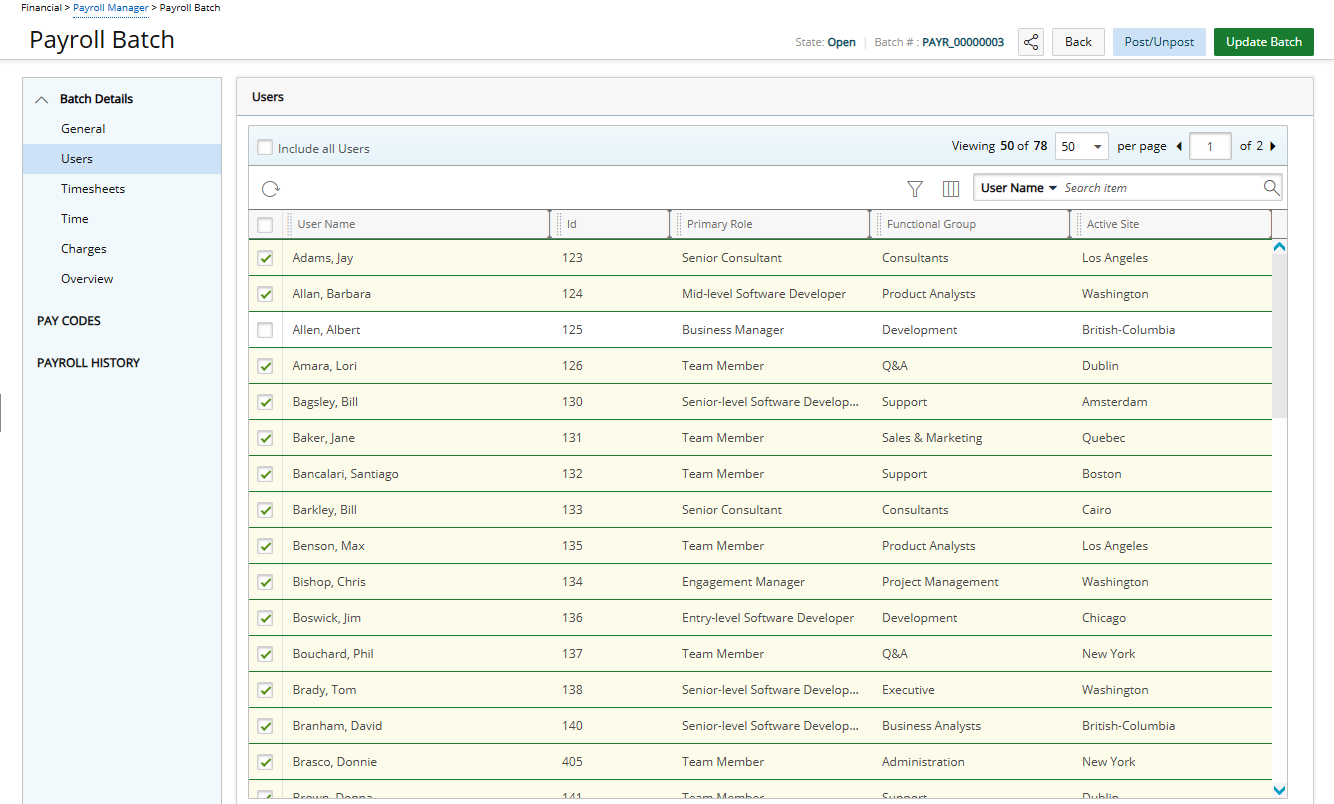
- Click Users from where you can opt to include selected Users within a Payroll Batch. You can also choose to include all Users by selecting the Include all Users option which is not selected by default.
By Default, the Users list includes the following columns: User Name, Id, Primary Role, Functional Group and Active Site with the following Search criteria: User Name, Id, Primary Role, Functional Group and Active Site. You can choose to customize the Search Filter(s) and the Columns that display through Columns Selection by clicking .
. 
- Click Timesheets from where you can opt to include selected User Timesheets within a Payroll Batch. You can also choose to include all Timesheets by selecting the Include all Timesheets option which is not selected by default.
By Default, the Timesheets list includes the following columns: User Name, Id, Group, Start Date, End Date and Payable Hours with the following Search criteria: User Name, Id, Group, Start Date and End Date.
You can choose to customize the Search Filter(s) and the Columns that display through Columns Selection by clicking. 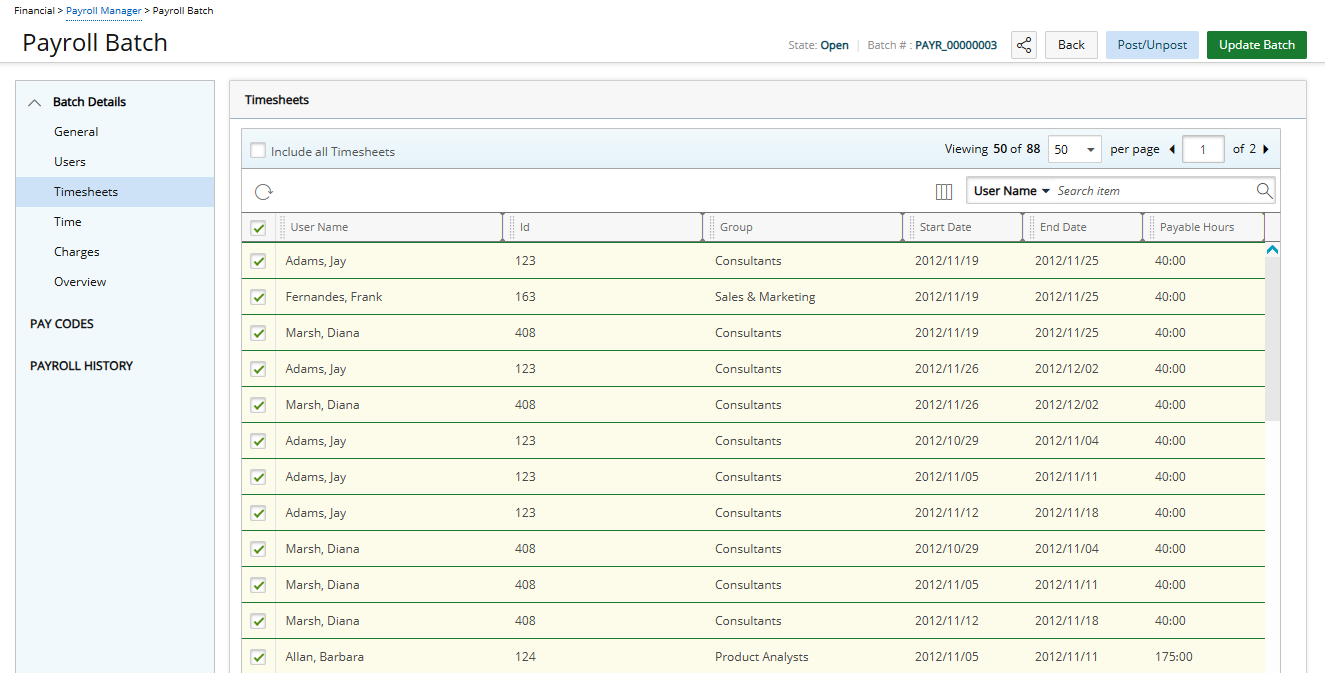
Note: Only Time Entries within the selected date range, within the Payroll Batch, are displayed.
- Click Time from where you can opt to include selected User Time Entries within a Payroll Batch. You can also choose to include all Time Entries by selecting the Include all Time Entries option which is not selected by default.
By Default, the Time list includes the following columns: User Name, Id, Task, Project, Hours and Amount with the following Search criteria: User Name, Id, Task and Project.
You can choose to customize the Search Filter(s) and the Columns that display through Columns Selection by clicking. 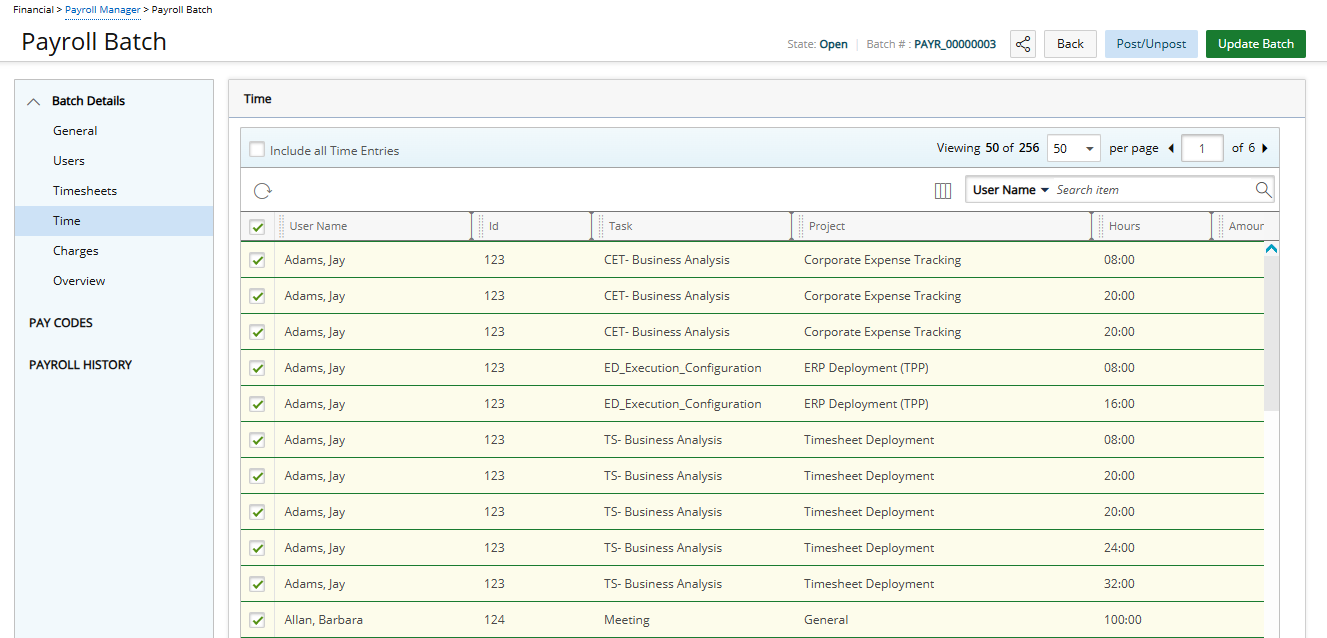
- Click Charges from where you can opt to include selected User Charge Entries within a Payroll Batch. You can also choose to include all Charge Entries by selecting the Include all Charge Entries option which is not selected by default.
By Default, the Charges list columns: User Name, Id, Task, Charge and Amount with the following Search criteria: User Name, Id, Task and Charge.
You can choose to customize the Search Filter(s) and the Columns that display through Columns Selection by clicking. 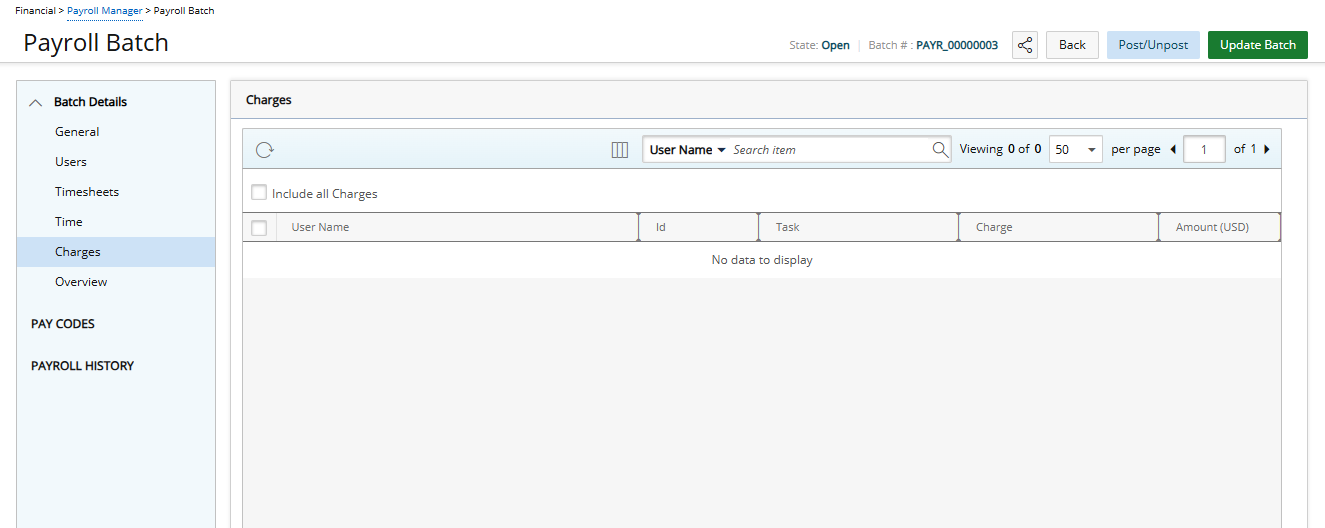
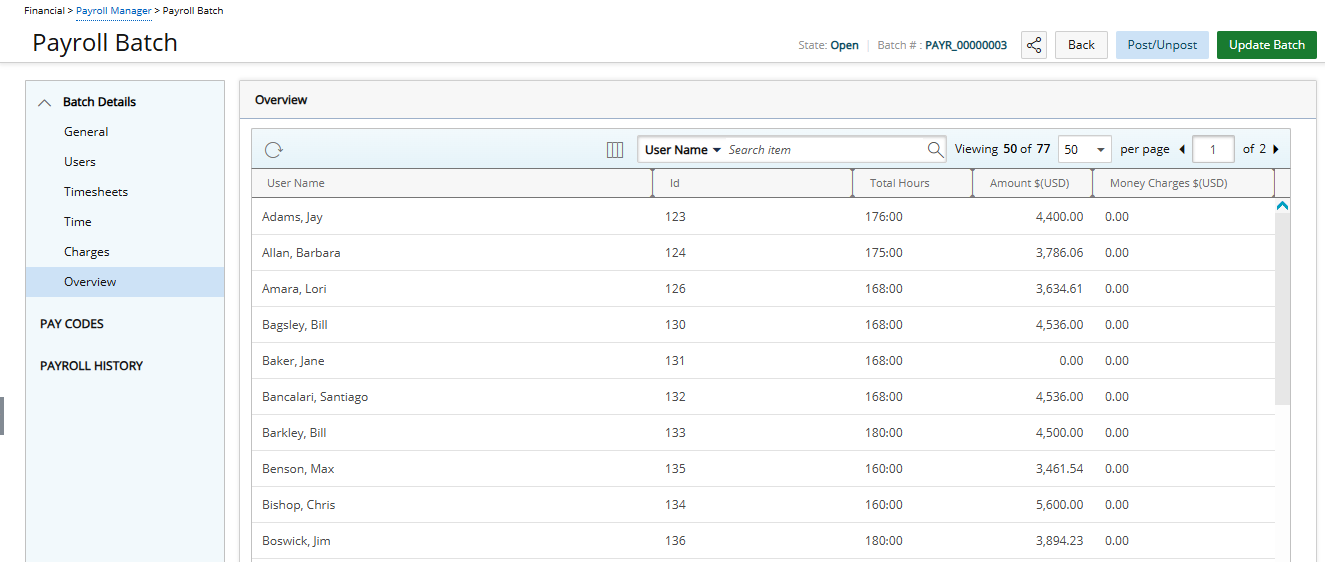
- Click Overview from where you can quickly have insight on your Payroll Batch. The page displays Read-only information and any modifications made to the Users, Timesheets, Time and Charges tabs will be reflected here.
The columns displayed by default are: User Name, Id, Total Hours, Amount and Charges. From the Column Selectionyou can choose to add the following columns: Active Site, Functional Group and Primary Role.
By default, you can search by User Name, Id, Primary Role, Functional Group and Active Site.Note: If Money Charges are not included in the Payroll Batch, the Money Charges column will display N/A for all Users. Otherwise, it will display the total amount for each User.
- Click Pay Codes from where you can view the Pay Codes associated with the Payroll Batch.
The Pay Codes list includes the following: User Name, User Id, Pay Code, Pay Code Id, Hours and Amount.
You can choose to search the list based on User Name, User IdPay Code and Pay Code Id.
The list can be exported to Excel by clicking the Export button and refreshed by clicking the Refresh
  button.
- Click Payroll History from where you can view the Payroll history.
The Payroll History includes the following columns by default: User Name, From, To, Action Date, Post Date, Action, Currency, Total hours, Total Money Charges, Total net cost of Time and Total Payroll with Taxes and Deductions. You can choose to add the Batch Number or remove columns from the Column Selection dialog box.
By default, you can search the list based on User Name, Action, Currency, Total hours, Total Money Charges, Total net cost of Time, Total Payroll with Taxes and Deductions or Batch Number. Additional search criteria such as From, To, Action Date and Post Date can be added from the Column Selection.
The list can be exported to Excel by clicking the Export button.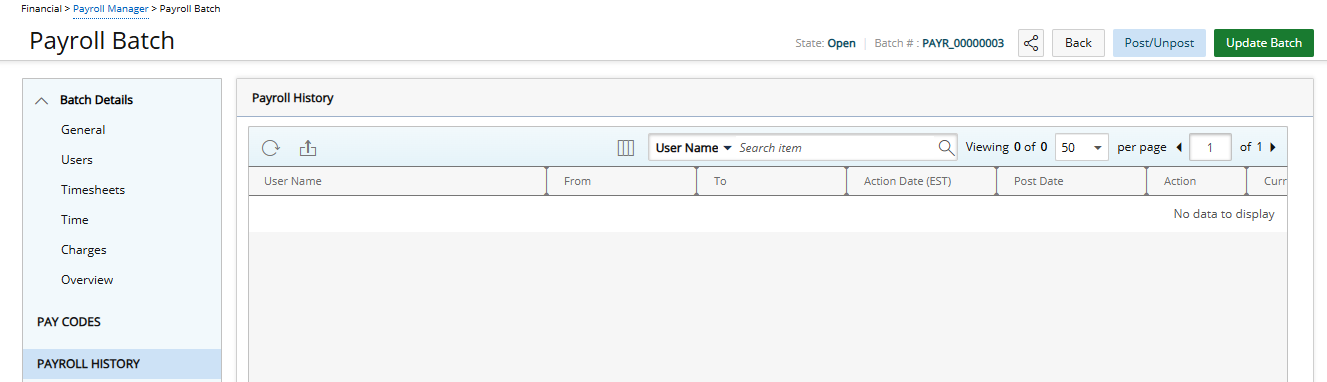
- Click Save.
Export Payroll Batch to ADP
Prior to exporting a payroll batch, ensure each component included in the payroll batch, such as the following, has an ID:
- Projects
- Users
- Groups
- Tasks
- Work Types
This ID can be entered in the edit pages of each component. For example, the Project Edit page, Task Edit page, etc.
To export a payroll batch:
- From the Icon Bar click Financial .
- From the Navigation Menu click Payroll Manager.
Note: You must have the appropriate rights to access the Payroll.
- Click the payroll batch that is to be posted under the Batch Number column.
- The Payroll Batch page displays.
- Click the Pay Codes link located within the left navigation .
- The Pay Codes page opens and displays the information to be transferred to the ADP export file.
Note: On the Pay Codes page, depending on the ADP Export Options selections/settings in the Payroll Connection Setup:
- The Department displays either the Project or Group
- The Shift columns display the Resource Type associated to the Users
- Once viewing is complete, click Back to return to the Payroll Batch page.
- Click Post to open the Post Payroll Batch.
- Batch Number: This is a read-only field that displays the automatically generated batch number.
- Post Date *: Click the Calendar icon to select the appropriate date if different from the default date currently displayed.
- Payroll Template: Select a template from the list.
- Within the Overview section you will see the following payroll batch information :
- Total hours
- Total net cost of Money Charges
- Total Money Charges
- Total Payroll with Taxes and Deductions
- Total hours
- From the Export section you can export the transactions.
- Select the appropriate ADP application from the drop-down list.
- Click the Export button to prompt the export.
- Select the appropriate ADP application from the drop-down list.
- The Export Payroll page displays a message, confirming export of all transactions to ADP was either successfully completed or could not be completed with suggested solution.
- When all data is successfully exported, it is to the ADP export file specified in the Payroll Connection Setup.
Note: The exported file name is auto-generated and is overridden each time a payroll batch is exported.
- Click Back to return to the Post Payroll Batch page.
Payable Batches Setup
Payable Connection Setup
To set up a connection to ADP for payable batches:
- From the Icon Bar click Setup .
- From the Navigation Menu click Expense to expand the menu options.
- From the available options click Expense Items.
- Upon the Expense System setup page displaying, click the Payable button.
- Complete the fields and select the options as required on the Payable Setup page:
- Payable system Select the appropriate ADP application from the list:
- ADP HR Partner
- ADP HRizon
- ADP Pay eXpert
- ADP PC/Payroll
- Next batch number *: Enter the number to be used for the next payroll batch, which automatically increments by one (1) each time a new payable batch is created.
- Batch number prefix: Enter a prefix to precede the payable batch number.
Cycle: Set the start date and period of the payable batch cycle
Deprecated as of: Summer Heat 2010 The Based on the Timesheet period option - Start Date: To enter the appropriate start date of the payable batch cycle, if different from the default date that displays, either: Payable Batches Setup
- Key in the date OR
- Click the Calendar icon to select the appropriate date
- Key in the date OR
- Payable cycle is every Enter the number to represent length of the period. then select the cycle period from the list:
- month(s)
- semi-month(s)
- week(s)
- month(s)
- Payable system Select the appropriate ADP application from the list:
- Click Connection, located at the top of the page.
- Upon the Connection page displaying, make the entries and select the options as required :
- Date exchange directory *: Click the Browse button (...) to define where the ADP export file is to be saved.
- Company Code *:Enter the code of the company for which you wish to export the payable data. This code is used in the ADP export file.
- From the ADP Export Options section, select which of the following fields or components are to be exported to the ADP
- Include Multi-Department: Select this option to map the department to the Project ID or the Functional Group ID and enable the associated Header and Map to fields
- Header: Enter a title for the column, if different from the default name, "Temp Dept", under which the Project ID or the Functional Group is displayed.
- Map to: Select from the drop-down, where the department is to be mapped to:
- Group - Select this option to map to the Functional Group.
- Project - Select this option to map to the Project, which is the default selection.
See Multi-Department Sample ADP Export File (with the TEMP DEPT column highlighted), below, once the data has been exported to the ADP file.Note: When the Include Multi-Department option is selected, the group history is taken into consideration.
- Group - Select this option to map to the Functional Group.
- Include EmployeeShift: Select this option to export the Resource Type to the ADP export file and enable the associated Header field- Header: Enter a title for the column, if different from the default name, "Shift", under which the resource types appear.
See Employee Shift Sample ADP Export File (with the SHIFT column highlighted), below, once the data has been exported to the ADP file.Note:
- When the Include Employee Shift is selected:
- The resource type history is taken into consideration, and the information is grouped by resource type
- The Expense amount and Charge amount fields are enabled.
- Employee Shift refers to Resource Type.- For Expense Amount: specify the name of the column under which the expenses display
- Header: Enter the name of the column, if different from the default name, "Adjust Ded".
- Code: Enter the code to which the expense entries are to be associated, if different from the default entry.
- For Charge Amount specify the name of the column under which the money charges display.
- Header: Enter the name of the column, if different from the default name, "Adjust Ded".
- Code: Enter the code to which the money charges are to be associated, if different from the default entry.
See Charge Amount Sample ADP Export File (with the Charge DED Code and Charge DED Amount columns highlighted), below, once the information is exported to the ADP file.Note: The Expense Amount and the Charge Amount fields are enabled upon selecting the Include Employee Shift option.
- For Expense Amount: specify the name of the column under which the expenses display
- Include Multi-Department: Select this option to map the department to the Project ID or the Functional Group ID and enable the associated Header and Map to fields
- Date exchange directory *: Click the Browse button (...) to define where the ADP export file is to be saved.
Multi-Department Sample ADP Export File
| CO Code | Batch ID | File# | TEMP DEP | SHIFT | Charge BED Code | Charge BED Amount |
|---|---|---|---|---|---|---|
| ABC | 27 | 200 | A | 1 | A | -1.00 |
| ABC | 27 | 266 | B | 1 | A | -20.50 |
| ABC | 27 | 282 | A | 1 | A | -90.50 |
| ABC | 27 | 424 | A | 1 | A | -100 |
Employee Shift Sample ADP Export File
| CO Code | Batch ID | File# | TEMP DEP | SHIFT | Charge BED Code | Charge BED Amount |
|---|---|---|---|---|---|---|
| ABC | 27 | 200 | A | 1 | A | -1.00 |
| ABC | 27 | 266 | B | 1 | A | -20.50 |
| ABC | 27 | 282 | A | 1 | A | -90.50 |
| ABC | 27 | 424 | A | 1 | A | -100 |
Charge Amount Sample ADP Export File
| CO Code | Batch ID | File# | TEMP DEP | SHIFT | Charge BED Code | Charge BED Amount |
|---|---|---|---|---|---|---|
| ABC | 27 | 200 | A | 1 | A | -1.00 |
| ABC | 27 | 266 | B | 1 | A | -20.50 |
| ABC | 27 | 282 | A | 1 | A | -90.50 |
| ABC | 27 | 424 | A | 1 | A | -100 |
Generating a New Payable Batch
Prior to generating a Payable batch, the following must be completed:
-
Approval of all Expense Reports and Charge Entries to be included in the Payable Batch.
- Creation of multi-companies.
Creating Expense Reports
The Expense Reports must first be completed and then submitted for approval before they can be included in the Payable Batch.
Note: Expense Reports must be marked as payable to appear in the Payable Batch.
Creating a Company
- From the Icon Bar click Setup .
- From the Navigation Menu click Financial to expand the corresponding menu.
- From the Financial menu items, click System.
- Upon the Financial System page displaying, click the Accounting tab.
- If not already, select Internal from the Accounting System selection box.
- Click Save.
- Click the Companies sub-tab to access the Company list page.
- Click New to create a new Company.
- Complete the fields and select the options, as required, to create a new company.
- Upon creating the company, ensure that it is associated to the appropriate User or Site, through the User Edit or Site Edit pages, respectively.
Note:
- When a company is associated to various objects, based on the hierarchy of association rule, only the objects that are directly associated to the company selected for a Payroll Batch are included in the batch.
- The hierarchy of association rule defines the precedence order as User > Site > Default company, therefore the object with the highest precedence to the associated company is included in the payroll batch.
To generate a new Expense Payable Batch:
Before including the Expense Reports in payable batches, they must be approved, in the workflow state called Include entries in Payable Batch and not already posted.
- From the Icon Bar click Financial .
- From the Navigation Menu click Expense Payable Manager.
Note: You must have the appropriate rights to access the Expense Payable Batches.
- Upon the Expense Payable Batches page displaying, click Create Batch.
Note: By default, the list is filtered based on Open Expense Payable Batches.
- Enter or select the appropriate information:
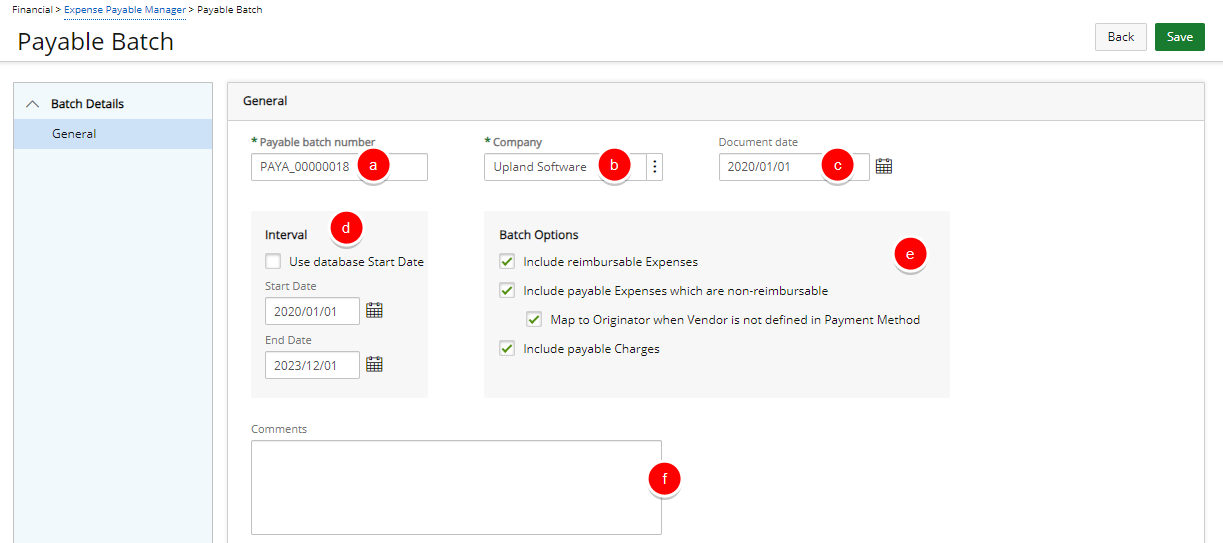
- The Payable Batch Number is automatically generated. You may modify the Payable Batch Number if necessary.
Note: When modifying the Payable Batch Number, ensure the number is unique enough to identify when searching for the batch.
-
Click Browse button located beside the Company to select the company for which the payable batches are processed. The company concept allows you to filter the list of users associated to the selected company.
Companies can be associated to users and sites from the User Edit (under Invoice Options tab) and Site Edit pages, respectively.
- During the payable batch generation process, once a company is selected, the system displays only those users associated to the selected company. If the selected company is not associated to the user, then the system validates the site. If the companies match, then all users associated to the site are displayed.
- If no users and sites are associated to the selected company, and if the selected company is the default company (set under Setup > Financial > System: Defaults), then all other users in the application are processed in the payable batch.
Note: Selecting a company allows the proper export of the users and time entries under that specific company.
- Click the Document date calendar icon to select a date and to define the document date of the Expense Payable Batch. By default, the Document date is set to the date the batch is created. Note:
- The Document date is not restricted to the date range of the payable batch and also not limited by the System or Fiscal start date. The Document date calendar control is editable for non-read only and non-posted payable batches.
- The document date for each payable batch is sent to a financial system, such as ACCPAC or Great Plains, when the payable batches are exported (if applicable). If exporting to Great Plains as a G/L Transaction, the related Doc. Date field in Great Plains must also receive the payable batch’s Document date.
- From the Interval section define the cycle of the expense payable batch. If the start date of the expense payable batch is the same as the application database, then select the Use database start date box. If not, then set the Start Date and End Date of the expense payable batch cycle.
- From the Batch Options section, choose:
- The Include reimbursable Expenses: box to include any expenses marked as Reimbursable in the users' expense reports. If you selected the Include reimbursable expenses option and clicked Next, the Expense Reports page appears. This page includes a list of expenses reports you can include in the payable batch. The page shows the list of all users for whom the Payable batch is processed. By default, all users have their names selected. This page selects specifically users whose expense reports are included in the payable batch. To exclude users, clear the check boxes beside their names. After clicking next, the Expense reports for the Payable Batch are displayed.
- The Include payable Expenses which are non-reimbursable option. When selected, the payable batch not only includes expense entries with the reimbursable flag set but also expense entries with the payable flag set. Then choose Map to Originator when Vendor is not defined in Payment Method if required.
- The Include payable Money Chargesoption to include any money type charges marked as Payable in the users' expense reports. If you selected the Include payable Money Charges check box, the Expense Reports page appears. By default, all users have their names selected. This page selects users with specific charges to be included in the payable batch.
- If there are comments regarding the payable batch, enter them in the Comments box.
- The Payable Batch Number is automatically generated. You may modify the Payable Batch Number if necessary.
- Click Save. Note that once the minimum required information for creating a Payable Batch is entered, upon clicking Save, the page will refresh and show all the other elements that can be completed.
- From the right hand side navigation click Users to select the User(s) from a list of users whose reimbursable expenses and money type charges are included in the payable batch.
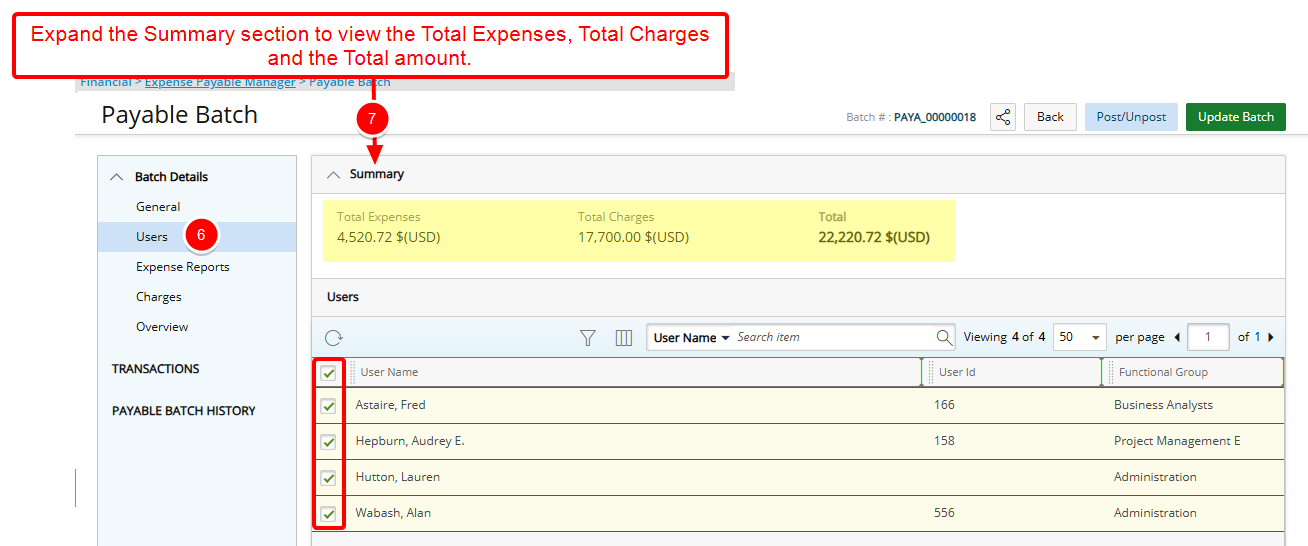
Note: By default, all users have their names selected. To exclude a User, clear the selection box(es) beside their names.
Tip: You may wish to narrow your list results so that you retrieve just the right amount of information you need. To do so you can perform a search. Select either User Name, User Id or Functional Group from the Search By options and then enter a corresponding value in the Search For box. Click the search icon to narrow down the list.
- Expand the Summary section to view the Total Expenses, Total Charges and the Total amount.
- From the right hand side navigation click Expense Reports (Available only when the Include reimbursable expenses selection box is checked). This page includes a list of expenses reports you can include in the Payable Batch. By default, all Expense Reports are selected. To exclude an Expense Report, clear the selection box(es) beside their Tracking #.
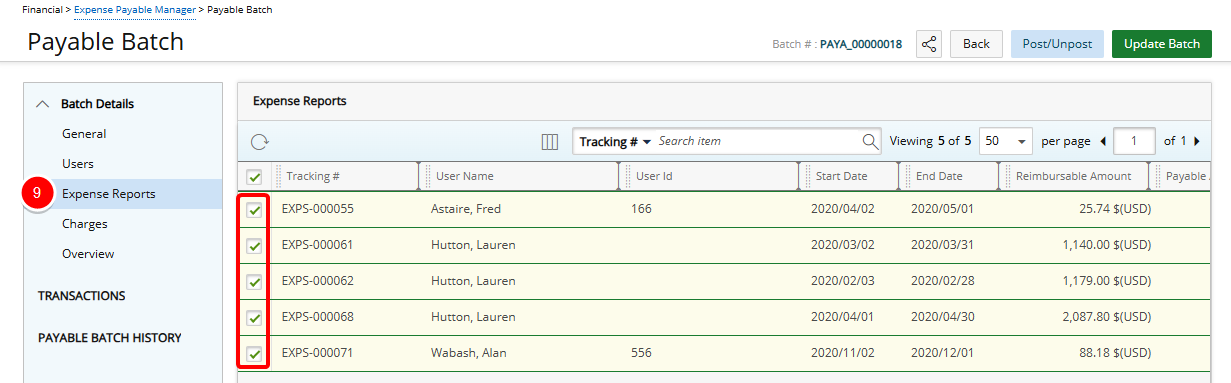
Tip: You may wish to narrow your list results so that you retrieve just the right amount of information you need. To do so you can perform a search. Select either Tracking#, User Name, User Id, Start Date, End Date, Title, Approval Group or Functional Group from the Search By options and then enter a corresponding value in the Search For box. Click the search icon to narrow down the list.
- From the right hand side navigation click Charges (Available only when the Include payable Money Charges selection box is checked). By default, all Charge Entries are selected. To exclude a Charge Entry, clear the box(es) beside their names.
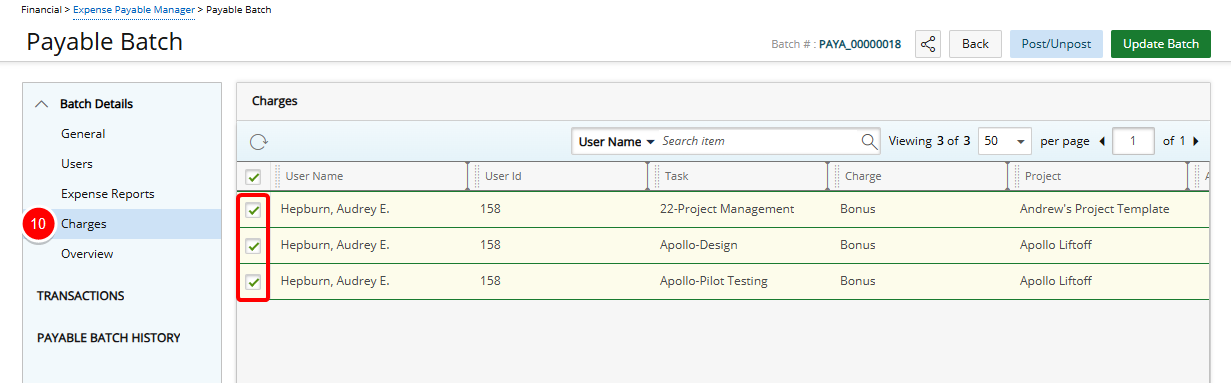
Tip: You may wish to narrow your list results so that you retrieve just the right amount of information you need. To do so you can perform a search. Select either User Name, User Id, Task, Charge or Project from the Search By options and then enter a corresponding value in the Search For box. Click the search icon to narrow down the list.
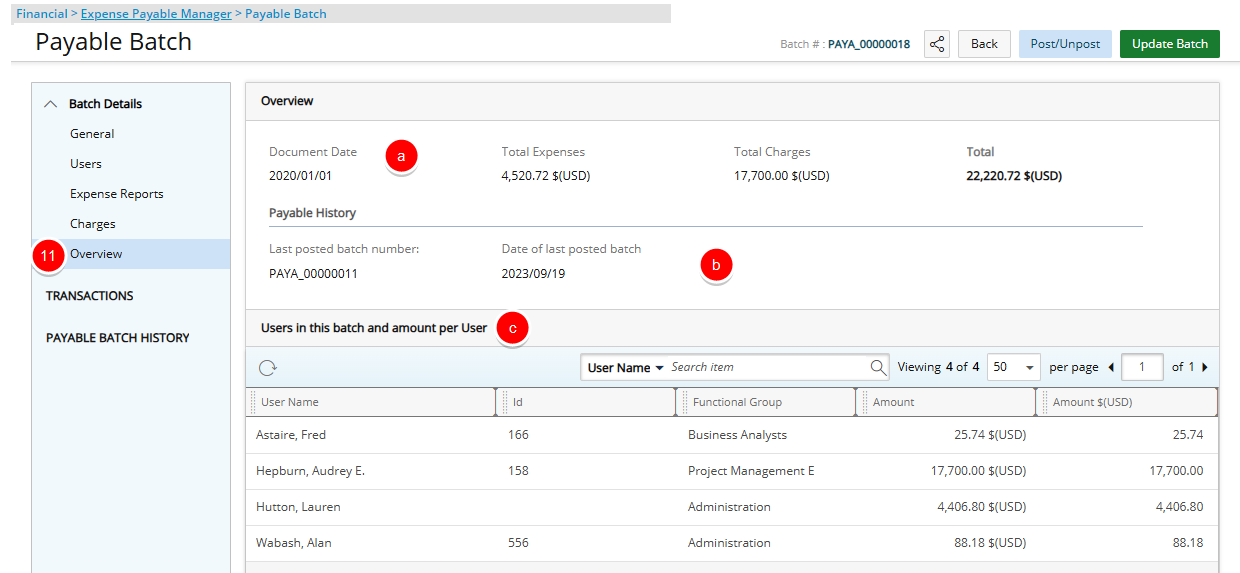
- Click Overview to review your Expense Payable Batch:
- The Document Date, Total Expenses, Total Charges, and Total are displayed on top of the Overview page.
- The Payable History section displays the Last posted batch number and the date when the last batch was posted.
- The Users in this batch and amount per User table
lists all users and the Amounts per User that are included in the batch.
- After reviewing the details of the batch, click Save to save the any changes you may have made.
- Click Back to return to the Expense Payable Manager page and view the newly created Payable Batch.
Exporting a Payable Batch to ADP
Prior to exporting a payable batch, the following must be completed:
All components included in the payable batch, such as the following, must have an ID:
- Projects
- Users
- Groups
- Tasks
- Work Types
- Expense Items
- Charge Items
This ID can be entered in the edit pages of the components. For example the User Setup page, the Project Edit page, Task Edit page, etc.
Note: The ID for the user must be entered in the ADP Value field of the Integration page, accessed from the Employment tab of the User Edit page and clicking the Integration button.
To export an ExpensePayable Batch:
- From the Icon Bar click Financial .
- From the Navigation Menu click Expense Payable Manager.
Note: You must have the appropriate rights to access the Expense Payable Batches.
- Upon the Expense Payable Batches page displaying, you will see the list of Expense Payable Batches.
Note: By default, the list is filtered based on Open Expense Payable Batches.
- Click the payable batch that is to be posted under the Batch Number column.
- The Payable Batch page displays.
- On the Batch tab, click the Post link at the top of the page.
- The Post Payable Batch page displays.
- Batch Number: This is a read-only field that displays the automatically generated Batch Number.
- Post Date *: Click the Calendar icon to select the appropriate date if different from the default date currently displayed.
- Payable template: Select a template from the drop-down list.
- The Overview displays read-only fields containing the following payable batch information being posted:
- Total expenses
- Total money charges
- Total
- Total expenses
- From the Export section:
- Select the appropriate ADP application from the drop-down list.
- Click the Export button to prompt the export.
- Select the appropriate ADP application from the drop-down list.
- The Export Payable Batch page displays a message, confirming export of all transactions to ADP was either successfully completed or could not be completed with suggested solution When all data is successfully exported, it is to the ADP export file specified in the Payable Connection Setup.Note: The exported file name is auto-generated and is overridden each time a payable batch is exported.
- Click Back to return to the Post Payable Batch page.