The Upland PSA Time Tracking app in Jira streamlines your workflow by syncing time tracking data from Jira to PSA. This one-way integration ensures that all recorded time is accurately reflected in PSA, maintaining consistency across platforms and eliminating the need for manual updates.
PSA Technical Support is a team of Application Support Analysts trained to use, configure, and troubleshoot PSA in your specific enterprise environment.
If you have any questions, you can reach us by sending us an email.
The PSA Software license agreement was reviewed and accepted during the installation procedure of this software in your environment. Copyright © 2026 Upland Software. All rights reserved. You may not photocopy or share this document with any other party without express written permission from Upland Software Inc..
This guide walks you through the key steps to successfully use the Upland PSA Time Tracking app in Jira. You will learn how to set up the integration, log time entries directly within Jira, and manage those entries efficiently. Whether you’re entering new time or removing logged hours, this guide ensures your data stays in sync to PSA with minimal manual effort.
Set Up the Integration
Set up the Integration in PSA
- From the Icon Bar click Integrations
 .
. - From the Navigation Menu click Jira.
- From the General tab, select Enable Integration to activate the integration between PSA and Jira.
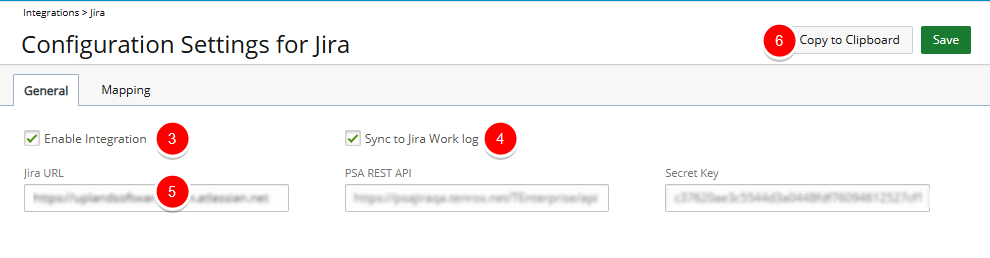
Note: This page is accessible only if the Jira integration License is enabled and the logged-in user has the necessary Jira Integration security permission (Setup > Organization > System > Security > Security Profile > Tools) to configure the integration.
- When Sync to Jira Work Log is enabled, a single time entry is created per day in the Jira Work Log, with all associated notes combined.
- Enter your Jira URL where the data will be synchronized.
- Click Copy to Clipboard to copy the PSA configuration data.
Understanding Sync to Jira Work Log Setting
The Sync to Jira Work Log setting controls whether time logged in Jira also appears in Jira’s native Work Log tab, in addition to being stored in PSA.
- When enabled, a single time entry is created per day in the Jira Work Log, with all associated notes combined.
- When not enabled, time entries made in Jira are stored only in PSA and do not appear in Jira’s native Work Log.
Note: The sync is one-directional, from Jira to PSA. If you rely solely on Jira’s native Work Log, be aware that time entries may not appear there unless this setting is enabled.
Example: If a user logs 3 hours of work on an issue in Jira, that time will be visible in PSA for tracking and reporting purposes. However, the Jira issue itself will not display the 3 logged hours in its Work Log tab.
Set up the Integration in Jira
- Navigate to your Jira URL and click Apps.
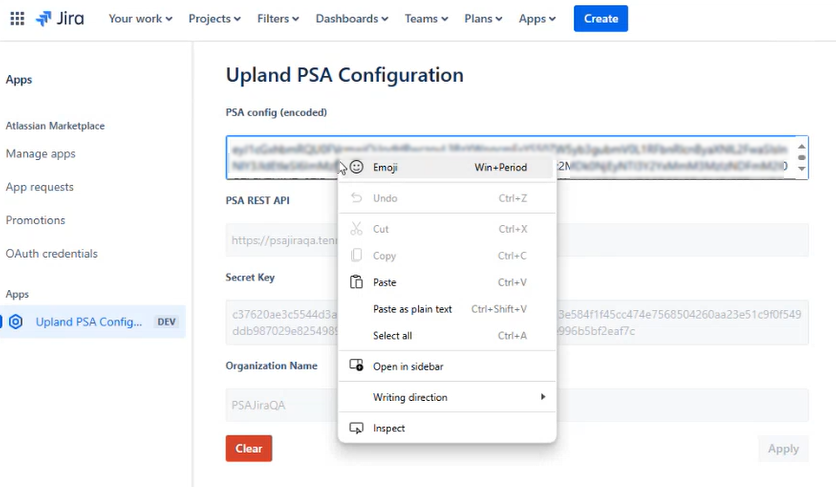
- Select Manage your apps.
- In the Upland PSA Configuration page, paste the previously copied PSA configuration data.
- Click Apply to establish the connection.
Log Time in Jira
Once the integration is successfully set up, follow these steps to log time in Jira:
- Open your web browser and sign into Jira with your credentials.
Note: User mapping between Jira and PSA is based on the email address. The user's email in Jira must match their email in PSA to ensure proper synchronization of Time Entries.
- Locate and open the Jira ticket where you want to log time.
- Within the Jira ticket, look for the Upland PSA Time Tracking section located on the right panel of the page and click the down arrow to expand it.
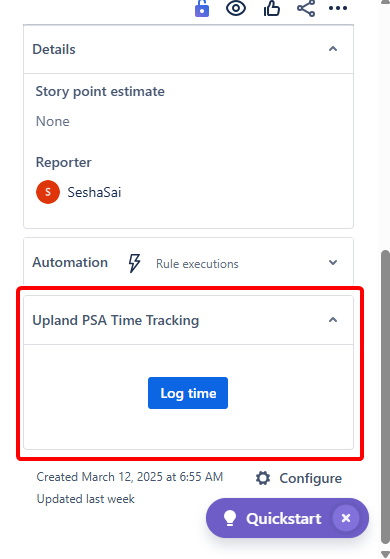
Note: This section becomes available only when the integration is enabled.
- You will see a Log Time button. When you click this Log Time button, a time entry form will appear.
Note: The Log Time button is displayed only once per Jira session. After clicking it, the button will no longer be visible for the duration of the session. A new session begins only when you log out of Jira and log back in.
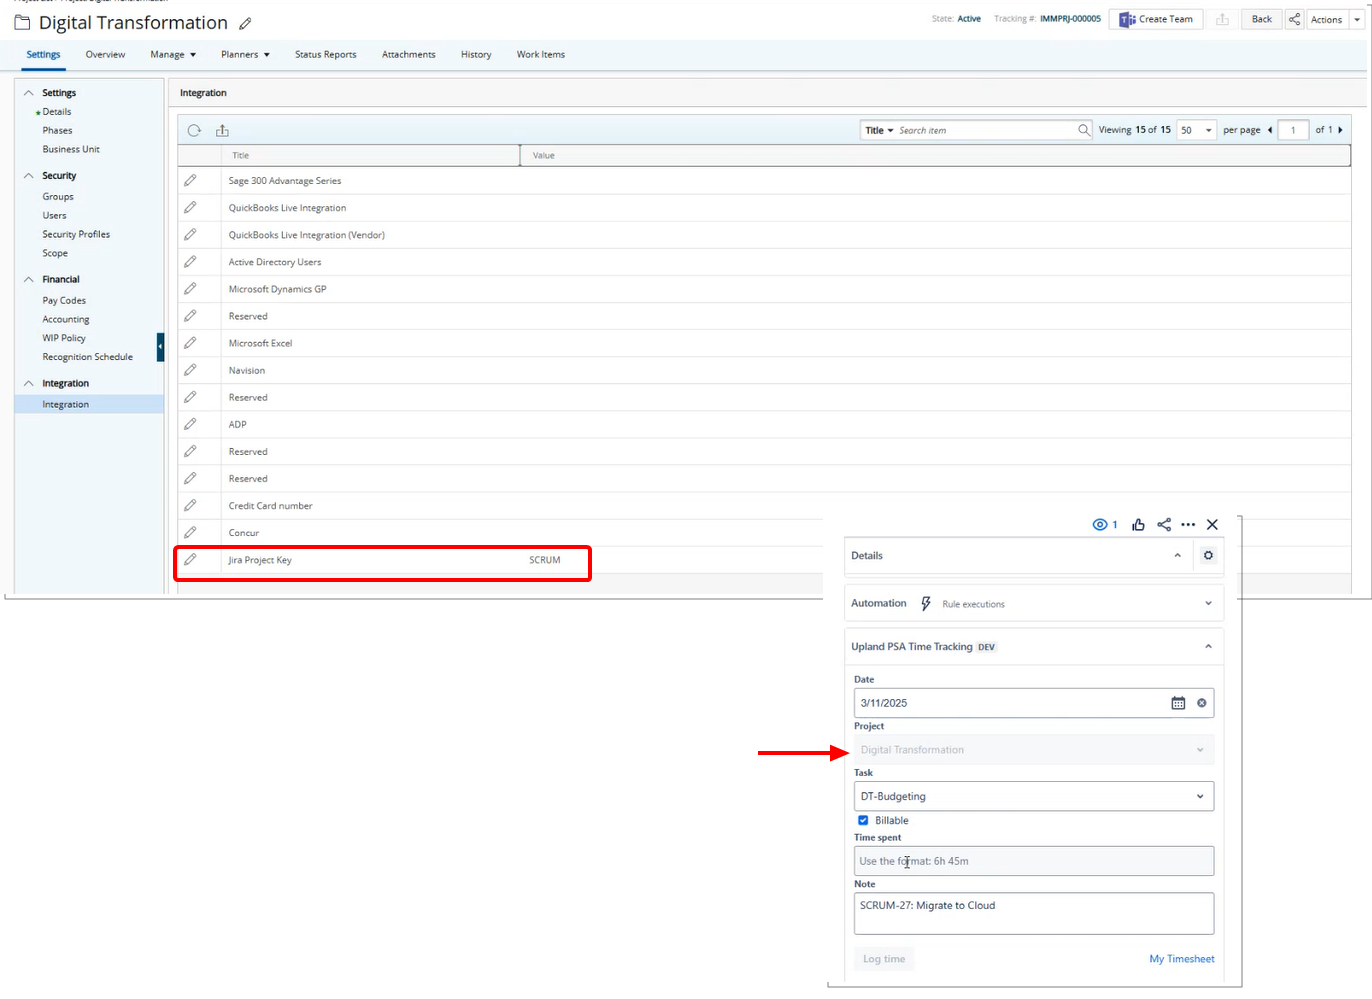
- The following fields will be available to you:
- Date: The date of the Time Entry
- Project: Select the relevant project.
- Task: Choose a Task associated with the selected Project for the Time Entry.
Note: When you log time for a Task, it will stay selected when you go back to the Jira ticket, but only if you still have access to the Task.
The following checkboxes determine how the corresponding Time Entry is classified in Upland PSA. When a checkbox is selected in Jira, the related attribute is automatically checked for the Time Entry created in PSA.
Jira Checkbox Description Billable Marks the Time Entry as Billable in PSA. Payable Marks the Time Entry as Payable in PSA. Capitalized Marks the Time Entry as Capitalized in PSA. Funded Marks the Time Entry as Funded in PSA. R&D Marks the Time Entry as R&D in PSA. Note: The Time Entry attribute checkboxes in Jira are available based on the Timesheet Template associated with the logged-in user in PSA. Only the attributes included in that Template will appear in Jira.
Example: If the user’s Timesheet Template includes only the Billable attribute, then only the Billable checkbox will be visible in Jira.
- Time Spent: Enter the total time spent on the task. Both positive and negative values are allowed.
- A Note is automatically generated with the Jira ticket ID and Jira Summary.
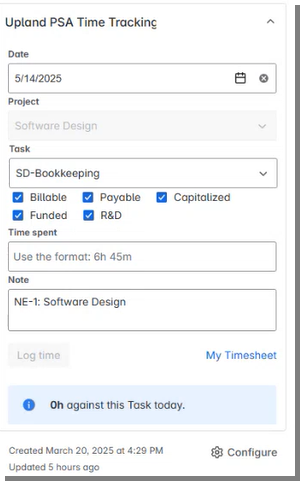
Tip: You can navigate to PSA by clicking My Timesheet.
- Click the Log Time to log the time spent on the task.
- Status messages will indicate whether the action was successful or if it failed.
- If the action is successful: The Time Entry, including both positive and negative values, will be logged directly into PSA against the selected Date, Project, Task, and the attribute (Billable/Payable/Capitalized/Funded/R&D) flag(s) in My Timesheet.
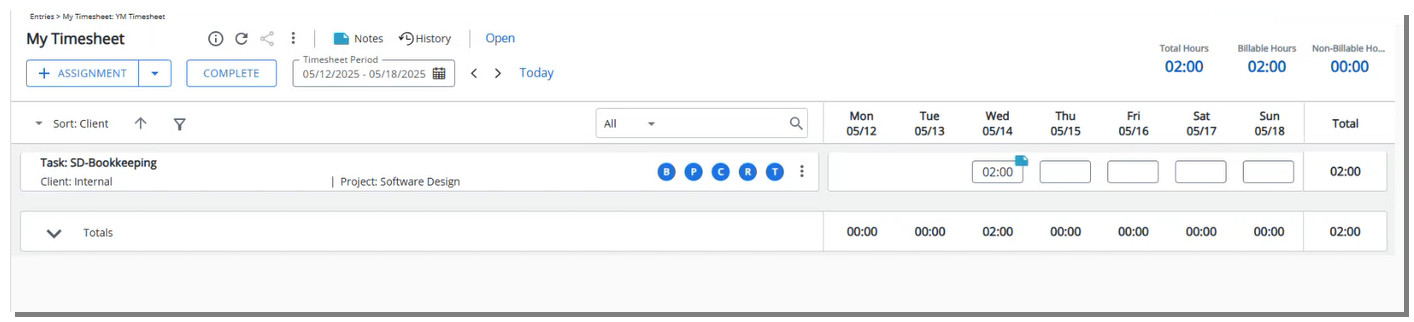
Caution: Any additional fields configured through the Timesheet Template will be set to their default values in My Timesheet.
Understanding Time Removal and Adjustment Logic
When you remove logged time by entering a negative value in Jira, the system first checks if the amount you are removing is equal to or less than the time that needs to be corrected.
Example:
- If you remove 2 hours, and the correction allows for 2 hours or more, it will be removed normally.
- If you enter 5 hours, but only 3 hours can to be corrected, the system will adjust it to 0 and notify you that 3 hours were removed so you can manually adjust the remaining 2 hours elsewhere.
How the system validates time before reducing:
- Jira side: The system checks if the total logged time for the selected date is enough. If not, an error appears.
- PSA side: The system checks if your timesheet has enough time logged for the selected Task, User, and Billable status. If not, an error appears.
How time is reduced:
- On PSA: The system removes time from the largest entry first. If one entry doesn’t have enough time, it removes it completely and continues with the next one. This means some entries may be removed while others are adjusted.
- On Jira: Entries are reduced in the order Jira provides them. If the first entry doesn’t have enough time, it is removed, and the system moves to the next one. Again, some entries may be removed while others are adjusted.
Note: In this release, any Notes associated with negative values entered in Jira will not be saved in PSA. This behavior is specific to negative values and does not apply to positive Time Entries.
Mapping of Jira Project Key
A Jira Project Key setting is available on the Integration page when modifying a Project. This setting enables you to enter the Jira Project Key. Once the mapping is configured, the Project field in Jira will be automatically populated with the mapped Projects that the user has access to (dependent on User permissions in Upland PSA).
Jira Project Key in Project Edit
-
From the Icon Bar click Project List
 .
. -
Upon the Project List displaying, click the name of the Project you wish to access.
-
From the Settings navigation menu click Integration.
- Click the Edit
 button located against the Jira Project Key.
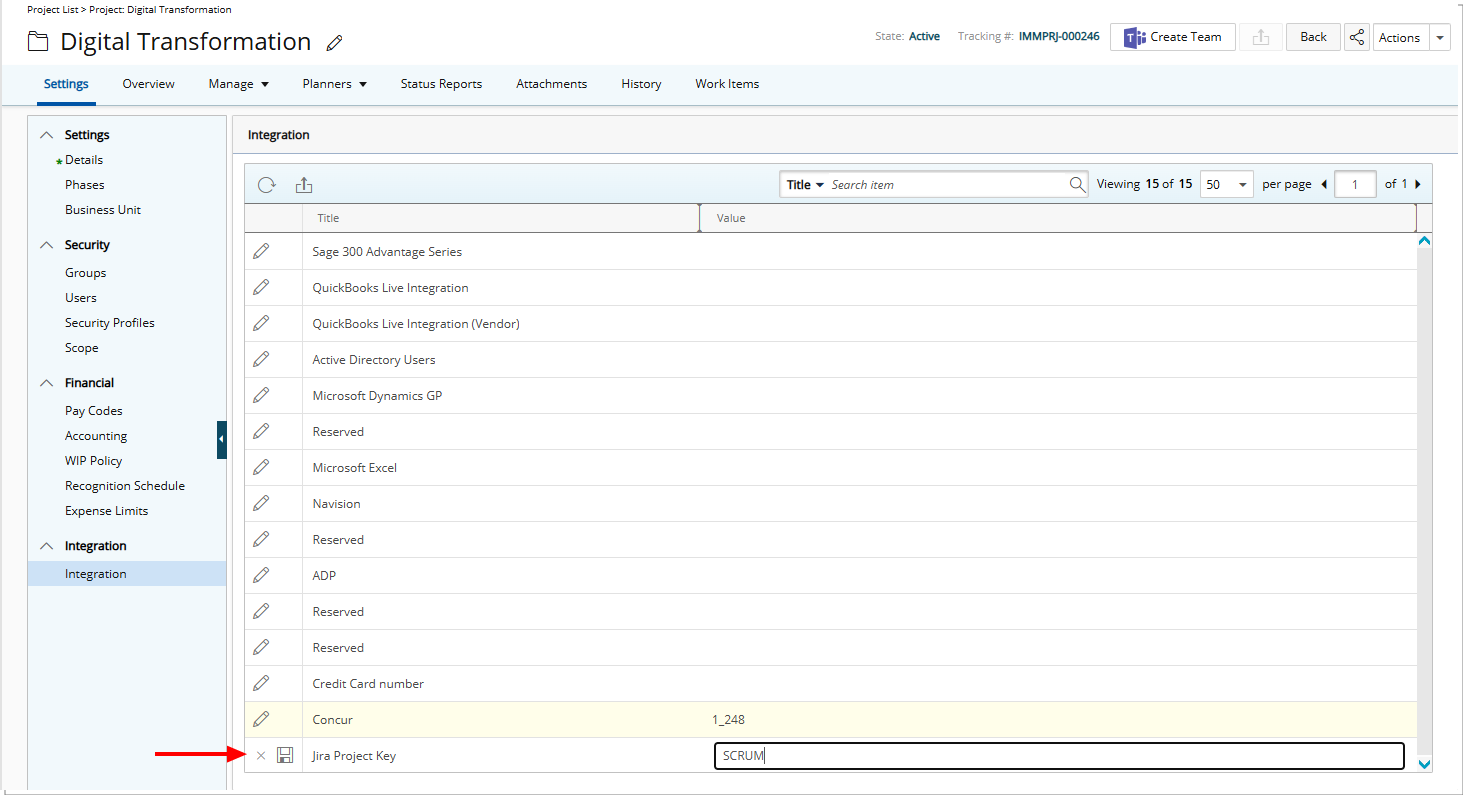
- Inline editing will be enabled, allowing you to enter the new Value.
- Click Save
 .
.
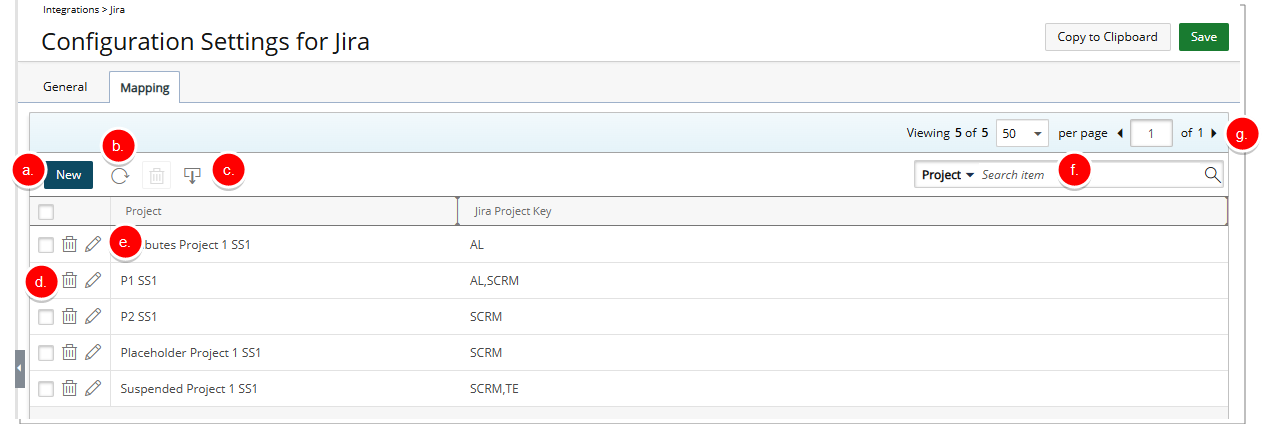
Jira Project Key in Configuration Settings
This mapping can also be configured from the Mapping tab within the Configuration Settings for Jira page (Integrations > Jira), where you can manage and create mappings as needed.
- From the Icon Bar click Integrations .
- From the Navigation Menu click Jira.
- Navigate to the Mapping tab.
- From where you can:
- Create a New mapping.
- You can Refresh
 the list.
 - Import from Excel

- Click Delete
 to remove a mapping.
 - Modify an Existing mapping click the Edit button
- Search
 for a Project by Project Name or Jira Project Key.
 - Pagination is available to facilitate easy navigation across pages.
Bulk Project Mapping via Excel Import
Upland PSA supports bulk mapping of PSA Projects to Jira Projects through an Excel import, streamlining the initial configuration of the Jira integration. This enhancement allows administrators to associate multiple projects in a single action, eliminating the need for manual, one-by-one mappings. The feature helps accelerate integration setup and ensures consistency across project connections between PSA and Jira.
To import project mappings in bulk
- Navigate to Mapping tab.
- Click Import from Excel .
- On the Import Project Mapping page click Download Import Template.
- The system downloads an Excel file with the correct column structure.
- Open the downloaded Excel template.
- Enter the project mapping information in the following columns:
- Project Code (required): Must match an existing PSA Project Code.
- Project Name (for reference): For validation only; imported from PSA.
- Jira Project Key: Enter the corresponding Jira Project Key.
- Override Existing:
- Enter 1 to replace existing Jira Project Keys.
- Enter 0 to append new keys to existing ones (separated by commas).
- Save the Excel file.
- Return to the Import Project Mapping page in PSA.
- Click Browse button against the File field, and then select your completed Excel file.
- Click Import.
-
Review the import results on-screen.
The system displays success, warning, or error messages for each record.
- Confirm the imported mappings:
- Go to Integration > Jira > Mapping to view all mappings,
or - Open an individual project via Project List > Project Edit > Settings > Integrations.
- Go to Integration > Jira > Mapping to view all mappings,
Notes
- For successful imports, only the import start and end times are logged in the Import Status field.
- Ensure that all Project Codes exist in PSA before importing.
- Verify that Jira Project Keys are valid.
- Keep a copy of the import file for audit or rollback purposes.