PSA and Microsoft Dynamics CRM Integration
About this Guide
This guide describes the procedures for setting up integration between Microsoft Dynamics CRM and PSA, as well as mapping, importing and exporting objects between PSA and Microsoft Dynamics CRM.
This guide is used to integrate Microsoft Dynamics CRM with the PSA.
PSA Technical Support is a team of Application Support Analysts trained to use, configure, and troubleshoot PSA in your specific enterprise environment.
If you have any questions, you can reach us by sending us an email.
The PSA Software license agreement was reviewed and accepted during the installation procedure of this software in your environment. ©2026 Upland Software, Inc. All rights reserved. You may not photocopy or share this document with any other party without express written permission from Upland Software Inc..
PSA and Microsoft Dynamics CRM Integration
The integration of Microsoft Dynamics CRM and the PSA application offers users the flexibility to manage sales, marketing, and customer service operations, while using PSA to manage people, projects and business processes more efficiently by:
- Automating repetitive tasks
- Tracking actuals (time and expense)
- Centralizing internal business process activities and generating detailed, real-time analysis reports to analyze operations, as well as reduce costs, meet budgets, and improve project and service delivery
Setting Up Integration Between PSA and Microsoft Dynamics CRM
For integration purposes, Microsoft Dynamics CRM is the primary and PSA the secondary to ensure that only one set of data exists in both applications. For example, if changes are applied to an object in Microsoft Dynamics CRM that has already been imported into PSA, then Microsoft Dynamics CRM (primary) performs an update in PSA (secondary) when the object is re-imported. However, if PSA Key Performance Indicators (KPIs) are associated to the Microsoft Dynamics CRM projects, then the KPIs are tracked in PSA and updated in Microsoft Dynamics CRM. For more information, see Mapping PSA KPIs to the Microsoft Dynamics CRM Fields.
Note: The master/slave model is a communication protocol that is used to define the primary application (master) that controls and updates the objects of the secondary application (slave).
The integration process between PSA and Microsoft Dynamics CRM consists of the following steps:
- Supported Microsoft Dynamics CRM version
- Configuring the PSA CRM Integration Package.
- Setting Up the Connection to Microsoft Dynamics CRM.
- Mapping Objects Between Microsoft Dynamics CRM and PSA.
- Mapping PSA KPIs to the Microsoft Dynamics CRM Fields.
- Importing Users and Contacts from Microsoft Dynamics CRM into PSA.
- Setting up Automated (Batch) Processing.
- Exporting Projects from Microsoft Dynamics CRM into PSA.
Note: Only users with administrative rights Microsoft Dynamics 365 can perform the integration setup process.
Supported Microsoft Dynamics CRM version
Latest Dynamics 365 Online: 2025 release wave 2 enabled
- Server version: 9.2.25112.00171
- Client version: 1.4.11291-2511.2
Note: The new Unified Interface is supported.
Configuring the PSA CRM Integration Package
The PSA CRM Integration package is configured in the Microsoft Dynamics CRM environment to support integration with PSA. The configuration of the PSA CRM Integration package consists of the following steps:
- Importing the PSA CRM Integration Package
- Customizing the PSA CRM Objects
- Setting Up User Integration Between PSA and Microsoft Dynamics CRM
- Setting the Upland PSA Import Flag in Microsoft Dynamics 365
Importing the PSA CRM Integration Package
The PSA CRM integration package maps the Microsoft Dynamics CRM objects to the PSA objects by customizing Projects, Accounts, Contacts and Users upon import.
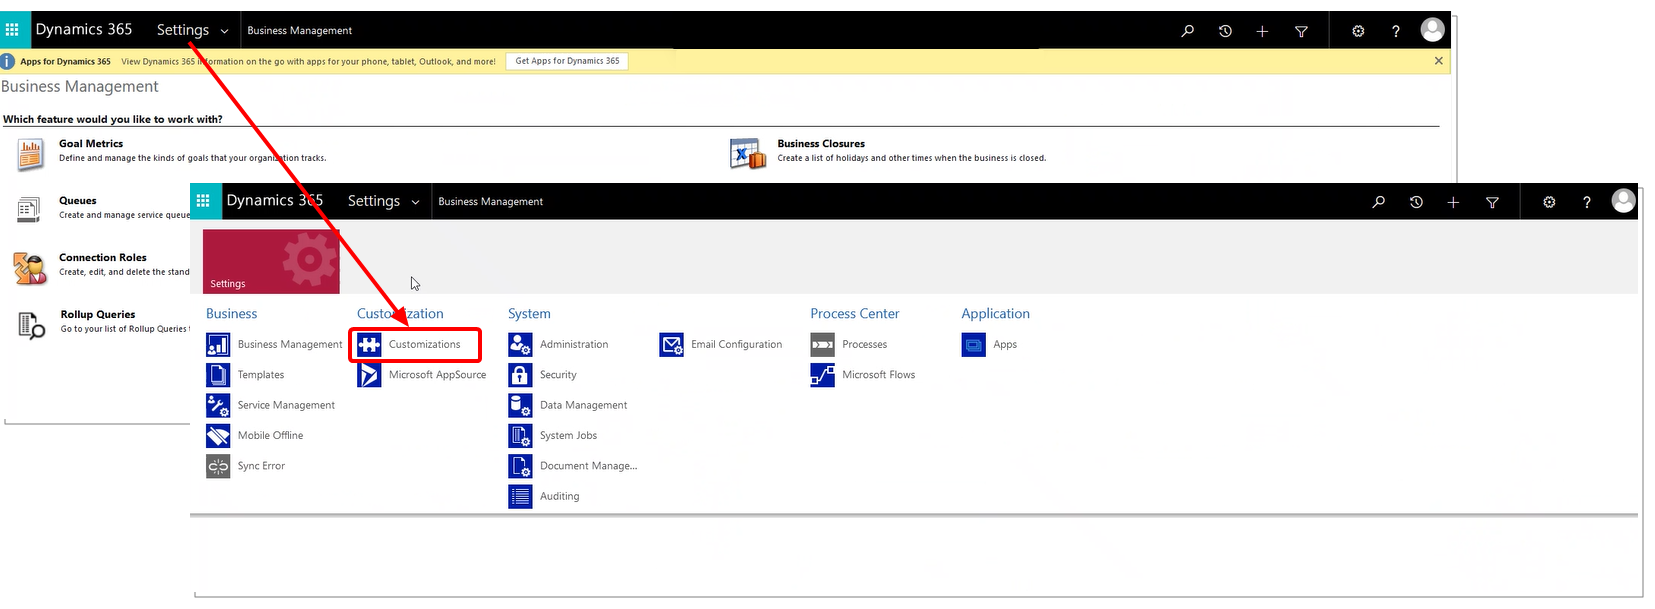
- Log on to Microsoft Dynamics CRM and then click Settings in the navigation pane.
- Under Customization, click Solutions and then click the Import button to open the Import Solutions dialog box.
- Click the Browse button to locate the Tenrox CRM integration package.
Note: This package is provided to you by the PSA team. For assistance, please contact PSA Support.
- Then click Next to process the files.
- Click View solution package details to view a list of the components that were imported and then click Close.
Note: If any of the components are not processed successfully, an error message is displayed.
- Click Next to import the customizations and then click Close to close the dialog box that displays whether the import process was successful or not.
- Click Publish All Customizations to simultaneously publish the customizations for the unpublished components.
Note: The imported customizations must be published before they are available.
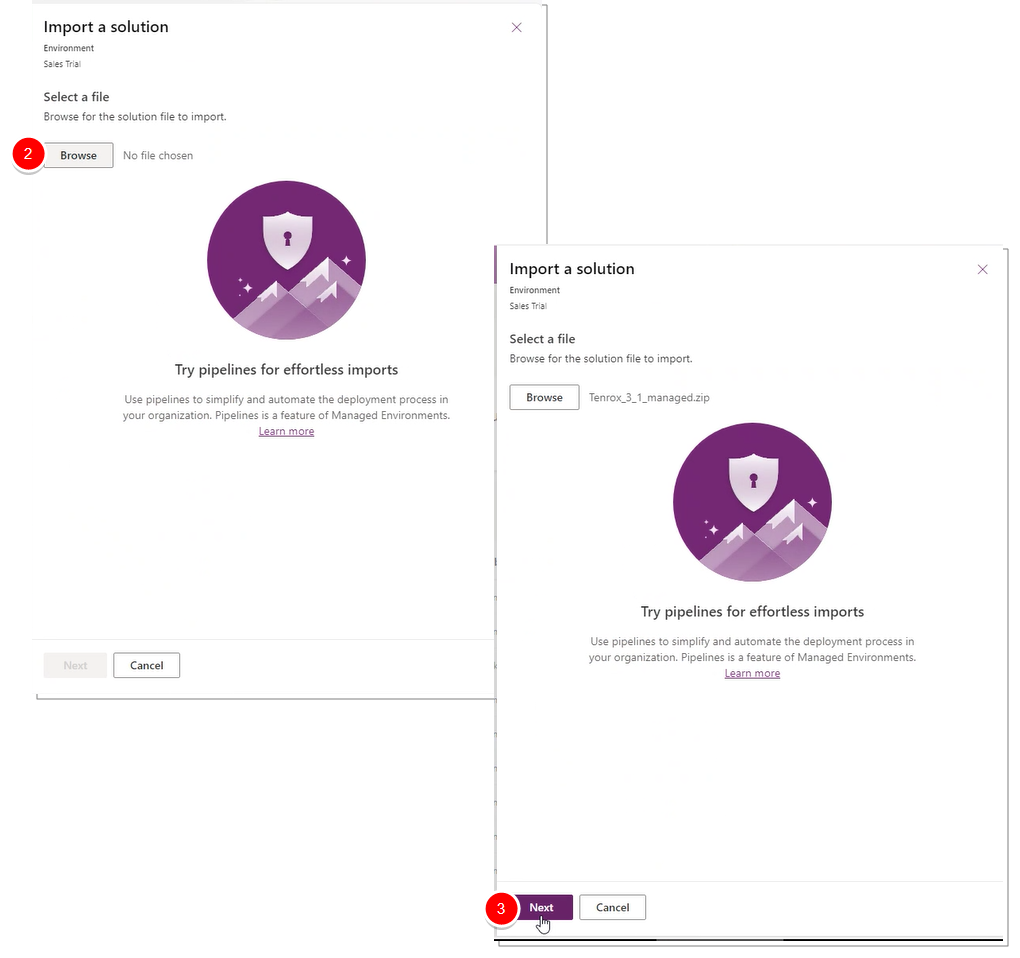
- From Power Apps, click Import Solutions.
- From the Import a solution screen on the right, click Browse and select the Tenrox CRM integration package.
Note: Please reach out to PSA Support for the Tenrox CRM integration package.
- Click Next.
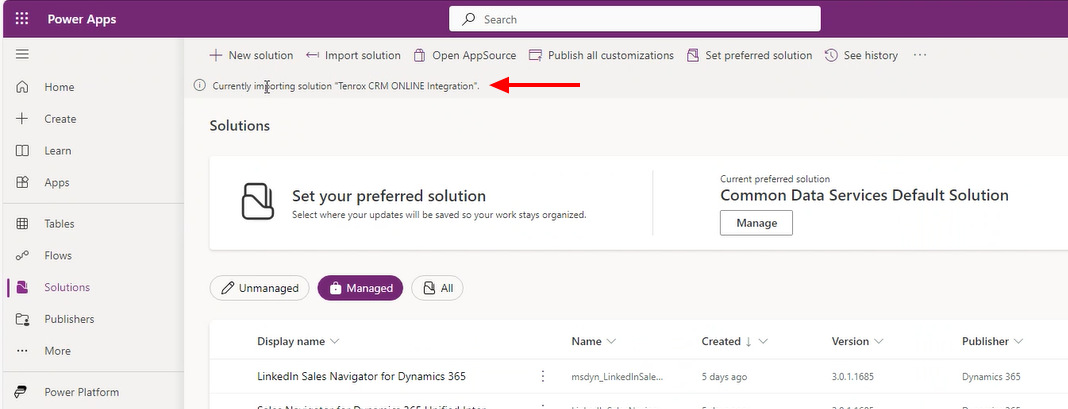
- View the details of the Managed Solution and then click Import.
- While the package is being imported, note that an information icon will be displayed with the following information: Currently importing solution "Tenrox CRM ONLINE Integration".
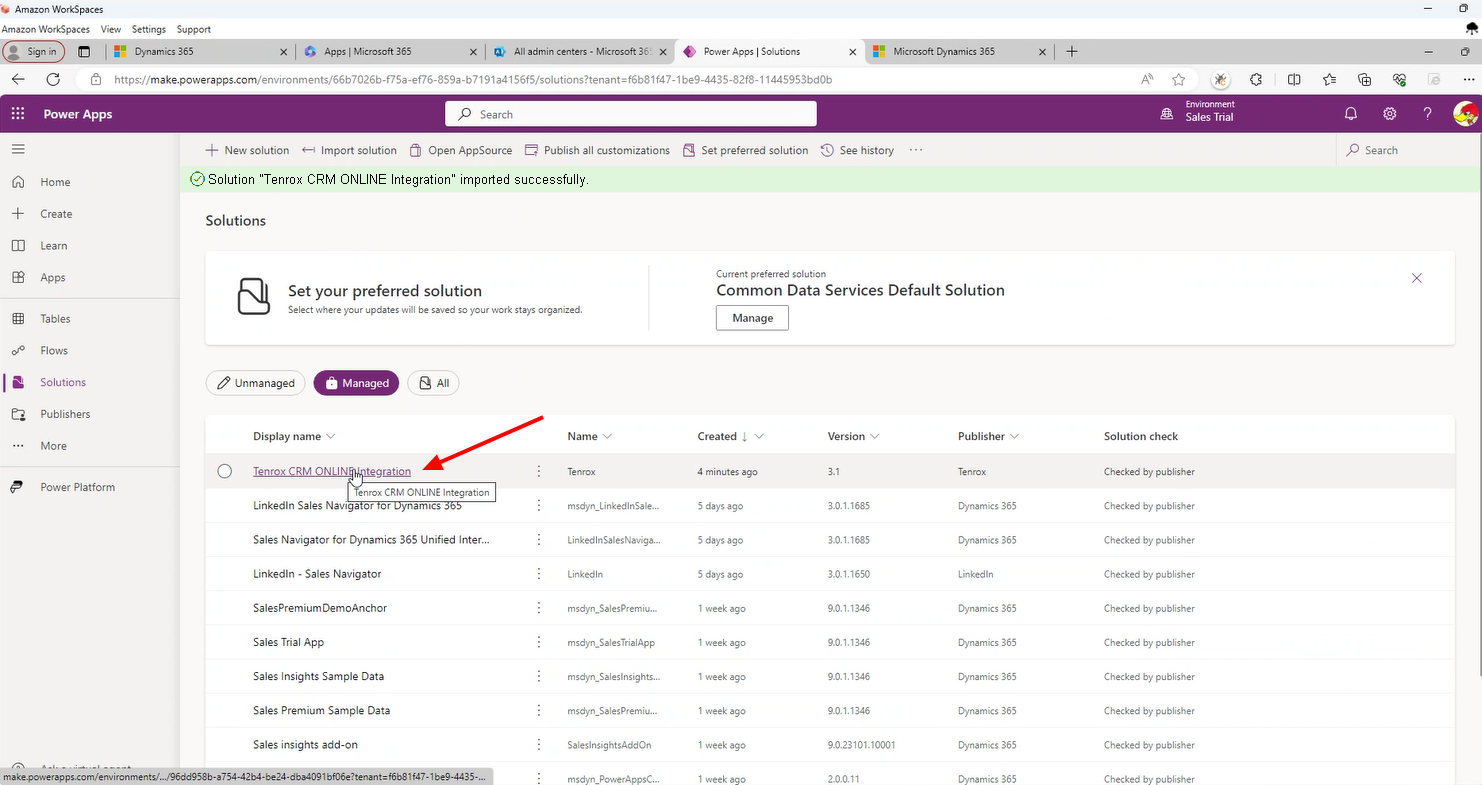
- When the import process is completed the Tenrox CRM Online Integration package will be listed under the solutions table and a green success message will be displayed.
Customizing the PSA CRM Objects
After the customizations are imported into Microsoft Dynamics CRM, the Account and Project objects are modified to establish a connection between Microsoft Dynamics CRM and PSA.
To customize the PSA CRM objects:
- Log on to Microsoft Dynamics CRM and then click Settings in the navigation pane.
- Under Customization, click Customizations and then click the Customize the System link.
- Click Web resources in the navigation pane to display the objects imported by PSA.
- Click the Project Milestones respectively to open the Publish to Upland PSA dialog box for each of the selected objects.

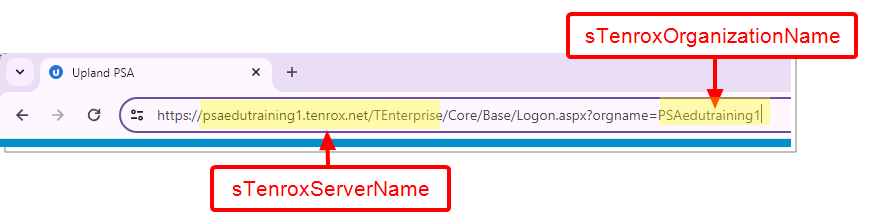
- Under Section to fill, enter the values for:
- sTenroxServerName
- sTenroxOrganizationName = '';
Note: The sTenroxServerName is part of the URL when accessing PSA. As an example, if your PSA URL is: https://yourcopamnyname.tenrox.net/TEnterprise/Core/Base/Logon.aspx?orgname=yourcopamnyname; Then your:
- sTenroxServerName = psaedutraining1.tenorx.net/Tenterprise
and - sTenroxOrganizationName = PSAedutraining1.
Example:
//////////Section to fill
var sTenroxServerName = ''; // ex: PSAedutraining1.Tenrox.net/tenterprise
var sTenroxOrganizationName = 'PSAedutraining1';
///////////
Where:
- Click OK to close the form editor and then click Save and Close to save the changes and close the Web Resource page for the selected object.
- Click the Save and Close button to save the changes and close the Web resources page.
- To Publish Tenrox_Account_main and Tenrox_Project_main, click on Publish All Customizations.
Setting Up the Connection to Microsoft Dynamics CRM
Before users can integrate with Microsoft Dynamics CRM, a connection must first be established between Microsoft Dynamics CRM and PSA. The connection to Microsoft Dynamics CRM is configured using the PSA application.
To set up the Microsoft Dynamics CRM connection:
- Log on to the PSA application.
- Navigate to the CRM Integration page:
- From the Icon Bar click Integrations
 .
. - From the Navigation Menu click CRM.
- From the Icon Bar click Integrations
- Select the CRM System select Microsoft Dynamics CRM Online and then click Save.
- Enter the URL of the server where Microsoft Dynamics CRM is installed, as well as the Logon ID and Password of the Microsoft Dynamics CRM user.
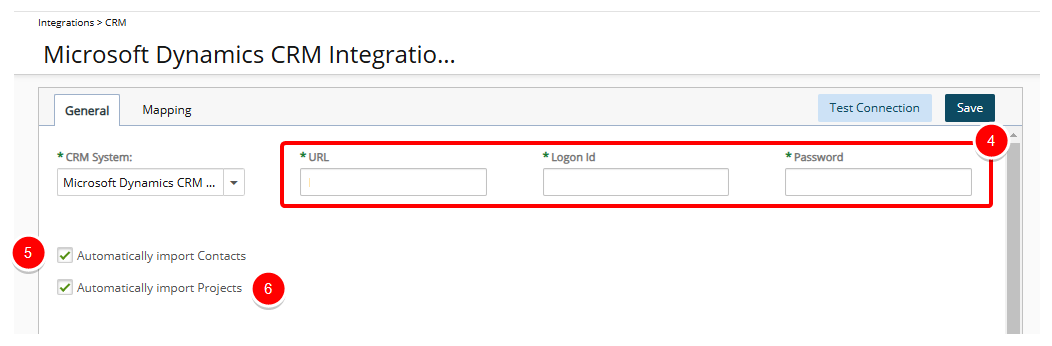
- Select the Automatically import Contacts check box to automatically import a client's associated contacts for a project when the accounts are imported from Microsoft Dynamics CRM to PSA.
- Select the Automatically import Projects check box to automatically import all projects created in Microsoft Dynamics CRM to PSA.
Note: If the Automatically import Contacts and the Automatically import Projects options are not selected, the contacts associated with the client and the projects created in Microsoft Dynamics CRM are not automatically imported to PSA when the CRM Users and Contacts Import and CRM Data Exchange services are running. For more information, see Setting up Automated (Batch) Processing.
- Click the Test Connection link to verify the connection between PSA and Microsoft Dynamics CRM.
- Click Save to save the changes.
- Click the Mapping tab to display a list of fields that can be mapped between the Microsoft Dynamics CRM and PSA; for more information, see section Mapping Objects Between Microsoft Dynamics CRM and PSA.
Setting Up User Integration Between PSA and Microsoft Dynamics CRM
Caution: To be able to publish from Microsoft Dynamics CRM to PSA, Microsoft Dynamics CRM user must be imported to PSA first.
Steps to import Users to PSA:
- Login to Microsoft Dynamics CRM.
- Navigate to Customer Service Admin center.
- From the navigation menu click User Management.
- Click Manage Users.
- Click the required User Name.
- Locate the TenroxImportFlag option to define whether or not the selected user will be imported into PSA. Select Yes to import the user into PSA or No to not import the user into Tenrox.
Note: Tenrox ID must be left empty. Upon a successful import from Microsoft Dynamics CRM to PSA this ID will be then be populated.
- Click Save to save the user.
- Login to PSA as an administrator.
- Go to Tools tab, expand import menu, and choose CRM.
- Check the checkbox for Import Users; then, click on Import.
Now the Microsoft Dynamics CRM user is ready to be used in publishing projects from CRM into PSA.
- Tenrox ID: displays a unique identifier for each user published to PSA; a unique identifier is created for each new user imported into PSA.
Note: The unique identifier is created automatically in PSA and should never be modified in Microsoft Dynamics CRM since the identifier is used to map the user between PSA and Microsoft Dynamics CRM.
- TenroxImportFlag: defines whether a selected CRM user is imported into PSA.
Note: The Tenrox ID and TenroxImportFlag can be dragged and dropped in any section of the form.
Note: For Microsoft CRM Dynamics Online, users should be added to the CRM through Office365 Customer Service Admin center.
Setting the PSA Import Flag in Microsoft Dynamics 365
The Upland PSA Import Flag with Yes/No options is available when modifying a Project in Microsoft Dynamics 365.
By default, the Upland PSA Import Flag is set to Yes for all Projects created after the 2024 R3.0 RELEASE, ensuring that newly created projects in Microsoft Dynamics 365 will be automatically imported into PSA either when published from Microsoft Dynamics 365 or through the CRM Data Exchange Automation Process from PSA.
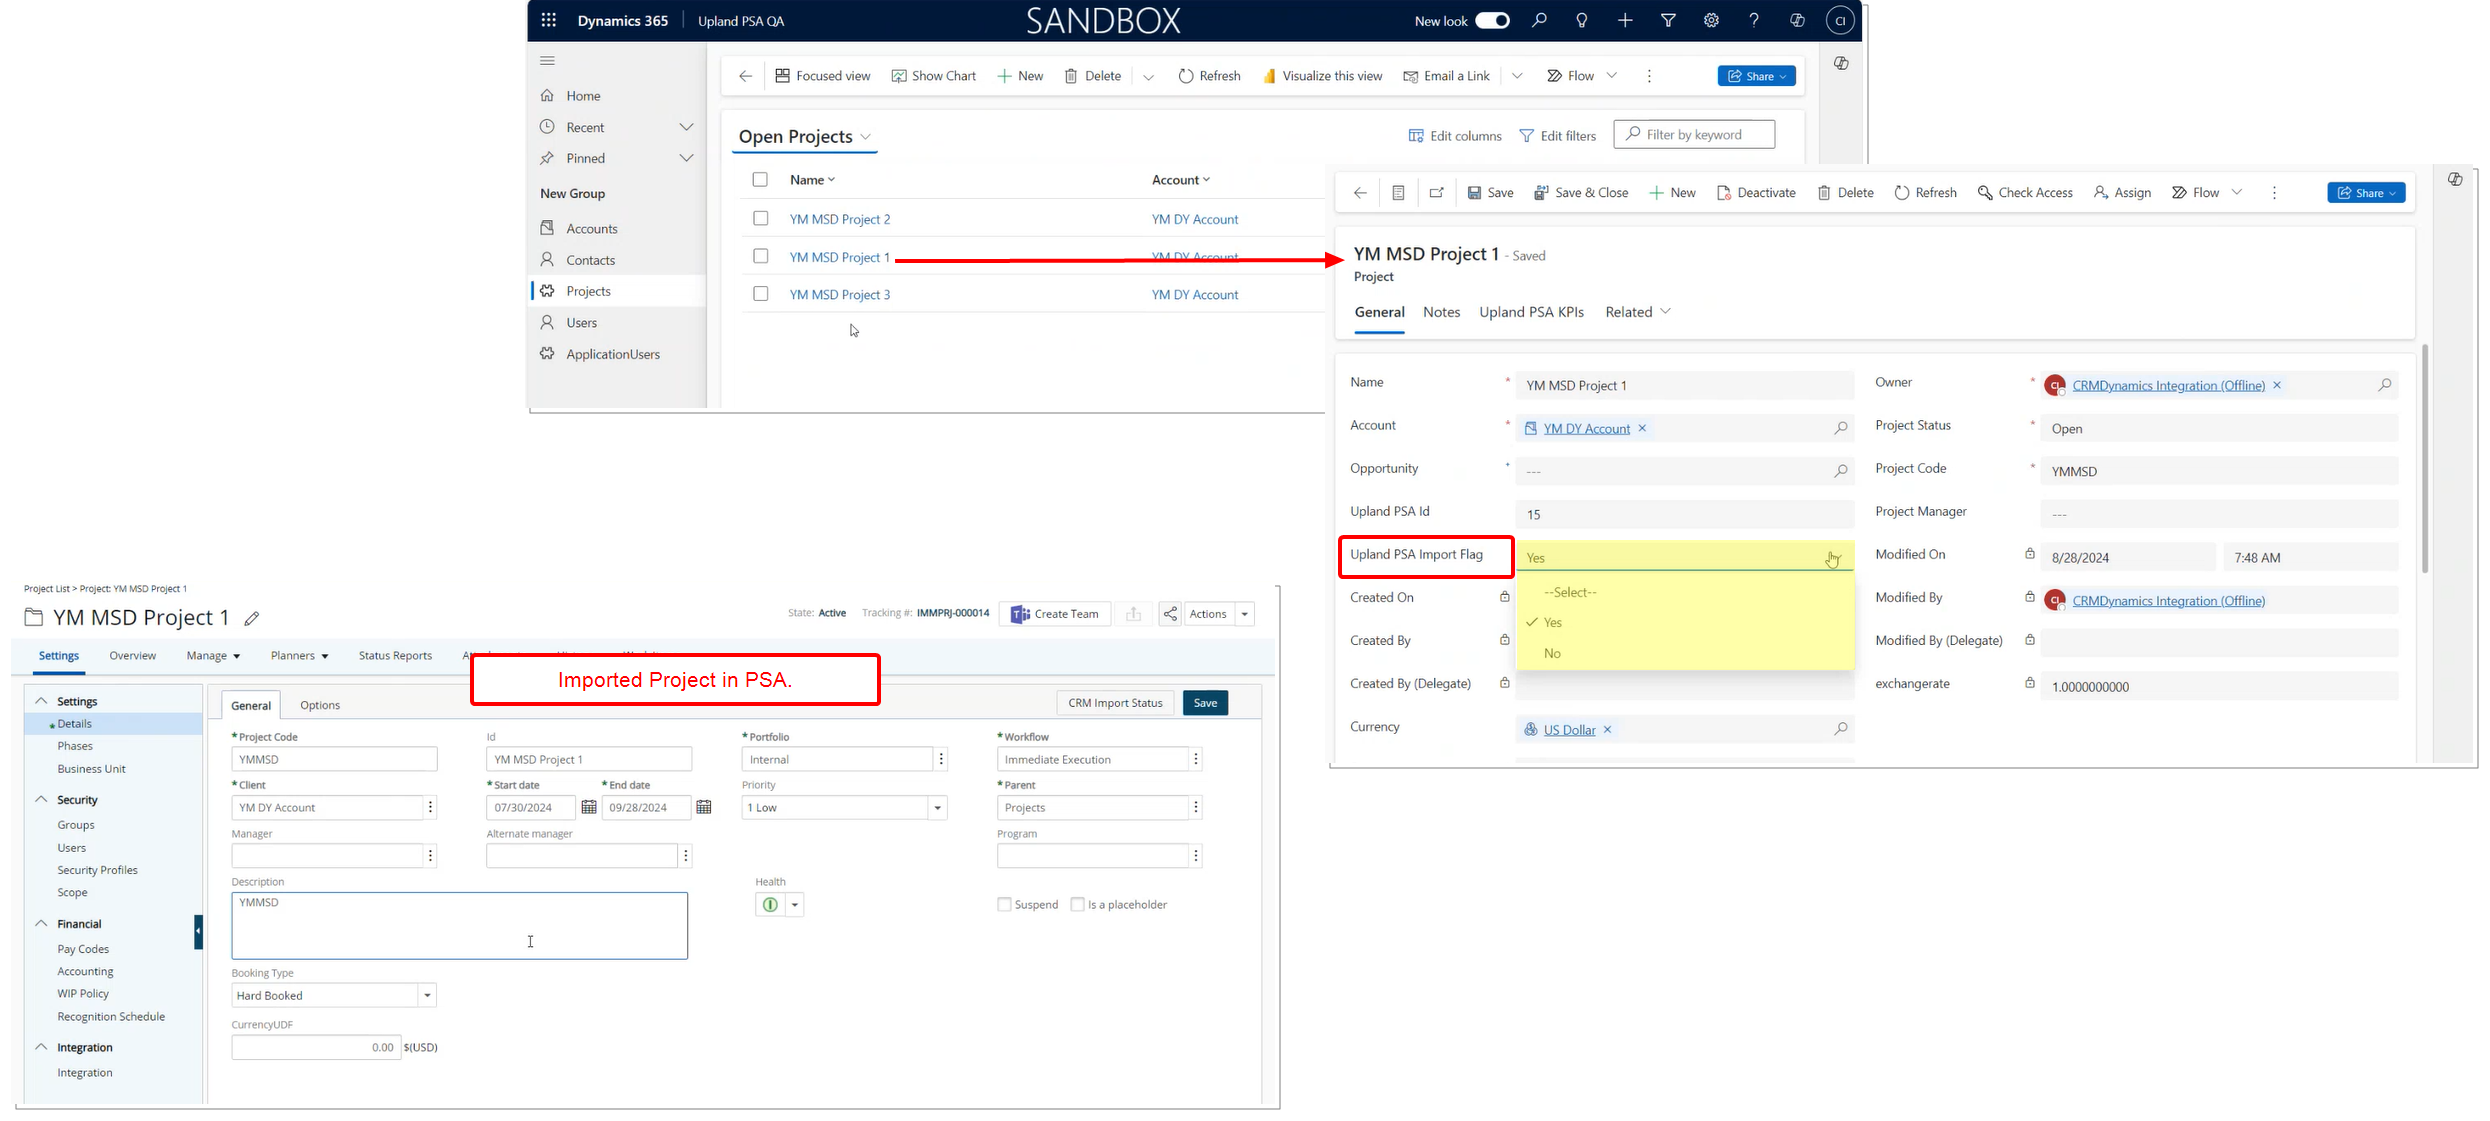
For Projects created in Microsoft Dynamics 365 before the 2024 R3.0 release, the Upland PSA Import Flag will have no set value (will be blank), and additional steps will be required to modify it.
- In Microsoft Dynamics 365 filter your Projects view by the new Upland PSA Import Flag having no value (blank).
- Select the required Projects in this filtered result set.
- Click Edit.
- Modify the value of Upland PSA Import Flag to Yes.
- Click Save.
Note: An error message is displayed upon attempting to publish a Project from Microsoft Dynamics CRM using the Publish to Upland PSA option where the Upland PSA Import Flag is set to No informing you that the Project could not be published to Upland PSA.
Mapping Objects Between Microsoft Dynamics CRM and PSA
The mapping of objects between Microsoft Dynamics CRM and PSA ensures that the information is transferred properly and reliably during the import and export processes. After the Microsoft Dynamics CRM connection is set up, the system automatically maps certain Microsoft Dynamics CRM and PSA fields by default.
Note: The preconfigured fields provided by the system can be customized and addition fields can also be configured. However, Key Performance Indicators (KPIs) are not mapped automatically and need to be manually configured. For more information, see Mapping PSA KPIs to the Microsoft Dynamics CRM Fields.
Since the mapping of fields for all Microsoft Dynamics CRM and PSA objects is similar, the mapping of CRM Users to PSA Users example serves as a reference of how to define the fields for all other objects, including:
-
CRM Users to PSA Users
-
CRM Accounts to PSA Clients
-
CRM Contacts to PSA Contacts
-
CRM Project to PSA Projects
-
PSA Kpis to CRM Project
Supported Import Objects
Modules supported for Importing are:
| CRM | PSA |
|---|---|
| Users | Users |
| Accounts | Clients |
| Contacts | Contacts |
| Projects | Projects |
Supported Export Objects
Modules supported for Exporting are
| PSA | CRM |
|---|---|
| Project KPIs | Project KPIs |
To map CRM Users to PSA Users:
- Log on to PSA.
- From the Icon Bar click Integrations .
- From the Navigation Menu click CRM.
- Ensure that the Microsoft Dynamics CRM connection is set up; for more information, see Setting Up the Connection to Microsoft Dynamics CRM.
- Navigate to the Mapping tab.
- From the Mapping types selection box choose CRM Users to Upland PSA Users.
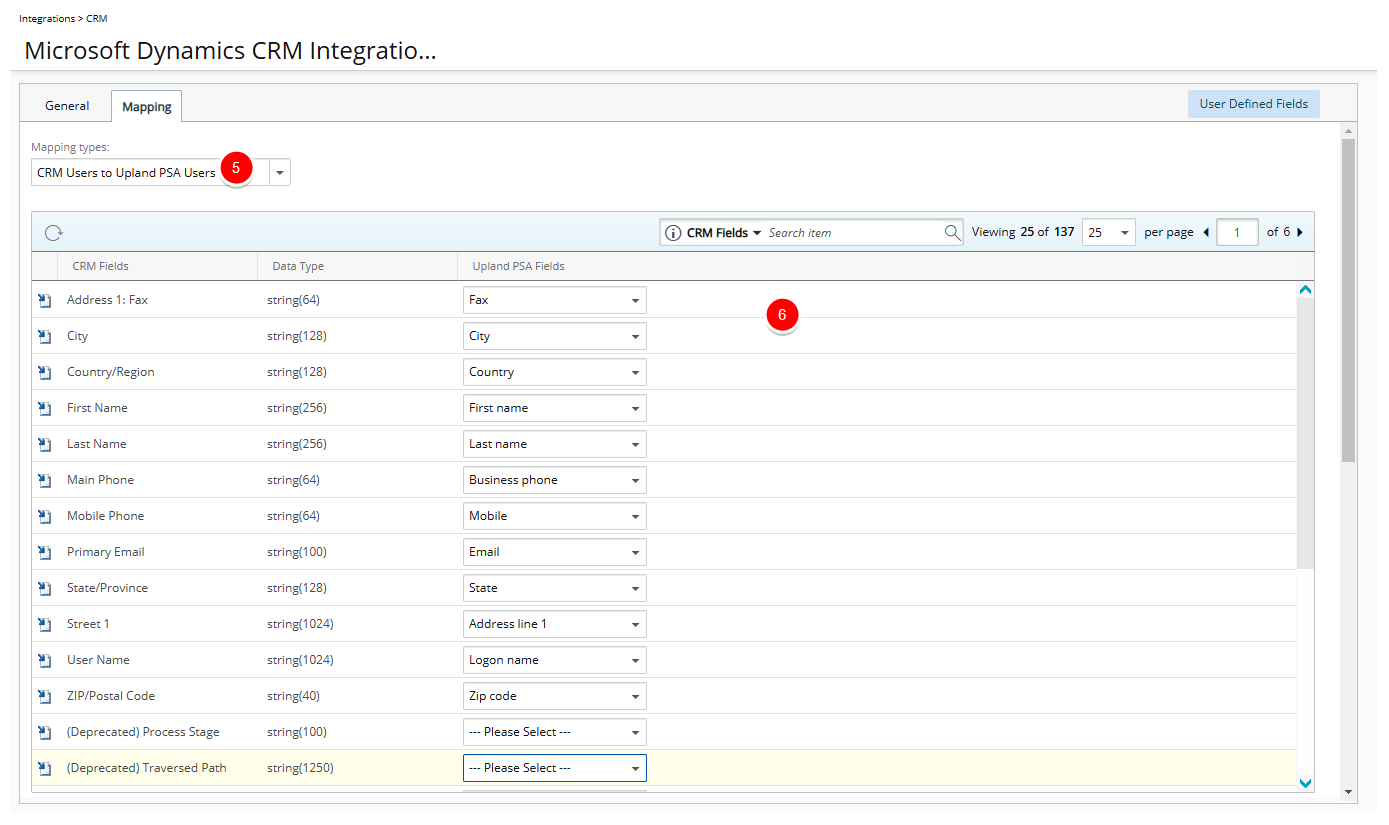
- The page will refresh and display all mapped User fields that can be imported to the PSA Users profile.
Mapping Objects Between Microsoft Dynamics CRM and PSA
- Click the Copy and Associate button to create the user-defined fields in PSA and associate them to the PSA Users profile.
Note: When the Copy and Associate icon is gray, the field exists in the PSA User profile and is already mapped. When the Copy and Associate icon is blue, the entry does not exist in the PSA User profile and is not mapped. If a user-defined field with the same name and type already exists in PSA, then the system automatically maps the imported Salesforce field to the existing user-defined field in PSA.
-
Verify that the appropriate PSA Field has an assigned CRM Field.
Note: By default User Defined Fields will be added to General tab of User Edit page. To access and move these UDFs to another tab, click the User Defined Fields button.
- Click the User Defined Fields button to move or reposition the mapped Fields created as UDFs within the required tab.
- Click Save and then Back to save your changes and return to the previous page.
Note: A placeholder name can also be defined for the objects when mapping the CRM Accounts to PSA Clients and CRM Project to PSA Projects.
Mapping PSA KPIs to the Microsoft Dynamics CRM Fields
PSA provides Key Performance Indicators (KPIs) to help companies monitor the efficiency of their projects and employees against operational targets. The PSA KPIs track and transfer specific project-related information from PSA to Microsoft Dynamics CRM using a set of KPI fields.
The KPI fields are created as custom fields in Microsoft Dynamics CRM and then associated to the projects; for information on creating custom fields, refer the Microsoft Dynamic CRM user guide. After the PSA KPI fields are created and associated, the KPI fields are mapped to the PSA project fields.
Note: Since all updates to the KPI fields originate in PSA, PSA is the primary application (master).
The information between Microsoft Dynamics CRM and PSA is synchronized through the Automation Processing options; for more information, see Setting up Automated (Batch) Processing.
To map the PSA KPIs to Microsoft Dynamics CRM fields
- Log on to PSA.
- From the Icon Bar click Integrations .
- From the Navigation Menu click CRM.
- Ensure that the Microsoft Dynamics CRM connection is set up; for more information, see Setting Up the Connection to Microsoft Dynamics CRM.
- Navigate to the Mapping tab.
- From the Mapping types selection box choose Upland PSA KPI(s) to CRM.
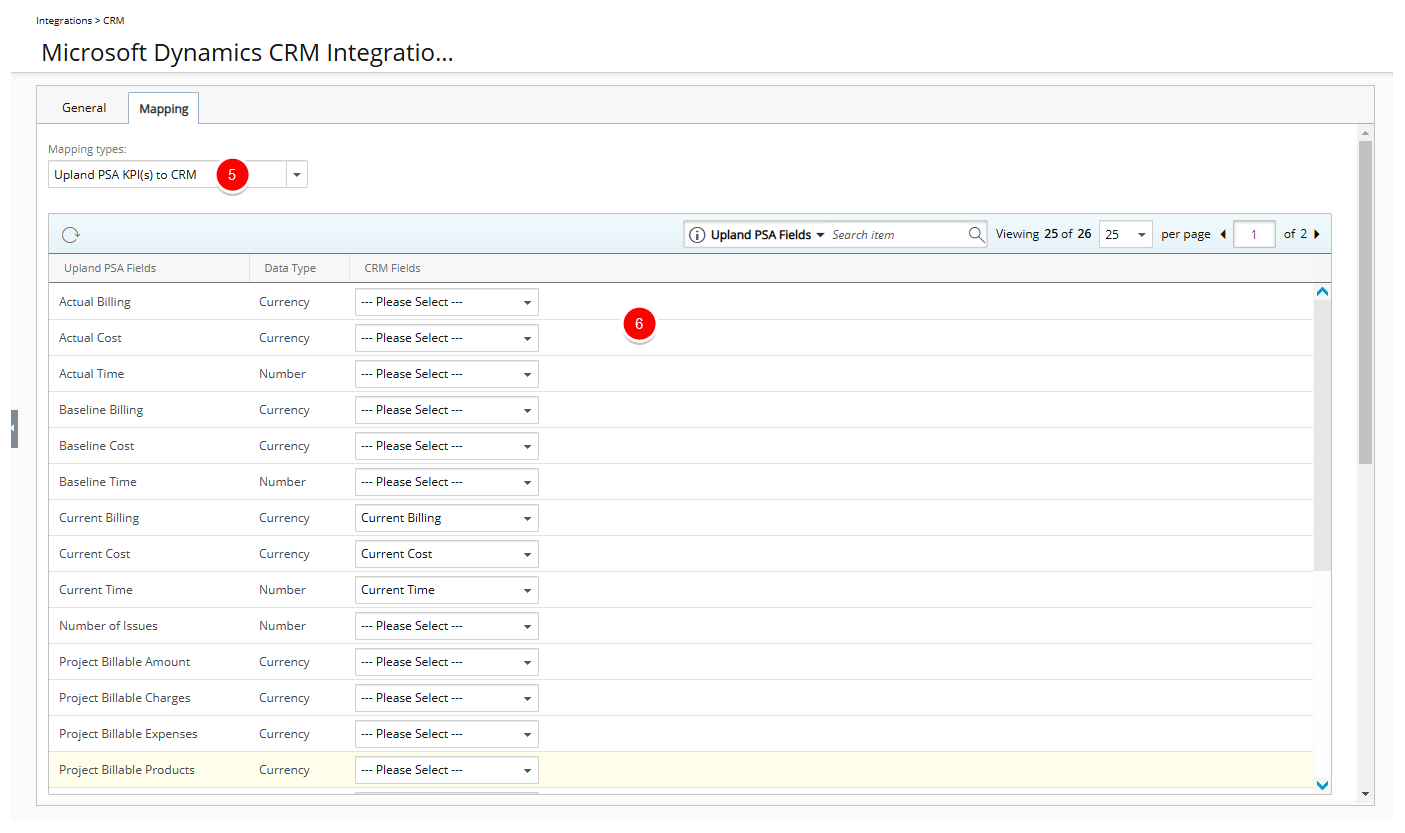
- The page will refresh and display all the PSA project fields that can be associated to the PSA KPI fields created in the Microsoft Dynamics CRM application.
- Select the corresponding Microsoft Dynamics CRM field from the CRM Fields list for each of the PSA KPI fields that you want to map. The CRM Fields lists are filtered based on the data type of the corresponding PSA field.
Note: Only the PSA KPI fields created in Microsoft Dynamics CRM are displayed in the CRM Fields lists. Therefore, PSA KPI fields that are not created in Microsoft Dynamics CRM, do not display in the CRM Fields lists.
- Click Save to apply your changes. After the fields are mapped, the information is transferred to Microsoft Dynamics CRM projects when the Automation Processing is scheduled to run.
Importing Users and Contacts from Microsoft Dynamics CRM into PSA
The users and contacts are imported from Microsoft Dynamics CRM into PSA from the Tools menu.
Note: If Microsoft Dynamics CRM contacts are not associated to any Microsoft Dynamics CRM accounts already imported to PSA, then they are not imported.
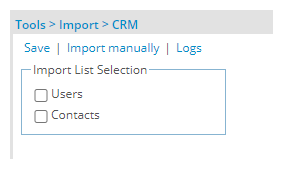
To import users and contacts to PSA:
- From the Icon Bar click Tools
 .
. - Click Import to expand the Import menu options.
- From the available options click CRM.
- Under Import List Selection, select the Users and Contacts check boxes to import the users and contacts respectively from Microsoft Dynamics CRM into PSA.
- Click the Import manually link to start the import process. During the import process, only the CRM contacts associated to already imported CRM accounts are imported.
- Click the Logs link to display the following information:
- CRM Object: type of object imported from Microsoft Dynamics CRM
- ID: Id of object imported from Microsoft Dynamics CRM
- Imp/Exp: type of activity performed, options include Import or Export
- Results: type, name and error messages of the object created in PSA
- Date/Time: date of import
- Source: name of the user who performed the import from PSA or Automation Service in the case of automated operation having been done.
- Click Setup > Work > Clients and the required client from the list to open the Client Edit page, then click the Contacts button to open the Contact List page that displays a list of the imported contacts.
- Click Setup > Organization > Users to open the Users page that displays a list of the imported users. By default, the Standard User security profile is assigned to all users imported from Microsoft Dynamics CRM.
Note: In the case of importing, a placeholder name can be defined for the objects when mapping the CRM Accounts to PSA Clients and CRM Project to PSA Projects.
Setting up Automated (Batch) Processing
The Microsoft Dynamics CRM automation processing options are used to automatically update information between Microsoft Dynamics CRM and PSA. Setting up automated processing for Microsoft Dynamics CRM and PSA integration ensures that the information is synchronized in both systems.
Note: If information updated directly in PSA differs from the information in Microsoft Dynamics CRM, then it is overwritten on the next import from Microsoft Dynamics CRM. To transfer project-related information from PSA to Microsoft Dynamics CRM, the PSA KPI fields are associated to the projects in Microsoft Dynamics CRM; for more information, see Mapping PSA KPIs to the Microsoft Dynamics CRM Fields.
From the Automation Processing Options page, the following CRM services can be automated:
- CRM Data Exchange: updates the information of projects, users and contact data, as well as imports projects, from Microsoft Dynamics CRM to PSA and updates KPIs from PSA to Microsoft Dynamics CRM
- CRM Users and Contacts Import: imports and updates the information of users and contacts from Microsoft Dynamics CRM to PSA
Note: To automate the processing of the CRM Users and Contacts Import and CRM Data Exchange services, ensure that the Automatically import Contacts and the Automatically import Projects check boxes are selected; for more information, see Setting Up the Connection to Microsoft Dynamics CRM.
To setup the Automated (Batch) Processing
- From the Icon Bar click Setup
 .
. - From the Navigation Menu click Organization.
- From the menu click System.
- Click the Automation button to open the Automation Processing Options page.
- Select the Enable Automation Processing check box to enable the automatic processing feature.
- Choose the selection box located against CRM Data Exchange to enable it. This service automates the following:
- Update Project, User and Contact data from Microsoft Dynamics CRM to PSA
- Update KPIs from PSA to Microsoft Dynamics CRM.
- Import Projects from Microsoft Dynamics CRM to PSA.
- Choose the selection box located against CRM Users and Contacts Import to enable it. This service automates the import of Users and Contacts from Microsoft Dynamics CRM to PSA.
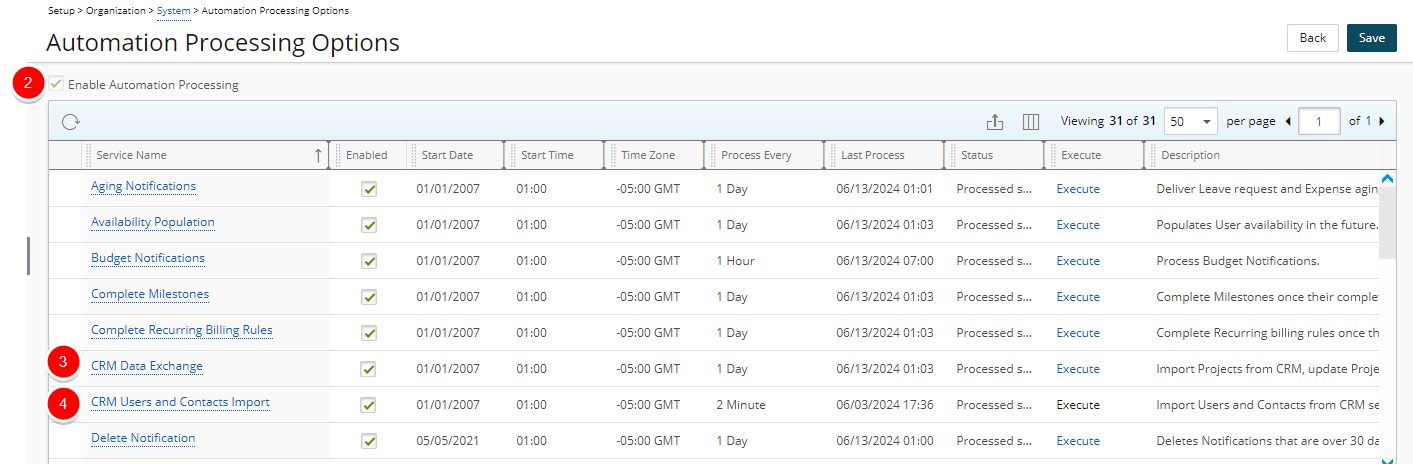
- To define the settings forthe above mentioned services, click each service name to open the Automation Service Setup page to edit the following:
- Start Date: start date of processing; set by default to the date when batch service was initialized
- Start Time: time the service starts the processing; set by default to 01:00
- Time Zone: time zone of the processing time; set by default to the server time zone
- Process Every: frequency service is processed (Minute/ Hour/ Day/ Week/ Month/ Year); set by default to one day
- Last Process: date and time of the last automated background process
- Status: status of the process (successful or unsuccessful)
- Description: description of the process
- Enable Service: indicates if the service is enabled or disabled
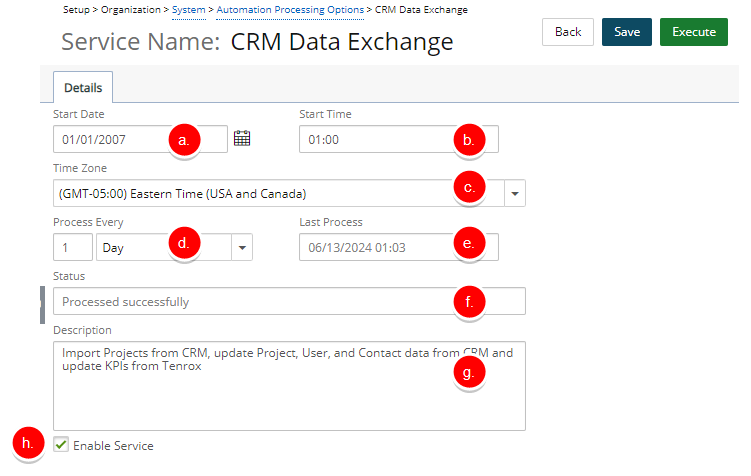
- Click Save and then Back to save your changes and return to the previous page.
Exporting Projects from Microsoft Dynamics CRM into PSA
When exporting projects from Microsoft Dynamics CRM, the associated accounts and users are automatically exported to PSA. The associated contacts for the corresponding accounts can also be exported as long as the Import Contacts option is selected; for more information, see Setting Up the Connection to Microsoft Dynamics CRM.
Before exporting projects from Microsoft Dynamics CRM into PSA, the projects are associated to the Microsoft Dynamics CRM accounts. For more information on accounts refer to Working with Microsoft Dynamics CRM Accounts in PSA
To export projects from Microsoft Dynamics CRM into PSA:
- Log on to Microsoft Dynamics CRM.
- Under workplace panel, select Projects.
- Click New.
- Fill all fields with valid values.
- Save the Project.
- Click Publish to Tenrox button.
The PSA Project page opens with the published project displayed.
Working with Microsoft Dynamics CRM Accounts in PSA
When Microsoft Dynamics CRM projects are exported into PSA, their associated accounts are automatically exported, and accounts are not exported independently without being associated to Projects. The following rules apply when exporting Microsoft Dynamics CRM accounts to PSA:
- If an account is deleted in Microsoft Dynamics CRM that has associated entries in PSA or not, then it will not be deleted in PSA.
Note: This rule also applies to exported projects, users, and contacts.