PSA – Salesforce Integration
This guide describes the procedures for setting up integration between Salesforce and PSA, as well as mapping, importing and exporting objects between PSA and Salesforce.
PSA Technical Support is a team of Application Support Analysts trained to use, configure, and troubleshoot PSA in your specific enterprise environment.
If you have any questions, you can reach us by sending us an email.
The PSA Software license agreement was reviewed and accepted during the installation procedure of this software in your environment. ©2026 Upland Software, Inc. All rights reserved. You may not photocopy or share this document with any other party without express written permission from Upland Software Inc..
Introduction
The purpose of a Salesforce and PSA integration is to accommodate your continued use and maintenance of Salesforce, and your required information be passed from Salesforce to PSA. The integration:
- Provides a two-way communication between Salesforce and PSA.
- Allows you to see what is coming down the "pipeline" from Salesforce, as a result allowing for proper planning using the PSA Work Plans (Resource Management) and allocating a role to a Salesforce opportunity that may become an PSA project. This is accomplished by having information imported from Salesforce into PSA:
- Salesforce Accounts imported as Clients in PSA.
- Salesforce Opportunities imported as Projects in PSA.
OR - Salesforce Projects (custom object imported as Projects in PSA).
Note: You must choose to either use Salesforce Opportunities or Projects. Switching from one setup to the other will cause loss of data.
- Some Salesforce Users are imported, allowing manual publication of Salesforce opportunities.
- Allows financial information, both actuals (time, cost, billing) and budgets, to be captured for the Salesforce Accounts, Opportunities and Users. This is accomplished by having information exported to Salesforce from PSA.
Note: For integration purposes, Salesforce is the primary and PSA the secondary to ensure that only one set of data exists in both applications. For example, if changes are applied to an object in Salesforce that has already been imported into PSA, then Salesforce (primary) performs the updates in PSA (secondary) when the object is re-imported. However, if PSA Key Performance Indicators (KPIs) are associated to the Salesforce projects, then the KPIs are tracked in PSA and updated in Salesforce.
The integration process between PSA and Salesforce consists of the following steps:
- Supported Salesforce versions
- Required Configurations in Salesforce:
- Apply the PSA Package in Salesforce
- Configure Salesforce Environment
- Configure Tenrox Settings Information
- Adding the Tenrox UniqueID field to Page Layouts (Account, Opportunity, Contact and User)
- Adding the Import to Tenrox field on the User Page Layout
- Adding Projects tab
- Adding a Publish link to Opportunity Page Layout
- Adding a Project Manager Field to Project Page Layout
- Setting Up the Connection Between Salesforce and PSA
- Requirements for setting up the connection:
- Configuring the PSA Environment (Establishing a Connection)
- Mapping Objects Between Salesforce and PSA
- Importing Users into PSA
- Open/publish a Salesforce Projects as an PSA Project
- Open/publish a Salesforce Opportunity as an PSA Project
- Setting Up the Automated (Batch) Processing
Supported Salesforce versions
- Salesforce Lightning & Classic Winter '26 with API version 64 or earlier
- Salesforce Lightning & Classic Summer '25 with API version 64 or earlier
Note:
To enable the Project Manager field functionality in Salesforce integration, clients must upgrade their Salesforce package from version 1.1 to 1.2. and the Project Manager Field must be included in the Salesforce Project Page Layout.
This action is required for all clients using the Salesforce integration to fully benefit from the enhancement.
The latest package can be installed from the following link: Salesforce version 1.2.
Required Configurations in Salesforce
Here is an overview of the Required Configurations in Salesforce:
- Apply the PSA Package in Salesforce
- Configure Salesforce Environment
- Configure Tenrox Settings Information
- Adding the Tenrox UniqueID field to Account, Opportunity and Contact Page Layouts
- Adding the Import to Tenrox field on the User Page Layout
- Adding Projects tab
- Adding a Publish link to Opportunity Page Layout
- Adding a Project Manager Field to Project Page Layout
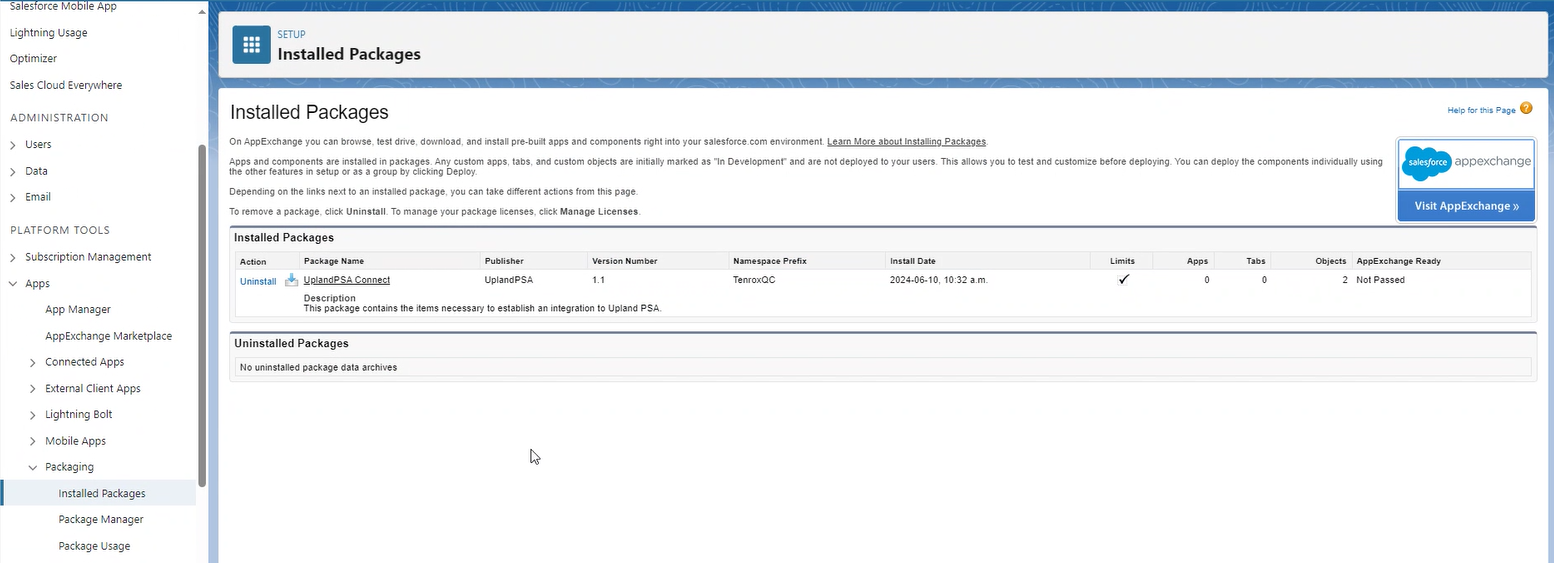
Apply the PSA Package in Salesforce
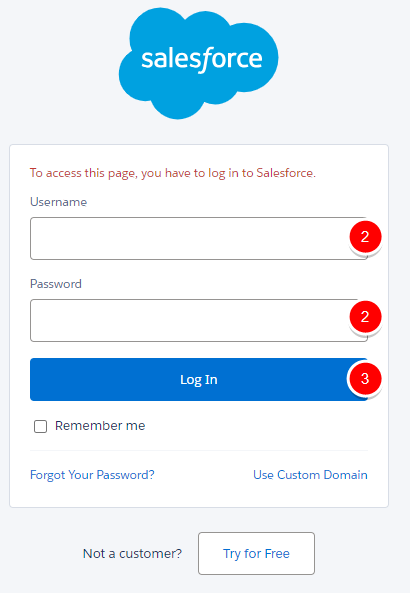
- Copy the URL:
https://login.Salesforce/packaging/installPackage.apexp?p0=04t0H000000p5QX&isdtp=p1and paste it in your Web browser’s Address bar to access the Salesforce login page. - Enter your Username and your Password.
- Click Log In.
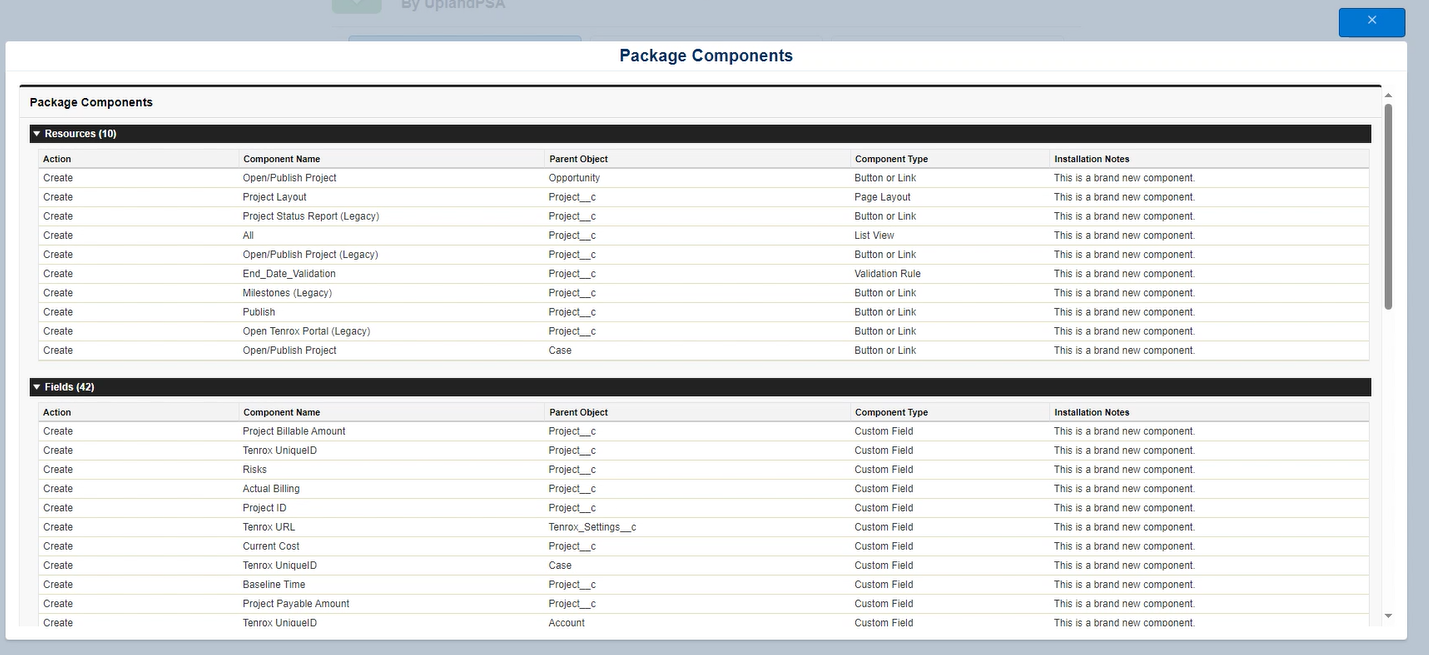
- View the PSA Package details, including the Version Number being installed.
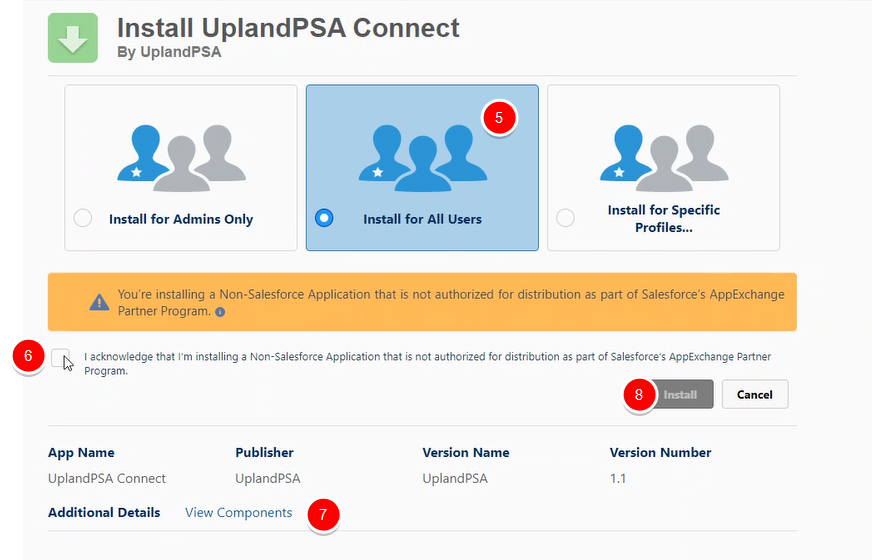
- Select Install for All Users.
- Select “I acknowledge that I’m installing a Non-Salesforce Application that is not authorized for distribution as part of Salesforce’s AppExchange Partner Program” selection box.
- If required, click, and view the Package Components.
- Then Click Install.
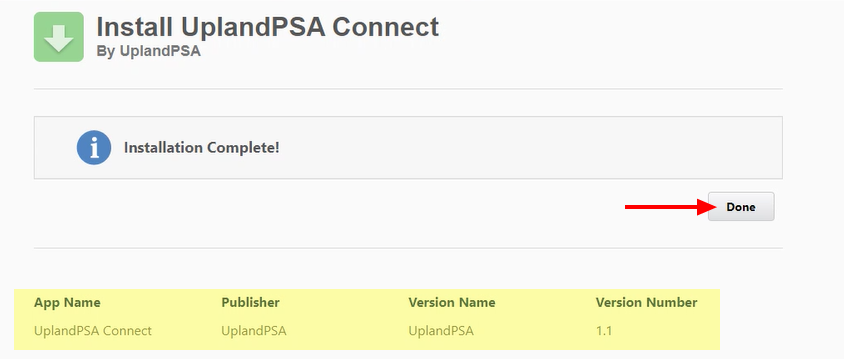
- Upon completing the installation, click Done.
-
You will be redirected automatically to the Installed Packages page.
The package contains the following objects and fields:
| Component Name | Parent Object | Type |
|---|---|---|
| All | Project | List View |
| Tenrox UniqueID | User | Custom Field |
| Tenrox UniqueID | Opportunity | Custom Field |
| Tenrox UniqueID | Contact | Custom Field |
| Tenrox UniqueID | Case | Custom Field |
| Tenrox UniqueID | Account | Custom Field |
| Actual Billing | Project | Custom Field |
| End Date | Project | Custom Field |
| Description | Project | Custom Field |
| Account | Project | Custom Field |
| Baseline Cost | Project | Custom Field |
| Baseline Billing | Project | Custom Field |
| Actual Time | Project | Custom Field |
| Publish | Project | Button or Link |
| Actual Cost | Project | Custom Field |
| Project_Status_Report | Project | Button or Link |
| Milestones | Project | Button or Link |
| Current Cost | Project | Custom Field |
| Open_Publish_Project | Opportunity | Button or Link |
| Current Billing | Project | Custom Field |
| Open_Publish_Project | Case | Button or Link |
| Baseline Time | Project | Custom Field |
| Project | Custom Field | |
| Tenrox Settings | Custom Field | |
| Open_Tenrox_Portal | Project | Button or Link |
| Open_Publish_Project | Project | Button or Link |
| Project Billable Amount | Project | Custom Field |
| Issues | Project | Custom Field |
| Current Time | Project | Custom Field |
| Project Billable Time | Project | Custom Field |
| Project Billable Products | Project | Custom Field |
| Project Billable Expenses | Project | Custom Field |
| Project Billable Charges | Project | Custom Field |
| Project Payable Amount | Project | Custom Field |
| Project Paid Amount | Project | Custom Field |
| Project Invoices | Project | Custom Field |
| Project Billed Amount | Project | Custom Field |
| Project Payable Time | Project | Custom Field |
| Project Payable Products | Project | Custom Field |
| Project Payable Expenses | Project | Custom Field |
| Project Payable Charges | Project | Custom Field |
| Opportunity | Project | Custom Field |
| Scope | Project | Custom Field |
| Changes | Project | Custom Field |
| Risks | Project | Custom Field |
| Project Work In Progress | Project | Custom Field |
| Tenrox UniqueID | Project | Custom Field |
| Start Date | Project | Custom Field |
| Project ID | Project | Custom Field |
| Project Code | Project | Custom Field |
| Import to Tenrox | Project | Custom Field |
| Tenrox URL | Tenrox Settings | Custom Field |
| Organization Name | Tenrox Settings | Custom Field |
| End_Date_Validation | Project | Validation Rule |
| Project Layout | Project | Page Layout |
Configure Salesforce Environment
- Configure Tenrox Settings Information
- Adding the Tenrox UniqueID field to Page Layouts (Account, Opportunity, Contact and User)
- Adding the Import to Tenrox field on the User Page Layout
- Adding Projects tab
- Adding a Publish link to Opportunity Page Layout
- Adding a Project Manager Field to Project Page Layout
Configure Tenrox Settings Information
- Click to expand the Custom Code navigation menu.
- From the available options, click Custom Settings.
- Upon the Custom Settings page displaying, click Manage.
- From the Tenrox Settings page, click New.
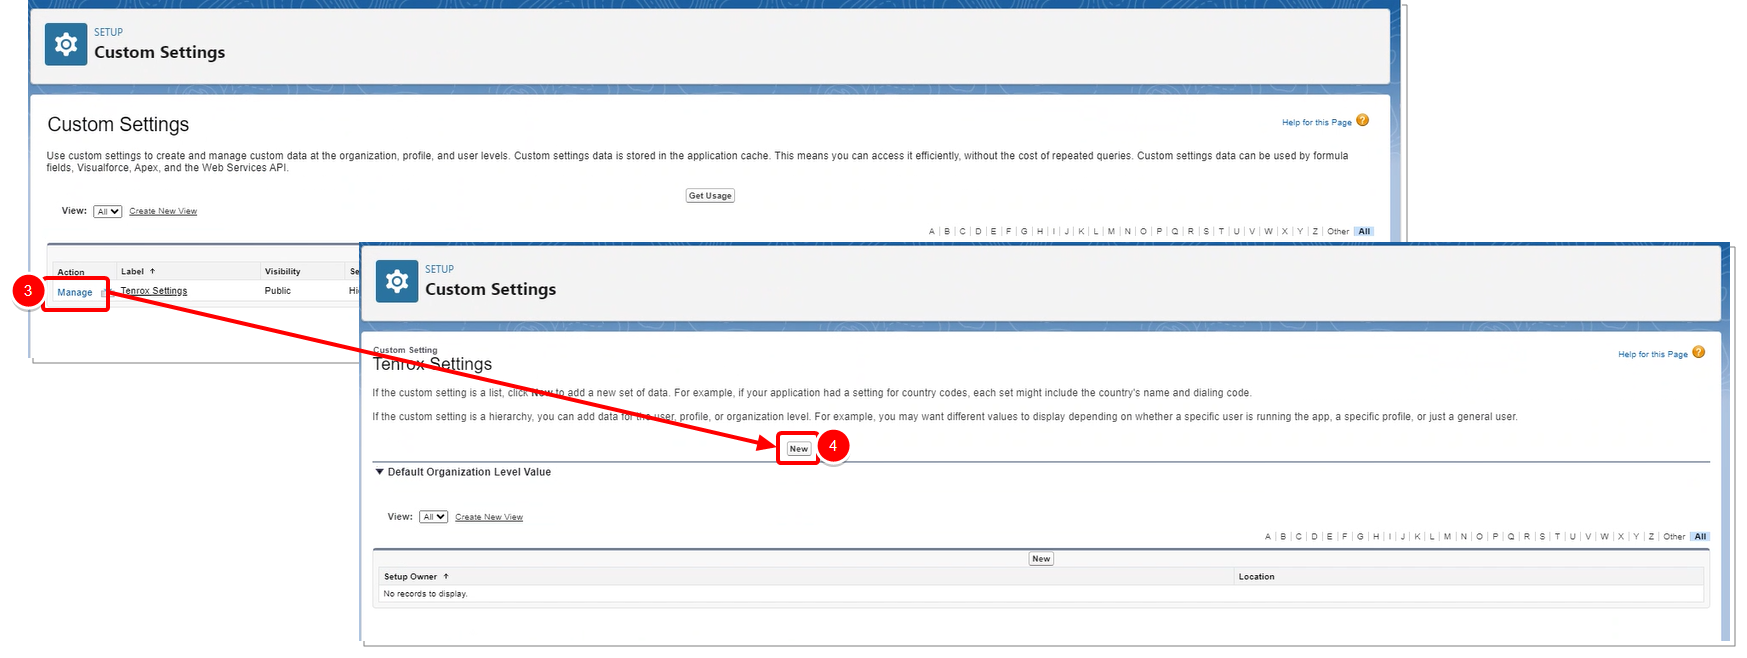
- Under Tenrox Settings Information section, enter the following:
- Location: Select Profile, then click the search button and choose the System Administrator Profile from the available options.
- Organization Name: Enter your PSA OrgName.
- Tenrox URL: Enter the PSA URL.

- Click Save to apply your changes.
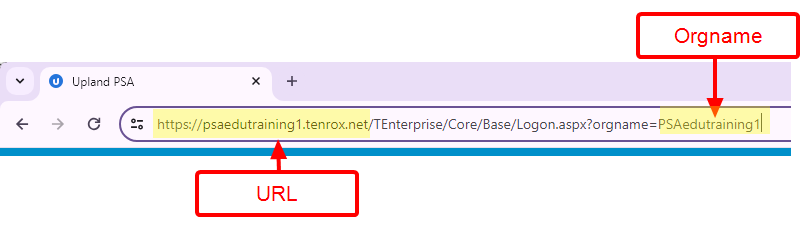
Note: The Organization name is part of the URL when accessing PSA. As an example, if your PSA URL is: https://yourcopamnyname.tenrox.net/TEnterprise/Core/Base/Logon.aspx?orgname=yourcopamnyname, then your Organization name = yourcopamnyname.
Adding the Tenrox UniqueID field to Page Layouts (Account, Opportunity, Contact and User)
The configuring of the Salesforce environment requires the following:
- Adding the Tenrox UniqueID field to Page Layouts (Account, Opportunity, Contact and User)
- Adding the Import to Tenrox field to the User Page Layout
- Adding a Publish Project or Opportunity link
Note: You must choose to either use Salesforce Opportunities or Projects. Switching from one setup to the other will cause loss of data.
Note: The Tenrox UniqueID field allows PSA users to change the name of a client, project, user, etc., without affecting PSA's ability to identify each of these objects. In any integration, it is helpful for each system to keep track of the Unique ID of each object that is shared between the two systems. This Tenrox UniqueID field is PSA's way to ensure that PSA and Salesforce agree on an identifier for each object.
When a Salesforce Account, Opportunity or User is sent to PSA, the Tenrox UniqueID field is automatically populated in Salesforce. Therefore, there is no need to manually enter anything in the field. This indicates, to any Salesforce user, that this object is integrated with PSA.
The Import to Tenrox field is an option only on the Salesforce User, that must be selected to indicate a User who is to be imported as a User in PSA.
This section details how to add the Tenrox UniqueID on the Account Page Layout as part of the configuration of the Salesforce environment.
- Click Setup.
- From the Object Manager tab click Account.
- Then click Page Layouts from the left navigation.
- Click the required Page Layout Name.
- Within the Fields category, search, select and hold the Tenrox UniqueID field from those available to select.
- Drag and drop it in the preferred area within the Account Detail section below, on condition you are permitted to take the spot which is indicated by a green check mark as you are still “holding” the field and when the area turns green.
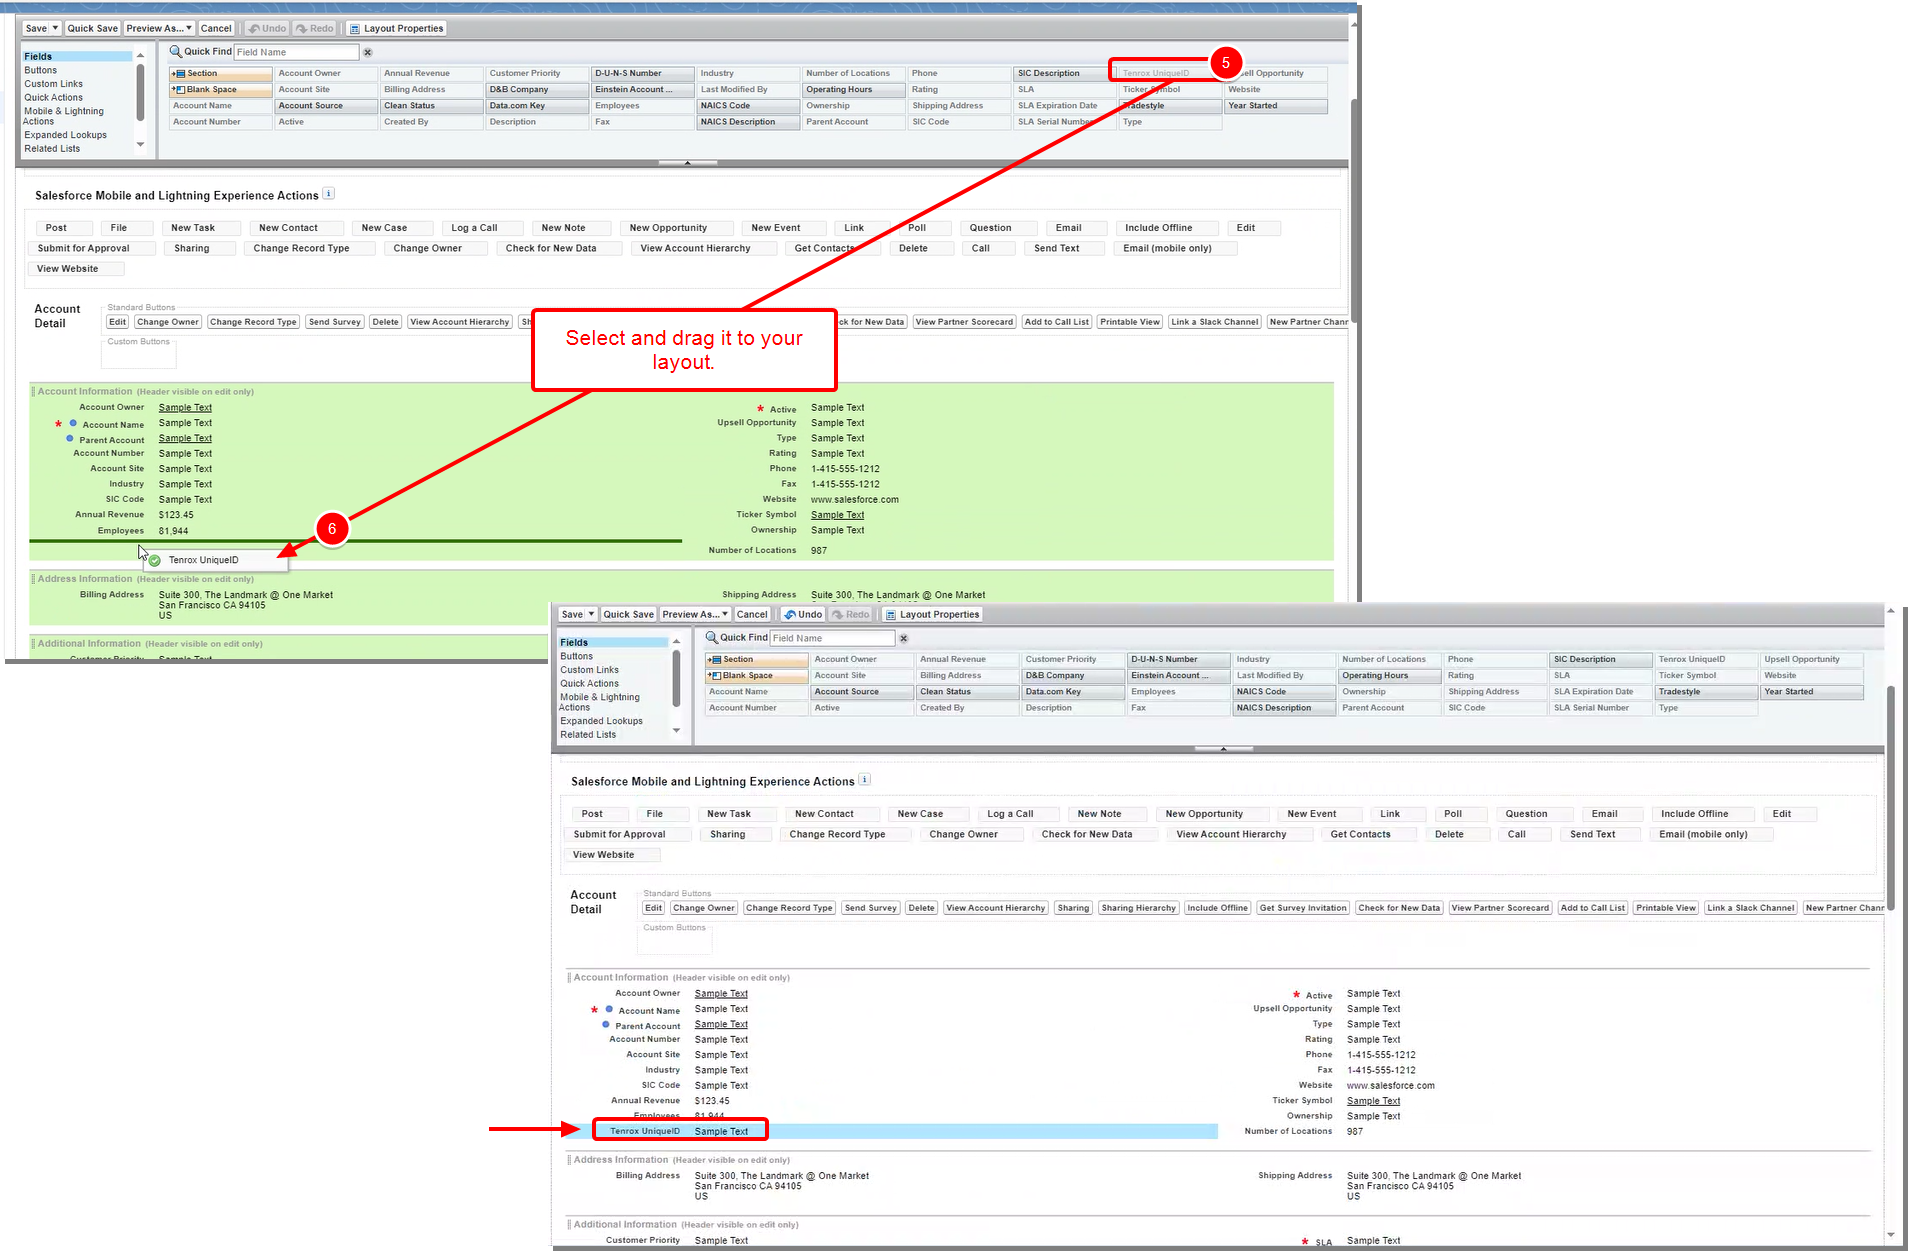
- Click Save to apply your changes.
This section details how to add the Tenrox UniqueID on the Opportunity Page Layout as part of the configuration of the Salesforce environment.
- Click Setup.
- From the Object Manager tab click Opportunity.
- Then select Opportunity Page Layouts from the left navigation.
- Click the required Page Layout Name.
- From the Fields category, search, select and hold the Tenrox UniqueID field from those available to select.
- Drag and drop it in the preferred area within the Opportunity Detail section below, on condition you are permitted to take the spot which is indicated by a green check mark as you are still “holding” the field and when the area turns green.
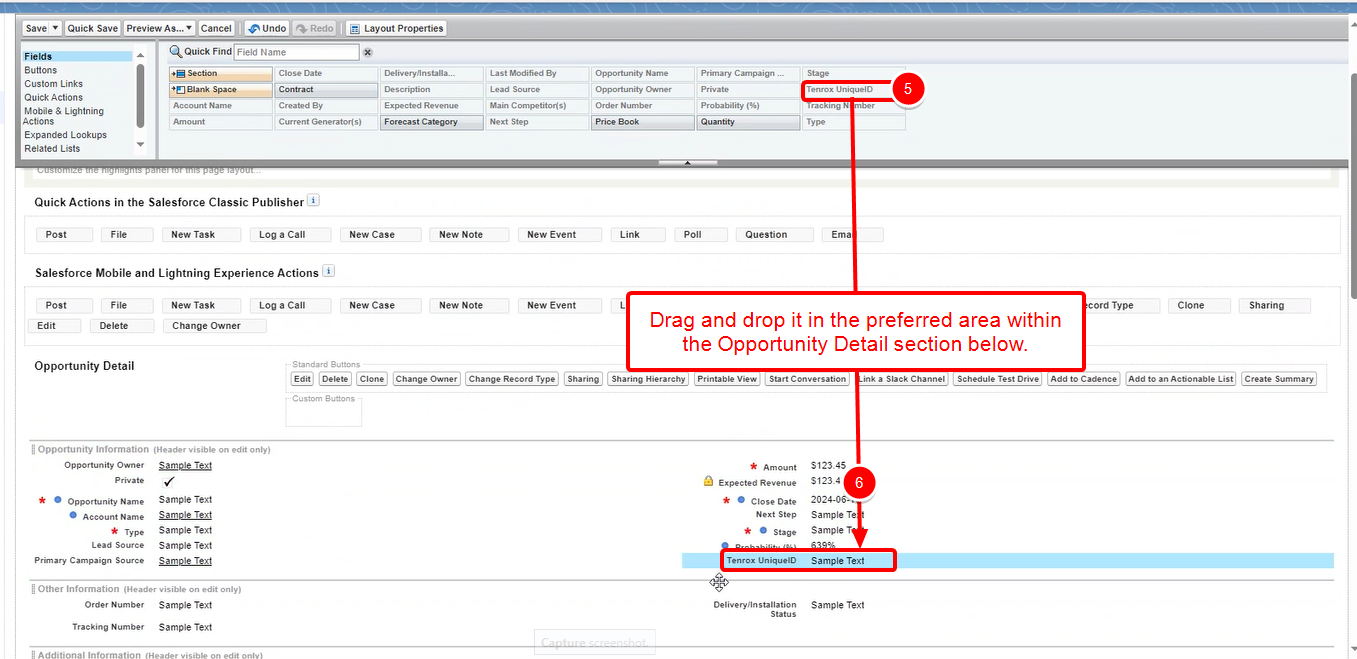
- Click Save to apply your changes.
This section details how to add the Tenrox UniqueID on the User Page Layout as part of the configuration of the Salesforce environment.
- Click Setup.
- From the Object Manager tab click User.
- Then select User Page Layouts from the left navigation.
- Click User Layout.
- From the Fields category, search, select and hold the Tenrox UniqueID field from those available to select.
- Drag and drop it in the preferred area within the Additional Information section below, on condition you are permitted to take the spot which is indicated by a green check mark as you are still “holding” the field and when the area turns green.
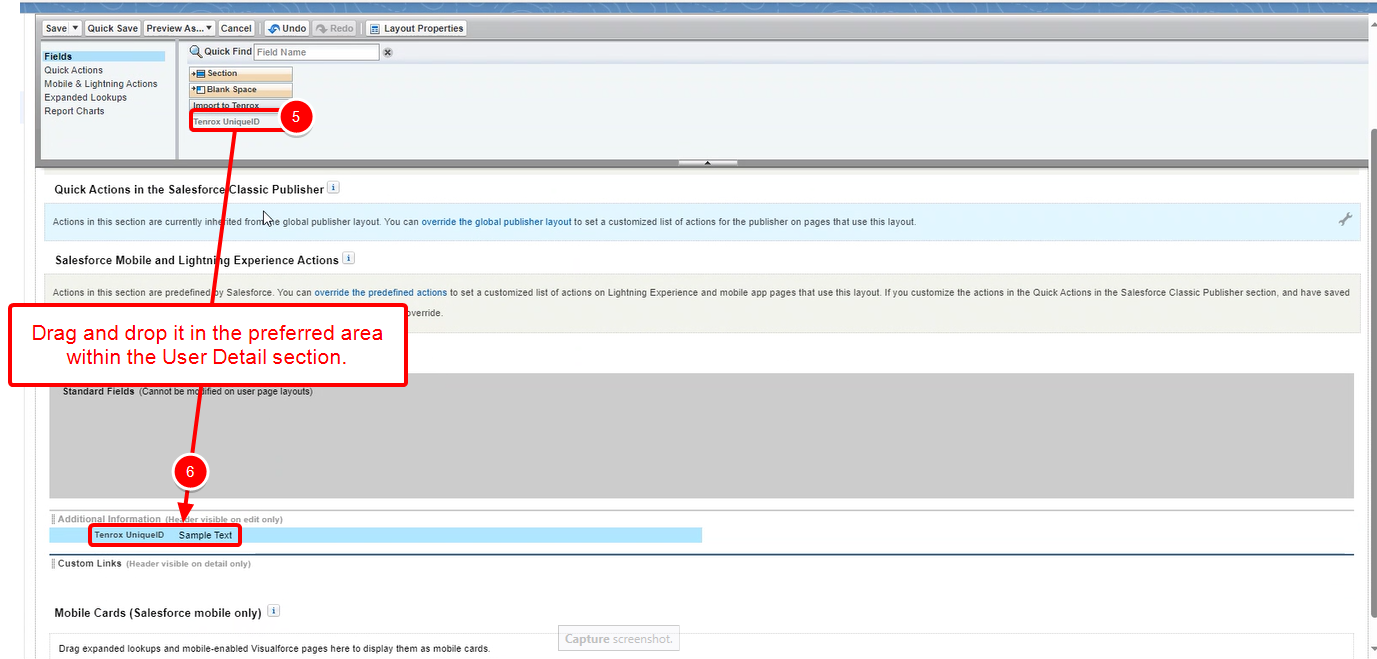
- Click Save to apply your changes.
This section details how to add the Tenrox UniqueID on the Contact Page Layout as part of the configuration of the Salesforce environment.
- Click Setup.
- From the Object Manager tab click Contact.
- Then select Contact Page Layouts from the left navigation.
- Click the required Page Layout name.
- On the top section, within the Fields category, search, select and hold the Tenrox UniqueID field from those available to select.
- Drag and drop it in the preferred area within the User Detail section below, on condition you are permitted to take the spot which is indicated by a green check mark as you are still “holding” the field and when the area turns green.
- Click Save to apply your changes.
Adding the Import to Tenrox field on the User Page Layout
This section details how to add the Import to Tenrox field on the User Page Layout as part of the configuration of the Salesforce environment.
- Click Setup.
- From the Object Manager tab click User.
- Then select User Page Layouts from the left navigation.
- Click the required Page Layout Name.
- On the top section, within the Fields category, search, select and hold the Import to Tenrox field from those available to select.
- Drag and drop it in the preferred area within the User Detail section below, on condition you are permitted to take the spot which is indicated by a green check mark as you are still “holding” the field and when the area turns green.
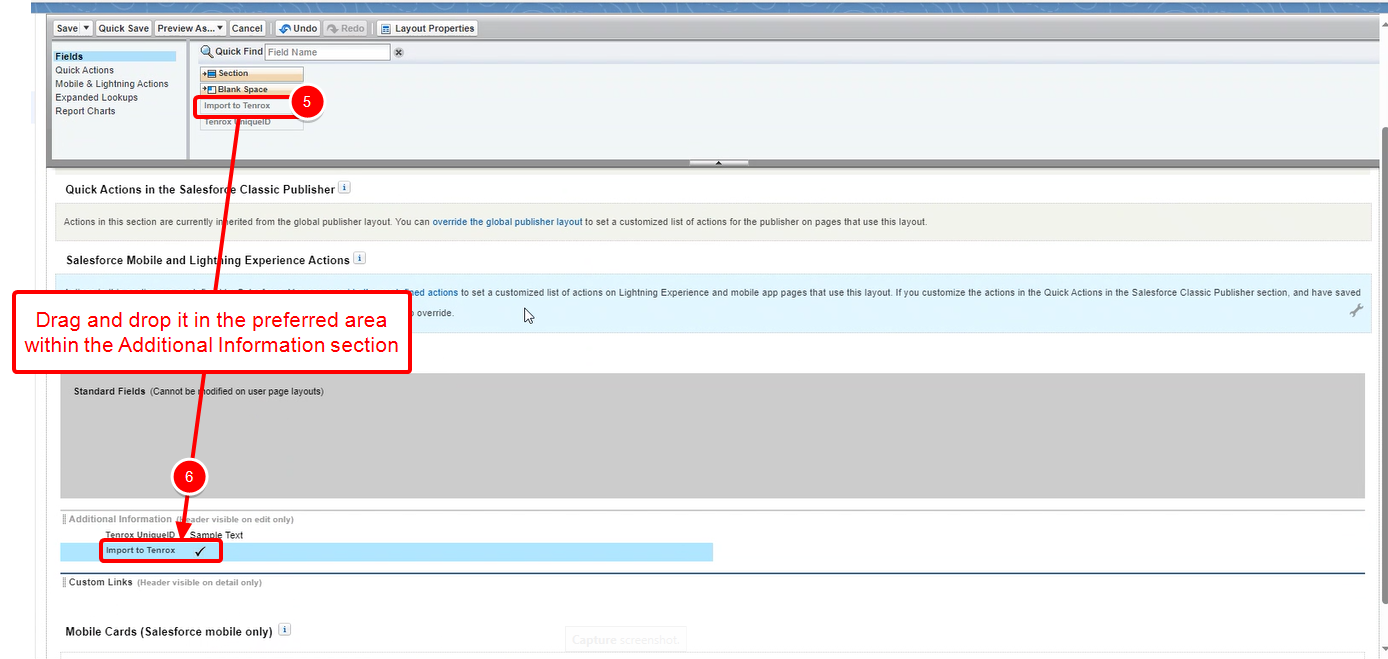
- Click Save to apply your changes.
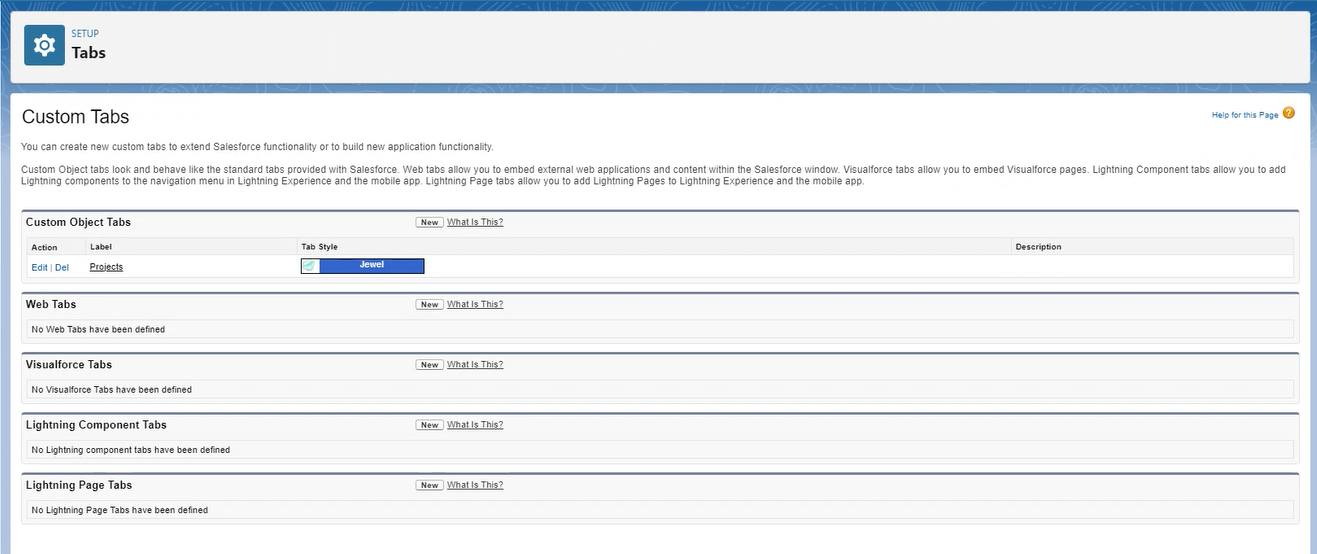
Adding Projects tab
Note that the Tenrox Unique ID field and Publish link are added automatically to the Project Layout.
To add the Projects tab to Salesforce:
- From the top right corner of the page, click Setup.
- From the navigation menu, click to expand User Interface.
- From the available options, click Tabs.
- From the Custom Object tabs section, click New.
- Select the Project Object.
- For Tab Style select a style or create your own.
- Follow the on-screen wizard to complete the setup.
- Click Save to apply your changes.
Adding a Publish link to Opportunity Page Layout
Note that for Project Layout, the Tenrox Unique ID field and Publish link are added automatically.
This section details how to verify if the Open/Publish Project link is already in your layout and how to add it as part of the configuration of the Opportunity Page Layout.
- Click Setup.
- From the Object Manager tab click Opportunity.
- Then select Page Layouts from the left navigation.
- Click the required Page Layout Name.
- On the top section, within the Custom Links category, search, select and hold the Open/Publish Project link from those available to select.
- Drag and drop it in the preferred area within the Opportunity Detail section below, on condition you’re permitted to take the spot which is indicated by a green check mark as you are still “holding” the field and when the area turns green.
- Click Save to apply your changes.
Adding a Project Manager Field to Project Page Layout
- Click Setup.
- From the Object Manager tab click Project.
- Then select Page Layouts from the left navigation.
- Click the required Page Layout Name.
- Within the Fields category, search, select and hold the Project Manager field from those available to select.
- Drag and drop it in the preferred area within the Project Detail section below, on condition you’re permitted to take the spot which is indicated by a green check mark as you are still “holding” the field and when the area turns green.
- Click Save to apply your changes.
Setting Up the Connection Between Salesforce and PSA
- Requirements for setting up the connection:
- Configuring the PSA Environment (Establishing a Connection)
- Mapping Objects Between Salesforce and PSA
Requirements for setting up the connection:
The following information is required to configuring the connection in PSA :
- API Version Number (required for your specific SOAP address)
- SOAP address (required for the URL box of the CRM Integration Options page in PSA)
- Security Token (required for the Password box of the CRM Integration Options page in PSA)
API Version Number
- Login to your salesforce account.
- Go to:
https://CompanyName.my.salesforce-setup/soap/wsdl.jsp - Where CompanyName in the URL is specific to your SalesForce account.
- Copy the Salesforce Partner Web Services API Version number.
- You will need this version number to create your specific SOAP address.
SOAP address
When configuring PSA, the SOAP address is one of the pieces of information you are required to enter.
As an example: https://CompanyName.my.salesforce/services/Soap/u/63.0
Tip: Where CompanyName is specific to your SalesForce account and 63.0 is the version number copied from Step 4 of API Version Number.
Caution: The word "Soap" in the URL should be capitalized with an uppercase "S" (e.g., /services/Soap/u/), as it is case-sensitive and required for proper functionality.
Copy and paste your specific URL in a text file to be able to copy it when you make the entry in the URL box of the CRM Integration Options page.
Example: https://ACMECORP.my.salesforce/services/Soap/u/63.0
Security Token
1. Login to your Salesforce account.
2. Click View profile located on the top right corner of the page.
3. From the available menu options click Settings.
4. Then select Reset My Security Token from the left navigation.
5. Click the Reset Security Token button, which will trigger an email to the email address associated with your profile containing the security token.
6. Copy and paste the Security Token on a text file to be able to copy it when you make the entry in the Password box of the CRM Integration Options page in PSA.
Configuring the PSA Environment
Establishing a Connection
This section details how to configure PSA for the Salesforce and PSA integration.
- Login to PSA.
- From the Icon Bar click Integrations
 .
. - From the Navigation Menu click CRM.
- Ensure the CRM System selected is Salesforce.
- Slick Save.
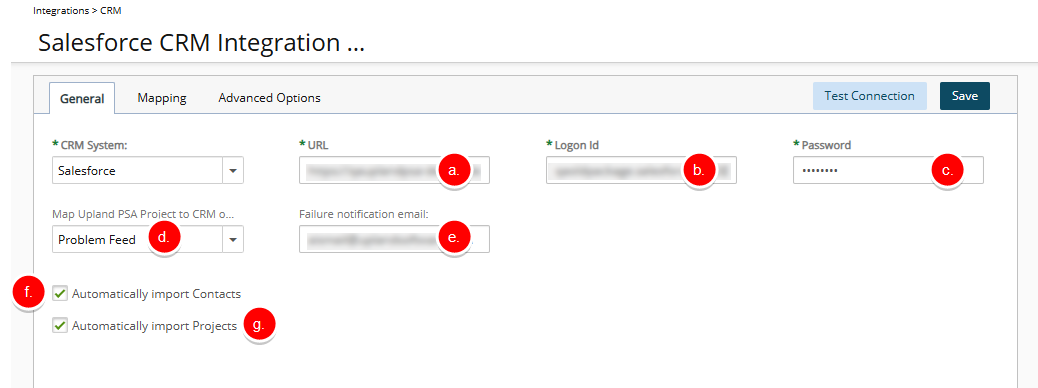
- On the Salesforce CRM Integration page, complete the boxes, accordingly, paying particular attention to the following:
- In the URL box, paste the SOAP address you previously captured. (https://CompanyName.Salesforce/services/Soap/u/63.0)
- Enter your Salesforce Logon Id.
- In the Password box, follow this example, pulling up the Security Token you previously captured from your email.If your password = "mypassword"
And your security token = "XXXXXXXXXX"
You must enter "mypasswordXXXXXXXXXX" in place of your Password - For Map PSA Project to CRM object option, choose the object in CRM that will be mapped with PSA Project object. Select Opportunity or Project from the available options.
Note: You must choose to either use Salesforce Opportunities or Projects. Switching from one setup to the other will cause loss of data.
Select an Import Workflow to specify the Project Workflow to apply when a new project is created via the Salesforce integration. By default, the Import Workflow is set to the System Default Project Workflow defined in Setup > Work > System.
Note: This setting only affects new imports—existing projects will not be updated retroactively, even if the workflow setting is modified or a re-import occurs. Changes in Opportunity fields (such as name) will still be reflected in the project upon re-import, but the workflow will remain unchanged unless a new project is created.
- In the Failure notification email box, you can enter semi-colon-separated email addresses. When the failure notification email is generated, it will be sent to each recipient email address as specified.
- Select the Automatically import Contacts check box to automatically import a client’s associated contacts when the accounts are imported from Salesforce to PSA.
- Select the Automatically import Projects check box to automatically import all projects, cases or opportunities created in Salesforce to PSA.
Note: If the check boxes for automatically importing the contacts and the projects are not selected, the contacts associated with the client, as well as the projects, cases or opportunities created in Salesforce, are not automatically imported to PSA when the CRM Users and Contacts Import and CRM Data Exchange services are running. For more information on automation, see Setting Up the Automated (Batch) Processing.
- Click Test Connection.
- If the connection fails, you will receive a Test Connection failed message. Verify your URL, Logon Id, and Password. Please refer to Requirements for setting up the connection for further details. Otherwise, click Ok upon the display of the notification confirming that PSA has been successfully connected to Salesforce.
- Click Save and then Back to save your changes and return to the previous page.
Caution: After saving the CRM Integration Options settings, given that the page does not automatically refresh, you must click Back and click CRM again to trigger the refreshing of the page.
- Upon the confirmation box displaying, click Yes.
Mapping Objects Between Salesforce and PSA
After the Salesforce connection is set up, the system automatically maps certain imported objects from Salesforce to objects existing in PSA by default. The mapping of objects between Salesforce and PSA ensures that the information is transferred properly and reliably during the import and export processes.
The mapping of PSA Users and CRM Users serves as an example of how fields are mapped between Salesforce and PSA objects since the mapping of the fields between the Salesforce and PSA objects is similar for the other objects, which include the following:
- CRM Accounts to PSA Clients.
- CRM Accounts to PSA Clients
- CRM Contacts to PSA Contacts
- CRM Projects to PSA Projects (Ensure that at a minimum the following objects are mapped: Account, End Date, Project Code, Project Name Start Date). Refer to Mapping CRM Project to PSA Projects
- PSA KPIs to CRM Projects: Refer to Mapping the PSA KPIs to the Salesforce Fields
- Default Out-Of-The-Box mapped objects
- Advanced Options
Note: For all mapping, please refer to your designated PSA consultant to confirm what the most appropriate mapping are for your organization's PSA and Salesforce integration.
Mapping CRM Users to PSA Users
To map CRM Users to PSA Users:
- Login to PSA.
- From the Icon Bar click Integrations .
- From the Navigation Menu click CRM.
- Navigate to the Mapping tab.
- From Mapping types select CRM Users to PSA Users.
- Click the Copy and Associate button to create the user-defined fields in PSA and associate them to the PSA Users profile.
Note: When the Copy and Associate icon is gray, the field exists in the PSA User profile and is already mapped. When the Copy and Associate icon is blue, the entry does not exist in the PSA User profile and is not mapped. If a user-defined field with the same name and type already exists in PSA, then the system automatically maps the imported Salesforce field to the existing user-defined field in PSA.
- Verify that the appropriate PSA Field has an assigned CRM Field.
Note: By default User Defined Fields will be added to General tab of User Edit page. To access and move these UDFs to another tab, click the User Defined Fields button.
- Click the User Defined Fields button to move or reposition the mapped Fields created as UDFs within the required tab.
- Click Save and then Back to save your changes and return to the previous page.
Mapping CRM Projects to PSA Projects
To map CRM Projects to PSA Projects:
- Login to PSA.
- From the Icon Bar click Integrations .
- From the Navigation Menu click CRM.
- Ensure the CRM System selected is Salesforce, click Save, and then click Options.
- Navigate to the Mapping tab.
- From Mapping types select CRM Project to Upland PSA Projects.
- For the Account CRM Field , select Client as the PSA Field.
- For CRM Field End Date, select End Date as the PSA Field.
- For CRM Field Project Code select Project Code as the PSA Field.
- For CRM Field Project Name select Name as the PSA Field.
- For CRM Field Start Date select Start Date as the PSA Field.
- For CRM Field Project Manager select Project Manager as the PSA Field.
Note: For all mapping, please refer to your designated PSA consultant to confirm what the most appropriate mapping are for your organization's PSA and Salesforce integration.
- Click Save and then Back to save your changes and return to the previous page.
Mapping the PSA KPIs to the Salesforce Fields
PSA provides Key Performance Indicators (KPIs) to help companies monitor the efficiency of their projects and employees against operational targets. The PSA KPIs track and transfer specific project-related information from PSA to Salesforce using a set of KPI fields.
Note: Since all updates to the KPI fields originate in PSA, PSAis the primary application (master). The information between Salesforce and PSA is synchronized through the Automation Processing.
To map the PSA KPIs to the Salesforce fields:
- Login to PSA.
- From the Icon Bar click Integrations .
- From the Navigation Menu click CRM.
- Ensure the CRM System selected is Salesforce.
- Navigate to the Mapping tab.
- Click PSA Kpis to CRM Project.
- Select the corresponding Salesforce field from the CRM Fields list for each of the PSA KPI fields that you want to map.
Note: For all mapping, please refer to your designated PSA consultant to confirm what the most appropriate mapping are for your organization's PSA and Salesforce integration.
- Click Save to apply your changes.
Note: After the fields are mapped, the information is transferred to Salesforce projects when the Automation Processing options are scheduled to run.
- Click Back to return to the previous page.
Default Out-Of-The-Box mapped objects
After the Salesforce connection is set up, the system automatically maps certain imported objects from Salesforce to objects existing in PSA by default. This mapping ensures that the information is transferred properly and reliably during the import and export processes. The tables below illustrate Default Out-Of-The-Box mapped objects.
| CRM Fields | Data Type | PSA Fields | User Defined Fields Tab |
|---|---|---|---|
| Alias | string (8) | Id | -- |
| City | string (40) | City | -- |
| Country | string (80) | Country | -- |
| email (128) | -- | ||
| Fax | phone (40) | Fax | -- |
| First Name | string (40) | First Name | -- |
| Language | picklist (40) | Language | -- |
| Last Name | string (80) | Last Name | -- |
| Mobile | phone (40) | Mobile | -- |
| Phone | phone (40) | Business Phone | -- |
| Profile ID | reference (18) | Security Role | -- |
| Street | textarea (255) | Address Line 1 | -- |
| Username | string (80) | Logon Name | -- |
| Zip/Postal Code | string (20) | Zip code | -- |
| CRM Fields | Data Type | PSA Fields | User Defined Fields Tab |
|---|---|---|---|
| Account Description | textarea (32000) | Description | -- |
| Account Fax | phone (40) | Fax | -- |
| Account Name | string (255) | Name | -- |
| Account Number | string (40) | Id | -- |
| Account Phone | phone (40) | Phone | -- |
| Account Rating | picklist (255) | Rating | -- |
| Annual Revenue | currency | Annual Revenue | -- |
| Billing City | string (40) | Billing City | -- |
| Billing Country | string (80) | Billing Countryl Code SIC Code Ticker Symbol Web Site | -- |
| Billing State/Province | string (80) | Billing State/Province | -- |
| Billing Street | textarea (255) | Billing Address Line 1 | -- |
| Billing Zip/Postal Code | string (20) | Billing Zip/Postal Code | -- |
| Employees | int | Employees | -- |
| Industry | picklist (255) | Industry | -- |
| Owner ID | reference (18) | Account Executive | -- |
| Shipping City | string (40) | City | -- |
| Shipping Country | string (80) | Country | -- |
| Shipping State/Province | string (80) | State/Province | -- |
| Shipping Street | textarea (255) | Address Line 1 | -- |
| Shipping Zip/Postal Code | string (20) | Zip/Postal Code | -- |
| SIC Code | string (20) | SIC Code | -- |
| Ticker Symbol | string (20) | Ticker Symbol | -- |
| Website | url (255) | Web Site | -- |
| CRM Fields | Data Type | PSA Fields | User Defined Fields Tab |
|---|---|---|---|
| Business Fax | phone (40) | Fax | -- |
| Business Phone | phone (40) | Phone | -- |
| Contact Description | textarea (32000) | Description | -- |
| Department | string (80) | Department | -- |
| email (80) | -- | ||
| First Name | string (40) | First Name | -- |
| Last Name | string (80) | Last Name | -- |
| Lead Source | picklist (255) | Lead Source | -- |
| Mailing City | string (40) | City | -- |
| Mailing Country | string (80) | Country | -- |
| Mailing State/Province | string (80) | State | -- |
| Mailing Street | textarea (255) | Address | -- |
| Mailing Zip/Postal Code | string (20) | Zip Code | -- |
| Mobile Phone | phone (40) | Mobile | -- |
| Title | string (128) | Title | -- |
Ensure that at a minimum the following objects are mapped
| CRM Fields | Data Type | PSA Fields | User Defined Fields Tab |
|---|---|---|---|
| Account | Reference (18) | Client | -- |
| End Date | date | End Date | -- |
| Project Code | String (32) | Project Code | -- |
| Project Name | String (80) | Name | -- |
| Start Date | date | Start Date | -- |
Advanced Options
The Advanced Options page is used to define the conditions for importing, updating and deleting the objects, as well as setting the pre- and post-processes to trigger the successful import, update or deletion of objects. For more information, see the following
Defining the Custom Integration Settings
From the Advanced Options page, users can:
- Define the custom filters to apply conditions to the filter queries for the Salesforce objects that are imported, updated or deleted in PSA
- Define the custom operations when importing, updating or deleting Salesforce objects
- Define the project fields that need to be imported from Salesforce.com into PSA but cannot be mapped through PSA; the fields are used to customize functionality
To define the conditions for the custom filters:
- Login to PSA.
- From the Icon Bar click Integrations .
- From the Navigation Menu click CRM.
- Ensure the CRM System selected is Salesforce.
- Navigate to the Advanced Options tab to add or edit the user-defined queries in the system defined statement boxes. A system defined statement is available for each filter.
- Import filter logic: allows you to specify which objects are imported.
- Update filter logic: allows you to specify which objects are updated.
- Delete filter logic: allows you to specify which objects are deleted.
Note:
- The system defined statement is followed by a user-defined query that is used to filter the list of projects that are imported, updated or deleted in PSA.
- The format of a user-defined query is set as an SQL statement. The user-defined query is used only with the Automation Service since objects manually pushed from Salesforce do not need to meet the filter conditions to be successfully imported into PSA.
- Click the Validate query button to run the query on Salesforce.
- If the query syntax is valid, the query returns the number of records for the import and update filters.
- If the query syntax is not valid, the query is not processed and an error message is displayed for the import and update filters.
- If no query is defined for the delete filter, no projects are deleted and an error message is displayed.
Note: When a project is deleted, the project, case or opportunity is set to TenroxUniqueId = “” and since the default condition of the Import filter logic is to import any projects, cases or opportunities with TenroxUniqueId = “”, a user-defined condition needs is defined for the Import filter logic to prevent deleted projects from being re-imported.
- Click the Copy to clipboard to copy the query to the clipboard and paste it into an editor, such as Apex Explorer, to correct syntax errors.
- Under the Pre/post processing define the stored procedures that trigger the custom functions performed before or after the Salesforce objects are imported, updated or deleted in PSA.
- Execute before delete: defines the stored procedure that is triggered before a deletion occurs; it runs on every project marked for deletion.
- Execute after create: defines the stored procedure that is triggered after a creation occurs; it runs on every newly imported project.
- Execute before update: defines the stored procedure that is triggered before the actual updates occur to the project; occurs before the Execute after update procedure.
- Execute after update: defines the stored procedure that is triggered after an update successfully completes.
Note:
- The pre- and post-processing run the stored procedures when an action is carried out by the Automation Service; for example, creating a task for a specific work type after a project is imported. The stored procedures only affect objects that are imported, updated or deleted through the automation service in PSA or pushed out of Salesforce.
- All stored procedures must be setup to accept the following input parameters (as defined below):
- USERUID
- TenroxObjectType
- TenroxObjectID
- IntegrationObjectType
- IntegrationObjectID
- Enter a list of project fields, separated by a comma, that should be imported from Salesforce to PSAbut cannot be mapped through PSA in the Use this area to add fields to the returned query (separate fields by comma) box.
- Click Save save the changes.
Note: When the filter logic statements are saved, the syntax of the queries is validated. If an error is encountered for a given filter, a message displays that the syntax of the filter is invalid and to validate the syntax for proper integration.
- Click Import Status to view the status of the imported objects; for more information, see Verifying the Status of Imports.
Verifying the Status of Imports
- From the Advanced Options tab, click Import Status to verify the synchronization status of a specific object or objects.
- Select the required search criteria from the following available options:
- Status: Status of last update, options include Success or Failure.
- CRM Object: Name of the Salesforce object that was updated.
- Name: Name of Salesforce object that is synchronized.
- Date: Date and time of the last update.
- CRM Object Id: ID of Salesforce.com object that was updated.
- Message: Error message describing an encountered failure condition.
- Updated by: Name of user who performed the last update; if the update is performed by the automation service, Automation Service is displayed.
- Enter the required search term then click the Search
 button.
 - Click Back to exit the Import Status page.
Workflow Transition Logic
From the Workflow Transition Logic tab you can configure PSA to automatically assign the initial Workflow State of projects created from Salesforce opportunities using conditional logic. By defining rules based on Opportunity attributes—such as the Probability field—you can ensure that new projects enter the most appropriate state in PSA , streamlining project intake and reducing the need for manual adjustments.
To Configure Conditional Workflow States for Salesforce-Imported Projects:
- In the General tab, select the required Import Workflow. Any new project created through the Salesforce integration will follow the associated Project Workflow.
- Navigate to Workflow Transition Logic tab.
- Click New
 rule to create a new condition. Each rule can have one or more conditions based on Salesforce Opportunity fields (e.g., Probability).
 - Set the criteria for the rule (e.g., Probability <= 50%).
- Use multiple conditions if needed.
Tip: You can also create nested conditions and combine with AND/OR logic.
- Choose the Workflow Status the project should enter if the rule is met.
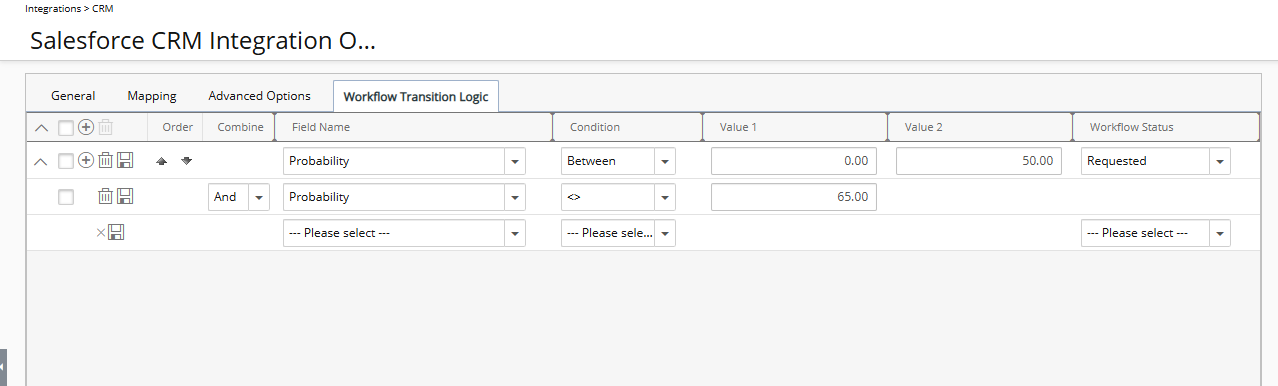
Note: Only states one step beyond the Initial State (from the General tab) are available to ensure valid transitions.
- Reorder Rules (Optional): If required click the up/down arrows set the priority order.
Note: PSA evaluates rules top to bottom, and the first matching rule determines the project’s initial state.
- Click Save
 to apply the configuration.
 -
Rules take effect automatically during project creation via the CRM Data Exchange Automation Service.
- Probability values must be integers (no decimals).
- Rules only apply when a new project is created from Salesforce; updates to existing projects do not trigger workflow logic.
- Attempting to modify workflows tied to these rules will trigger alerts to maintain integration integrity.
Note:
For example:
If Probability <= 50% → move to "Requested" state
If Probability = 75% → move to "Approved" state
Importing Users into PSA
This section details how to import a User from Salesforce to PSA to allow the user to be recognized in both environments.
Note: There may be many users in Salesforce not needed to be imported to PSA. For example, there may be many users who will never need to publish a project or track time in PSA. The Import to Tenrox flag, on each user's page, indicates which users are to be imported. Each user to be imported must have the Import to Tenrox flag selected.
- In Salesforce, from the right-hand corner of the page, click Setup.
- from the left navigation click to expand Users.
- Click Users.
- Upon the All Users page displaying, click the Name of the required User.
- Scroll to Import to Tenrox checkbox. If the option is clear, from the top of the user detail page, click Edit.
- Upon the user edit page displaying, scroll down to find the Import to Tenrox option and select it.
- Click Save to apply your changes.
Users can be imported by following either one of these processes:
Manual Import
- From the PSA icon bar, click Tools
 .
. - Click and expand the Import menu
- Click the CRM menu option.
- Select the Users and Contacts selection boxes located under Import List Selection section.
- Click Save to apply your changes.
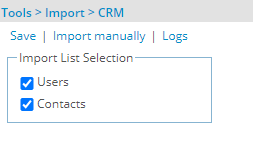
- Click Import manually to manually import Users/Contacts from Salesforce.
Note: Upon a successful import, note that the imported User in Salesforce now has a Tenrox UniqueId.
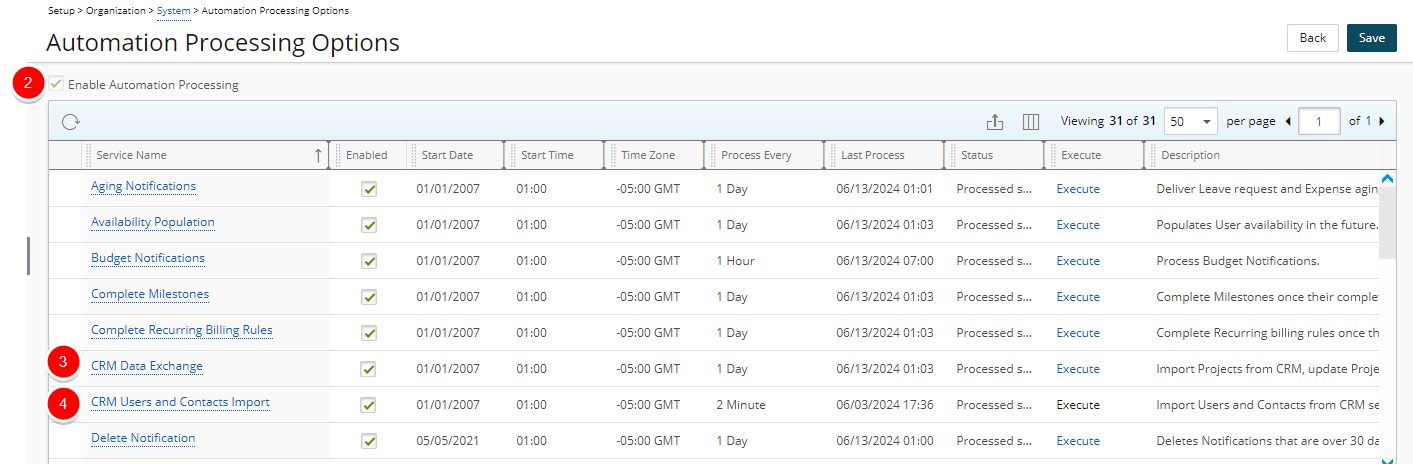
Automation Processing
- From the PSA icon bar, click Setup
 .
. - From the Navigation Menu click Organization.
- From the available options click System.
- Click the Automation button.
- From the Automation Processing Options click CRM Users and Contacts Import Process name.
- Click Execute to run the service.
Verify Import logs in PSA
- From the PSA icon bar, click Tools .
- Click and expand the Import menu
- Click the CRM menu option.
- Click Logs to view which Users/Contacts have been successfully imported.
Ensure the Security Role selected, includes the permission to create projects
- From the PSA icon bar, click Setup .
- From the Navigation Menu click Organization.
- From the available options click Users.
- Upon the Users list page displaying click the imported User’s name.
- Upon the User Edit page displaying navigate to Security.
- Ensure the Security Role selected, includes the permission to create Projects and Clients.
- Click Save to apply your changes.
Open/publish a Salesforce Projects as an PSA Project
This section details how to open/publish a Salesforce Project as an PSA Project.
Note: Ensure that the Open/Publish Project button is configured in Salesforce.
- In Salesforce, navigate to the Projects tab.
- Upon the Projects page displaying, click the Name of the required Project.
- From the header click the down arrow to view the available options and then click Edit.
- Upon the project edit page displaying, click Publish Project.
- In PSA, click Projects
 from the icon bar.
 - Upon the Projects list page displaying note that the imported Project is listed.
Note: Any related Client/Contact will also be imported in PSA as per your previously mapped settings.
Open/publish a Salesforce Opportunity as an PSA Project
This section details how to open/publish a Salesforce Opportunity as an PSA Project.
Note: Ensure that the Open/Publish Project button is configured in Salesforce.
- In Salesforce, navigate to the Opportunities tab.
- Upon the Opportunities page displaying, click the Name of the required Opportunity.
- From the header click the down arrow to view the available options and then click Edit.
- Upon the opportunity edit page displaying, click Publish Opportunity.
- In PSA, click Projects from the icon bar.
- Upon the Projects list page displaying note that the imported Project is listed.
Setting Up the Automated (Batch) Processing
The CRM automation processing options are used to automatically update information between Salesforce and PSA. Setting up automated processing for Salesforce and PSA integration ensures that the information is synchronized in both systems.
Note: If information updated directly in PSA differs from the information in Salesforce, then it is overwritten on the next import from Salesforce.
From the Automation Processing Options page, ensure that the following CRM services are turned on:
- CRM Data Exchange
- CRM Users and Contacts Import
Note: To automate the processing of the CRM Users and Contacts Import and CRM Data Exchangeservices, ensure that the check boxes for automatically importing the contacts and projects are selected.
To setup the Automated (Batch) Processing
- From the Icon Bar click Setup .
- From the Navigation Menu click Organization.
- From the menu click System.
- Click the Automation button to open the Automation Processing Options page.
- Select the Enable Automation Processing check box to enable the automatic processing feature.
- Choose the selection box located against CRM Data Exchange to enable it. This service automates the following:
- Update Project, User and Contact data from Salesforce to PSA
- Update KPIs from PSA to Salesforce
- Import Projects from Salesforce to PSA
- Choose the selection box located against CRM Users and Contacts Import to enable it. This service automates the import of Users and Contacts from Salesforce to PSA.
- To define the settings forthe above mentioned services, click each service name to open the Automation Service Setup page to edit the following:
- Start Date: start date of processing; set by default to the date when batch service was initialized
- Start Time: time the service starts the processing; set by default to 01:00
- Time Zone: time zone of the processing time; set by default to the server time zone
- Process Every: frequency service is processed (Minute/ Hour/ Day/ Week/ Month/ Year); set by default to one day
- Last Process: date and time of the last automated background process
- Status: status of the process (successful or unsuccessful)
- Description: description of the process
- Enable Service: indicates if the service is enabled or disabled
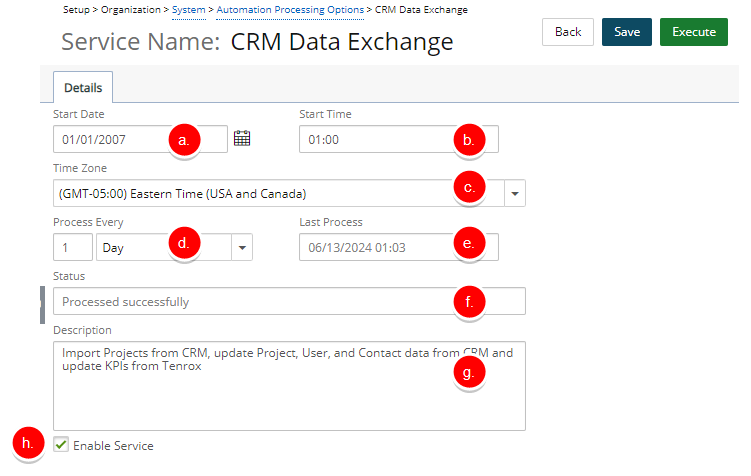
- Click Save and then Back to save your changes and return to the previous page.