This preview provides an overview of what you can expect in the forthcoming 2026 R1.0 release. Note that the content of this page is subject to change as the release continues to evolve.
While the listed Enhancements are currently expected to be included in the 2026 R1.0 release, the finalized release notes will be available closer to the deployment dates.
PSA 2026 R1.0 will be deployed to your staging sites on April 15, 2026. Production sites will be upgraded on May 10, 2026. The listed Enhancements will become available to you upon upgrading to 2026 R1.0.
What’s New in This Release
This release delivers meaningful improvements designed to make PSA more intuitive, flexible, and efficient. From a modernized user interface and enhanced navigation to new automation capabilities and expanded project management controls, these updates focus on simplifying everyday work while giving administrators and managers greater visibility and configuration power. Together, these enhancements help streamline workflows, improve usability, and ensure teams can manage projects, resources, and operations with greater clarity and confidence.
While the highlights below showcase some of the most impactful updates, be sure to explore the full release notes to discover everything included in this release.
This release delivers a broad set of user interface improvements designed to create a cleaner, more consistent, intuitive experience across PSA. From modernized navigation and authentication pages to standardized buttons, breadcrumbs, and page layouts, the updates bring a unified design language throughout the application. These enhancements reduce visual clutter, improve usability, and help users navigate and complete tasks with greater confidence and efficiency.
Administrators can now take control of how Project information is organized with the new Project Designer capability. This enhancement allows organizations to customize the Project Edit interface—restructuring menus, tabs, and field placement to match their unique priorities.
By tailoring the layout to how teams actually work, administrators can streamline project configuration, surface the most important information first, and deliver a more efficient and role-focused project management experience.
2026.03.18.2026R1.0.V1.EB
Note:
- This page may be updated as new information becomes available. Visit this page regularly for the latest updates.
- Screenshots and examples are for illustration only. Your environment may appear differently depending on your organization’s configuration, access permissions, and feature settings.
Audit Trail

Description: To support detailed Task change tracking, a new Task Detailed Auditing Event Type is now available in the Audit Setup page (Setup > Organization > System > Security) under the Setup > Work menu. When the Update Event is enabled, the system captures and logs changes made to Task fields configured under Setup > Work > Task Edit, including fields on the General and User Defined Fields tabs.
These audit logs can be reviewed in the new History tab available on the Task Edit page (Setup > Work).
Note: Only changes made within the Task Edit page General and User Defined Fields tabs are audited.
Caution: Modifications made to a task outside of the Task Edit page are not included in the Task History.
Benefit: With this improvement, you gain greater visibility and control over Task changes by enabling detailed auditing at the configuration level. This helps you track who changed what and when for key Task fields, supporting auditing, compliance, and troubleshooting needs, while giving you the flexibility to enable or disable detailed Task tracking as required.
Automation

Description: To support the New Milestone Target Completion Date Reminder System Notification, a new Automation Processing service titled Milestone Target Completion Date Reminder Notifications has been added under Setup > Organization > System > Automation Processing Options.
This Service governs the execution schedule and filter criteria for the Milestone Target Completion Date Reminder System Notification.
The Processing Service includes two tabs:
- From the Details tab you can set up the general details of the Milestone Target Completion Date Reminder such as:
- Start Date: Start date of processing; set by default to the date when batch service was initialized through the Server Administration application.
- Start Time: Time the service starts processing; set by default to 01:00.
- Time Zone: Time zone of the processing time; by default, set to the server time zone.
- Process Every: Frequency at which the service runs; by default, 1 Day is displayed.
- Last Process: Date and time of the last automated background process.
- Status: Status of the last automated background process.
- Description: Description of the service. By default: Notify Manager about approaching Milestone Target Completion Date
- Enable Service: Select or clear the box to enable or disable the automation of this service.

- From the Filter tab, you can specify criteria to determine which Milestones are processed. Supported filters include Milestone Target Completion Date, Milestone Billing Date, Milestone State, Milestone Status, Is Billing Milestone, Project Name, Project ID, Portfolio, and all associated Project and Milestone User Defined Fields.

When enabled, the service processes eligible Milestones according to the defined schedule and Filters; triggering the Milestone Target Completion Date Reminder System Notification.
Benefit: Administrators gain centralized control over Milestone reminder scheduling, reduce manual intervention, and ensure consistent and automated processing of upcoming Milestone notifications.
Excel Import
Description: In previous releases, Resource Type, Title, and Functional Group could not be updated through Excel Import, requiring manual updates in the user interface.
With this release, the Users tab in the Excel Import Template has been enhanced to support updating Resource Type, Title, and Functional Group details.
New columns have been added to the Users sheet, including:
- Resource_Type_Name: Specifies the User's Resource Type (for example, Employee).
- Resource_Type_Start_Date: Defines the Start Date for the User's Resource Type.
- Title_Start_Date: Defines the Start Date for the User’s Title.
- Functional_Group_Start_Date: Defines the Start Date for the User’s Functional Group.
Note: Only Resource Type values of the Employee User type are supported.
Imports follow the same validation rules as the application UI. Any validation errors encountered during import are reflected in the Excel Import logs, ensuring consistency and transparency.
Action Required: You must download and use the new Excel Import Template that includes the newly added columns.
Benefit: This enhancement enables administrators to efficiently manage Resource Type, Title, and Functional Group in bulk, reducing manual effort and ensuring data consistency across the system.
Global Search
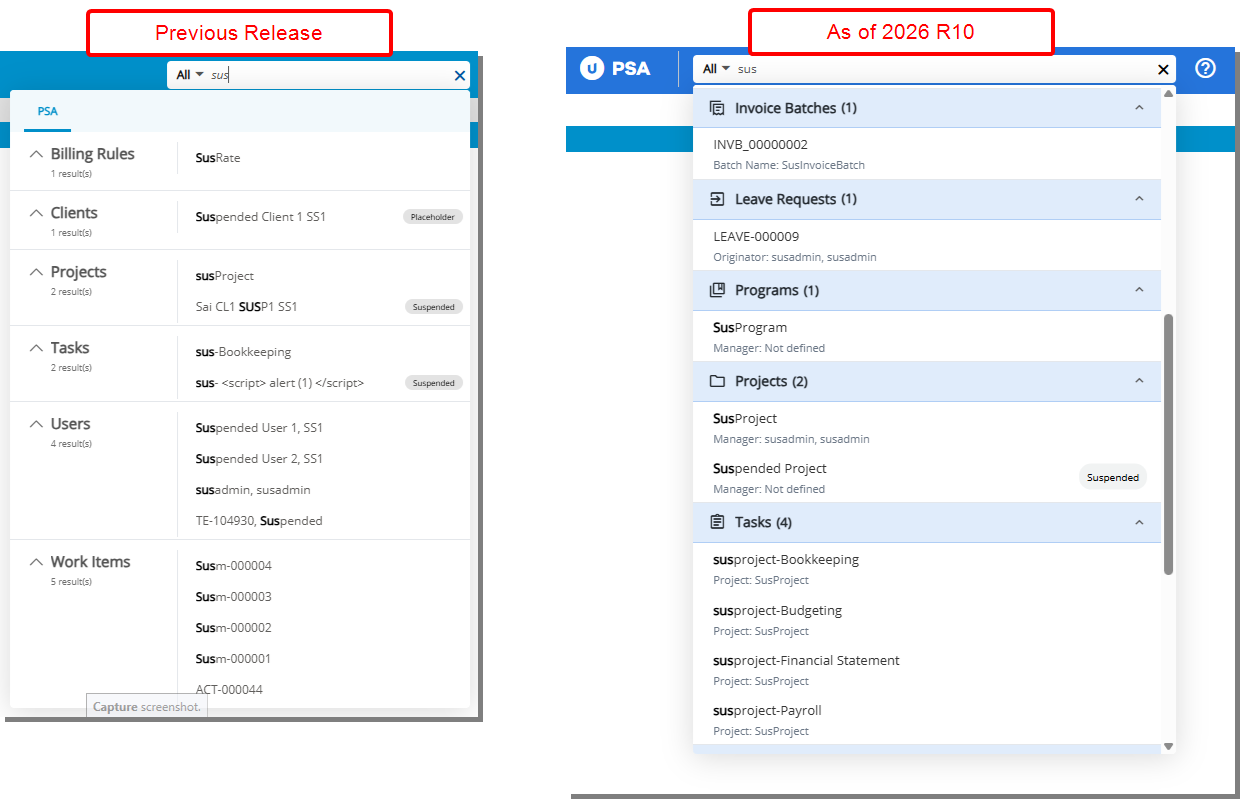
Description: Previously, search results in PSA displayed only the object name (for example, Project, Task, Client), making it harder to quickly identify the relevant record among similar entries.
In this release, identifiers have been added to each search object in Global Search. The identifier appears below the search result and provides additional context to quickly recognize the correct record. Identifiers are displayed in the format appropriate for the object (for example, Manager, Company, User ID, or Rule Type) and may be left blank if no data is available.
Objects and identifiers now included in Global Search:
- Billing Rules – Rule Type
- Clients – Parent / Client PO
- Cost Rules – Rule Type
- Expense Payable Batches – Company
- Expense Reports – Originator
- Groups – Manager (can be empty)
- Invoice Batches – Batch Name (can be empty)
- Invoices – Client
- Leave Requests – Originator
- Payroll Batches – Company
- Programs – Manager
- Projects – Manager
- Tasks – Project
- Users – User ID
- Work Items – Title
Supported search parameters for each object include:
- Billing Rules – Name, ID, Description
- Clients – Name, ID, Description
- Client POs – Name, Reference Number, Description
- Cost Rules – Name, ID, Description
- Expense Payable Batches – Batch No.
- Expense Reports – Title, Report Number
- Groups – Name, ID, Description
- Invoice Batches – Batch Number, Name
- Invoices – Current Invoice No., Batch Number, Status
- Leave Requests – Tracking No., Summary, associated Task names
- Payroll Batches – Batch No.
- Programs – Name, ID
- Projects – Name, Release Alias, ID, Description
- Tasks/Activities – Name, ID, Description
- Users – First Name, Last Name, ID, Description
- Work Items – Tracking No., Summary Description
Benefit: With this improvement, you can quickly identify and access the correct record in Global Search without scrolling or switching screens, reducing time and improving efficiency when working across Projects, Tasks, Clients, and other objects.
Description: Previously, the Global Search in PSA had a compact layout that made it difficult to quickly view search results and access multiple records efficiently.
In this release, the Global Search experience has been modernized to improve usability, readability, and result visibility:
- Longer Search Bar: The search input has been extended for easier text readability and better visibility.
- Enhanced Search Results: Each result displays the Search object icon and the total number of results. If a Search result has an associated identifier, it will appear below the search result.
- Partial Results For Large Sets: When a Search object returns 25+ results, only the first 5 results are shown by default, with a “View All” link to display the remaining results.
- Long Text Handling: For items with long names or sub-text, hover over the item to view the full text.
- No Results Message: When no results are found, the interface clearly communicates that no matches exist.
Benefit: With these improvements, you can more efficiently search for records across PSA, quickly identify relevant results, and access additional details without scrolling or navigating away from the current page, providing a faster and more intuitive search experience.
Integrations
Description: We have upgraded the MS Teams Bot to version 4.0 with backend enhancements to improve overall stability and ensure continued functionality. This update does not introduce changes to the user interface or core bot interactions. However, the updated version of the Teams app must be deployed within your organization to ensure uninterrupted service.
Administrative action required:
IT administrators must upload the updated Teams app (v4.0) to the Teams Admin Center. Once deployed, the update will propagate to all users in the organization.
What to expect:
Most users will receive the update automatically once the new app version is deployed by their organization. In some cases, users may temporarily experience bot unresponsiveness immediately following the upgrade.
If issues occur:
Users may need to uninstall and reinstall the bot within MS Teams to restore functionality.
Benefit: This upgrade improves the reliability and stability of the MS Teams Bot through backend enhancements, ensuring a more consistent user experience and better support for future updates.
Salesforce has announced that SOAP API login() will be retired in API versions 31.0 through 64.0 with the Summer ’27 release and is already unavailable in API version 65.0 and later. Any PSA integrations still using SOAP API after this date will fail to authenticate, resulting in all Salesforce API calls from those integrations failing. For further details, see Platform SOAP API login() Retirement from Salesforce, published on Feb 19, 2026.
With PSA 2026R1.0, administrators can now choose the API used for Salesforce integration directly from Setup > Integrations > CRM > Salesforce. Two radio button options—SOAP API and REST API—allow you to define the API for your integration.
Caution: Before enabling REST API, an External Client App must be created in your Salesforce tenant. Until REST API is ready, continue using SOAP API with API version 64.0 or below. Documentation will be available soon.
We strongly recommend updating your Salesforce integration to use the REST API as soon as possible to ensure uninterrupted connectivity. REST API integrations support modern authentication via OAuth 2.0 and provide a more secure, future-proof connection to Salesforce.
Action Required: Review your Salesforce integration settings and update any connections still using SOAP API to REST API well before the Summer ’27 retirement date to avoid service interruptions.
Benefits:
- Seamless integration with supported Salesforce API versions
- OAuth 2.0 authentication for enhanced security
- Unified integration logging for SOAP and REST API calls
- No disruption to existing configurations when switching
Notifications

Description: Previously, there was no automated reminder to notify Project Managers when Milestones were approaching their Target Completion Date. Administrators had to manually monitor Milestone timelines and send reminder emails, increasing operational workload and the risk of missed or outdated Milestones.
With this release, a new System Notification titled Milestone Target Completion Date Reminder has been introduced. This notification alerts the assigned Project Manager when Milestones meet configured reminder criteria and are approaching or past their Target Completion Date.

The notification includes the parameter %MILESTONE_LIST%, which displays a dynamic list of applicable Project Milestones. Project Names and Milestones are linked and route directly to their respective pages. Notifications are triggered per Project Manager, regardless of the number of qualifying Milestones across Projects, only a single consolidated notification is sent.
Note: Only Milestones that are not completed are included.
The delivery of this System Notification is controlled by the Automation Processing service Milestone Target Completion Date Reminder Notifications, configured under Setup > Organization > System > Automation Processing Options.
Projects are excluded from processing if they:
- Have an Open EndedEnd Date
- Are Suspended
- Are Placeholders
- Do not have an assigned Project Manager
- Do not have a Project Manager or Alternate Manager with a valid email
Benefit: Project Managers receive proactive reminders that support timely Milestone updates, reduce missed deadlines, and improve Project data accuracy, while Administrators reduce manual monitoring and email follow-up.
Description: Previously, the Project End Date Reminder Notifications supported limited filtering capabilities, restricting how precisely administrators could target projects for automated reminders.

New Fields have been added to Project End Date Reminder Notifications under Setup > Organization > System > Automation Processing Options. In this release, in addition to any User Defined Field associated with the Project object, you can now configure this Notification using the following criteria:
| Field Name | Condition Options | Value 1 | Value 2 |
|---|---|---|---|
| Project ID | =, <>, Like, Not Like, In, Not In | Text box | - |
| Project State | In, Not In | Multi-select dropdown (Project States) | - |
| Portfolio | In, Not In | Portfolio list browse select | - |
| Project Workflow | In, Not In | Project Workflow list browse select | - |
| Client | In, Not In | Client list browse select | - |
| Project Priority | In, Not In | Multi-select dropdown (1 Low, 2 Medium, 3 High, 4 Important, 5 Urgent) | - |
| Parent | In, Not In | Project list browse select | - |
| Program | In, Not In | Program list browse select | - |
| Project Health | In, Not In | Multi-select dropdown (Green, Yellow, Red) | - |
| Project Manager | In, Not In | User list browse select | - |
| Alternate Manager | In, Not In | User list browse select | - |
| Used By | In, Not In | Multi-select dropdown (Time, Expense, Money Charge, Product, Resource Planning) | - |
Benefit: Administrators can now configure the Project End Date Reminder Notifications using comprehensive project attributes, ensuring notifications are accurately targeted. This reduces unnecessary reminders, improves oversight of projects approaching completion, and supports more effective automation aligned with organizational requirements.
Description: In previous releases, Project End Date Reminders were sent as individual notifications for each Project, which could result in multiple emails/notifications for Project Managers overseeing several Projects.
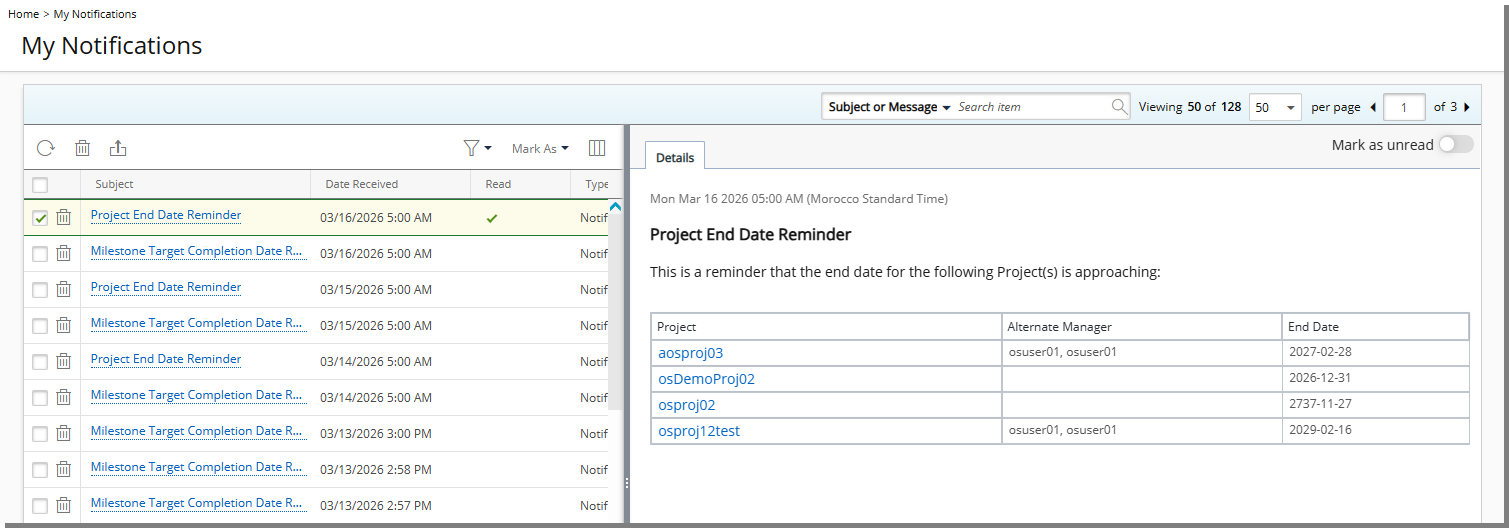
With this release, the Project End Date Reminder notification has been enhanced to send a single consolidated email/notificaiton per Project Manager. The notification now includes a list of all Projects managed by that Project Manager whose End Date is approaching based on the configured settings.
The notification message has been updated to display a Project list using the parameter %PROJECT_LIST%, which includes the following information in a table:
- Project (linked to the Project Edit page)
- Alternate Manager
- End Date
Benefit: This enhancement allows Project Managers to review all upcoming Project End Dates in a single notification, making it easier to take timely actions such as closing the Project or extending the End Date.
Organization Breakdown Structure (OBS)

Description: The option Enable Project Designer is now available from the System Configuration page (Setup > Organization > System > System Setup) accessible only to the Master Administrator User Profile.
Note: By default, Enable Project Designer is unchecked.

When the Enable Project Designer setting is turned on, you can access the new Project Designer (Setup > Work), which allows full customization of the Project Edit layout, including menus, tabs, and field placement.
When you select the checkbox, the following confirmation message is displayed: Enabling this setting will grant you access to the new Project Designer interface. Do you want to continue?
When enabled:
- The Project Designer menu item becomes available.
- The Project Edit interface becomes fully customizable.
- In the User Defined Fields Association page, the Associate to selection list no longer includes the Projects option.
When the setting is turned off, Project Edit reverts to the default system layout. Upon clearing the checkbox, the following confirmation message is displayed: Disabling this setting will revert Project Edit to its default layout. Once done, your current design cannot be restored. Do you want to continue?
If disabled:
- Menus and tabs return to the default system order.
- System-defined fields appear at the top of the page.
- User Defined Fields appear below system fields in sequential order without custom layout configuration.
- Any existing custom Project Designer configuration will be permanently removed and cannot be restored.
- In the User Defined Fields Association page, the Projects option will be available in the Associate to selection list.
- User Defined Fields previously associated in Project Designer will appear in the Projects User Defined Fields Association page.
Benefit: Master Administrators can centrally control whether the Organization uses the customizable Project Designer or the standard Project Edit layout. This ensures a consistent Project configuration experience across the Organization while providing flexibility to adopt or revert from the customizable interface as needed.
Project Designer
In this release, we are introducing Project Designer, a new configuration capability that allows you to design and control the layout of the Project Edit page.
Previously, the Project Edit page displayed a fixed set of out-of-the-box fields that could not be configured. You could extend the page by adding User Defined Fields, but you could not control the placement or visibility of system fields.
With Project Designer, you can now customize the Project Edit page to better align with organizational workflows and data requirements.
Access to Project Designer depends on two factors: the organization-level Enable Project Designer setting and the Project Designer Security Permission.
- The Enable Project Designer setting in System Configuration (Setup > Organization > System > System Setup) allows Master Administrators to turn the feature on or off for the Organizationwhich controls whether Project Designer is available. For more information see New Setting to Enable Project Designer.
- Access is further restricted by the new Project Designer Security Permission; only users with this Security Permission can open and configure the Project Designer. For more information see New Security Permission for Project Designer.
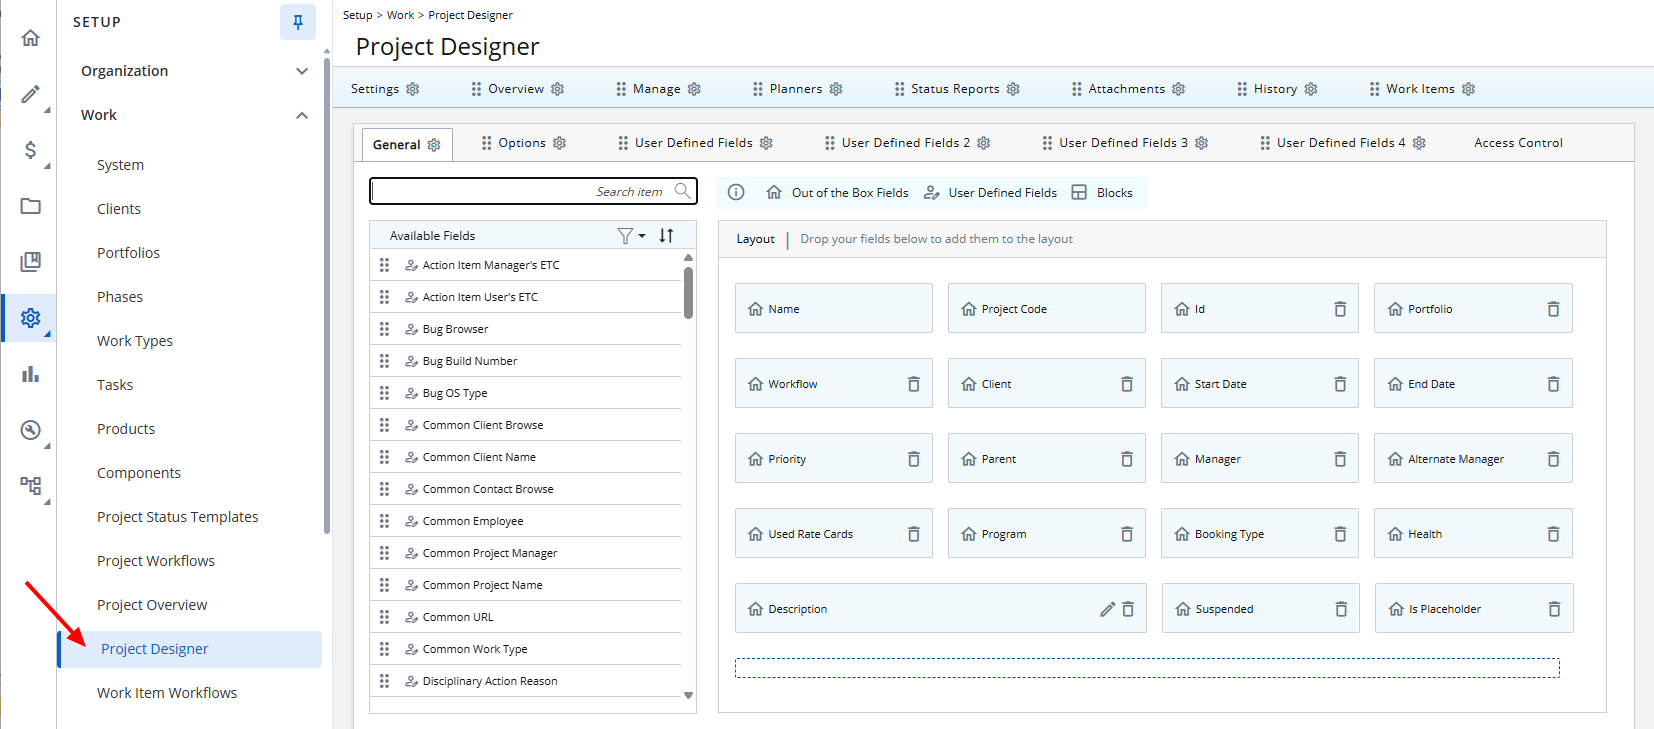
Once Project Designer is enabled and you have the appropriate permission, a Project Designer link appears in the navigation menu under Setup > Work, where you can view and modify the Project Edit layout, including arranging fields, blocks, menus, and tabs.
Initial Layout
When Project Designer is first opened, the layout reflects the structure defined prior to enabling it to ensure continuity with the existing Project Edit interface.
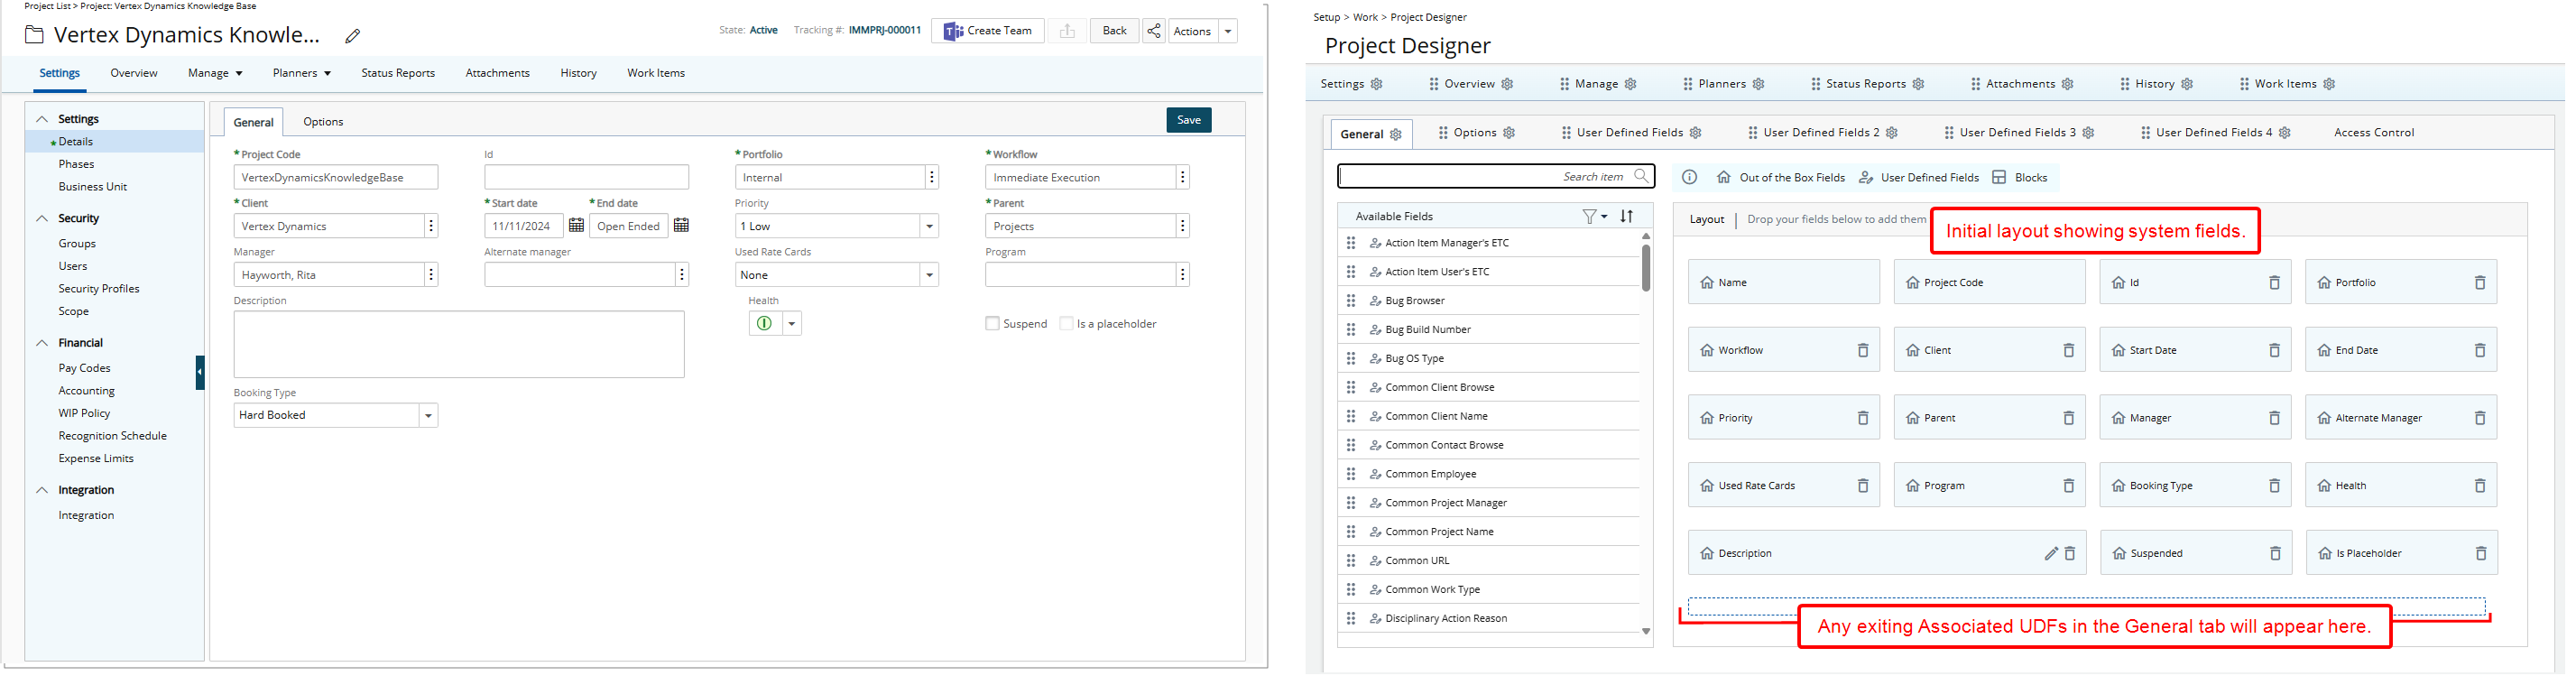
In the General tab, system-defined (out-of-the-box) fields appear at the top of the layout. Any associated User Defined Fields appear below the system fields, matching the existing Project Edit page structure.
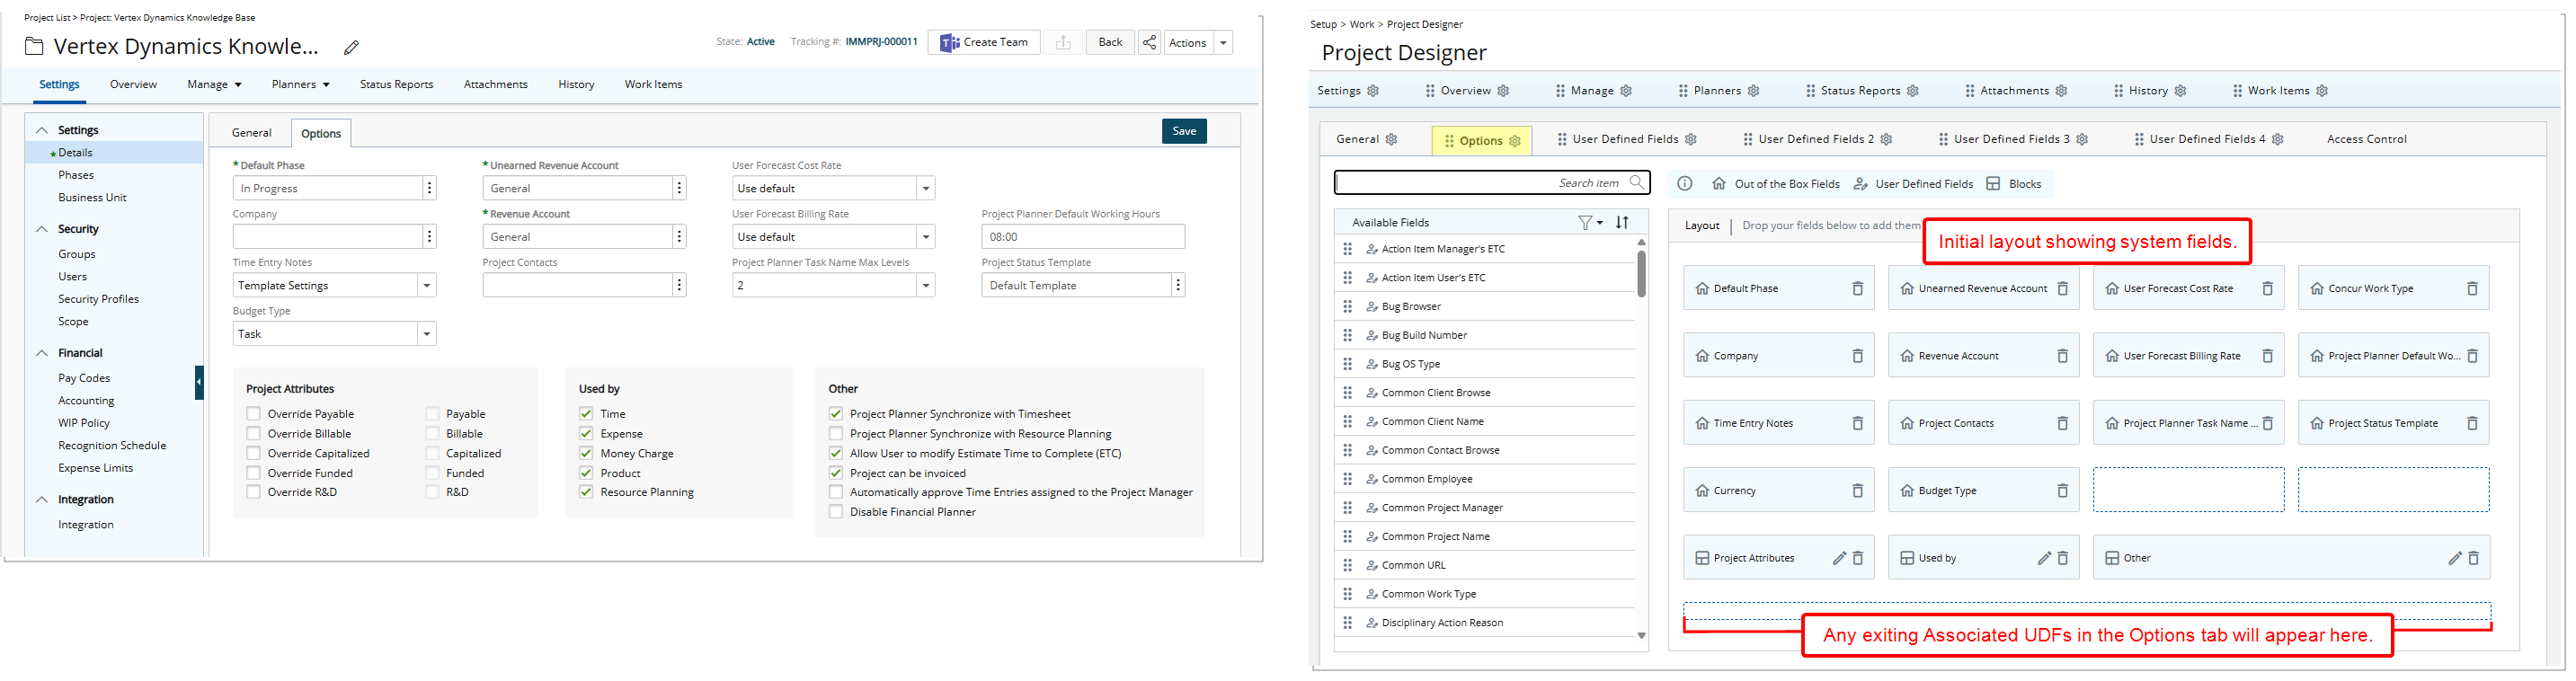
The Options tab renders exactly as it appears in your current Project Edit page. Existing fields and layout are preserved when the designer is first accessed.
If User Defined Fields are associated within these tabs, they will appear based on your existing configuration.
The Access Control tab has been relocated and now appears as a subtab within Project Designer.
Project Designer provides configuration options for managing tabs, subtabs, and menu items within the Project Edit interface. Each tab includes a Settings  button. Selecting the button opens the Menu Edit dialog, where you can control visibility, naming, and placement of navigation elements.
Available actions include:
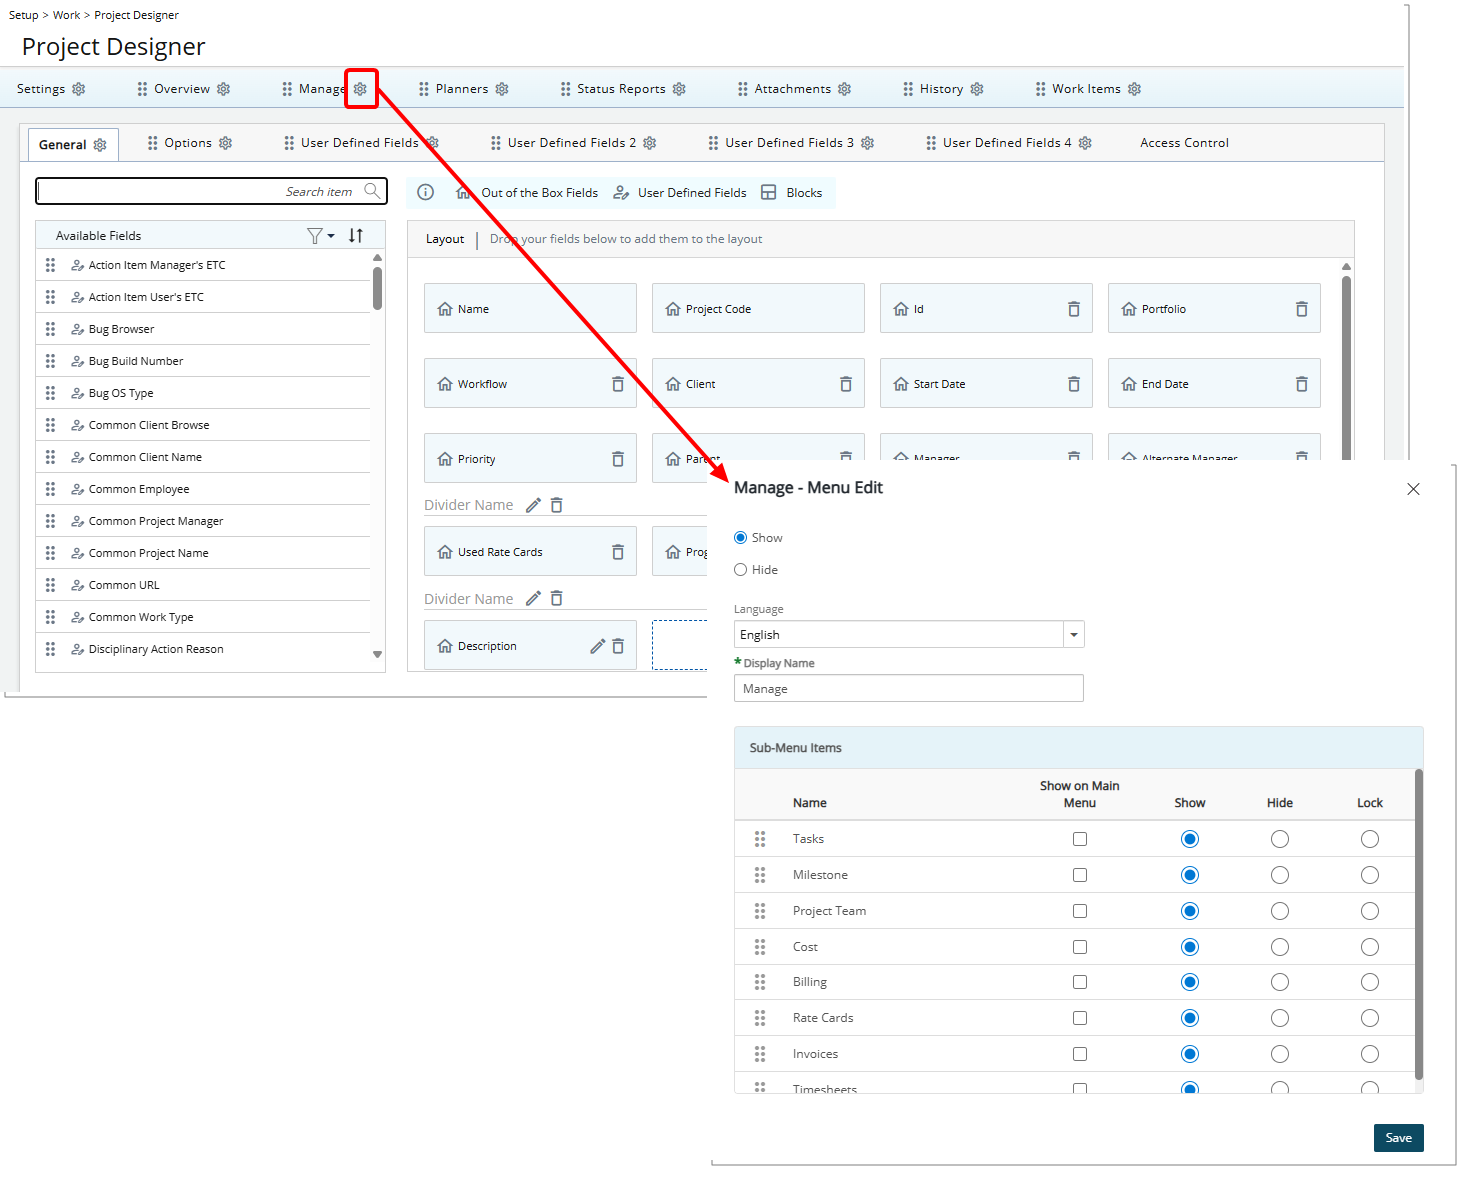
Each tab includes a Settings button. Selecting the button opens the Menu Edit dialog, where you can choose to Show, Hide, or Lock a tab menu, or submenu item.
Tab/menu item visibility and editability are determined based on two factors: the Project Designer settings and whether a User's Security Profile has Tab Security enabled. Each tab can be in one of three states: Shown (fully visible and editable), Locked (visible but read-only), or Hidden (not visible at all). The final state for a user depends on both the Project Designer’s configuration and the user’s Tab Security permissions.
General Rules:
- If a tab/menu item is set to Show in the Project Designer:
- Users with Tab Security may see it as Locked or Hidden, depending on the Tab Security rules.
- Users without Tab Security generally see it fully visible and editable.
- If a tab/menu item is set to Lock in the Project Designer:
- Users with Tab Security may have it Hidden or Locked.
- Users without Tab Security typically see it Locked (read-only).
- If a tab/menu item is set to Hide in the Project Designer:
- The tab is always Hidden for all users, regardless of Tab Security.
- When a tab is hidden in the designer, the corresponding option is also hidden in Tab Security.
Note: The Lock option is not available for History as it is always read-only.
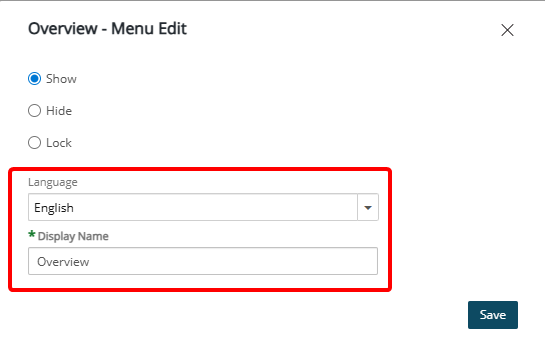
You can update the language-specific label or display name of tabs within Project Designer. Changes are reflected immediately in the Project Edit page upon saving.
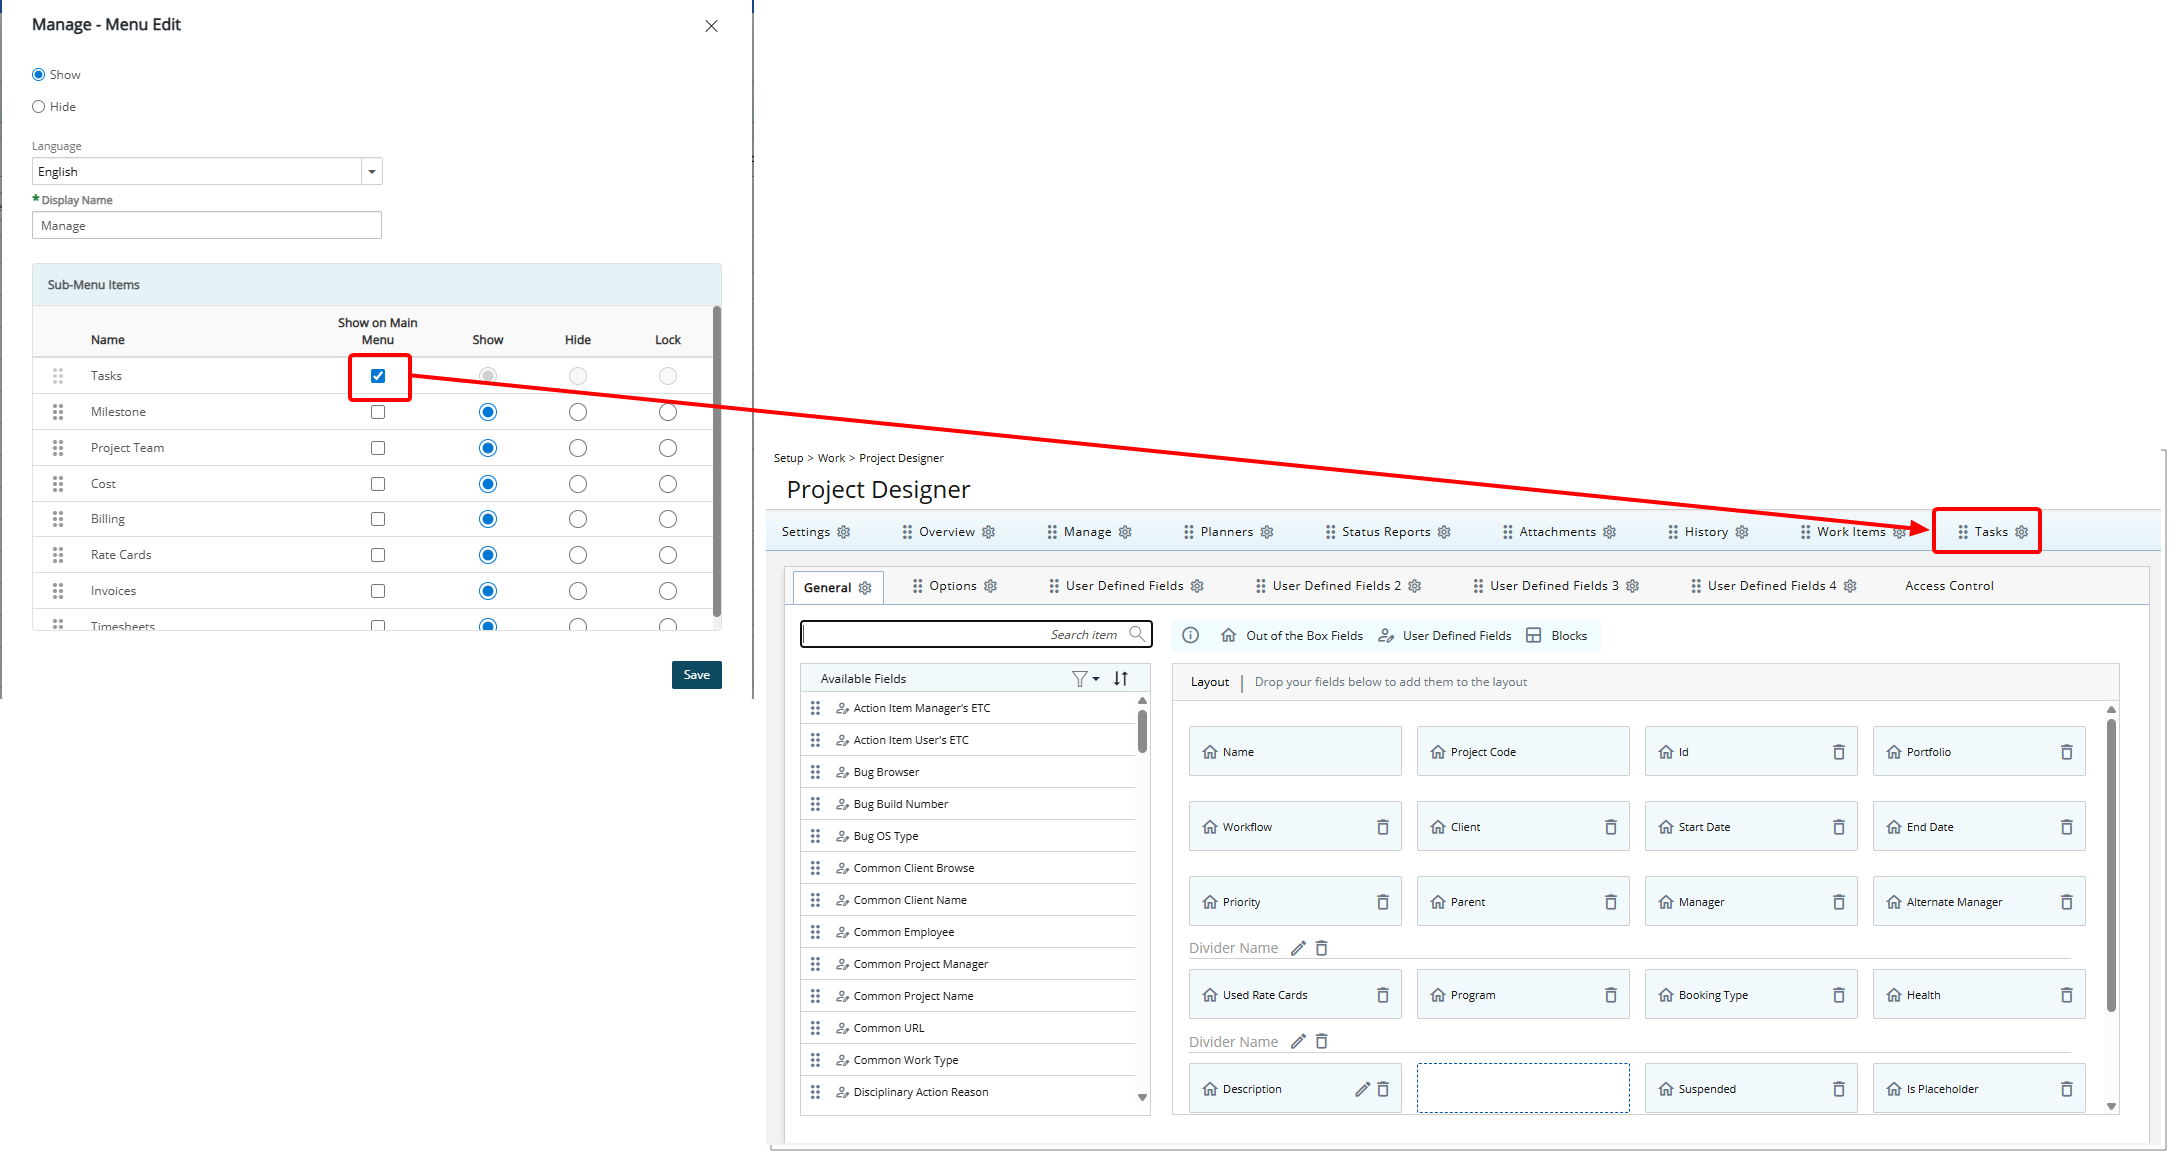
Child menu items can be shown on the main menu by selecting the Show on Main Menu option. When the layout is saved, it appears, by default, in the main menu as the last item. You can then reposition it using the drag handle ( ) or modify its settings using the Settings icon.
To convert a menu item back into a child under the parent, open the Settings for the parent (e.g., Manage) and make the change there. Clearing the Show on Main Menu box immediately removes the item from the main menu.
Note: In the Settings dialog box of Project Planner, all options are disabled. If Project Planner is promoted to a menu item, no Settings icon appears, as its display name is controlled by the System Terminology.
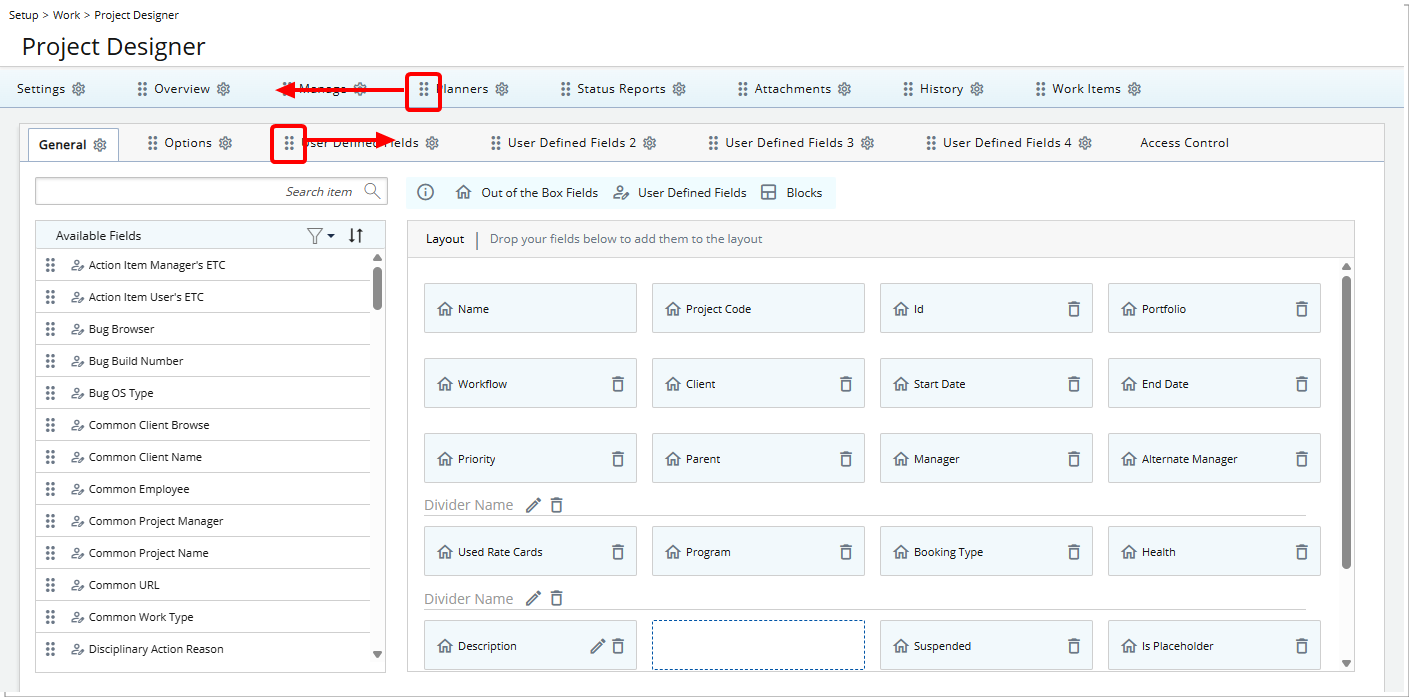
Each tab and subtab in Project Designer includes a drag handle (), allowing you to move and reposition them within their designated areas.
Tabs can be reordered within the main tab area, and subtabs can be reordered within their subtab area, providing greater flexibility in configuring the Project Edit layout.
Note: The Access Control sub-tab always appears last and cannot be reordered. It remains fixed in this position.
Project Designer allows you to add and organize fields and dividers within the Project Edit layout to structure information and improve readability.
Available options include:
Project Designer supports three types of fields that can be added to the layout:
- User Defined Fields: Custom fields created by administrators to capture organization-specific project information.
- Out-of-the-box Fields: Standard system fields provided by PSA. These fields are available by default and can be positioned within the layout but cannot be modified.
- Blocks: Predefined layout sections used to group related information and improve readability.
Furthermore, a new Unique ID field is now available in Project Designer under Available Fields. This out-of-the-box field can be added to or removed from the Project Edit layout but cannot be edited. When included in a layout, the Unique ID is displayed on the Project Edit page, making it easier to identify and reference projects for validation, troubleshooting, or data review.
Note: This field is available only when Project Designer is enabled.
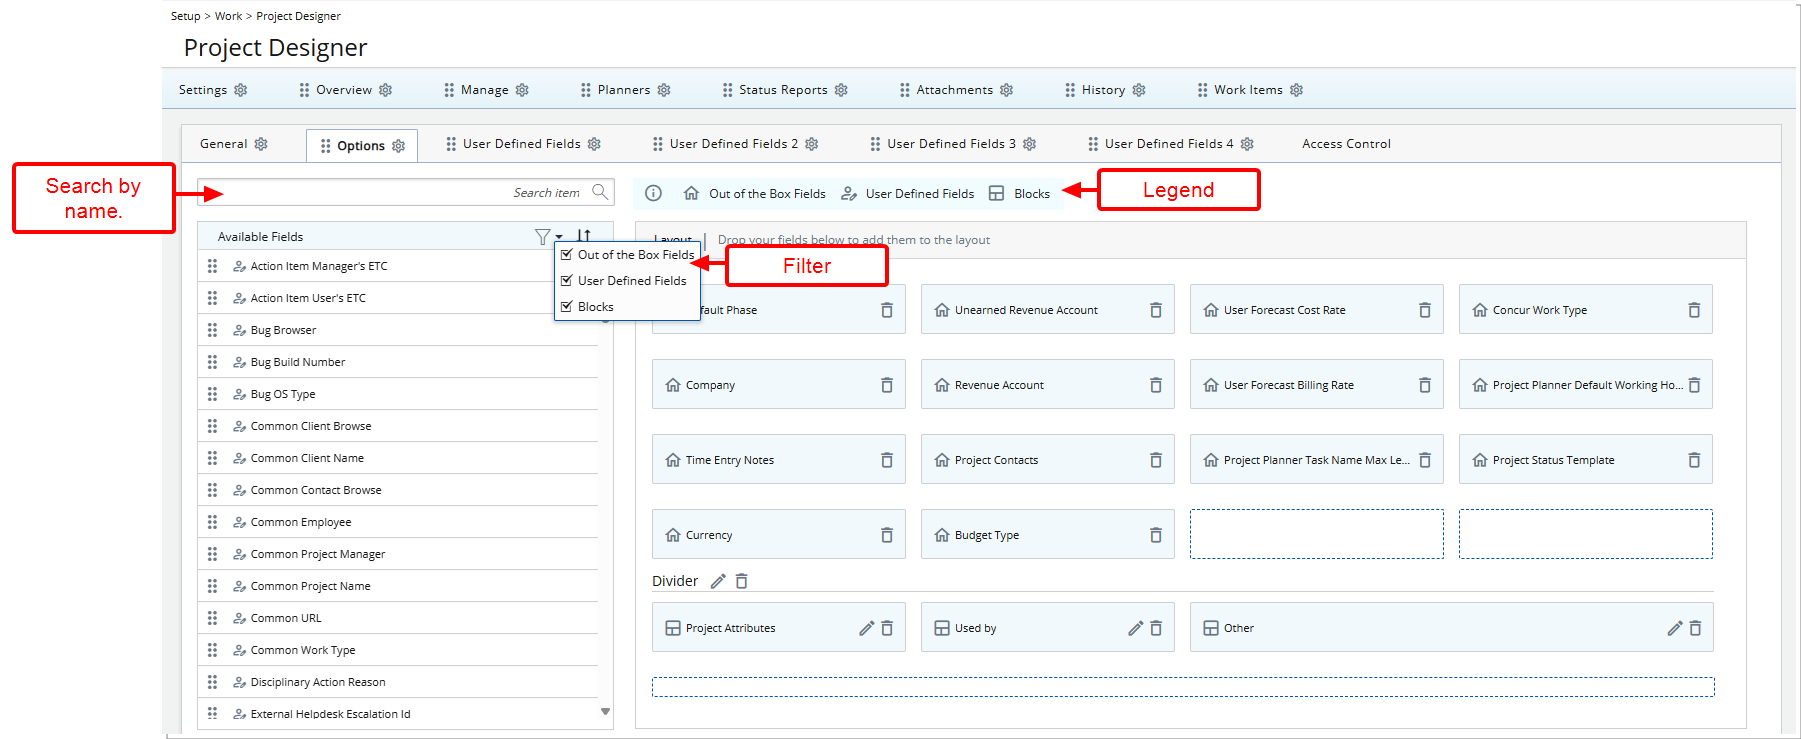
The Available Fields panel can be filtered to help locate elements quickly. Administrators can show or hide specific element types (such as User Defined Fields, out-of-the-box fields, or Blocks) or search by name to find a specific field or block before adding it to the layout.
Add Fields and Blocks to the Layout
To add a Field or a Block to the layout, drag it from the Available Fields panel and drop it in the desired location within the layout area. The element will then appear in that position on the Project Edit page.
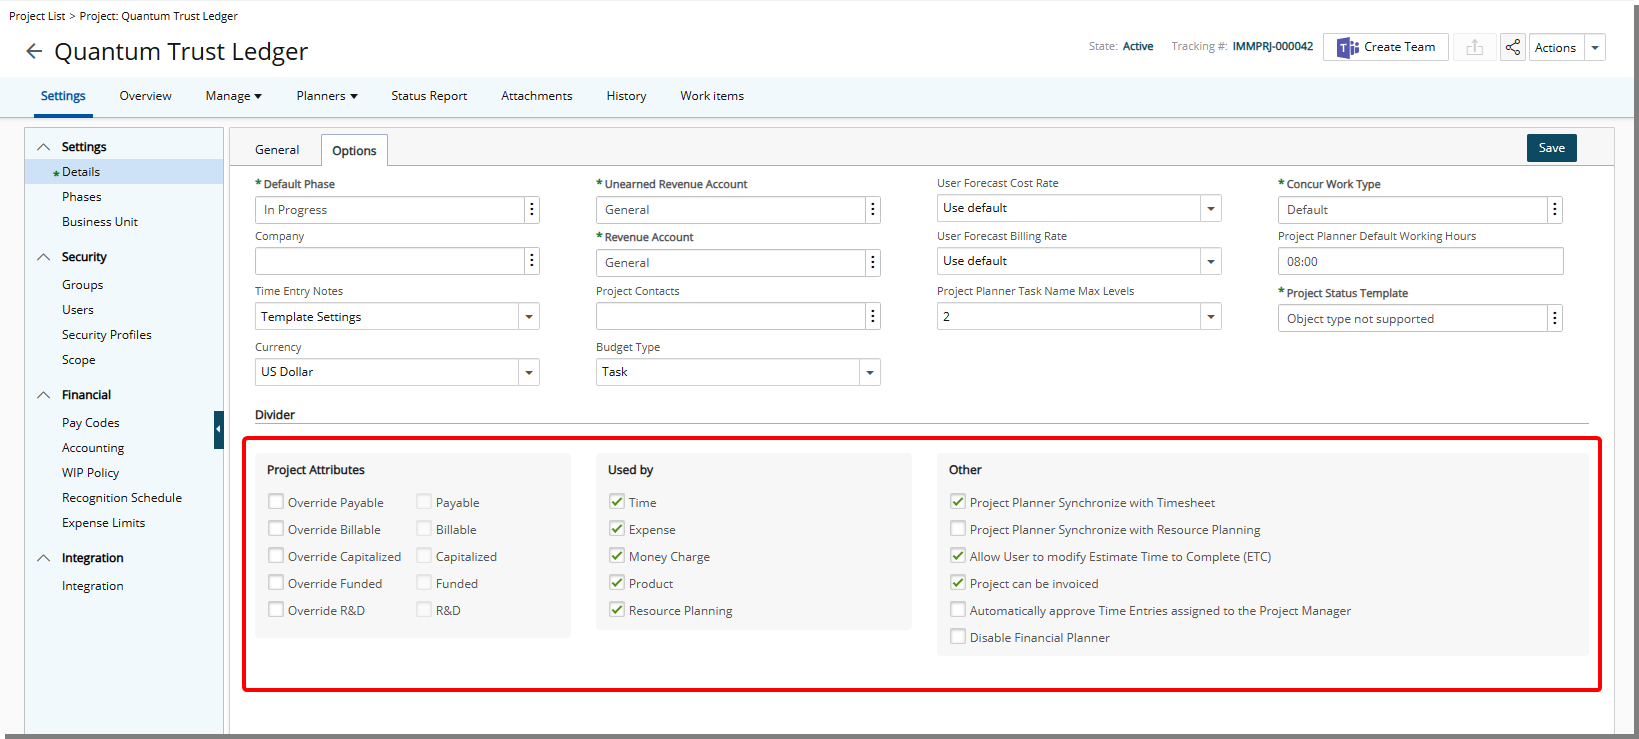
Three block types are available: Project Attributes, Used By, and Others. Blocks appear in the Available Fields panel with a dedicated icon and are also included in the legend. They can be added to the layout using drag-and-drop or removed using the delete option. Unlike fields, blocks cannot be edited.
By default, blocks are placed in the Options tab in Project Designer, but they can be moved to other tabs.
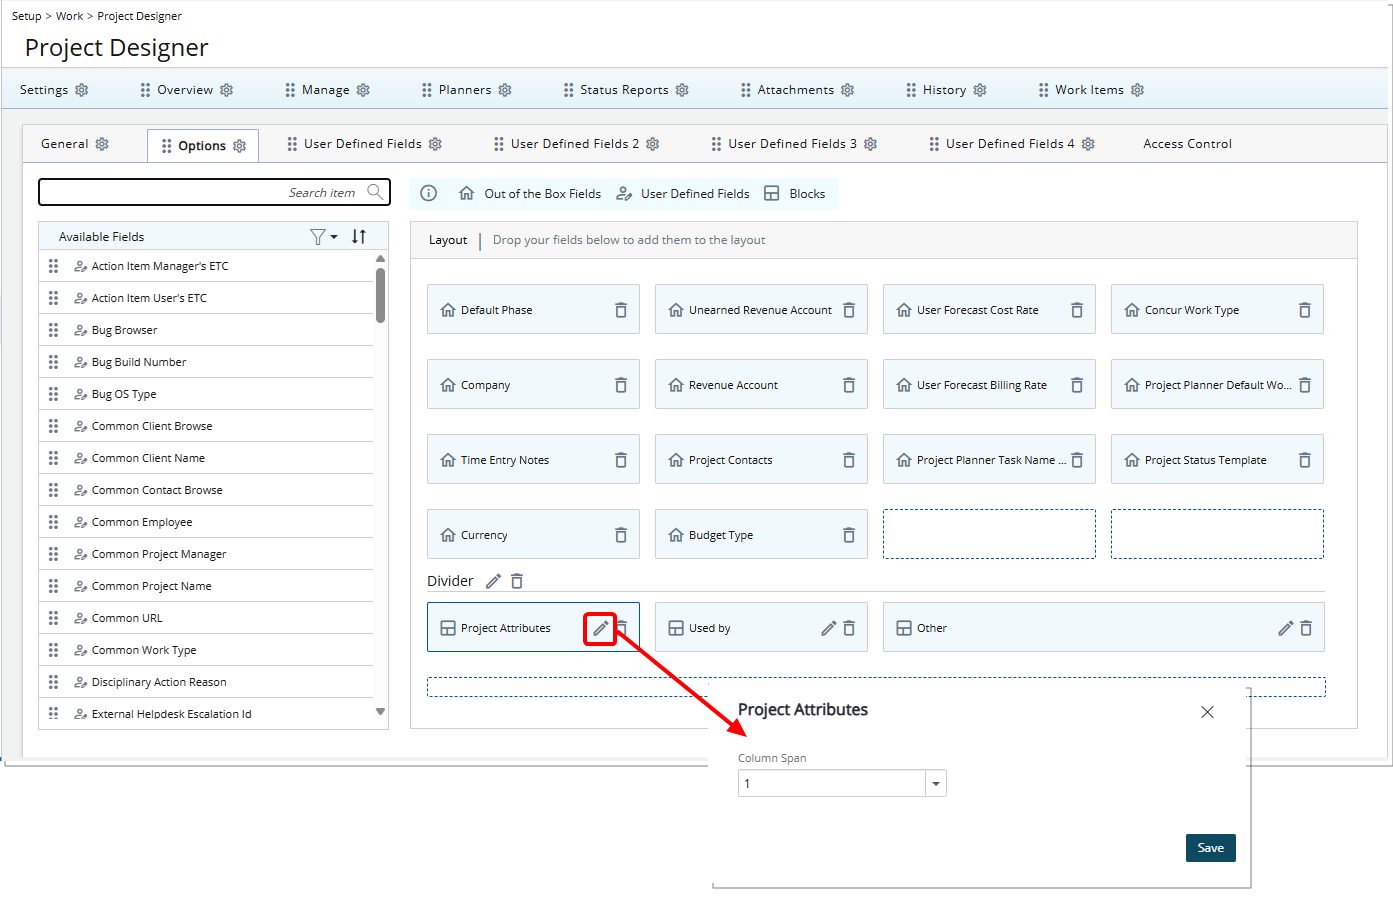
When adding a Block, the Description field, or a User Defined Field of type Memo to the layout, you can configure how many columns the element spans. The column span can be set from 1 to 4 columns.
Each row in the Project Edit layout supports a maximum of four columns, and the combined span of all elements on a single row cannot exceed four columns.
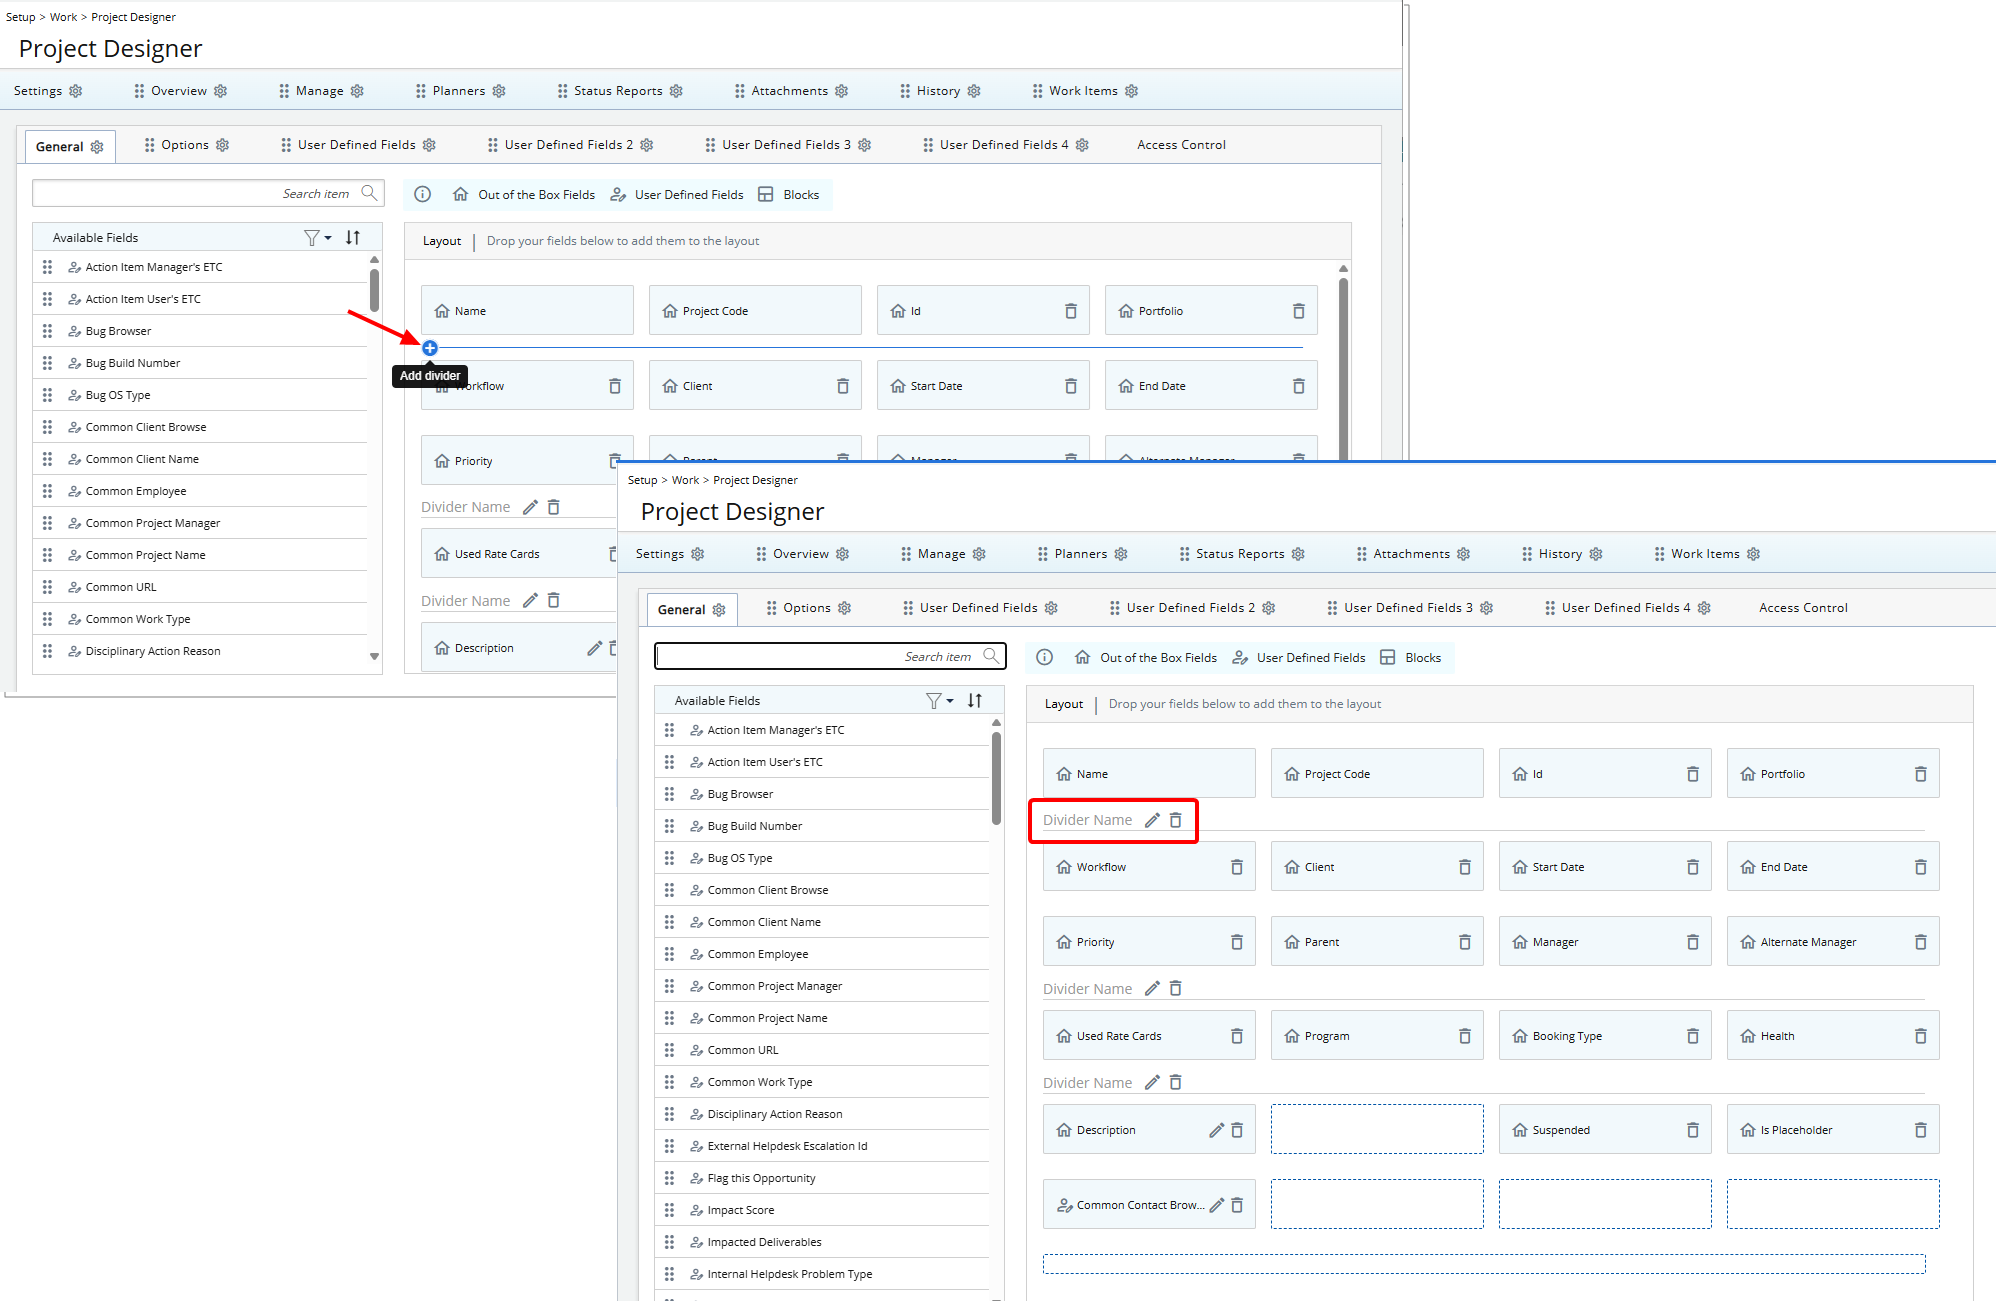
You can add dividers to the Project Edit page to create sections and improve readability.
Adding Dividers: Hover between rows in the Project Designer layout to display a ( ) icon with the tooltip Add divider. A new divider placeholder, "Divider Name", is added with Edit (
 ) and Delete (
 ) buttons.
Configuring Dividers: Click the Edit () button to open Divider Settings.
- Display Name: Optional, but if provided, both English and French names are supported.
- Language: English and French options are supported.
- Tooltip Description: Optional, but if provided, hovering over the divider name will display the Description as a tooltip.
Deleting Dividers: Click the Delete () button to open a confirmation pop-up before removal.
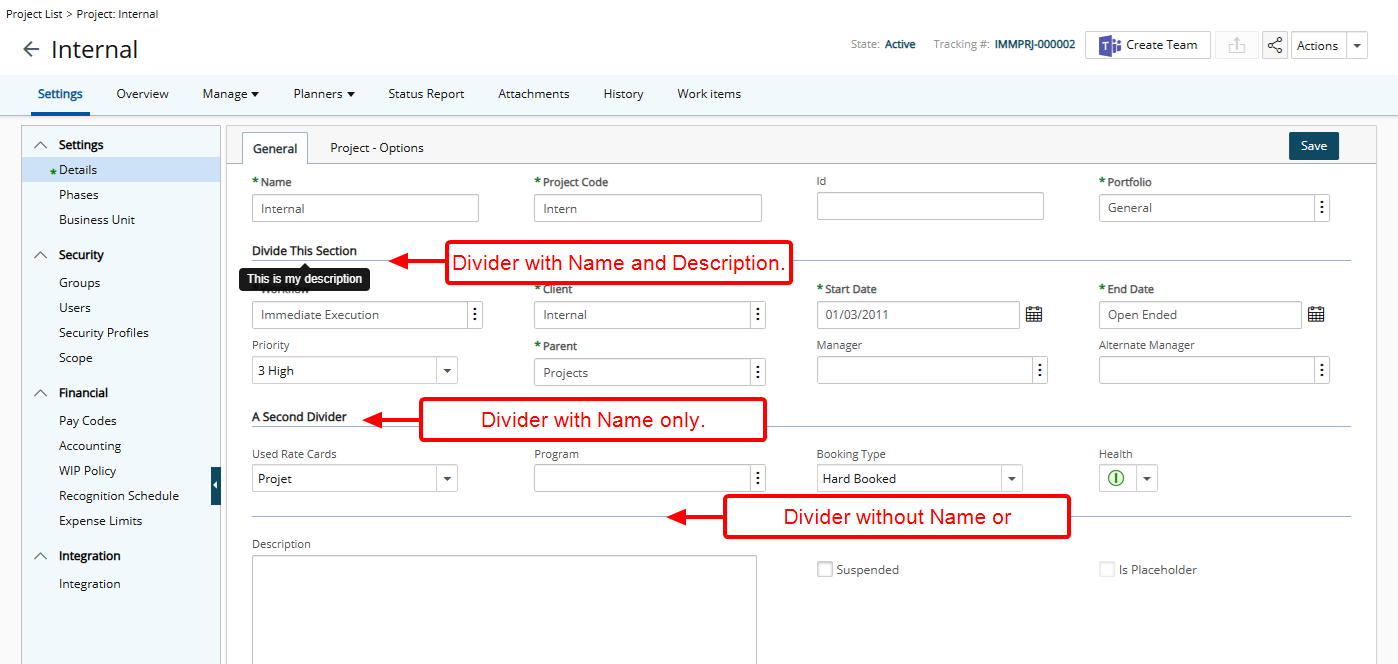
On the Project Edit page, dividers appear as configured in Project Designer. All fields below a divider up to the next divider belong to that section, preserving the layout and grouping created in the designer.
Project Management
Description: Previously, when Project Start or End dates were updated, Project Managers were required to manually adjust related Milestone Target Completion dates to keep them aligned. This created additional effort and increased the risk of schedule discrepancies.
In this release, Milestone Target Completion dates automatically update based on changes to Project Start and End dates under the following conditions:
- Condition 1: The Milestone Target Completion Date is the same as the Project End Date, and the Milestone is not Completed.
When the Project End Date is changed, the Milestone Target Completion Date automatically updates to match the new Project End Date. - Condition 2: The Milestone Target Completion Date is the same as the Project Start Date, and the Milestone is not Completed.
When the Project Start Date is changed, the Milestone Target Completion Date automatically updates to match the new Project Start Date. - Condition 3: The Milestone Target Completion Date is the same as both the Project Start Date and Project End Date, and the Milestone is not Completed.
When both the Project Start Date and Project End Date are changed, the Milestone Target Completion Date automatically updates to match the new Project End Date.
Note: This behavior applies to Project date changes made through the application, Excel Import, or API.
Benefit: This enhancement reduces manual effort for Project Managers by automatically keeping Milestone Target Completion dates aligned with Project Start and End dates. It ensures schedule consistency, minimizes the risk of errors or discrepancies, and improves overall project planning and tracking efficiency. Users can now rely on the system to maintain accurate milestone timelines, allowing them to focus on higher-value project management tasks.
Description: Previously, switching Financial Planner Templates could result in the loss of manual entries and notes without any warning, which could lead to accidental data loss.
In this release, Financial Planner now displays a clear warning message whenever you switch Templates. The message varies based on the type of template change:
- Project Specific Template → another planner: Changing the Template will result in the loss of customized settings as well as all manual entries & associated Notes. This action cannot be undone. Are you sure you want to continue?
- System Template → another planner: Changing the Template will result in the loss of all manual entries & associated Notes. This action cannot be undone. Are you sure you want to continue?
- Overriding a Template (via pencil icon): Overriding the Template will result in the loss of all manual entries & associated Notes. This action cannot be undone. Are you sure you want to continue?
Selecting Yes proceeds with the Template switch and deletes all manual Entries and associated Notes. Selecting No cancels the action, leaving the current planner unchanged.
Benefit: You will be clearly warned before switching or overriding Financial Planner templates, so you can avoid accidentally deleting manual entries and associated notes. This helps you maintain control over your data and ensures that your customized forecasts are not lost unintentionally.
Description: Previously, the Project List allowed filtering by Project Manager but did not support filtering Projects based on the managers of those Project Managers. This limited visibility for users who need to track and manage projects owned by Project Managers reporting to them.
This release introduces hierarchy-based filtering on the Project List, allowing Projects to be filtered based on the reporting relationships of the assigned Project Manager. These new filtering options are available in the following areas:
- Project List On-Page Filter (Project List)
")
- Project List View Filter (Project List > Views)

The following fields are now available as filter criteria and support In and Not In conditions using the User browse control:
- Project Manager’s Approval Group Manager
- Project Manager’s Resource Group Manager
- Project Manager’s Functional Group Manager
Additional behavior details:
- Projects without a defined Project Manager are not returned in these filters.
- Out-of-Office status in PSA is not considered; projects are returned based on the assigned Project Manager regardless of OOO state.
- The Functional Group Manager is always evaluated based on the current assignment.
- Project scoping is applied when returning results. User scoping is not applied.
Benefit: With this enhancement, you can more easily view and track projects owned by Project Managers who report to a specific manager. This improves managerial oversight, supports workload and delivery tracking across reporting hierarchies, and reduces the need for manual filtering or multiple views when managing teams at scale.
Description: Previously, users of the Project Edit page had no way to see a count of Work Items, requiring them to manually tally items to understand project status.
As of this release, the Work Items tab displays the number of Work Items whose Workflow State is not marked as Final (per the Final Attribute in the Workflow States Detail sub-tab).
Benefit: This improvement allows project managers and team members to quickly see ongoing work, improving visibility and efficiency when managing projects.
Description: In previous releases, a Project could not be deleted if user-level Billing Rate or Cost Rate rule associations referenced that Project or its Tasks. Administrators had to manually remove these associations from each user before deleting the Project.

With this release, when deleting a Project from the Project List, the system automatically identifies and removes any user-level Billing Rate and Cost Rate rule associations that depend on the Project or its associated Tasks.
Before deletion, the following confirmation message is displayed: Deleting these Project(s) will also remove associated User-level Billing and Cost Rate rules. Do you want to continue?

If Yes is selected, the system automatically removes the dependent associations from the Cost and Billing tabs in Setup > Organization > Users > User Edit > Financial, and then deletes the Project. If No is selected, no action is taken.
Note: This behavior also applies when multiple Projects are deleted in a bulk action, and when the deletion is performed through the API.
Benefit: Administrators can now delete Projects without manually removing related user-level rate rule associations, simplifying Project cleanup and reducing administrative effort.

Description: In previous releases, Attachments associated with a Project, such as Notes and Documents & Links, were not included when copying a Project. Project Managers had to manually re-upload or transfer these files to the new Project.
With this release, a new Attachments option is available in the Copy Options section of the Project Copy dialog (Project List > Project context menu). The Attachments option includes the following selectable sub-options:
- Notes
- Documents & Links
The Attachments option is unchecked by default, and the sub-options are initially disabled. When Attachments is selected, the sub-options become available for selection. If Attachments is selected but no sub-options are chosen, no attachments are copied to the new Project.

When attachments are copied:
- Notes appear under the Notes tab of the new Project.
- Documents & Links appear under the Documents & Links tab of the new Project.
Note: File names and file types are retained.
When copying attachments into an existing Project:
- Notes are copied without changing the file name, even if a note with the same name already exists.
- Documents & Links with duplicate names are copied with a numeric suffix added (for example, _1, _2) to ensure unique names.
Attachment copying respects user permissions:
- If the user does not have permission to Can attach documents to Projects (Entry > Document), the Documents & Links option is disabled.
- If the user does not have permission to create Notes (Entry > Other) , the Notes option is disabled.
- If the user has neither permission, the Attachments section is disabled.
Note: The user performing the copy is recorded as the creator of the copied attachments.
Benefit: This enhancement allows Project Managers to duplicate Projects while preserving relevant documentation and notes, reducing manual effort and ensuring important project information is carried forward.
Description: Previously, when a Resource was added to a Project, the Onboarding date, Project Start date, and Role Association date were initially aligned. If the Project Start date was moved earlier, the Role Association date did not update, causing the Role to appear blank in the Project Team page.
In this release, when the Onboarding date, Project Start date, and Role Association date are initially the same, the Role Association date is automatically updated when the Project Start date is moved earlier. This ensures the dates remain aligned.
This change applies only when all three dates were originally equal.
Benefit: This improvement, ensures consistent role visibility when adjusting project timelines and reduces the need for manual updates when shifting project start dates backward.
Description: In previous releases, when the Project Start date or End date was updated, Milestone Billing Dates did not automatically adjust. Project Managers had to manually update each milestone to keep billing dates aligned with the Project timeline.
With this release, Milestone Billing Dates now automatically update when Project dates change. If a Milestone’s Billing Date matches the Project Start Date or End Date, and the Milestone is not in a Completed state, the Billing Date will automatically adjust to match the updated Project date when the Project is saved.
- Milestones with Billing Dates equal to the Project Start Date will update when the Start Date changes.
- Milestones with Billing Dates equal to the Project End Date will update when the End Date changes.
- Completed milestones are not affected.
- Milestones with Billing Dates that do not match Project dates remain unchanged.
Benefit: This enhancement ensures that milestone billing dates remain aligned with Project timelines automatically, reducing manual effort and improving billing accuracy.
Project Work Plan

Description: Previously, when opening the Project Work Plan for projects starting in the future, the default timeline could begin before the Project Start date. This required you to manually adjust the timeline view to align with the project start in order to see relevant planning information.
In this release, the default Project Work Plan timeline now aligns automatically with the Project Start date when the project begins in the future. The timeline start date is determined based on the selected Timeline View setting to ensure consistent rendering and usability:
- Daily View: Timeline starts on the Project Start date
- Weekly View: Timeline starts at the beginning of the week containing the Project Start date
- Monthly View: Timeline starts at the beginning of the month containing the Project Start date
If the project has already started, the existing timeline behavior remains unchanged and continues to respect the current view date.
Benefit: This enhancement reduces manual adjustments when planning future projects by automatically presenting the most relevant timeframe. It improves usability and planning efficiency by ensuring the Work Plan opens with a timeline that accurately reflects the project’s start, while maintaining consistent behavior across Daily, Weekly, and Monthly views.
Resource Management

Description: Previously, Resource Managers could view bookings only for a single user or rely on group-based filtering, limiting flexibility when managing multiple resources at once. This made it difficult to focus the work plan on a specific subset of users.
With this release, the Resource Scheduling Work Plan now includes a User filter that allows Resource Managers to select one or more users and filter the work plan to display only the bookings associated with the selected users. This filter refines the view without performing a user search or modifying user data.
The User filter behaves similarly to the existing Group filter. By default, users belonging to the selected groups are preselected, and the Resource Work Plan automatically displays their bookings. When no users are selected, the Work Plan remains unfiltered until a selection is made.
Furthermore, several usability improvements were made to the Group selection list in Resource Scheduling:
- The divider no longer appears when Groups are selected, and multiple scroll bars have been consolidated into a single scroll bar.
- Group names now load dynamically as the list is scrolled, and the arrow button previously shown at the bottom of the list has been removed.
- Excess white space that appeared when multiple groups were selected has been eliminated.

Note: In user-created Views, the Select All option remains fixed at the top of the list while scrolling, with selected Groups displayed below it.
Benefit: This enhancement gives Resource Managers more precise control over the Resource Scheduling view by allowing them to isolate and manage bookings for specific users. It simplifies capacity review, improves focus when working with multiple resources, and reduces visual noise by showing only the relevant bookings in the work plan.
Description: Previously, tooltip behavior on Work Plans was inconsistent. Some fields did not provide helpful tooltips, while others displayed unnecessary ones, which created visual clutter and reduced usability.
In this release, tooltip behavior has been refined across Work Plan pages in Upland PSA:
- Tooltips are now added to all fields in the left panel when the page is in read only mode, ensuring you can easily view full field information.
- Tooltips on date fields in the right panel have been removed to reduce unnecessary visual distractions.
- The tooltip on the Total allocation value has been updated to display allocation dates using the format “Allocation dates: <start date> to <end date>”.
Benefit: You will experience a cleaner and more consistent interface on Work Plans pages. Tooltips are now available where they provide value and removed where they are unnecessary, helping you quickly understand field details while reducing visual clutter.
Security

Description: A new Project Designer Security Permission with Yes/No options has been added under Work (Security Profile > Setup). This permission allows Administrators to control which Users can access and configure Project Designer.
Access to the feature also depends on the Enable Project Designer setting in System Setup, which must be turned on at the organization level for the page to be available. When enabled, any user with the permission can open Project Designer, customize the Project Edit layout, and manage menus, tabs, and field placement.

Description: Previously, there was no way to restrict Project Managers from modifying Work Type Attributes or Used By configurations. As a result, critical Work Type settings, including those created through Excel Import or API integrations, could be changed without administrative oversight, increasing the risk of unintended configuration errors and governance issues.
To address this, a new Can Modify Work Type Attributes security permission with Yes/No options has been added under Work (Security Profile > Setup). This permission allows Administrators to control whether users can modify Work Type Attributes.
Note:
- Can Modify Work Type Attributes is unchecked by default.
- This permission applies only to regular Work Types and does not apply to Leave Time Work Types.
System Behavior
The behavior of the Work Type Attributes and Used By sections depends on the Security Profile assigned to the User.

When the Can Modify Work Type Attributes permission is checked, Users with that profile will have full access to edit both the Work Type Task Attributes and Used By sections. Setup > Work > Work Types > Work Type Edit.
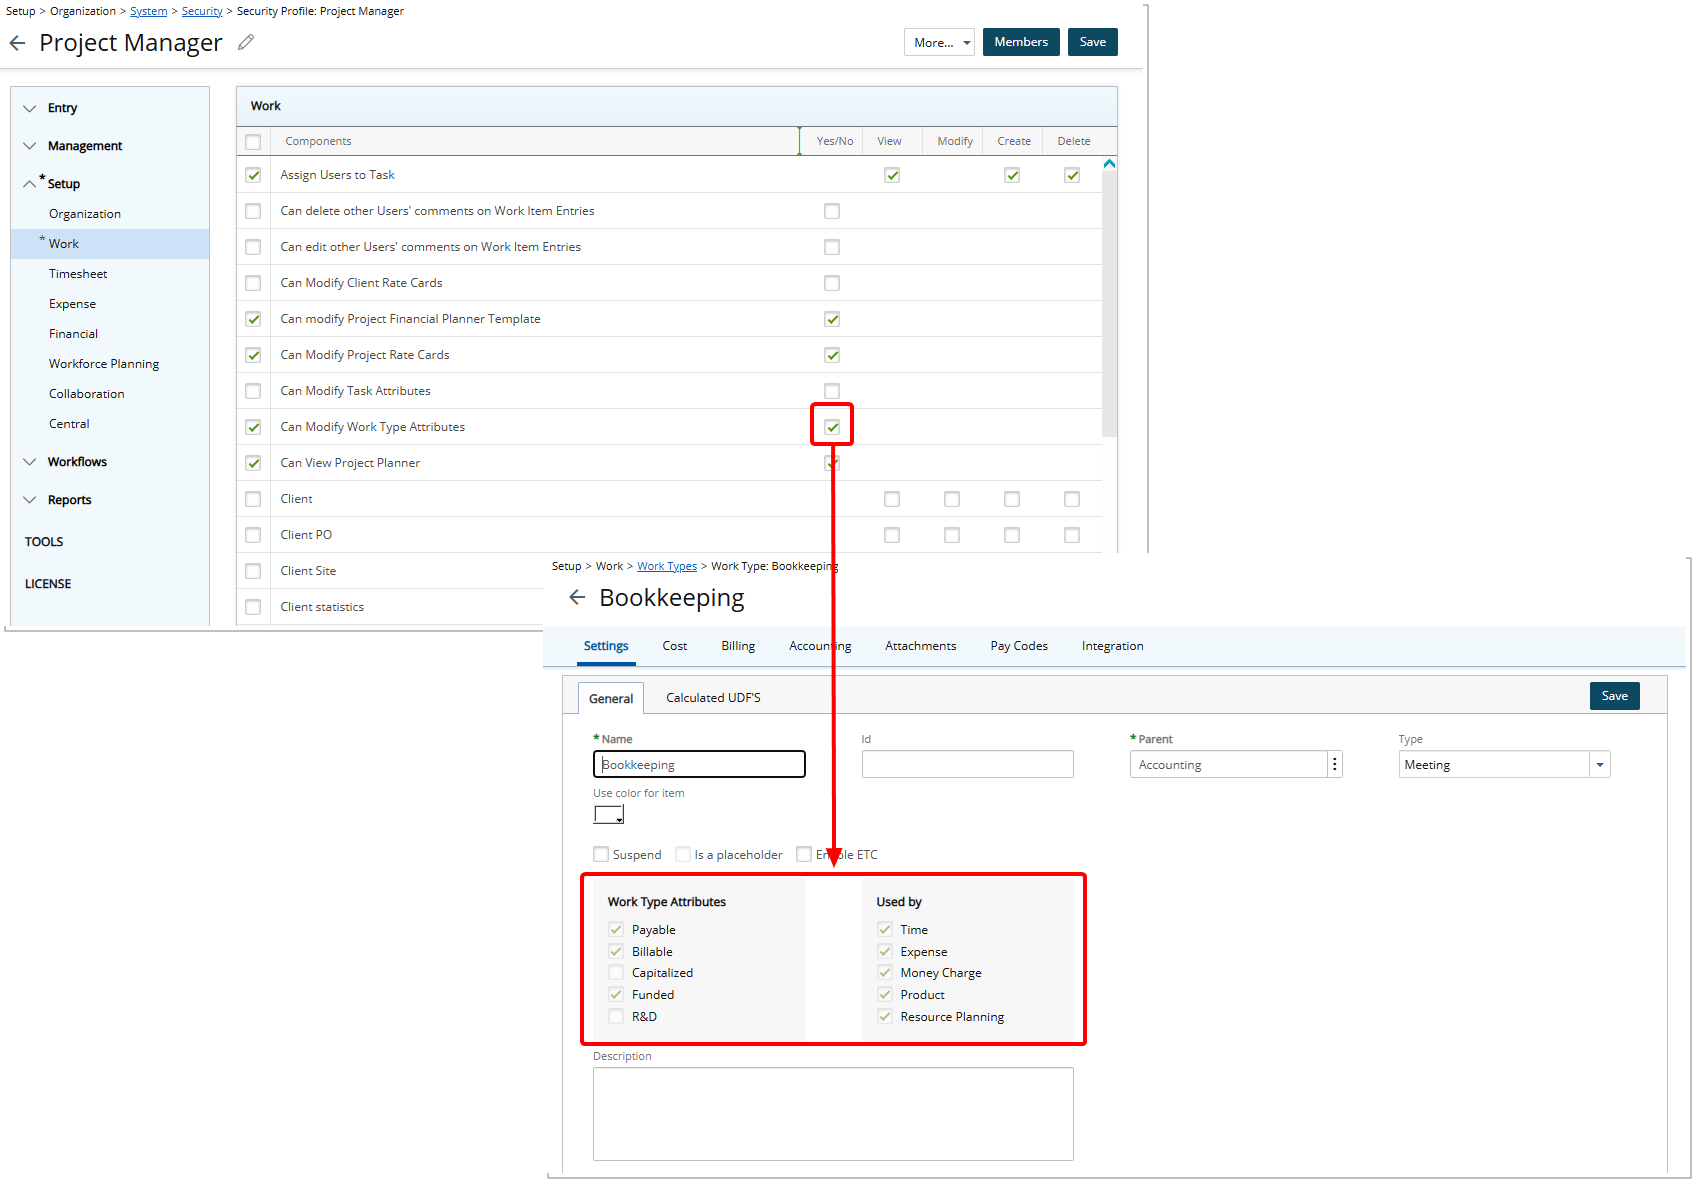
When the Can Modify Work Type Attributes permission is unchecked, Users with that profile will see these sections locked on Setup > Work > Work Types > Work Type Edit, preventing any edits. Additionally, if such a User attempts to modify Work Type Attributes or Used By fields via Excel Import or API, the system displays the error: You do not have the required permission to modify the Work Type Attributes and Used By fields.
This ensures that only users with the appropriate administrative permission can modify critical Work Type settings, maintaining governance and reducing the risk of unintended changes.
Benefit: Administrators now have stronger governance over Work Type configurations while still allowing Project Managers to manage Work Types within defined boundaries. This reduces the risk of unauthorized changes, protects imported configurations, and improves overall system control.
Timesheet
Description: Previously, when duplicating an Assignment, Timesheet Users were required to manually re-enter any associated Time Entry notes because the Copy action did not include existing Time Entries or their Notes. This resulted in unnecessary rework and increased the likelihood of errors or missing information.

In this release, a new Copy With Entries action is available in the Assignment row context menu.

When selected, the system opens the Assignment modal or row (depending on your preference), allowing you to modify Client, Project, Task, and Attributes. Upon saving, a new Assignment line is created with the updated details, and all Time Entries and associated Notes from the original Assignment (within the current Period) are copied to the new Assignment.
Note: The Copy With Entries action is disabled when the selected Assignment has no Time Entries. This capability is not supported for In/Out Timesheets or Hourly Timesheets.
Benefit: This enhancement allows Timesheet Users to quickly duplicate an Assignment together with its associated Time Entries and Notes, eliminating the need to manually re-enter existing Notes. It reduces the risk of missing or inconsistent information and makes reallocating time within the same reporting period faster and more reliable.

Description: Previously, modifying an existing Time Entry Note in My Timesheet required manually saving changes, increasing the risk of losing updates when navigating away or forgetting to save.
In this release, editing existing Time Entry Notes now supports automatic saving to reduce data loss and streamline updates. Changes, including modifications to the Note and the Note Type, are automatically saved when you click anywhere outside of the note area.
Benefit: With this enhancement, updates to existing Time Entry Notes are preserved more reliably, reducing the need for manual saves while maintaining control over when edits are finalized.

Viewing Planned Hours as a User
When viewing the Planned Hours dialog box from the Timesheet Summary, users can modify the columns displayed by selecting additional KPI fields from the column selection menu.
With this release, a Restore Defaults button is now available. Selecting Restore Defaults resets the column configuration to the default columns defined by the administrator in your assigned Timesheet Template.
This enhancement allows you to temporarily customize the columns displayed in the Planned Hours dialog box while ensuring you can easily return to the default layout configured for your organization.
Viewing Planned Hours as a Manager
To see your preferred columns when reviewing subordinate Timesheets, first customize the columns in your own Planned Hours dialog box.
Once your preferences are set, navigate to Entries > Timesheet Manager and open the Timesheet of any subordinate. The Planned Hours dialog will display the columns you configured in your own Timesheet.
Selecting Restore Defaults resets the column configuration to the default columns defined by the administrator in your assigned Timesheet Template.
Benefit: This ensures that managers can consistently view Planned Hours data for subordinates using their preferred column layout, regardless of the subordinate’s individual configuration.
For information about how administrators configure the default columns, see Configure Default Columns for Planned Hours in the Timesheet Summary.
Timesheet Templates

Description: In previous releases, you could see Planned Hours KPIs in the Timesheet Summary when administrators added them directly to the Summary section of your assigned Timesheet Template. You could also open the Planned Hours dialog to view additional KPI details beyond those fields.
With this release, administrators can configure the default columns displayed in the Planned Hours dialog through the Timesheet Template Setup tab (Setup > Timesheet > Timesheet Templates > Timesheet Template Edit). When the Summary section is enabled and at least one Planned Hours–type KPI is included in the Summary section, a new Default Planned Hours Column(s) option becomes available. Administrators can use this multi-select setting to define which columns appear by default when users open the Planned Hours dialog.
Administrators can choose to include the following KPIs: Planned Hours, Planned Billable Hours, Future Planned Hours, Future Planned Billable Hours, Remaining Planned Hours, Remaining Planned Billable Hours and Future Planned Non-Billable Hours
Note: The Project/Task column is always displayed by default and therefore does not appear in the selection list.
When a user assigned to the Template opens the Planned Hours dialog, the administrator-defined columns are displayed by default. Users can adjust the column selection within the dialog, as in previous releases, to display additional KPI fields. Users can also select Restore Defaults to return to the administrator-defined column configuration.
Benefit: This enhancement provides a consistent starting layout for Planned Hours details while still allowing users the flexibility to customize the column display as needed.

Description: In previous releases, you could search for Clients, Projects, and Tasks in My Timesheet only by their Names. This made it difficult to accurately select the correct assignment when names were duplicated or similar.
With this release, a new option, Can search Assignment fields by ID, is available in Timesheet Template Options tab (Setup > Timesheet > Timesheet Templates > Timesheet Template Edit). This option is unchecked by default.

When enabled, users can search Clients/My Clients, Projects/My Projects, and Tasks/My Tasks by both Name and ID.
When creating an Assignment, Adjustment, or Non-Working Time in My Timesheets (Entries > My Timesheet), the search functionality now supports:
- Client Name or Client ID – entering a Client ID displays the associated Projects.
- Project Name or Project ID – entering a Project ID displays the associated Project.
- Task Name or Task ID – entering a Task ID displays the associated Task.
Note: This enhancement is applicable only to the New Timesheet.
Benefit: You can now quickly and accurately locate the correct client, project, or task, even when names are duplicated or similar, reducing errors and improving timesheet entry efficiency.
UI/UX Enhancements
In this release, we have focused on modernizing and standardizing the PSA interface to provide you with a cleaner, more intuitive, and consistent experience across the application. From the updated icon bar and improved navigation menu behavior to refreshed authentication and profile experiences, these enhancements create a more seamless and predictable interaction model across PSA.
You will notice modernized Login and Help experiences, streamlined navigation elements, standardized buttons and breadcrumbs, and usability improvements across key edit and list pages including User Defined Fields, Products, Resource Types, Teams, Charges, and System Tables. We’ve also introduced consistent button colors, improved title handling, and clearer page structures to ensure a cohesive look and feel throughout the system.
Together, these updates deliver a more polished interface, improved usability, and a unified design standard that helps you move through PSA more efficiently and confidently.
Description: In previous releases, the Logon, Forgot Password, and Reset Password pages followed older UI standards that were visually inconsistent with the rest of the application. Layout structure, spacing, button styling, and validation messaging did not align with updated design patterns, resulting in a fragmented entry experience.
With this release, the authentication experience has been modernized to ensure consistency with current design standards.
On these pages, selecting the PSA logo now opens the Upland PSA website homepage in a new browser tab.

The Logon page has been refreshed with an updated layout, modernized button styling, improved spacing, and consistent typography. Visual elements now align with current PSA UI standards, providing a cleaner and more structured entry point into the application.
Clicking the PSA logo

The Forgot Password page has been updated to align with the modernized authentication experience. Form fields, button styling, spacing, and page layout have been refined to provide a consistent look and feel with the updated Login interface.

The Reset Password page has been updated to align with the modernized authentication experience. Form fields, button styling, spacing, and page layout have been refined to provide a consistent look and feel with the updated Login interface.
Benefit: These improvements provide you with a modern and consistent login and password recovery experience. You benefit from clearer layouts, better alignment of input areas, standardized button styling, and more intuitive validation messaging. This allows you to sign in, recover, or reset your password more efficiently and with greater confidence across PSA.

Description: Previously, the header followed an older layout and branding style. The top navigation bar used a different color scheme. The PSA logo was positioned on the left side of the header and was not clickable, requiring users to rely on navigation menus to return to the homepage.
With this release, the header has been visually refreshed:
- The top navigation bar color has been updated to Upland Blue,
- A hamburger menu has been introduced and is positioned where the logo previously appeared.
- The logo has been resized and repositioned to be right-aligned, located just before the Global Search, with a divider separating it from the search area for improved clarity
Additionally, the PSA logo is now clickable. Selecting the logo takes you directly to your Home Page from anywhere in the application.
Benefit: This enhancement improves navigation efficiency and provides a more intuitive, consistent header experience across the application.
Description: In previous releases, navigation elements, including the Icon Bar and Menu, followed legacy interaction patterns that were not fully aligned with newer UI standards. This resulted in inconsistent visual behavior and interaction feedback across pages.
As of this release, the Icon Bar has been modernized to deliver a cleaner and more flexible navigation experience while preserving all existing links and destinations.
Icon Bar
| Legacy icon | New Icon | Behavior |
|---|---|---|
|
|

|
Takes you to your Home Page. |
|
|

|
Appears only when at least one Dashboard is accessible to you. |
|
|

|
Has an associated Navigation Menu giving access to: My Timesheet, Timesheet Manager, Leave Request Manager, My Schedule, Expense Manager, Work Item Manager, My Work Plan, Charges, Products, Resource Scheduling, and Project Scheduling. |
|
|

|
Has an associated Navigation Menu giving access to: Invoice Manager, Expense Payable Manager, Payroll Manager, WIP Accrual Manager, and Revenue Batch Manager. |
|
|

|
Takes you to your Project List page. |
|
|

|
Takes you to your Program List page. |
|
|

|
Has an associated Navigation Menu giving access to: Organization, Work, Workforce Planning, Timesheet, Expense, Financial, User Defined Fields, Notifications, and Homepage Templates. |
|
|

|
Takes you to the Reports central. |
|
|

|
Takes you to Upland Analytics. |
|
|

|
Has an associated Navigation Menu giving access to: Import, Upgrade Operations, Export, Failed Notifications, and Audit Trail. |
|
|

|
Has an associated Navigation Menu giving access to: Concur, Upland PSA, Microsoft Teams, Microsoft Business Central, CRM, Jira, and Power BI. |
Icons that have an associated Navigation Menu display a small triangle indicator to the right of the icon.

Navigation Menu
- Navigation Menus open as an overlay and do not reduce the main page workspace unless the menu is pinned.

- Navigation Menu can be pinned to remain open.
- When pinned, the menu occupies space alongside the main page.
- When unpinned, the Navigation Menu automatically collapses.

- Selecting an icon highlights it with a light blue background and a dark blue vertical bar on the left.

- When a Menu Icon with an associated Navigation Menu is selected, clicking the hamburger menu in the header bar opens or collapses the Navigation Menu overlay.

Benefit: With these improvements, you gain a more modern navigation experience with improved readability, better use of screen space, and greater control over how navigation menus are displayed—while maintaining existing navigation behavior and workflows.
Description: Previously, the Help icon and menu used legacy styling that was inconsistent with recent navigation and user interface updates across the application.
In this release, the Help menu in the top navigation bar of Upland PSA has been updated for visual consistency with the modernized interface. The Help icon and menu now align with the styling of the top blue bar and the Notification icon.
Furthermore, the Help menu has been updated to make assistance resources more readily available for further details see Access Upland Assist and Help Center from the Help Menu.
Benefit: With this improvement, you benefit from a more consistent and polished interface when accessing Help, improving usability and visual coherence across the application.
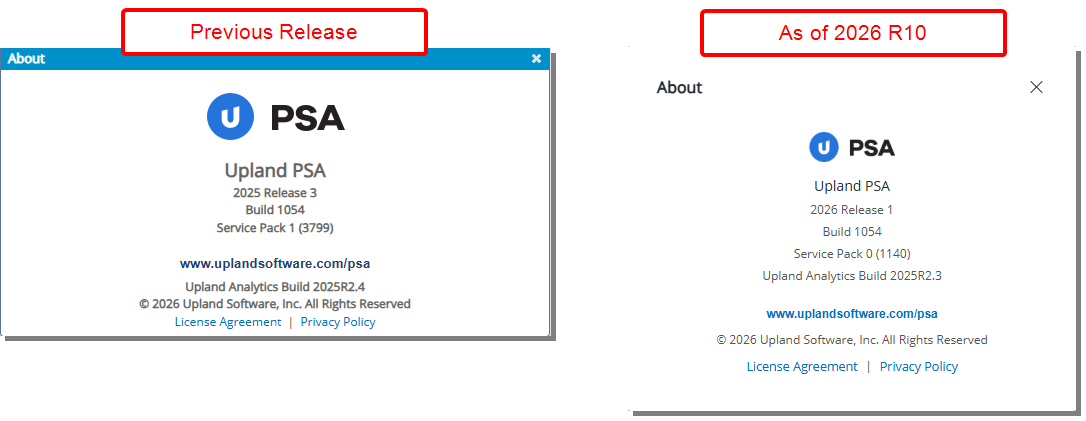
Description: Previously, the About pop-up used legacy styling that was inconsistent with recent navigation and UI updates across the application.
In this release, the About pop-up has been modernized with updated styling and layout to align with the modernized look of the application.
Benefit: With this improvement, you benefit from a more consistent and polished interface when accessing the About information, improving usability and visual coherence across the application.
Description: Previously, updating a profile picture relied on an older pop-up design that required users to browse local files and navigate away from their current context, with limited visual feedback during upload.
In this release:
- The Profile Picture and Profile menu have been updated with improved readability, fonts, and colors to align with recent UI updates across the application.

- The Update Profile Picture pop-up has been modernized. You can now drag and drop an image or browse local files, with support limited to valid image formats. The updated experience allows users to upload and preview their profile picture without leaving the current page.

Note: Profile Picture Upload Requirements:
- Supported file formats: .JPEG, .TIFF, .PNG, .GIF. Attempting to upload any other file type will trigger an error.
- Maximum file size: 4 MB (Files larger than this limit cannot be uploaded).
Benefit: You can update and preview your profile picture more quickly and intuitively, benefiting from a modern, consistent experience.

Description: Breadcrumbs across the application have been updated to follow a consistent and modern format.
- Breadcrumb links are displayed in blue and underlined to clearly indicate they are clickable.
- The current page (final breadcrumb item) is displayed in black and not underlined to distinguish it from navigable links.
- Breadcrumb paths, names, and casing are now consistent across the application.
- Breadcrumbs now update dynamically when related names are modified
Benefit: This update improves visual consistency and helps you more easily understand your current location within the application.

Description: Previously, the Save button in dialog boxes did not always follow the application’s standard color scheme, reducing visual consistency.
As of this release, all Save buttons in dialog boxes are now displayed in navy blue ( ), ensuring consistency across the application.
Benefit: This update ensures consistent visual styling across dialog boxes, reinforcing the application’s standard design language. A uniform navy blue Save button improves visual recognition, reduces user confusion, and provides a more cohesive and predictable user experience when performing save actions.

Description: Previously, the Back button was inconsistently positioned on some pages, requiring users to move between the left and right sides of the screen to navigate to the previous page.
As of this release, pages that previously displayed the Back button ( ), have been updated. The button has been redesigned as a left-pointing arrow (
 ) and moved to a consistent location before the page title. When you hover over the button, a hand cursor appears and a tooltip reads “Back.”
Note: Pages that previously displayed a Back text link ( ) remain unchanged, as those pages will be updated to the new button style in a future release.
Benefit: This enhancement standardizes Back button placement and behavior, creating a more predictable navigation experience across the application. By positioning the redesigned left-pointing arrow consistently before the page title and reinforcing its interactivity with a hover state and tooltip, users can navigate more efficiently with reduced cognitive load and fewer layout-based adjustments. This improves overall usability while preparing the interface for future alignment to a single navigation standard.

Description: In the previous release, several field labels inconsistently included trailing colons, while others did not.
As of this release, unnecessary colons have been removed from field labels on select edit pages, including Business Unit, Title, and Work Item Workflow Setup, to ensure consistent formatting.
Benefit: This update improves visual consistency and alignment with the application’s UI standards. Standardized label formatting creates a cleaner interface, reduces visual clutter, and provides a more uniform user experience across edit pages.

Description: In the previous release, certain left-panel menu entries were labeled generically, which could cause ambiguity in workflow selection.
As of this release, applicable menu items have been renamed for greater clarity and specificity. For example, Workflows has been updated to Invoice Workflows or Expense Workflows where appropriate.
Benefit: This enhancement improves navigation clarity by making menu options more descriptive and context-specific. Users can more easily identify the correct workflow type, reducing confusion and streamlining task selection.
Description: Pagination on Cost and Billing Rule Rate Type pages has been updated to use the latest UI component. Header spacing has also been adjusted for specific Rate Types to improve readability and layout consistency.
Benefit: These updates provide a more consistent and modern user interface, making it easier to navigate lists and interpret header information. Improved spacing enhances clarity and overall usability when reviewing cost and billing rules.
Description: In previous releases, the User-Defined Fields Association pages used a legacy layout that did not align with current design standards. This update modernizes these pages to deliver a consistent and improved user experience across the application.
Where This Update Applies
- Associating User Defined Fields to objects (Setup > User Defined Fields)
- Associating User Defined Fields to Work Item Workflows (Setup > Work > Work Item Workflows > Edit Work Item Workflow > Setup)
User Interface and Behavior Updates
- The recalculation icon for Calculated User Defined Fields has been repositioned to the right, alongside the other field action icons, improving visual consistency.
- The layout header has been consolidated. Previously, Layout appeared on the left while the instruction Drop your fields below to add them to the layout appeared separately on the right. These elements are now combined into a single header—Layout | Drop your fields below to add them to the layout—displayed in a light gray bar above the layout area.

Benefit: This modernization enhances usability by streamlining the interface, improving clarity, and aligning the experience with modern design standards while reducing visual clutter.

Description: The Product edit page (Setup > Work > Products) has been updated to improve visual consistency and usability. Updates include refinements to layout, spacing, colors, positioning, buttons, icons, and fonts to align with recent UI changes across the application.
Furthermore, Recognition Schedule, Accounting, and Integration, which were previously available as buttons on the Product Edit page and disabled until the product was saved, are now presented as tabs. These tabs become available after a new product is saved.
These updates do not change existing functionality. You can continue to complete the same tasks using the same workflows and achieve the same results as in previous releases.

Description: The Resource Type edit page (Setup > Organization) has been updated to improve visual consistency and usability. Updates include refinements to layout, spacing, colors, positioning, buttons, icons, and fonts to align with recent UI changes across the application.
Furthermore, Overtime Policy and Leavetime, which were previously available as buttons on the Resource Type Edit page and disabled until the resource type was saved, are now presented as tabs. These tabs become available after a new resource type is saved.
These updates do not change existing functionality. You can continue to complete the same tasks using the same workflows and achieve the same results as in previous releases.

Description: The Teams edit page (Setup > Organization) has been updated to improve visual consistency and usability. Changes include refinements to layout, spacing, colors, positioning, buttons, icons, and fonts to align with recent UI updates across the application.
Previously, the Scope button was disabled until the team was saved. In this release, it is now presented as a tab, which becomes available after a new Team is saved. The Members tab continues to behave as in the previous version.
These updates do not change existing functionality. You can complete the same tasks using the same workflows and achieve the same results as in previous releases.

Description: The Group Edit page (Setup > Organization > Groups) has been redesigned to improve visual consistency, structure, and overall usability. Updates include refinements to layout, spacing, colors, button styling, iconography, positioning, and typography to align with recent UI changes across the application.
The page now follows the standardized main tab layout introduced in other areas of the application. As part of this update:
- A new main tab framework has been introduced to provide clearer structural organization.
- A new Settings main tab has been introduced. The following subtabs are now located under Settings: General, Users, Roles and any configured User Defined Fields tabs.
- The Work Plan and Group Leave Time are now accessed through the main tab navigation instead of links.
- Existing pages such as Work Types, Leave Time, Business Units, Approvers, Scope, Accounting, Integration, and Attachments, which were previously accessed through standalone buttons, are now organized as tabs within the updated layout.
- Group Utilization Configuration is now accessed through a button located next to Save.
These updates are visual and structural only and do not introduce functional changes. You can continue to complete the same tasks using the same workflows and achieve the same results as in previous releases.

Description: The Charge edit page (Setup > Timesheet > Charges) has been updated to improve visual consistency and usability. Updates include refinements to layout, spacing, colors, positioning, buttons, icons, and fonts to align with recent UI changes across the application.
Furthermore, Accounting, Pay Codes, and Integration, which were previously available as buttons on the Charge Edit page and disabled until the charge was saved, are now presented as tabs. These tabs become available after a new charge is saved.
These updates do not change existing functionality. You can continue to complete the same tasks using the same workflows and achieve the same results as in previous releases.

Description: The System Tables list page (Setup > Organization > System) has been updated to improve visual consistency and usability. Updates include refinements to layout, spacing, colors, positioning, buttons, icons, and fonts to align with recent UI changes across the application.
Furthermore, a Refresh button has been added, and you can now Search System Tables by Name. Pagination has also been modernized and moved to the top-right corner of the page, consistent with other modernized list pages.
These updates enhance usability and navigation but do not change existing functionality. You can continue to complete the same tasks using the same workflows and achieve the same results as in previous releases.

Description: In previous releases, button colors varied across pages, with green commonly used for primary actions. This created visual inconsistency and reduced clarity in distinguishing primary versus secondary actions.
As of this release, all primary and secondary action buttons across the application have been updated to align with the current UI standards. Primary buttons are now displayed in dark blue, while secondary and tertiary buttons are shown in light blue. Previously used green buttons have been replaced to ensure visual consistency across all modules.
Benefit: This update delivers a more modern and unified user interface, improving visual consistency and alignment with the application’s design standards.
Description: In previous releases, several pages allowed editable titles in the top-left header area, while others required a Name field within the page. This inconsistency created confusion around where entity names should be managed.
In this release, several pages have been updated to standardize how titles and record names are managed across the application. Where applicable:
- A new mandatory Name field has been added as the first field within the main tab of the pages.
- Titles are now static, no longer editable directly from the top-left corner. This aligns these pages with other standardized edit pages such as Role Edit and Business Unit Edit.
- Icons displayed before the page title have been removed.
- Missing page Titles have been added.
The update applies to:
- Announcement Notification Edit (Setup > Notifications > Announcement Notifications)
- A new mandatory Name field has been added to the Message tab.
- The editable page title has been removed and is now static.
- The field previously labeled Title has been renamed to Subject.
- Fields are reorganized as follows:
- Row 1: Name, Subject, Language and Valid Until.
- Row 2: Delivery Method, Scheduled Send Date, Scheduled Send Time and Time Zone.

- Financial Planner Template Edit (Setup > Financial > Financial Planner Templates)
- A new mandatory Name field has been added to the General tab.
- The page title is now static.

- Program Edit (Program List)
- A new mandatory Name field has been added to the General tab.
- The page title is now static.
- The Program icon has been removed and replaced with the back button.

- Project Edit (Project List)
- A new mandatory Name field has been added to the General tab.
- The page title is now static.
- Field labels have been standardized:
- Alternate manager updated to Alternate Manager
- Start date and End date updated to Start Date and End Date
- The Project icon has been removed and replaced with the back button.
- Missing page Titles have been added on:
- Workflow pages, including Timesheet, Leave Request, Financial Workflows, Resource Request, Work Item, Project, and Expense.
- Notification edit pages, including PO Notification Edit, Budget Notification Edit, and Workforce Planning Notification Edit.
- Standardized workflow edit page titles:
- Creation pages now display [Create <Workflow Type> Workflow] (for example, Create Leave Request Workflow).
- Edit pages now display the workflow name as the page title (for example, Action Item for a Work Item Workflow).
Benefit: These updates improve consistency, enforce clearer naming standards, and ensure uniform behavior across edit pages, resulting in a more predictable and professional user experience.
Upland Assist
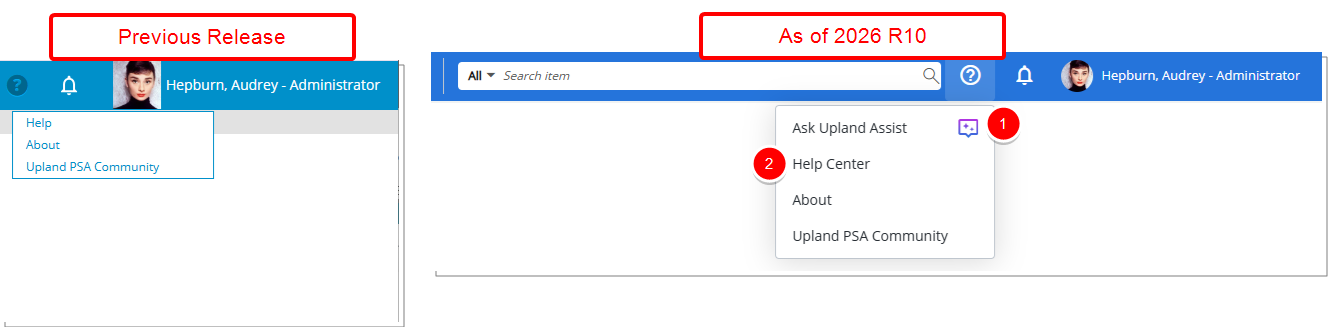
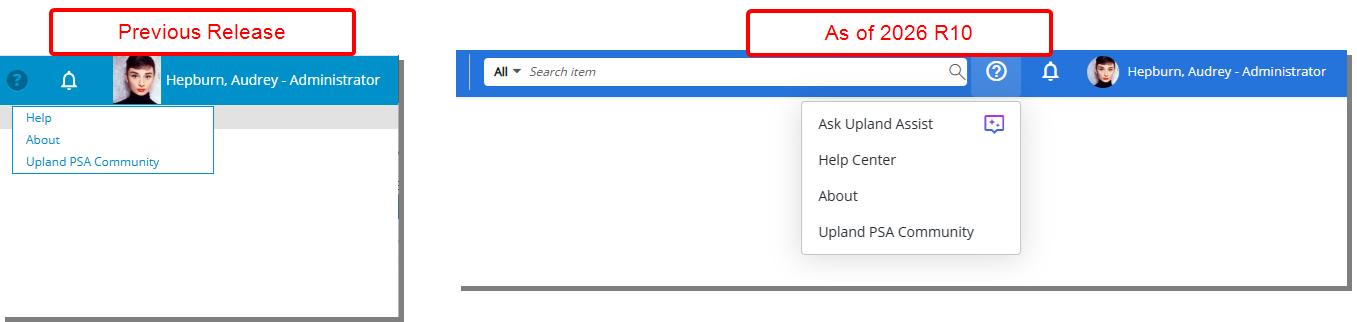
Description: Previously, you could access the Upland PSA Online Help from the Help menu in the top navigation bar. Access to Upland Assist was available only if it had been specifically enabled for an organization.
In this release, the Help menu has been updated to make assistance resources more readily available:
- Ask Upland Assist is now included by default as the first option in the menu for all users and is identified by a new icon (
 ) indicating AI-powered functionality.
 - Online Help has been renamed to Help Center to better reflect the broader support resources available.
About Upland Assist

Upland Assist provides a centralized access point for self-service guidance and customer support directly within the application. It brings together key resources so you can quickly find answers without leaving your workflow.
Upland Assist includes the following resources:
- Help Center articles - Official product documentation created and maintained by the product team. These articles provide the most reliable and authoritative guidance on product features and configuration.
- Community articles - Content created by the support team, often based on real customer questions. These articles provide practical context, troubleshooting guidance, and examples drawn from common scenarios.
- AI-generated suggestions - Automated recommendations designed to help you quickly locate relevant information across available resources.
Caution: Community articles and AI generated suggestions can help you explore common questions and potential solutions. However, they may not always reflect the most recent product updates.
Benefit: You can now access both Upland Assist and the Help Center directly from the Help menu without requiring additional configuration. This provides quicker access to assistance and allows you to choose the support option that best fits your needs while working in the application.
User Defined Fields
Description: Previously, Conditional Formatting Rules for User Defined Fields could not distinguish between fields that were intentionally set to N/A and fields that were left blank, making it harder to identify incomplete data.

In this release, an Empty Condition has been added to User Defined Field Conditional Formatting rules. When this condition is used, conditional formatting is applied whenever a User Defined Field has no value, either because it was never populated or because an existing value was cleared. The corresponding legend is also displayed to clearly indicate the Empty state.
Note: This feature does not apply to the following User Defined Field Types: Currency, Time, Timespan, Health, Percentage, Number, Integer, and Checkbox.
Benefit: With this enhancement, you can quickly identify missing or incomplete User Defined Field data across the application without manually reviewing each record.
Description: In the previous release, the Advanced User Defined Field of Date Type associated with the Project Edit page did not update immediately when its dependent Field was changed. Users had to navigate away from the Project Edit page and return to see the updated value.
As of this release, the Advanced User Defined Field of Date Type now recalculates and displays changes instantly during Project editing.
Benefit: You can see updates to the Advanced User Defined Field of Date Type on the Project Edit page in real time, eliminating extra navigation and reducing the risk of working with outdated information. This streamlines project editing, improves efficiency, and ensures more accurate management of project data.
Description: In previous releases, User Defined Fields associated to Groups displayed in the Groups edit page in a 3-column layout. This limited the amount of information visible at once and was inconsistent with other object configuration pages that support a more structured layout.

With this release, a fourth column has been added to the User Defined Fields Layout for the Groups, aligning with the layout standard introduced for other objects such as Projects.
The spacing and arrangement of UDFs have been adjusted to accommodate the additional column, improving overall readability and organization.
Benefit: This enhancement provides a more consistent and scalable layout across object configuration pages, improving readability and allowing administrators to view and manage User Defined Fields associations more efficiently.
Description: Previously, the Description field for Group User-Defined Fields supported plain text only. When rich text formatting was applied, the tooltip for the field displayed the content as raw HTML instead of rendering formatted text, and hyperlinks were not usable.

In this release, the Description field for User-Defined Fields associated with Groups fully supports the rich text editor. The tooltip now renders formatted content, including hyperlinks.
Note: Images and tables are not supported.
Benefit: This improvement provides a more consistent and user-friendly experience by properly rendering formatted descriptions in tooltips, enabling users to include and access hyperlinks directly for supporting information without exposing raw HTML.
Work Breakdown Structure (WBS)
Description: The out-of-box Internal project (the project used to record Leave Time) is now configured with the Disable Financial Planner option enabled by default. This setting is available in Project Edit > Options.
With this change, Financial Planner data is no longer generated for the Internal project when Leave Time is recorded.
Action Required: If your organization requires Financial Planner processing for the Internal project, you can manually clear the Disable Financial Planner checkbox in Project Edit.
Benefit: This update prevents unnecessary Financial Planner processing for Leave Time entries, reducing system overhead and aligning the Internal project configuration with its intended purpose.

Description: In previous releases, project managers and administrators had limited visibility into changes made to Tasks, making it difficult to audit updates or understand how Task data evolved over time. To improve traceability, the system now provides detailed auditing for Task updates, limited to changes made directly through the Task Edit page.
When Task Detailed Auditing is enabled under Setup > Organization > System > Security > Audit Setup, the system records modifications made through the General and User Defined Fields tabs of the Task Edit page. These changes are displayed in a new History tab on the Task Edit page, providing a chronological record of updates to Task fields.
Note: Only modifications performed within the Task Edit page (General and User Defined Fields tabs) are audited.
Caution: Modifications made to a Task outside of the Task Edit page, including updates from external processes or integrations, are not included in Task History.
Benefit: This enhancement provides a clear and reliable audit trail for Task updates, improving visibility into when and how Task data changes over time. With access to detailed historical records, you can more easily investigate changes, support compliance requirements, and maintain accountability for Task-level updates while preserving existing workflows.
Workflow Setup

Description: Previously, there was no ability to copy a Workflow Role. Administrators had to create new Roles from scratch and manually reconfigure all User Associations, which was time-consuming and prone to errors.
With this release, a Copy option is now available in the context menu of Workflow Roles across all Workflow types, including:
- Project - Setup > Work > Project Workflows > Project Roles
- Work Items - Setup > Work > Work Item Workflows > Work Item Roles
- Resource Request - Setup > Workforce Planning > Resource Request Workflows > Resource Request Roles
- Timesheet - Setup > Timesheet > Timesheet Workflows > Timesheet Roles
- Invoicing - Setup > Financial> Invoice Workflows > Invoicing Roles
- Leave Request - Setup > Timesheet > Leave Request Workflows > Leave Request Roles
![Creates a new role named “Copy of [source Workflow Role Name]”, copying all user associations from the original role, while leaving the ID and Description fields blank for further configuration.](images/TE-104276-2.png "Creates a new role named “Copy of [source Workflow Role Name]”, copying all user associations from the original role, while leaving the ID and Description fields blank for further configuration.")
Selecting this option creates a new role named “Copy of [source Workflow Role Name]”. All User Associations are copied from the original role.
The ID and Description fields remain blank for further configuration.
Note: Suspended and Decommissioned Users are not copied.
Benefit: This enhancement allows administrators to quickly duplicate existing roles instead of rebuilding them from scratch, significantly reducing setup time, minimizing configuration errors, and ensuring consistency across workflows.
Work Items
Description: Previously, the Recall action in Work Item Workflows was available only to the Originator. Other Assignees of the Initial workflow State could not recall a Work Item after submission, even when they were responsible for the item at that stage. This limited flexibility when correcting or retracting items submitted in error.

With this release, the Recall capability can be extended to Assignees of the Initial workflow state. A new Enable Recall for Initial State Assignees option is now available on the General tab of the Work Item Workflow edit page in Upland PSA.

When enabled, Assignees of the Initial state can access the Recall action from the Actions dropdown, subject to the defined workflow rules:
- A Work Item can be recalled from a State flagged as Completed back to the Initial State, provided the item is not marked as Approved.
- A Work Item cannot be recalled from a State that is not flagged as Completed, and it cannot be recalled from a State flagged as Approved.
- If NORECALL is included in the State ID, the Recall transition is suppressed even when the State is flagged as Completed.
Note: When the checkbox is enabled, the functionality applies to newly created Work Items associated with that Workflow. Work Items created prior to enabling this setting are not impacted.
Benefit: This enhancement provides greater flexibility for teams managing Work Items by allowing responsible assignees to correct or retract submissions when necessary, reducing workflow interruptions and improving overall process efficiency.
Description: Previously, Work Items could only follow the Project Manager’s assignments, limiting flexibility when an alternate manager needed to act. This could delay workflow progress when the Project Manager was unavailable.

In this release, Work Item Workflows include a new Alternate Manager option in the Assignment Rule configuration. When configured, the Alternate Manager automatically receives the same permissions as the Project Manager, enabling them to transition Work Items according to the workflow rules, regardless of the Project Manager’s availability.
The Alternate Manager option is also available in the following areas:
- When Direct Assignment is enabled, you can assign the Workflow State to the Alternate Manager.
- From the Assign to field on the Assignments tab of a Work Item entry.
Benefit: Project teams can maintain uninterrupted workflow even when the Project Manager is unavailable. Work Items are automatically routed to the Alternate Manager, reducing delays, ensuring consistent progress, and simplifying management of assignment responsibilities across the team.
Description: Previously, Work Item Workflows allowed Assignments and Notifications only to predefined Roles such as the Originator, Creator, or other configured recipients. There was no option to automatically route Work Items to the Resource Manager associated with the Originator or Creator.

With this release, two new options are available in the Assigned to selection list when creating or editing an Assignment Rule in Work Item Workflows (Setup > Work > Work Item Workflows > Work Item Workflows Edit > Assignment):
- Creator’s Resource Manager
- Originator’s Resource Manager
Selecting either option assigns the work item to the Resource Manager of the corresponding user, allowing that manager to transition the work item to the next workflow state according to the configured assignment rule.

In addition, Originator’s Resource Manager and Creator’s Resource Manager are now available as Recipients in State and Transition Notifications, enabling Workflow Notifications to be sent directly to the appropriate Resource Manager.
Benefit: This enhancement enables organizations where approval, functional management, and resource management responsibilities are handled by different roles to route work items and notifications directly to the appropriate Resource Manager, ensuring the correct manager can review and approve requests.
Description: Previously, users could not see when a Work Item last changed state on the relevant list pages, making it difficult to track progress and manage updates.

As of this release, a column named Last State Change is available via Column Selection on the following pages:
- Work Item Manager (Entries)
- Project Edit Work Items tab (Project List > Project Edit)
When added to the layout, the column displays the date and time when the Work Item transitioned to its current Workflow State. The displayed time reflects the logged-in user’s Active Site Time zone. The value corresponds to the Date Modified entry recorded in the Work Item History tab for the current State transition.

The Last State Change field is searchable by default, even when the column is not added to the layout. You can manage the visibility of this search criterion from Column Selection, where it can be turned on or off in the same way as other search criteria.

The Last State Change field is also available as an Advanced Filter criterion on all Work Item Manager Views and on the Work Items tab in Project Edit, supporting date comparison, range-based, relative date, and fiscal date conditions.
Benefit: Project managers and Work Item Managers can quickly identify when Work Items last changed state on these pages, improving visibility, accuracy, and efficiency when managing project work.

Description: Previously, the left panel in the Project Work Items tab had a fixed width, which caused longer Work Item Type Names (Work Item Workflow names) to be truncated and difficult to read. Managing space required collapsing and expanding the panel.
With this release, the left panel in Project Edit > Work Items can now be resized by dragging its edge. The panel can be expanded up to approximately 50 percent of the available browser width, allowing full Work Item Type Names to be viewed without truncation.
The collapse and expand buttons have been removed, while the horizontal scroll bar at the bottom remains available.
Benefit: This enhancement improves usability and readability when working with complex or long-named Work Items. Users can adjust the panel width to suit their workflow, reducing visual clutter and eliminating the need for repeated panel toggling.
General

Description: Previously, users were displayed and searchable by First Name and Last Name in some areas of PSA, while other areas used User Name, resulting in inconsistent identification and search behavior across the application.
In this release, user identification has been standardized to User Name across applicable list pages, browse controls, and search experiences. The User Name is displayed in the format Last Name, First Name (for example, Abbot, Gary).
Where this change applies:
- Setup > Organization > Sites > Site Edit > Timesheet Templates tab > Timesheet Template Administrator (search by User Name)
- Setup > Organization > Groups > Group Edit > Users tab > Approval/Functional or Resource Types (search by User Name)
- Setup > Organization > Groups > Group Edit > Approvers (search by User Name)
- Work Plans > Booking dialog > User browse control (search by User Name)
- Setup > Work > Clients > Client Edit > Invoice Options > To the attention of > Contact List (search by Contact Name)
- Financial > Invoice Manager > Invoice Edit > Settings > Others > Billing Details > To the attention of > Contact List (search by Contact Name)
- Entries > Expense Manager > Column Selection (First Name and Last Name are replaced with User Name)
-
Entries > Expense Manager > View Edit > Columns tab (First Name and Last Name are replaced with User Name)
- Setup > Organization > Teams > Team Edit > General tab (First Name and Last Name are replaced with User Name)
- Setup > Organization > Teams > Team Edit > Members tab (First Name and Last Name are replaced with User Name)
Benefit: With this improvement, you can consistently identify and search for users by User Name across PSA, improving clarity, reducing ambiguity, and providing a more predictable and streamlined user experience.