From the Timesheet Manager page, you can create custom Timesheet views by accessing the View context menu.
The available options to you are:
- Click Create to access the Views page and create a new View.
- Click Edit Details to edit the details of the current View you are on. You may also then choose to copy.
- Click Manage to access the Views page where you can: Choose a View to copy/modify or Create a new one.
- Click Delete to delete current View you are on.
Click the View selection box to access a list of all the out-of-the-box views that logged users can access, public views created by other users and custom views created by the logged users. When the Timesheet Manager page opens, if a default view exists for a logged user, then that view is displayed; however, if no default view exists, then Timesheet Manager loads the last view selected by the logged user. If Timesheet Manager is loading for the first time, then the first View displayed in the View selection box is shown.
Note:
- When users are deleted, all their associated Timesheet Views are also deleted.
- If users do not have access to the source View on which a custom View is created, then the View is not displayed in their View list.
Caution: The Conditional Formatting tab is not available from the Assigned Timesheet by Project View or any View where it is set as the Source View.
- From the Views context menu click Create.
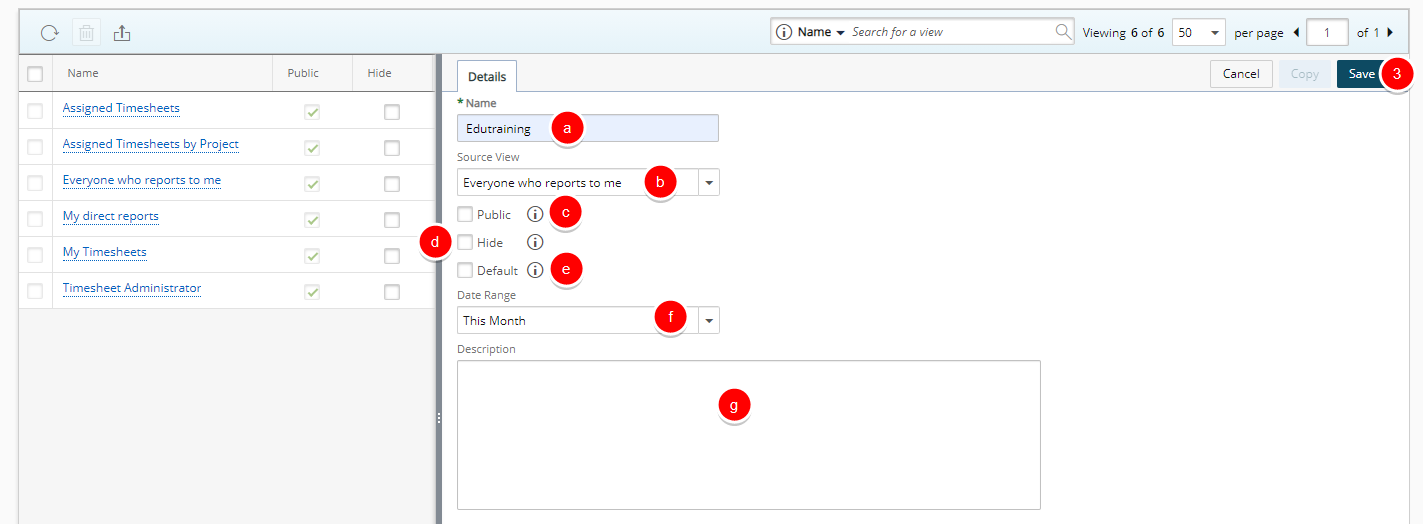
- Upon the Views page displaying, enter or select the following required information within the Details tab:
- Enter the Name of the custom View
Note: When entering a View Name note that:
- Two different users can have the same Private View name.
- A User’s own View names must be unique.
- Public View names must be unique
- Select a View from the Source View list. The available out of the box views are:
- Assigned Timesheets
- Assigned Timesheets by Project
- Everyone who reports to me
- My direct reports
- My Timesheets
- Timesheet Administrator
- Select Public to allow all Users access to this View.
- Select Hide to hide the View from the Timesheet Manager Views for the logged user.
- Select Default to set the View as the default one for the logged user.
Note: Only one View can be set as the Default. Upon choosing a View as the Default a previously chosen Default View will no longer be tagged as Default.
- Choose the default Date Range for the View from the following available options:
- Today
- This Week then choose weekday for the Starting From Last option.
- Last Week then choose weekday for the Starting From Last option..
- This Month then enter the Number of Weeks/Months and choose weekday for the Starting From Last option.
- Last Month
- Weeks in the past then enter the Number of Weeks/Months and choose weekday for the Starting From Last option.
- Months in the past then enter the Number of Weeks/Months.
- Enter a brief Description. This Description be displayed within the tooltip when hovering over the selected View within the Timesheet Manager page.
- Enter the Name of the custom View
- Click Save.
- Upon saving, note that the Columns, Filters and Conditional Formatting tabs are now available to you.
Note: The Conditional Formatting tab is not available from the Assigned Timesheet by Project View or any View where it is set as the Source View.
- Access the Columns tab to define the default columns to be displayed for this View.
- If required, search for the item you are looking for by entering the term in the search box. Click the Search button. The list will be refreshed, showing you only items that contain your search term.
- Select the item from the Available Columns list.
- Click the right arrow
 to add your selection to the Selected Columns list.
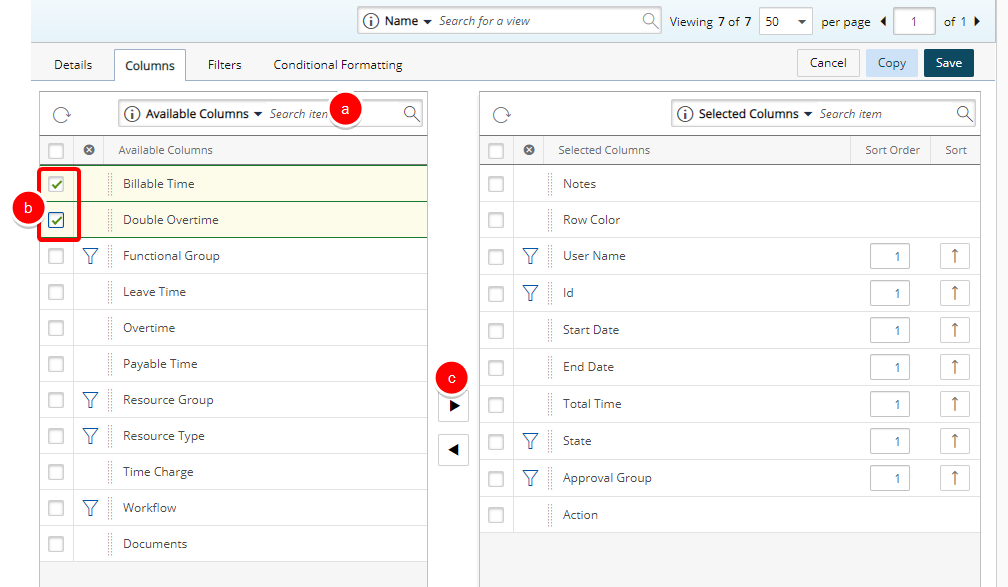
- Click the funnel icon
 located against the fields to either include or exclude any of these options as search criteria within the Timesheet Manager page: User Name, Id, State, Approval Group, Functional Group, Resource Group and Resource Type.
Note: A blue funnel icon
 denotes items that are selected and can be used as anchored Search Criteria. When unselected, the icon is charcoal gray .
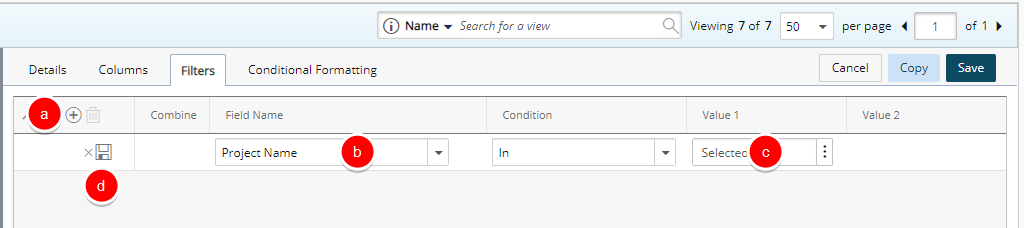
 - Access the Filters tab to define the default applied Filters for this View:
- Click the Add
 button to add a new line item for the Filter you wish to create.
 - From the Field Name list, select the required option from: Billable Time, Client Name, Double Overtime, Is Billable, Is Payable, Overtime, Payable Time, Period Status, Project Alternate Manager, Project Code, Project Id, Project Is Active, Project Manager, Project Name, Project Portfolio, State Attribute, State Name, Task Id, Task Name, Task Work Type, Time Charge, Total Time, User Active Site, User Approval Group, User Approval Group Manager, User Functional Group, User Functional Group Manager, User Id, User is Active, User Master Site, User Name, User Resource Group, User Resource Group Manager, User Resource Type, User Termination Date and User Title.
- Depending on the Field you choose, the Condition available to you will vary and may include one of the following options to choose from:
- Select In, Not In and then choose the Value 1.
- Select =, <>, >=, <=, <, >, Between, Not Between and then enter a value in Value 1/Value 2.
- Select =, <>, Like, Not Like, In, Not In and then enter the Value 1.
- Click the Save
 button located against the line item to save it.
 - Repeat steps a-d above to add additional Filters, if necessary.
- Click the Add
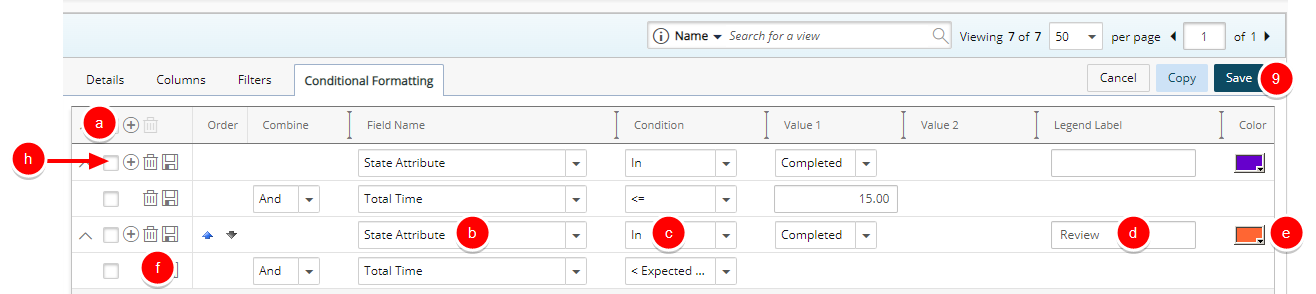
- Access the Conditional Formatting tab to define the displayed color indicators for this View.
- Click the Add button to add a new line item for the conditional format you wish to create.
- From the Field Name list, select the required option from: Billable Time, Double Overtime, Leave Time, Overtime, Payable Time, State Attribute, State Name, Time Charge, Total Time and User Is Active.
- Depending on the Filed you choose, the Condition available to you will vary and may include one of the following options to choose from:
- Select =, <>, >=, <=, <, >, Between, Not Between, = Expected Working Hours, <> Expected Working Hours, >= Expected Working Hours, <= Expected Working Hours, > Expected Working Hours or < Expected Working Hours.and then if applicable enter value in Value 1/Value 2.
Note: Calculation for the Expected Working Hours is as follows for all Period Types (Weekly Bi-weekly, Semi-monthly, Monthly):
Hours per day * the number of working days in the period (excluding any Saturdays and Sundays).
Holidays are not considered and have no effect on the calculations. - Select In, Not In and then choose the Value 1.
- Select =, <>, >=, <=, <, >, Between, Not Between, = Expected Working Hours, <> Expected Working Hours, >= Expected Working Hours, <= Expected Working Hours, > Expected Working Hours or < Expected Working Hours.and then if applicable enter value in Value 1/Value 2.
- Enter a Legend Label which will be visible when viewing the Legend.
- Click the color picker and choose a color indicator to display .
- Click the Save button located against the line item to save it.
- Repeat steps a-f above to add additional conditions, if necessary.
- Additionally you can add a nested items which will allow for more complex conditions . Click the New button located on the left of your existing Condition. Click the Save button located against the line item to save it.
- Click the Add
- Click Save to save your View.
- Click Back to return to the Timesheet Manager page.
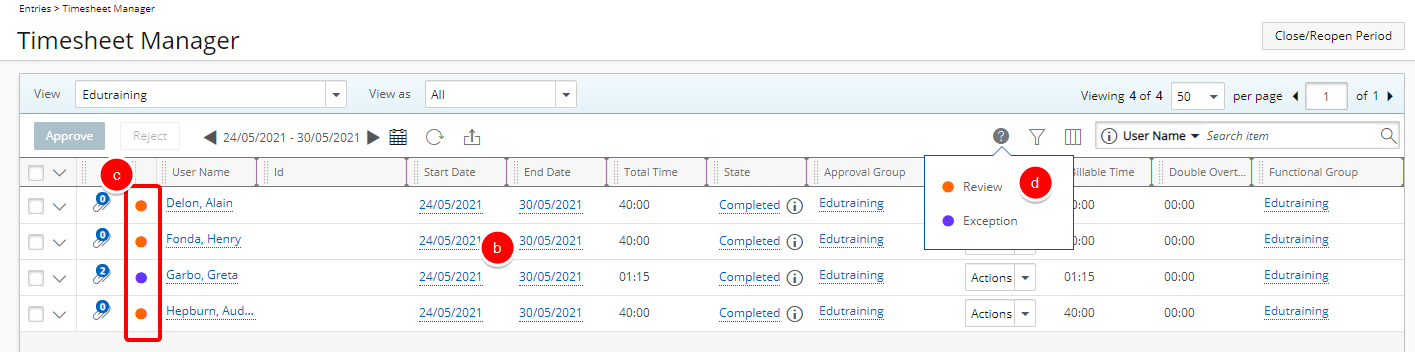
- Upon returning to the Timesheet Manager page note that:
- The Newly created private View is the Default View for the logged user.
- It is Filtered to only show the Timesheets for the selected Project(s).
- The conditional color indicator(s) are visible.
- The Legend labels are displays accordingly.