Adding an Expense Entry under a newly created Expense Report
This article details how to create a new Expense Entry immediately after creating a new Expense Report.
- From the Icon Bar click Entries
 .
. - From the Navigation Menu click Expense Manager.
- Create the Expense Report. For more information on how to create an Expense report click here.
- Click New. Note that the Detail section now displays the selection and entry boxes.
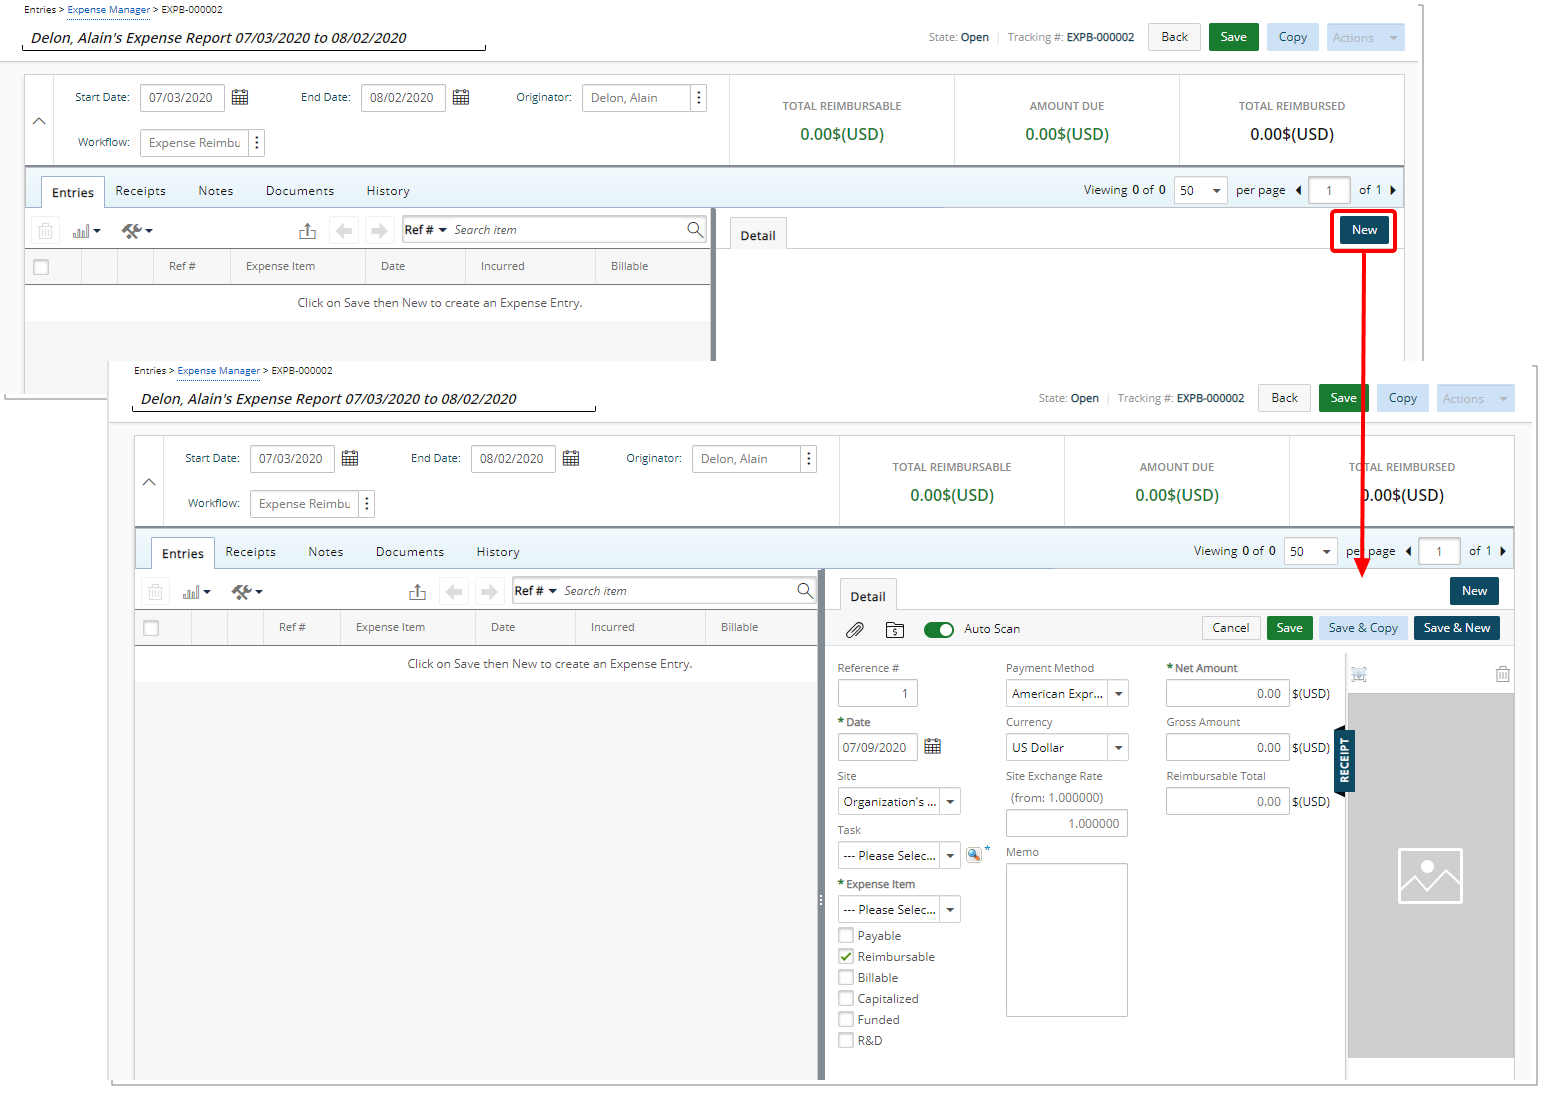
- You can either:
Enter the appropriate information
or
Attach a Receipt and scan it. This will result in the information to be recognized and populated in the corresponding Expense Entry boxes. If you are interested in using the Receipt Capture functionality, contact your PSA Project Manager or Customer Success Manager to discuss your needs further.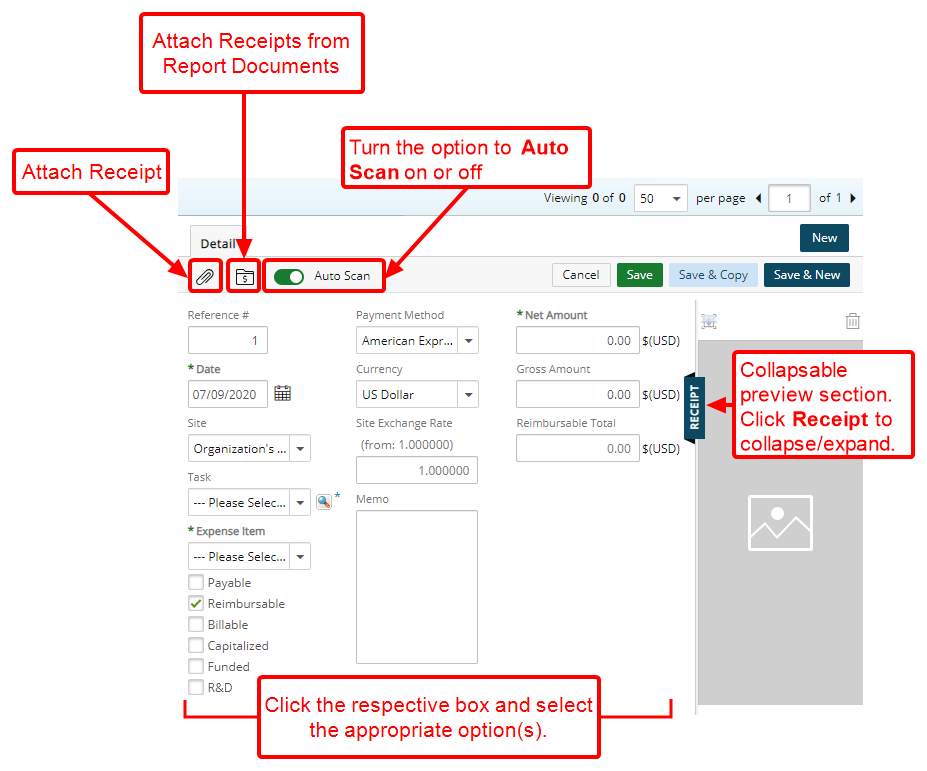
Note: When collapsing or expanding the preview section, your choice will be remembered upon next login.
 Enter the appropriate information
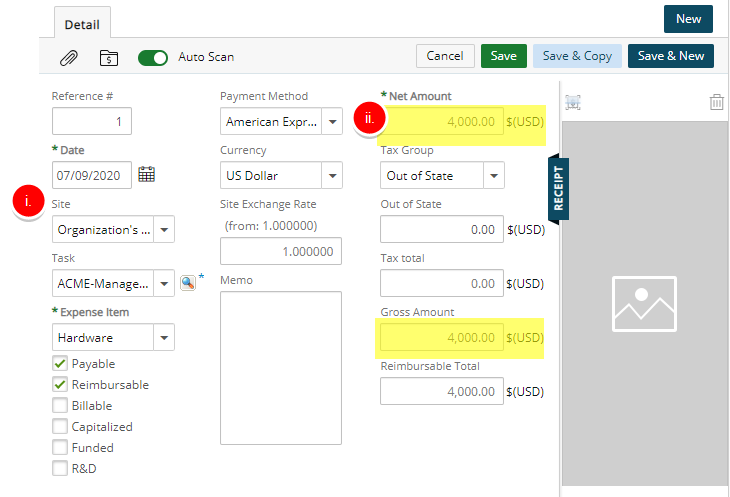
- Enter the appropriate properties in the required boxes. Selection of specific expense items automatically generates the required fields accordingly. As in this example, upon selecting Airfare, the Airfare-specific, required entry boxes automatically displayed, as does Meal, which had been set under the Entertainment Expense Category. The expense items that trigger the automatic display of associated required fields are those that fall under any of the Expense Categories: Airfare, Cash Advanced, Entertainment, and Mileage.
- Enter the Net Amount and the Gross Amount. The Reimbursable Total will calculate accordingly, taking info consideration any applicable tax, mark-up and/or tips.
Note: Based on your Expense Item and Tax Group selection, additional entry boxes may display, either prefilled (editable) or blank and ready to accept an entry, some of which are mandatory.
- An Expense Item that falls under any of the following Expense Categories will generate mandatory boxes:
- Airfare
- Cash Advanced
- Entertainment
- Mileage
- The Expense Entry Attributes are inherited from the Expense Item Attributes and its associated Task; therefore, the expense entry attributes depend on which attributes, Payable, Reimbursable, Billable, Capitalized, Funded and R&D, are defined for the Expense Item.
Attach a Receipt and scan it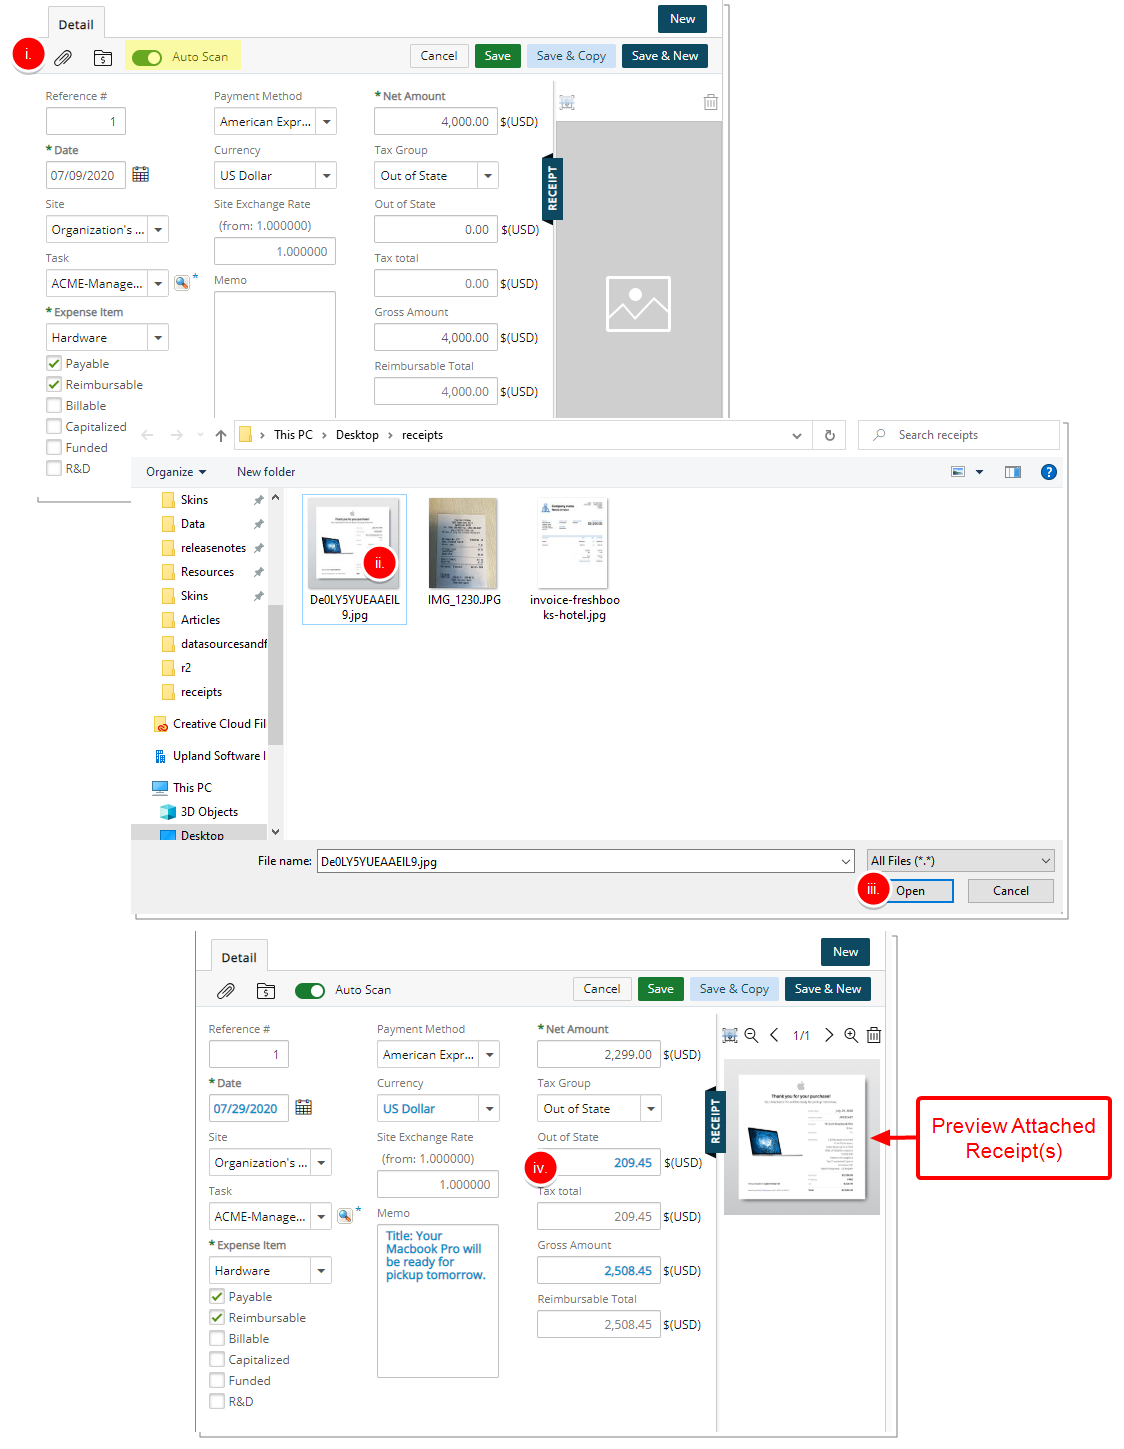
- Select Attach Receipt.
- Choose the required Receipt.
- Click Open. Note that if Auto Scan is selected your previously entered amounts will be overwritten. A confirmation box will display asking you to continue or cancel the scan. Click Yes to Continue.
- The details tab will refresh with the updated information. Note that he information resulting from the scan is shown in blue font. You can then make any necessary changes to the Entry before saving it.
For more information on:
Note:- If you turn the Auto Scan functionality off, it will also be turned off for you on the mobile app and vice versa.
- The Supported file formats for this capability are .jpg, .png and .pdf (single page only).
- Some scanned results such as Tax and/or Tip are hidden until you select an Expense Item.
Caution: Capturing an acceptable quality image of your receipt is necessary to ensure that the information can successfully be scanned. It is also important for you to verify the Expense Entry for accuracy before submitting your Expense Report.
- Select the required Save button. Ensure to use any of the Save buttons at the Entry level, otherwise the entry will not be saved.
- Click Save to save your Expense Entry.
- Click the Save & Copy to create a duplicate of the Expense Entry that you currently have displayed, with identical details, except for the Reference # that increments by 1.
Note: The Site field in the copied Expense Entry defaults to the Originator's Active Site ONLY when the original Expense Entry is associated with a suspended or out-of-scope Site.
- Click the Save & New to open a clean Detail, ready for an entirely new entry, with the options and boxes reverting to default values, except for the Reference # that increments by 1. In this example, you see #2, in read-only format.

- If applicable, address any errors: Upon saving an entry, if there are any error messages that generate, it will clearly identify what requires correcting.

-
If applicable, address any call to action: As the entry is being saved, note any messages that display that may be a call to action, such as the requirement for attaching a receipt for an entry.

-
View your Expense Entry
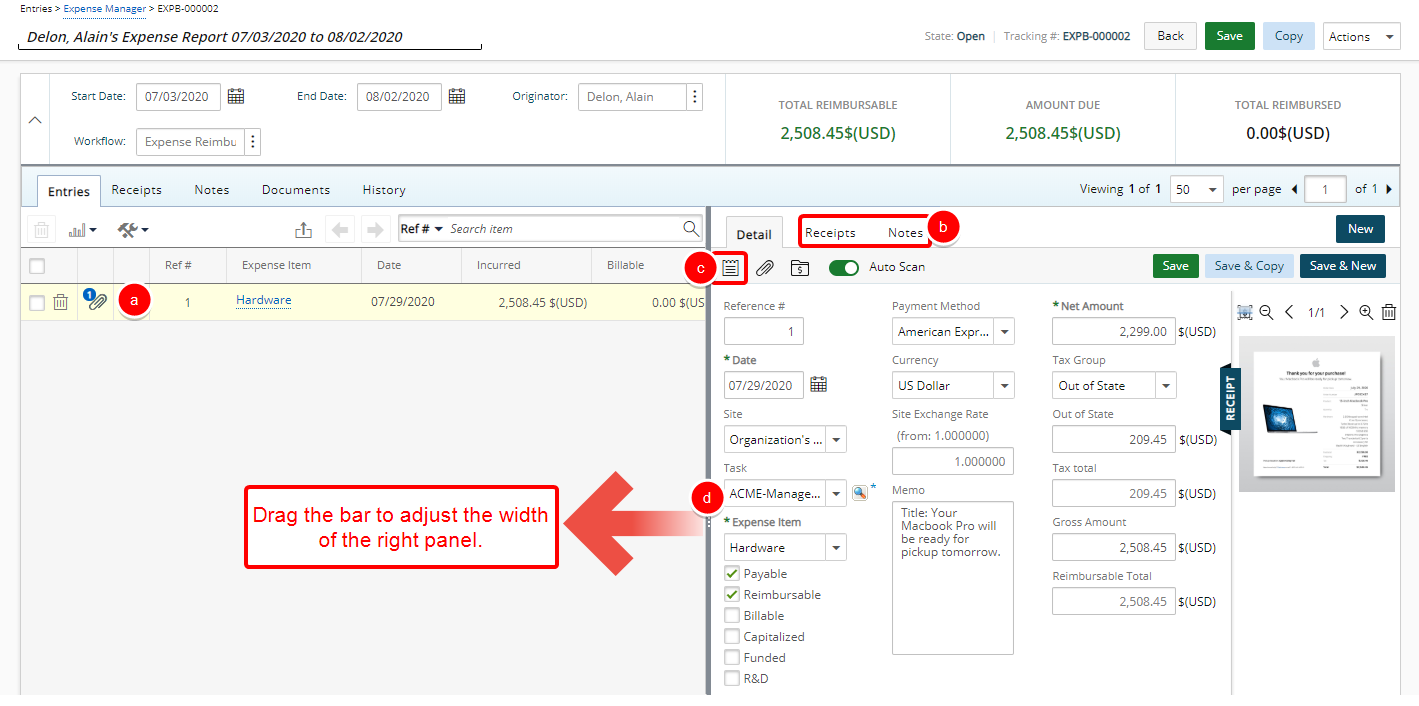
- The Expense Entry is now listed on the left pane.
- The Receipts and Notes tab are now available.
- The Details tab is visible with the additional Add Note button.
- The separator bar can be adjusted to accommodate a larger right panel area.
Note:
- Modifications to the width of the right panel within the Expense Report are retained per User/Browser until changed.
- Minimizing the left panel will result in the search box to be hidden from view. To access the search bar, the left panel must have a wider width.
- The size of the left panel can only be a maximum of 33% of the browser window.