This article covers how to create an Expense Payable Batch.
Note: Before including the Expense Reports in payable batches, they must be approved, in the workflow state called Include entries in Payable Batch and not already posted.
- From the Icon Bar click Financial
 .
. - From the Navigation Menu click Expense Payable Manager.
Note: You must have the appropriate rights to access the Expense Payable Batches.
- Upon the Expense Payable Batches page displaying, click Create Batch.
Note: By default, the list is filtered based on Open Expense Payable Batches.
- Enter or select the appropriate information:
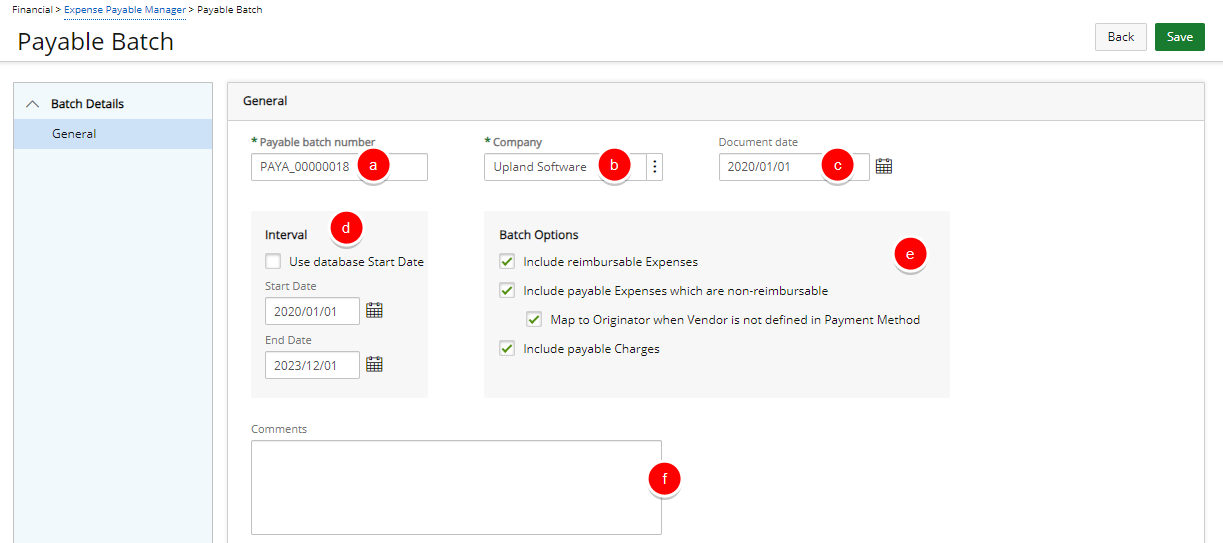
- The Payable Batch Number is automatically generated. You may modify the Payable Batch Number if necessary.
Note: When modifying the Payable Batch Number, ensure the number is unique enough to identify when searching for the batch.
-
Click Browse button located beside the Company to select the company for which the payable batches are processed. The company concept allows you to filter the list of users associated to the selected company.
Companies can be associated to users and sites from the User Edit (under Invoice Options tab) and Site Edit pages, respectively.
- During the payable batch generation process, once a company is selected, the system displays only those users associated to the selected company. If the selected company is not associated to the user, then the system validates the site. If the companies match, then all users associated to the site are displayed.
- If no users and sites are associated to the selected company, and if the selected company is the default company (set under Setup > Financial > System: Defaults), then all other users in the application are processed in the payable batch.
Note: Selecting a company allows the proper export of the users and time entries under that specific company.
- Click the Document date calendar icon to select a date and to define the document date of the Expense Payable Batch. By default, the Document date is set to the date the batch is created. Note:
- The Document date is not restricted to the date range of the payable batch and also not limited by the System or Fiscal start date. The Document date calendar control is editable for non-read only and non-posted payable batches.
- The document date for each payable batch is sent to a financial system, such as ACCPAC or Great Plains, when the payable batches are exported (if applicable). If exporting to Great Plains as a G/L Transaction, the related Doc. Date field in Great Plains must also receive the payable batch’s Document date.
- From the Interval section define the cycle of the expense payable batch. If the start date of the expense payable batch is the same as the application database, then select the Use database start date box. If not, then set the Start Date and End Date of the expense payable batch cycle.
- From the Batch Options section, choose:
- The Include reimbursable Expenses: box to include any expenses marked as Reimbursable in the users' expense reports. If you selected the Include reimbursable expenses option and clicked Next, the Expense Reports page appears. This page includes a list of expenses reports you can include in the payable batch. The page shows the list of all users for whom the Payable batch is processed. By default, all users have their names selected. This page selects specifically users whose expense reports are included in the payable batch. To exclude users, clear the check boxes beside their names. After clicking next, the Expense reports for the Payable Batch are displayed.
- The Include payable Expenses which are non-reimbursable option. When selected, the payable batch not only includes expense entries with the reimbursable flag set but also expense entries with the payable flag set. Then choose Map to Originator when Vendor is not defined in Payment Method if required.
- The Include payable Money Chargesoption to include any money type charges marked as Payable in the users' expense reports. If you selected the Include payable Money Charges check box, the Expense Reports page appears. By default, all users have their names selected. This page selects users with specific charges to be included in the payable batch.
- If there are comments regarding the payable batch, enter them in the Comments box.
- The Payable Batch Number is automatically generated. You may modify the Payable Batch Number if necessary.
- Click Save. Note that once the minimum required information for creating a Payable Batch is entered, upon clicking Save, the page will refresh and show all the other elements that can be completed.
- From the right hand side navigation click Users to select the User(s) from a list of users whose reimbursable expenses and money type charges are included in the payable batch. By default, all users have their names selected. To exclude a User, clear the selection box(es) beside their names
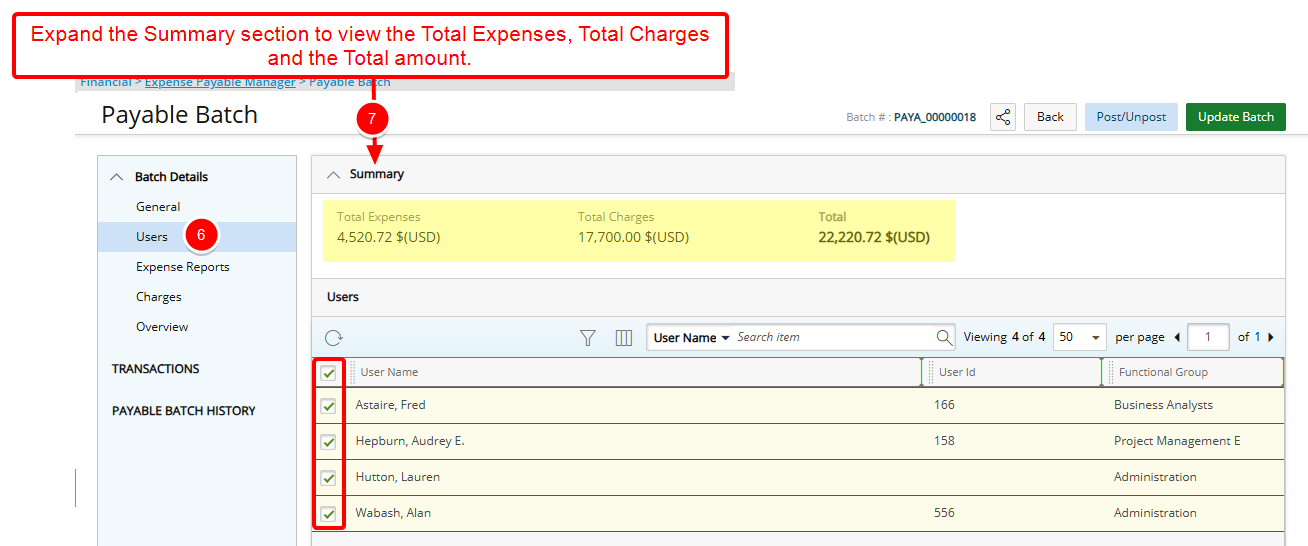
Note: By default, the following columns are displayed: User Name, User Id and Functional Group. You can choose to include the following columns through Columns Selection
 : Active Site, Approval Group, Hire Date, Master Site, Primary Role, Resource Group, Resource Type, Security Role and Title.
Tip: You may wish to narrow your list results so that you retrieve just the right amount of information you need. To do so you can perform a search. By default you can search based on User Name, User Id, Functional Group or Resource Type. These default search options can be managed from Column Selection
. - Expand the Summary section to view the Total Expenses, Total Charges and the Total amount.
- You can Filter
 the list based on Active Site, Approval Group, Functional Group, Hire Date, Master Site, Primary Role, Resource Group, Resource Type, Security Role, Title, User Id or User Name.
 - From the right hand side navigation click Expense Reports (Available only when the Include reimbursable expenses selection box is checked). This page includes a list of expenses reports you can include in the Payable Batch. By default, all Expense Reports are selected. To exclude an Expense Report, clear the selection box(es) beside their Tracking #.
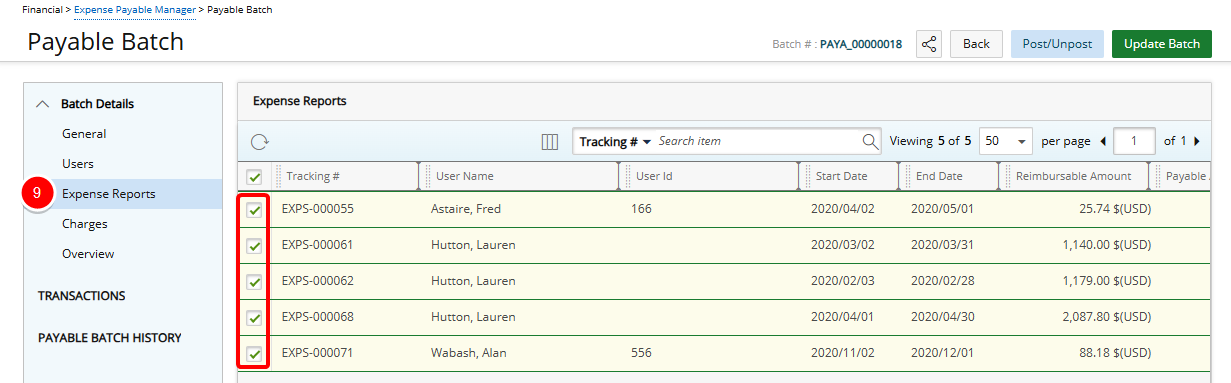
Tip: You may wish to narrow your list results so that you retrieve just the right amount of information you need. To do so you can perform a search. Select either Tracking#, User Name, User Id, Start Date, End Date, Title, Approval Group or Functional Group from the Search By options and then enter a corresponding value in the Search For box. Click the search icon to narrow down the list.
- From the right hand side navigation click Charges (Available only when the Include payable Money Charges selection box is checked). By default, all Charge Entries are selected. To exclude a Charge Entry, clear the box(es) beside their names.
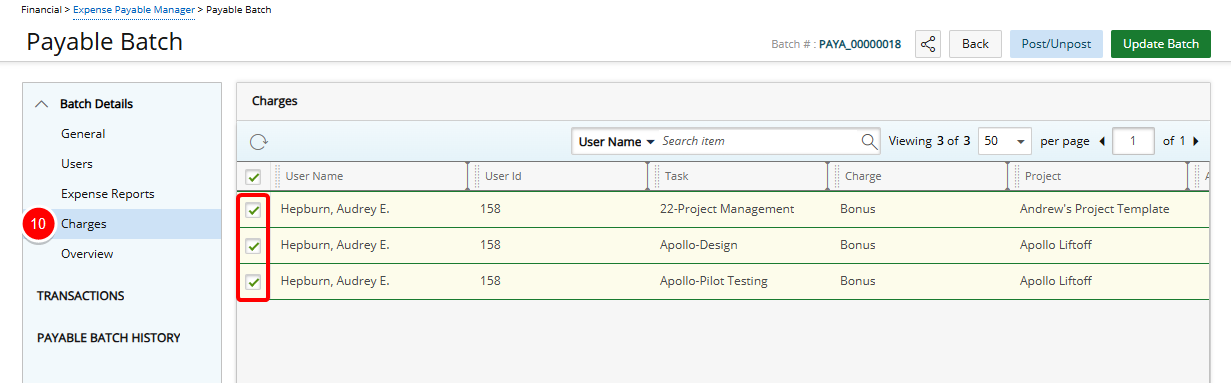
Tip: You may wish to narrow your list results so that you retrieve just the right amount of information you need. To do so you can perform a search. Select either User Name, User Id, Task, Charge or Project from the Search By options and then enter a corresponding value in the Search For box. Click the search icon to narrow down the list.
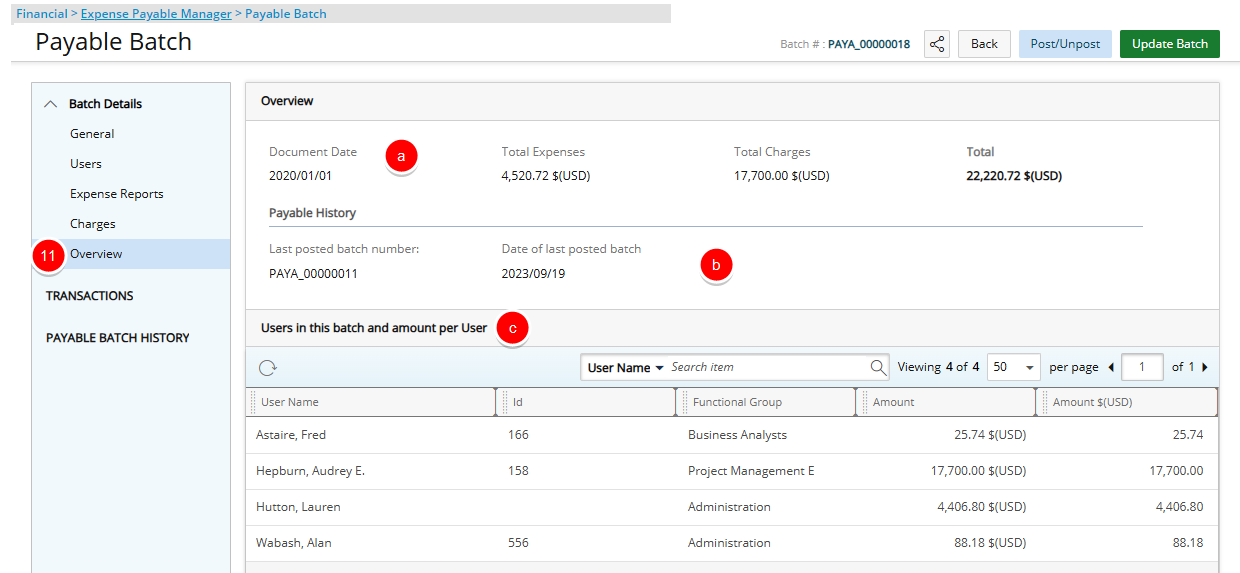
- Click Overview to review your Expense Payable Batch:
- The Document Date, Total Expenses, Total Charges, and Total are displayed on top of the Overview page.
- The Payable History section displays the Last posted batch number and the date when the last batch was posted.
- The Users in this batch and amount per User table
lists all users and the Amounts per User that are included in the batch.
- Any modifications to the Batch are saved automatically.
- Click Back to return to the Expense Payable Manager page and view the newly created Payable Batch.