From the Work Plans you have the option to copy an existing booking to another user/role/project/task with similar or different properties.
Bookings can be copied in one of the following two ways:
- By selecting Quick Copy: This method offers a quick way of copying a booking without any advanced Skill, Allocation definitions or Notes.
- By selecting Copy: This method offers more advanced capabilities for copying the booking by allowing you to defining additional Skills and advanced Allocation methods as well as Booking Properties.
Depending on your organizational role and rights granted to you, you can access the Work Plan through one of any or one of the following avenues, each of which are illustrated in the Accessing the Work Plans article.
For this article, the steps are demonstrated using the Project Work Plan as the example.
Note: The pages and formats shown in this article may differ from what you see in your environment. Your organization’s configuration or the rights assigned to you may result in a different experience.
Quick Copy
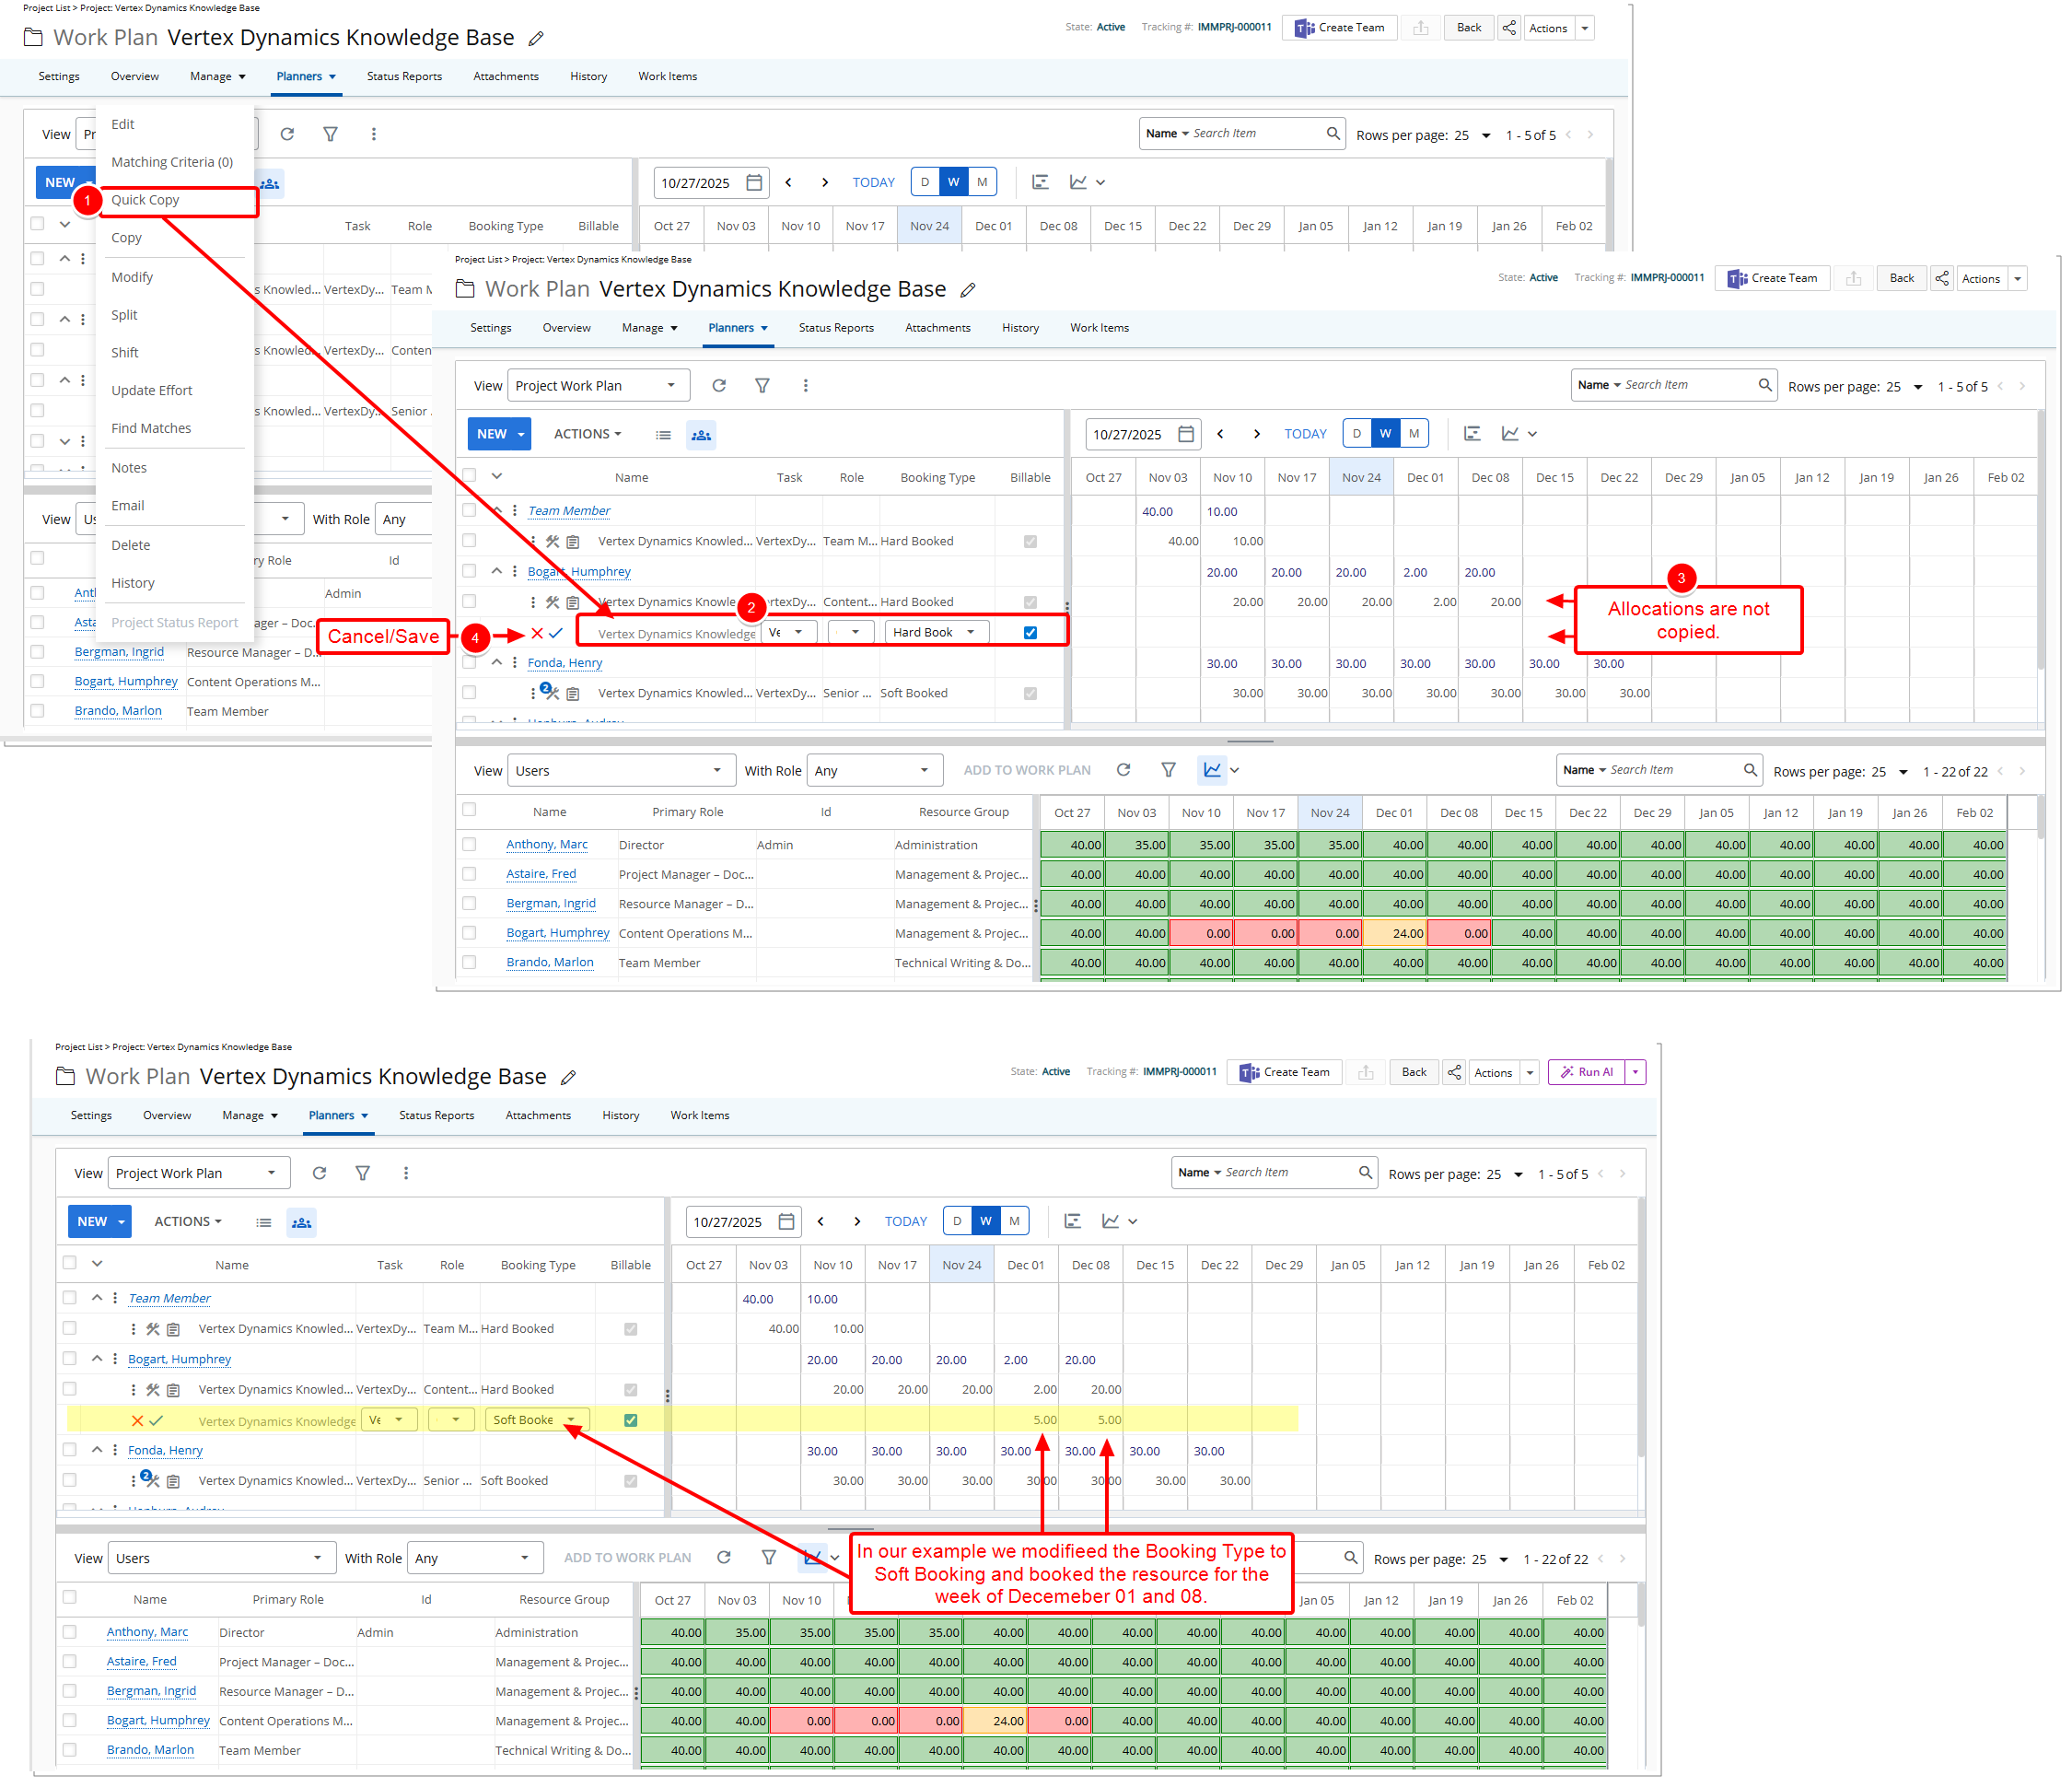
- From the Booking context menu select Quick Copy.
- The following settings are copied from the source Booking:
- Project
- From Resource Scheduling, Group Work Plan, User Work Plan or Role Work Plan page, the list of projects will include:
- All projects if the logged user has rights to the Can select any Project component in their security profile. Note scoping is applied.
- Any project of which the logged user is the active manager regardless of scope.
- Any project of which the logged user is the associated Portfolio’s manager regardless of scope.
- Any project on which the logged user is part of the project security regardless of scope.
- From the My Work Plan page, the list of projects will include:
- All projects if the logged user has rights to the Can select any Project component in his security profile. Note scoping is applied.
- Any project of which the logged user is the active manager regardless of scope.
- Any project of which the logged user is the associated Portfolio’s manager regardless of scope.
- Any project on which the logged user is part of the project security regardless of scope.
- Any projects on which the logged user has task assignments regardless of scope.
- Any project the logged user is a team member regardless of scope.
- The list of projects will be additionally filtered to show only those Projects that are of type Resource Planning.
- From Resource Scheduling, Group Work Plan, User Work Plan or Role Work Plan page, the list of projects will include:
- Role
- When a booking is being copied for a Role, this box will be grayed out and set to the Role name. If the role is suspended, it is displayed in red font.
- When a booking is being copied for a User, the list of active Roles associated to the respective user will be available in the list. Note that if the role is suspended, it will appear in red font.
- Booking Type
- The available options for Booking Type are: Hard Booked and Soft Booked.
- If the logged user does not have rights to the Can hard book Resources component in their security profile, the option Hard Booked will not be available.
- If the source booking was hard booked and the logged user does not have rights to the Can hard book Resources component in his security profile, the Booking Type will be automatically changed to Soft Booked.
- Any Booking Attributes
- Project
- The allocations from the existing booking will not be copied when using quick copy. If the allocations are to be copied, you must initiate an advanced copy through the Copy context menu option.
- The new row will be in edit mode with Save
 and Cancel
  icons displayed to the left of the booking. Select Save to save your copied booking.
Note: When saving a new row, if the booking properties match exactly an existing booking, the two bookings will be merged and the allocations will be summed up. Furthermore, the notes for both bookings will be merged as well .
- View your changes.
After saving a booking using Quick Copy, the updated line is briefly highlighted in light blue before fading back to the normal background. This temporary highlight helps you quickly identify the booking you just saved.
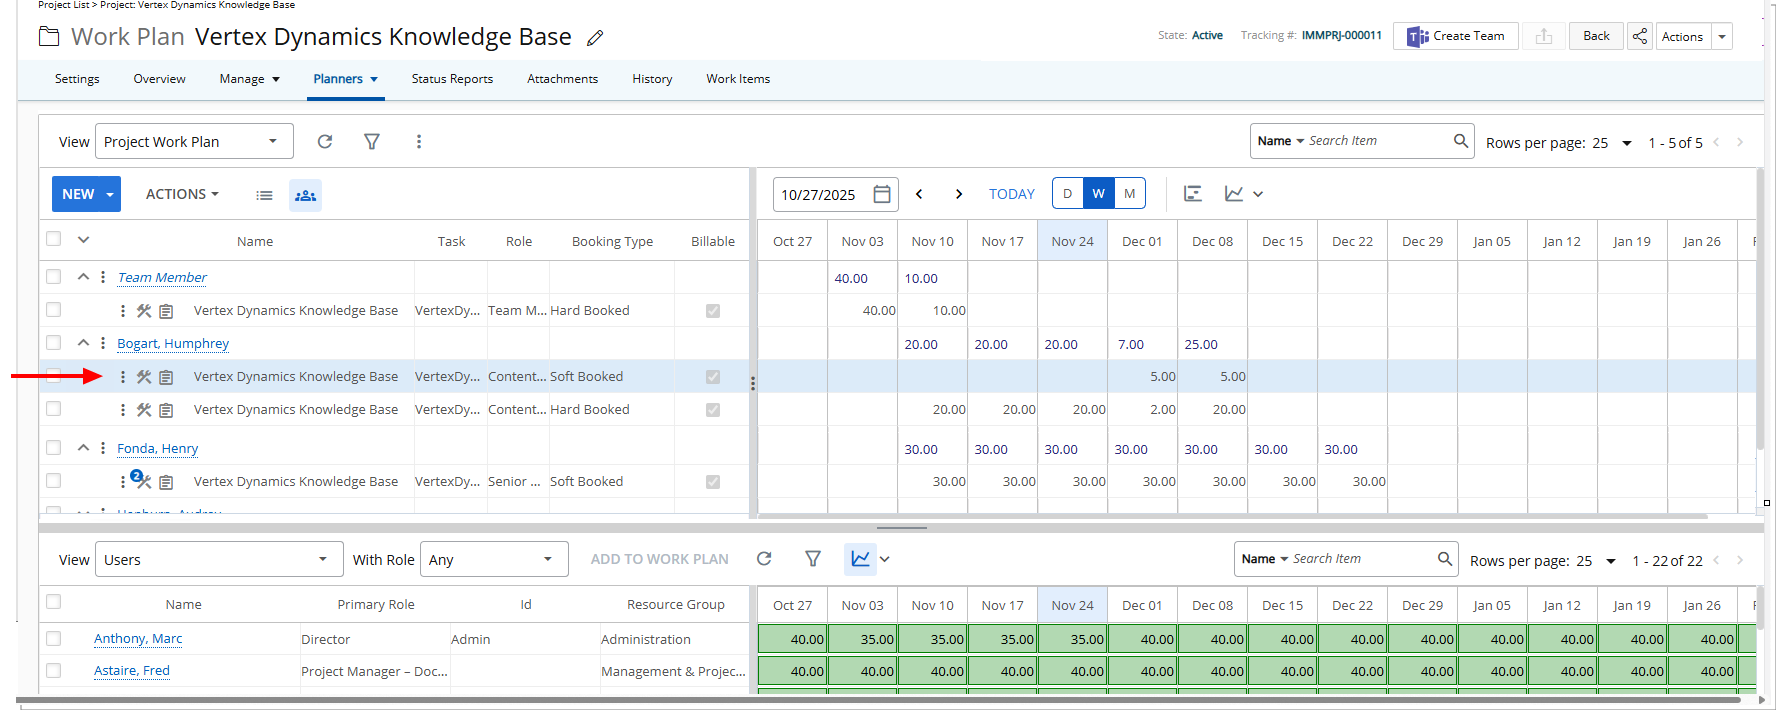
Tip: The saved booking line is highlighted in light blue for a few seconds. The highlight then fades back to the normal background color. This helps you quickly spot the booking.
Copy
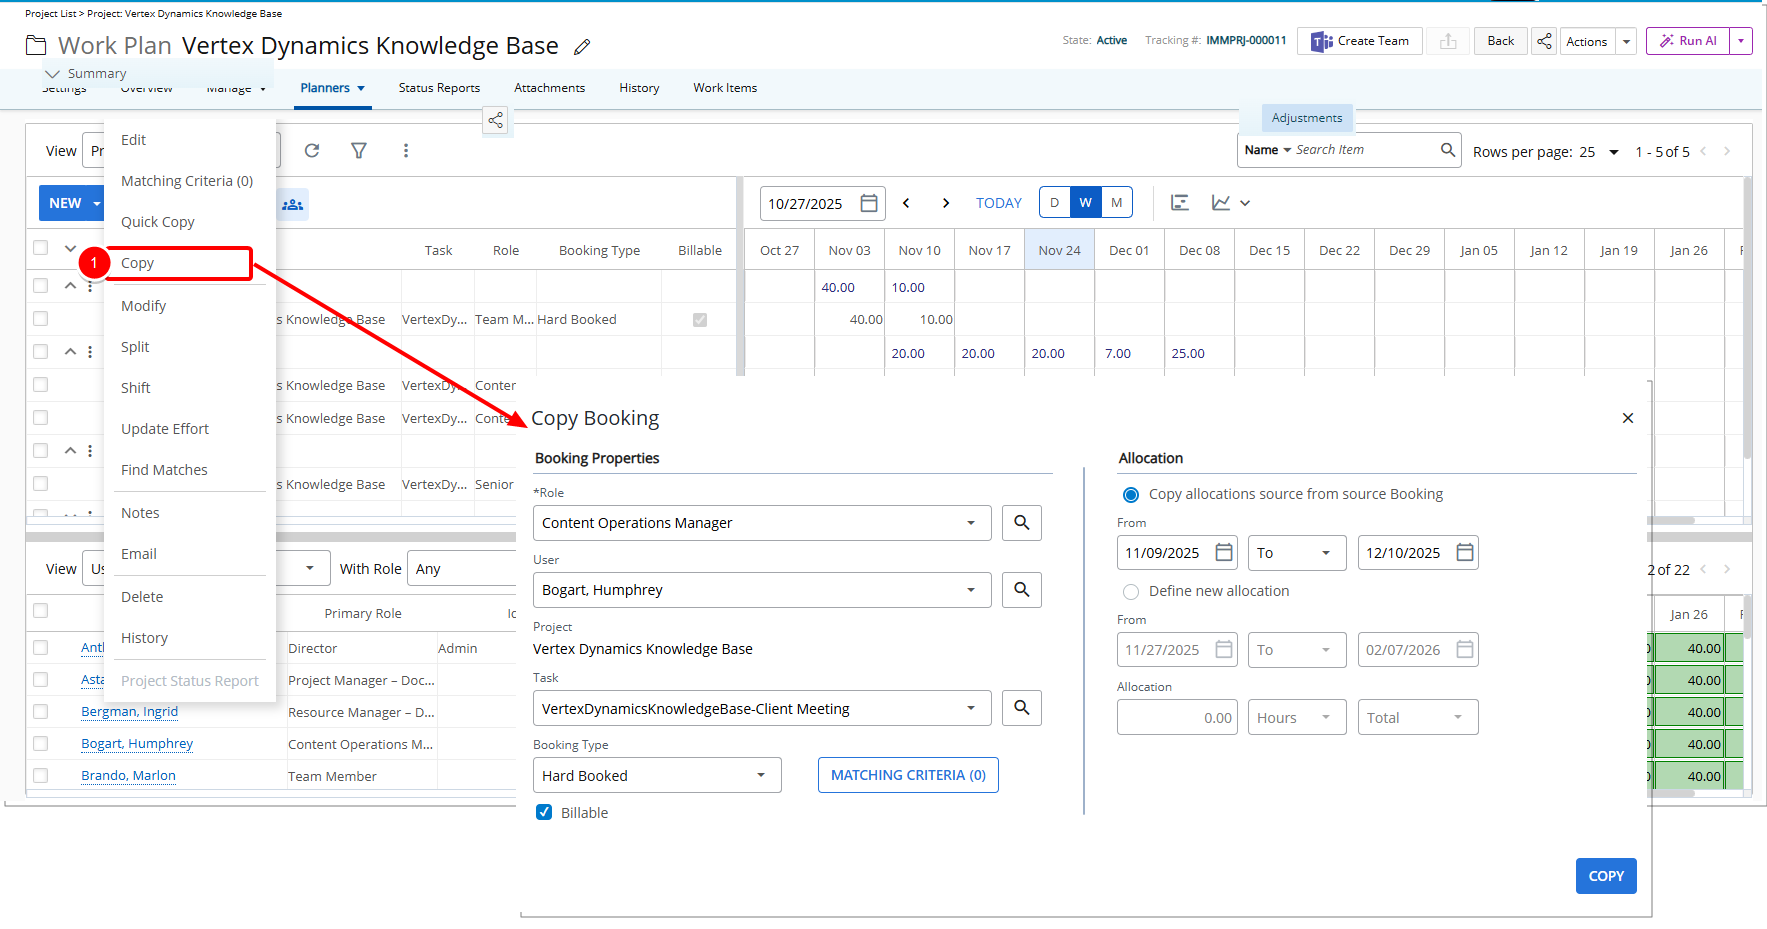
- From the Booking context menu select Copy. This will open the Copy Booking dialog box.
- The following settings are copied from the source Booking:
- Project: Set to the source booking project by default.
- Role: Set to the source booking role by default. If required it can be modified. Note: Copy Booking page accessed from the Role Work Plan page, the Role will be read-only.
- User: Set to the source booking user by default. If required it can be modified.
- Booking Type: Set to the source Booking Type by default. If required Booking Type can be modified.
- Any Booking Attributes Set to the source Booking Attributes by default. If required Booking Attributes can be modified.
- The Allocation section will allow defining the booking allocation details.
- Copy allocations from source Booking: This option will allow defining whether the booking allocations should be copied as well and is selected by default. The following two options are available to you when you choose Copy allocations from source Booking:
- From: Choose the date from which bookings will be copied. Note that this be available to you only if the Copy allocations from source Booking option is selected.
The date will default based on the following logic- If the current date is within the current view and a Task is defined, this date will be set to the maximum date between the Task start date and the current date.
- If the current date is within the current view and a Task is not defined, this date will be set to the maximum date between the Project start date and the current date.
- If the current date is within the current view and neither a Task nor Project is defined, this date will be set to the current date.
- If the current date is not within the current view and a Task is defined, this date will be set to the maximum date between the view start date and the Task start date.
- If the current date is not within the current view and a Task is not defined, this date will be set to the maximum date between the view start date and the Project start date.
- If the current date is not within the current view and neither a Task nor Project is defined, this date will be set to the view start date.
- To/For: Choose the date up to which the bookings will be copied.
- To: When the To option is selected, a date control will be displayed allowing the user to select an end date. The default date will be set to the latest allocation entry date for the source booking.
- For: When the For option is selected, a text and combo-box box will be displayed allowing selecting the number of Day(s), Week(s) or Month(s) for which the booking will be created. When selected, this will default to the number of days from the selected From date until the latest allocation entry date.
- From: Choose the date from which bookings will be copied. Note that this be available to you only if the Copy allocations from source Booking option is selected.
- Define new allocation: Selecting this option will allow you to define a new allocation for the copied booking.
- Copy allocations from source Booking: This option will allow defining whether the booking allocations should be copied as well and is selected by default. The following two options are available to you when you choose Copy allocations from source Booking:
- Booking Properties section: Display all properties associated to the booking. All booking attributes are copied from the source booking.
Note: When saving a copied booking, if the booking properties match exactly an existing booking, the two bookings will be merged and the allocations will be summed up. Furthermore, the notes for both bookings will be merged as well.
- Click Copy.
Tip: The saved booking line is highlighted in light blue for a few seconds. The highlight then fades back to the normal background color. This helps you quickly spot the booking.