Custom fields in Upland Analytics are user-defined data elements that enhance the flexibility and functionality of your reports. They allow you to go beyond the limitations of predefined system fields by enabling tailored calculations, logic-based transformations, or the reformatting of data to meet specific business needs. With custom fields, you can apply functions and expressions to combine existing fields, compute derived metrics, or create conditional outputs—empowering you to generate deeper insights and more dynamic, purpose-driven reports. This capability is particularly valuable for users who need to align reporting outputs with unique organizational workflows, KPIs, or data visualization preferences.
This article details how to:
Create a Custom Field
- Click Create Custom Field. The Create Custom Field dialog box displays.
- In the Custom Field Name box, type a name for your custom field.
- Click the Format dropdown and select the format in which your custom field will be. For detailed information refer to Data Types
- Click in the box below and create an expression. The custom fields expression editor supports a wide range of mathematical, date-time, string, and logical functions. For more information, refer to:
- Optional: Check the Create Another check box to create another custom field after you save this one. After you click Save Custom Field, a blank Create Custom Field dialog box displays.
- Click Save Custom Field. The custom field displays in the Available Fields list.
Note: Drag and drop the fields that you want to use in your report from the Available Fields section to the bucket on the right. To select multiple fields, press Shift, select the fields, and drag and drop them in the bucket on the right.
Example 1 - Balance Due
We are going to create a Custom Field to calculate the Balance Due amount. To do this we are going to use the following two fields:
- Invoice Total Amount with Tax in Base Currency
- Invoice Total Payment in Base Currency
- In the expression editor start by typing "Invoice Total Amount with...". As you type you will see the Invoice Total Amount with Tax in Base Currency field appear in the list of available fields; click it to select.
- Enter the minus operator (-)
- Then type "Invoice Total Payment in Base...". As you type you will see the Invoice Total Payment in Base Currency field appear in the list of available fields; click it to select.
- You will see expression displayed within the expression editor and a message informing you that The calculation is valid.
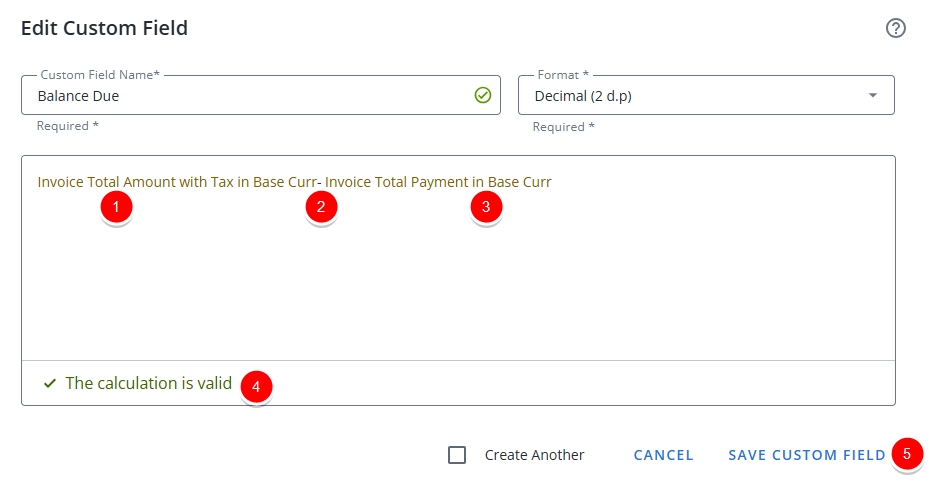
- Click Save Custom Field.
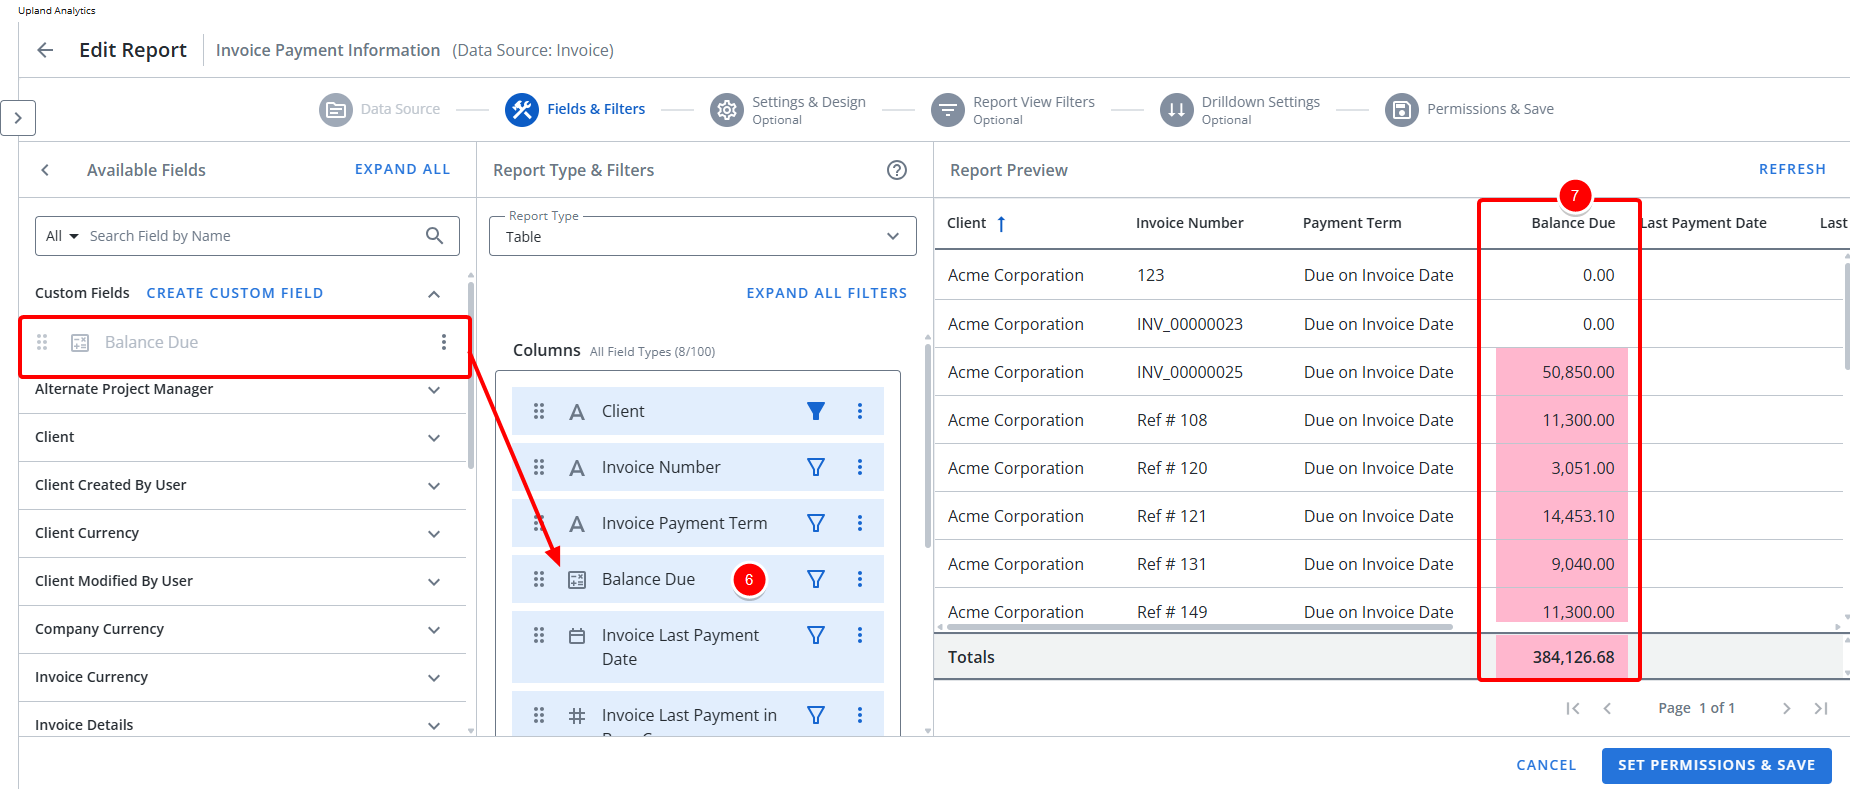
- Then include the Field in your report by dragging it into the Column section.
- Preview your report.
Example 2 - Number of Projects
As an example we are going to create a Custom Field to display the Number of Projects. To do this we are going to use the Count Function and choose Project as the Field:
- In the expression editor start by typing "Count". As you type you will see the Count function appear in the list; click it to select.
- In the expression editor you will now see COUNT(field), where the word field is already selected.
- Then type Invoice "Project". As you type you will see the Project field appear in the list of available fields; click it to select.
- You will now the see expression displayed within the expression editor and a message informing you that The calculation is valid.
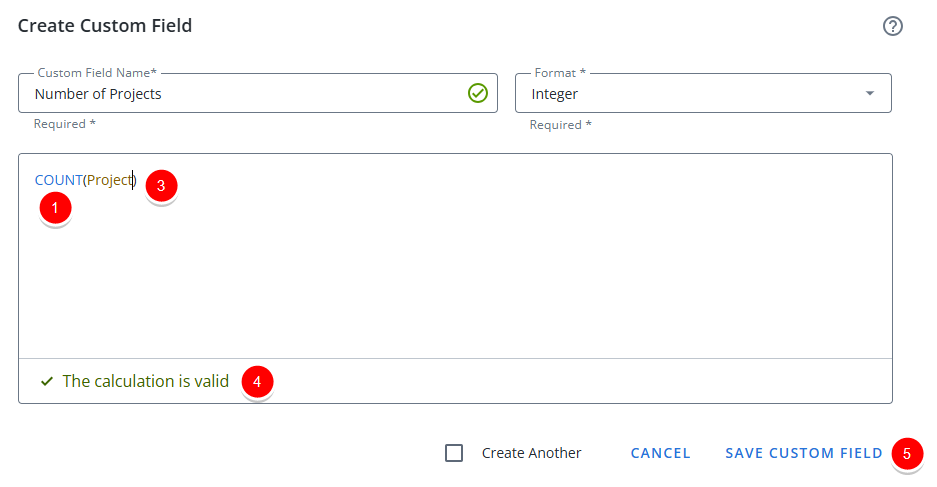
- Click Save Custom Field.
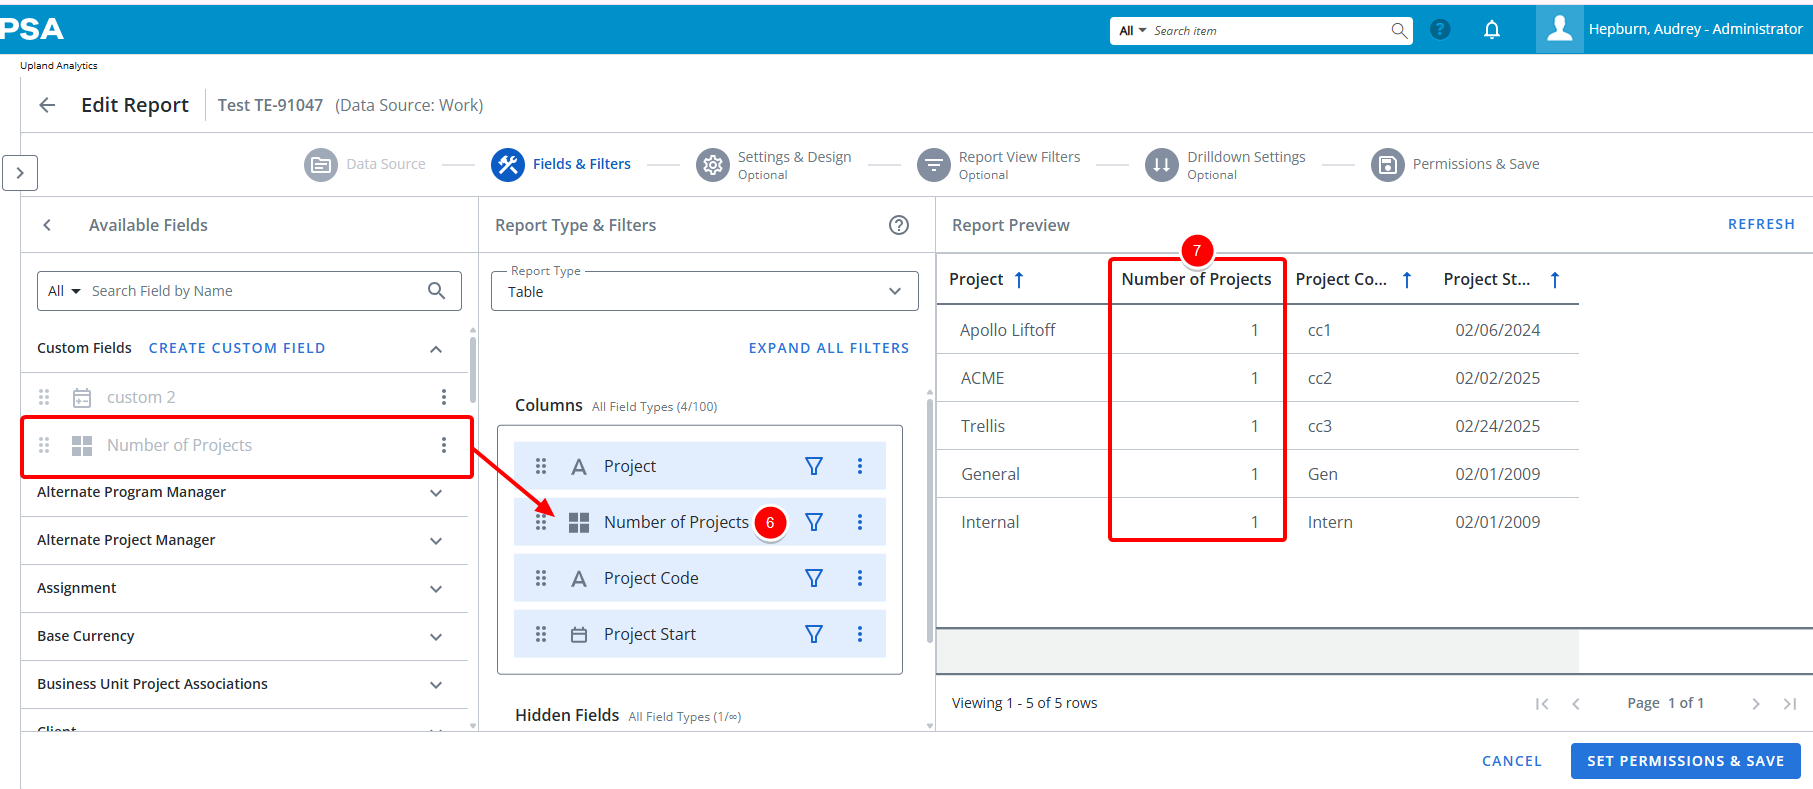
- Then include the Field in your report by dragging it into the Column section.
- Preview your report.
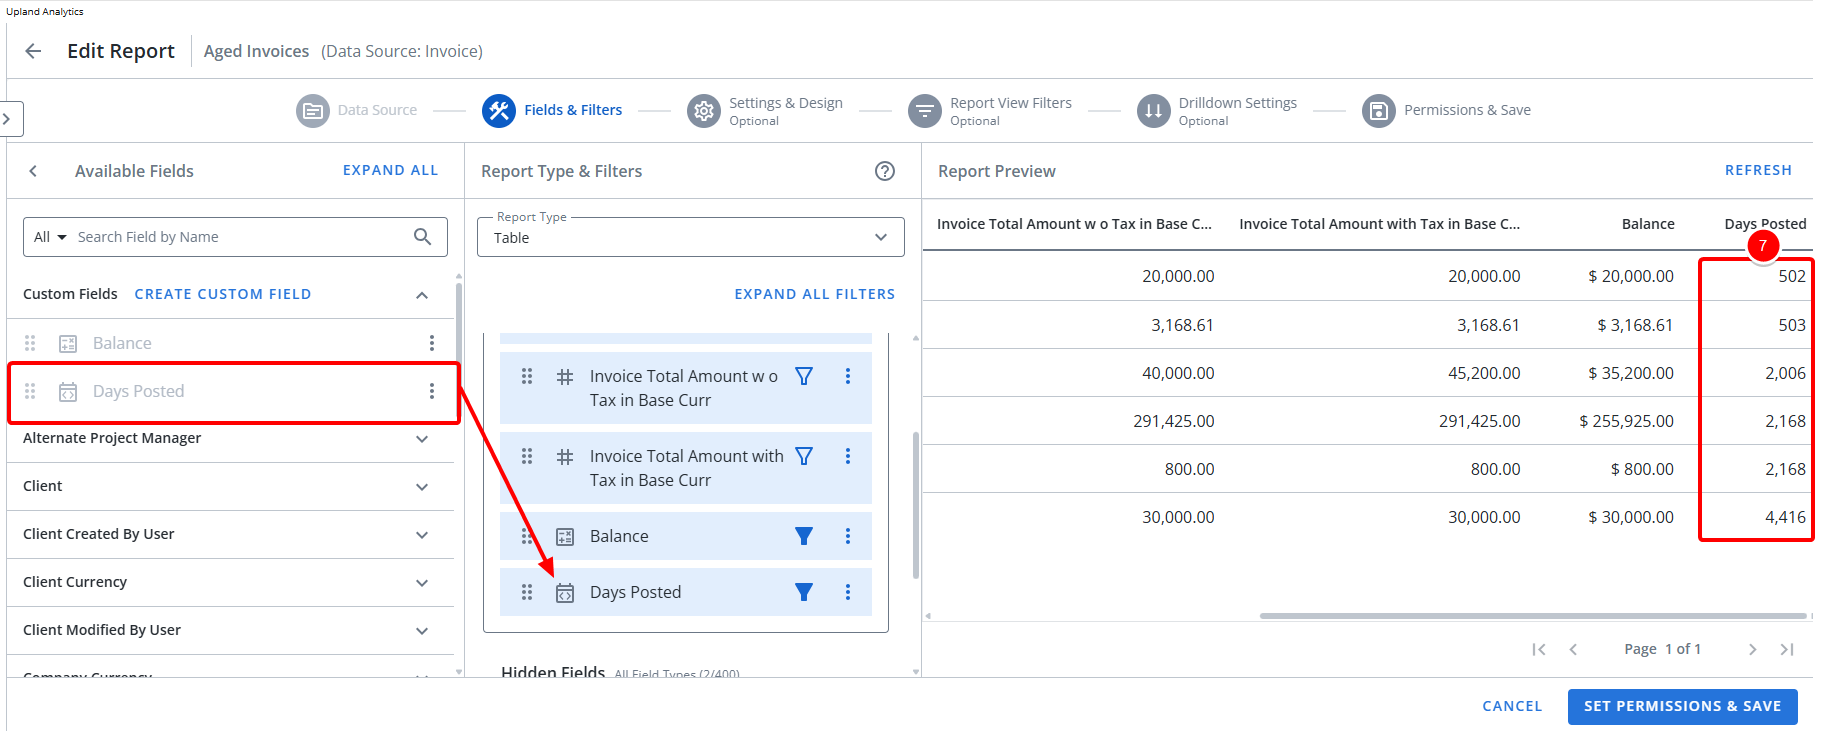
Example 3 - Days Posted
As an example we are going to create a Custom Field to display the Number days the Invoice is in posted state. To do this we are going to use the DateDiff Function which returns the difference in numbers (based on $interval) between two dates:
- In the expression editor start by typing "DATEDIFF". As you type you will see the DATEDIFF function appear in the list; click it to select.
- For the Interval select Day from the available options.
- For Field1 type "Invoice Posted Date". As you type you will see the Invoice Posted Date field appear in the list of available fields; click it to select.
- For Field2 type "Today". As you type you will see the Today field appear in the list of available fields; click it to select.
- You will now the see expression displayed within the expression editor and a message informing you that The calculation is valid.
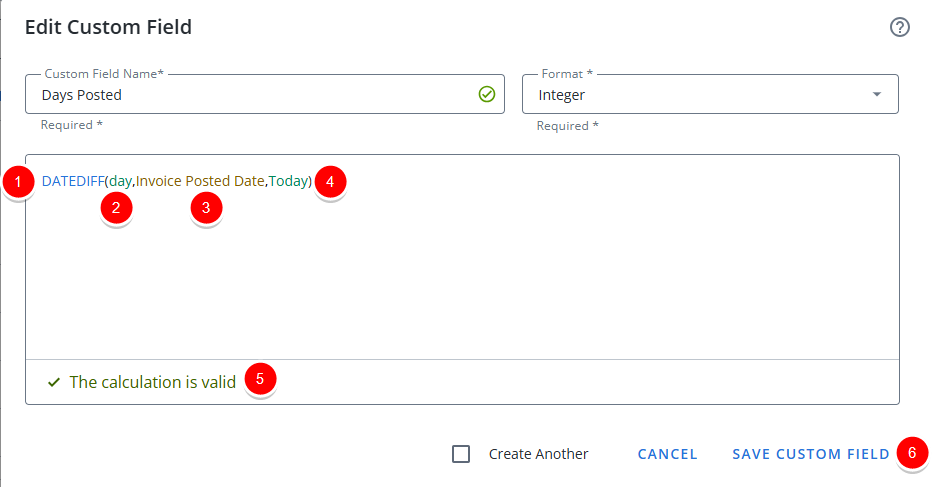
- Click Save Custom Field.
- Then include the Field in your report by dragging it into the Column section.
- Preview your report.
Example 4 - Calculating Allocated Time for Tasks That Have Ended
As an example we are going to create a Custom Field that calculates the allocated time only for Tasks that have already ended. This helps focus reporting on work that is complete, excluding future or ongoing tasks.
In this formula:
- If the task ended before today, the field shows the assigned/allocated time.
- If not, it returns 0.
This is helpful for tracking effort tied specifically to completed tasks or analyzing historical workload.
- In the expression editor start by typing CASE. As you type you will see the CASE function appear in the list; click it to select. Note that the editor will now display:
CASE WHEN condition THEN true ELSE false END - Insert < before condition to start your comparison, as follows: <condition
- Then replace the placeholder condition with Task End field by selecting it from the available options.
- To get the current date, enter GETDATE()
- Replace the true placeholder with the Assignment Allocated Time field by selecting it from the available options.
- Replace the false placeholder with the 0.
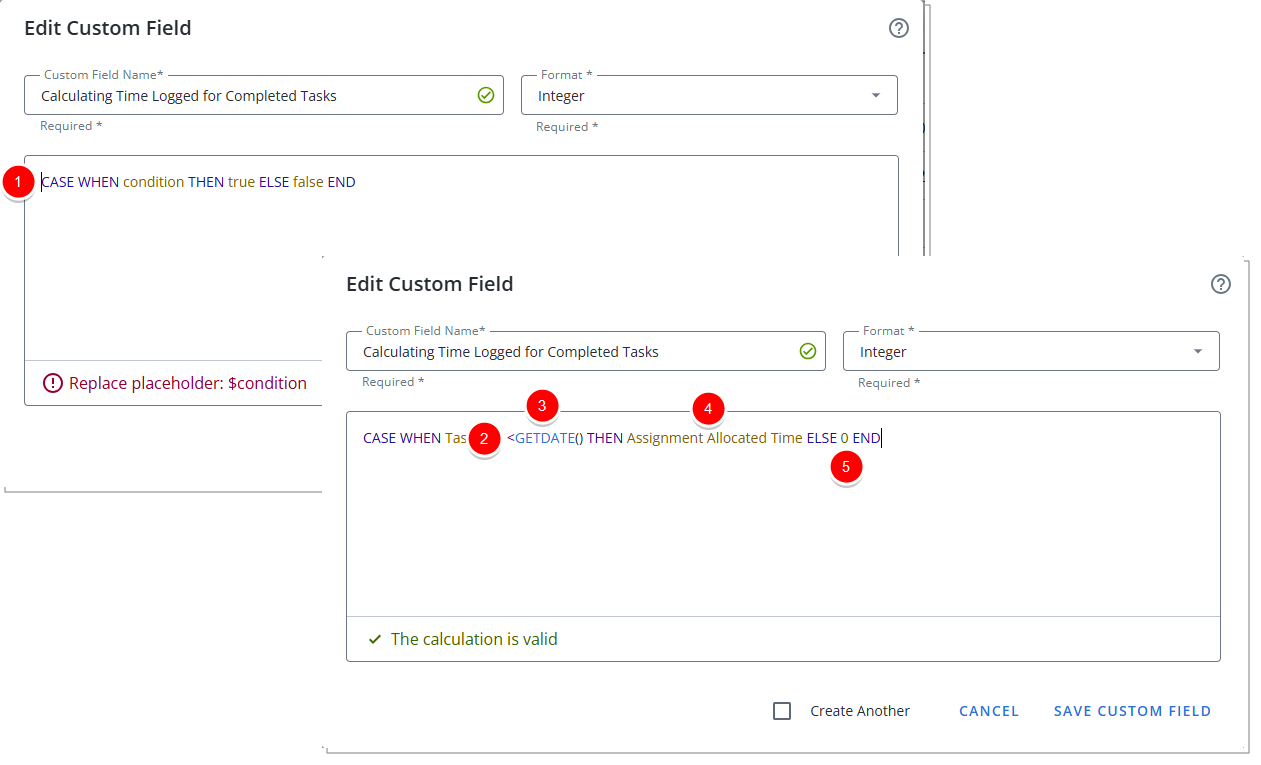
- You will now the see expression displayed within the expression editor and a message informing you that The calculation is valid.
- Then include the Field in your report by dragging it into the Column section.
- Preview your report.

Edit a Custom Field
You can edit the name, format, or expression of a custom field.
- Click See more
 on the custom field in the Available Fields list that you want to edit.
 - Click Edit. The Edit Custom Field dialog box displays.
- Edit the fields as necessary.
- Click Save Custom Field.
Remove a Custom Field From a Report
When you remove a custom field from the report, you can move it back to the Custom Fields list or add it to the Hidden Fields list.
Note: There is no difference between the two locations.
To move the custom report back to the Custom Fields list, do one of the following:
- Drag and drop the custom field from the report list to the Available Fields list.
- Click See more on the custom field in the report list that you want to move and click Remove.
To move the custom report to the Hidden Fields list, do one of the following:
- Drag and drop the custom field from the report list to the Hidden Fields list.
- Click See more on the custom field in the report list that you want to move and click Move to Hidden Fields.