When a report or dashboard has a filter, you can select to have a maximum of three filters display on the top of the report or dashboard as a quick filter to easily apply/modify or clear the filter value. The quick filter on a dashboard applies to all widgets.
Note: The AND logic applies to all filter types, including Report Filters, On Page Filters, Quick Filters, and Subscription Filters. All filter conditions must be met for data to be included in the results.
Create an On Page Filter
To allow Report Viewers to apply their own filters to reports or dashboards, you must select the fields in the Report View Filterswhere you will find a list of Views and Fieldscontained in the Data Source that you selected in the Data Source step.
- Navigate to Report View Filters.
- Optionally, you can turn on the Require users to select filters prior to running report toggle. When enabled, users must choose filter values before the report can be run. This helps ensure that reports are viewed with a specific focus and prevents loading large volumes of unfiltered data, which can improve performance and deliver more relevant results.
- Do one of the following:
- Click the dropdown arrow next to the group that contains the field that you want to add.
OR - In the Search Field by Name box, enter a keyword related to the field you want to add. Groups containing matching fields will appear in the results. Locate the group that includes your desired field, then click the dropdown arrow next to that group to view and select the field.
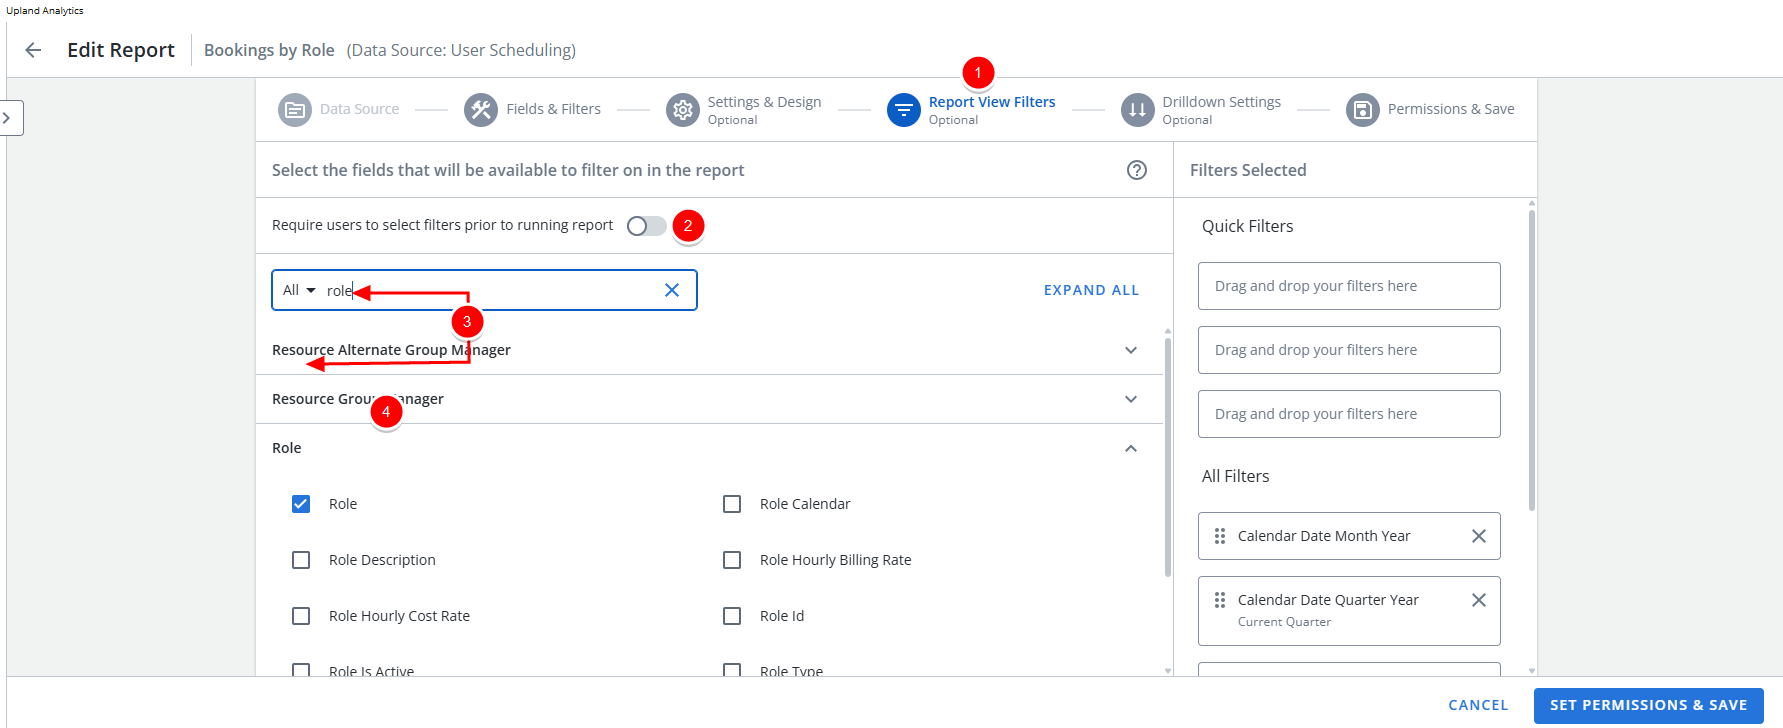
- Click the dropdown arrow next to the group that contains the field that you want to add.
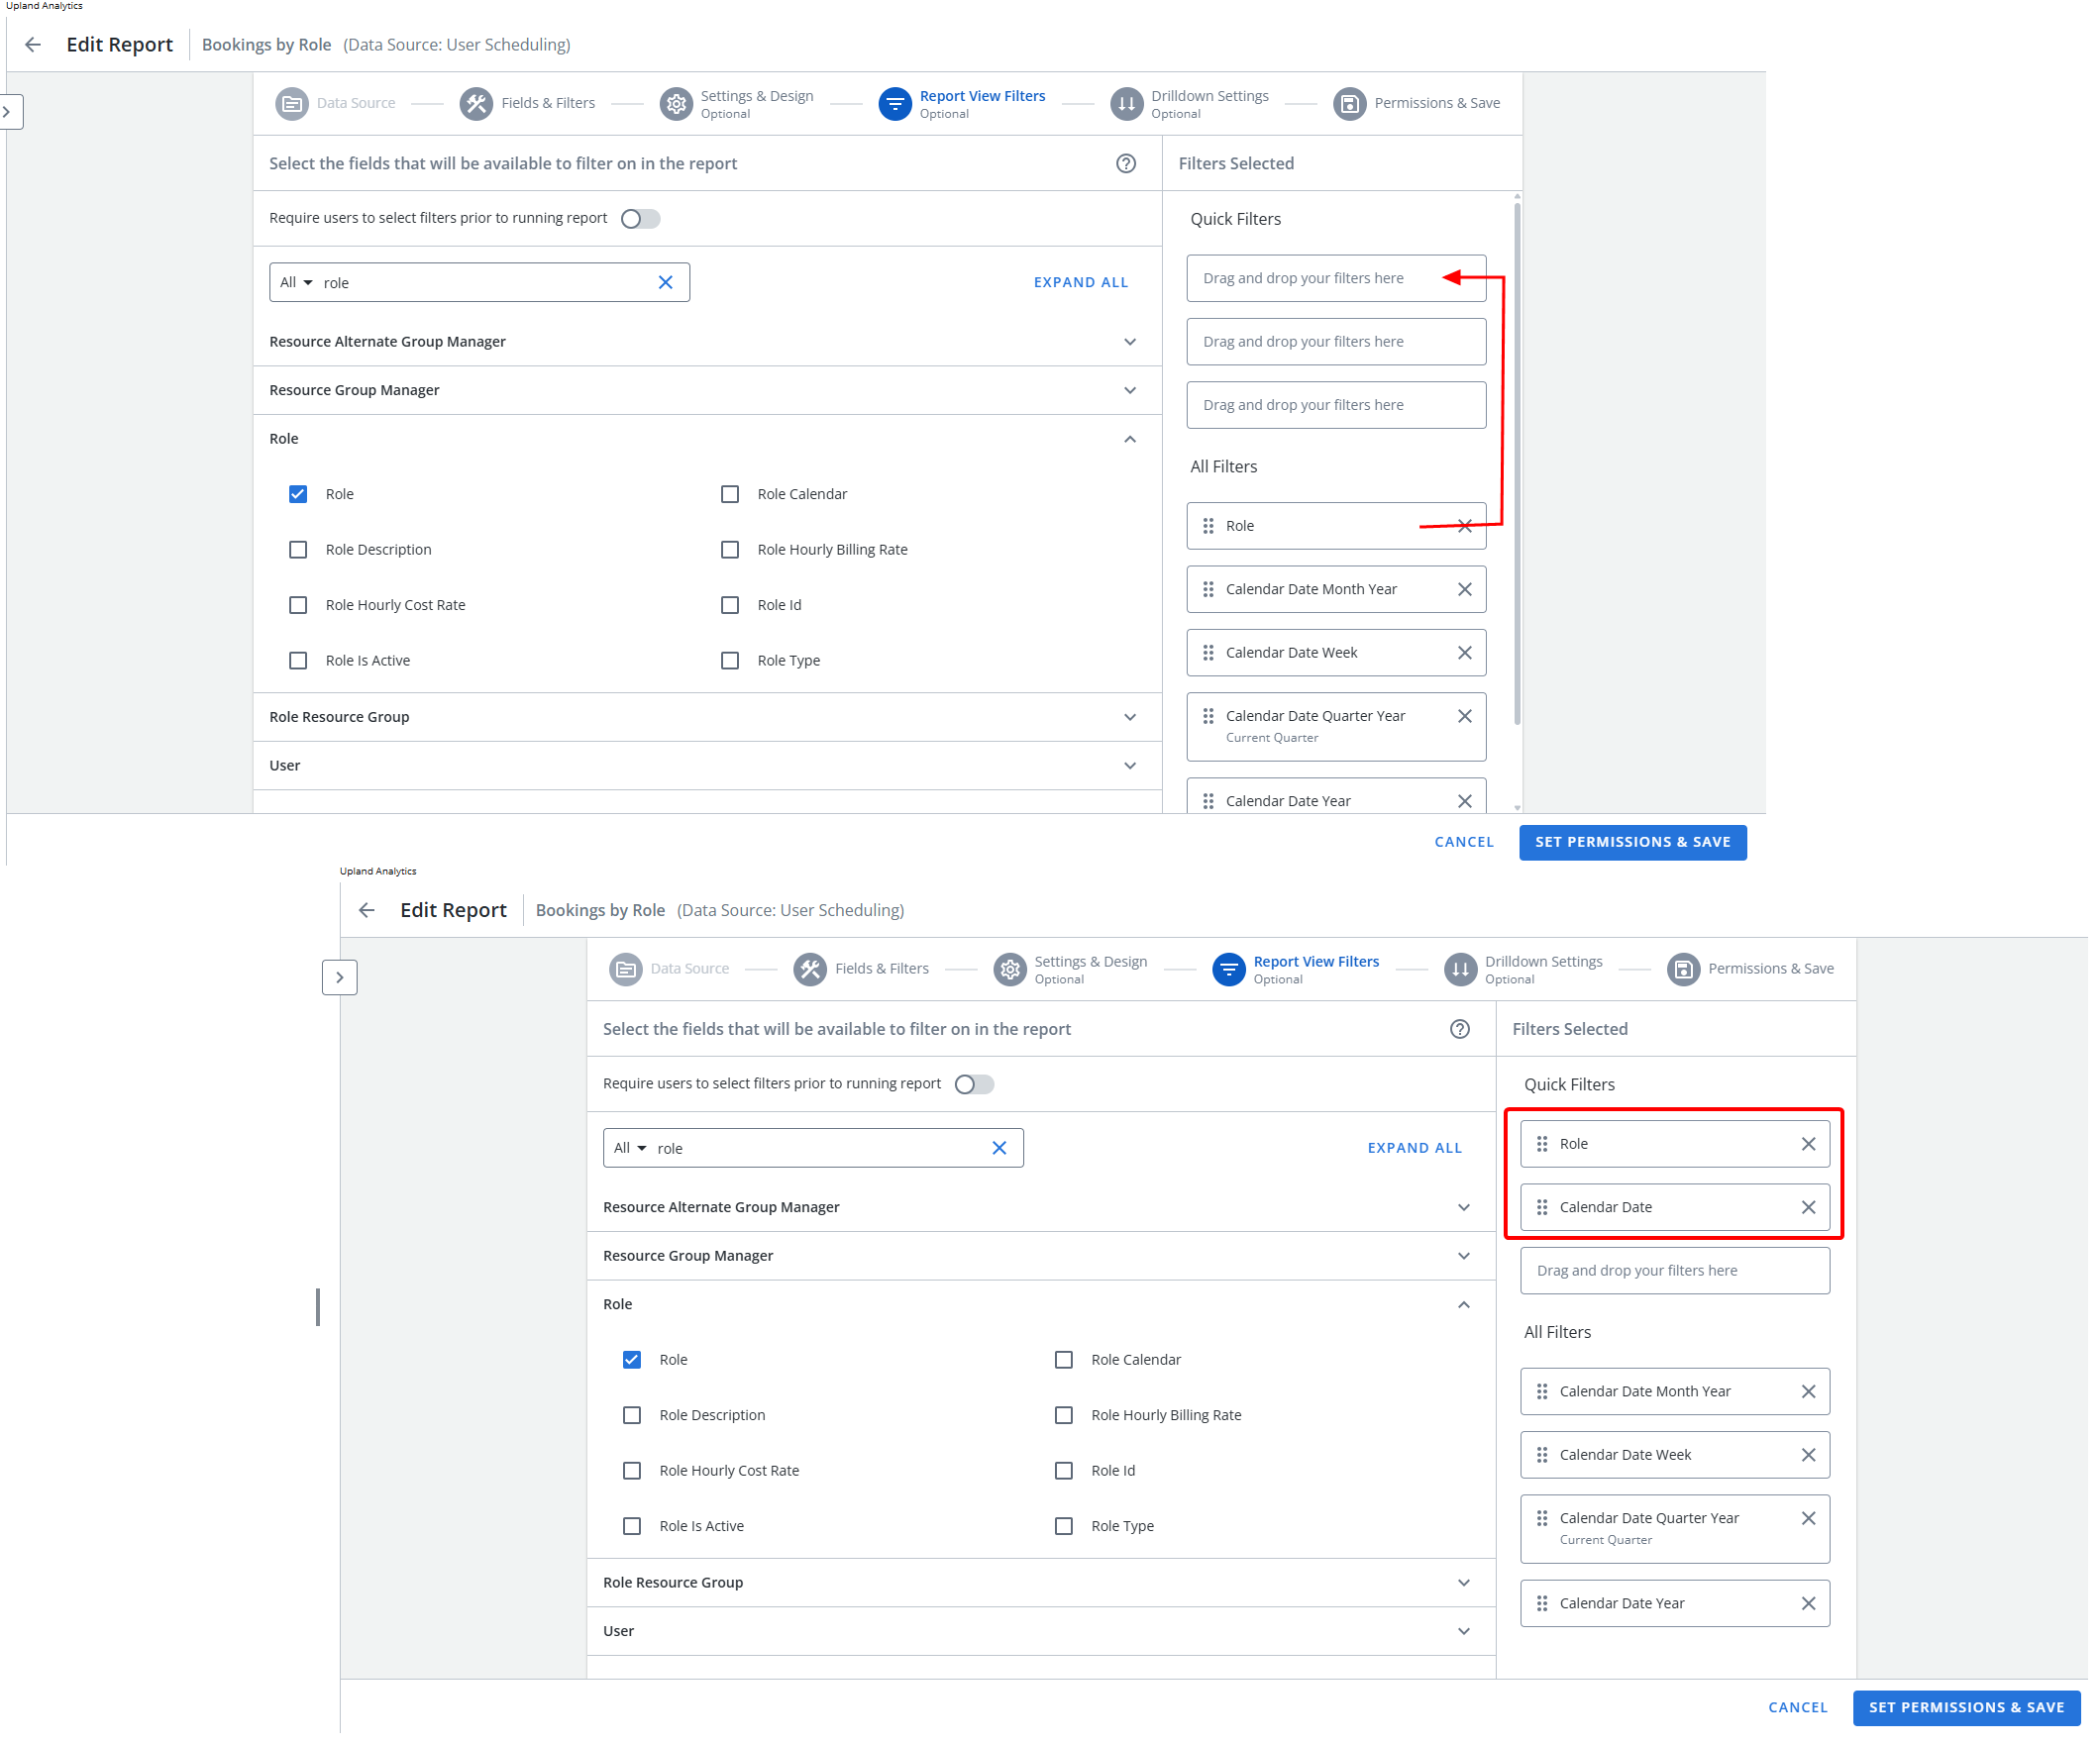
- Click the checkbox next to the field(s) you want to make available for filtering. The selected field(s) will appear in the Filters Selected list on the right side of the page.
- Quick Filters: These filters appear at the top of the report or dashboard, allowing users to easily apply, modify, or clear filter values. You can display up to three quick filters at a time.
- All Filters: These filters appear only in the Filter drawer and do not display at the top of the report or dashboard.
-
To rearrange filters in the Filters Selected list, use drag-and-drop:
- Remove a Quick Filter: Move a filter from the All Filters section to the Quick Filters section to display it at the top of the report or dashboard.
- Rearrange Quick Filters: Within the Quick Filters section, drag filters up or down to change their order of appearance.
- Click Set Permissions & Save.
Apply or Modify a Quick Filter
When you apply or modify a Quick Filter, your changes will not be saved. To save your changes, you must apply/modify the filter in the filter drawer and click All Filters.
Note: To work with a Quick Filter, the filter drawer must be closed.
-
Click the dropdown arrow next to the quick filter you want to modify. The contents of the filter displays.
- Select one of the following:
Basic
- Click the field to expand the available options.
- Select Basic.
- In the Type your keywords here, field type the required filter value. A dropdown menu displays all data values that match the search.
- Select one or more values to add to the filter from the list.
- Click Apply.
Example 1 - Filtered Role
Let's assume we want to filter the report to only show the booking of a specific Role.
- Click the Role field to expand the available options.
- Select Basic.
- In the Type your keywords here, field type Project Manager.
- From the available options select Project Manager.
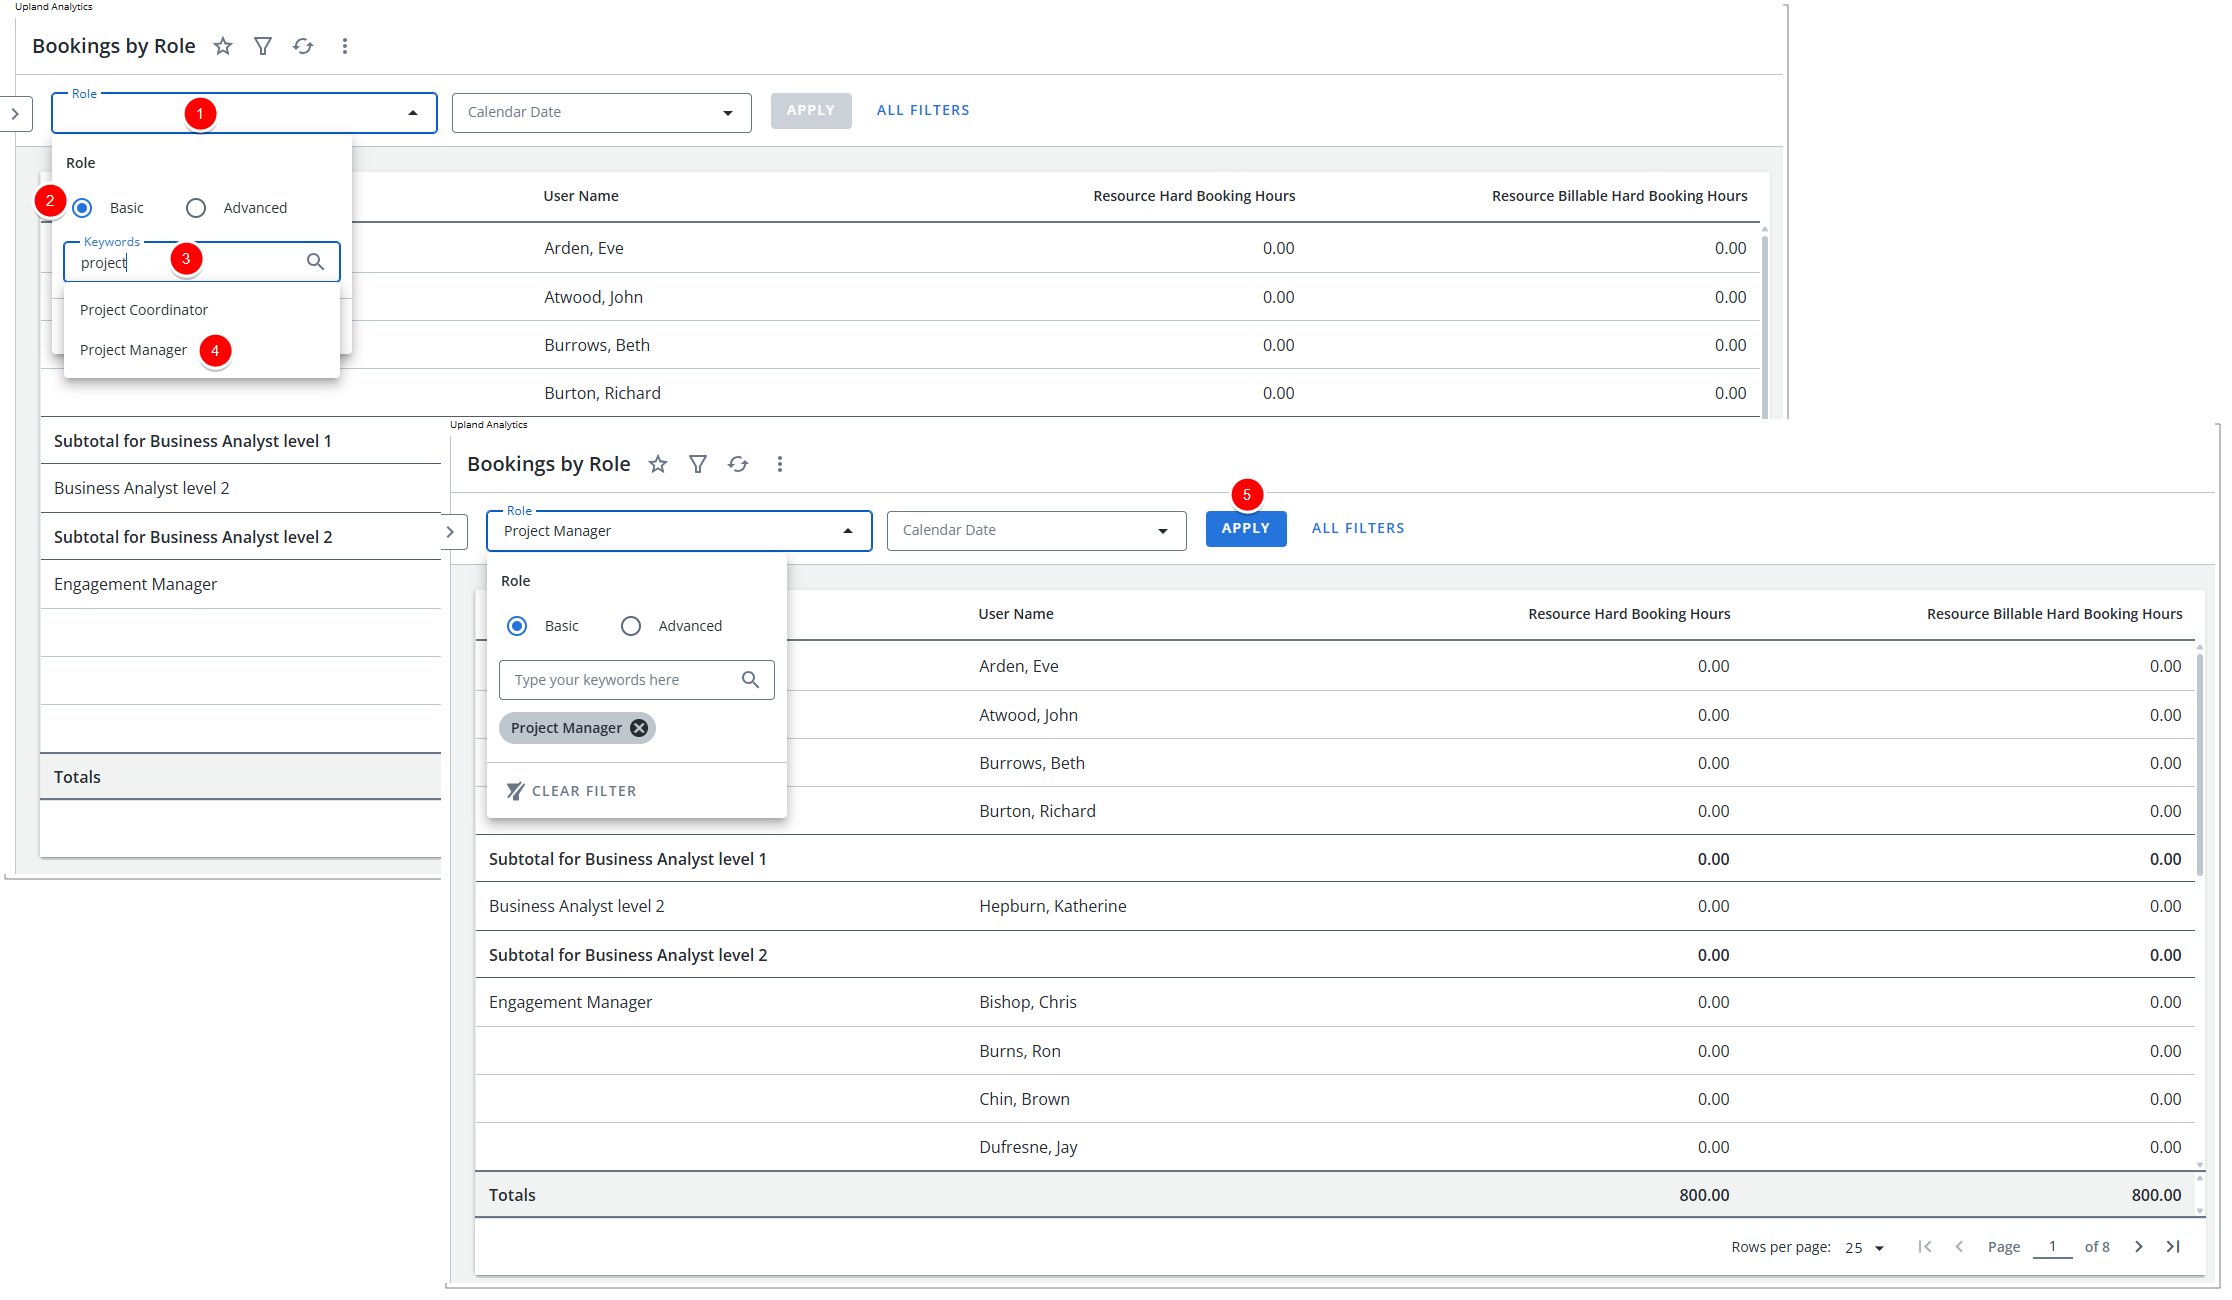
- Click Apply.
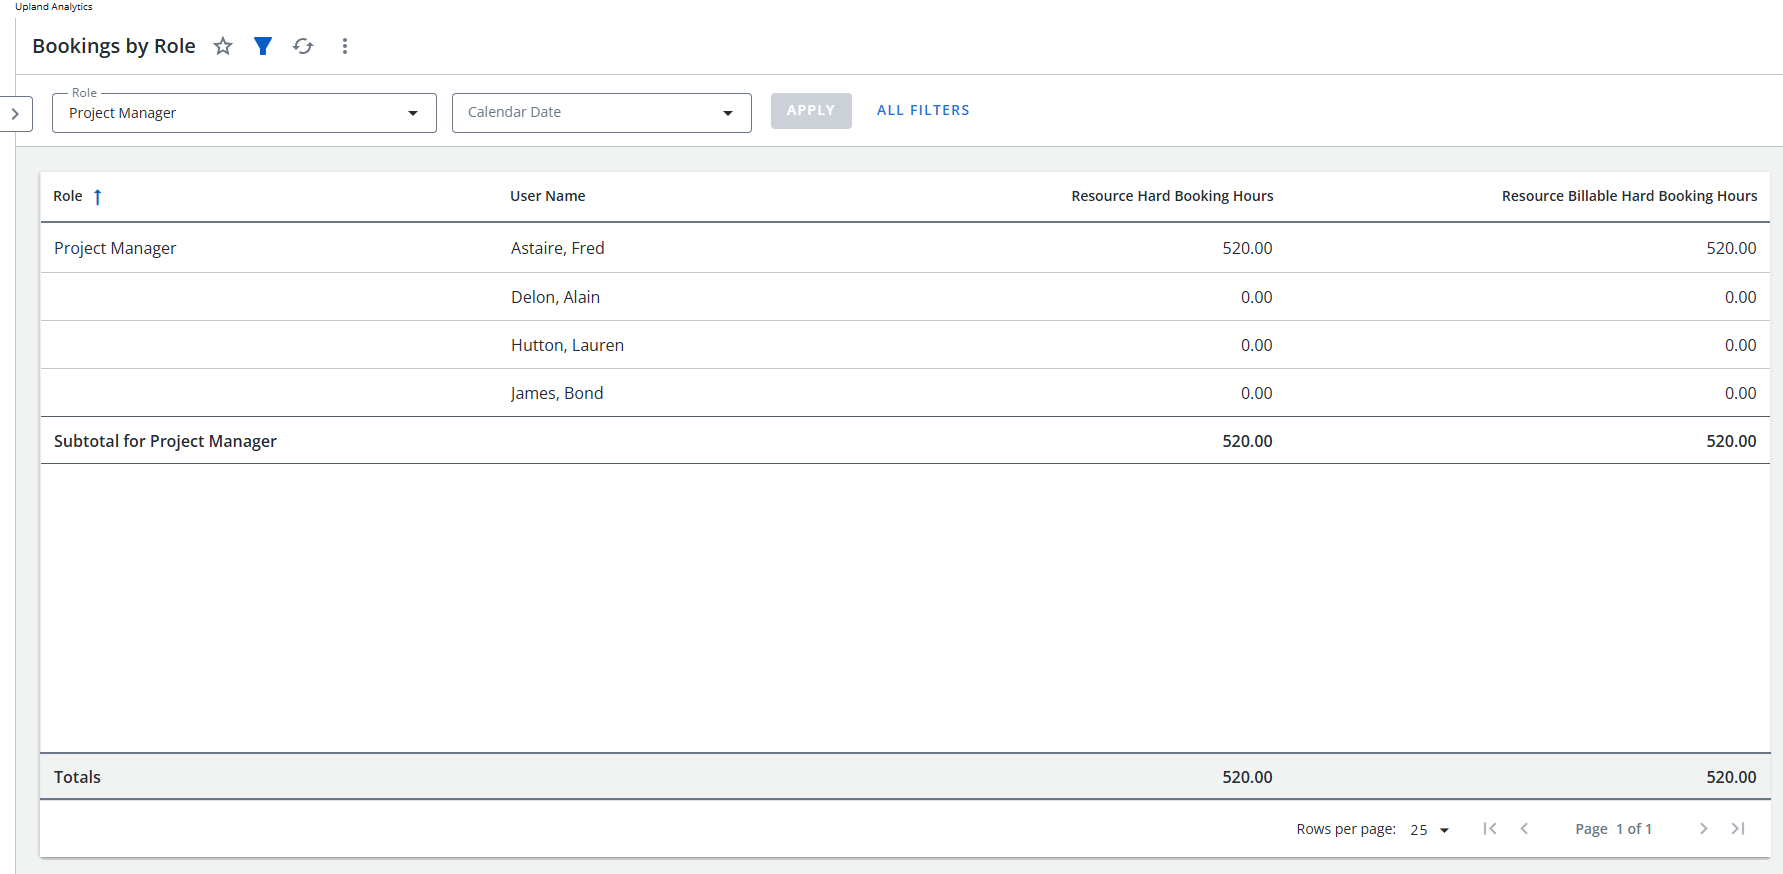
- Note that the Report is Filtered based on your selection.
Advanced
- Click the field to expand the available options.
- Select Advanced to add conditions.
- Click Add Condition.
- Click the Condition dropdown and select an operator. The following operators are available depending on the Field Type you select:
 Dimensions:
Operator Description Equals To Returns records if the field matches the target value. Not Equal To Returns records where the field does not match the target value. Contains Returns records if the field includes the target value. Not Contain Returns records where the field does not contain the target value. Starts With Returns records if the field starts with the target value. Not Start With Returns records where the field does not begin with the target value. Ends With Returns records if the field ends with the target value. Not End With Returns records where the field does not end with the target value. Pattern Returns records that match the specified set of characters in the exact order. In Returns records where the field contains the specified value. For example, if you have a field called City and you apply the condition In and the value Los Angeles, the results will include only data where the city is Los Angeles, excluding all others. Not In List Returns records where the field is not equal to the value(s). Is Null Returns all records where the field is null. Is Not Null Returns all records where the field is not null. - Measures:
Operator Description Equals To Returns records if the field matches the target value. Not Equal To Returns records where the field does not match the target value. In Returns records where the field contains the specified value. For example, if you have a field called City and you apply the condition In and the value Los Angeles, the results will include only data where the city is Los Angeles, excluding all others Greater Than Returns records where the data in the column is less than the value in the filter. Equal or Greater Than Returns records where the data in the column is less than or the same as the value in the filter. Less Than Returns records where the data in the column is greater than the value in the filter. Equal or Less Than Returns records where the data in the column is greater than or the same as the value in the filter. Between Returns records where the data in the column is between the two values in the filter. Not Between Returns records where the data in the column is not between the two values in the filter. - Dates:
Operator Description Current Returns records for the current period specified. You can choose from Day, Week, Month, Quarter and Year. Previous Returns records from a previous time period that you specify. You can choose from Day, Week, Month, Quarter, or Year, and enter the number of periods you want to go back. For example, selecting Month and entering 2 will show records from the previous 2 months. Next Returns records for a time period that is upcoming, starting from today. You can choose from Day, Week, Month, Quarter, or Year, and enter how many future periods to include. For example, if today is July 9 and you select Week and enter 2, the filter will return records scheduled for the next two full weeks (e.g., July 10–July 23). Range Returns records within a specific date range that you define. You can choose from Day, Week, Month, Quarter and Year and enter the start and end of the range. All YTD Returns records from the beginning of the current year up to today. Null Returns all records where the start date is null. Not Null Returns all records where the start date is not null.
- One of the following fields displays depending on the operator you selected in step 4:
- Type your keywords here: Type the data value on which you want to filter. A dropdown menu displays all data values for the selected field.
- Value: Type the value on which you want to filter.
- Repeat steps 4 to 5 as necessary.
- Click Apply.
Example 1 - Filtered Client
Let's assume we want to filter the Client Backlog with PO Details Report to only show the data for Client names beginning with AC.
- Click the Client field to expand the available options.
- Select Advanced then click Add Conditions.
- Select Starts With as the Condition.
- In the Value field type AC.
- Click Apply.
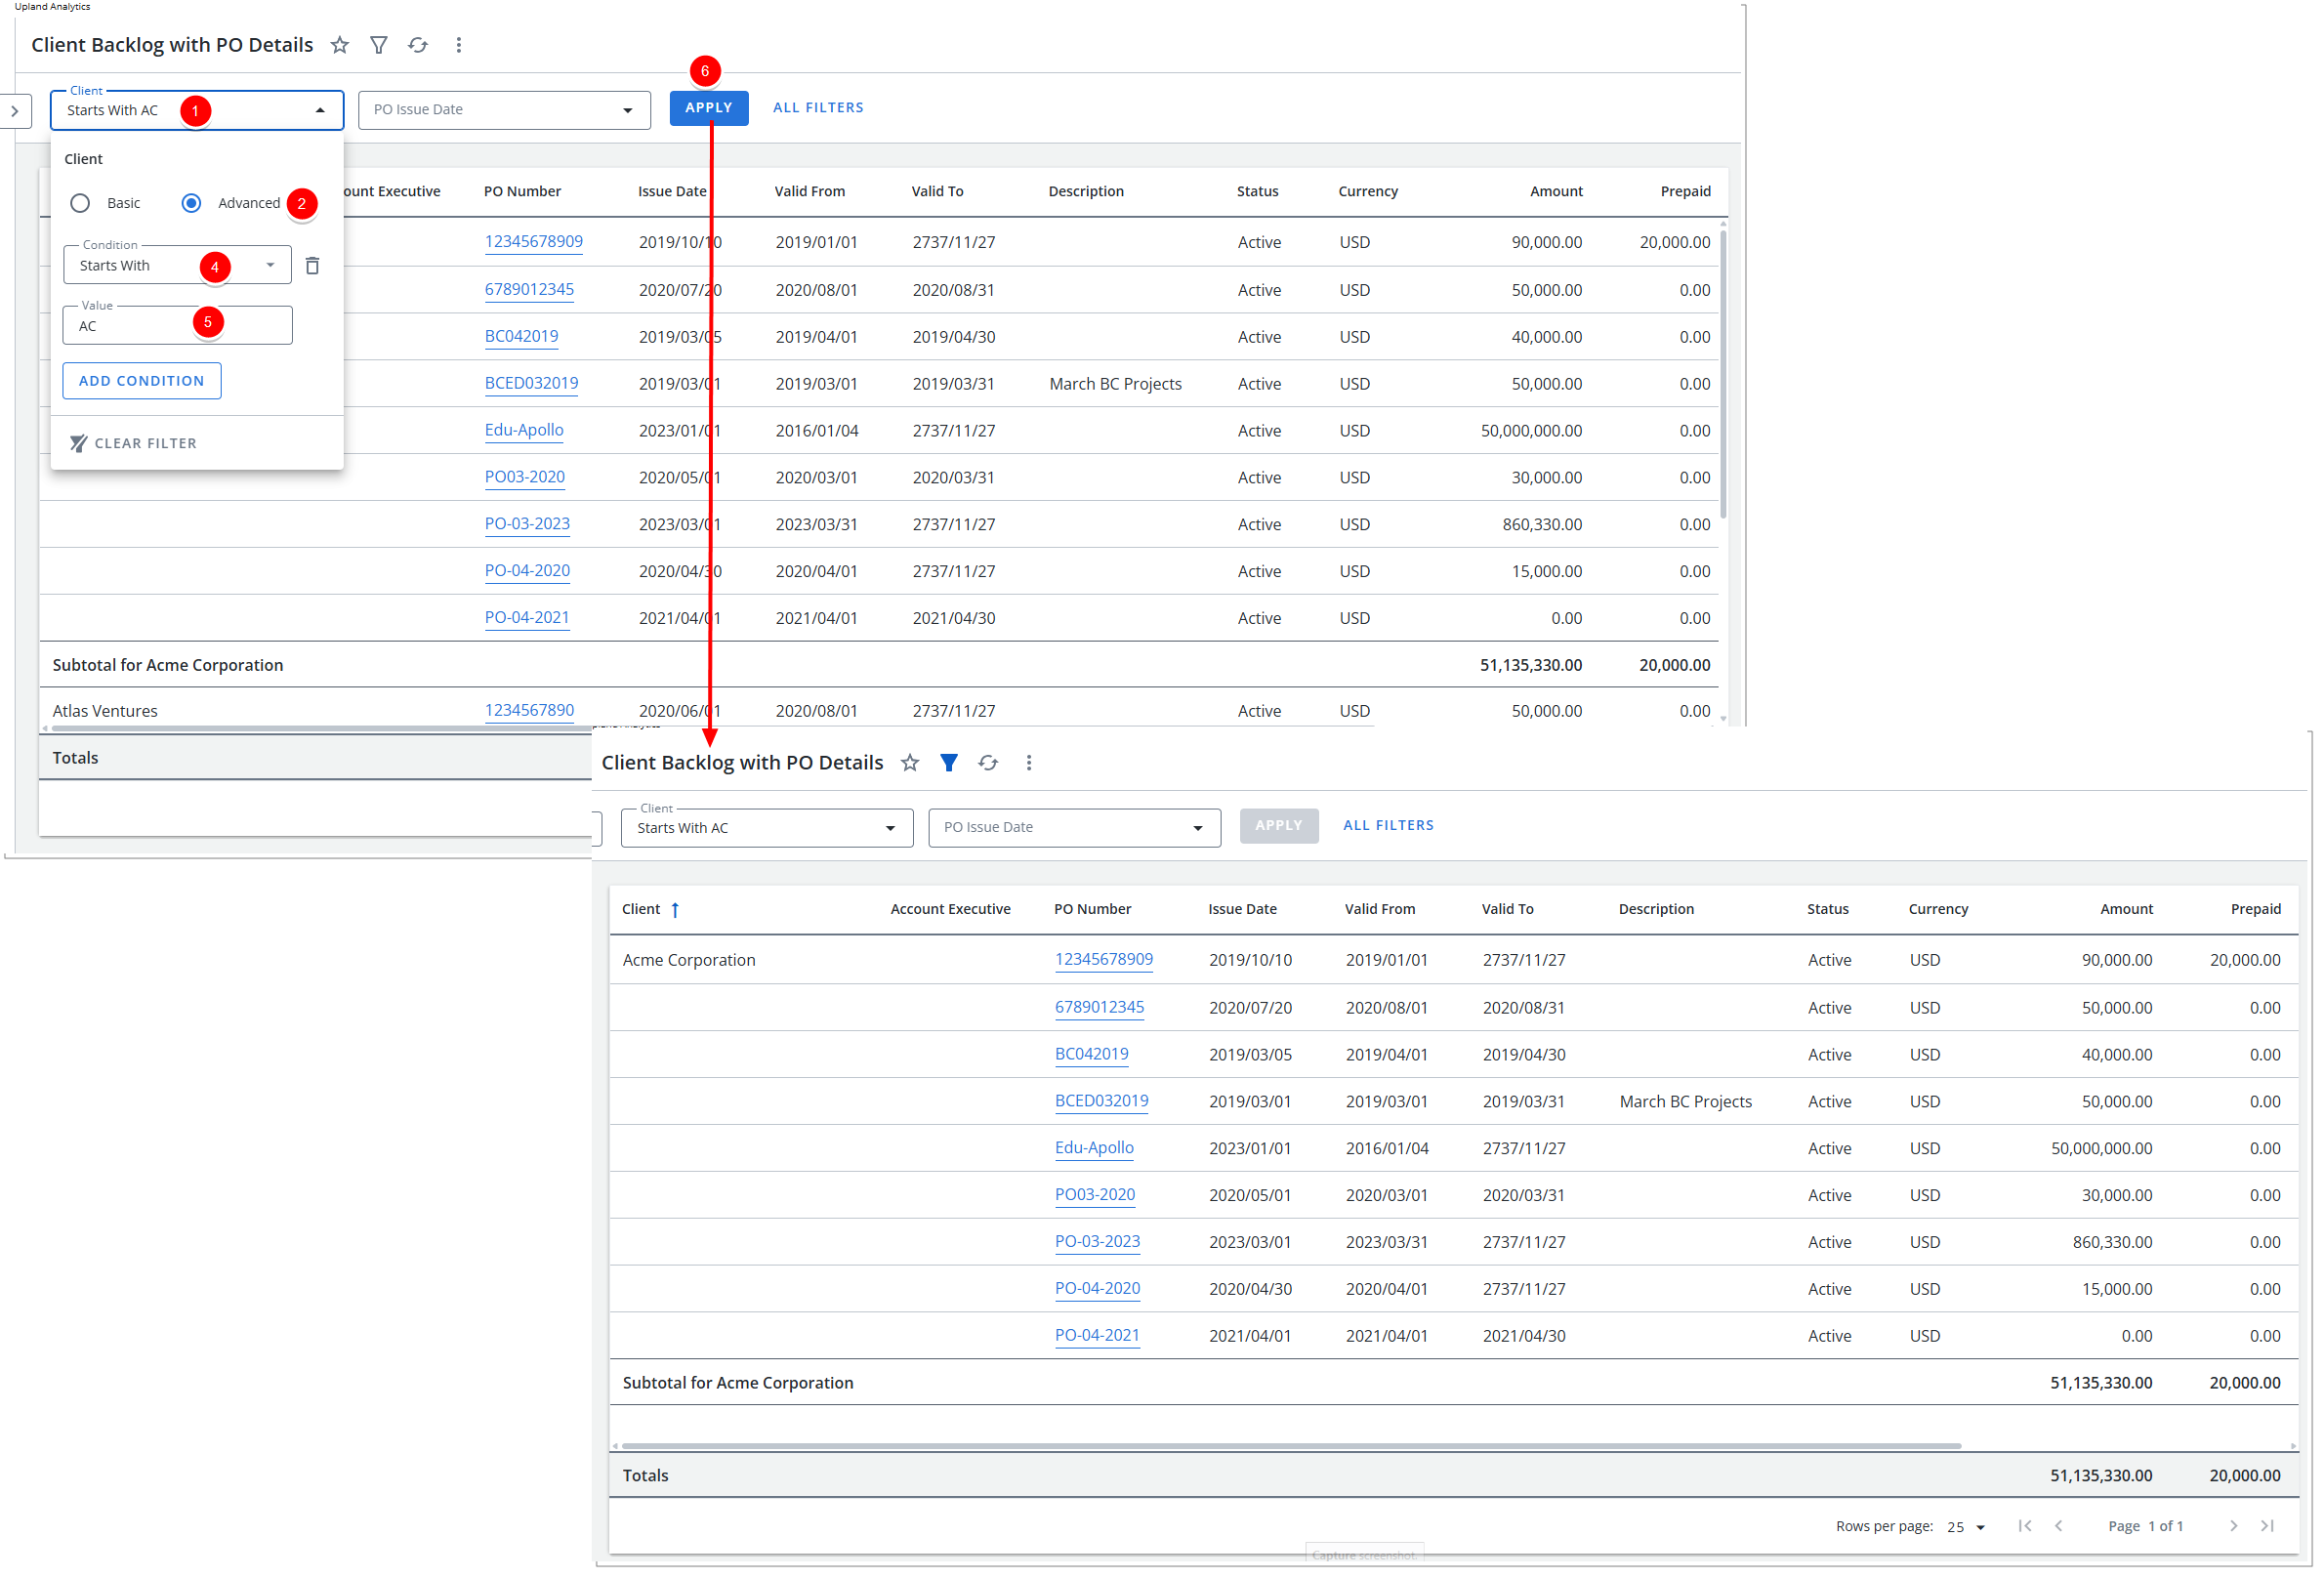
- Note that the Report is Filtered based on Client names starting with AC.
Example 2 - Filtered based on Invoice Date
Let's assume we want to filter the Client Backlog with PO Details Report to only show the data for March 2020.
- Click the PO Issue Date field to expand the available options.
- Select Date as the Condition.
- Then choose the Start and End Dates (March 1st 2020 to March 31 2020).
- Click Apply.
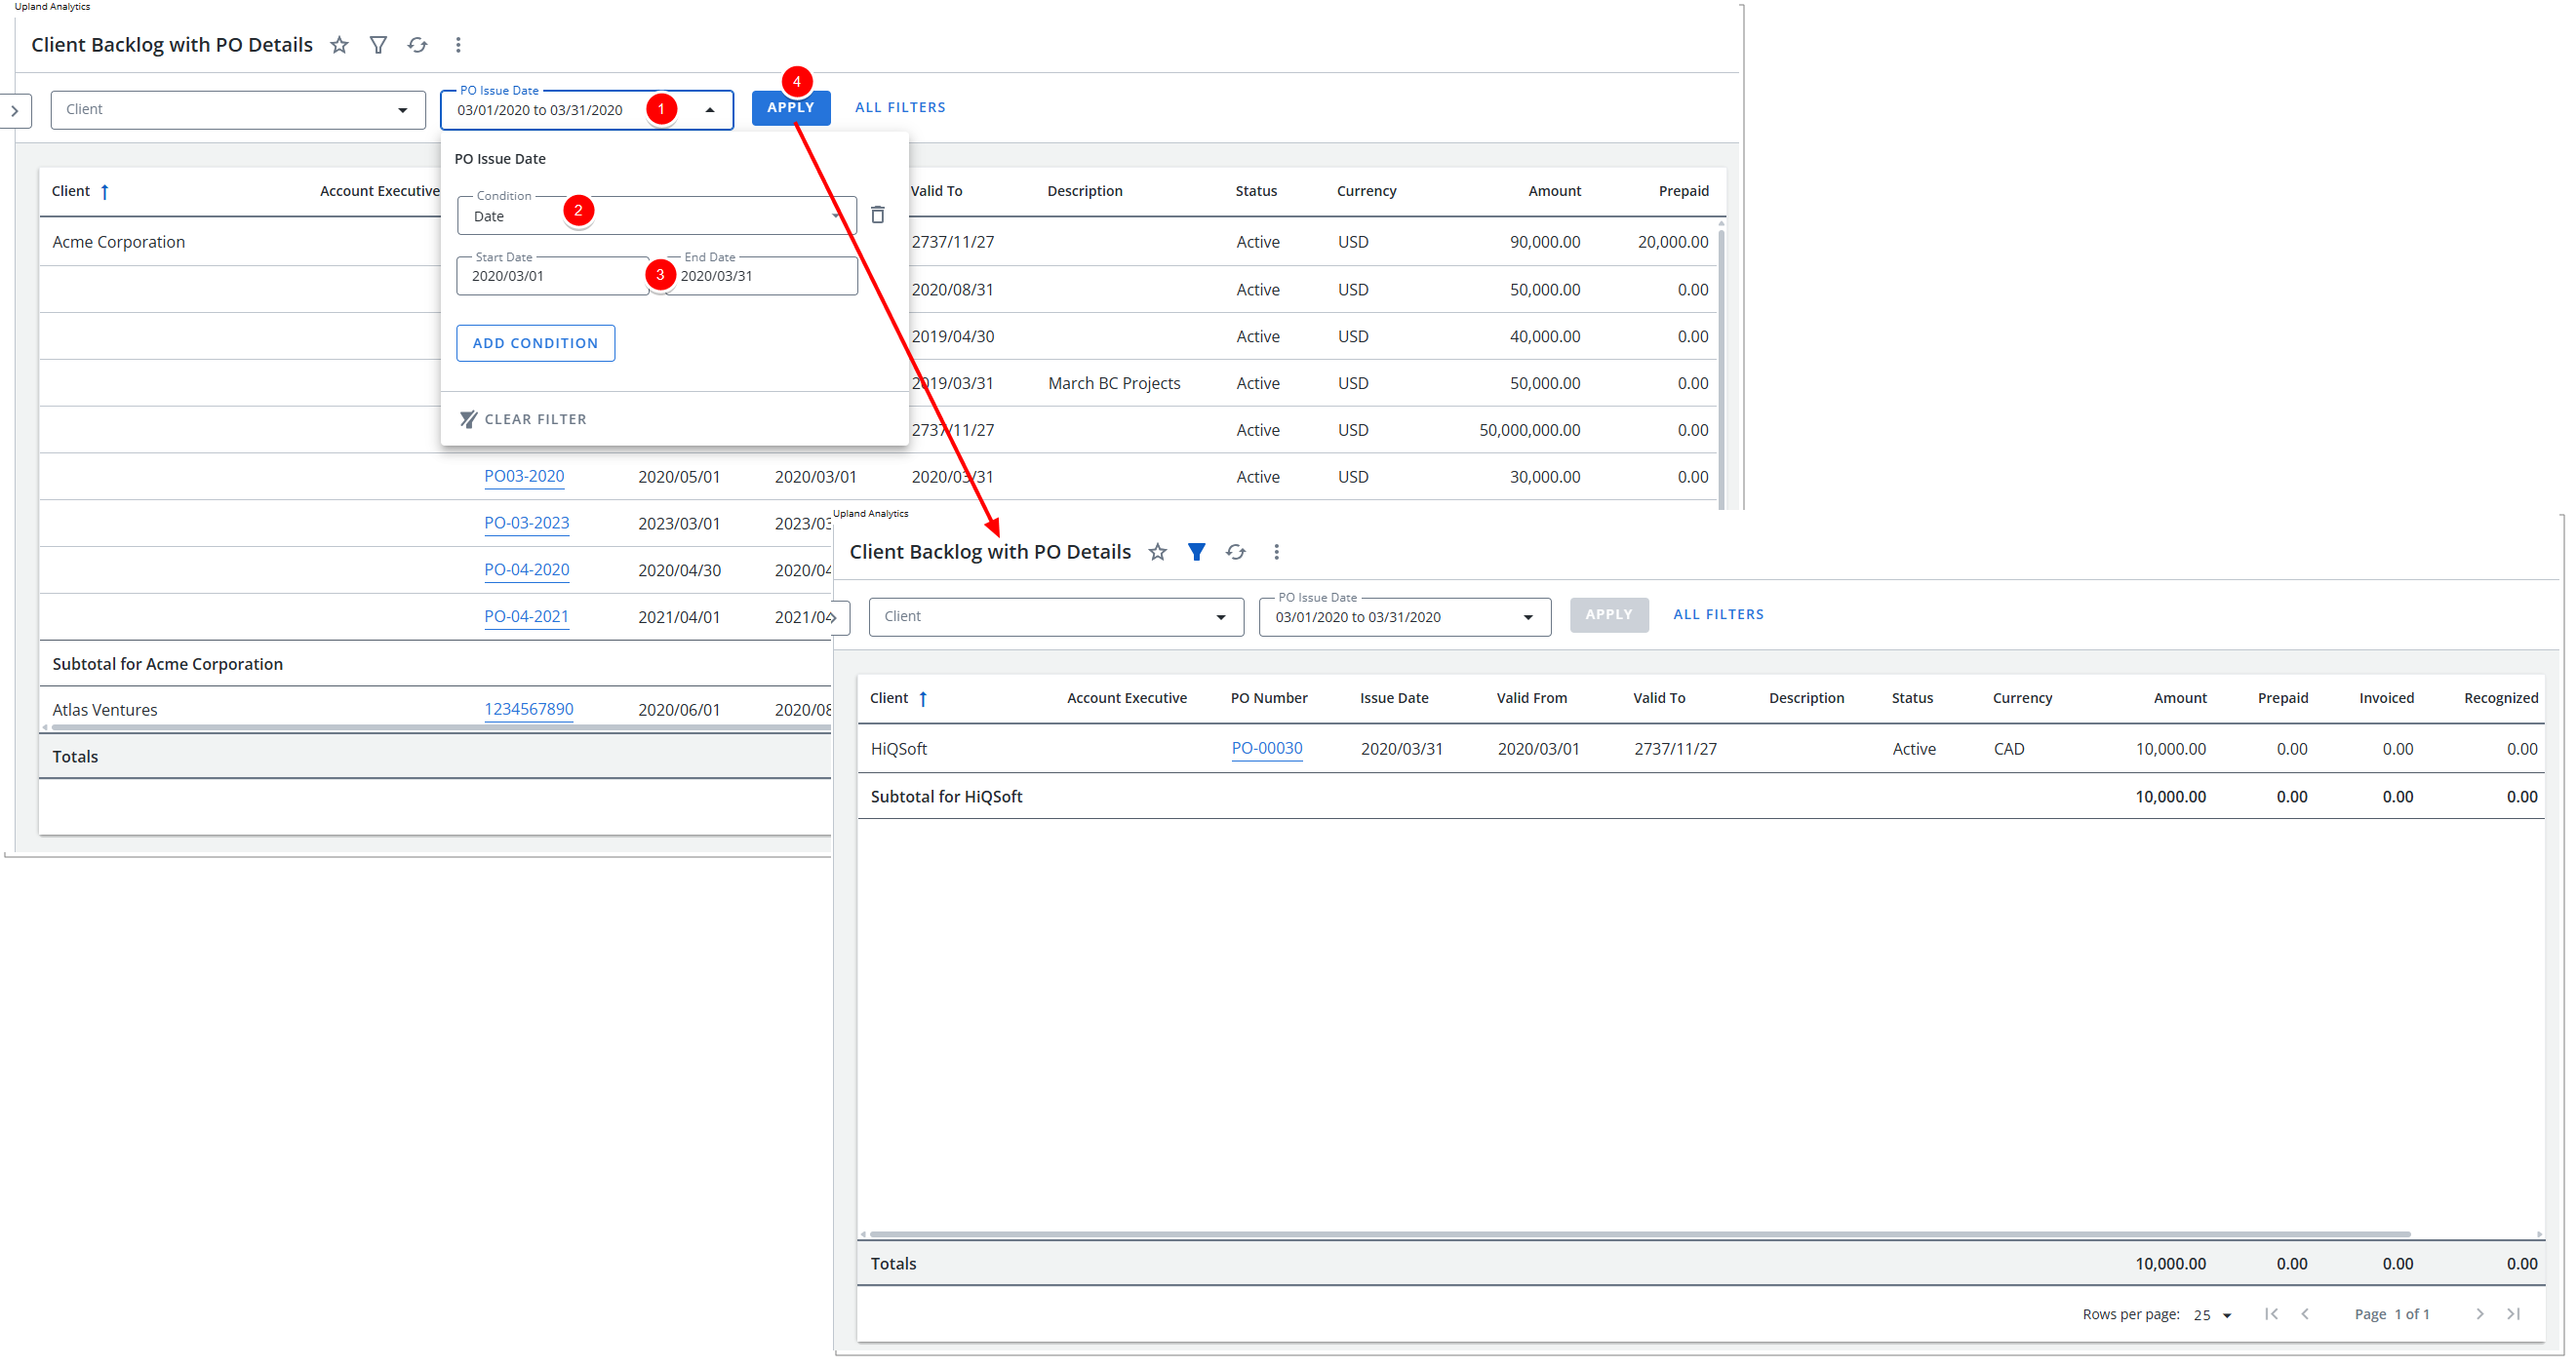
- Click Preview Report. Note that the Report is Filtered.
Clear a Quick Filter
When you clear a quick filter, the values are removed from the filter.
Note: To work with a quick filter, the filter drawer must be closed.
- Click the dropdown arrow next to the quick filter you want to clear. The contents of the filter displays.
- Click Clear Filter.
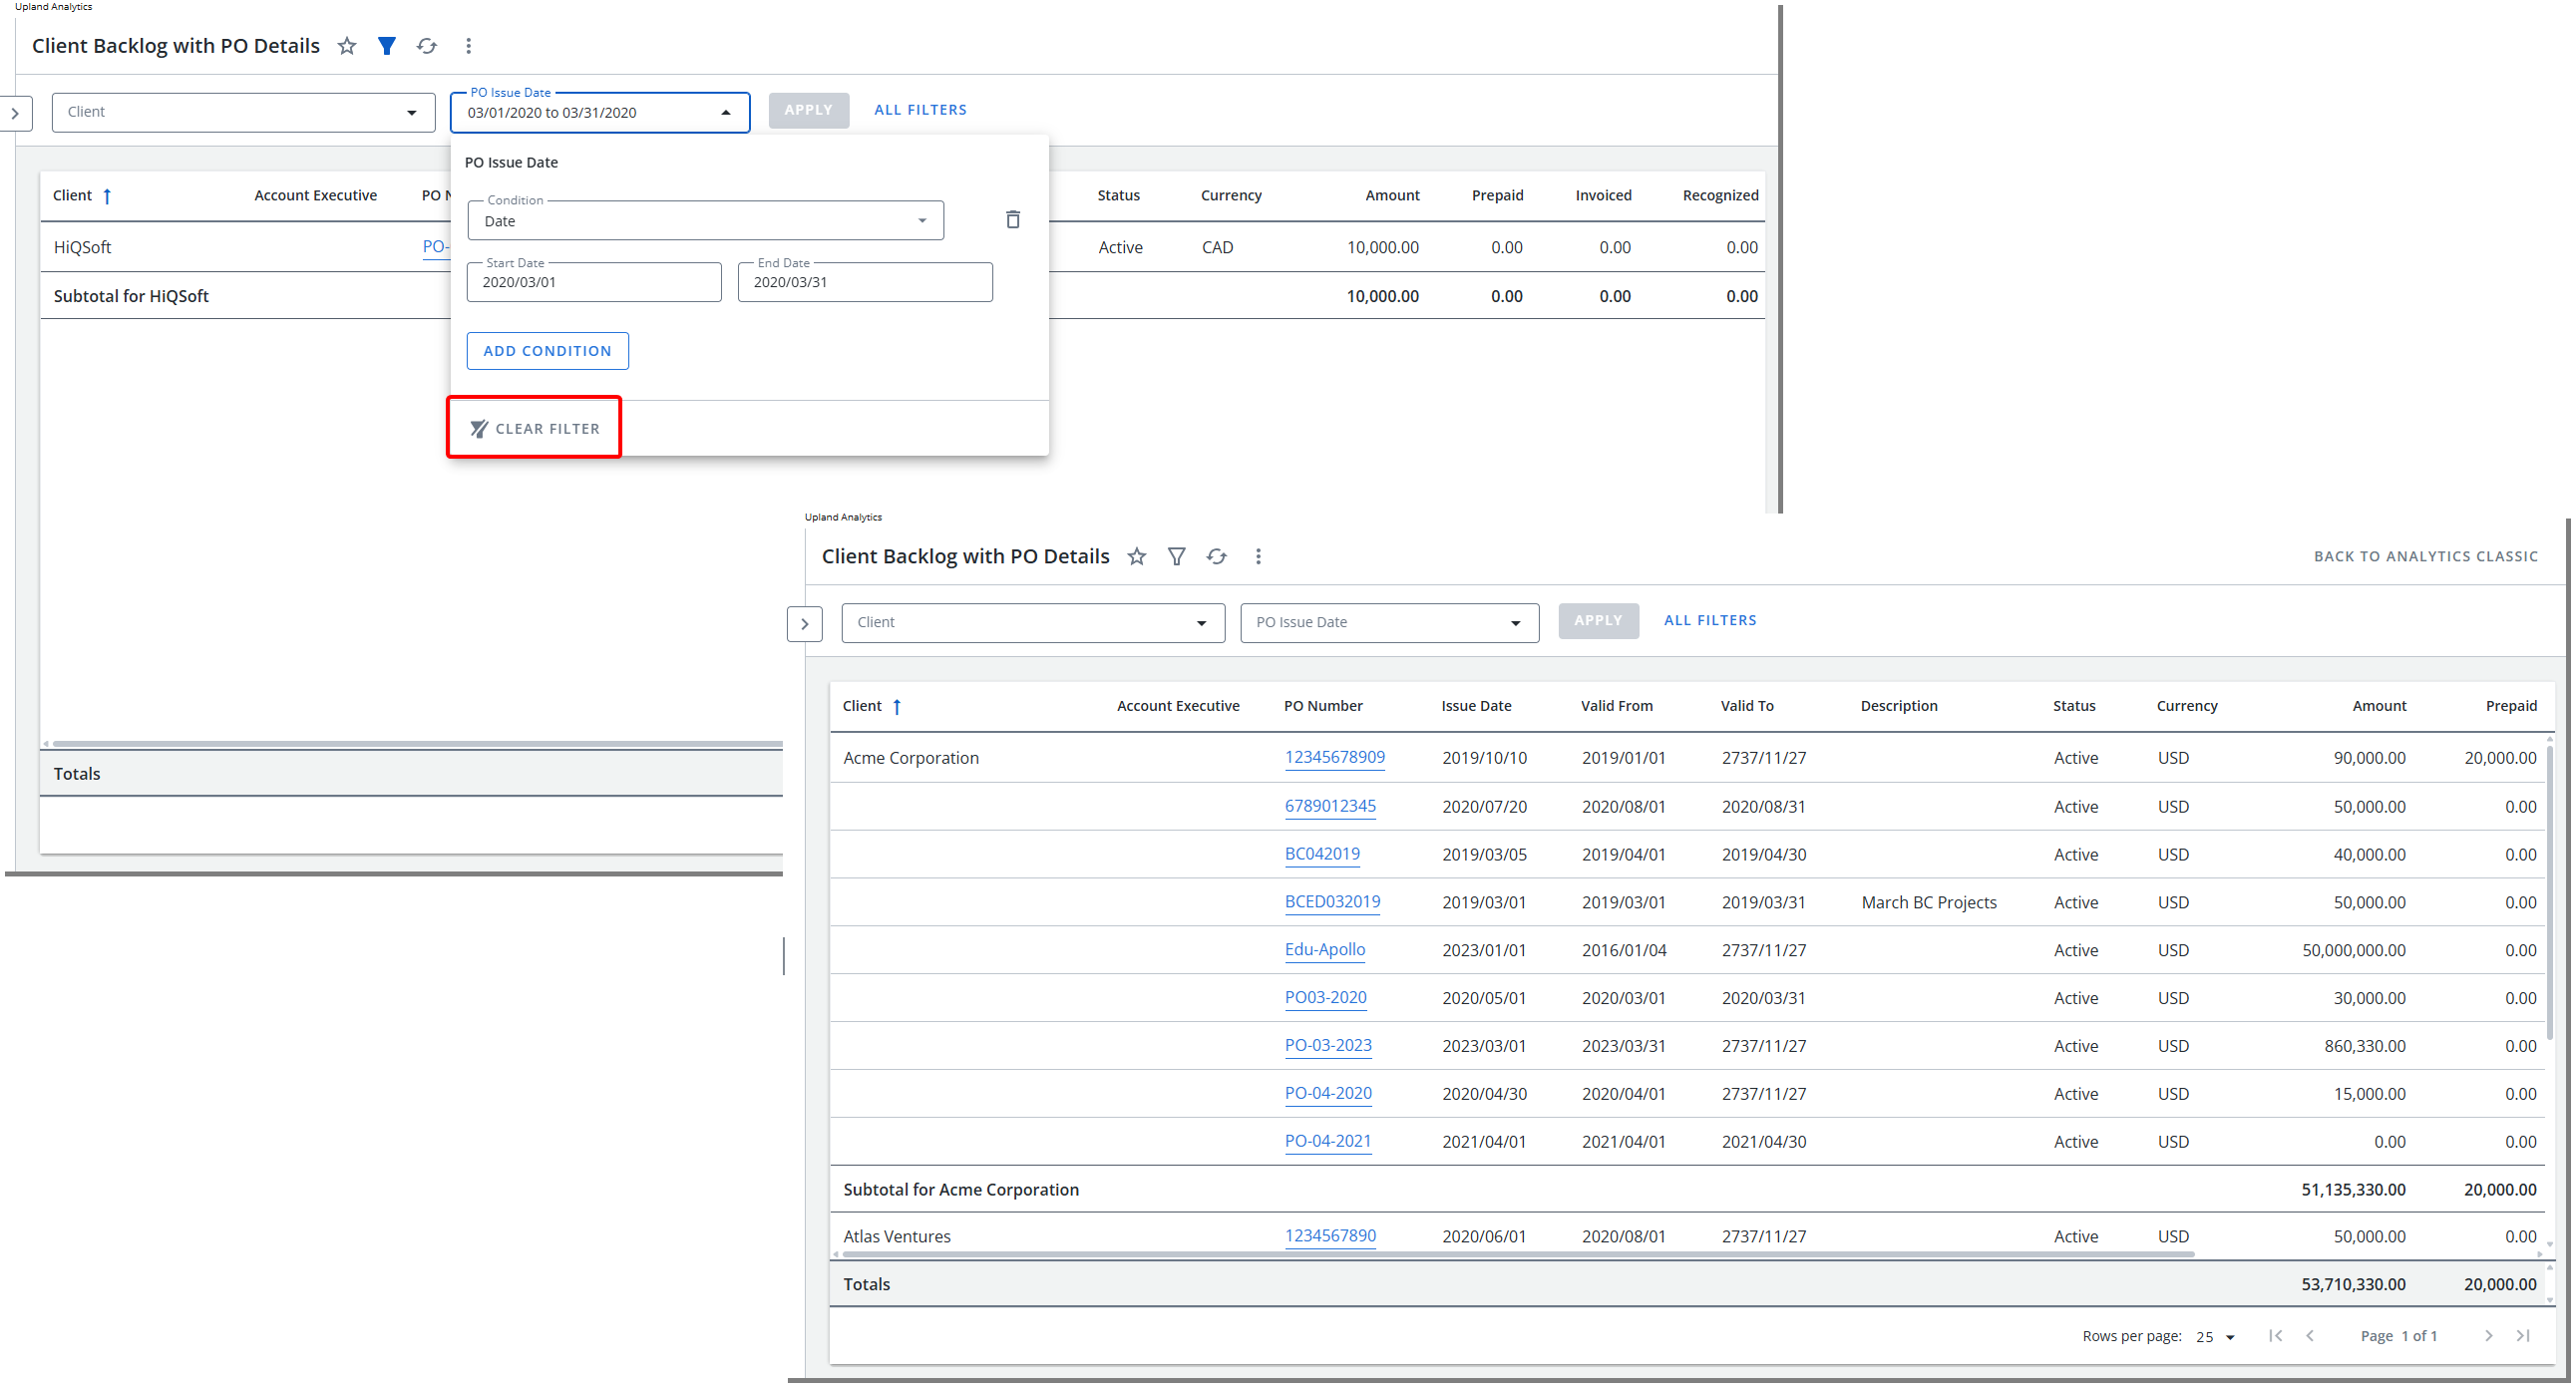
- Click Apply.