Add Upland Qvidian Integration Components
Once the Upland Qvidian Integration package is installed and configured for your Salesforce organization, you must add components of this package to the Salesforce pages to make them available to your users. Upland Qvidian Integration components are currently available for Accounts, Contacts, and Opportunity objects of Salesforce. Adding components to other standard and custom objects is addressed later in the guide. To make Upland Qvidian components available on these pages, you must customize appropriate page layouts, including adding and configuring a Related List and Create New Project and Link to Project buttons.
Open a Page Layout to customize
Salesforce Classic
- Click the Setup link located at the top of the page.
- On the tree view under Build, click Customize to expand the node.
- Depending on the Page Layout you want to customize, click either Accounts, Contacts, or Opportunities.
- Click Page Layouts, and then click the Edit link corresponding to the Page Layout you want to customize.
Salesforce Lightning
- Click the Settings
 icon located in the top right of the page, and then select Setup.
 - Click the Object Manager tab.
- Depending on the Page Layout you want to customize, click either Account, Contact, or Opportunity.
- From the left side menu, click Page Layouts.
- Click the drop-down menu to the right of the Page Layout you want to customize, and select Edit.
Add and Configure a Upland Qvidian Project Related List
-
In a page layout, click Related Lists on the left panel. On the right panel, drag and drop the Qvidian Projects item to the spot you want the related list to be located.
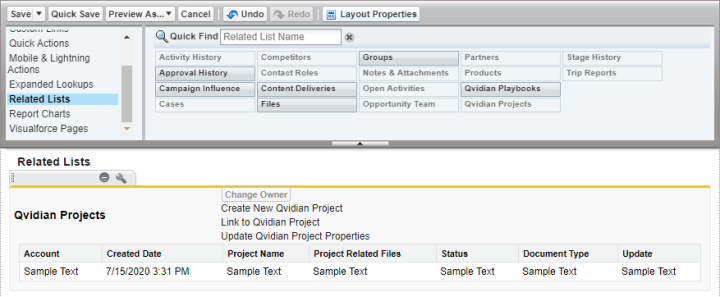
An example of the top of a page layout in Salesforce.
-
Click the wrench symbol on the Qvidian Projects panel to display the Related List Properties dialog.
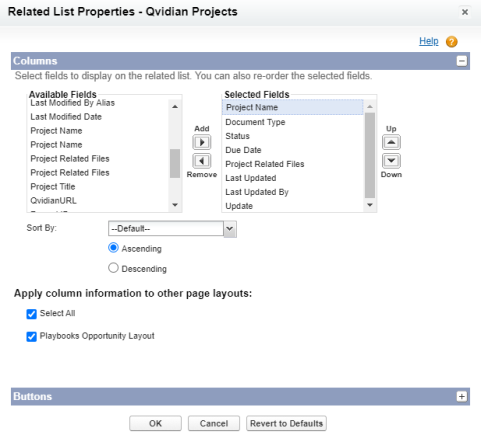
The Related List Properties - Upland Qvidian Projects dialog box in Salesforce with the columns section expanded.
- Select values from the Available Fields list and click the Add arrow to add the fields to the Selected Fields list.
Example: The following is a recommended selection and order of fields:
Project Name
Document Type
Status
Due Date
Project Related Files
Last Updated
Last Updated By
Update: This will direct the user to Upland Qvidian Project properties where properties, such as the name of project and status, can be changed. When you save those changes, the data gets pushed back to Salesforce.
Note: In the Available Fields list, there are what appear to be three fields, Projects, Project Name, and Update, which have three copies. These duplicate field names correspond to Accounts, Contacts, and Opportunities, in that order. For example, if you are customizing the Opportunity page layout, always select the third copy of any duplicate field.
- If desired, reorder the Selected Fields using the Up and Down arrows.
- If desired, update the Sort By behavior.
- To apply column information to other page layouts, select the checkboxes of the desired page layouts.
Add Create Project and Link to Project Buttons
- Expand the Buttons section in the Related List Properties dialog.
- Under Standard Buttons, deselect the New checkbox.

The Related List Properties dialog in Salesforce with the buttons section expanded.
- Under Custom Buttons, select values from the Available Buttons list and click the Add arrow to add the buttons to the Selected Buttons list.
- If desired, reorder the Selected Buttons using the Up and Down arrows.
- Click OK.
- Click Save at the top left of the page to save the Page Layout. A dialog will ask you to confirm your changes.
- Click Yes to save the changes. You can repeat the these tasks to modify additional page layouts.
Example: The following is a recommended selection and order of buttons:
Create New Qvidian Project
Link to Qvidian Project
Update Qvidian Project Properties: This button opens a new browser tab, which displays the selected Upland Qvidian project page and opens that project's Properties dialog.
Note: Custom Object buttons are auto-generated when Qvidian-Salesforce integration Connection Information is completed.
Add Custom Objects
Salesforce integration has been extended to Custom Objects in Managed Package v1.12. You can integrate Qvidian with Custom Objects in Salesforce (pre-v1.12 only Opportunity, Account, and Contact records could be integrated). No matter what Salesforce object you’re working from, you can link to and update existing Qvidian documents and projects and pre-fill new Qvidian documents and projects with trusted CRM data.
Note: Use the following tasks to add custom objects if you've already integrated your custom objects when you created your Salesforce connection. If you did not integrate your custom objects when you created your Salesforce connection, you'll need to manually configure your custom objects.
Salesforce Classic
- Click the Setup link located at the top of the page.
- On the tree view under Build, click Create to expand the node.
- Click Objects to open the Custom Objects page.
- Click the New Custom Object button to create your custom object.
Note: Once created, you can: Open a Page Layout to customize, Add and Configure a Upland Qvidian Project Related List, Add Create Project and Link to Project Buttons from here.
Salesforce Lightning
- Click located in the top right of the page, and then select Setup.
- Click the Object Manager tab.
- Click Create and select Custom Object from the dropdown menu.
Note: Once created, you can: Open a Page Layout to customize, Add and Configure a Upland Qvidian Project Related List, Add Create Project and Link to Project Buttons from here.
In order to enable a custom object in the managed package, a custom field must be added to the “Qvidian Project” object and two custom buttons must be created for the “Qvidian Project” object.
Note: Use the following tasks if do not intend on granting additional privileges to the Qvidian integration user account and automatically integrating your custom objects when you created your Salesforce connection.
- Click the Setup link located at the top of the page and select the desired Package Name.
- Click the View Components button.
- Select the Qvidian Project name within the Metadata Components Included in Package section.
- Click the New button within the Custom Fields & Relationships section. The "New Custom Field" page will be displayed.
- Select the Lookup Relationship radio button. The "New Relationship" page will be displayed.
- Select the name of the custom object from the Related To dropdown menu.
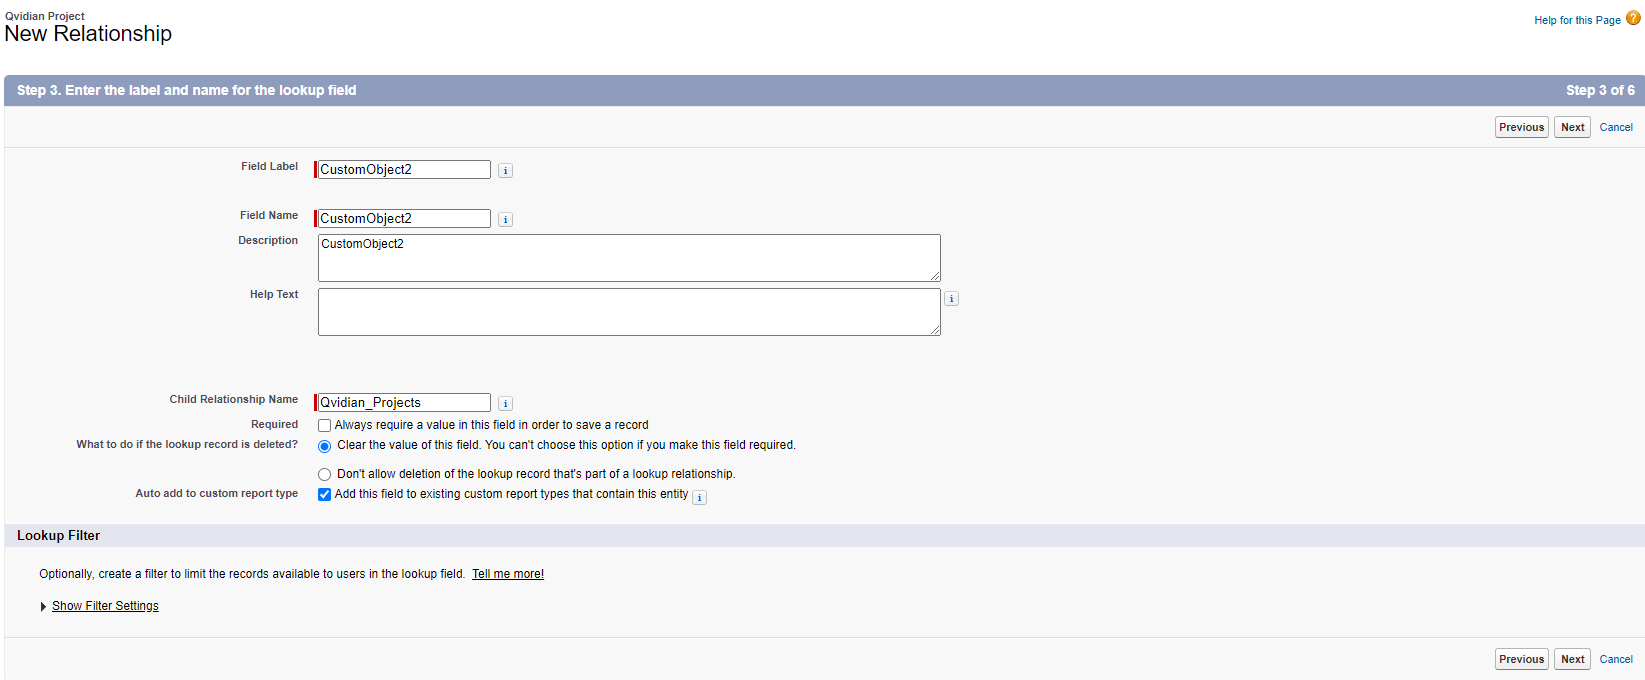
- Enter the Field Label, Field Name, and Description for the custom object and then click Next.
- Click Next to accept the default security settings.
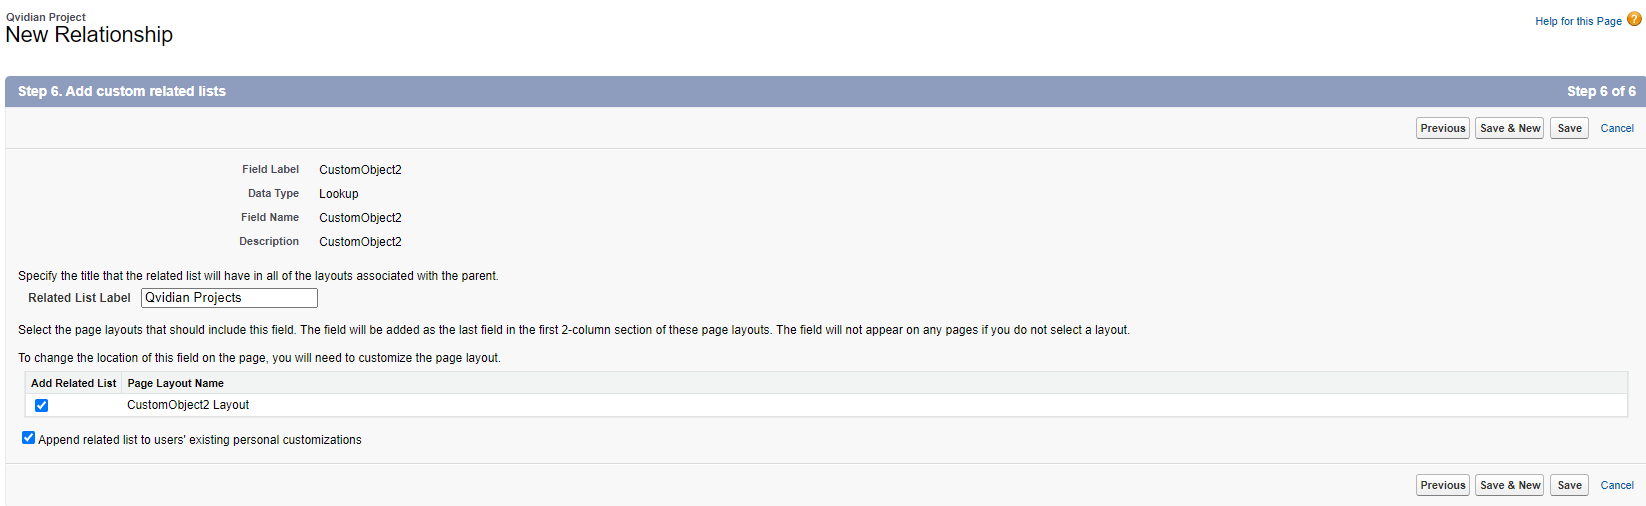
- Click Next again to automatically include the “Qvidian Project” in the Qvidian Project Layout.
- Click Save to automatically include the “Qvidian Project” in the page layout for the custom object.
- Verify that the new field is displayed in the Custom Fields and Relationships section.
- Click the New button within the Button, Links, and Actions section. The "New Button or Link" page will be displayed.
- Enter New_<customobjectname>_Project into the Label and Name fields, where
<customobjectname>is the name of your custom object. - Enter Created using Metadata API into the Description field.
- Select the List Button radio button and unselect the Display Checkboxes checkbox.
- Accept the default values for all other fields.
- Enter the following into the text area field, where
<customobjectAPIname>is the API name of your custom object: - Click Save to save the new custom button.
- Return to the "Custom Object: Qvidian Project" page and click the New button within the Button, Links, and Actions section to create another button. The "New Button or Link" page will be displayed.
- Enter Link_<customobjectname>_Project into the Label and Name fields, where
<customobjectname>is the name of your custom object. - Enter Created using Metadata API into the Description field.
- Select the List Button radio button and unselect the Display Checkboxes checkbox.
- Accept the default values for all other fields.
- Enter the following into the text area field, where
<customobjectAPIname>is the API name of your custom object: - Click Save to save the new custom button.
- Verify that the new buttons appear on the Buttons, Link, and Actions section of the "Custom Object: Qvidian Project" page. Verify that "Qvidian Projects" appears in the Related List section of your Page Layout
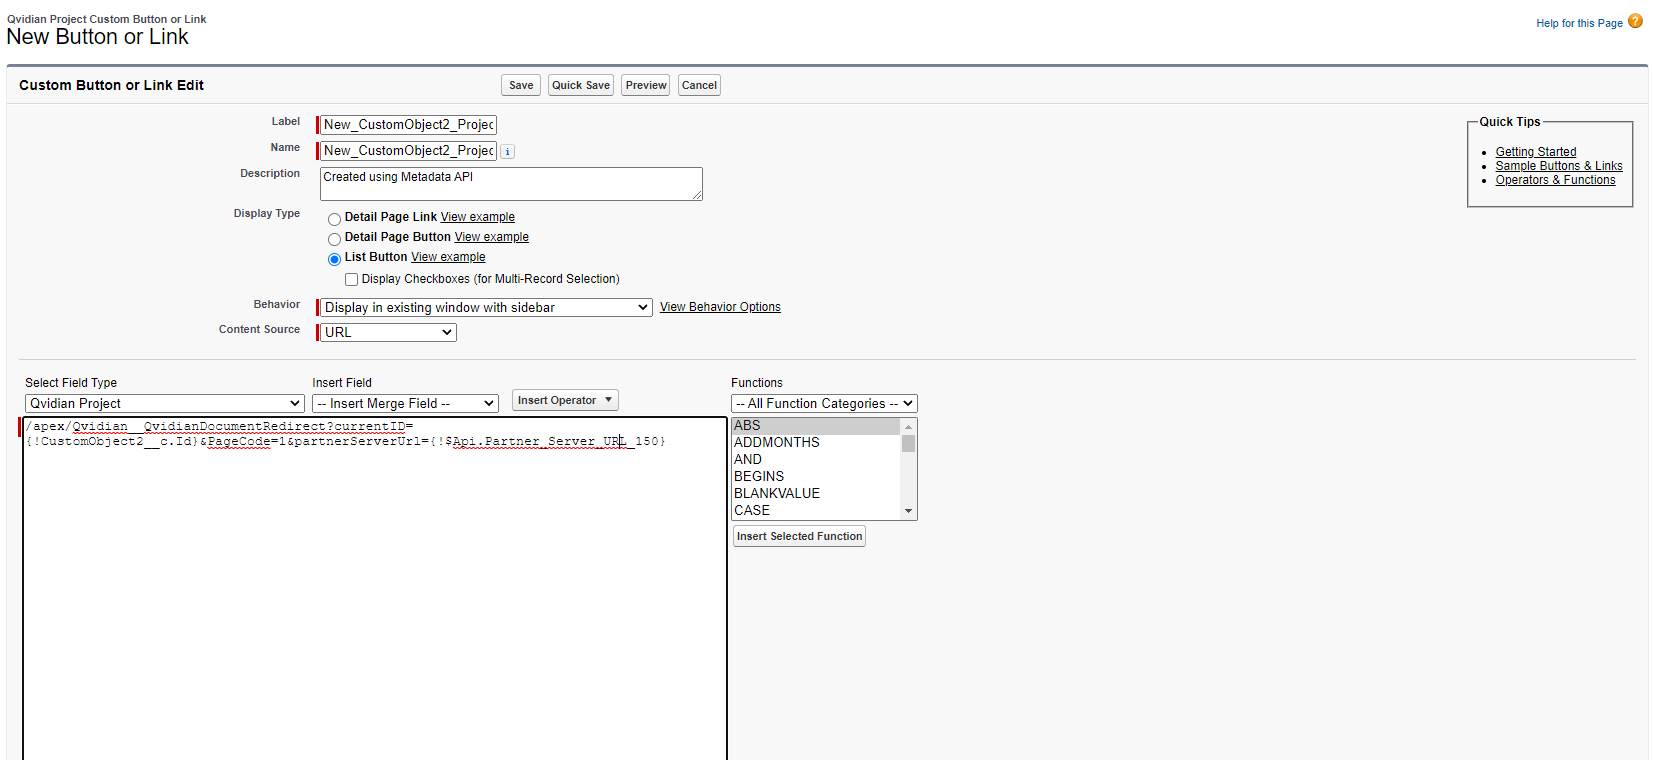
/apex/Qvidian__QvidianDocumentRedirect?currentID={!<customobjectAPIname>.Id}&PageCode=1&partnerServerUrl={!$Api.Partner_Server_URL_150}Tip: For standard objects like “Case” you would omit the “__c” on the end.
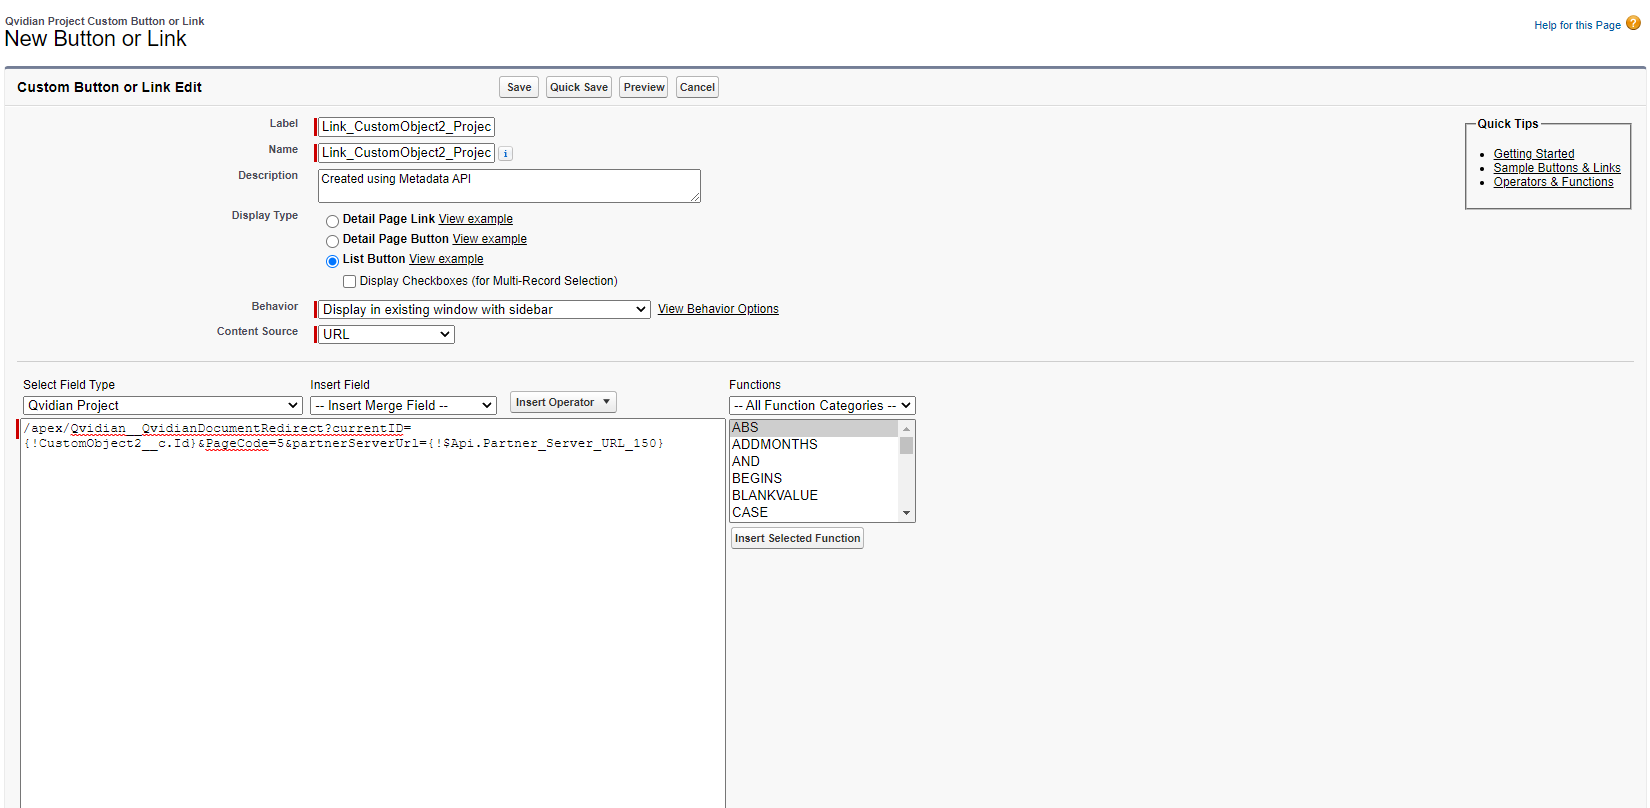
/apex/Qvidian__QvidianDocumentRedirect?currentID={!<customobjectAPIname>.Id}&PageCode=5&partnerServerUrl={!$Api.Partner_Server_URL_150}Note: The only difference in the text area between the New and Link buttons is the “PageCode”. It should be "1" for New and "5" for Link.
Tip: For standard objects like “Case” you would omit the “__c” on the end.