Note: Upland Software has made the decision to discontinue Rant & Rave’s Proactive Communications (Pro Comms) solution. We will continue to support all current Pro Comms functionality for customers with active agreements until our End-of-Support date, December 31, 2023.
Customers will be given the option to use a new Messaging API solution that will enable a more modern and robust messaging capability for our customers. Please contact your Customer Support Manager if you require more information.
You can send email messages to one or more contacts or distribution lists:
Sending an email message
From the Proactive Communication home page:
- Click Email in the left pane.
-
Click New.
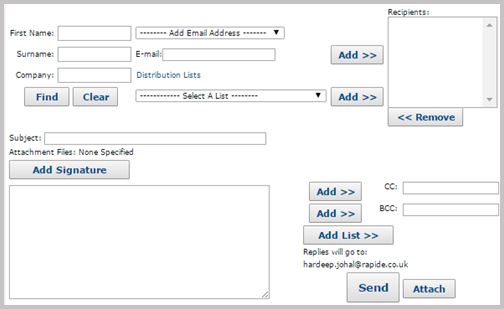
You see the email message form.

- Select one or more recipients for the email message:
- To search by contact, enter the contact's first name, surname, or company and then click Find. Select the contact from the search results in the drop-down list below the search criteria fields and then click Add.
- To search by email address, type the email address in the Email field and then click Add.
To add contacts by list, in the Distribution List section, select the list to which you want to send an email message and then click Add. The message can be sent only to contacts with an email address.
The contacts who will receive the email message are added to the Recipients list on the right.
-
To remove contacts from the Recipients list, select the contact in the list and then click Remove Number.
- To add contacts to the CC (copy) or BCC (blind copy) lists, locate one or more email addresses and then click Add next to the CC or BCC field.
-
Note: You can add the currently selected distribution list to the BCC field, by clicking Add List.The text boxes show the additional recipients in a comma-separated list. To edit these recipients, you must manually change the contents of these fields.
When you have finished adding recipients, add the subject line and message body.
- In the Subject field, type the subject line.
-
In the message box below the Subject field, type in the message body.
-
(Optional) To add a signature based on your personal contact details, click Add Signature.
-
When you are done, click Send.
You see a confirmation message.

-
Click Continue.
Resending an email message
You can resend an email message that you have previously sent.
From the Proactive Communication home page:
- Click Email in the left pane.
-
Click Sent.
You see a list of sent email messages.

-
In the To column, click the email address.
The Send Email screen is pre-populated with the details from the previous email message. You can now send another email based on this one. For more information, see Sending an email message.
Viewing sent email messages
From the Proactive Communication home page:
- Click Email in the left pane.
-
Click Sent.
You see a list of sent email messages.

Deleting sent email messages
From the Proactive Communication home page:
- Click Email in the left pane.
-
Click Sent.
You see a list of sent email messages.

- Tick one or more boxes next to the email(s) you want to delete.
- Click Delete.
-
To confirm, click OK.
You see a confirmation message.

- Click Continue.