Note: Upland Software has made the decision to discontinue Rant & Rave’s Proactive Communications (Pro Comms) solution. We will continue to support all current Pro Comms functionality for customers with active agreements until our End-of-Support date, December 31, 2023.
Customers will be given the option to use a new Messaging API solution that will enable a more modern and robust messaging capability for our customers. Please contact your Customer Support Manager if you require more information.
Sending text messages is a core part of Proactive Communication. Using this feature is easier if you have already created contacts in a list.
- Set up text templates
- Send a text message
- Resend a text message
- Cancel a scheduled text message
- View sent text messages
- Review and respond to replies
- Store sent messages
Setting up text templates
You can set up a library of text templates to ensure that your message formats and wording follow best practices.
From the Proactive Communication home page:
- Click Text in the left pane.
-
Click Text Templates.
You see a list of existing templates in the template library, if any.

-
If a list exists, click Add; otherwise, click Continue.
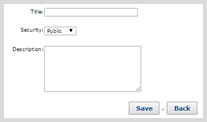
You see the template form.

Note: Be mindful of your entries in the template form; you cannot edit a template after it has been created, unless you are an administrator.
- Fill in the following fields:
- Title: Enter a descriptive name for the template.
- Security: Select an option from the drop-down list:
- Private to Self: Only the user who created the template can see it.
- Public: Any user in your company with access to Proactive Communication can see it.
- Description: Enter the body of the text message you want to save and reuse.
-
Click Save.
You see a confirmation message.

- Click Continue.
Tip: If you later need to update a text template, you cannot edit it. Create a new template based on the existing template and then delete the original. If you cannot delete the old template, see your Administrator for assistance.
Deleting a text template
If you no longer need a text template, or if it is out of date, you can delete it from the template library. You will still be able to see the text messages that were sent to customers using the template. For more information, Viewing sent text messages.
Note: Only administrators can delete text templates.
From the Proactive Communication home page:
- Click Text in the left pane.
-
Click Text Templates.
You see a list of existing templates in the template library.

- Click the check box next to one or more templates to delete.
-
Click Delete.
You see a confirmation message.

- Click Continue.
Sending a text message
At a minimum, a text message requires the names of the sender and recipient and a message body.
Optionally, you can also do the following:
- add information about the sender.
- schedule the message to be sent at a specified date and time.
- receive confirmation of delivery from the recipient's mobile network provider.
- enable replies from recipients.
From the Proactive Communication home page:
- Click Text in the left pane.
-
Click New Text.
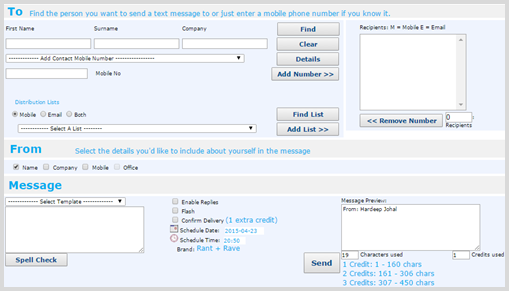
You see the text entry form.

- In the To section, select one or more recipients for the text message:
- To search by contact, enter the contact's first name, surname, or company and then click Find. Select the contact from the search results in the drop-down list below the search criteria fields, and then click Add Number.
- To add a mobile number, type the telephone number in the Mobile No. field, and then click Add Number.
To add contacts by list, in the Distribution List section, select Mobile, click Select a List and select the list to which you want to send a text message, and then click Add List.
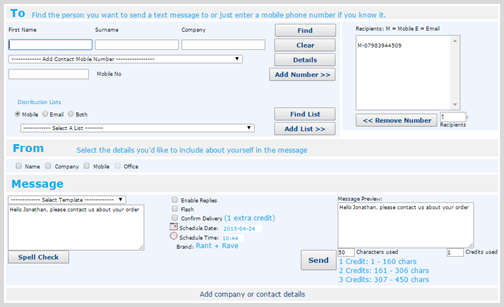
The number of recipients who will be sent the text message displays near the bottom of the Recipients list on the right.
-
To remove contacts from the Recipients list, select the contact in the Recipient box on the right and then click Remove Number.
-
In the From section, click the check box next to the details you want to include about the sender.
Note: The user who is currently logged in is the sender of the message.
The Message Preview in the lower-right corner displays the sender information you selected.
-
(Optional) To add information about the sender, first make sure that pop-ups are enabled in your browser and then click Add company or contact details at the bottom of the form.
The Details section opens.

To search for your contact information in the contact database:
-
Click Include Contact or Include Company, enter your search criteria, and then click Find.
-
In the search results, select the contact or company.
You see a list of Details data fields.

-
Tick the box next to one or more of the available fields. (If information for a field is not available, the check box is greyed and you cannot select it.)
The Message Preview in the lower-right corner displays the additional sender information you selected.
-
-
In the Message section, add the body of the message:
- Type the message directly into the Message box.
-
To use a message template, select an existing template from the Select Template drop-down list. The message displays in the Message box. You can edit the body of the message directly in the Message box, though your edits will not change the template. For more information, see Setting up text templates.
Tip: To check your spelling, click Spell Check below the Message box.
The Message Preview in the lower-right corner displays the message, as well as the number of characters used and the credits the message will incur.
Note: Be sure to consider the recipients' time zones when sending a text message. For example, if you send a text message from the UK to contacts in Australia, you do not want the message to arrive in the middle of the night. Alternatively you may want to send your message during the weekend or outside work hours.
- (Optional) To schedule your message, first make sure that pop-ups are enabled in your browser and then select the date and time for delivery:
- Click the Schedule Date (
 ) icon and select the date.
- Click the Schedule Time (
 ) icon and select the hour and minutes.
- Click the Schedule Date (
-
(Optional) To request confirmation when the message is delivered, select the Confirm Delivery check box.
Note: Delivery confirmation may incur one additional credit for each text message sent.
Rant & Rave can confirm that text messages are sent to the mobile network provider; however, this is not confirmation of receipt by the handset. You can use delivery confirmation to create a report indicating that recipients have received your message, for example, in the case of an emergency when you have sent a text message saying that you don't want people coming into the office. The delivery confirmation informs you that the message has been delivered to the recipient's handset.
-
(Optional) If you need recipients to acknowledge the text message, select the Enable Replies check box.
For example, in the case of an emergency where you don't want people to come to the office, you can ask recipients to reply back in order to acknowledge that they have read the message and understood it.
Tip: Be sure to include the request for a response within the body of the message.
-
When you are done, click Send.
You see a confirmation message indicating whether the message is being sent right away or is scheduled for a later date and time.


You can cancel a scheduled message before it is sent. For more information, see Cancelling a scheduled text message.
-
Click Continue.
Resending a text message
If there is a failure or other problem in sending a text message, you can resend it.
From the Proactive Communication home page:
- Click Text in the left pane.
-
Click Sent.
You see a list of sent messages.

The list of messages can be very long.
 To change the number of messages on a page
- To change the number of messages displayed on the page, click the View field in the upper-right corner of the list, and then select a number from the messages per page drop-down list.
 To filter the list by date or keyword
- To locate a message, you can filter the list by date sent or by keywords in the message text:
- To filter by date, click the calendar <icon> next to the Date field and select a date.
To filter by keyword, enter the word or phrase in the Message field and then click Filter.
The text filter can contain any characters in a word and not just the complete word , for example, 'con' would find 'confirm' and 'contact'. You can also use a wild card to match patterns, for example, to find a reference number range, searching for '123%AB' would find all reference numbers starting with '123' followed by any set of characters and ending with 'AB'.
To retry your search, click Clear and filter again.
-
When you see the message you want to resend, click the text in the Message column.
You see the text entry form. The Message box contains the message text.

-
You can resend the original message, or update the message and then resend it.
-
To resend the original message, click Send.
Note: Your message will be re-sent to the original recipient list. The recipient list will not be updated with any changes made in the interim.
- To update the message before sending, see Sending a text message.
-
Cancelling a scheduled text message
From the Proactive Communication home page:
- Click Text in the left pane.
-
Click Scheduled.
You see a list of scheduled messages.

- Locate one or more scheduled messages to cancel and tick the box in the left column.
- From the menu above the messages list, click Cancel.
-
To confirm, click OK.

The message status on the right is changed to Cancelled.
Tip: To check, wait a short amount of time for the cancellation to be processed. Click Text in the left pane and then click Scheduled. The message should no longer appear in the Scheduled list.
Viewing sent text messages
From the Proactive Communication home page:
- Click Text in the left pane.
-
Click Sent.
You see a list of sent messages.

The list of messages can be very long.
 To change the number of messages on a page
- To change the number of messages displayed on the page, click the View field in the upper-right corner of the list, and then select a number from the messages per page drop-down list.
 To filter the list by date or keyword
- To locate a message, you can filter the list by date sent or by keywords in the message text:
- To filter by date, click the calendar <icon> next to the Date field and select a date.
To filter by keyword, enter the word or phrase in the Message field and then click Filter.
The text filter can contain any characters in a word and not just the complete word , for example, 'con' would find 'confirm' and 'contact'. You can also use a wild card to match patterns, for example, to find a reference number range, searching for '123%AB' would find all reference numbers starting with '123' followed by any set of characters and ending with 'AB'.
To retry your search, click Clear and filter again.
-
Locate the sent message in the list, and then click View in the Summary column at the end of the row.
Reviewing and responding to replies
If replies were enabled for original text message, recipients can send replies to your message and you can respond to their replies.
From the Proactive Communication home page:
- Click Text in the left pane.
-
Click Inbox.
You see a list of sent messages.

The list of messages can be very long.
 To change the number of messages on a page
- To change the number of messages displayed on the page, click the View field in the upper-right corner of the list, and then select a number from the messages per page drop-down list.
 To filter the list by date or keyword
- To locate a message, you can filter the list by date sent or by keywords in the message text:
- To filter by date, click the calendar <icon> next to the Date field and select a date.
To filter by keyword, enter the word or phrase in the Message field and then click Filter.
The text filter can contain any characters in a word and not just the complete word , for example, 'con' would find 'confirm' and 'contact'. You can also use a wild card to match patterns, for example, to find a reference number range, searching for '123%AB' would find all reference numbers starting with '123' followed by any set of characters and ending with 'AB'.
To retry your search, click Clear and filter again.
-
When you locate the reply message, click the recipient in the From column to review.

- To return to the sent list, click your browser's Back button.
- To reply to one or more messages, tick the box in the left column for each message.
- From the menu above the messages list, select Reply.
- Add your response to the text message form. For more information, see Sending a text message.
Storing sent messages
Messages older than 30 days will be archived unless you select to keep them.
From the Proactive Communication home page:
- Click Text in the left pane.
-
Click Sent.
You see a list of sent messages.

The list of messages can be very long.
 To change the number of messages on a page
- To change the number of messages displayed on the page, click the View field in the upper-right corner of the list, and then select a number from the messages per page drop-down list.
 To filter the list by date or keyword
- To locate a message, you can filter the list by date sent or by keywords in the message text:
- To filter by date, click the calendar <icon> next to the Date field and select a date.
To filter by keyword, enter the word or phrase in the Message field and then click Filter.
The text filter can contain any characters in a word and not just the complete word , for example, 'con' would find 'confirm' and 'contact'. You can also use a wild card to match patterns, for example, to find a reference number range, searching for '123%AB' would find all reference numbers starting with '123' followed by any set of characters and ending with 'AB'.
To retry your search, click Clear and filter again.
-
Locate one or more sent messages in the list, and then tick the box at the beginning of each row.
-
From the menu above the messages list, click Keep or Archive:
- To continue to access the selected sent messages, click Keep.
- To store the messages in the archive right away, click Archive.