Workflow Setup: Setting Up the Notifications for the Workflows (Setting Up the Workflows)
Note: This article was authored in the former format, which includes functionality dating back to version 2013 R1 and earlier. The content will be converted to the current platform article format.
After setting up the notifications, the system automatically generates and sends email messages when the specified conditions are met. In addition, messages can also be set up to notify users when a workflow changes states; for example, a creator of a workflow can receive a message confirming that the workflow has been resolved and closed.
To set up the notifications for the workflows:
- Select the workflow type by clicking the following:
- Click Setup>Work>Projects and then click the Project Workflows link to create the Project Workflows; for more information, see Project Setup: Setting Up Project Workflows
- Click Setup>Timesheet>Workflows to create the Timesheet Workflows
- Click Setup>Expense>Workflows to create the Expense Workflows
- Click Setup>Financial>Workflows to create the Invoicing Workflows
- Click Setup>Purchase>Requisition Workflows to create the Requisition Workflows
- Click Setup>Purchase>Purchase Workflows to create the Purchase Workflows
- Click Setup>Work Processes to create the Work Processes Workflows
- Click an existing workflow from the list and then double-click a workflow state in the designer area to open the State Edit dialog box.Note: From the States tab, all the states added to a workflow are listed by name and type in the left pane, as well as graphically represented in the design area.
- Click the Notifications tab and then the New icon to open the Notification Edit dialog box.
- From the General tab, enter the name of the notification and select the following, if required:
- Send Email check box to send the notification by email
- Create Action Item check box to automatically create work process entries, such as tasks, for users based on the criteria defined.Note: The Create Action Item option is available for the Expense, Invoicing, Requisition, Purchase and Work Processes workflows.
- Click the Next link and then define the conditions for sending the notification.Note: Before a notification can be sent to a user, the conditions specified must be met. Depending on the workflow selected, the criteria that is defined can vary.
- Click the Next link to define the criteria for the escalation (aging) notifications.Note: The escalation notifications are available only for the Project and Work Processes workflows. The notification conditions are set at the state level for all workflow based processes; therefore, a notification can be triggered based on an entry stuck at a state or inactive for a given amount of time; or alternately, for not reaching a state.
- Click the Next link to define the notification subject and message.
- Select the language for the email notification.Note: Currently French and English messages are supported; the users receive notifications in the language specified in their preferences; for more information, see Accessing the Menu Bar in the Tenrox Application.
- Enter a title for the email notification and then create the message for the email. When creating a message, certain parameters that relate to the type of reminder or notification can be used; for more information, see Setting Up the Email Notifications.
- Click the Next link and then click the New icon to open the Select Recipient dialog box and then add the users who will receive the notification when the specified conditions are met.
- Select from the Message Type list how the email is sent to the recipients.
- To: sends the email message directly to the user
- Cc (carbon copy): sends a copy of the email message to a recipient whose email address appears in the message to the user
- Bcc (blind carbon copy): sends a copy of the email message to a recipient whose email address does not appear in the message to the user
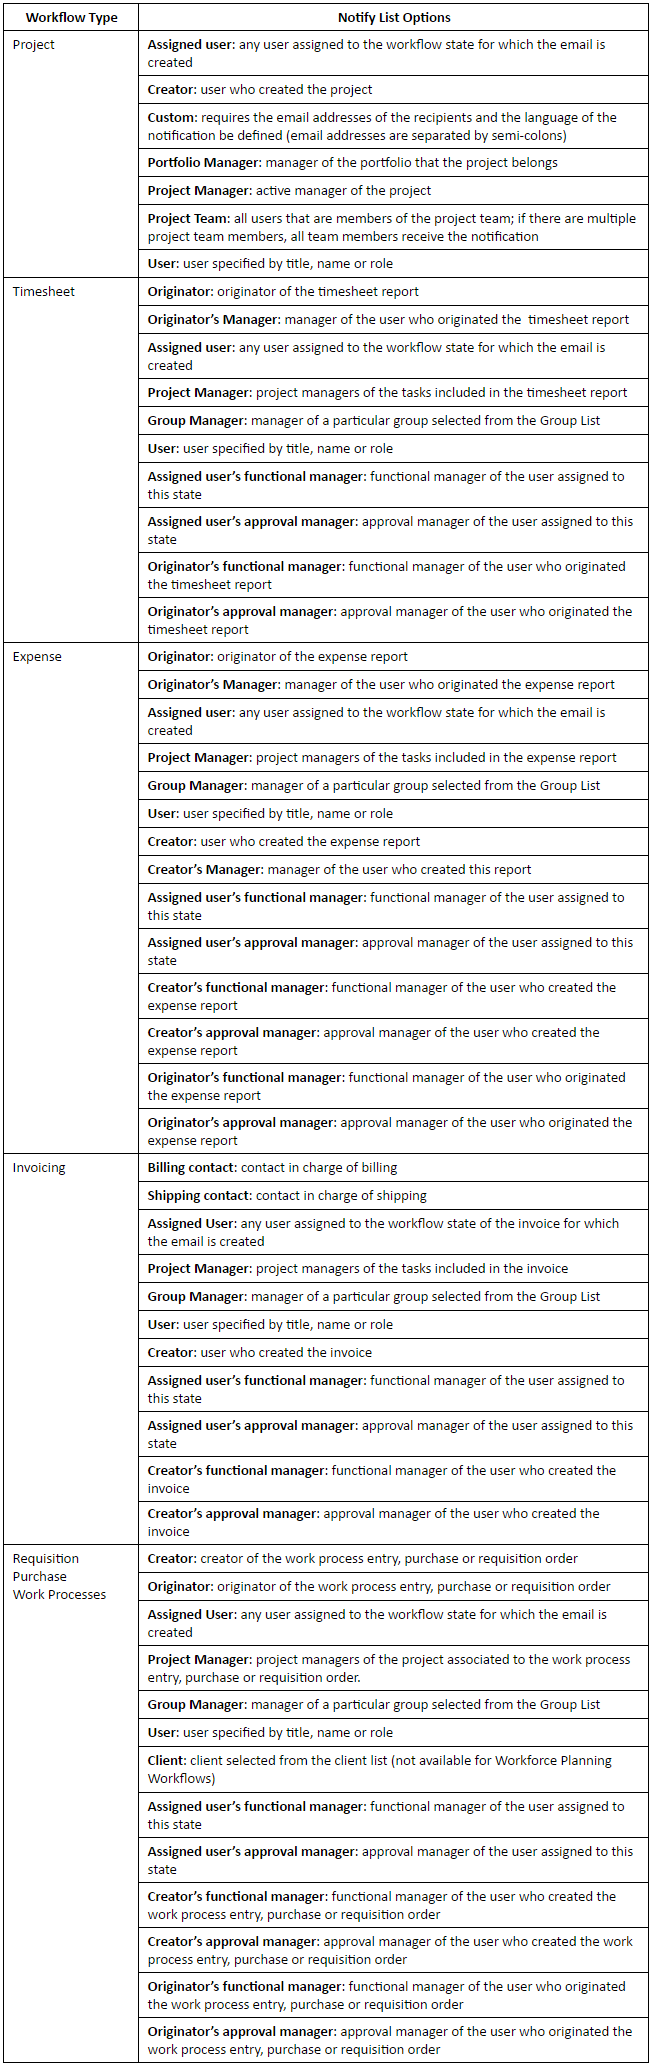
- Select the recipients who will be notified by email from the Notify list. Depending on the type of workflow notification created, the Notify list can vary; for more information, see the table Notify List Recipient Options.
- Click the Save link and then the Close link to return to the Notification Edit dialog box.
- Click the New icon to define additonal recipients and then click the Save link and the Close link to return to the Notification Edit dialog box.
- Click the Finish link to return to the State Edit dialog box.
Notify List Recipient Options