Tenrox-SharePoint Server 2010 Installation and Configuration Guide
This guide describes the procedures to install and configure the Sharepoint connectors to set up the SharePoint workspace integration and the SharePoint document management integration. Depending on the configuration, the SharePoint workspace and document management integration can work independently or concurrently.
The main sections covered in this document include the following:
- Verifying the System Requirements
- Installing and Configuring the Connectors for Sharepoint Workspace Integration
- Installing and Configuring the Connectors for Sharepoint Document Management Integration
For troubleshooting integration issues, see also the following sections:
Verifying the System Requirements
This section lists the software requirements for setting up integration between Tenrox and SharePoint.
The Installation and Configuration of the Connectors require the following:
- Installation of Tenrox 2011 R3
- The project worspace integration licence, referred to as either SPI Integration or Sharepoint Integration, for Sharepoint Project Workspace.
- The Sharepoint Document Management licence for Document Management.
SharePoint Server Requirements
(Microsoft Office SharePoint Server 2010)
- Microsoft SharePoint Server 2010
- Tenrox application with SharePoint Document Integration licensing
- .NET Framework 3.5 and .NET Framework 4
Database Server Requirements
Tenrox requires a Database Management System (DBMS) to operate. The Tenrox application supports SQL Server 2008 and 2008R2
Operating System Requirements
Tenrox runs only on the following operating systems:
- Microsoft Windows Server 2008 64-bit versions for the Database Server
- Microsoft Windows Server 2008 64-bit versions for the Web Server
Web Server Requirements
The Tenrox server uses industry-standard Hypertext Markup Language (HTML), Asynchronous JavaScript and XML (AJAX), Active Server Pages (ASP) and ASP .NET technology. It also requires Internet Information Services (IIS) version 6.0 or 7 based on the MS Windows Server version you are using.
Note: The Web services extensions must be enabled for Active Server Pages and Web-based Distributed Authoring and Versioning (WebDAV).
Installing and Configuring the Connectors for Sharepoint Workspace Integration
This section describes the procedures for installing and configuring the Connectors to set up the SharePoint workspace integration:
Configuring Network
When using the Tenrox Hosted Sharepoint, the only option is to have the Sharepoint-Tenrox Connector create a second IIS website, using forms authentication, specifically using the username and password defined in the Tenrox DataBase.
When choosing the Corporate Windows Active Directory for the User Authentication Service, a second site is not created.
Note: Admin site is not created in the Integrated Windows Authentication. In this mode network administrators can access the site content/configuration using the business site (for TX mode it is technically impossible).
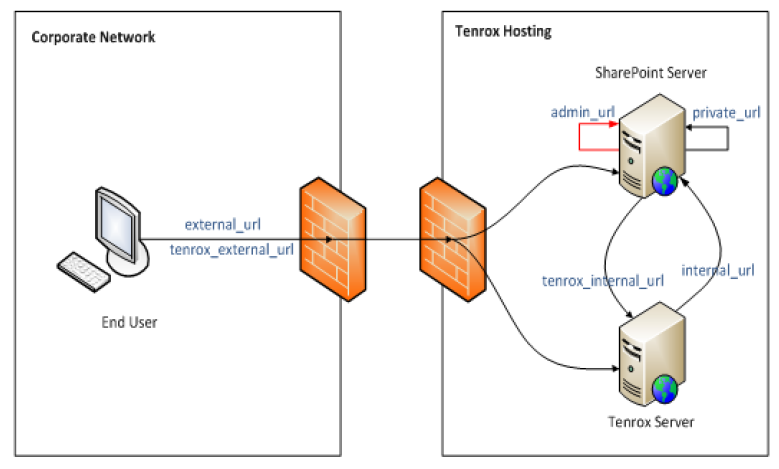
The admin and business sites require unique network names. Moreover, since the access to the business site is required for different network areas, the business site can have up to 3 names (URLs). The network infrastructure (DNS servers and firewalls) MUST be configured to map these names to the SharePoint server.
Note: The procedure for creating DNS entry varies, depending on the DNS server.
For reference purposes:
- admin_url - the network name of the admin site; used to access the admin site from the same server where the SharePoint is installed
- private_url - the network name of the business site; used to access the business site from the same server where the SharePoint software is installed
- internal_url2 - the network name of the business site; used to access the SharePoint site from the server where the Tenrox software is installed
- external_url2 - the network name of the business site; used to access the SharePoint site from end-users' computers
Additionally, the following URLs are also used:
- tenrox_internal_url - the network name of the server where the Tenrox software is installed; used to access the Tenrox web services from the server where SharePoint software is installed
- tenrox_external_url - the network name of the server where the Tenrox software is installed; used to access the Tenrox web pages/services from end-users' computers
For the simplest case (no firewalls) - private_url, internal_url, and external_url are the same (since they actually point to the same web site); tenrox_internal_url and tenrox_external_url are the same too (they also point to the one web site).
The following typical configurations are supported:
- Tenrox Hosting - both Tenrox and SharePoint servers are installed on the Tenrox hosting
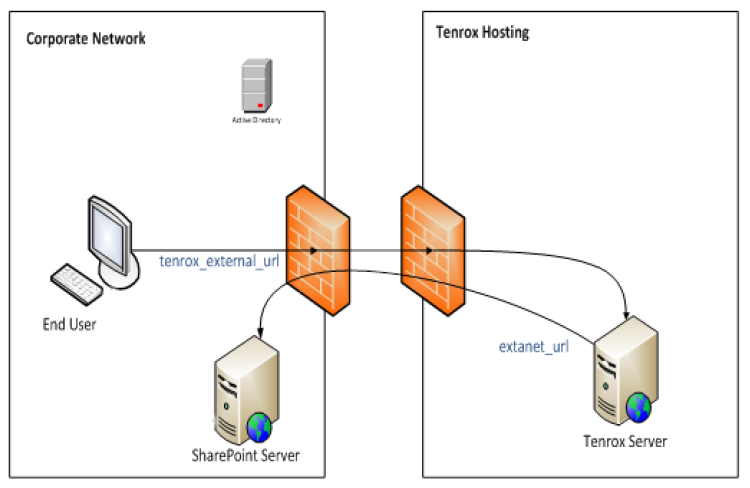
- Corporate SharePoint Hosting - Tenrox server is installed on the Tenrox hosting, SharePoint server is installed in a client's corporate network, Active Directory is used for user authentication
- Corporate Hosting - both Tenrox and SharePoint servers are installed in a client's corporate network, Tenrox server or Active Directory are used for user authentication
Typical Configuration: Tenrox Hosting
In this configuration the typical URLs are:
- admin_url = http://name1.tenroxhosting.com
- private_url = http://name2.tenroxhosting.com
- internal_url = http://name2.tenroxhosting.com
- external_url = https://name2.tenroxhosting.com
- tenrox_internal_url = http://name3.tenroxhosting.com
- tenrox_external_url = https://name3.tenroxhosting.com
Tenrox software can be configured to use Tenrox authentication or Remote Windows authentication.
Typical Configuration: Corporate SharePoint Hosting
In this configuration the SharePoint is installed inside the corporate network and corporate Active Directory is used for user authentication (Integrated Windows Authentication). It makes sense only if SharePoint installation already exists and/or used for other purposes. In this case the SharePoint administrator MUST prepare/configure a SharePoint web application to be integrated with the Tenrox server.
Requirements are:
- SharePoint web application MUST allow access from internal and external networks (typically - two zones)
- extranet_url - for accessing the SharePoint web application from the Tenrox server (external network)
- Tenrox server MUST be configured to use Remote Windows Authentication
- A special Active Directory user account MUST be created, it will be used to Tenrox-SharePoint internal communications
- This account MUST NOT be used by a real person; it MUST be a service account
In this configuration the typical URL is:
- tenrox_external_url = https://name3.tenroxhosting.com
Typical Configuration: Corporate Hosting
In this configuration the SharePoint and Tenrox servers are installed inside the corporate network; user authentication cab be performed by the corporate Active Directory (Integrated Windows Authentication) or by the Tenrox server (TX mode). In other words, it is a custom network configuration. Network administrators MUST provide valid values for all configuration parameters themselves - no typical rules will be applied.
Installing the SharePoint-Tenrox Connector
Microsoft Office SharePoint Server 2010
Before the SharePoint-Tenrox bridge can be created, the SharePoint connector software needs to be installed. The SharePoint-Tenrox connector acts as the interface between an organization and the SharePoint-Tenrox server. For information on installing the SharePoint-Tenrox bridge, see Creating the Bridge Between Tenrox and SharePoint.
Note: In the case of multiple front-end servers, deployment only needs to be done on one of them, as a Sharepoint deployment package that replicates this to the other front end servers is used.
To install the SharePoint-Tenrox connector:
- Use Windows Explorer to locate the TenroxSPIAddOnEnglish.exe file on your local or remote machine. Note:
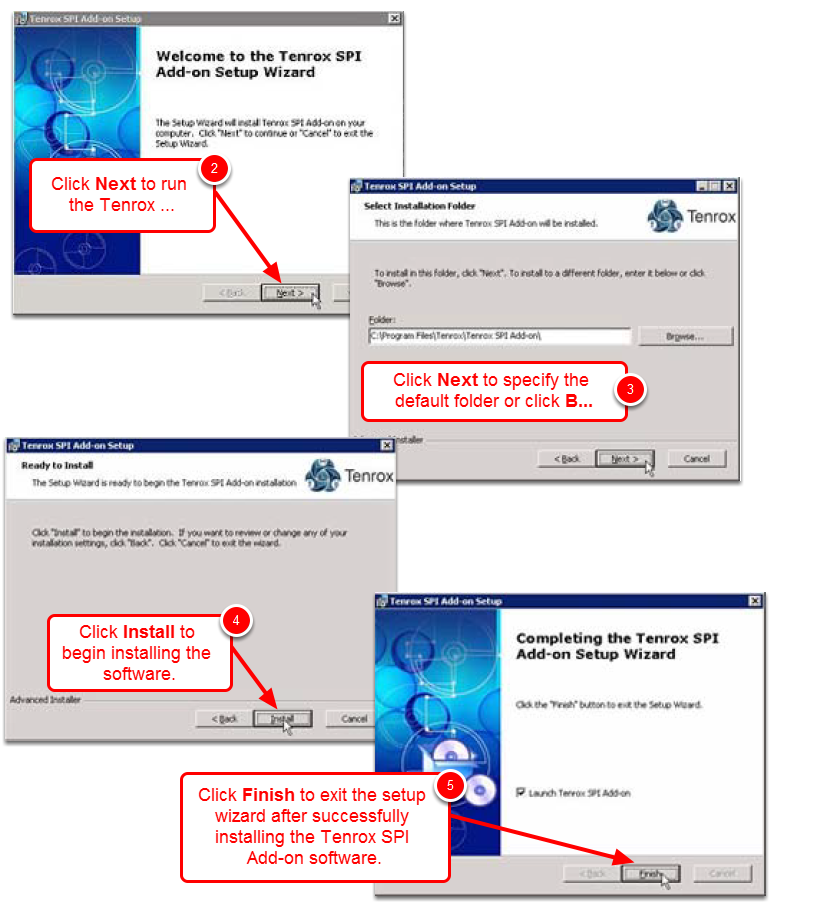
- The executable file can be accessed either from the CD/DVD drive for a local machine or over the network for a remote machine. The executable file that starts the SharePoint-Tenrox connector installation is named TenroxSPIAddOnEnglish.exe br />- To install the French version of the Sharepoint-Tenrox connector, use the French TenroxSPIAddOnFrench.exe file. - Double-click the TenroxSPIAddOnEnglish.exe to extract the files and then click Next to run the Tenrox SPI Add-on Setup.
- Click Next to specify the default folder or click Browse... to find another folder for the Tenrox SPI software, and then click Next to continue.Note: Tenrox recommends using the default folder, C:\Program Files\Tenrox\Tenrox SPI Add-on\, for the software installation to avoid any problems when saving files
- Click Install to begin installing the software in the specified folder.Note: The setup wizard takes a few minutes to install the Tenrox SPI Add-on software.
- Click Finish to exit the setup wizard after successfully installing the Tenrox SPI Add-on software.
Creating the SharePoint Web Site
Microsoft Office SharePoint Server 2010
After successfully installing the SharePoint-Tenrox connector, the SharePoint web application is created.
To create the SharePoint web application:
- Click Start>All Programs>Microsoft SharePoint 2010 Products >SharePoint 2010 Central Administration to launch the SharePoint application and then click the Application Management section
- Click the Manage web applications link
- Click the New button on the ribbon
- Authentication: Claims Based Authentication (REQUIRED)
- Claim Authentication Types: Enable Windows Authentication & Integrated Windows authentication (REQUIRED)
- To get the detail description about other web application configuration parameters, please refer to the appropriate SharePoint documentation. Below are provided typical values:
- IIS Web Site: Create a new IIS web site
- IIS Web Site/Create a new IIS web site/Description: enter organization name (can be any text value, orgname is suggested to simplify management)
- IIS Web Site/Port: 80 (or a custom value if non-standard port is used in the Corporate Hosting configuration)
- IIS Web Site/Host Header: host name from the admin_url if TX mode will be used; or host name from the private_url if Integrated Windows Authentication will be used
- Application Pool: Create new application pool
- Application Pool/Create new application pool/Select a security account for this application pool: Predefined/Network Service
- Reset Internet Information Services: Restart IIS Automatically
- Click OK
Creating the Bridge Between Tenrox and SharePoint
Microsoft Office SharePoint Server 2010
After successfully installing the SharePoint-Tenrox connector, the bridge is created between Tenrox and SharePoint server to allow users access the Tenrox-SharePoint server.
To create the SharePoint-Tenrox bridge:
- Click Start>All Programs>Microsoft SharePoint 2010 Products >SharePoint 2010 Central Administration to launch the SharePoint application and then click the Application Management section
- Click the Manage Integration link in Tenrox Project Workforce Management section to manage integration between SharePoint Web application and the Tenrox system.
- Select the Web application and then click Activate to create the bridge.
- Enter the following information to configure the bridge between the SharePoint and Tenrox servers:
- SharePoint Web Application section (TX mode - users are authenticated by the Tenrox server):
- Hosting Type: specifies "Tenrox Hosting" if the SharePoint server is installed on Tenrox hosting; otherwise: "Corporate Network"
- User Authentication Service: specify "Tenrox Project Workforce Management"
- New IIS web site: enter private_url
- Override advanced settings: check and provide private_url, internal_url, and external_url explicitly if the configuration is not the typical one
- SharePoint Web Application section (Integrated Windows Authentication):
- Hosting Type: specifies "Corporate Network"
- User Authentication Service: specify "Corporate Windows Active Directory"
- New IIS web site: enter private_url
- Web Application URL: enter extranet_url
- Operational Account Login Name: enter DOMAIN\username for the account that will be used for SharePoint-Tenrox communications
- Operational Account Password: enter the password for the account above 4c. Tenrox Project Workforce Management:
- Hosting Type: specifies "Tenrox Hosting" if the SharePoint server is installed on Tenrox hosting; otherwise: "Corporate Network"
- Server URL: enter tenrox_internal_url
- Organization: Tenrox organization name (orgname)
- Administrator: Tenrox user with administrative rights on the SharePoint server. Note: Tenrox provides an administrative profile for a single user with administrative rights on the SharePoint server after the bridge is created.
- Password: Tenrox user password
- SharePoint Web Application section (TX mode - users are authenticated by the Tenrox server):
- Click Submit to save the settings.
Installing and Configuring the Connectors for Sharepoint Document Management Integration
This section describes the procedures for installing and configuring the Connector to set up the SharePoint document management integration:
Installing the Tenrox/SharePoint Server Software
The Tenrox SharePoint Server Setup wizard installs the files required for the document management integration on the SharePoint server.
Note:
- Before installing the Tenrox/SharePoint server software, ensure that any previous version is uninstalled.
- In the case of multiple front-end servers, this Software must be manually installed on each of them.
To install the Tenrox SharePoint server software:
- Use Windows Explorer to navigate to the TenroxSharepointDocumentManagementIntegrationEnglish.exe file on your local or remote machine. Note: To install the French version of the Tenrox Sharepoint server software, navigate to the TenroxSharepointDocumentManagementIntegrationFrench.exe file on your local or remote machine.
- Double-click the TenroxSharepointDocumentManagementIntegrationEnglish.exe icon to extract main application files.
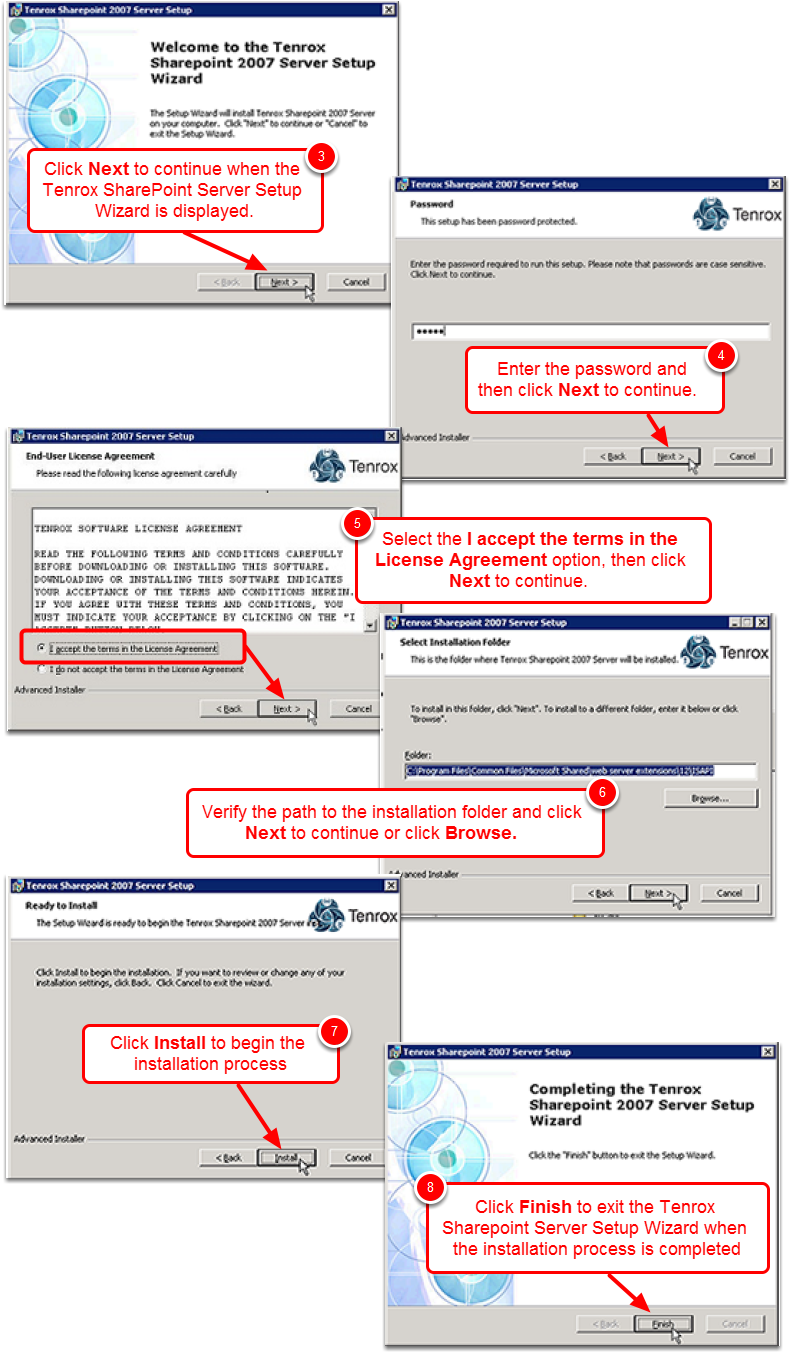
- Click Next > to continue when the Tenrox SharePoint Server Setup Wizard is displayed.
- Enter the password and then click Next > to continue.Note: The installation process is password-protected. Contact your System Administrator or Tenrox representative to provide you with an appropriate password.
- Select the I accept the terms in the License Agreement option, then click Next > to continue.
- Verify the path to the installation folder and click Next to continue or click Browse to find the folder for the SharePoint software installation, and then click Next to continue.Note: In cases where the installer is unable to find the path to the installation folder, the probable path would be:
If using Sharepoint 2010, C:\Program Files\Common Files\Microsoft Shared\web server extensions\14\ISAPI. - Click Install to begin the installation process.
- Click Finish to exit the Tenrox Sharepoint Server Setup Wizard when the installation process is completed.
Configuring the Connectors for Sharepoint Document Management Integration
Configuring the Connectors for Sharepoint Document Management Integration requires defining a Sharepoint Site and Folder at the System level, which is part of Defining the SharePoint Document Upload Locations in Setting up the SharePoint Document Repository. The SharePoint document upload location is defined in the Tenrox application at the System (default), Global and Local level, the latter two levels detailed under Setting up the SharePoint Document Repository in the Setup and User Guide for Sharepoint Server 2010.
Defining a SharePoint Site and Folder at the System (Default) Level
When the Tenrox application is first installed, the application's internal Document Management System is enabled by default; however, when SharePoint is selected as the Document Management System, a default SharePoint upload location is defined for all document attachments made from Tenrox. The default document upload location is used when no site or folder is defined at the Global and Local levels for a given object and for all document attachments made to Notes.
To define a default document upload location:
- Launch the Tenrox application and log on as a user with administrative rights.
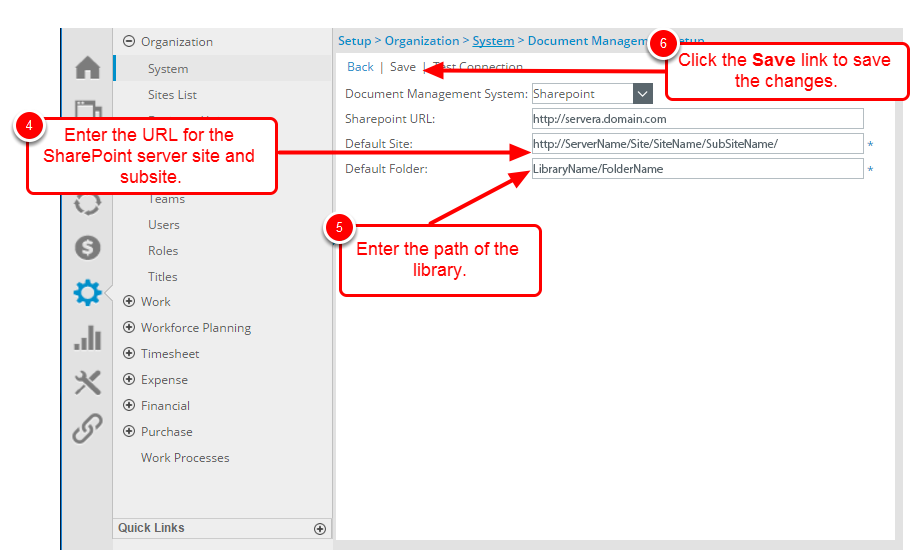
- Click Setup>Organization>System and then click the Document Management button to open the Document Management Setup page.
- Select SharePoint from the Document Management System list to enable the application.
- Enter the URL for the SharePoint server site and subsite in the Default Site box to specify the location for the document uploads. The URL format is http://ServerName/Site/SiteName/SubSiteName/
Note: The specified site and subsite must exist on the SharePoint server. The subsite name is optional and does not need to be entered. - Enter the path of the library and folder in the Default Folder box to specify where the documents will be uploaded. The path format is LibraryName/FolderName.Note: The specified library must exist on the SharePoint server; however, if a specified folder does not exist on the SharePoint server, it will be created during the document upload. The library name is required, but the folder name is optional and does not need to be entered.
- Click the Save link to save the changes.
- Click the Test Connection link to verify the connection to the SharePoint site and folder.
- Click Back to return to the System page.
Character Limitations and Troubleshooting Common Tenrox/SharePoint Integration Issues
The Microsoft Sharepoint Server has certain limitations in regard to the size and naming conventions of the sites, libraries, folders and files.
Character Limitations
The SharePoint Server system has limitations in regard to the maximum number of characters, as well as the special characters, it supports.
- The characters not allowed in SharePoint document libraries, include: / \ : * ? " < > | # <TAB> { } % ~ &.
- Note the following Sharepoint limitations for the number characters:
- Site name limitations: the SharePoint site name supports a maximum of 80 alphanumeric characters
- Site description limitations: the SharePoint site description supports a maximum of 200 alphanumeric characters
- Site URL limitations: the SharePoint site URL supports a maximum of 255 characters (including the virtual directory)
- Document library/folder limitation: the maximum file or folder name length is 128 characters, including the extension
Possible Troubleshooting Issues
This section describes common troubleshooting issues that may be encountered in the Tenrox/SharePoint integration.
Error# 1: Invalid URL: the format of the URL could not be determined.
This message may be displayed while uploading documents to the SharePoint URL. Please verify that no unsupported characters are included in the folder or file name, such as / \ : * ? " < > | # <TAB> { } % ~ &. The most common character to generate this message is the colon (:).
Error# 2: The file or folder name <File or FolderName> contains characters that are not permitted. Please use a different name.
This message may be displayed while uploading documents to the SharePoint URL. Please verify that no unsupported characters are included in the folder or file name, such as / \ : * ? " < > | # <TAB> { } % ~ &.
Error# 3: SharePoint File not found.
This message may be displayed on the Tenrox Document List page. Please verify that the document exists in SharePoint or that is has not been moved or renamed.
Error# 4: Your current security settings prohibit running ActiveX controls on this page. As a result, the page may not display correctly.
This message may be displayed when accessing the Documents page. Please verify that the options to download or run ActiveX controls are set to Enabled or Prompt in the Internet browser settings.
