Tenrox 2019 R1 - Tenrox and Microsoft Dynamics CRM Integration Guide
About this Tenrox Guide
This guide describes the procedures for setting up integration between Microsoft Dynamics CRM and Tenrox, as well as mapping, importing and exporting objects between Tenrox and Microsoft Dynamics CRM. This guide is used to integrate Microsoft Dynamics CRM with the following Tenrox releases:
- Tenrox 2019 R1
- Tenrox 2018 R1
- Tenrox 2016 R1
- Tenrox 2015 R2
- Tenrox 2015 R1
Tenrox Software License Agreement
The Tenrox Software license agreement was reviewed and accepted during the installation procedure of this software in your environment. Copyright © 2019 by Upland Software. All rights reserved. You may not photocopy or share this document with any other party without express written permission from Tenrox.
Tenrox Technical Support
The Tenrox support specialists are trained to use, configure, and troubleshoot Tenrox in your specific enterprise environment. If you have any questions, you can reach us by:
- Calling (877) 483-6769
- Sending an email to tenroxsupport@uplandsoftware.com
For additional information, please contact us at:
| Corporate site: | www.uplandsoftware.com |
| https://uplandsoftware.com/tenrox/ | |
| Sales email: | tenroxsales@uplandsoftware.com |
| Customer care: | tenroxcustomercare@uplandsoftware.com |
Tenrox and Microsoft Dynamics CRM Integration
The integration of Microsoft Dynamics CRM and the Tenrox application offers users the flexibility to manage sales, marketing, and customer service operations, while using Tenrox to manage people, projects and business processes more efficiently by:
- Automating repetitive tasks
- Tracking actuals (time and expense)
- Centralizing internal business process activities and generating detailed, real-time analysis reports to analyze operations, as well as reduce costs, meet budgets, and improve project and service delivery
Available as of
- Microsoft Dynamics CRM 2016 available as of Tenrox 2018 R1 SP2
- Microsoft Dynamics CRM 365 available as of Tenrox 2016 R1 SP10
- Microsoft Dynamics CRM 2016 Online available as of Tenrox 2016 R1
- Microsoft Dynamics CRM 2015 Online available as of Tenrox 2015 R2
- Microsoft Dynamics CRM 2015 Online available as of Tenrox 2015 R1
Setting Up the Server to Support Microsoft Dynamics CRM
Enabling Identity Framework
- Click the Turn Windows features on or off option.
- Select the check box for Windows Identity Framework 3.5 (this supports .NET 3.5 and 4.0 applications).
- Click OK and allow the setup to proceed.
If the above is not available to you, install from here: https://www.microsoft.com/en-us/download/details.aspx?id=17331
Setting Up Integration Between Tenrox and Microsoft Dynamics CRM
For integration purposes, Microsoft Dynamics CRM is the master and Tenrox the slave to ensure that only one set of data exists in both applications. For example, if changes are applied to an object in Microsoft Dynamics CRM that has already been imported into Tenrox, then Microsoft Dynamics CRM (master) perforMicrosoft the updates in Tenrox (slave) when the object is re-imported. However, if Tenrox Key Performance Indicators (KPIs) are associated to the Microsoft Dynamics CRM projects, then the KPIs are tracked in Tenrox and updated in Microsoft Dynamics CRM. For more information, see Mapping Tenrox KPIs to the Microsoft Dynamics CRM Fields.
Note: The master/slave model is a communication protocol that is used to define the primary application (master) that controls and updates the objects of the secondary application (slave).
The integration process between Tenrox and Microsoft Dynamics CRM consists of the following steps:
- Configuring the Tenrox CRM Integration Package.
- Setting Up the Connection to Microsoft Dynamics CRM.
- Mapping Objects Between Microsoft Dynamics CRM and Tenrox.
- Mapping Tenrox KPIs to the Microsoft Dynamics CRM Fields.
- Importing Users and Contacts from Microsoft Dynamics CRM into Tenrox.
- Setting up Automated (Batch) Processing.
- Exporting Projects from Microsoft Dynamics CRM into Tenrox.
Note: Only users with administrative rights Microsoft Dynamics CRM 5 or Online can perform the integration setup process.
Configuring the Tenrox CRM Integration Package
The Tenrox CRM Integration package is configured in the Microsoft Dynamics CRM environment to support integration with Tenrox. The configuration of the Tenrox CRM Integration package consists of the following steps:
Importing the Tenrox CRM Integration Package
The Tenrox CRM integration package maps the Microsoft Dynamics CRM objects to the Tenrox objects by customizing the projects, accounts, contacts and users upon import.
Note: Before importing the Tenrox CRM integration package into the Microsoft Dynamics CRM application, copy the ASP.NET Web pages in C:\Program Files (x86)\Tenrox\EnterpriseSoftware\CRM\Microsoft CRM 5.0\_Resources and paste them to the root folder of the IIS on the Microsoft Dynamics CRM server; typically, c:\inetpub\wwwroot\_resources or c:\Microsoftcrm5\wwwroot\_resources. If the ASP.NET Web pages cannot be found, please contact your Tenrox representative. The ASP.NET Web pages ensure that when a project is opened in Microsoft Dynamics CRM, the links work properly.
To import the Tenrox CRM integration package:
- Log on to Microsoft Dynamics CRM and then click Settings in the navigation pane.
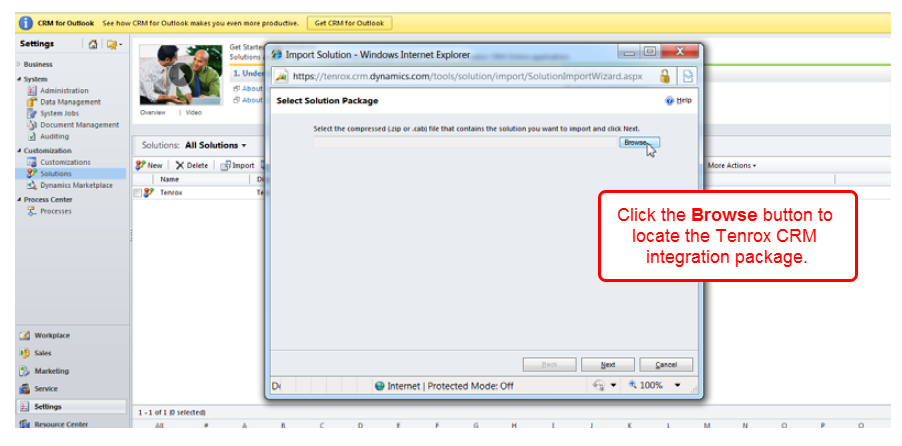
- Under Customization, click Solutions and then click the Import button to open the Import Solutions dialog box.
- Click the Browse button to locate the Tenrox CRM integration package and then click Next to process the files.Note: The Tenrox CRM integration package is located either on a local machine (CD/ DVD drive) or remote machine over the network. If the CRM integration package cannot be found, please contact your Tenrox representative.
- Click View solution package details to view a list of the components that were imported and then click Close.Note: If any of the components are not processed successfully, an error message is displayed.
- Click Next to import the customizations and then click Close to close the dialog box that displays whether the import process was successful or not.
- Click Publish All Customizations to simultaneously publish the customizations for the unpublished components.Note: The imported customizations must be published before they are available.
Customizing the Tenrox CRM Objects
After the customizations are imported into Microsoft Dynamics CRM, the account and project objects are modified to establish a connection between Microsoft Dynamics CRM and the Tenrox server.
To customize the Tenrox CRM objects:
- Log on to Microsoft Dynamics CRM and then click Settings in the navigation pane.
- Under Customization, click Customizations and then click the Customize the System link.
- Click Web resources in the navigation pane to display the objects imported by Tenrox.
- Click the Tenrox_Account_main.js and the Tenrox_Project_main.js links respectively to open the Web Resource dialog box for each of the selected objects.
- Click the Text Editor button to edit the Account_main and Tenrox_Project_main Web resources:
- Find the following line and replace <TenroxApplicationServer> with the Tenrox organization URL:
var sTenroxServerName = '<TenroxApplicationServer>'; // no http - Find the following line and replace <TenroxOrganizationName> with the Tenrox organization name:
var sTenroxOrganizationName = '<TenroxOrganizationName>'; - Find the following line and replace <CRMicrosofterver> with the CRM server name: var MicrosoftcrmURL = '<CRMicrosofterver>'; //no http Note: Tenrox recommends using the domain name to specify the server names. Also, the organization name is case sensitive and needs to match the initial entry.
- "For Hypertext Transfer Protocol Secure (HTTPS) connections, find the following strings in both javascript files and add the letter s to the http
- In Tenrox_Account_main javascript file
} else {
var sUserId = GetLoggedUserId(); if (crmForm.ObjectId != null) { sTenroxLink = "http://" + sTenroxServerName + "/tenterprise/Core/Base/LogonCRM.aspx?orgname=" + sTenroxOrganizationName + "&SFsessionid=" + sUserId + "&extapplication=Microsoftcrm" + "&OppId=" + crmForm.ObjectId.toString().replace('{', '').replace('}', '') +
"&OppName=" + sProjectName;
}- InTenrox_Project_main javascript file
if (Xrm.Page.data.entity.getId() != "") {
 iTenroxUniqueID = document.getElementById("new_troxuniqueid__c").value;  sProjectName = document.getElementById("tenrox_name").value;
sTenroxLink = "http://" + sTenroxServerName + "/tenterprise/Core/Base/LogonCRM.aspx?orgname=" + sTenroxOrganizationName + "&SFsessionid=" + sUserId + "&extapplication=Microsoftcrm" + "&OppId=" + Xrm.Page.data.entity.getId() + "&OppName=" + sProjectName;- Click OK to close the form editor and then click Save and Close to save the changes and close the Web Resource page for the selected object.
- Click the Save and Close button to save the changes and close the Web resources page.
- To Publish Tenrox_Account_main and Tenrox_Project_main, click on Publish All Customizations.
Setting Up the Connection to Microsoft Dynamics CRM
Before users can integrate with Microsoft Dynamics CRM, a connection must first be established between Microsoft Dynamics CRM and Tenrox. The connection to Microsoft Dynamics CRM is configured using the Tenrox application.
To set up the Microsoft Dynamics CRM connection:
- Log on to the Tenrox application.
- Click Setup>Organization>System and then click the CRM button to open the CRM Integration page.
- Select the appropriate CRM from the list whether Microsoft Dynamics CRM 5 or Microsoft Dynamics CRM Online and then click Save.
- Click the Options button to open the CRM Integration Options page.
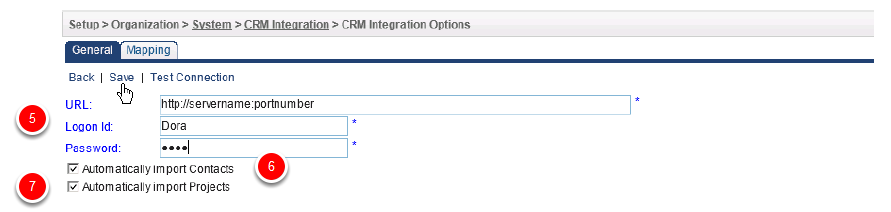
- Enter the URL of the server where Microsoft Dynamics CRM is installed, as well as the Logon ID and Password of the Microsoft Dynamics CRM user.Note: The URL format is http://servername:portnumber. The servername is the name or IP address of the Microsoft Dynamics CRM server and the portnumber is the Web service port number used by Microsoft Dynamics CRM.
- Select the Automatically import Contacts check box to automatically import a client's associated contacts for a project when the accounts are imported from Microsoft Dynamics CRM to Tenrox.
- Select the Automatically import Projects check box to automatically import all projects created in Microsoft Dynamics CRM to Tenrox.Note: If the Automatically import Contacts and the Automatically import Projects options are not selected, the contacts associated with the client and the projects created in Microsoft Dynamics CRM are not automatically imported to Tenrox when the CRM Users and Contacts Import and CRM Data Exchange services are running. For more information, see Setting up Automated (Batch) Processing.
- Click the Test Connection link to verify the connection between Tenrox and Microsoft Dynamics CRM.
- Click Save to save the changes.
- Click the Mapping tab to display a list of fields that can be mapped between the Microsoft Dynamics CRM and Tenrox; for more information, see section Mapping Objects Between Microsoft Dynamics CRM and Tenrox.
Setting Up User Integration Between Tenrox and Microsoft Dynamics CRM
To be able to publish from Microsoft Dynamics CRM to Tenrox, the Microsoft Dynamics CRM user must be imported to Tenrox first.
Steps to import Users to Tenrox:
- Log on to Microsoft Dynamics CRM and then click Settings in the navigation pane.
- Under System, click Administration and then click the Users link.
- Click New to create a new User or click on an existing user from the list to edit
- Fill all fields with valid values
- Locate the TenroxImportFlag option to define whether or not the selected user will be imported into Tenrox. Select Yes to import the user into Tenrox or No to not import the user into Tenrox.
- Click Save to save the user.
- Go to Tenrox and login as an administrator.
- Go to Tools tab, expand import menu, and choose CRM.
- Check the checkbox for Import Users; then, click on Import link.
Now the Microsoft Dynamics CRM user is ready to be used in publishing projects from CRM into Tenrox.
- Tenrox ID: displays a unique identifier for each user published to Tenrox; a unique identifier is created for each new user imported into Tenrox. Note: The unique identifier is created automatically in Tenrox and should never be modified in Microsoft Dynamics CRM since the identifier is used to map the user between Tenrox and Microsoft Dynamics CRM.
- TenroxImportFlag: defines whether a selected CRM user is imported into Tenrox. Note: The Tenrox ID and TenroxImportFlag can be dragged and dropped in any section of the form.
In case the Tenrox ID and TenroxImportFlag are not visible:
- Click the Customize tab
- Click Customize Entity
- Select forMicrosoft then the information form
- Drag and drop TenroxImportFlag and Tenrox ID in any section of the form
- Click Save then Publish.
Note: For Microsoft CRM Dynamics Online, users should be added to the CRM through Office365 administrator panel.
Mapping Objects Between Microsoft Dynamics CRM and Tenrox
The mapping of objects between Microsoft Dynamics CRM and Tenrox ensures that the information is transferred properly and reliably during the import and export processes. After the Microsoft Dynamics CRM connection is set up, the system automatically maps certain Microsoft Dynamics CRM and Tenrox fields by default.
Note: The preconfigured fields provided by the system can be customized and addition fields can also be configured. However, Key Performance Indicators (KPIs) are not mapped automatically and need to be manually configured. For more information, see section Mapping Tenrox KPIs to the Microsoft Dynamics CRM Fields.
Since the mapping of fields for all Microsoft Dynamics CRM and Tenrox objects is similar, the mapping of CRM Users to Tenrox Users example serves as a reference of how to define the fields for all other objects, including:
- CRM Accounts to Tenrox Clients
- CRM Contacts to Tenrox Contacts
- CRM Projects to Tenrox Projects
- Tenrox KPIs to CRM Projects; for more information, see Mapping Tenrox KPIs to the Microsoft Dynamics CRM Fields
Object Level Mapping Between Microsoft Dynamics CRM and Tenrox
| CRM IteMicrosoft | Tenrox IteMicrosoft |
|---|---|
| Users | Users |
| Accounts | Clients |
| Contacts | Contacts |
| Projects | Projects |
| Projects | Tenrox KPIs |
To map CRM Users to Tenrox Users:
- Log on to Tenrox.
- Click Setup>Organization>System and then click the CRM button to open the CRM Integration page.
- Click the Options button to open the CRM Integration Options page.Note: Ensure that the Microsoft Dynamics CRM connection is set up; for more information, see Setting Up the Connection to Microsoft Dynamics CRM.
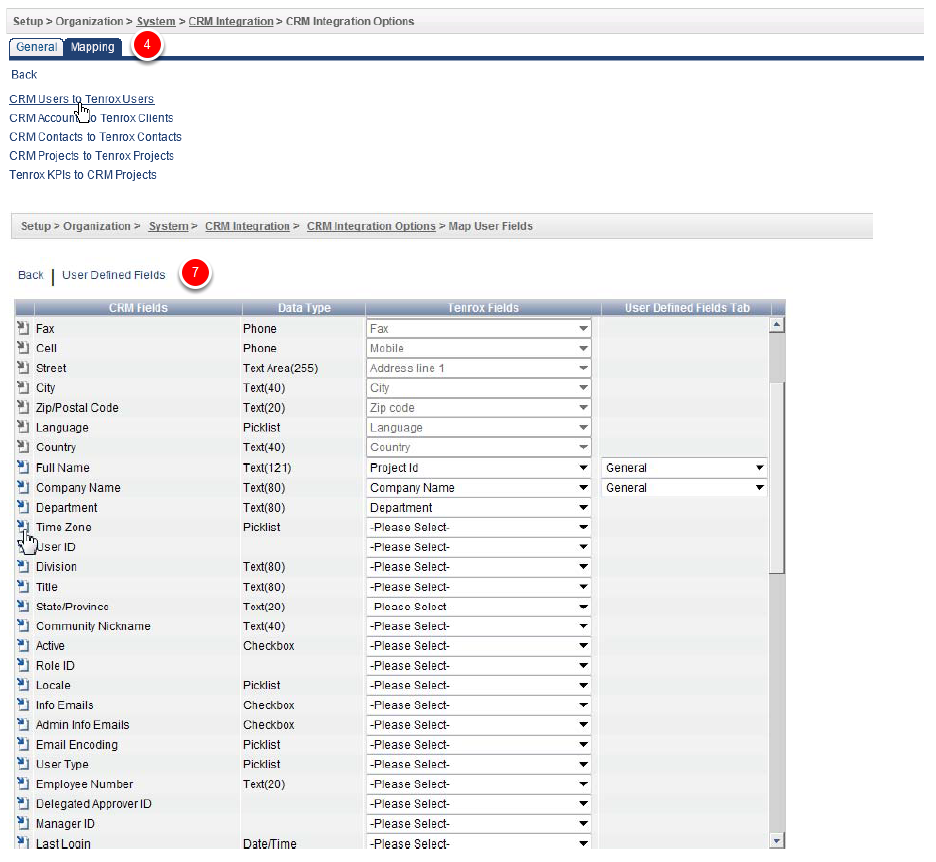
- Click the Mapping tab and then the CRM Users to Tenrox Users link to open the Map User Fields page. The Map User Fields page lists all the fields that can be imported to the Tenrox Users profile.
Mapping Objects Between Microsoft Dynamics CRM and Tenrox
- Click the Copy and Associate icon to create the user-defined fields in Tenrox and associate them to the Tenrox Users profile. Note: When the Copy and Associate icon is gray, the field exists in the Tenrox Users profile and is already mapped. When the Copy and Associate icon is blue, the entry does not exist in the Tenrox Users profile and is not mapped. If a user-defined field with the same name and type already exists in Tenrox, then the system automatically maps the imported CRM field to the existing user defined field.
- Verify that the appropriate Tenrox field is specified and assign a tab for each CRM field. For more information on mapping fields, see the table Object Level Mapping Between Microsoft Dynamics CRM and Tenrox.Note: The User Defined Fields Tab column displays the tab under which the CRM field appears. To verify that the field is displayed under the assigned tab, click Setup>Organization>Users and select a user from the list to open the User Edit page, then click the specified tab to view the field.
- Click the User Defined Fields link to map specific fields as user-defined fields, as well as view a list of all userdefined fields created under each tab for the users in Tenrox.
- Click the Save link to save the changes and then click the Back link.Note: A placeholder name can also be defined for the objects when mapping the CRM Accounts to Tenrox Clients and CRM Project to Tenrox Projects.
To add the Project object to Workplace in Microsoft CRM:
- Log on to Microsoft CRM.Note: The CRM User must be given the appropriate rights in order to access the pages and complete the steps below.
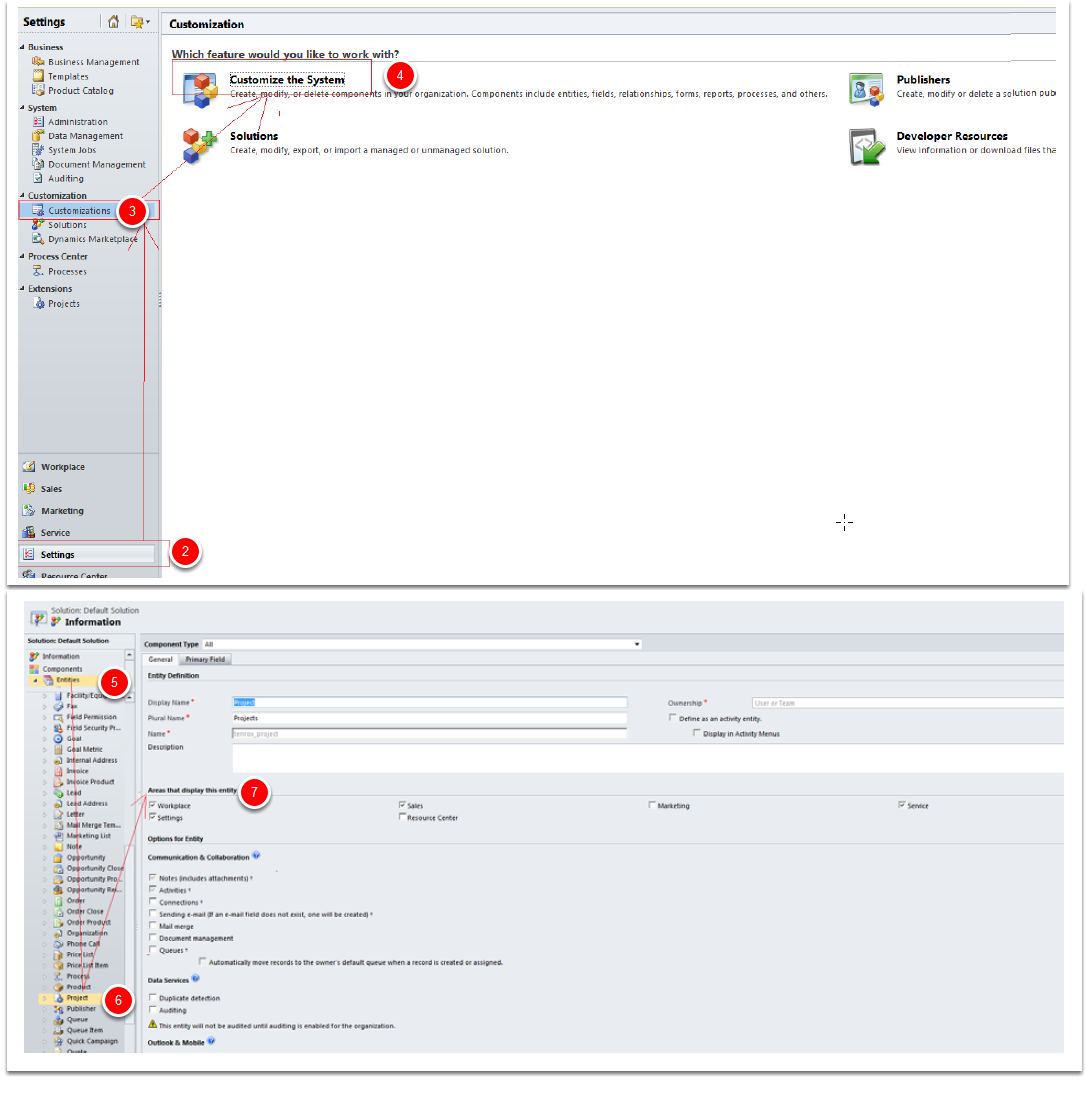
- Click Settings.
- Click Customizations to open the Customization page.
- Click Customize the System.
- Select and click Entities under Components.
- Select and click Project.
- Leaving the Component Type selection to All.
- On the General tab go to the Areas that display this entity.
- Click the Workplace option if it isn't already selected.
- Save the page and Publish.
Mapping Tenrox KPIs to the Microsoft Dynamics CRM Fields
Tenrox provides Key Performance Indicators (KPIs) to help companies monitor the efficiency of their projects and employees against operational targets. The Tenrox KPIs track and transfer specific project-related information from Tenrox to Microsoft Dynamics CRM using a set of KPI fields.
The KPI fields are created as custom fields in Microsoft Dynamics CRM and then associated to the projects; for information on creating custom fields, refer the Microsoft Dynamic CRM user guide. After the Tenrox KPI fields are created and associated, the KPI fields are mapped to the Tenrox project fields.
Note: Since all updates to the KPI fields originate in Tenrox, Tenrox is the primary application (master).
The information between Microsoft Dynamics CRM and Tenrox is synchronized through the Automation Processing options; for more information, see Setting up Automated (Batch) Processing.
To map the Tenrox KPIs to Microsoft Dynamics CRM fields
- Log on to Tenrox.
- Click Setup>Organization>System and then click the CRM button to open the CRM Integration page.
- Click the Options button to open the CRM Integration Options page.Note: Ensure that the Microsoft Dynamics CRM connection is set up; for more information, see Setting Up the Connection to Microsoft Dynamics CRM.
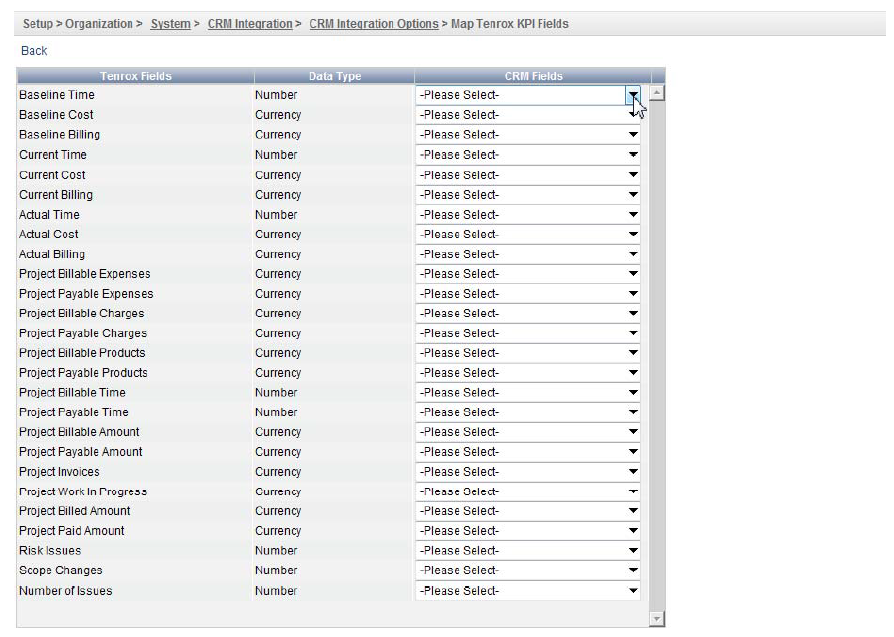
- Click the Mapping tab and then click the Tenrox KPIs to CRM Projects link to open the Map Tenrox KPI Fields page that lists all the Tenrox project fields that can be associated to the Tenrox KPI fields created in the Microsoft Dynamics CRM application.
- Select the corresponding Microsoft Dynamics CRM field from the CRM Fields list for each of the Tenrox KPI fields that you want to map. The CRM Fields lists are filtered based on the data type of the corresponding Tenrox field. Note: Only the Tenrox KPI fields created in Microsoft Dynamics CRM are displayed in the CRM Fields lists. Therefore, Tenrox KPI fields that are not created in Microsoft Dynamics CRM, do not display in the CRM Fields lists.
- Click the Back link when the mapping of the fields between the Tenrox and Microsoft Dynamics CRM is completed. After the fields are mapped, the information is transferred to Microsoft Dynamics CRM projects when automation processing is scheduled to run.
Importing Users and Contacts from Microsoft Dynamics CRM into Tenrox
The users and contacts are imported from Microsoft Dynamics CRM into Tenrox from the Tools menu.
Note: If Microsoft Dynamics CRM contacts are not associated to any Microsoft Dynamics CRM accounts already imported to Tenrox, then they are not imported.
To import users and contacts to Tenrox:

- Click Tools>Import>CRM.
- Under Import List Selection, select the Users and Contacts check boxes to import the users and contacts respectively from Microsoft Dynamics CRM into Tenrox.
- Click the Import using service or the Import link to start the import process. During the import process, only the CRM contacts associated to already imported CRM accounts are imported.Note: The Import using service option allows users to move to other pages while the import process is in progress. The Import option forces an immediate import and does not allow users to move to other pages while the import process is in progress.
- When using the Import service, the operation can be cancelled by clicking on Cancel Service Import.Note: An import using the Import link cannot be cancelled once it is started.
- Click the Logs link to display the following information:
- CRM Object: type of object imported from Microsoft Dynamics CRM
- ID: Id of object imported from Microsoft Dynamics CRM
- Imp/Exp: type of activity performed, options include Import or Export
- Results: type, name and error messages of the object created in Tenrox
- Date/Time: date of import
- Source: name of the user who performed the import from Tenrox or Automation Service in the case of automated operation having been done. Note: To delete all message logs, click the Clear Logs link and then click the Back link to return to Import List Selection page.
- Click Setup>Work>Clients and a client from the list to open the Client Edit page, then click the Contacts button to open the Contact List page that displays a list of the imported contacts.
- Click Setup>Organization>Users to open the Users page that displays a list of the imported users. By default, the Standard User security profile is assigned to all users imported from Microsoft Dynamics CRM.Note: In the case of importing, a placeholder name can be defined for the objects when mapping the CRM Accounts to Tenrox Clients and CRM Project to Tenrox Projects.
Setting up Automated (Batch) Processing
The Microsoft Dynamics CRM automation processing options are used to automatically update information between Microsoft Dynamics CRM and Tenrox. Setting up automated processing for Microsoft Dynamics CRM and Tenrox integration ensures that the information is synchronized in both systeMicrosoft.
Note: If information updated directly in Tenrox differs from the information in Microsoft Dynamics CRM, then it is overwritten on the next import from Microsoft Dynamics CRM. To transfer project-related information from Tenrox to Microsoft Dynamics CRM, the Tenrox KPI fields are associated to the projects in Microsoft Dynamics CRM; for more information, see Mapping Tenrox KPIs to the Microsoft Dynamics CRM Fields.
From the Automation Processing Options page, the following CRM services can be automated:
- CRM Data Exchange: updates the information of projects, users and contact data, as well as imports projects, from Microsoft Dynamics CRM to Tenrox and updates KPIs from Tenrox to Microsoft Dynamics CRM
- CRM Users and Contacts Import: imports and updates the information of users and contacts from Microsoft Dynamics CRM to Tenrox
Note: To automate the processing of the CRM Users and Contacts Import and CRM Data Exchange services, ensure that the Automatically import Contacts and the Automatically import Projects check boxes are selected; for more information, see Setting Up the Connection to Microsoft Dynamics CRM.
To set up automated processing for Microsoft Dynamics CRM and Tenrox integration:
 integration:" />
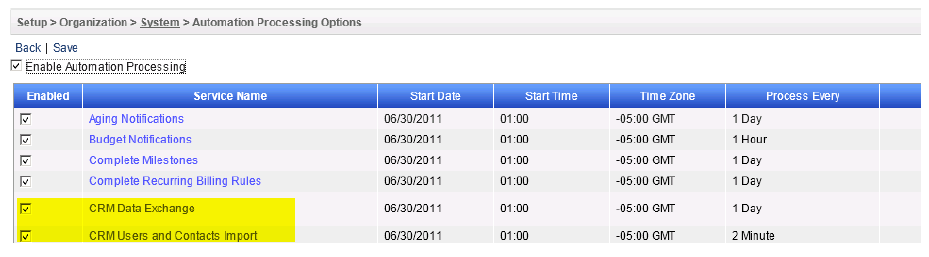
- Click Setup>Organization>System and then click the Automation button to open the Automation Processing Options page.
- Click the Enable Automation Processing check box to enable the automatic processing feature.
- Click the CRM Data Exchange and CRM Users and Contacts Import check boxes to enable the services or click each service to open the Automation Service Setup page to edit the following:
- Start Date: start date of processing; set by default to the date when batch service was initialized
- Start Time: time the service starts the processing; set by default to 01:00
- End Date: end date of the processing; set by default to Open Ended
- End Time: time the service stopped the processing; set by default to 23:59
- Time Zone: time zone of the processing time; set by default to the server time zone
- Process Every: frequency service is processed (Minute/ Hour/ Day/ Week/ Month/ Year); set by default to one day
- Last Process: date and time of the last automated background process
- Status: status of the process (successful or unsuccessful)
- Enable Service: indicates if the service is enabled or disabled
- Description: description of the process
- Click the Save link to save the changes and then the Back link to return to the Automation Processing Options page.
- Click the Save link to save the changes and then the Back link to return to the System page.
Exporting Projects from Microsoft Dynamics CRM into Tenrox
When exporting projects from Microsoft Dynamics CRM, the associated accounts and users are automatically exported to Tenrox. The associated contacts for the corresponding accounts can also be exported as long as the Import Contacts option is selected; for more information, see Setting Up the Connection to Microsoft Dynamics CRM.
Before exporting projects from Microsoft Dynamics CRM into Tenrox, the projects are associated to the Microsoft Dynamics CRM accounts. For more information on accounts, as well as viewing the reports, see the following:
To export projects from Microsoft Dynamics CRM into Tenrox:
- Log on to Microsoft Dynamics CRM.
- Under workplace panel, select projects.
- Click New.
- Fill all fields with valid values.
- Save the Project.
- Click Publish to Tenrox button.
The Tenrox Project page opens with the published project displayed.
Working with Microsoft Dynamics CRM Accounts in Tenrox
When Microsoft Dynamics CRM projects are exported into Tenrox, their associated accounts are automatically exported, and accounts are not exported independently without being associated to Projects. The following rules apply when exporting Microsoft Dynamics CRM accounts to Tenrox:
- If an account is deleted in Microsoft Dynamics CRM that has associated entries in Tenrox or not, then it will not be deleted in Tenrox.
Note: This rule also applies to exported projects, users, and contacts.