Creating Custom RDLC Reports in Tenrox
This section provides the instruction for creating the custom RDLC reports in Tenrox. The creation of the RDLC reports consists of the following steps:
Verifying the Server Requirements
The following are the minimum server requirements for creating the custom RDLC reports in Tenrox:
- Microsoft SQL Server 2005 or 2008
- Microsoft Visual Studio 2008
Deprecated as of: Tenrox 2011 R3, Microsoft SQL Server 2005 support.
Designing the SQL Queries
This procedure describes how to design an SQL query in SQL Server Management Studio.
To design an SQL query:
- Launch SQL Server Management Studio and connect to the Tenrox server.
- Right-click the Tenrox database and then click New Query.
- Create the SQL query to be used by the reports. The following is an example of an SQL query that returns a list of projects, the tasks that time is tracked against, as well as the users who track the time, and the total time tracked.
Note: To become familiar with the database structure, refer to the Tenrox data model diagram. Since the Tenrox data model diagram is release specific; contact your Tenrox representative to obtain a copy of the Tenrox Data Model diagram for your software release.
Creating the Stored Procedures in the Database
The queries used in the custom RDLC reports must be included in the stored procedures. This procedure describes how to create a stored procedure in SQL Server Management Studio.
To create a new stored procedure in the database:
- Launch SQL Server Management Studio and connect to the server.
- Create a new query for the database that you want to add the stored procedure to.
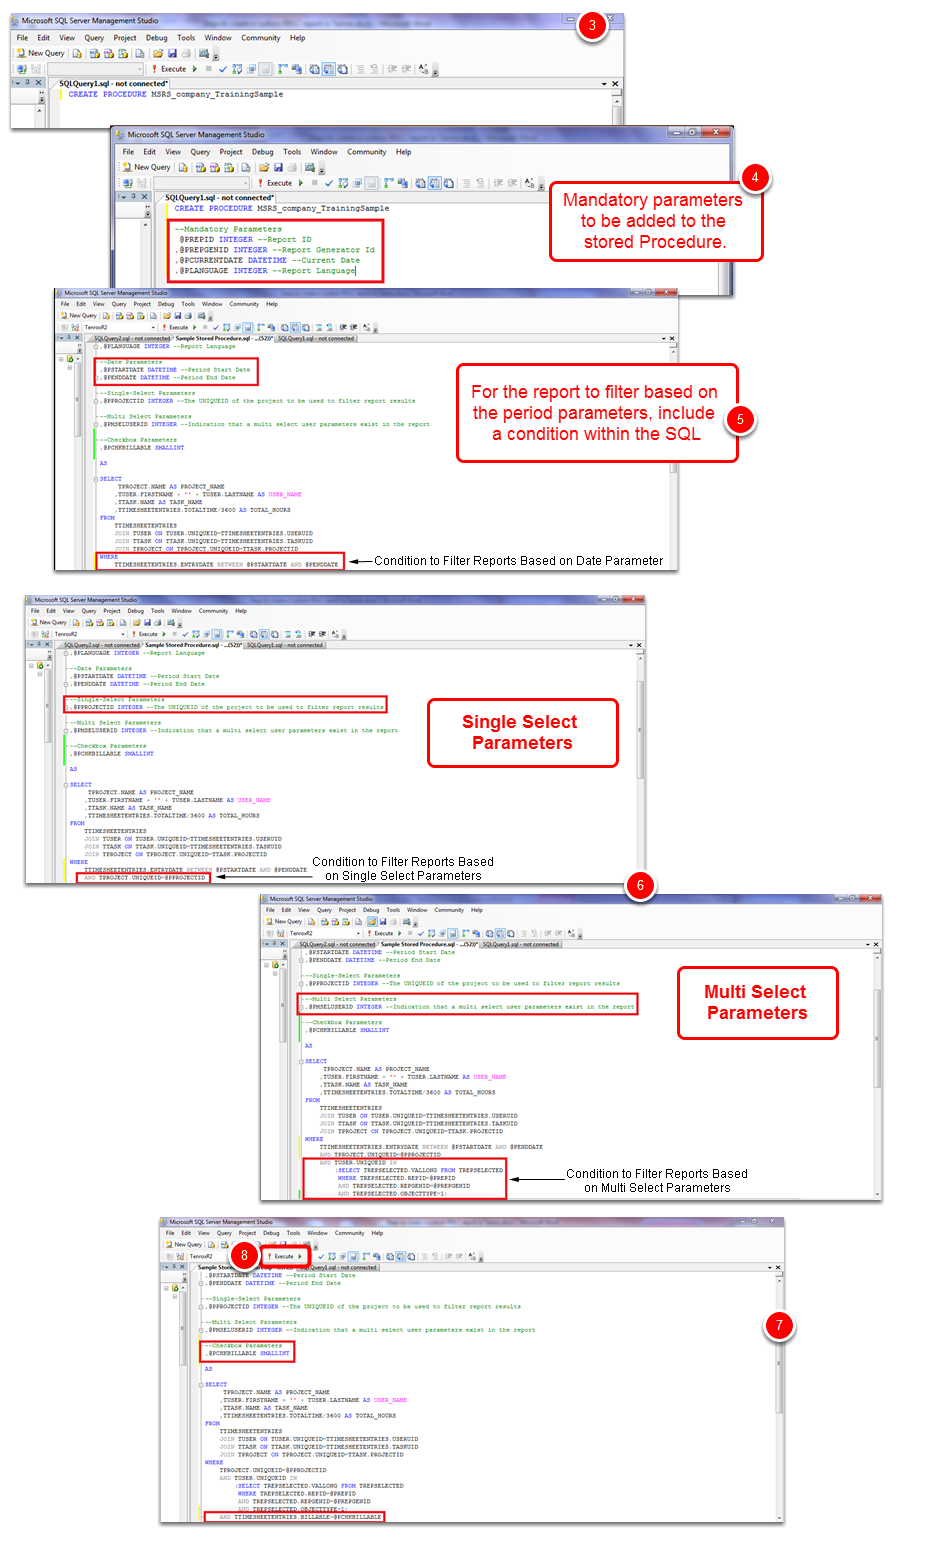
- Use the CREATE PROCEDURE statement to create a new stored procedure. Note: The stored procedures used by the out-of-box reports by default use MSRS_procedure name as the naming convention; therefore, a similar naming convention that also includes the company name is recommended, for example, MSRS_company name_procedure name.
- Add the following mandatory parameters to the stored procedure; otherwise, the reports will not work:
- PREPID: parameter type = integer that represents the id of the user running the report
- PREPGENID: parameter type = integer that represents the id of the report
- PCURRENTDATE: parameter is type = date that represents the date of the report generation
- PLANGUAGE: parameter type = integer that represents the language used for the report
- Add the following date parameters to the stored procedures when a date or period range is required in the report:
- PSTARTDATE: parameter type = date that represents the start date of a period
- PENDDATE: parameter type = date that represents the end date of a period. Note: For the report to filter based on the period parameters, include a condition within the SQL.
- Use either the single select or multi-select filter parameters to filter the reports according to the specified criteria.
Note: For the report to filter based on the included single select or multi-select filter parameters, add a condition within the SQL.
- Single Select Parameters: a single value is selected by the defined filter; for example, a project or a client
- Multi Select Parameters: multiple values are selected by the defined filter; for example, multiple or clients or users
- TUSER.UNIQUEID IN: do not use the "=" operand since multiple records are returned
- (SELECT TREPSELECTED.VALLONG FROM TREPSELECTED: table TREPSELECTED holds the UNIQUEIDs of all selected values for the parameters in the report (in this example users) and the UNIQUEIDs are stored in the VALLONG column
- WHERE TREPSELECTED.REPID=@PREPID: return only matching records selected for this particular report (as the TREPSELECTED table holds the selected values of all the multi-select parameters for all the reports in Tenrox)
- AND TREPSELECTED.REPGENID=@PREPGENID: return only matching records selected by the user generating the report (as the TREPSELECTED table holds selected values by the user generating the report for all the multi-select parameters)
- AND TREPSELECTED.OBJECTTYPE=1): each object, such as user, project, client and task, in Tenrox has a code; in this example the id for the user object is 1, this condition is required since several multiselect parameters can exist in the same report and only the records selected for the particular type of parameter (object) need to be compared. Note: The values selected for a particular multi-select parameter are stored in the TREPSELECTED table. For a list of the available single select and multi-select parameters, as well as objects and codes, see the Viewing the Tenrox Parameter.
- Add the check box parameter to filter report results by a parameter with a true or false value. The name of the check box parameter must include the prefix PCHK; for example, PCHKBILLABLE, and the parameter type SMALLINT (small integer).Note: The check box parameter PCHKBILLABLE example is used to filter the query results to only display the billable time.
- Click Execute to create the stored procedure as an object in the Tenrox database after adding the required parameters to the stored procedure.
Designing RDLC Reports in Visual Studio
This procedure describes how to design the RDLC reports in Microsoft Visual Studio 2008. The design of the RDLC reports consists of the following steps:
- Creating Report Applications
- Setting up the Connection to the Tenrox Database
- Linking Reports to Stored Procedures Using Dataset Objects
- Designing and Formatting the RDLC Reports
- Defining the Stored Procedure Parameters in the Reports
Creating Report Applications
This procedures describes how to create a new RDLC report in Microsoft Visual Studio 2008.
To create a report application:
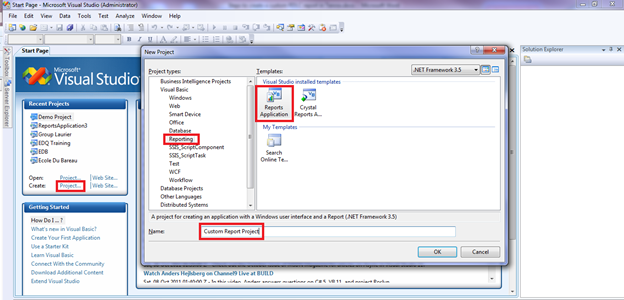
- Launch Microsoft Visual Studio 2008 and then click the Create Project link on the Start Page to create a new project.
Note: The Start Page is displayed by default when Microsoft Visual Studio 2008 is launched. If the Start Page does not display, from the File menu, click New>Project to display the New Project dialog box. - Under Project types, click Reporting and then the Reports Application template.
- Enter a name for the new project and then click OK.
Note: Click Cancel if prompted to use the Visual Studio application wizard to create the report since reports created using the Visual Studio wizard do not work properly in Tenrox.
Setting up the Connection to the Tenrox Database
To access the stored procedure, a connection must first be established to the Tenrox database. The connection to the Tenrox database is set up using the Server Explorer tool in Visual Studio.
To set up a database connection:
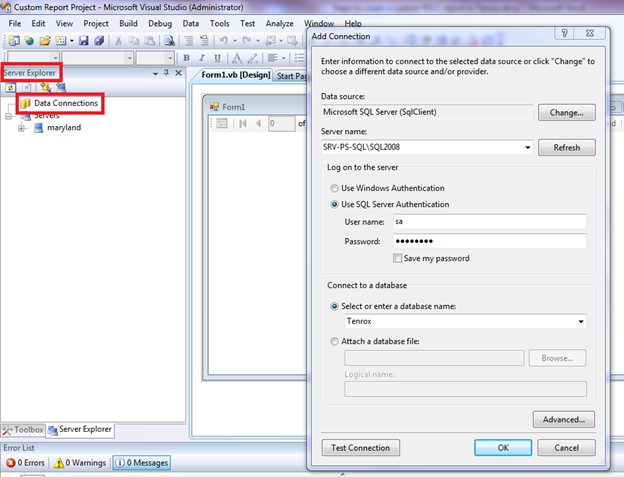
- From the View menu, click Server Explorer.
- In Server Explorer, right-click Data Connections and then click Add Connection to open the Add Connection dialog box.
- In the Server name box, select or type the name and instance of the SQL server instance to connect to.
- Under Log on to the server, select either Windows or SQL server authentication mode depending on your network configuration; for more information, contact your network administrator.
- Under Connect to a database, select or type the name of the Tenrox database where the stored procedure is hosted
- Click the Test Connection button to verify the connection.
- Click the OK button to save the connection setup.
Linking Reports to Stored Procedures Using Dataset Objects
To create a link to the stored procedure, a dataset object is required. The dataset object is created using the Solution Explorer tool in Visual Studio.
Note: The datasets are objects that contain data tables where you can temporarily store the data for use in your applications. If your application requires working with data, the data can be loaded into a dataset to provide your application with a local in-memory cache of the data to work with.
To create a dataset object:
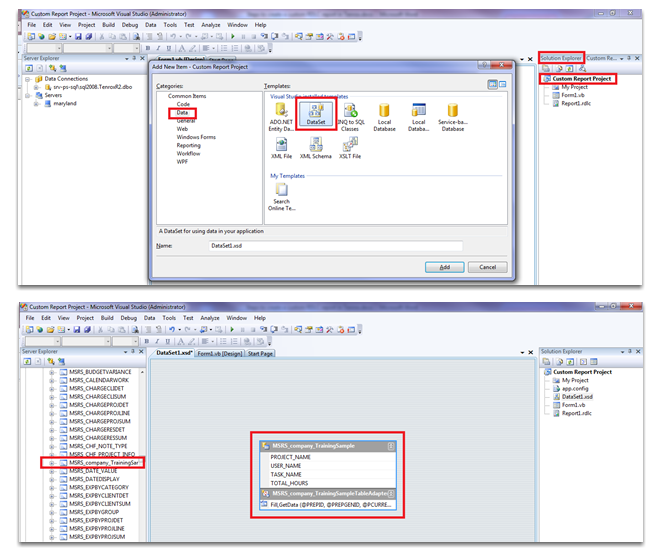
- From the View menu, click Solution Explorer.
- In Solution Explorer, right-click a project name and then click Add>New Item.
- Under Categories, click Data and then the DataSet template.
- Click the Add button to add the dataset to the project.
- In Server Explorer, expand the created connection and then locate the required stored procedure in the Stored Procedure folder.
- Drag and drop the stored procedure into the created dataset object.
Designing and Formatting the RDLC Reports
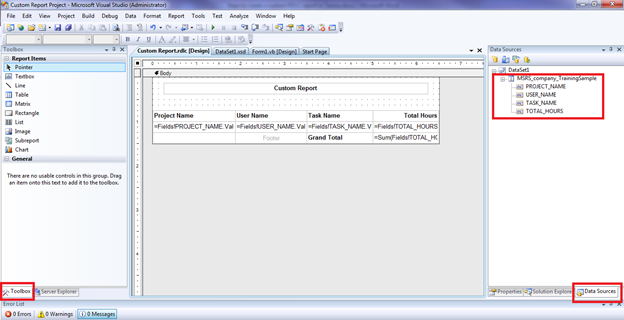
The custom reports are designed and formatted using the Visual Studio report controls available from the Toolbox tab.
To design and format the RDLC reports:
- From the View menu, click Toolbox to display the report controls.
- From the Data menu, click Show Data Sources to display the Data Sources pane.
- In Data Source pane, use the dataset object created to access the query columns of the stored procedure.
- Drag and drop the report controls in the Toolbox to design and format the custom report.
Defining the Stored Procedure Parameters in the Reports
All the parameters defined in the stored procedures used by the RDLC reports must also be defined in the reports.
To add the store procedure parameters to a report:
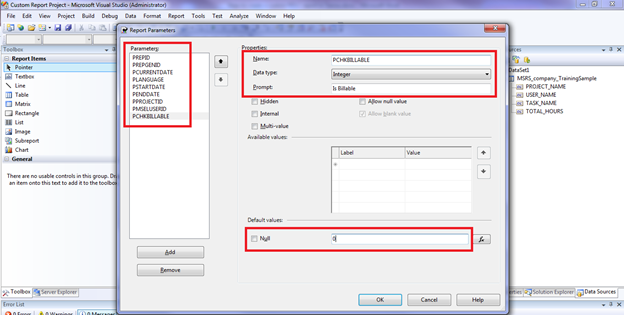
- From the Report menu, click Report Parameters to view the list of report parameters.
- Click the Add button to create a new report parameter and then set the following for the new report parameter:
- Name: type the name of the parameter; the spelling must match exactly to the corresponding parameter defined in the stored procedure; for more information, see Creating the Stored Procedures in the Database
- Data type: select the parameter type from the list
- If Integer or SMALLINT is defined as the parameter type in the stored procedure, then select Integer as the data type
- If the date is defined as the parameter type in the stored procedure, then select DateTime as the data type
- Prompt: type the name of the parameter shown on the report interface
- Default values: set a default value for all the parameters:
- If Integer or SMALLINT is defined as the parameter type in the stored procedure, then enter 0 as the value
- If the date is defined as the parameter type in the stored procedure, then enter any date in the format MM/DD/YYYY
- Click the OK button after all the parameters for the stored procedure are defined in the report.
Creating New Reports in Tenrox
To run a custom RDLC report in Tenrox, the RDLC file needs to be uploaded and linked to a new report in the Tenrox.
The creation of the new reports in Tenrox consists of the following steps.
- Uploading the RDLC Files to Tenrox
- Generating the Reports
Uploading the RDLC Files to Tenrox
The RDLC file is to be uploaded and linked to a new report in the Tenrox from the Reports portal.
To upload the RDLC file to Tenrox:
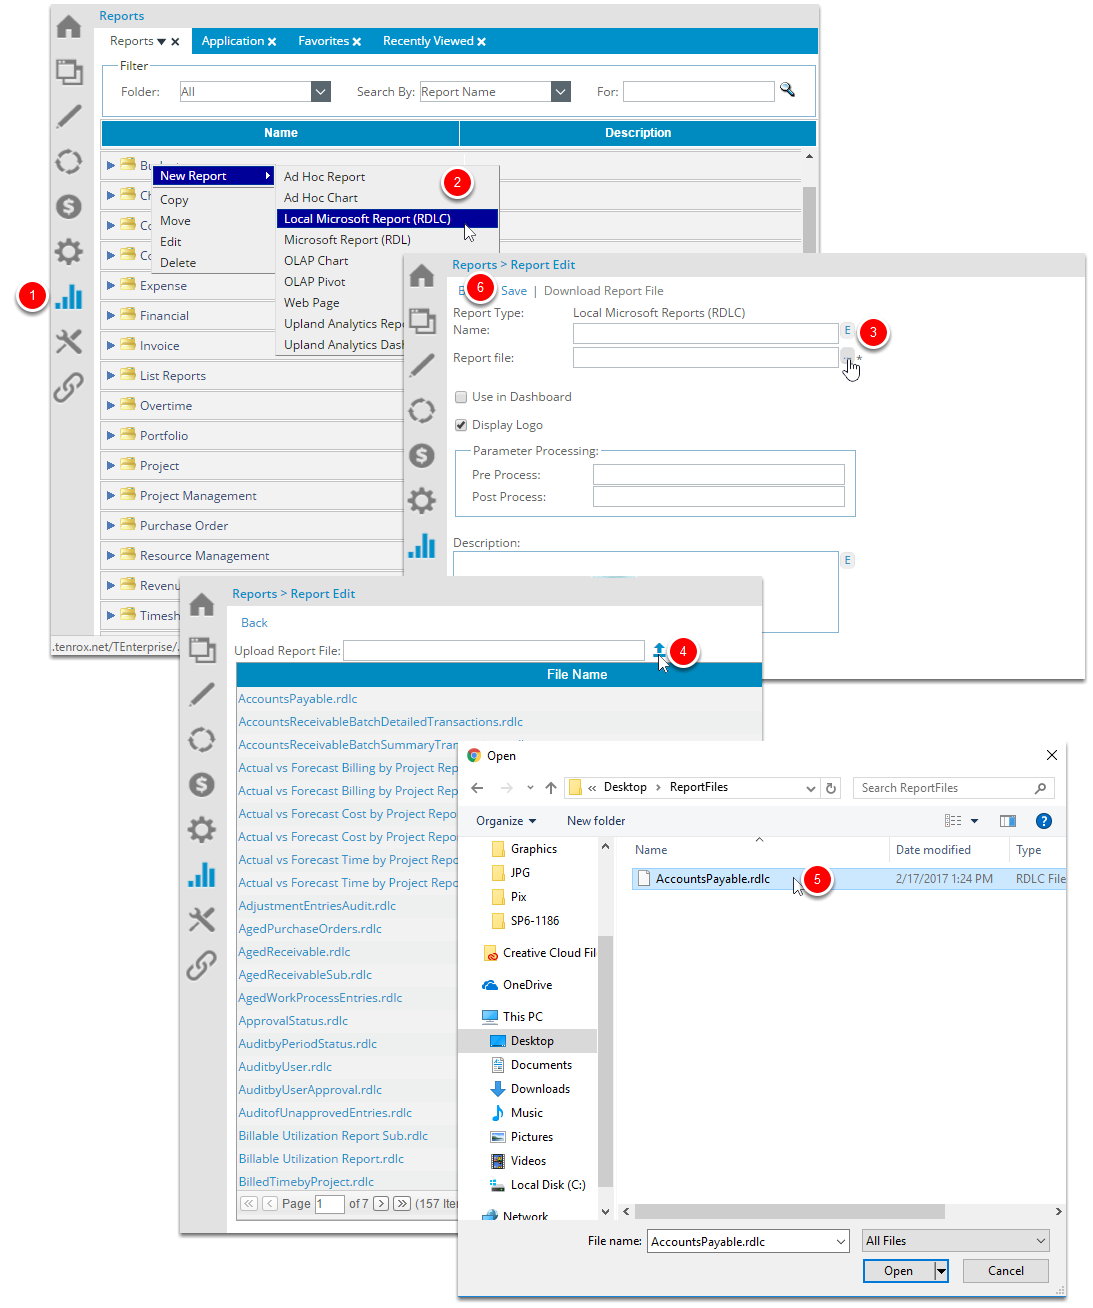
- Launch the Tenrox application and then click the Reports menu.
- Right-click the folder that will contain the report and then click New Report>Local Microsoft Report (RDLC) to create the custom report.
- Enter the name of the custom report in the Name box and the click on the Report file browse button (...) to open the Report Edit page.
- Click the Report Upload File browse button to upload a report and then
- Select the report File and then click Open.
- Click the Save link to save the file.
Note: The RDLC report is re-uploaded to Tenrox every time an RDLC file is modified in Visual Studio. When uploading an RDLC file that already exists, Tenrox overrides the previous version of the report.The same report created in Tenrox can be used to re-upload the RDLC file. A new report does not need to be created from the Reports page every time an RDLC report is modified.
Available as of Tenrox 2011 R2, previous versions of reports are not overridden when existing RDLC files are uploaded to Tenrox.
Generating the Reports
The created reports are generated from the Tenrox Reports portal.
To generate a report:
- Launch the Tenrox application and then click the Reports from the menu bar to display a list of all the reports.
- Expand the folder that contains the created report and then click the report name to run the report.
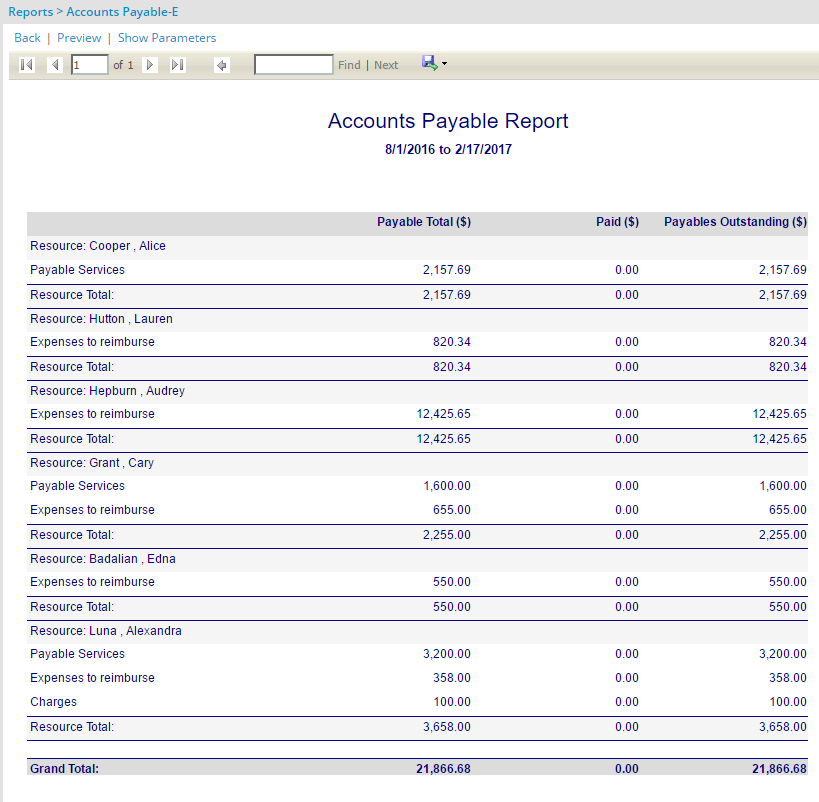
- Set the parameters for the selected report and then click the Preview link to generate the report.
Viewing the Tenrox Parameters
The available single select and multi-select parameters, as well as objects and codes, are listed in the tables Single Select Parameters and Multi-Select Parameters respectively.
Single Select Parameters
| Parameter Name | Description | Object ID |
|---|---|---|
WORKFLOWID
|
Single Select Workflow | 0 |
USERID
|
Single Select User | 1 |
PROJECTID
|
Single Select Project | 2 |
PURWKFLOWID
|
Single Select Purchasing Workflow | 3 |
CLIENTID
|
Single Select Client | 9 |
TASKID
|
Single Select Task | 10 |
PURITEMID
|
Single Select Purchase Item | 19 |
COMPONENTID
|
Single Select Component | 22 |
PRIORITY
|
Single Select Priority | 23 |
CREATORID
|
Single Select User | 25 |
ORIGINATORID
|
Single Select User | 26 |
TEAMID
|
Single Select Team | 27 |
TITLEID
|
Single Select Title | 28 |
GROUPID
|
Single Select Group | 29 |
ROLEID
|
Single Select Role | 30 |
SUPPLIERID
|
Single Select Supplier | 42 |
EXPITEMID
|
Single Select Expense Item | 47 |
SITEID
|
Single Select Site | 48 |
WORKTYPEID
|
Single Select Work type | 49 |
CONTACTID
|
Single Select Contact | 50 |
EXPWKFLOWID
|
Single Select Expense Workflow | 64 |
PORTFOLIOID
|
Single Select Portfolio | 68 |
WKFLOWROLE
|
Single Select Workflow Role | 69 |
PURROLEID
|
Single Select Purchasing Role | 70 |
BUSUNITID
|
Single Select Business Unit | 71 |
PHASEID
|
Single Select Phase | 72 |
WKFLWKFLOWMAPID
|
Single Select workflow Map | 76 |
PURWKFLOWMAPID
|
Single Select purchasing workflow Map | 77 |
EXPWKFLOWMAPID
|
Single Select expense workflow Map | 78 |
CHARGEID
|
Single Select Charge | 91 |
SKILLID
|
Single Select Skill | 92 |
PROFICIENCYID
|
Single Select Proficiency | 94 |
TSWKFLOWMAPID
|
Single Select timesheet workflow Map | 95 |
TSWKFLOWID
|
Single Select Timesheet Workflow | 96 |
RESTYPEID
|
Single Select Resource Type | 97 |
TAXGROUPID
|
Single Select Tax Group | 99 |
ACCOUNTID
|
Single Select Account | 107 |
SHIFTID
|
Single Select Shift | 112 |
PURTXGRPID
|
Single Select Purchasing Tax Group | 113 |
SALESTXGRPID
|
Single Select Sales Tax Group | 114 |
COSTRULEID
|
Single Select Cost Rule | 115 |
INVWKFLOWMAPID
|
Single Select Invoice workflow Map | 116 |
TAXDETAILID
|
Single Select Tax Details | 117 |
BILLRULEID
|
Single Select Billing Rule | 118 |
Multi-Select Parameters
| Parameter Name | Description | Object ID |
|---|---|---|
MSELTASKID
|
Multi Select Task | 10 |
MSELWORKFLOWID
|
Multi Select Workflow | 0 |
MSELUSERID
|
Multi Select User | 1 |
MSELPROJECTID
|
Multi Select Project | 2 |
MSELPURWKFLOWID
|
Multi Select Purchasing Workflow | 3 |
MSELCLIENTID
|
Multi Select Client | 9 |
MSELPURITEMID
|
Multi Select Purchase Item | 19 |
MSELCOMPONENTID
|
Multi Select Component | 22 |
MSELTEAMID
|
Multi Select Team | 27 |
MSELTITLEID
|
Multi Select Title | 28 |
MSELGROUPID
|
Multi Select Group | 29 |
MSELSUPPLIERID
|
Multi Select Supplier | 42 |
MSELEXPITEMID
|
Multi Select Expense Item | 47 |
MSELSITEID
|
Multi Select Site | 48 |
MSELWORKTYPEID
|
Multi Select Work type | 49 |
MSELEXPWKFLOWID
|
Multi Select Expense Workflow | 64 |
MSELPORTFOLIOID
|
Multi Select Portfolio | 68 |
MSELWKFLOWROLE
|
Multi Select Workflow Role | 69 |
MSELBUSUNITID
|
Multi Select Business Unit | 71 |
MSELWKFLWKFLOWMAPID
|
Multi Select workflow Map | 76 |
MSELPURWKFLOWMAPID
|
Multi Select Purchasing workflow Map | 77 |
MSELEXPWKFLOWMAPID
|
Multi Select Expense workflow Map | 78 |
MSELCHARGEID
|
Multi Select Charge | 91 |
MSELSKILLID
|
Multi Select Skill | 92 |
MSELTSWKFLOWMAPID
|
Multi Select Timesheet workflow Map | 95 |
MSELTSWKFLOWID
|
Multi Select Timesheet Workflow | 96 |
MSELINVWKFLOWMAPID
|
Multi Select Invoice workflow Map | 116 |

