Create or Edit a Function
Upland Analytics allows you to define your own powerful formulas to meet your specific reporting requirements. If there is a need to perform some calculations or to add specialized data in the report, you can use functions.
A number of options are available to you when choosing the Function Type. This topic details each of the available Conditions with examples.
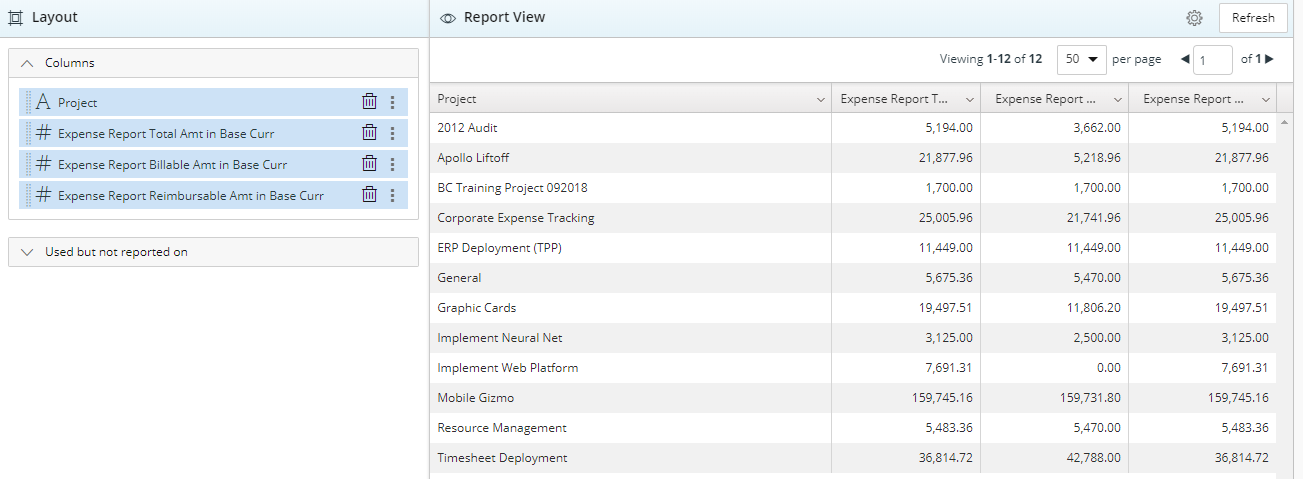
- For the purpose of this article a sample report is being used to demonstrate each addiction of the Custom fields.
1. Average
The Average condition returns the average of the Measure selected within the Apply condition over option.
Average is calculated by adding a group of numbers and then dividing by the count of those numbers.
Creating an Average Function
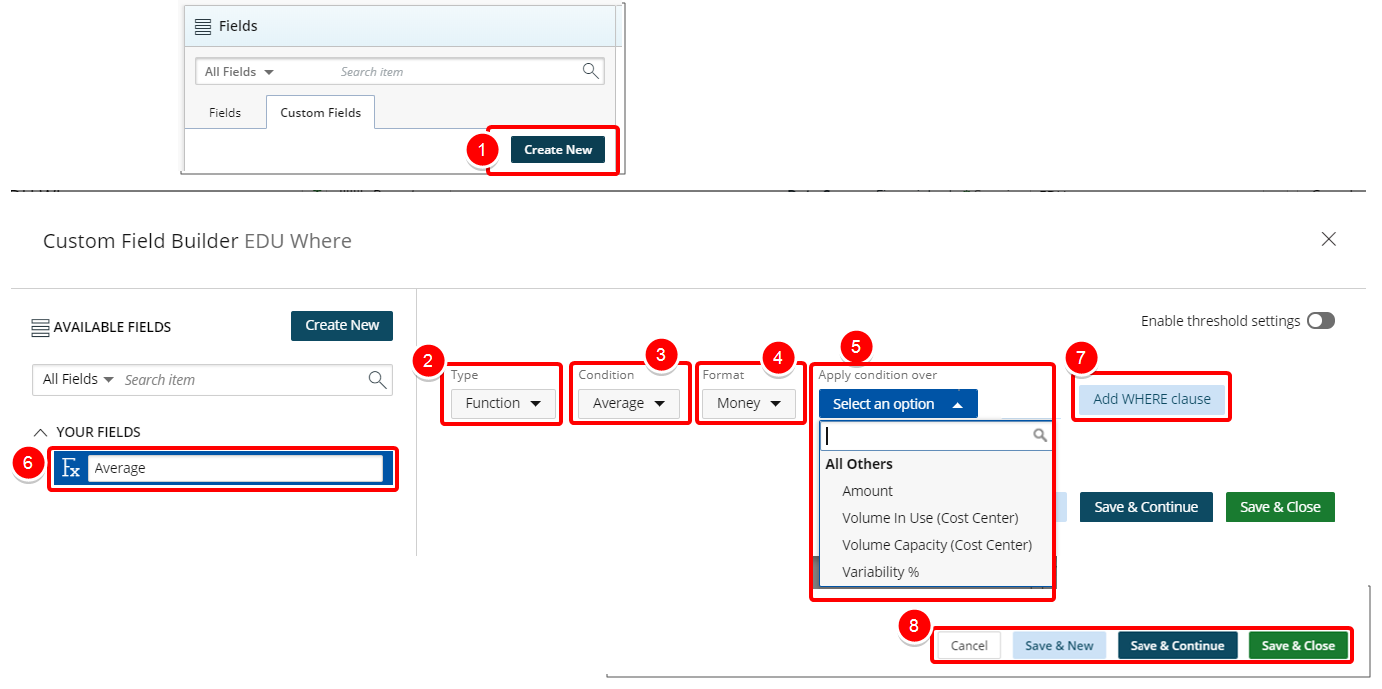
- Click Create New from the Custom Fields tab.
- In the Custom Field Builder dialog box click Type and select Function.
- Click Condition and select Average from the available options.
- Click Format and select from the following options: Integer, Decimal or Money.
- Click Apply condition over then search and select the Measure over which you wish to apply the Condition.
- Type the name of the Custom Field in the Custom Field Name box.
- Click Add Where Clause to apply a WHERE clause. For more information, see Add a Where Clause Function Custom Field.
- Click one of the following:
- Cancel to return the previous page.
- Save & New to save the Custom Field and create a new one.
- Save & Continue to save the Custom Field and continue working on it. This is useful when working on a large formula or function.
- Save & Close to save the Custom Field and then close the Custom Field Builder. You will be redirected to the Report Editor screen where the newly created Custom Field(s) can be used in a report.
View Your Changes
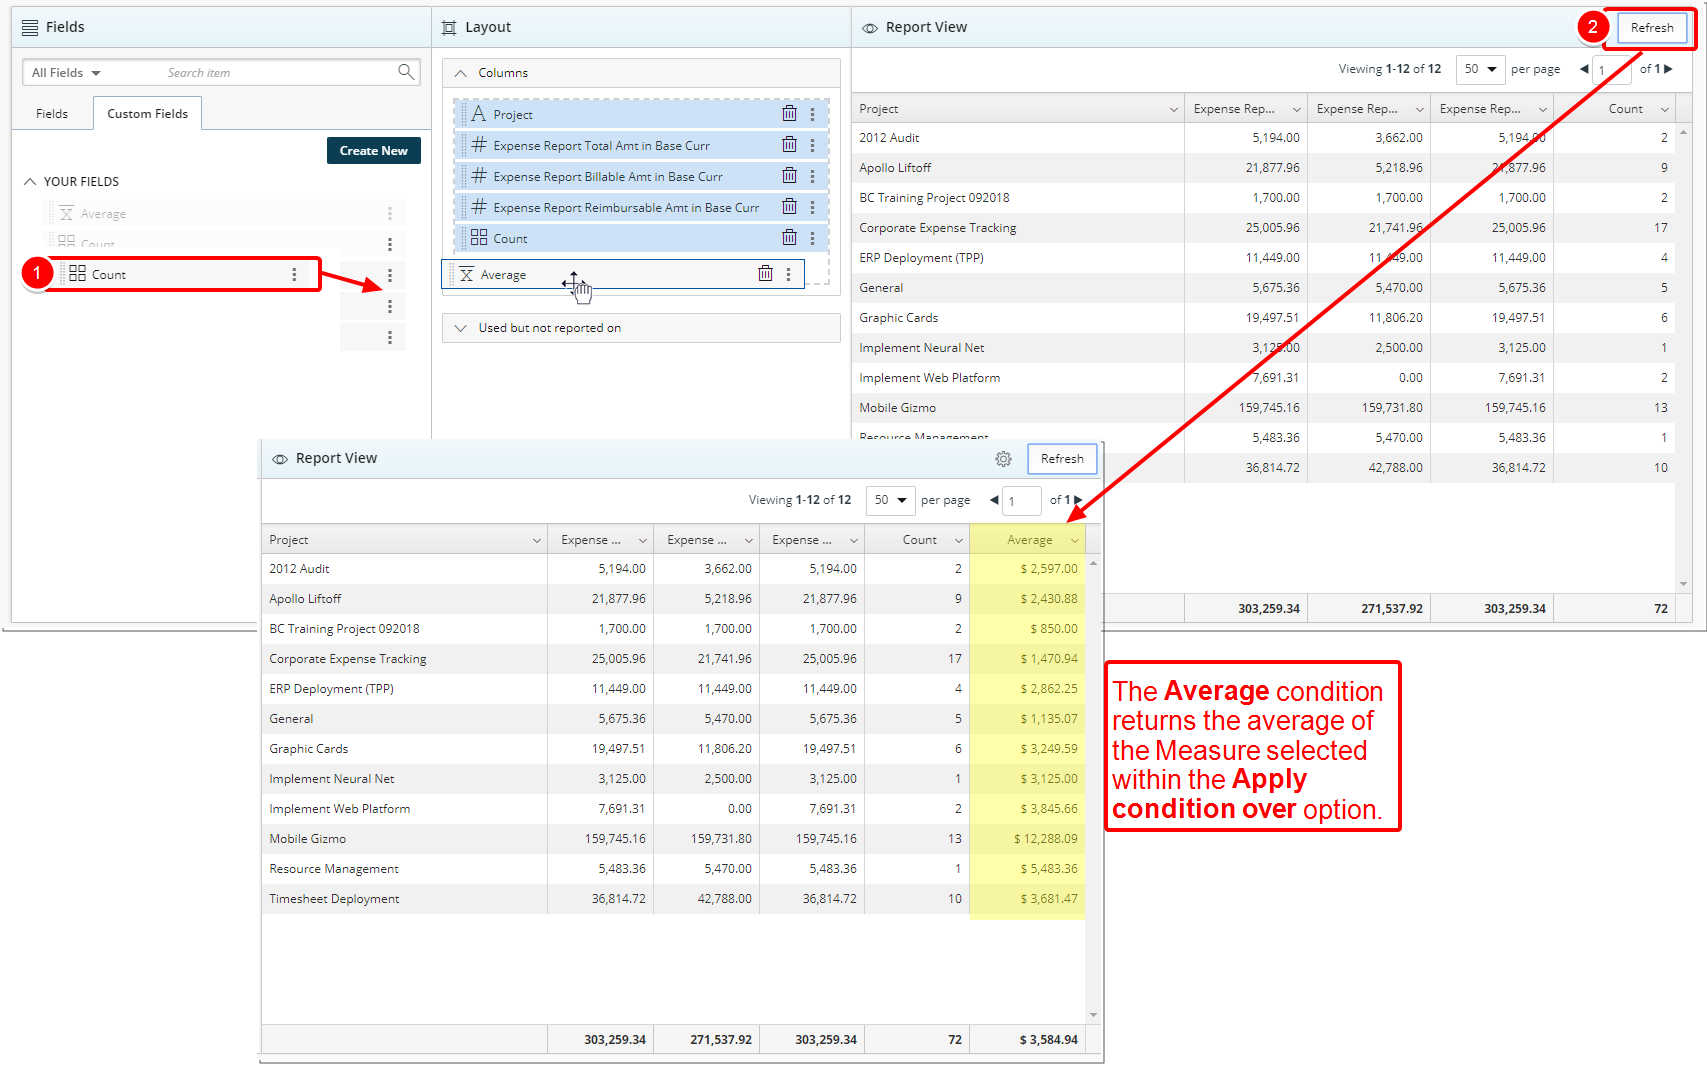
- From the Custom Fields tab drop the newly created Custom Field into the Layout section.
- Click Refresh to view your changes.
- View newly added Average column in your report.
- Click Save.
2. Count
The Count condition returns the number of the entries within the Apply condition over Field.
For example, the count of 2, 3, 3, 5, 7, and 10 is 6.
Creating a Count Function
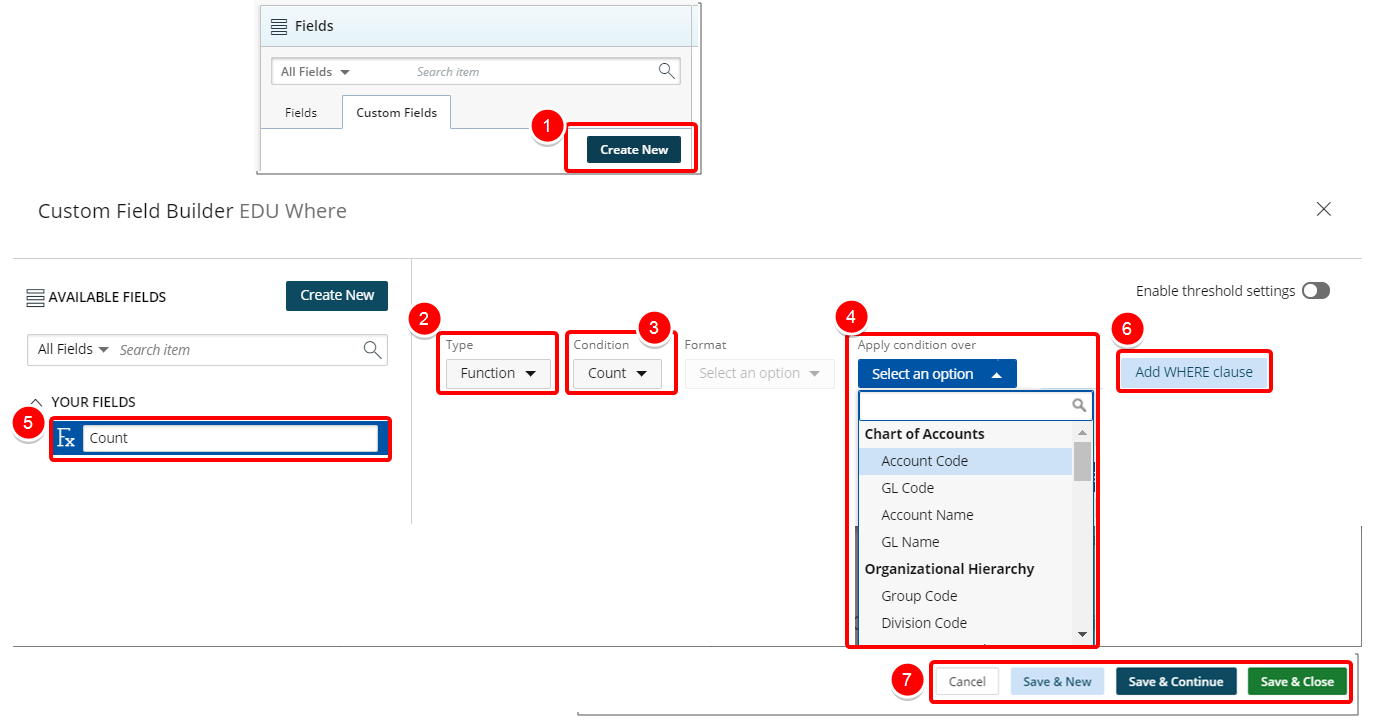
- Click Create New from the Custom Fields tab.
- In the Custom Field Builder dialog box click Type and select Function.
- Click Condition and select Count from the available options.
- Click Apply condition over then search and select the Measure over which you wish to apply the Condition.
- Type the name of the Custom Field in the Custom Field Name box.
- Click Add Where Clause to apply a WHERE clause. For more information, see Add a Where Clause Function Custom Field.
- Click one of the following:
- Cancel to return the previous page.
- Save & New to save the Custom Field and create a new one.
- Save & Continue to save the Custom Field and continue working on it. This is useful when working on a large formula or function.
- Save & Close to save the Custom Field and then close the Custom Field Builder. You will be redirected to the Report Editor screen where the newly created Custom Field(s) can be used in a report.
View Your Changes
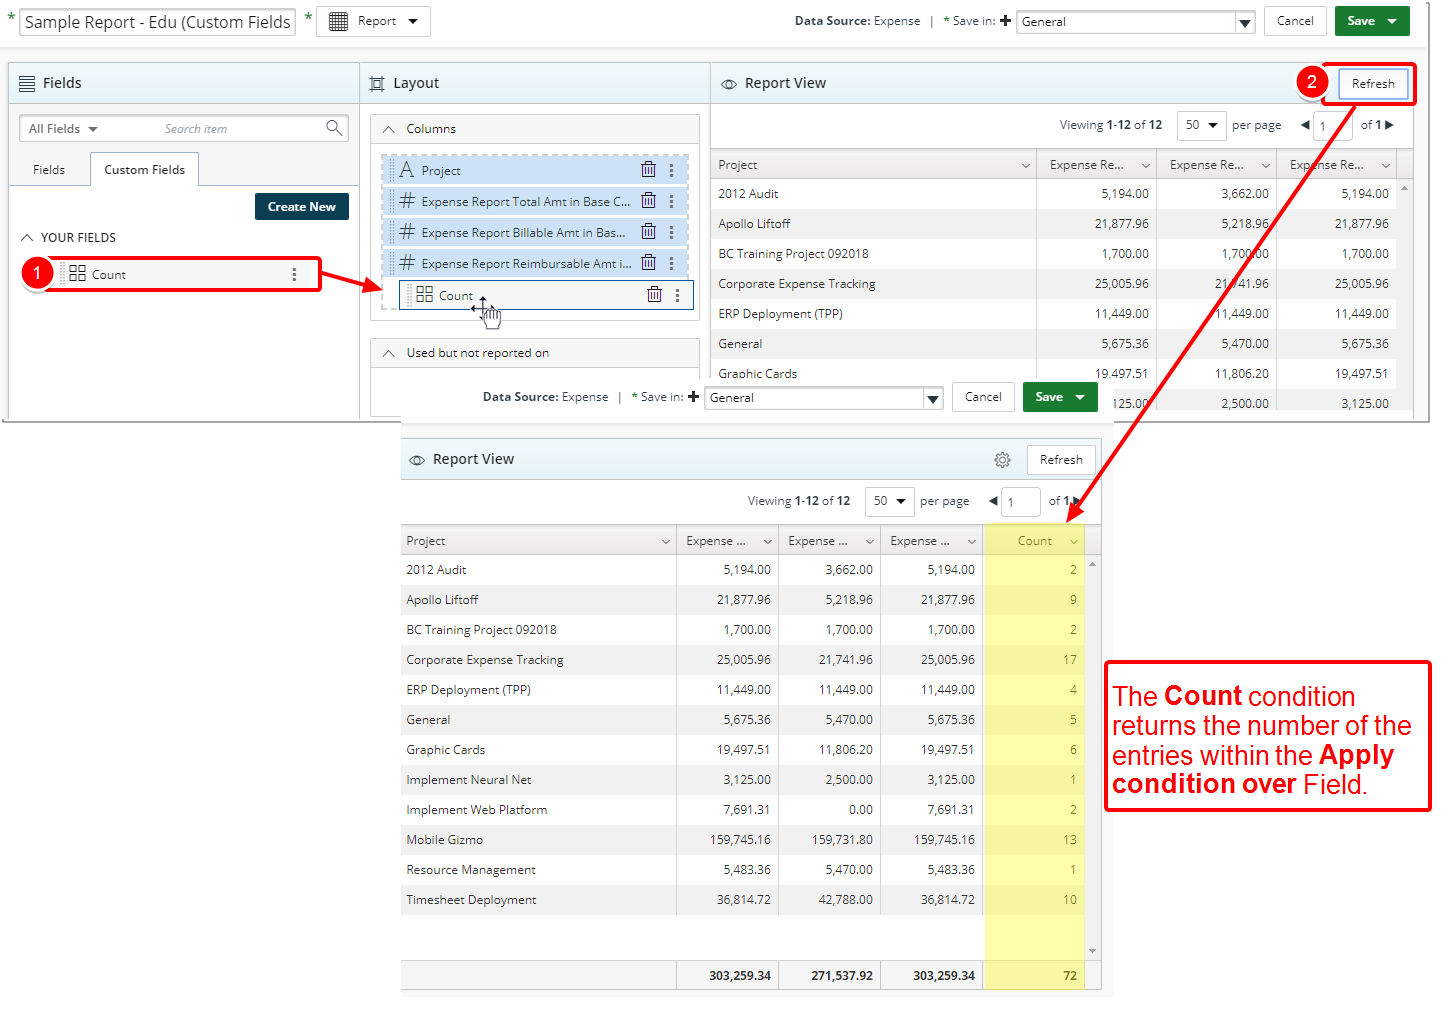
- From the Custom Fields tab drop the newly created Custom Field into the Layout section.
- Click Refresh to view your changes.
- View newly added Count column in your report.
- Click Save.
3. Count Distinct
The Count Distinct condition returns the distinct number of the entries within the Apply condition over Field.
For example, the count distinct of 2, 3, 3, 5, 7, and 10 is 5.
Creating a Count Distinct

- Click Create New from the Custom Fields tab.
- In the Custom Field Builder modal click Type and select Function.
- Click Condition and select Count Distinct.
- Click Apply condition over the search and select the Measure over which you wish to apply the Condition.
- Type the name of the Custom Field in the Custom Field Name box.
- Click Add Where Clause to apply a WHERE clause. For more information, see Add a Where Clause Function Custom Field.
- Click one of the following:
- Cancel to return the previous page.
- Save & New to save the Custom Field and create a new one.
- Save & Continue to save the Custom Field and continue working on it. This is useful when working on a large formula or function.
- Save & Close to save the Custom Field and then close the Custom Field Builder. You will be redirected to the Report Editor screen where the newly created Custom Field(s) can be used in a report.
View Your Changes
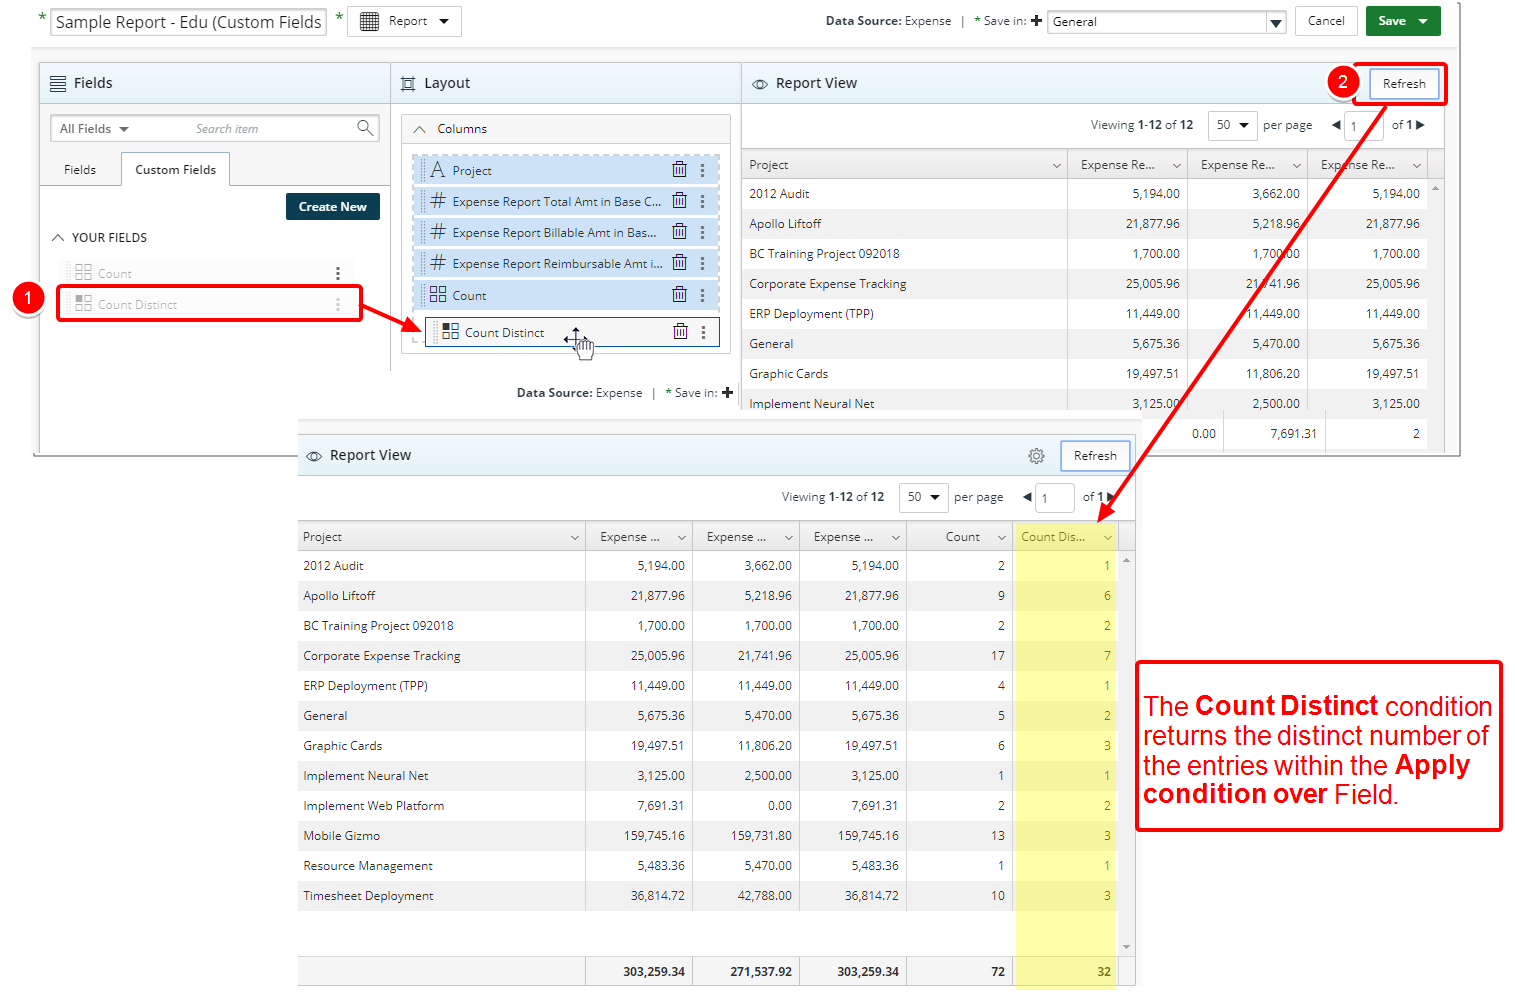
- From the Custom Fields tab drop the newly created Custom Field into the Layout section.
- Click Refresh to view your changes.
- View newly added Count Distinct column in your report.
- Click Save.
4. If
The IF THEN ELSE condition is a useful tool for creating a variety of calculated elements by verifying whether a condition is met or not. If the condition is met, it returns true. IF THEN ELSE can be used in calculations in several different ways, including filtering, grouping, bucketing, and relabeling results. When using IF THEN ELSE, you will need to provide an element or condition to test and values if the expression passes or fails.
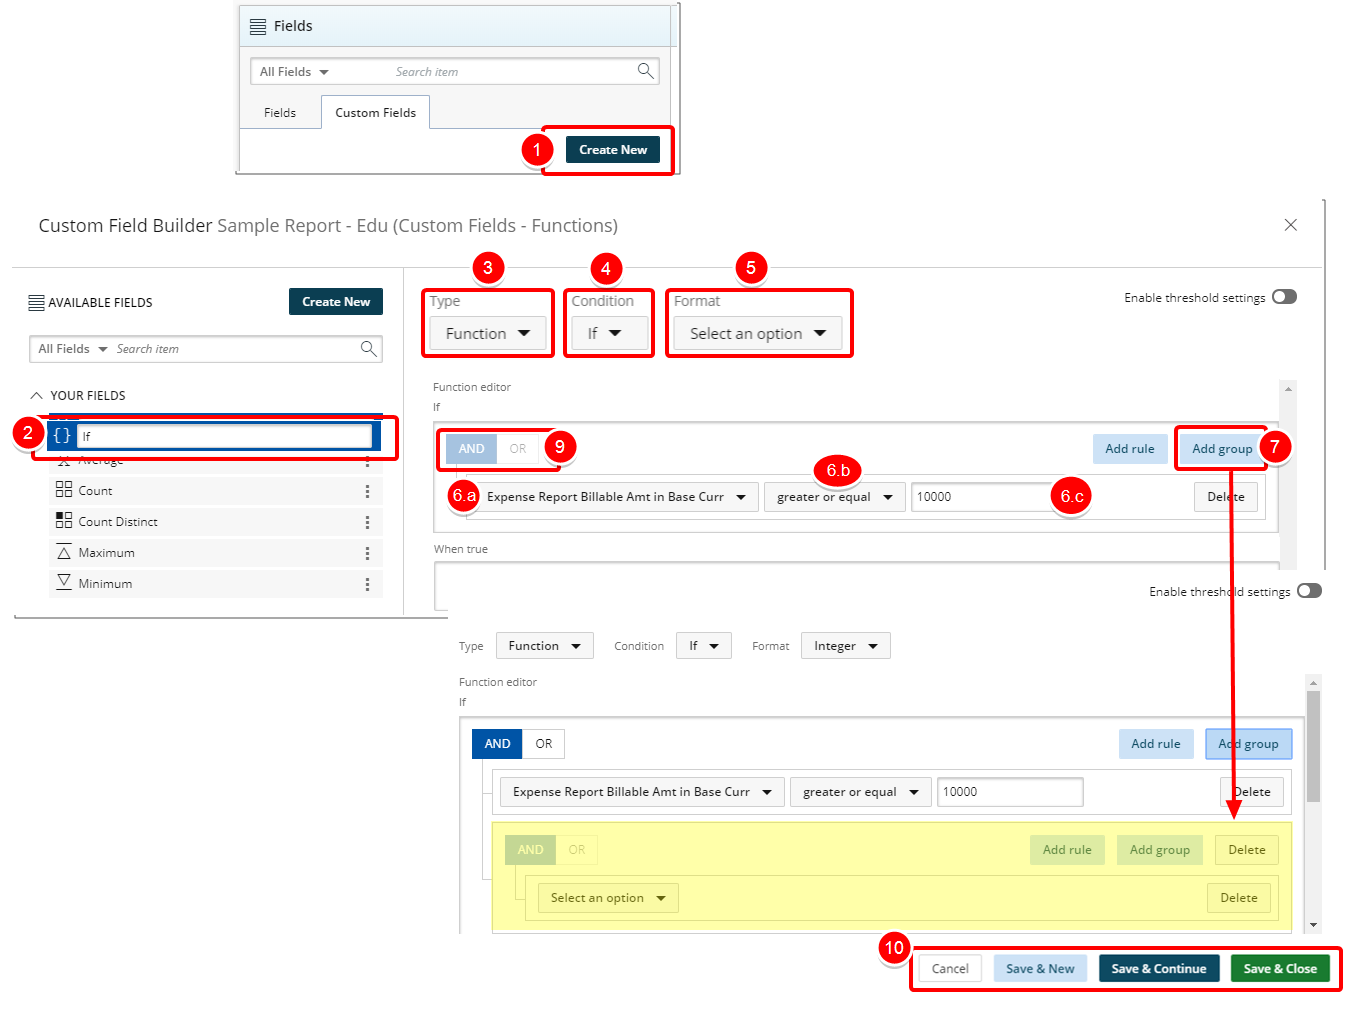
Creating an If Function

- Click Create New from the Custom Fields tab.
- Type the name of the Custom Field in the Custom Field Name box.
- In the Custom Field Builder dialog box click Type and select Function.
- Click Condition and select If from the available options.
- Click Format and select from the following options: Integer, Decimalor Money.
- Within the Function Editor box:
- Click Select an option to choose a Field from the available list.
- Click to select the necessary operator from: equal, not equal, in, not in, less, less or equal, greater, greater or equal, between, not between, is nullor is not null options.
- Enter the condition value.
- Click Add rule to add a second Rule at the same level as the first If condition, you will notice that the AND and OR buttons will be enabled, allowing you to make a choice then follow step 6-7 as many times as necessary.
- Click the When true box:
- Start typing the name of the expression you would like to use.
- Select the available expression from list.
- Note that the selected expression is added to the When true box.
-
Click the When false box:
- Start typing the name of the expression you would like to use.
- Select the available expression from list.
- Note that the selected expression is added to the When false box.
- Click one of the following:
- Cancel to return the previous page.
- Save & New to save the Custom Field and create a new one.
- Save & Continue to save the Custom Field and continue working on it. This is useful when working on a large formula or function.
- Save & Close to save the Custom Field and then close the Custom Field Builder. You will be redirected to the Report Editor screen where the newly created Custom Field(s) can be used in a report.
View Your Changes
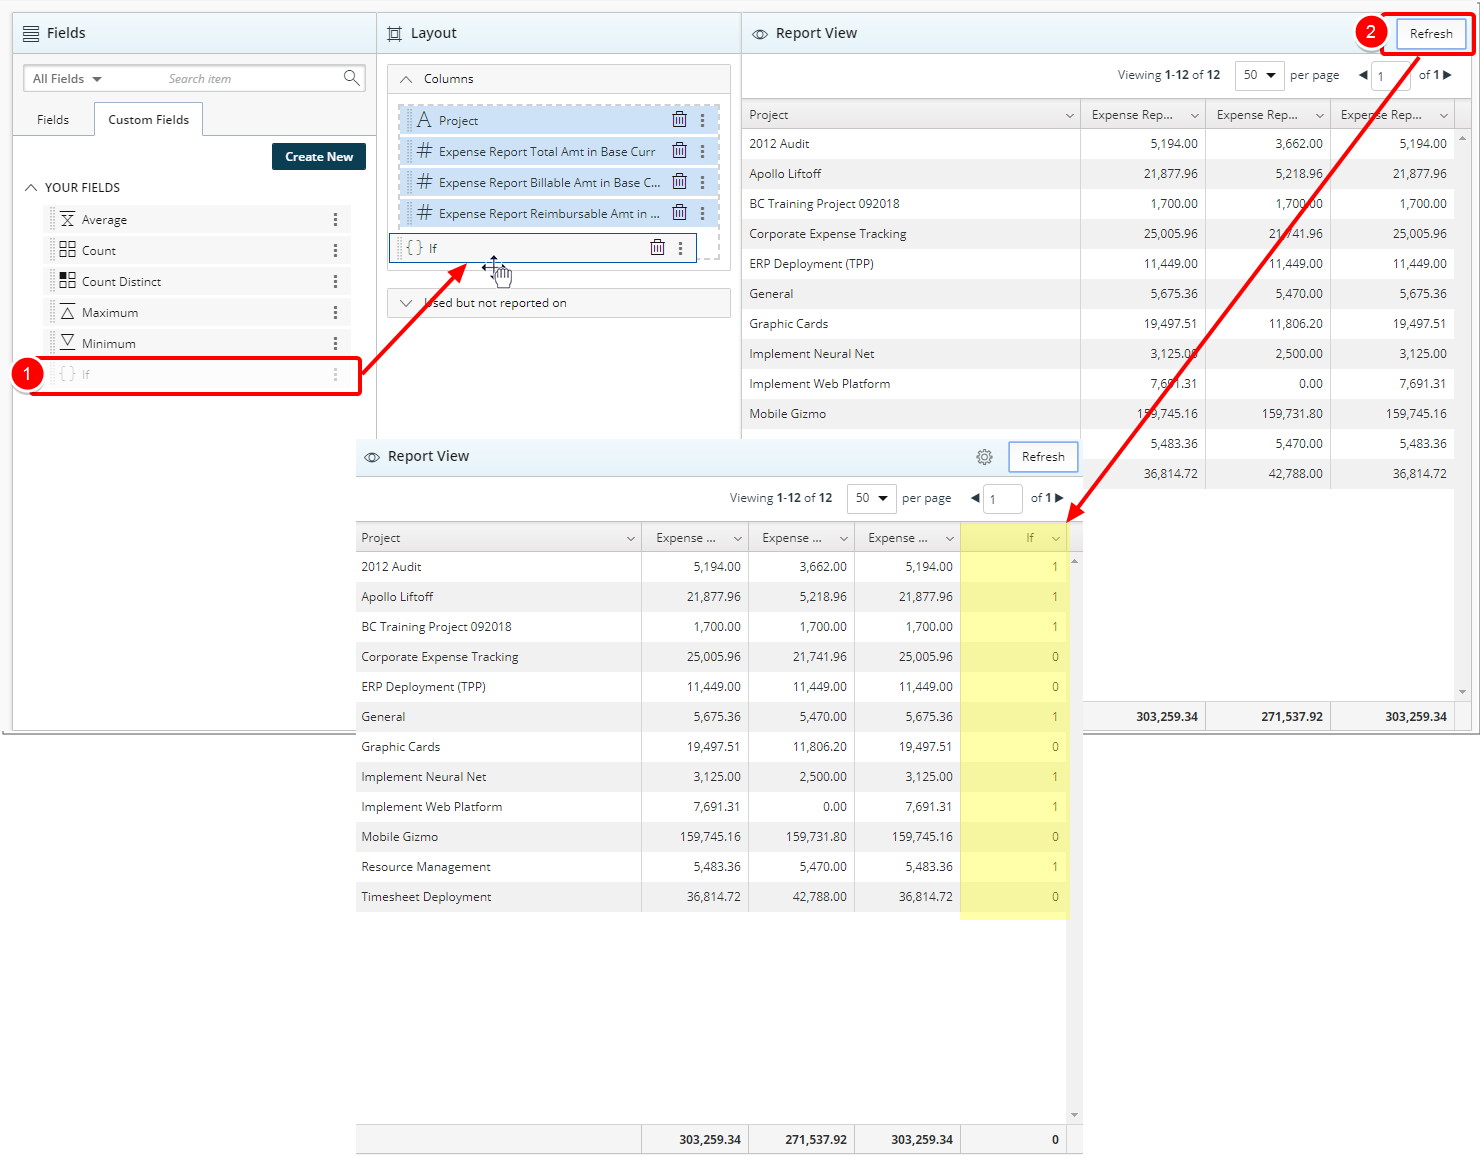
- From the Custom Fields tab drop the newly created Custom Field into the Layout section.
- Click Refresh to view your changes.
- View newly added Maximum column in your report.
- Click Save.
The Nested If Condition
You can add an IF...THEN (or IF...ELSE...THEN) statement inside another IF...THEN statement. Nesting multiple conditional IF THEN ELSE statements can be useful for creating several different groups or filtering by different conditional expressions.
Creating a Nested If Function
- Click Create New from the Custom Fields tab.
- Type the name of the Custom Field in the Custom Field Name box
- In the Custom Field Builder dialog box click Type and select Function.
- Click Condition and select If from the available options.
- Click Format and select from the following options: Integer, Decimalor Money.
- Within the Function Editor box:
- Click Select an option to choose a Field from the available list.
- Click to select the necessary operator from: equal, not equal,in, not in, less, less or equal, greater, greater or equal, between, not between, is nullor is not null options.
- Enter the condition value.
- Click Add group to add a nested If condition, you will notice that the AND and OR buttons will be enabled. Follow step 6-7 as many times as necessary.
- Click the When true box:
- Start typing the name of the expression you would like to use.
- Select the available expression from list.
- Note that the selected expression is added to the When true box.
-
Click the When false box:
- Start typing the name of the expression you would like to use.
- Select the available expression from list.
- Note that the selected expression is added to the When false box.
- Click one of the following:
- Cancel to return the previous page.
- Save & New to save the Custom Field and create a new one.
- Save & Continue to save the Custom Field and continue working on it. This is useful when working on a large formula or function.
- Save & Close to save the Custom Field and then close the Custom Field Builder. You will be redirected to the Report Editor screen where the newly created Custom Field(s) can be used in a report.
View Your Changes
- From the Custom Fields tab drop the newly created Custom Field into the Layout section.
- Click Refresh to view your changes.
- View newly added Maximum column in your report.
- Click Save.
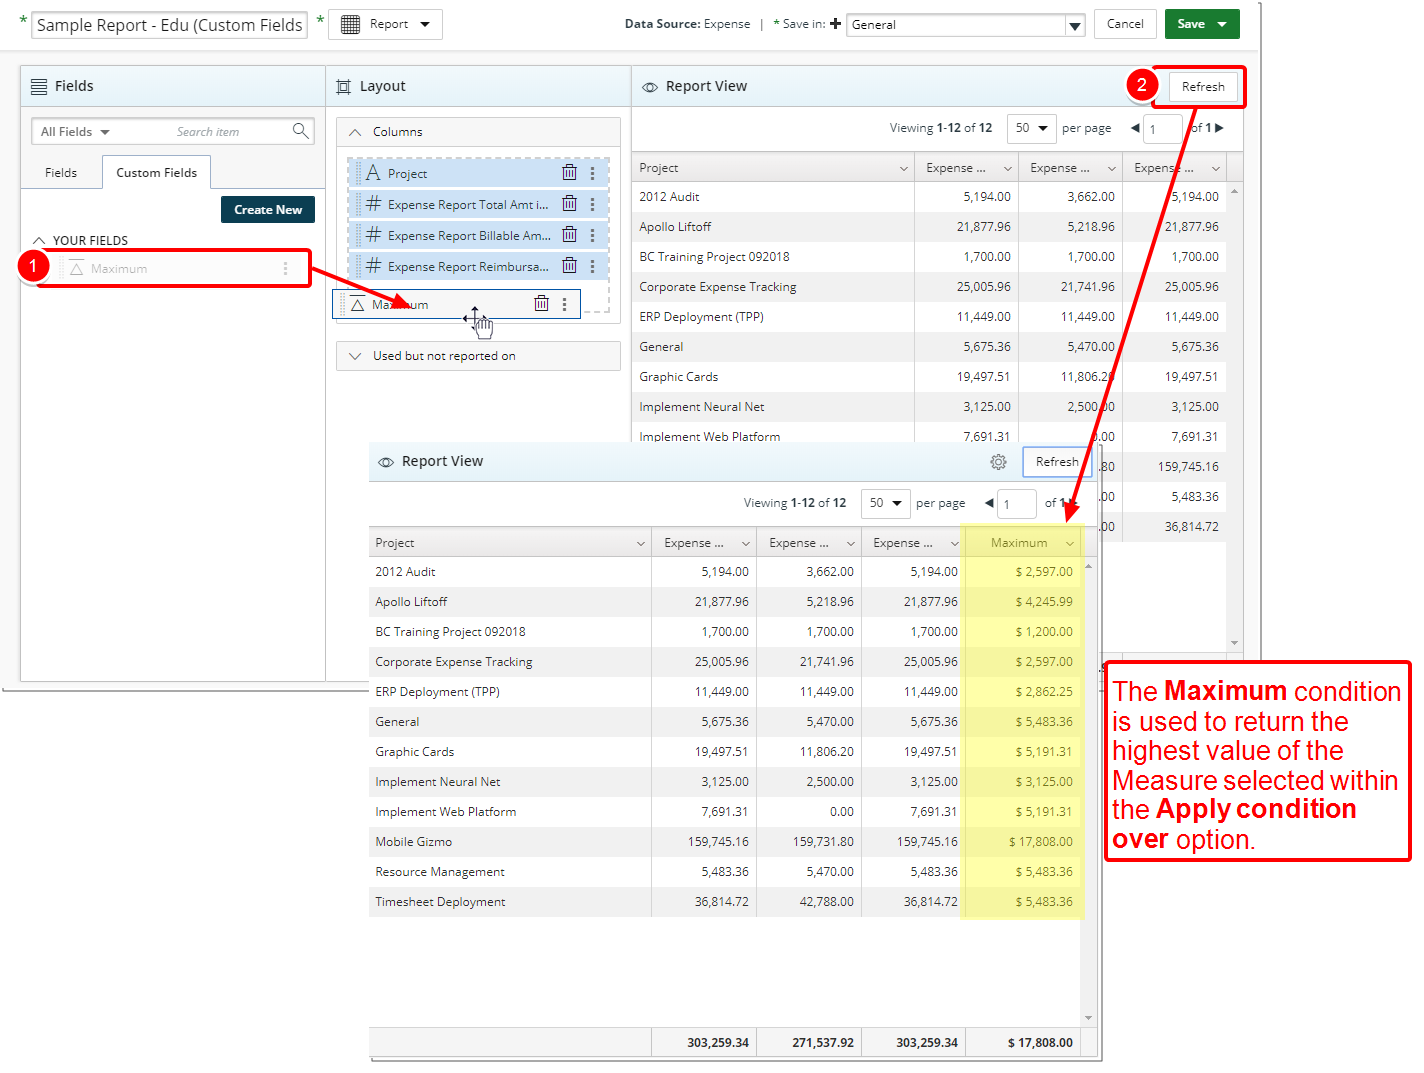
5. Maximum
The Maximum condition is used to return the highest value of the Measure selected within the Apply condition over option.
For example, the maximum of 2, 3, 3, 5, 7, and 10 is 10.
Creating a Maximum Function
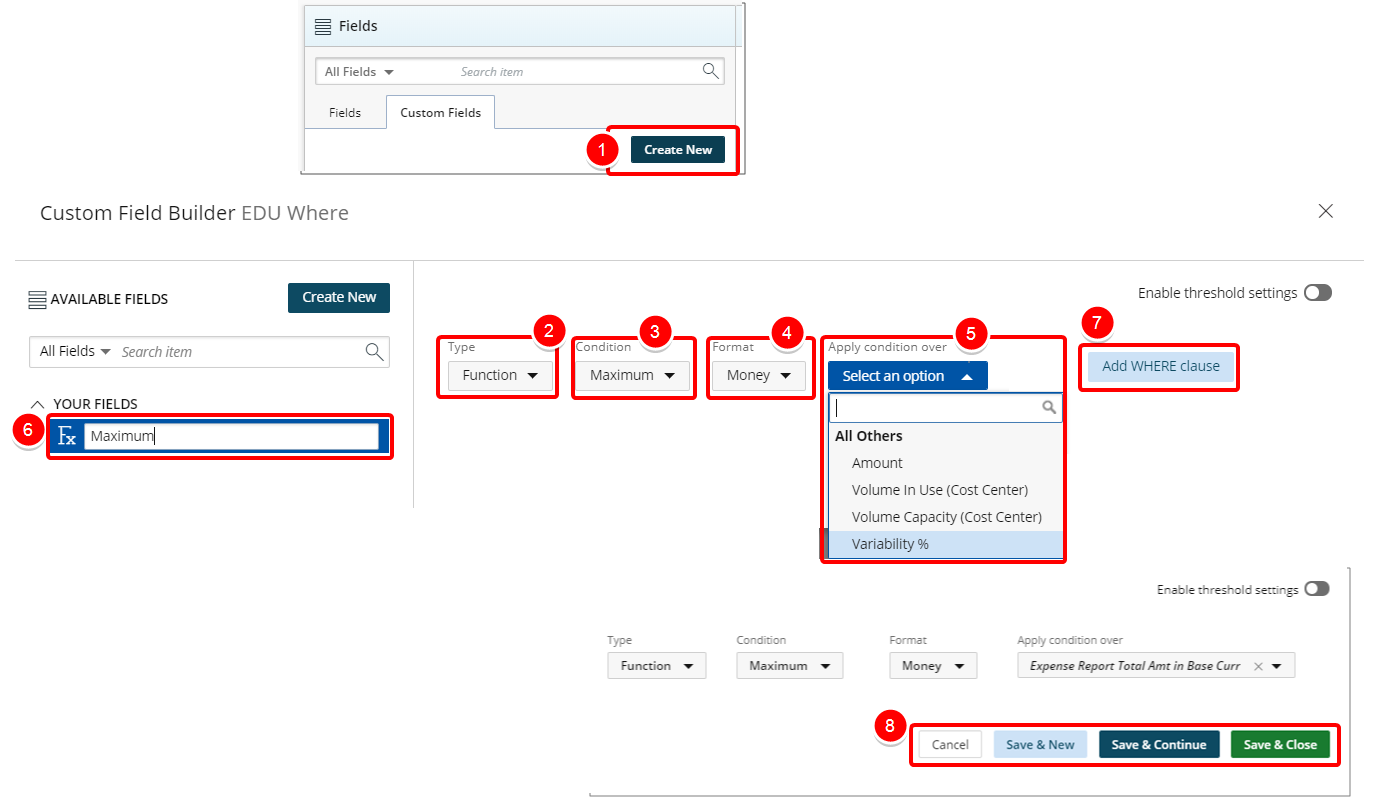
- Click Create New from the Custom Fields tab.
- In the Custom Field Builder dialog box click Type and select Function.
- Click Condition and select Maximum from the available options.
- Click Format and select from the following options: Integer, Decimalor Money.
- Click Apply condition over then search and select the Measure over which you wish to apply the Condition.
- Type the name of the Custom Field in the Custom Field Name box.
- Click Add Where Clause to apply a WHERE clause. For more information, see Add a Where Clause Function Custom Field.
- Click one of the following:
- Cancel to return the previous page.
- Save & New to save the Custom Field and create a new one.
- Save & Continue to save the Custom Field and continue working on it. This is useful when working on a large formula or function.
- Save & Close to save the Custom Field and then close the Custom Field Builder. You will be redirected to the Report Editor screen where the newly created Custom Field(s) can be used in a report.
View Your Changes
- From the Custom Fields tab drop the newly created Custom Field into the Layout section.
- Click Refresh to view your changes.
- View newly added Maximum column in your report.
- Click Save.
6. Minimum
The Minimum condition is used to return the lowest value of the Measure selected within the Apply condition over option.
For example, the minimum of 2, 3, 3, 5, 7, and 10 is 2.
Creating a Minimum Function
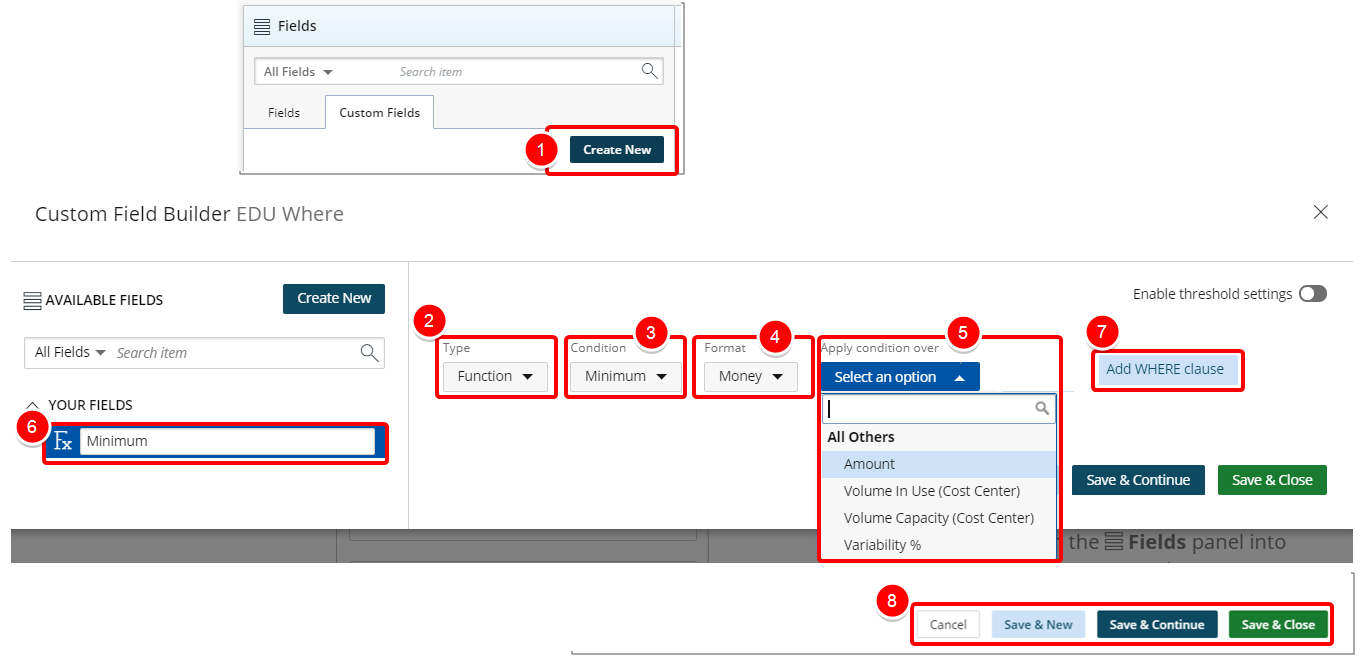
- Click Create New from the Custom Fields tab.
- In the Custom Field Builder dialog box click Type and select Function.
- Click Condition and select Minimum from the available options.
- Click Format and select from the following options: Integer, Decimalor Money.
- Click Apply condition over then search and select the Measure over which you wish to apply the Condition.
- Type the name of the Custom Field in the Custom Field Name box.
- Click Add Where Clause to apply a WHERE clause. For more information, see Add a Where Clause Function Custom Field.
- Click one of the following:
- Cancel to return the previous page.
- Save & New to save the Custom Field and create a new one.
- Save & Continue to save the Custom Field and continue working on it. This is useful when working on a large formula or function.
- Save & Close to save the Custom Field and then close the Custom Field Builder. You will be redirected to the Report Editor screen where the newly created Custom Field(s) can be used in a report.
View Your Changes
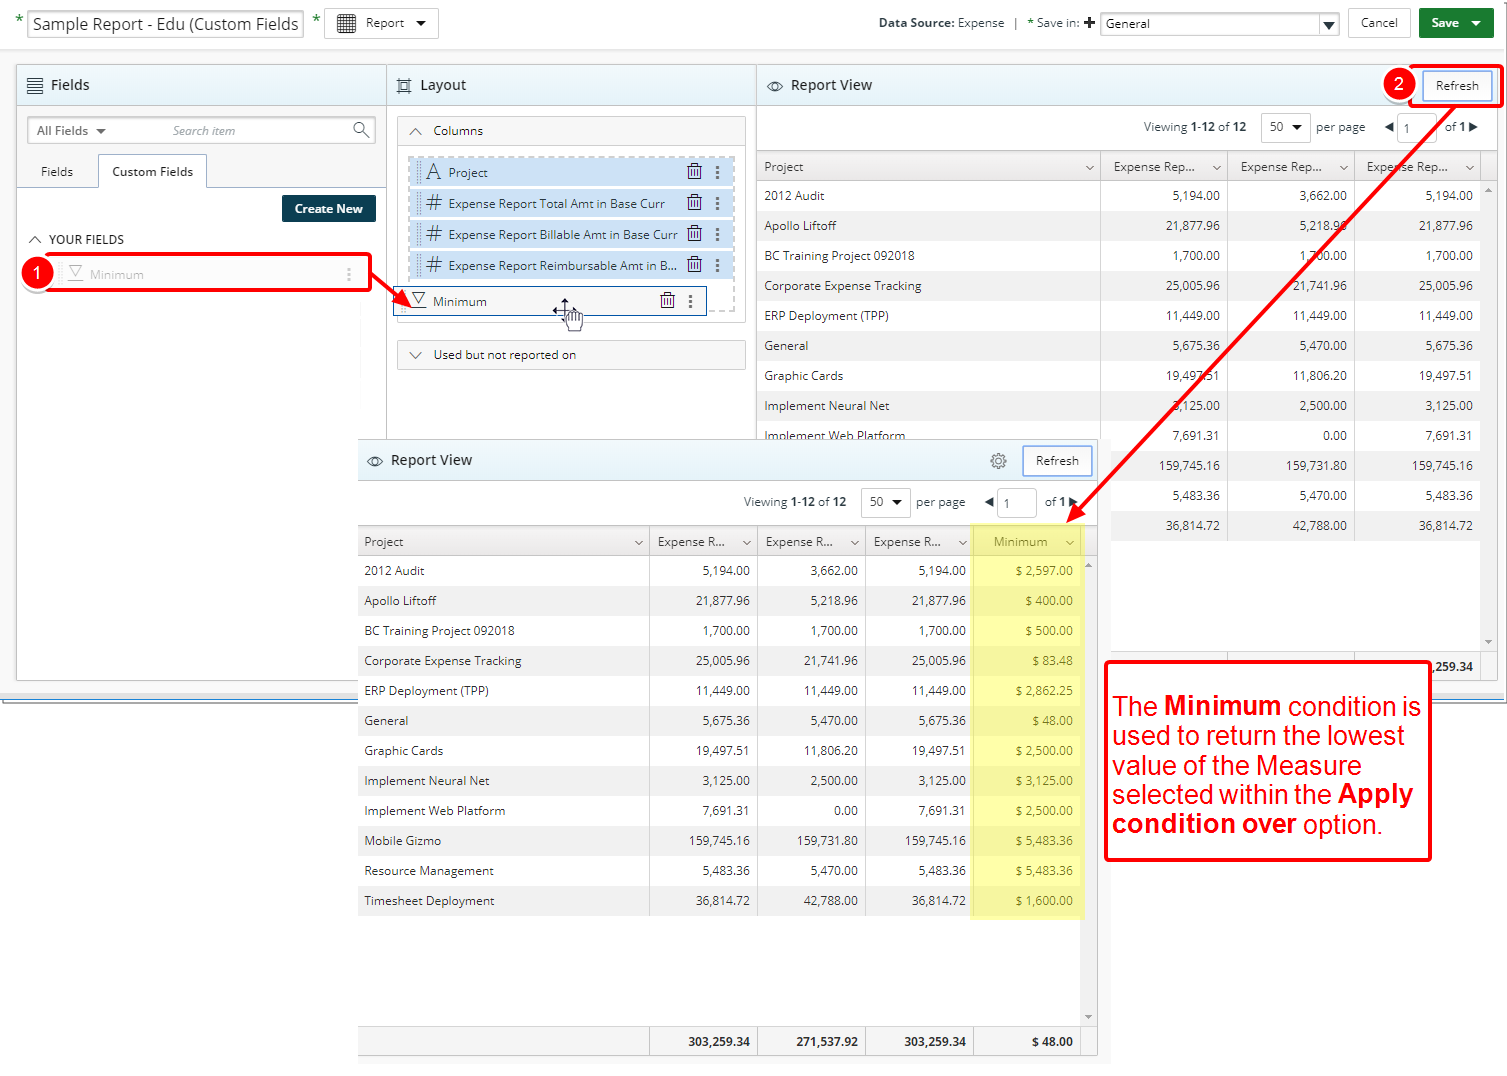
- From the Custom Fields tab drop the newly created Custom Field into the Layout section.
- Click Refresh to view your changes.
- View newly added Minimum column in your report.
- Click Save.
Menu