Create or Edit a Text Function
Upland Analytics allows you to define your own powerful Text Functions to meet your specific reporting requirements.
Text functions can be used in several ways: They can return the number of characters in text strings, remove extra characters, return exact position within a string, and even combine text from other cells.
A number of options are available to you when choosing the Text Function Type. This topic details each of the available Function options with examples.
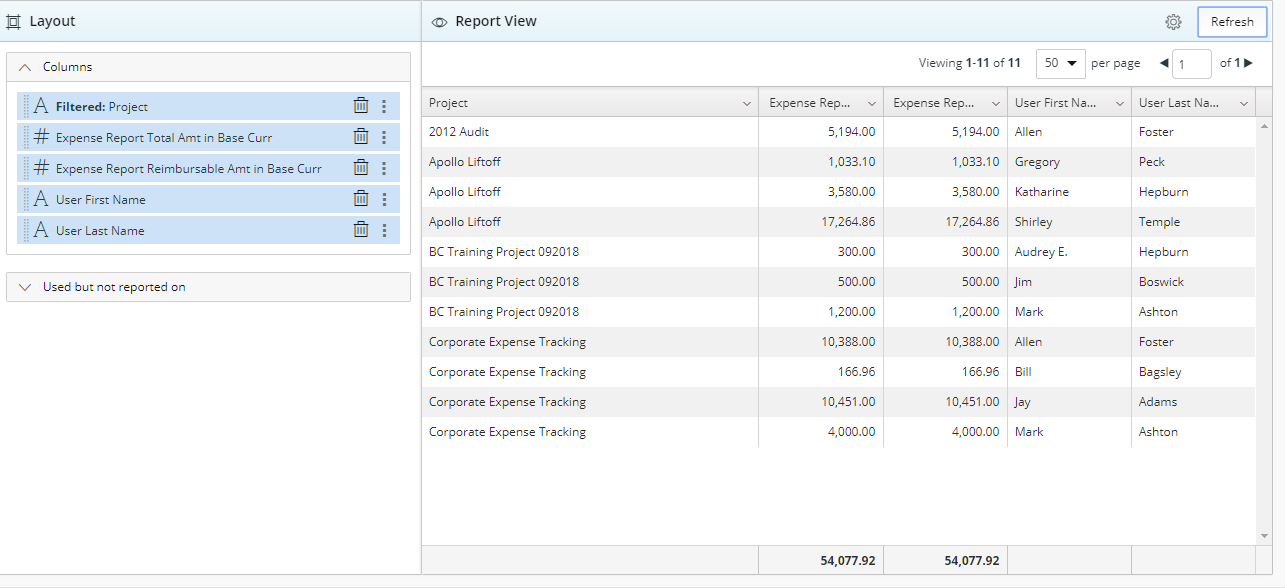
- For the purpose of this article a sample report is being used to demonstrate each addiction of the Text Function Custom fields.
1. Substring
Each character in a string is considered to have a numeric position; the position of the first character is 1, the position of the second character is 2, and so on. The Substring Function returns the strings between Start index and End index of a string.
For example, the substring of Audrey where the Start index=1 and End index=3 is Aud.
Creating a Substring Text Function
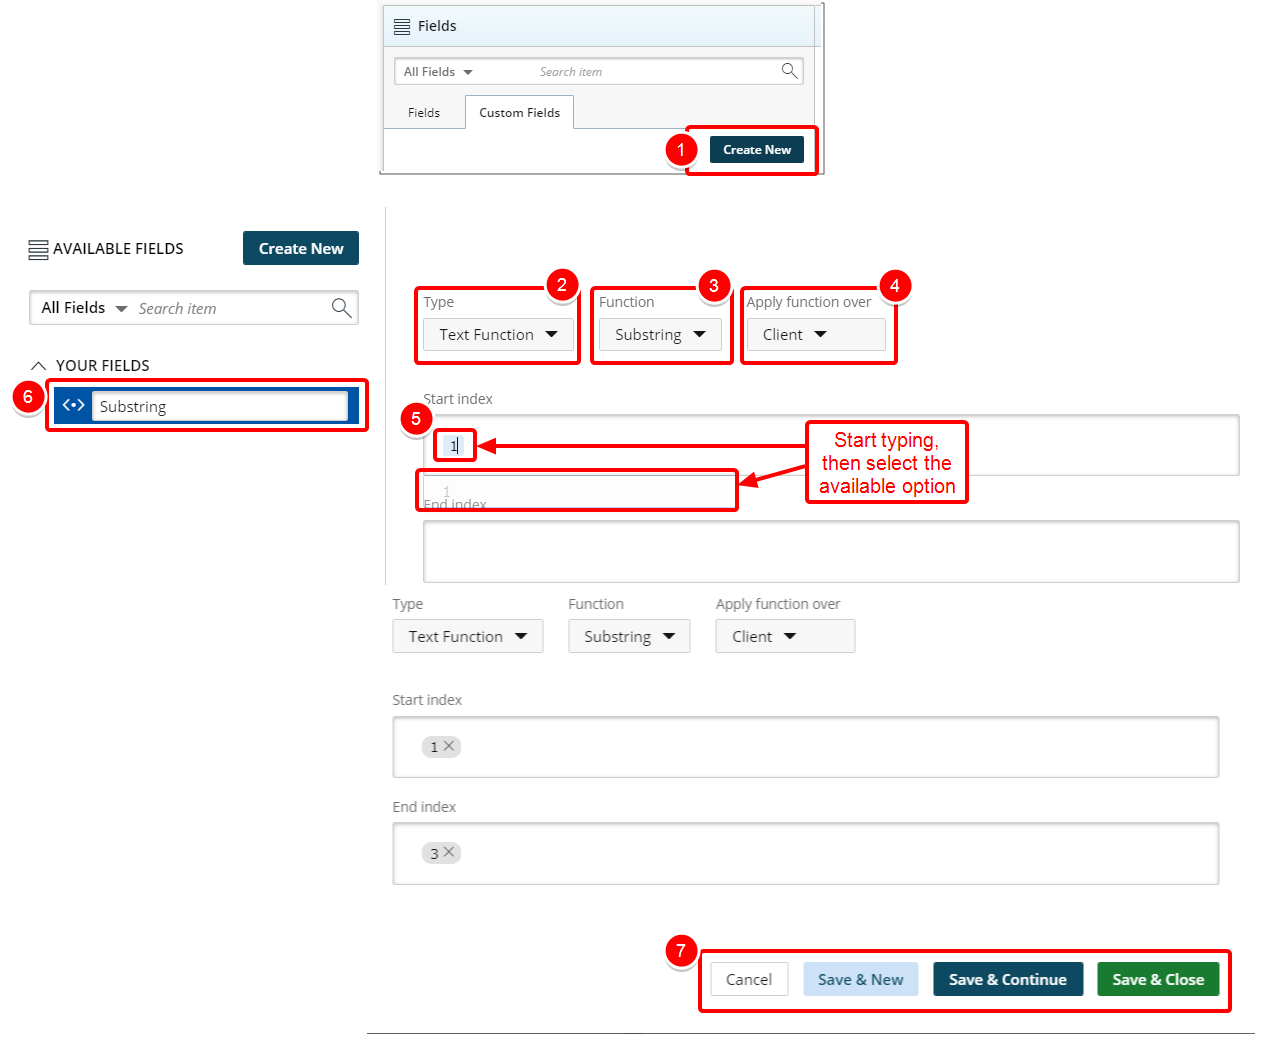
- Click Create New from the Custom Fields tab.
- In the Custom Field Builder dialog box click Type and select Text Function.
- Click the Function list and select Substring.
- Click the Apply function over list and select an option.
- In the Start Index box:
- Enter the position of the first character.
- Select the available option from list.
- Note that your selection is added to the Start Index box. (Repeat steps 4a-4c for the End index box).
- Type the name of the Custom Field in the Custom Field Name box.
- Click one of the following:
- Cancel to return the previous page.
- Save & New to save the Custom Field and create a new one.
- Save & Continue to save the Custom Field and continue working on it. This is useful when working on a large formula or function.
- Save & Close to save the Custom Field and then close the Custom Field Builder. You will be redirected to the Report Editor screen where the newly created Custom Field(s) can be used in a report.
View Your Changes

- From the Custom Fields tab drop the newly created Custom Field into the Layout section.
- Click Refresh to view your changes.
- View newly added Substring column in your report.
- Click Save.
2. Length
The Length function returns the length of the given string as an integer value. It includes all characters such as spaces, punctuation, numbers as well as letters where applicable.
For example, the Length of Apollo Liftoff is 14.
Creating a Length Text Function
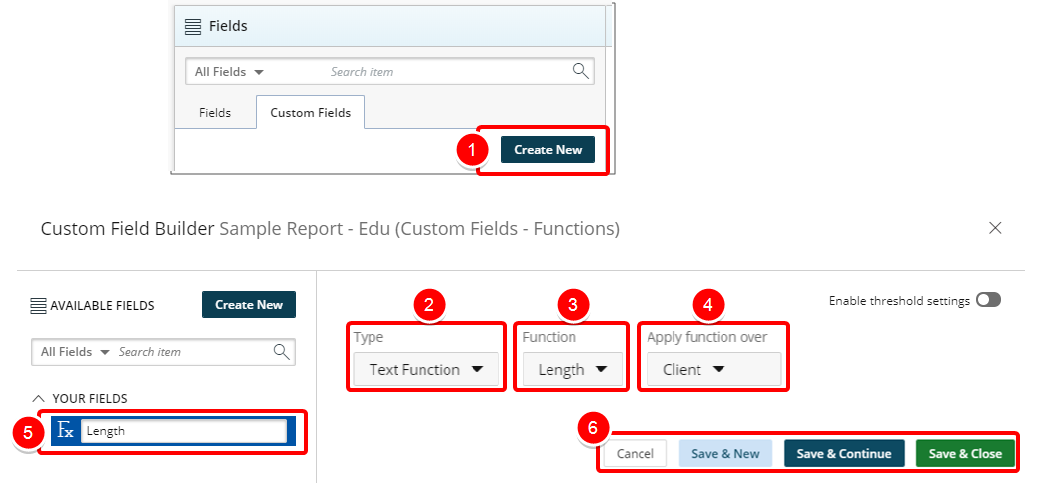
- Click Create New from the Custom Fields tab.
- In the Custom Field Builder dialog box click Type and select Text Function.
- Click Function and select Length from the available options.
- Click Apply condition over then search and select the Measure over which you wish to apply the Function.
- Type the name of the Custom Field in the Custom Field Name box.
- Click one of the following:
- Cancel to return the previous page.
- Save & New to save the Custom Field and create a new one.
- Save & Continue to save the Custom Field and continue working on it. This is useful when working on a large formula or function.
- Save & Close to save the Custom Field and then close the Custom Field Builder. You will be redirected to the Report Editor screen where the newly created Custom Field(s) can be used in a report.
View Your Changes
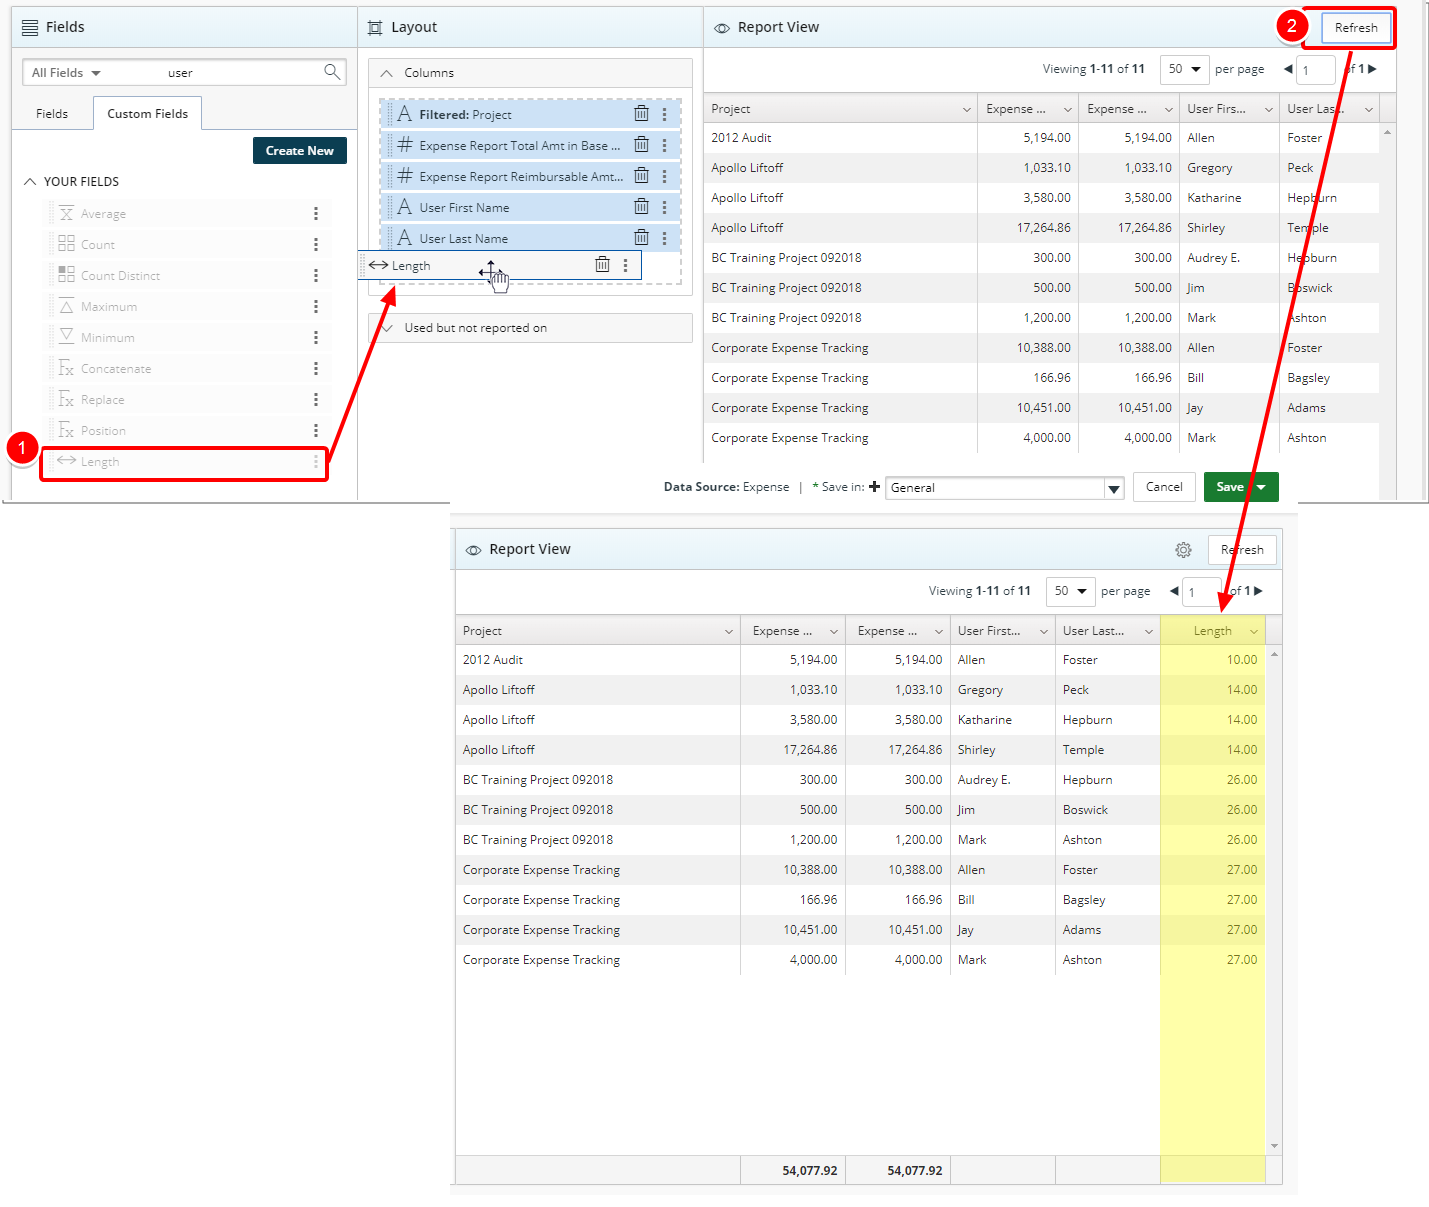
- From the Custom Fields tab drop the newly created Custom Field into the Layout section.
- Click Refresh to view your changes.
- View newly added Length column in your report.
- Click Save.
3. Position
The Position condition returns the position of the specified string within the Apply condition over Field.
For example, the position of the string "Apollo" within "Apollo Liftoff" is 1.
Creating a Position Text Function
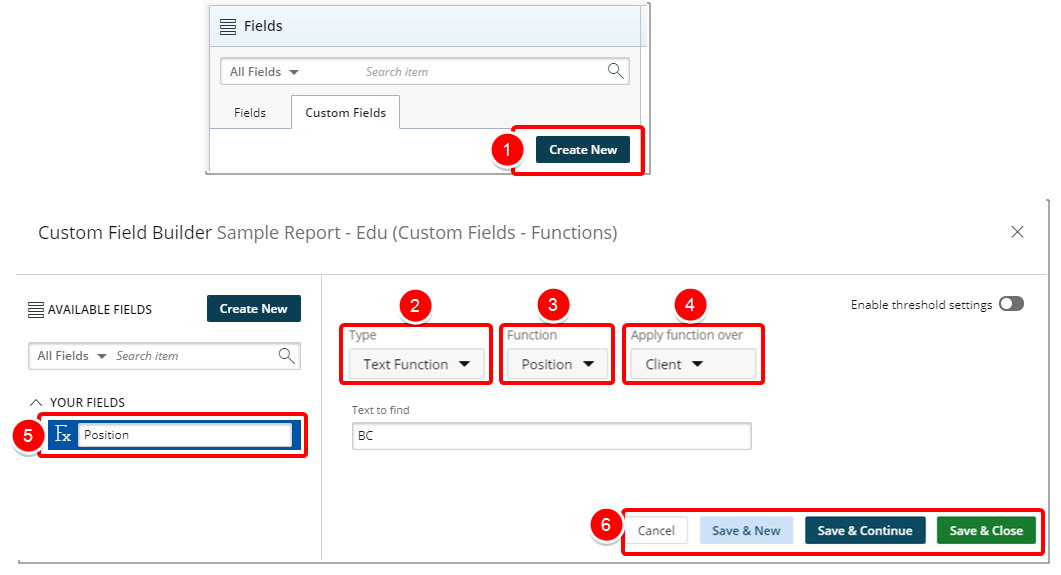
- Click Create New from the Custom Fields tab.
- In the Custom Field Builder modal click Type and select Text Function.
- Click Function and select Position.
- Click Apply condition over and select the Measure over which you wish to apply the Position Function.
- Type the name of the Custom Field in the Custom Field Name box.
- Click one of the following:
- Cancel to return the previous page.
- Save & New to save the Custom Field and create a new one.
- Save & Continue to save the Custom Field and continue working on it. This is useful when working on a large formula or function.
- Save & Close to save the Custom Field and then close the Custom Field Builder. You will be redirected to the Report Editor screen where the newly created Custom Field(s) can be used in a report.
View Your Changes
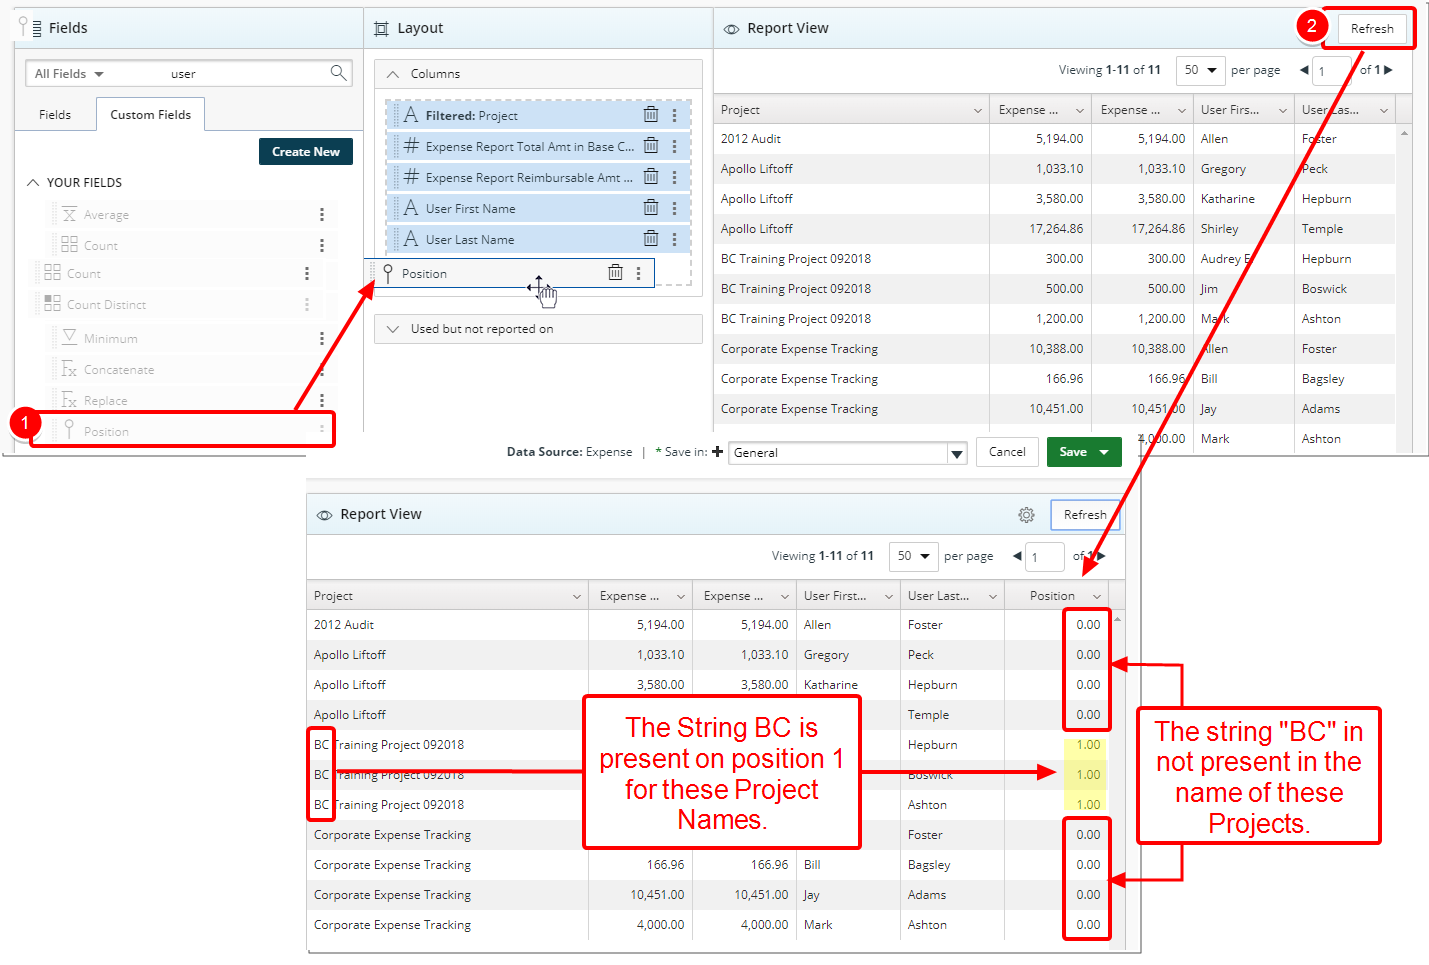
- From the Custom Fields tab drop the newly created Custom Field into the Layout section.
- Click Refresh to view your changes.
- View newly added Position column in your report.
- Click Save.
4. Replace
The Replace function replaces one text string with another.
Creating a Replace Text
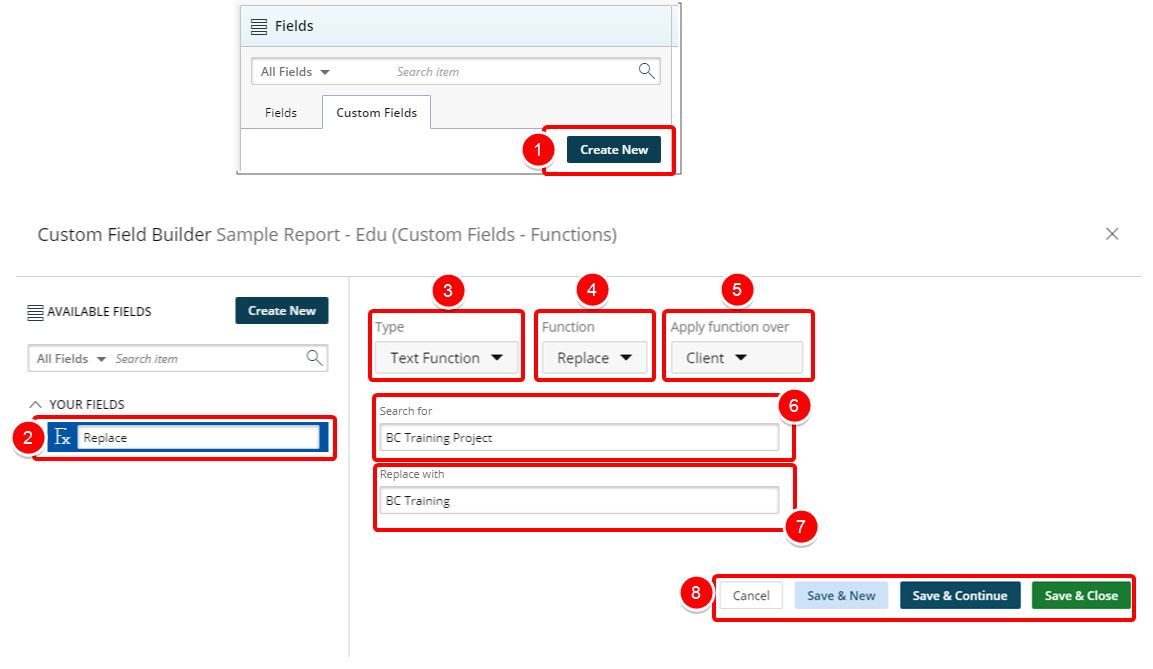
- Click Create New from the Custom Fields tab.
- Type the name of the Custom Field in the Custom Field Name box.
- In the Custom Field Builder dialog box click Type and select Text Function.
- Click Function and select Replace from the available options.
- Click Apply function over and select from the available options.
- Within the Search for box, click an type the text string you wish to search for.
- Within the Replace with box, click an type the text string you wish to replace the preciously typed Search for text string.
- Click one of the following:
- Cancel to return the previous page.
- Save & New to save the Custom Field and create a new one.
- Save & Continue to save the Custom Field and continue working on it. This is useful when working on a large formula or function.
- Save & Close to save the Custom Field and then close the Custom Field Builder. You will be redirected to the Report Editor screen where the newly created Custom Field(s) can be used in a report.
View Your Changes
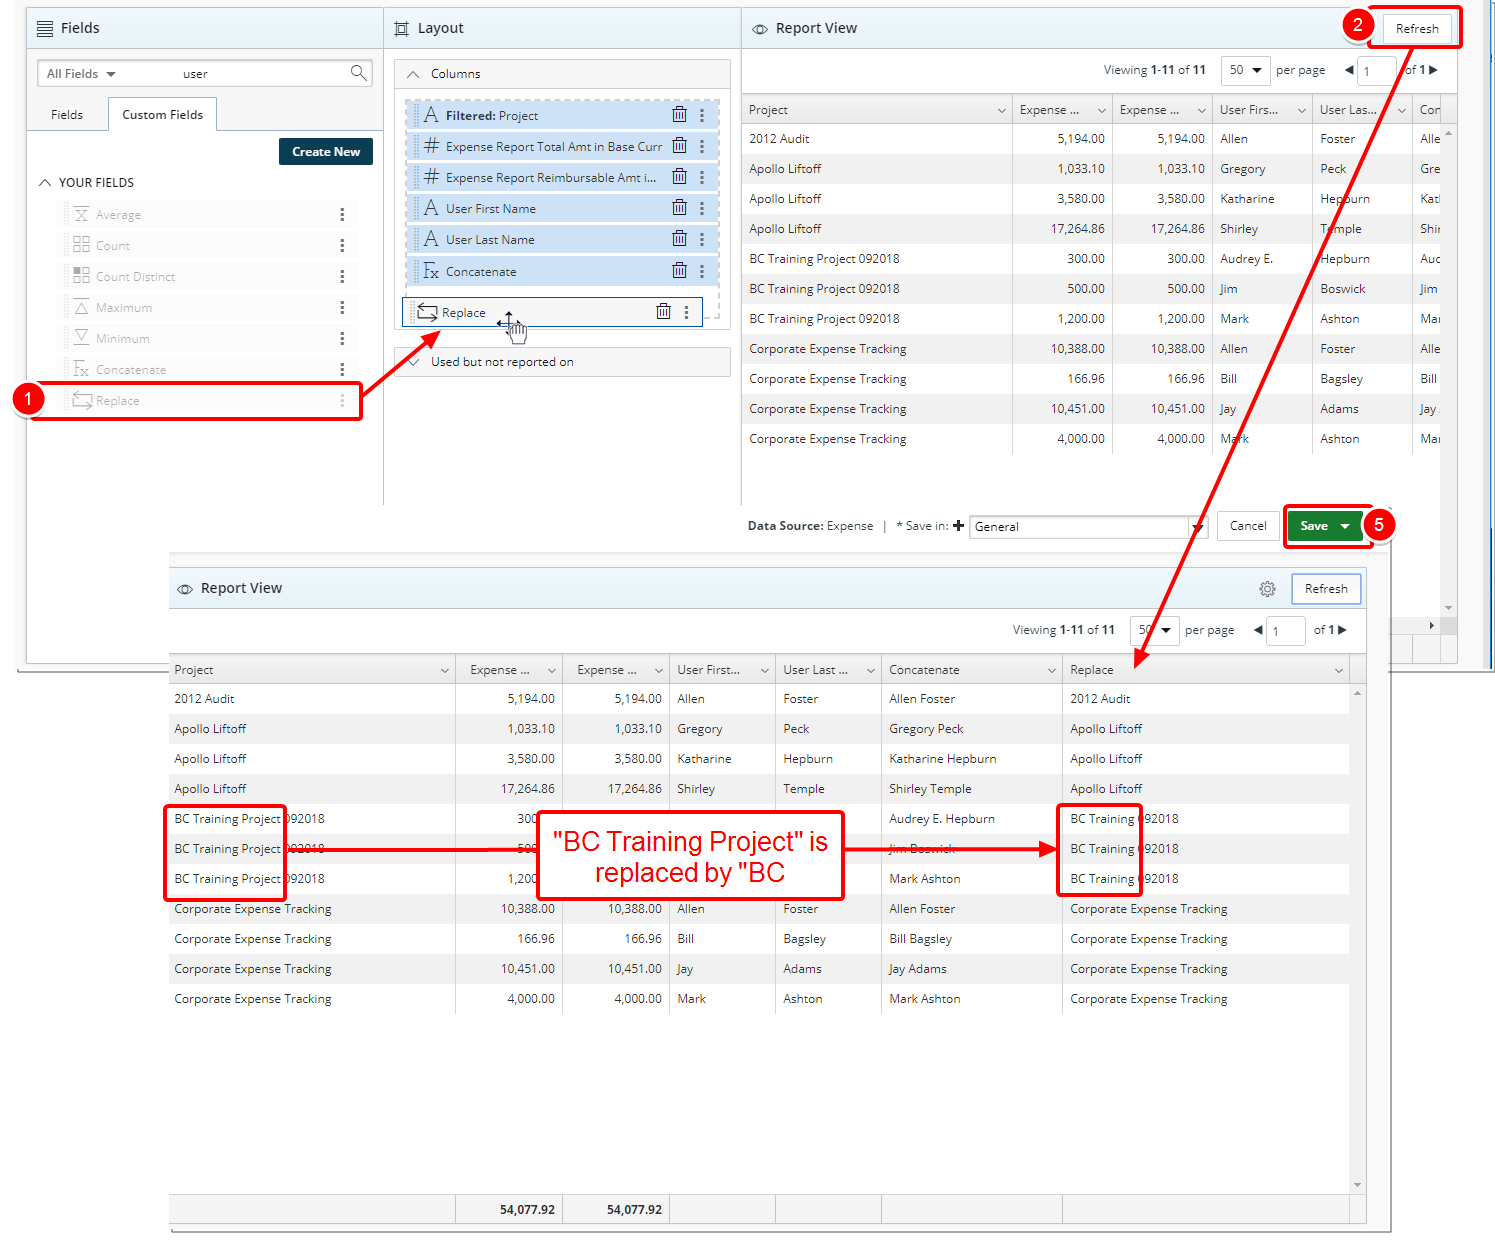
- From the Custom Fields tab drop the newly created Custom Field into the Layout section.
- Click Refresh to view your changes.
- View newly added Replace column in your report. Note that the "BC Training Project 092018" has been replaced with "BC Training 092018" in the Replace column.
- Click Save.
5. Concatenate
The Concatenate Text Function allows you to join text from separate cells into the same cell.
For example, Concatenate (Name Last Name). Using this function will result in the joining of a Name and Last Name as shown below.
Creating a Concatenate Text Function
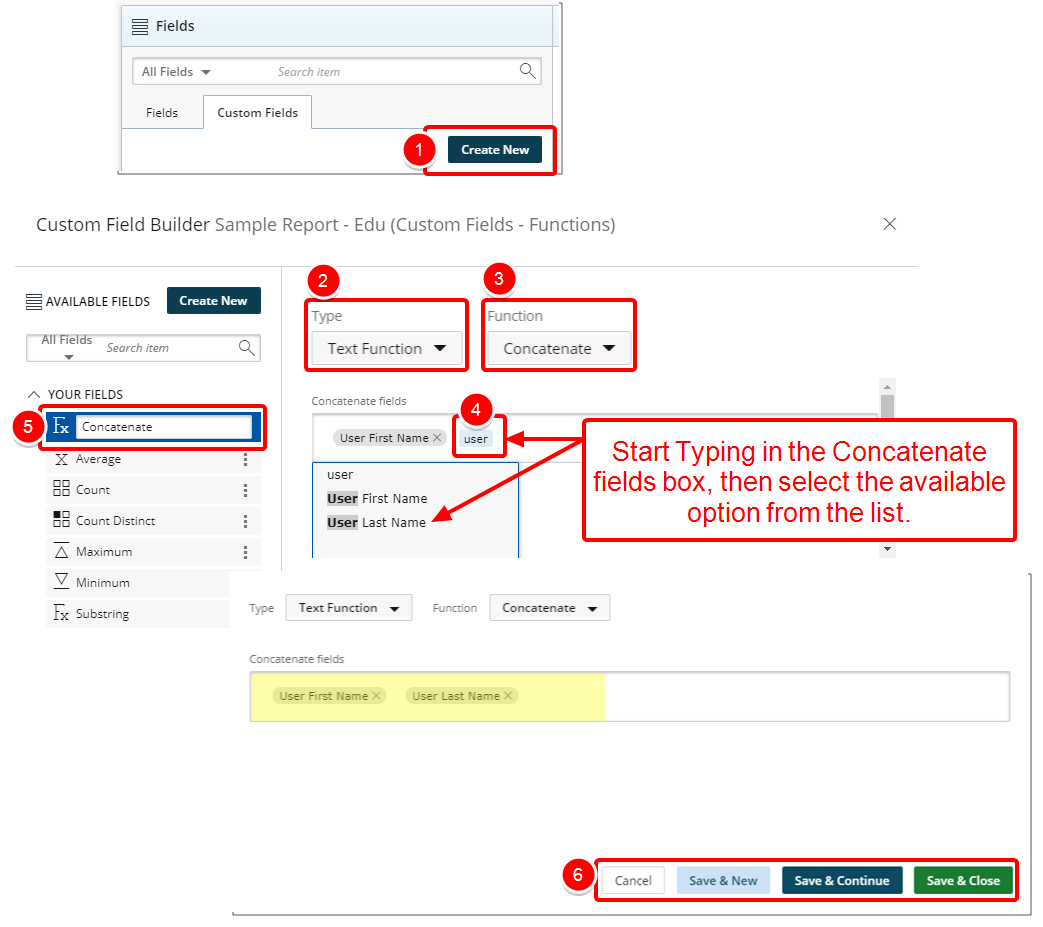
- Click Create New from the Custom Fields tab.
- In the Custom Field Builder dialog box click Type and select Text Function.
- Click Concatenate fields.
-
- Start typing the name of the field you would like to use.
- Select the available field from list.
- Note that the selected field is added to the Concatenate fields box. (Repeat steps 4a-4c to add more fields).
- Type the name of the Custom Field in the Custom Field Name box.
- Click one of the following:
- Cancel to return the previous page.
- Save & New to save the Custom Field and create a new one.
- Save & Continue to save the Custom Field and continue working on it. This is useful when working on a large formula or function.
- Save & Close to save the Custom Field and then close the Custom Field Builder. You will be redirected to the Report Editor screen where the newly created Custom Field(s) can be used in a report.
View Your Changes
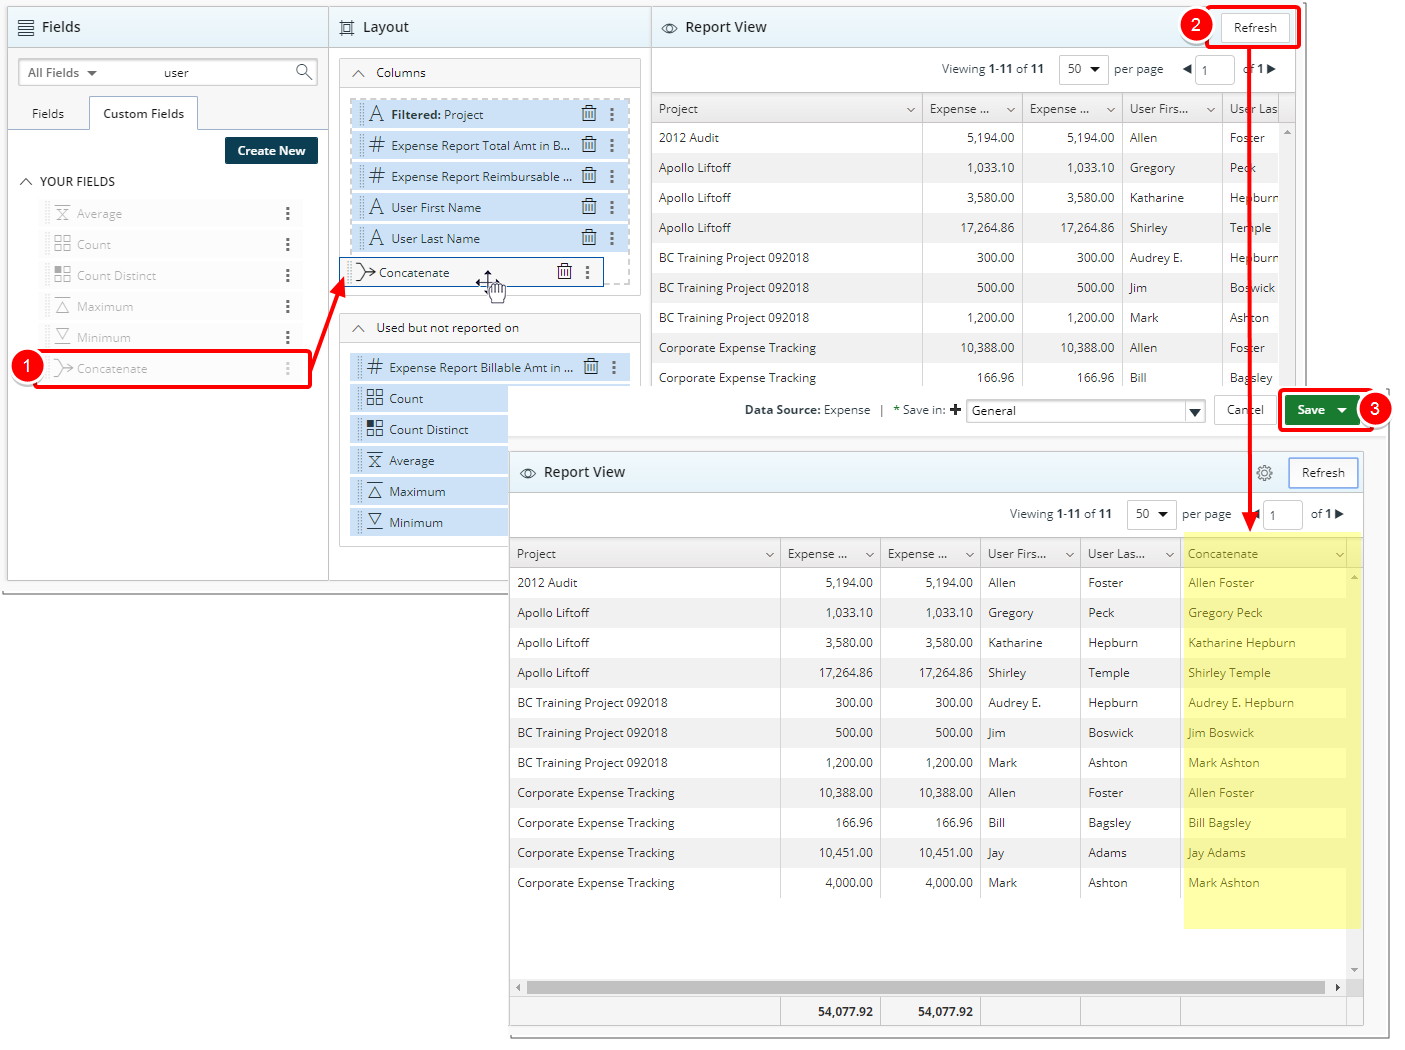
- From the Custom Fields tab drop the newly created Custom Field into the Layout section.
- Click Refresh to view your changes.
- View newly added Concatenate column in your report.
- Click Save.
Menu