React Native
Getting started
Installing Localytics Module
React Native version
We recommend you use the latest stable version of React Native, defined in package.json. The Localytics SDK was last verified against version 0.71.4.
"dependencies": {
  ...
  "react-native": "0.71.4",
  ...
}
Install npm module
$ cd YourProjectDirectory
$ npm install
For users who support RN 0.60 and above use the following with androidX support:
$ npm install -S localytics-react-native
For users who support RN 0.59 and below use the following:
$ npm install -S localytics-react-native-legacy
React Native Link
There are a few possible ways to link the Localytics React Native wrapper to your project. For apps on React Native version 0.60.x and above, it is highly suggested that you take advantage of the autolinking feature introduced by React Native. The Localytics SDK supports autolinking as of version 2.8.2.
For apps on React Native version 0.59.x and below, please proceed to the section on manual linking
-
Manual Linking the SDK as a dependency (Skip this if you are using Autolinking):
$ cd YourProjectDirectory
For users who support RN 0.60 and above use the following with androidX support:
$ react-native link localytics-react-native
For users who support RN 0.59 and below use the following:
$ react-native link localytics-react-native-legacy
-
Ensure the iOS cocoapod is installed:
$ cd iOS
$ pod install
-
Update your project’s top-level build.gradle script to include the Localytics Maven repository.
allprojects {
    repositories {
        ...
        google()
        jcenter()
        maven { url 'https://maven.localytics.com/public' }
        ...
    }
}
That's it! You're all set to begin integrating Localytics in your project.
Integrating iOS
1. Configure Test mode
To configure test mode, you'll need to setup a URL scheme. The URL scheme is defined as "amp" followed by your Localytics app key, as demonstrated below. You can find your app key in the Localytics Dashboard. If you switch between multiple Localytics app keys, as when you have separate testing and production app keys, there's no harm in registering both URL schemes.
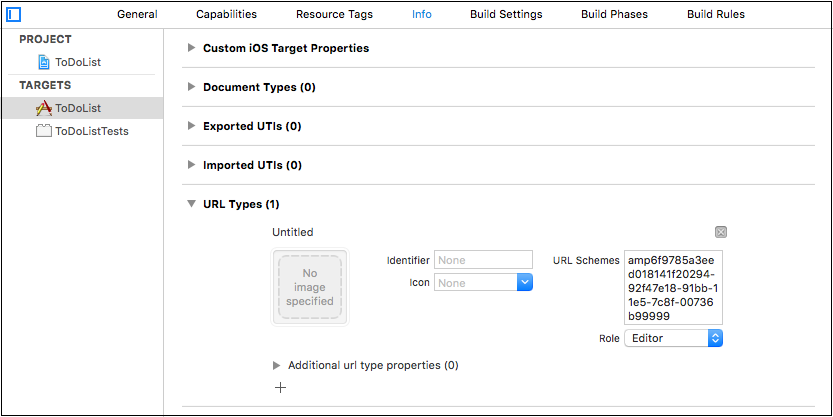
- Enter Project Navigator view and click on your project icon. It should be at the top of the Project Navigator.
- Select your target from the sidebar or from the dropdown menu, then select the Info tab.
- Open the URL Types expander and click +.
- In the URL Schemes field, enter "amp" followed by your Localytics app key.
2. Initialize the SDK
In order to run the Localytics SDK, you must initialize the SDK using your Localytics app key. You can find your app key in the Localytics Dashboard.
In your AppDelegate.mm:
-
Import the Localytics SDK under any existing imports.
#import <Localytics/Localytics.h>import Localytics
-
Add the following line to the start of didFinishLaunchingWithOptions:.
[Localytics autoIntegrate:@"YOUR-LOCALYTICS-APP-KEY"
    withLocalyticsOptions:@{
                            LOCALYTICS_WIFI_UPLOAD_INTERVAL_SECONDS: @5,
                            LOCALYTICS_GREAT_NETWORK_UPLOAD_INTERVAL_SECONDS: @10,
                            LOCALYTICS_DECENT_NETWORK_UPLOAD_INTERVAL_SECONDS: @30,
                            LOCALYTICS_BAD_NETWORK_UPLOAD_INTERVAL_SECONDS: @90
                          }
            launchOptions:launchOptions];
Localytics.autoIntegrate("YOUR-LOCALYTICS-APP-KEY", withLocalyticsOptions:[
                        LOCALYTICS_WIFI_UPLOAD_INTERVAL_SECONDS: 5,
                        LOCALYTICS_GREAT_NETWORK_UPLOAD_INTERVAL_SECONDS: 10,
                        LOCALYTICS_DECENT_NETWORK_UPLOAD_INTERVAL_SECONDS: 30,
                        LOCALYTICS_BAD_NETWORK_UPLOAD_INTERVAL_SECONDS: 90
                      ], launchOptions: launchOptions)
Localytics attempts to upload user data quickly to our backend to power time sensitive messaging use cases. By default, Localytics will upload data periodically based on the state of a user's network connection. However, you have full flexibility over this behavior. While not recommended, you can change the upload intervals for each type of connection, and even remove this type of behavior entirely and depend on your own Localytics.upload() calls to upload data whenever you wish.
To use the default intervals provided by Localytics, you can pass in nil into localyticsOptions. If you would like to disable scheduled uploads, pass in -1 as the value for all keys.
The available keys for setting upload intervals are:
- LOCALYTICS_WIFI_UPLOAD_INTERVAL_SECONDS: Defines the interval that will be used in the case of a WiFi connection. Having a WiFi connection will supersede any mobile data connection. Default value is 5 seconds.
- LOCALYTICS_GREAT_NETWORK_UPLOAD_INTERVAL_SECONDS: Defines the interval that will be used in the case of 4G or LTE connections. Default value is 10 seconds.
- LOCALYTICS_DECENT_NETWORK_UPLOAD_INTERVAL_SECONDS: Defines the interval that will be used in the case of 3G connection. Default value is 30 seconds.
- LOCALYTICS_BAD_NETWORK_UPLOAD_INTERVAL_SECONDS: Defines the interval that will be used in the case of 2G or EDGE connections. Default value is 90 seconds.
-
Compile and run your app.
Integrating Android
1. Configure Test Mode
Test mode intent-filter within your MainActivity activity element under the existing intent-filter (i.e. the one for android.intent.action.MAIN). Replace YOUR-LOCALYTICS-APP-KEY with your Localytics app key and be sure to prepend YOUR-LOCALYTICS-APP-KEY with amp as shown below.<intent-filter>
<data android:scheme="ampYOUR-LOCALYTICS-APP-KEY" />
<action android:name="android.intent.action.VIEW" />
<category android:name="android.intent.category.DEFAULT" />
<category android:name="android.intent.category.BROWSABLE" />
</intent-filter>
2. Add localytics.xml resource file
In order to run the Localytics SDK, you must initialize the SDK using your Localytics app key. You can find your app key in the Localytics Dashboard.
SDK 5.0 takes advantage of manifest merging in Android. This will help you quickly set up Localytics in your project by automatically including receivers and services in your Android Manifest.
To use manifest merging, the Localytics SDK relies on the presence of a localytics.xml file in the main/res/values directory of your project. You can download a sample localytics.xml file here.
Additionally, should you need to change any values, you can take a look at the full list of possible keys and how they are used.
3. Modify the MainActivity.java
Add the following imports.
import android.content.Intent;
import com.localytics.androidx.Localytics;
Add the following to the onNewIntent method.
@Override
public void onNewIntent(Intent intent) {
  super.onNewIntent(intent);

  Localytics.onNewIntent(this, intent);
}
4. Modify the MainApplication.java
Add the following import:
import com.localytics.androidx.Localytics;
Add the following to the onCreate method.
@Override
public void onCreate() {
  super.onCreate();
  SoLoader.init(this, /* native exopackage */ false);

  Localytics.autoIntegrate(this);
}
Importing LLLocalytics
You'll need to import LLLocalytics into each of the javascript files you use Localytics in. Add the following line as an import in your app's javascript files.
import LLLocalytics from 'localytics-react-native';
Now, you can reference LLLocalytics as follows.
LLLocalytics.tagEvent({...})
Next steps
Congratulations! You have successfully performed the basic Localytics integration and are now sending session data to Localytics. You can also use Localytics In-App Messaging to message users in your app, and you have everything you need to track where your most highly engaged users are coming from.
Note that it may take a few minutes for your first datapoints to show up within the Localytics Dashboard. In the meantime, we suggest reading the next few sections to learn how to:
- Track one user action as an event
- Track one user property as a profile attribute
- Integrate push messaging
We recommend doing these things before releasing your app for the first time with Localytics.
Session lifecycle
With just the basic setup above, the Localytics SDK automatically tracks user engagement and retention by tracking patterns of foregrounding and backgrounding of your app. Upon foregrounding, the Localytics SDK automatically creates and uploads a "start session" datapoint that captures many details about the user's device (e.g., device model, OS version, device IDs) and is used for powering charts within Localytics.
Upon backgrounding, the SDK marks the current time. When the user returns to the app later and it has been more than 15 seconds (or a manually set session timeout) since the user had last backgrounded the app, the SDK will close the previous session by creating a "close session" datapoint, create a new "start session" datapoint, and upload both of these datapoints. If the user foregrounds the app within the session timeout of the previous backgrounding, the previous session is resumed as if the user had not left the app at all. Due to this automatic session lifecycle tracking, Localytics is able to derive session length, session interval, session counts, session trending, and a number of other core metrics for exploration in the Localytics Dashboard.
Whenever the app transitions to the foreground or background, the Localytics SDK attempts to upload any datapoints which are cached on the device. Uploads are performed in batches to reduce network use and increase the likelihood of successful uploads. Data remains on the device until it is successfully uploaded, and only then does the SDK remove it from the device.
Starting in SDK v5.0, the Localytics SDK also will attempt to upload any datapoints periodically using set intervals based on a user's network connection.
Tagging events
Track user actions in your app using events in Localytics. All events must have a name, but you can also track the details of the action with event attributes. Event attributes help to provide context about why and how the action occurred. Every event can have up to 50 attributes unique to that event with each attribute having a limit of 255 characters.
Standard events
Standard events make it easier to analyze user behavior and optimize your app marketing around common business goals such as driving user registrations or purchases. You can also tag custom events for other user behavior in your app that doesn't match one of the standard events.
Purchased
LLLocalytics.tagPurchased({'itemName': 'Shirt', 'itemId': 'sku-123', 'itemType': 'Apparel', 'itemPrice': 15, 'attributes': {'extraAttributeKey': 'extraAttributeValue'}});
Added to Cart
LLLocalytics.tagAddedToCart({'itemName': 'Shirt', 'itemId': 'sku-123', 'itemType': 'Apparel', 'itemPrice': 15, 'attributes': {'extraAttributeKey': 'extraAttributeValue'}});
Started Checkout
LLLocalytics.tagStartedCheckout({'itemCount': 50, 'totalPrice': 2, 'attributes': {'extraAttributeKey': 'extraAttributeValue'}});
Completed Checkout
LLLocalytics.tagCompletedCheckout({'itemCount': 50, 'totalPrice': 2, 'attributes': {'extraAttributeKey': 'extraAttributeValue'}});
Content Viewed
LLLocalytics.tagContentViewed({'contentName': 'Top 10', 'contentId': 'e8z7319zbe', 'contentType': 'Article', 'attributes': {'extraAttributeKey': 'extraAttributeValue'}});
Searched
LLLocalytics.tagSearched({'queryText': 'Celtics', 'contentType': 'Sports', 'resultCount': 15, 'attributes': {'extraAttributeKey': 'extraAttributeValue'}});
Content Rated
LLLocalytics.tagContentViewed({'contentName': 'Headlines', 'contentId': '8a4z5j9q', 'contentType': 'Song', 'Rating': 5, 'attributes': {'extraAttributeKey': 'extraAttributeValue'}});
Customer Registered
The customer parameter is optional - you can pass in null. However, if you do choose to include an customer object, the appropriate identifying users properties will be automatically set.
var customer = {'customerId': '3neRKTxbNWYKM4NJ',
                 'firstName': 'John',
                  'lastName': 'Smith',
                  'fullName': 'Sir John Smith, III',
              'emailAddress': 'sir.john@smith.com'};

LLLocalytics.tagCustomerRegistered({'customer': customer, 'methodName': 'Facebook', 'attributes': {'extraAttributeKey': 'extraAttributeValue'}});
Customer Logged In
The customer parameter is optional - you can pass in null. However, if you do choose to include an customer object, the appropriate identifying users properties will be automatically set.
var customer = {'customerId': '3neRKTxbNWYKM4NJ',
                 'firstName': 'John',
                  'lastName': 'Smith',
                  'fullName': 'Sir John Smith, III',
              'emailAddress': 'sir.john@smith.com'};

LLLocalytics.tagCustomerLoggedIn({'customer': customer, 'methodName': 'Facebook', 'attributes': {'extraAttributeKey': 'extraAttributeValue'}});
Customer Logged Out
LLLocalytics.tagLoggedOut({'extraAttributeKey': 'extraAttributeValue'});
Invited
LLLocalytics.tagInvited({'methodName': 'SMS', 'attributes': {'extraAttributeKey': 'extraAttributeValue'}});
Custom event
LLLocalytics.tagEvent({'name': 'Team Favorited'});
Custom event with attributes
LLLocalytics.tagEvent({'name': 'Team Favorited', 'attributes': {'Team Name': 'Celtics', 'City': 'Boston'}});
Identifying users
The Localytics SDK automatically captures and uploads device IDs which the Localytics backend uses to uniquely identify users. Some apps connect to their own backend systems that use different IDs for uniquely identifying users. There is often additional identifying information, such as name and email address, connected with the external IDs. Localytics provides various setters for passing this information to Localytics when it is available in your app. Using these setters ensures that you will be able to properly connect Localytics IDs to the IDs available in other systems.
To easily identify your users during your login and/or registration flow, use our customer registered and customer logged in standard events.
Customer ID
LLLocalytics.setCustomerId('3neRKTxbNWYKM4NJ');
Customer first name
LLLocalytics.setCustomerFirstName('John');
Customer last name
LLLocalytics.setCustomerLastName('Smith');
Customer full name
LLLocalytics.setCustomerFullName('Sir John Smith, III');
Customer email address
LLLocalytics.setCustomerEmail('sir.john@smith.com');
User profiles
Track user properties using profile attributes in Localytics. Each profile has one or more named properties that describe that user. Because they contain rich user data, profiles are excellent for creating audiences to target with personalized messaging. Each profile is identified by a unique user ID that you provide to Localytics via the SDK. If you do not set a known user ID, then the Localytics SDK automatically generates an anonymous profile ID.
Each time you set the value of a profile attribute, you can set the scope to "app-level" or "org-level". App-level profile attributes are only stored in relation to that specific Localytics app key, so they can only be used for building audiences for that one app. Org-level profile attributes are available to all apps in the org, so they can be used across multiple Localytics app keys, which might represent the same app on a different platform or multiple apps produced by your company. If you choose not to set a scope, the SDK defaults to "app-level" scope.
If you repeatedly set the same profile attribute value, the Localytics SDK and backend will take care of deduplicating the values for you so only the most recent value gets stored for that profile.
Passing in dates
You'll need to pass dates as a String in YYYY-MM-DD format. Follow the sample below to properly format your String.
function formattedDate() {
   var d = new Date();
	var month = '' + (d.getMonth() + 1);
	var day = '' + d.getDate();
	var year = d.getFullYear();

   if (month.length < 2) month = '0' + month;
   if (day.length < 2) day = '0' + day;

   return [year, month, day].join('-');
}

var dateString = formattedDate();
Setting a profile attribute value
Numeric value
LLLocalytics.setProfileAttribute({'name': 'Age', 'value': 45, 'scope': 'org'});
Numeric values in a set
LLLocalytics.setProfileAttribute({'name': 'Lucky numbers', 'value': [8, 13], 'scope': 'app'});
Date value
LLLocalytics.setProfileAttribute({'name': 'Birthday', 'value': '1962-11-23', 'scope': 'org'});
Date values in a set
LLLocalytics.setProfileAttribute({'name': 'Upcoming Milestone Dates', 'value': ['2015-10-01', '2016-03-17'], 'scope': 'app'});
String value
LLLocalytics.setProfileAttribute({'name': 'Hometown', 'value': 'New York, New York', 'scope': 'org'});
String values in a set
LLLocalytics.setProfileAttribute({'name': 'States Visited', 'value': ['New York', 'California', 'South Dakota'], 'scope': 'app'});
Removing a profile attribute
LLLocalytics.deleteProfileAttribute({'name': 'Days until graduation', 'scope': 'app'});
Adding to a set of profile attribute values
Adding a numeric value to a set
LLLocalytics.addProfileAttributesToSet({'name': 'Lucky numbers', 'values': [7, 21], 'scope': 'app'});
Adding a date value to a set
LLLocalytics.addProfileAttributesToSet({'name': 'Upcoming Milestone Dates', 'values': ['2015-04-19', '2015-12-24'], 'scope': 'app'});
Adding a string value to a set
LLLocalytics.addProfileAttributesToSet({'name': 'States Visited', 'values': ['North Dakota'], 'scope': 'app'});
Removing from a set of profile attribute values
Removing numeric values from a set
LLLocalytics.removeProfileAttributesFromSet({'name': 'Lucky numbers', 'values': [8, 9], 'scope': 'app'});
Removing date values from a set
LLLocalytics.removeProfileAttributesFromSet({'name': 'Upcoming Milestone Dates', 'values': ['2016-03-17'], 'scope': 'app'});
Removing string values from a set
LLLocalytics.removeProfileAttributesFromSet({'name': 'States Visited', 'values': ['California'], 'scope': 'app'});
Incrementing a numeric profile attribute value
LLLocalytics.incrementProfileAttribute({'name': 'Age', 'value': 1, 'scope': 'org'});
Decrementing a numeric profile attribute value
LLLocalytics.decrementProfileAttribute({'name': 'Days until graduation', 'value': 3, 'scope': 'app'});
In-app messaging
In-app messaging allows you to engage with your users while they are inside your app using templated or custom HTML creatives that you define within the Localytics Dashboard.
Triggering an in-app message
When creating in-app campaigns in the Localytics Dashboard, you decide under which conditions the in-app creative should display. You can trigger in-app messages to display at session start. You can also trigger in-app messages to display when a particular event is tagged using the event name alone or using the event name combined with attribute conditions.
Sometimes, you just want to display an in-app message, but there is not an existing event tag of which to take advantage, and you don't want to create an additional event datapoint solely to display a message. In this situation, Localytics marketing triggers allow you to trigger in-app messages off of specific user behaviors that you do not have tagged as an event in the Localytics dashboard.
There are a variety of scenarios where these triggers might be relevant:
- You have a lot of Summary Events tagged, and Summary Events do not allow for granular behavioral triggering of messages.
- You do not want to pass a particular behavior as an Event to the Localytics dashboard because the behavior is so frequent that an Event tag would incur high data point usage.
Instrumenting marketing triggers
Instrumenting Marketing Triggers in the app’s code base is simple. It’s essentially the same as tagging an Event, but rather than using LLLocalytics.tagEvent() you will use the following:
LLLocalytics.triggerInAppMessage({'triggerName': 'Item Purchased'});
Marketing triggers with attributes
To create a trigger with additional attribute conditions, use:
LLLocalytics.triggerInAppMessage({'triggerName': 'Item Purchased', 'attributes': {'Item Name': 'Stickers'}});
Because there’s no data about that trigger in the Localytics backend, you’ll need to manually send the trigger attribute mappings to Localytics via a reported Event instead, at least one time. Essentially, you must fire an actual Event that reaches Localytics server once. You can do this by:
For one session tied to your app key - for example, just in your dev build but tagged with your production key temporarily - switch that triggerInAppMessage call to a standard tagEvent call instead, and run the app through that code to actually send the event to Localytics.
This will populate the event name and attributes in the autocomplete dialog within 10 minutes. Then you can switch the tag back from tagEvent to triggerInAppMessage. From there, you will be able to target on the trigger & attributes as if it were a normal event in the dashboard.
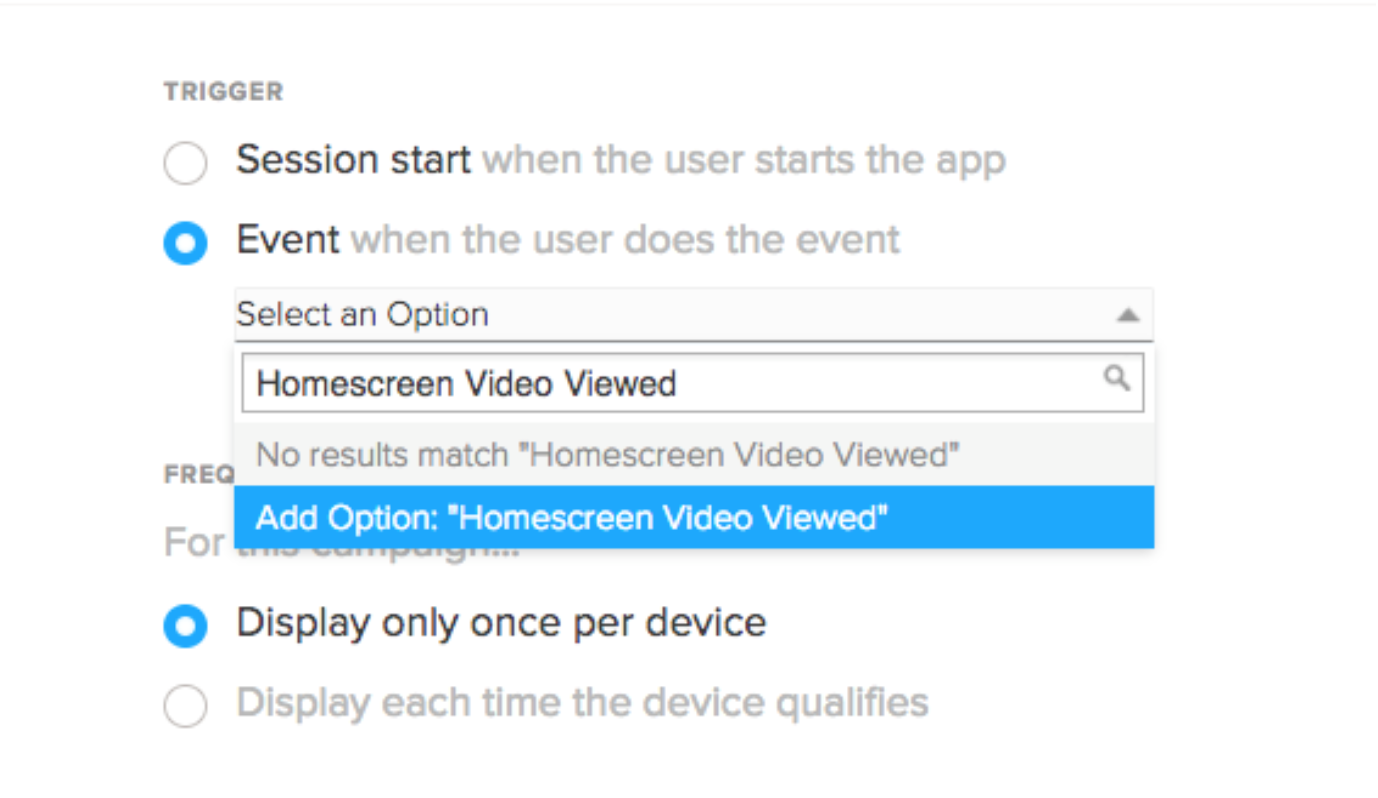
Selecting marketing triggers in the dashboard
Once the marketing trigger has been instrumented in the app’s code base, you can use these to trigger in-app messages in the Localytics dashboard. When you get to the Scheduling page of the campaign setup process, you will chose the “Event” trigger. For these marketing triggers, you will need to type in the name of the marketing trigger in the drop down (as seen below) - it will not automatically populate as the dashboard events do.
Customizing In-App messages
Customize In-App properties
In order to globally customize your In-App messages, you can call the following API:LLLocalytics.setInAppMessageConfiguration({});
- aspectRatio - The value passed in should be a float value representing a ratio of height to width. This property is only relevant for center in-app creatives.
- bannerOffsetDps - The value passed in should always be a positive density independent pixel offset from the top or bottom of the screen. This property is only relevant for top and bottom banner in-app creatives.
- backgroundAlpha - The value passed in should be a float value between 0.0 (transparent) and 1.0 (opaque).
- dismissButtonLocation - The value passed in should be a String with value "left" or "right". This value will override any values set globally with LLLocalytics.setInAppMessageDismissButtonLocation().
- dismissButtonHidden - The value passed in should be a Boolean. If false is set then no dismiss button will be rendered with the In-App. This value will override any values set globally with LLLocalytics.setInAppMessageDismissButtonHidden()
Customize In-Apps using HTML (SDK 2.3+)
As of SDK 2.3 you can modify some native elements of In App messages by modifying the index.html file of your creative. To do so, attach a data-localytics attribute to the meta name="viewport" element. The attributes should be a String containing a number of key values seperated by commas. An example might look as follows:
<html>
  <head>
    <meta http-equiv="content-type" content="text/html; charset=utf-8" />
    <meta name="viewport" content="width=device-width, initial-scale=1.0" data-localytics="notch_fullscreen=true, close_button_visibility=visible, close_button_position=right, offset=50, aspect_ratio=1.5, background_alpha=0.8" />
The list of available modifications is as follows:
- notch_fullscreen (iOS Only):: Modify if the In App will render across the entirety of the screen (outside of the safe area) on devices with a notch such as the iPhone X series. If set to true, this will render into the space surrounding the notch.
- close_button_visibility: Modify the visibility of the dismiss button. Valid values are hidden and visible. This option should only be used if the creative provides it's own close button.
- close_button_position: Modify the position of the dismiss button. Valid values are right and left.
- banner_offset: Only relevant to banner In App campaigns, this key defines an offset in pixels from the top or bottom of the screen. Valid values are any positive integer value.
- aspect_ratio: Only relevant to center In App campaigns, this key modifies the aspect ratio of the native window. Valid values are any float, although we suggest keeping the range within 1.0 and 3.0.
- background_alpha: Only relevant to fullscreen and center In App campaigns, this key modifies the transparency of the native window. Valid values are any float between 0.0 (transparent) and 1.0 (opaque).
Customize Individual In-App campaigns
In order to make changes to individual campaigns, you will need to set a messaging listener in native code. In order to accomplish this please follow the documentation in the android and iOS documentation
Note: Setting a messaging listener in native code will override any values set in the previously listed customization APIs.
Custom Creative Javascript API
The Localytics SDK adds a localytics Javascript function to the in-app HTML that provides access to several native SDK methods and properties and handles URL navigation and in-app dismissal.
The localytics Javascript function is only added to the in-app after the web view has finished loading, and initial rendering has completed. As a result, if you are trying to render content based on Localytics data (such as a custom dimension), we suggest calling Localytics asynchronously and including some type of loading indicator.
The sections below cover the details of the in-app Javascript API. It is crucial to understand these APIs when designing and uploading your own custom creatives. Note: When using the in-app message builder, calls to these APIs will be handled automatically.
Properties Accessors
localytics.campaign (Only available on SDK 4.3 and later): Returns a Javascript object containing information about the campaign that triggered this In-App message. The javascript object contains the campaign name as it would appear on the dashboard (name), the campaign ID (campaignId), the name of the event that triggered the In-App (eventName), and the attribute keys and values tagged on the event or trigger that launched the in-app message (eventAttributes).
var campaign = localytics.campaign; // {"name": "App Upgrade Campaign", "campaignId": "449859", "eventName": "App Launch", "eventAttributes": {"isFirstSession": "NO"}};
localytics.identifiers: Returns a Javascript object containing a user's identifying data: customer_id, first_name, last_name, full_name, and email. Note: These values will only be populated if you have set them for the user directly via the SDK.
var identifiers = localytics.identifiers; // {"customer_id": "3neRKTxbNWYKM4NJ", "first_name": "John", "last_name": "Smith", "full_name": "Sir John Smith, III", "email": "sir.john@smith.com"};
localytics.customDimensions: Returns a Javascript object containing the current session's custom dimensions. The keys of the object will be "c0", "c1", etc. for dimensions that have been set.
var dimensions = localytics.customDimensions; // {"c0": "Paid", "c1": "Logged In"};
localytics.attributes: Returns a Javascript object containing the attribute keys and values tagged on the event or trigger that launched the in-app message.
var eventAttributes = localytics.attributes; // {"Team Name": "Celtics", "City": "Boston"};
localytics.libraryVersion: Returns the Localytics SDK version as a string.
var sdkVersion = localytics.libraryVersion; // "iOSa_4.3.0"
Methods
localytics.tagClickEvent(action) (Only available on SDK 4.3 and later): Tags an in-app clickthrough (also kown as a conversion) with an optional action attribute. If the action attribute is omitted, the default of click will be used. This method can only be called once per in-app. The first time this method is called an event will be recorded, and any subsequent calls will be ignored.
localytics.tagClickEvent("Share");
localytics.tagEvent(event, attributes, customerValueIncrease): Tags an event with optional attributes and an optional custom value increase.
function submitNPS(ratingValue) {
  var attributes = {"Raw Rating": ratingValue};
  if (ratingValue >= 9) {
    attributes["Rating"] = "Promoter";
  } else if (ratingValue <= 6) {
    attributes["Rating"] = "Detractor";
  } else {
    attributes["Rating"] = "Neutral";
  }
  localytics.tagEvent("In-App Rating Result", attributes);
}
localytics.setCustomDimension(index, value): Sets a custom dimension value for a particular index.
localytics.setCustomDimension(0, "Trial");
localytics.close(): Closes the in-app. If an in-app message viewed event hasn't been tagged (i.e. ampView), an event with ampAction equal to "X" will be tagged.
function formSubmit() {
  localytics.tagEvent("Form Submit", {"Email": "john@smith.com"});
  localytics.close();
}
localytics.setProfileAttribute(name, value, scope) (Only available on SDK 4.3 and later): Sets a profile attribute with an optional scope ("app" or "org").
localytics.setProfileAttribute("Favorite Team", "Red Sox", "app");
localytics.deleteProfileAttribute(name, scope) (Only available on SDK 4.3 and later): Delete a profile attribute with an optional scope ("app" or "org").
localytics.deleteProfileAttribute("Favorite Team", "app");
localytics.addProfileAttributesToSet(name, values, scope) (Only available on SDK 4.3 and later): Add profile attributes with an optional scope ("app" or "org").
localytics.addProfileAttributesToSet("Favorite Team", ["Red Sox", "Celtics"], "org");
localytics.removeProfileAttributesFromSet(name, values, scope) (Only available on SDK 4.3 and later): Remove profile attributes with an optional scope ("app" or "org").
localytics.removeProfileAttributesFromSet("Favorite Team", ["Red Sox", "Celtics"], "org");
localytics.incrementProfileAttribute(name, value, scope) (Only available on SDK 4.3 and later): Increment a profile attribute with an optional scope ("app" or "org").
localytics.incrementProfileAttribute("Age", 1, "app");
localytics.decrementProfileAttribute(name, value, scope) (Only available on SDK 4.3 and later): Decrement a profile attribute with an optional scope ("app" or "org").
localytics.decrementProfileAttribute("Days Until Graduation", 3, "org");
localytics.setCustomerFirstName(name, value, scope) (Only available on SDK 4.3 and later): Set the user's first name.
localytics.setCustomerFirstName("John");
localytics.setCustomerLastName(name, value, scope) (Only available on SDK 4.3 and later): Set the user's last name.
localytics.setCustomerLastName("Smith");
localytics.setCustomerFullName(name, value, scope) (Only available on SDK 4.3 and later): Set the user's full name.
localytics.setCustomerFullName("Sir John Smith, III");
localytics.setCustomerEmail(name, value, scope) (Only available on SDK 4.3 and later): Set the user's email.
localytics.setCustomerEmail("sir.john@smith.com");
localytics.setOptedOut(optedOut) (Only available on SDK 5.2 and later): Opt the user into or out of data collection. See the advanced section for more details on the implications of this call.
localytics.setOptedOut([true/false]);
localytics.setPrivacyOptedOut(optedOut) (Only available on SDK 5.2 and later): Opt the user into or out of data collection. See the advanced section for more details on the implications of this call.
localytics.setPrivacyOptedOut([true/false]);
Push messaging
Push messaging allows you to keep your users up-to-date and reengage them with your app after periods of inactivity.
Before continuing, please be sure that you have completed all of the steps in Getting Started.
iOS Push
View the Localytics iOS Push Messaging docs to integrate push for your iOS build.
Android Push
Firebase Cloud Messaging
A sample project for using Localytics with Firebase Cloud Messaging is available in our React Native samples Github repository.
1. Add Firebase to your React Native project
Follow the instructions for adding Firebase to your Android project. Ensure that you have followed both steps for Adding Firebase to your app and Adding the SDK.
2. Add FCM dependency
Add the following dependencies to the app-level build.gradle.
dependencies {
  compile "com.google.firebase:firebase-core:11.8.0"
  compile "com.google.firebase:firebase-messaging:11.8.0"
}
3. Update the localytics.xml file
The localytics.xml file allows for easy integration of the default Localytics Firebase receivers. Set the following keys to ensure a proper push integration depending on your installation:
- ll_fcm_push_services_enabled to true. Localytics FirebaseService will be included in your manifest. These services will handle collecting of push tokens as well as the rendering of incoming notifications from FCM.
-
ll_push_tracking_activity_enabled to true.
If you installed the SDK manually, you will need to include the following in your manifest:
<activity android:name="com.localytics.androidx.PushTrackingActivity"
  android:enabled="true"/>
Note, that the PushTrackingActivity is launched through a pending intent that has the following flags: Intent.FLAG_ACTIVITY_NEW_TASK and Intent.FLAG_ACTIVITY_CLEAR_TASK, those two flags will ensure that if the app is running and the user presses the notification for action, the app tasks will all be closed and the PushTrackingActivity will lanch as the first activity. if you don't like this behavior and don't want your current activity to be closed you can follow this technique, And include the following in your manifest:
<activity
    android:name="com.localytics.androidx.PushTrackingActivity"
    android:enabled="@bool/ll_push_tracking_activity_enabled"
    android:exported="false"
    android:launchMode="singleTask"
    android:taskAffinity=""
    android:excludeFromRecents="true"/>
- ll_default_push_channel_id: Set this value to define the notification channel that push messaging will use if no channel is set in the dashboard.
- ll_default_push_channel_name: Set this value to define the notification channel's name that push messaging will use if no channel is set in the dashboard. This name will be visible to the end user.
- ll_default_push_channel_description: Set this value to define the notification channel's description that push messaging will use if no channel is set in the dashboard. This description will be visible to the end user.
4. Register for push
Import Platform to target Android devices.
import { Platform } from 'react-native';
import LLLocalytics from 'localytics-react-native';
Register for push notifications in your main component's componentDidMount.
componentDidMount() {
  if (Platform.OS === 'android') {
    LLLocalytics.registerPush();
  }
}
5. Add your server API key to the Localytics Dashboard
-
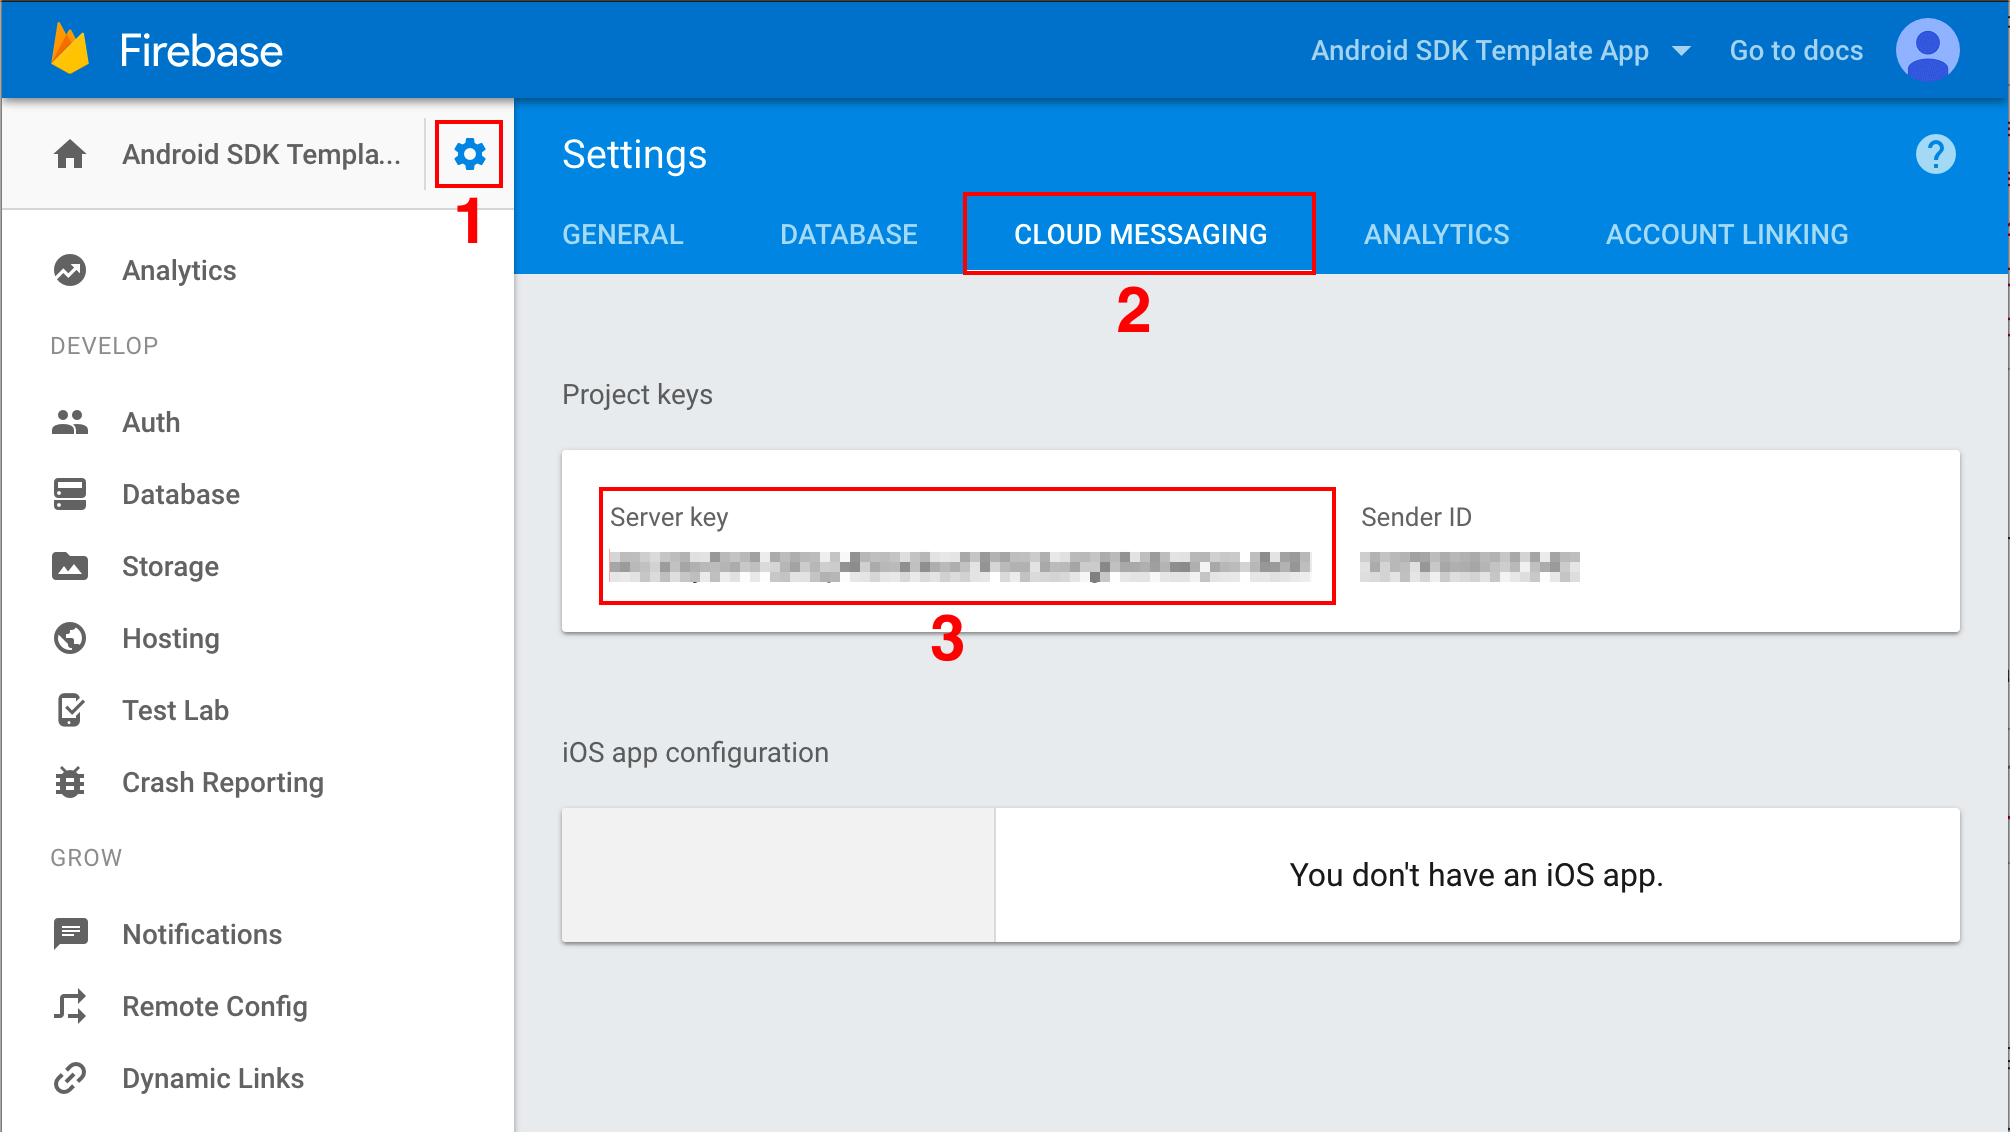
Retrieve your server API key from your Firebase project's settings as shown in the steps in the image below.
-
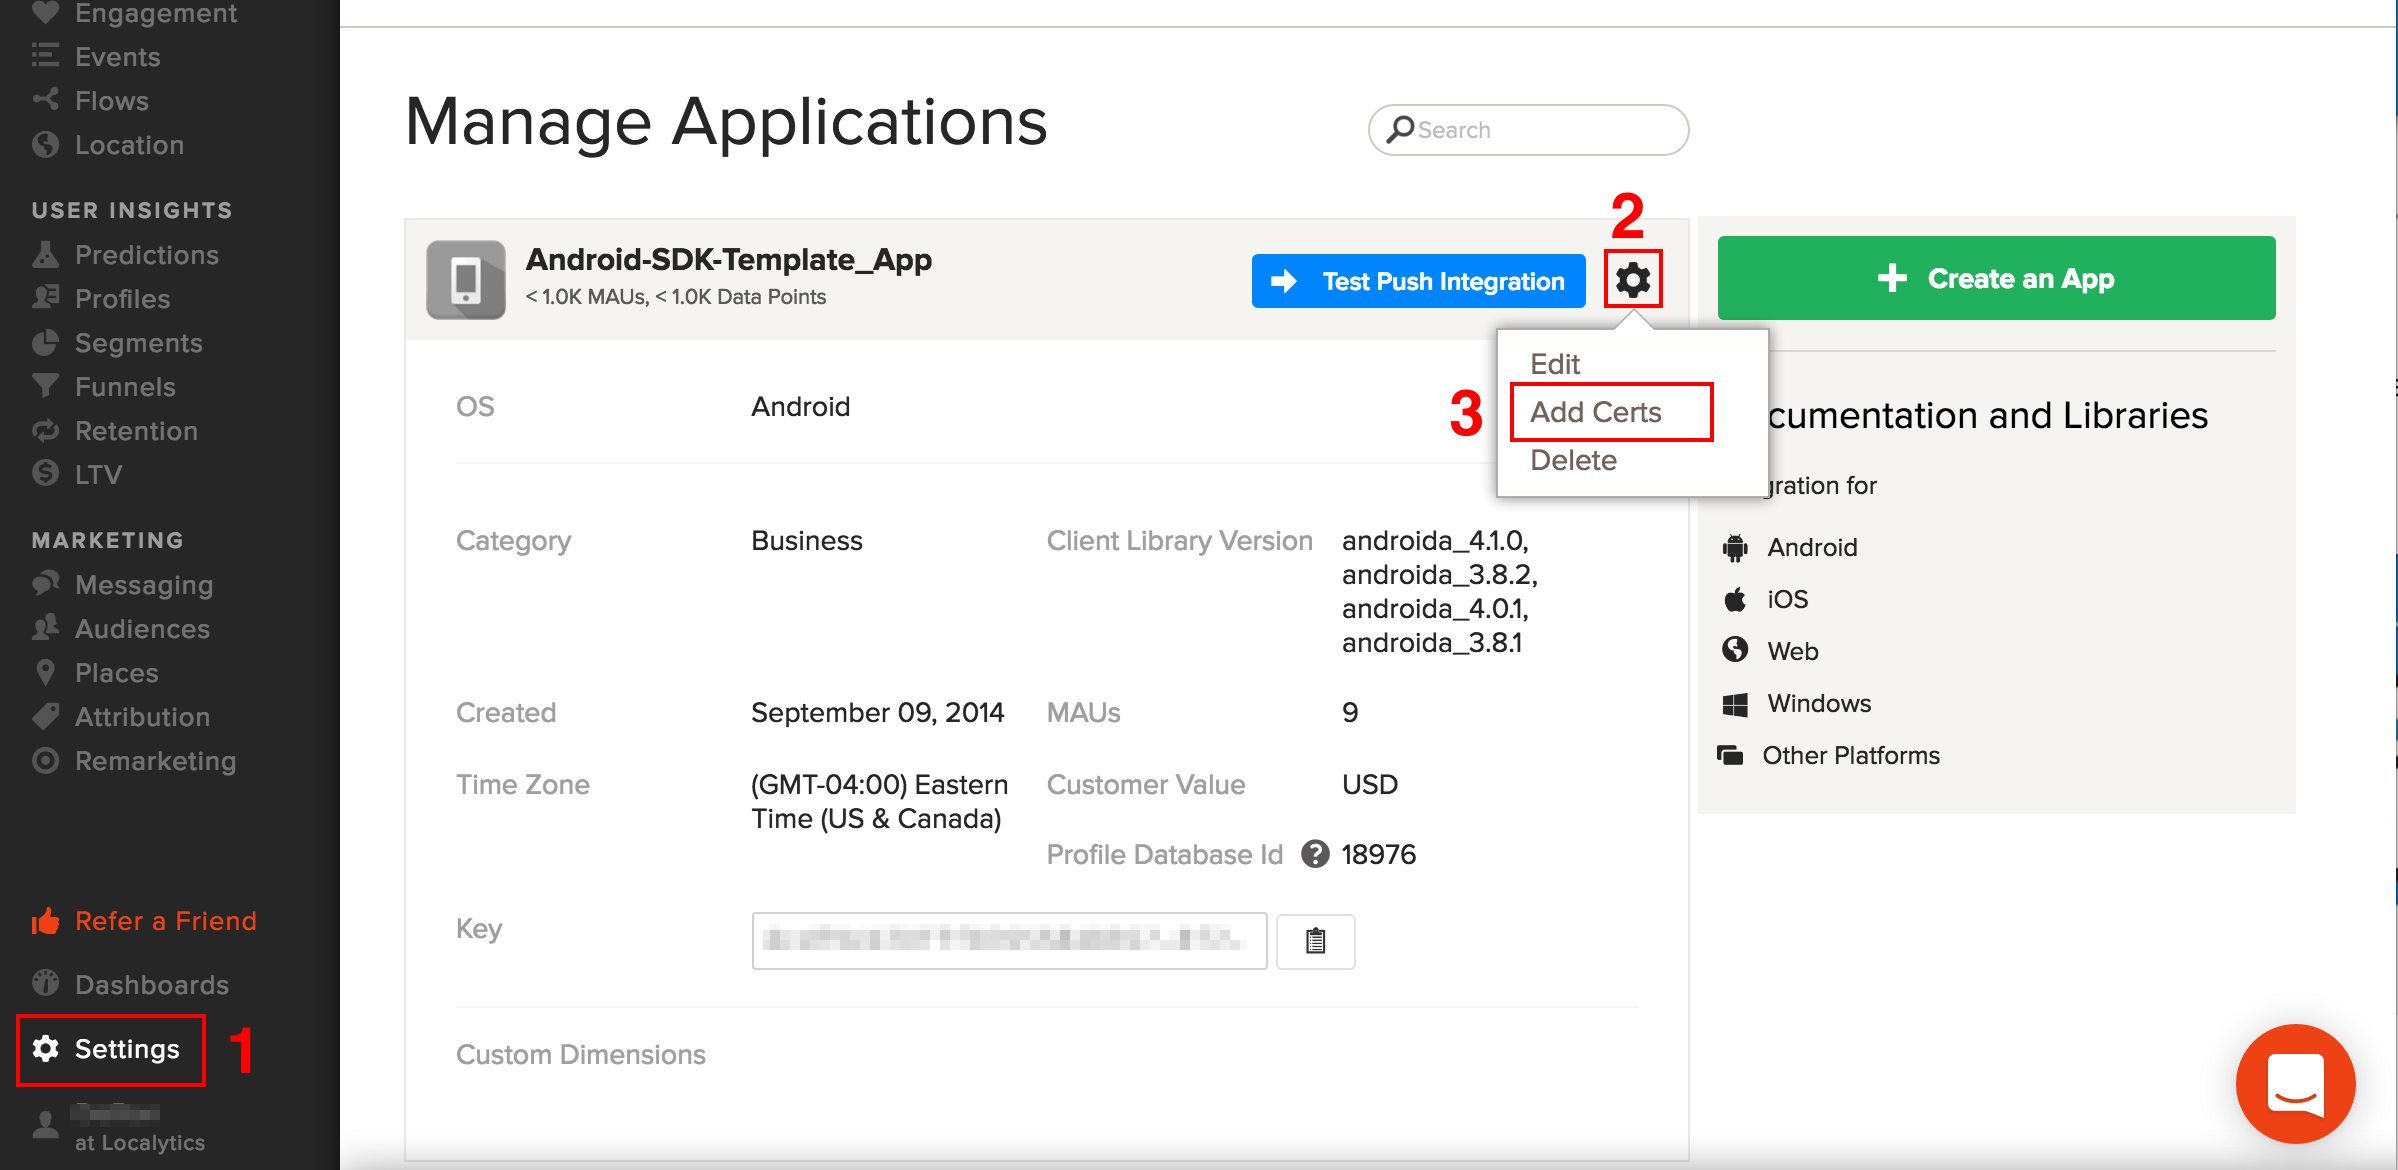
Log in to the Localytics Dashboard, navigate to Settings > Apps, and input your server API key within Add Certs as shown in the steps in the image below.
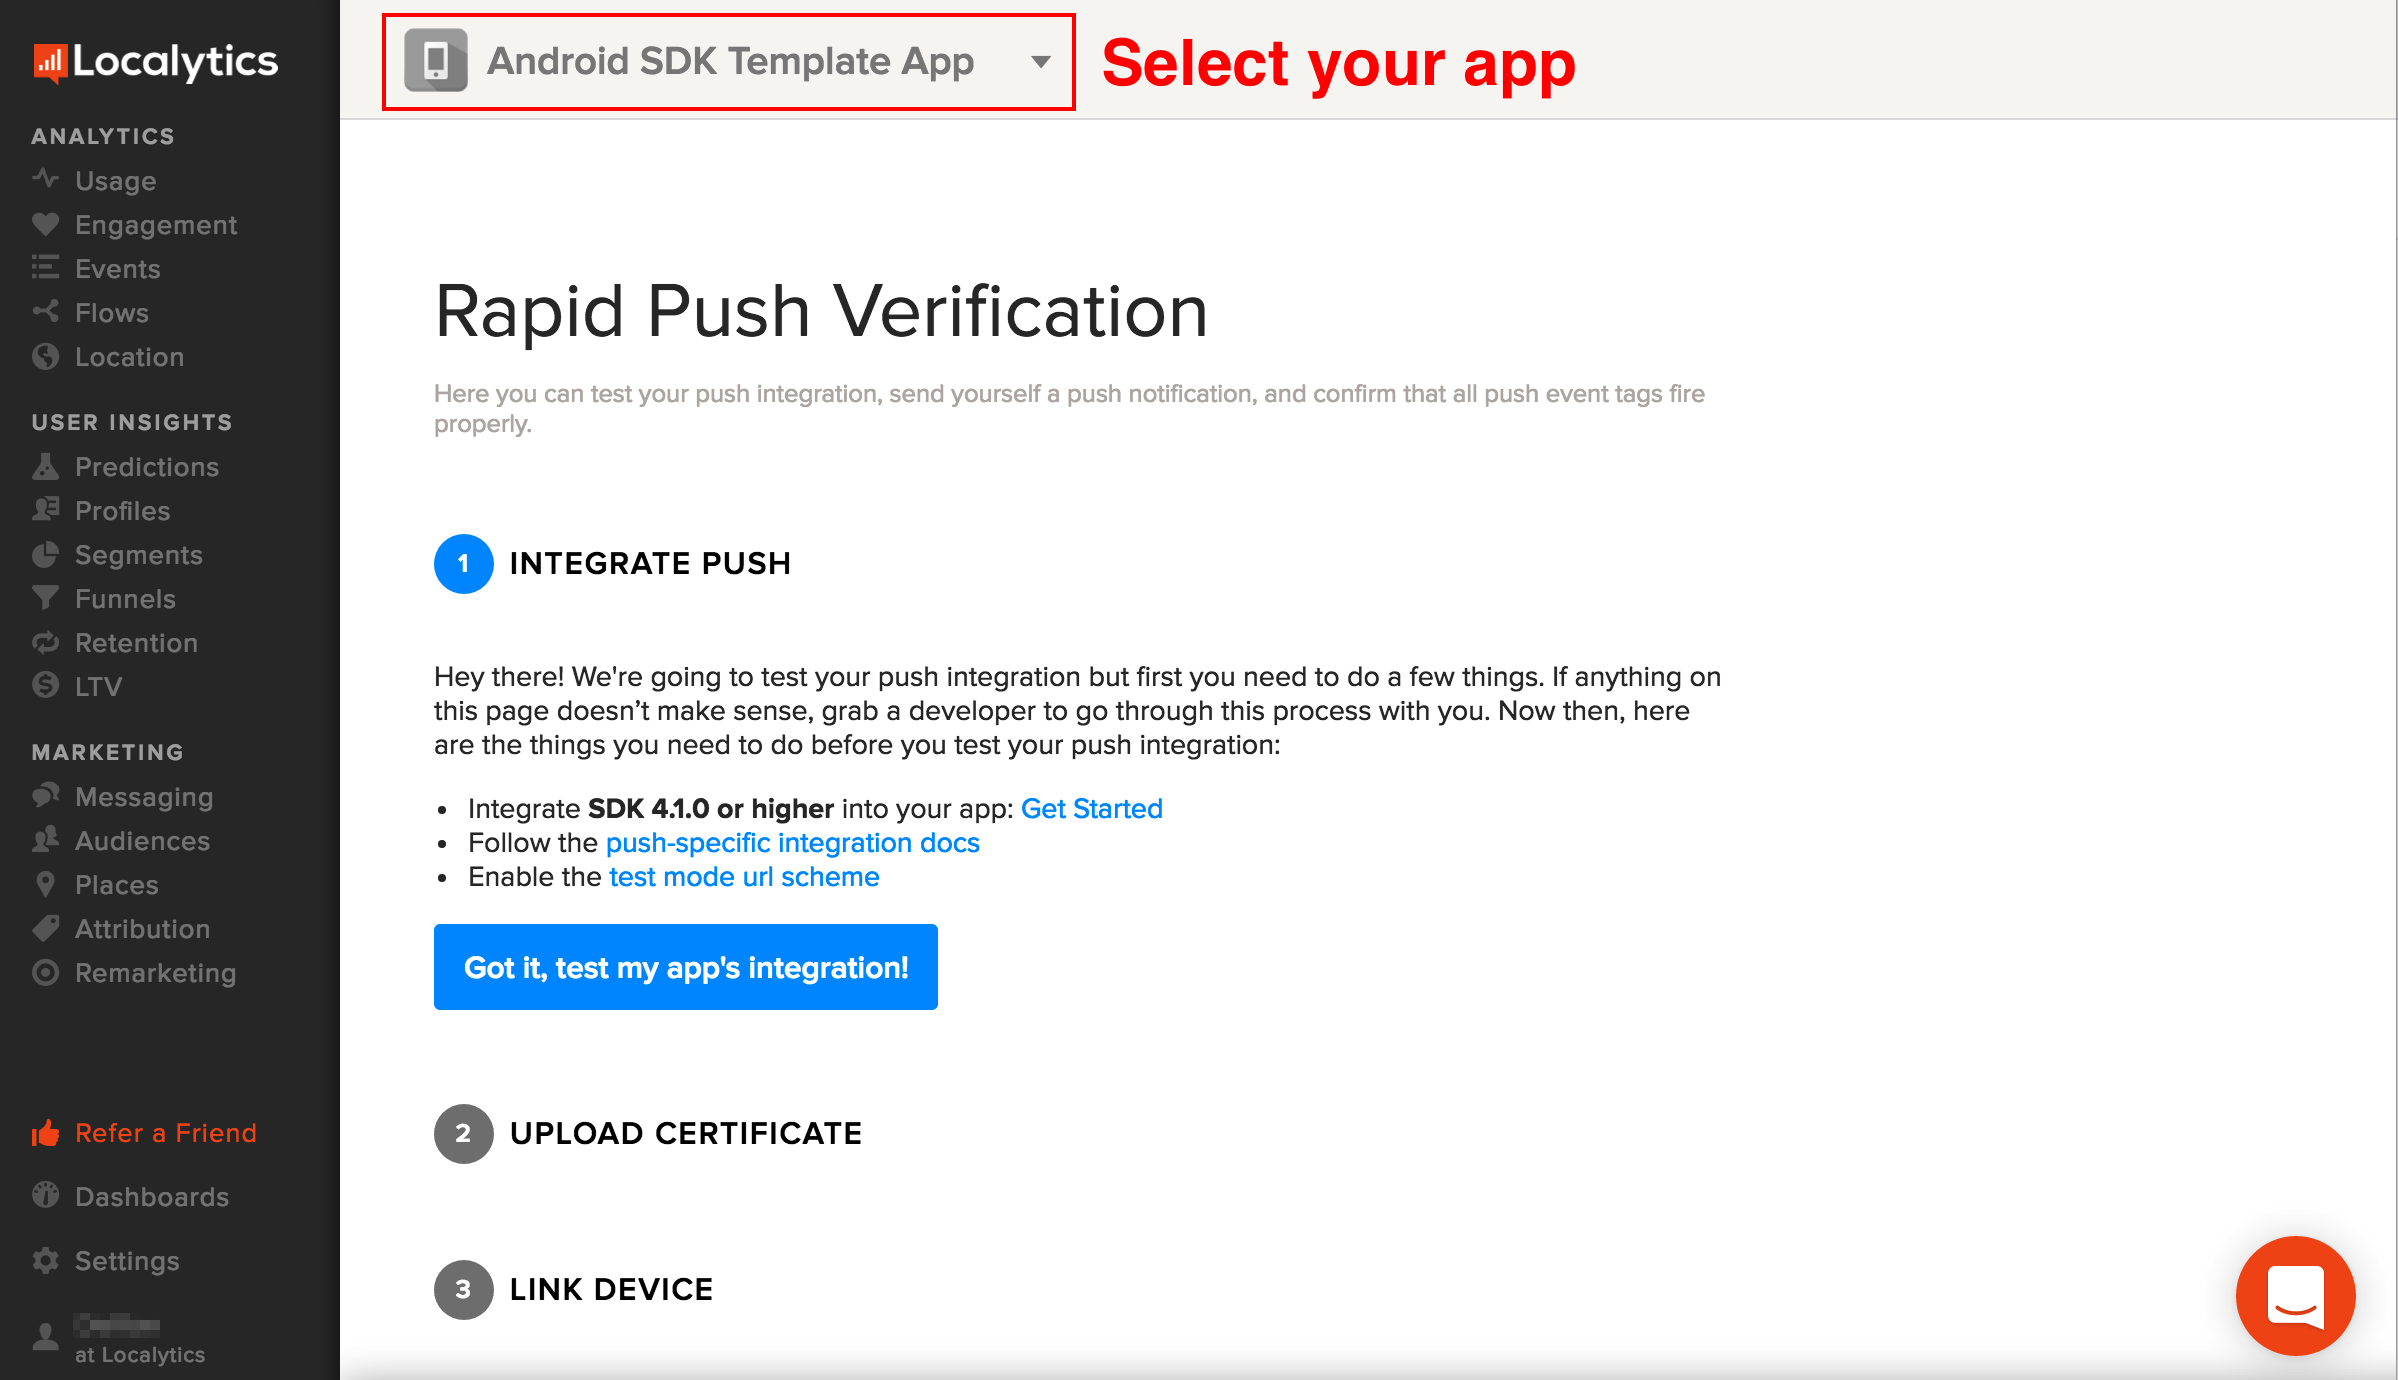
6. Test push integration
If you have integrated SDK version 4.1 or later, use the Rapid Push Verification page to confirm that you have integrated push correctly. Be sure to select the correct app in the dropdown at the top of the page.
7. Next steps
Since the release of Lollipop (API 21), the material design style dictates that all non-alpha channels in notification icons be ignored. Therefore, depending on the shape of your app icon, your notification icon may not appear as desired on devices running Lollipop or later. To change the notification icon and accent color, use MessagingListener#localyticsWillShowPushNotification to modify the NotificationCompat.Builder to meet your UI needs by following the steps in Modifying push notifications.
Notification Channels
Android O introduced support for notification channels. These are displayed as "categories" throughout the system interface and are ways for users to subscribe to certain types of notifications that you specify.
The default channel can be configured using the localytics.xml file.
To set the proper channel id, name, and description, use the ll_default_push_channel_id, ll_default_push_channel_name, and ll_default_push_channel_description keys respectively. You can still support channels on versions of the SDK below v5.0 by modifying your app code.
Rich Push
To send rich push notifications to Android devices on React Native there is no additional setup required within your app.
App Inbox (2.3.1+)
App Inbox allows you to deliver personalized content to users through a dedicated inbox inside your app. Create Inbox Campaigns using templated or custom HTML creatives from within the Localytics Dashboard. Inbox messages will display in your users' inbox for a scheduled amount of time.
Before continuing, please be sure that you have completed all of the steps in Getting Started.
To add App Inbox to your app, you need to include a list of inbox messages within your app's user interface and then handle displaying the inbox message detail view when a list item is tapped.
A sample project for using Localytics with Inbox is available in our React Native samples Github repository.
Refreshing Inbox campaigns
The recommended approach to getting Inbox campaigns is by refreshing them from the Localytics server.
Refresh Inbox campaigns
LLLocalytics.refreshInboxCampaigns().then((campaigns) => {
	try {
		// handle campaigns
	} catch(e) {
		console.error(e);
	}
});
Refresh all Inbox campaigns
LLLocalytics.refreshAllInboxCampaigns().then((campaigns) => {
	try {
		// handle campaigns
	} catch(e) {
		console.error(e);
	}
});
Getting Inbox campaigns
Get Inbox campaigns
  LLLocalytics.getDisplayableInboxCampaigns().then((campaigns) => {
    try {
// handle campaigns
    } catch(e) {
      console.error(e);
    }
  });
Get all Inbox campaigns
  LLLocalytics.getAllInboxCampaigns().then((campaigns) => {
    try {
// handle campaigns
    } catch(e) {
      console.error(e);
    }
  });
Handling read campaigns
Set Inbox campaign read
LLLocalytics.setInboxCampaignRead({'campaignId': campaign.id, 'read': true});
Tag Inbox campaign impression
LLLocalytics.tagInboxImpression({'campaignId': campaign.id, 'action': 'click'});
Get Inbox campaigns unread count
  LLLocalytics.getInboxCampaignsUnreadCount().then((count) => {
    try {
// handle unread count
    } catch(e) {
      console.error(e);
    }
  });
Display Inbox Detail View
Localytics provides a custom Webview (LLWebView) for presenting inbox campaigns. Simplay pass the campaign Id with a value of campaign to the LLWebView and your creative will be displayed.
First, import the LLWebView and StyleSheet:
import { LLWebView } from 'localytics-react-native';
import { StyleSheet } from 'react-native';
Second, define some styling in your project for the LLWebView. This step is crucial to ensure that the LLWebView expands to fill the space provided by the app. Excluding this step could lead to the content of the HTML shrinking:
var styles = StyleSheet.create({
  webView: {
    flex: 1
  },
});
Finally, reference the LLWebView from your rendering code, apply the predefined style, and pass in the campaign id:
render() {
  const campaign; //This should be the campaignId.

  return (
    <LLWebView style={styles.webView} campaign={ campaign } />
  );
}
Sample code for implementing an Inbox in react native can be found in the samples repo
Deleting Inbox Campaigns (SDK v2.2+)
Starting in SDK v2.2 Inbox campaigns can be deleted. To delete an Inbox Campaign, you can call:
Localytics.deleteInboxCampaign(campaignId);
Any deleted inbox campaign will not be considered displayable. As a result they will be excluded from the list of campaigns retrieved by calling getDisplayableInboxCampaigns, getInboxCampaigns and refreshInboxCampaigns. Additionally, they will be excluded from the count returned by getInboxCampaignsUnreadCount.
If you need the list of deleted Inbox campaigns, you can call Localytics.getAllInboxCampaigns() or Localytics.refreshAllInboxCampaigns() and filter for campaigns with the property deleted set to true.
Places
One of the unique aspects of mobile is that users always have their devices with them. Places lets you take advantage of this by sending users content that's personalized to their current location. With Places, you can send notifications to users the instant they enter or exit a specific location. Additionally, you can analyze data about visits to physical locations, giving you access to insights that have never before been available. Read more about setting up Places geofences.
Before continuing, please be sure that you have completed all of the steps in Getting Started.
Enable location monitoring
Add the following in your main component's componentDidMount.
componentDidMount() {
  LLLocalytics.setLocationMonitoringEnabled(true);
}
For customers who grant their users the ability to opt out of data collection, please refer to the integration details in the advanced Privacy section.
iOS Places
View the Localytics iOS Places docs to integrate Places for your iOS build.
Android Places
1. Add the Google Play Services Location dependency
Update your project's app-level build.gradle to include the Google Play Services location dependency and the GCM dependency as follows.
dependencies {
  implementation 'com.android.support:support-compat:26.0.2'
  implementation 'com.google.android.gms:play-services-ads:11.4.2'
  implementation 'com.google.android.gms:play-services-location:11.8.0'
  implementation 'com.google.android.gms:play-services-gcm:11.8.0'
}
2. Modify AndroidManifest.xml
Add the following to your AndroidManifest.xml as follows.
-
Permissions for accessing fine location and receiving boot completed intents above the application element.
<uses-permission android:name="android.permission.ACCESS_FINE_LOCATION" />
<uses-permission android:name="android.permission.RECEIVE_BOOT_COMPLETED" />
<uses-permission android:name="android.permission.ACCESS_BACKGROUND_LOCATION"/>
-
The Google Play Services version within the application element.
<meta-data
  android:name="com.google.android.gms.version"
  android:value="@integer/google_play_services_version" />
3. Update the localytics.xml file
The localytics.xml file allows for easy integration of the default Localytics places receivers. Set the following keys to ensure a proper Places integration:
- ll_places_enabled to true. This will include the Localytics LocationUpdateReceiver and BootReceiver to your manifest. These services will handle location updates, geofence triggers, and restarting location monitoring when the app is restarted.
-
ll_push_tracking_activity_enabled to true.
If you installed the SDK manually, you will need to include the following in your manifest:
<activity android:name="com.localytics.androidx.PushTrackingActivity"
  android:enabled="true"/>
Note, that the PushTrackingActivity is launched through a pending intent that has the following flags: Intent.FLAG_ACTIVITY_NEW_TASK and Intent.FLAG_ACTIVITY_CLEAR_TASK, those two flags will ensure that if the app is running and the user presses the notification for action, the app tasks will all be closed and the PushTrackingActivity will lanch as the first activity. if you don't like this behavior and don't want your current activity to be closed you can follow this technique, And include the following in your manifest:
<activity
    android:name="com.localytics.androidx.PushTrackingActivity"
    android:enabled="@bool/ll_push_tracking_activity_enabled"
    android:exported="false"
    android:launchMode="singleTask"
    android:taskAffinity=""
    android:excludeFromRecents="true"/>
- ll_default_places_channel_id: Set this value to define the notification channel that places messaging will use if no channel is set in the dashboard.
- ll_default_places_channel_name: Set this value to define the notification channel's name that places messaging will use if no channel is set in the dashboard. This name will be visible to the end user.
- ll_default_places_channel_description: Set this value to define the notification channel's description that places messaging will use if no channel is set in the dashboard. The description will be visible to the user.
4. Make sure the user has the latest Google Play Services
Follow the guide on updating Google Play Services.
5. Request location permissions
Request the location permission at an appropriate time to show users a prompt as follows.
import {
  Platform,
  PermissionsAndroid,
} from 'react-native';
if (Platform.OS === 'android') {
  const granted = await PermissionsAndroid.request(
    PermissionsAndroid.PERMISSIONS.ACCESS_FINE_LOCATION,
    {
      'title': 'Location Permission',
      'message': 'Your location is needed for Places'
    }
  )
  if (granted === PermissionsAndroid.RESULTS.GRANTED) {
    console.log("Location permission granted")
  } else {
    console.log("Location permission denied")
  }
}
Uninstall Tracking
Localytics Uninstall Tracking reports an analytics event for users that uninstall your app at high accuracy within 24 hours. Those uninstalls can be used in charts, funnels, campaign performance reports, and remarketing so you can find and address the root causes of user loss.
Before continuing, please be sure that you have completed all of the steps in Getting Started and Push Messaging. You'll need a subscription to Uninstall Tracking to use this feature.
Ensuring app ignores Uninstall Tracking pushes
Make sure your app does not display uninstall tracking push notifications. The Localytics uninstall tracking push includes a key/value of localyticsUninstallTrackingPush: "true" which you can use to detect when an app launch is coming from a background uninstall tracking push.
Provisioning Uninstalls
Once your app's integration has been set up, contact your account manager or our support team to enable Uninstall Tracking for your app. You'll need an active subscription to Uninstalls. Let us know which Localytics apps are configured for uninstalls, along with their iOS bundle IDs.
Tracking user flow
Track screens or views within your app so you can visualize user flow within the Localytics Dashboard. We recommend exhaustively tagging every visible view in your app.
The Localytics SDK will perform duplicate suppression on two identical tagged screens that occur in a row within a single session. For example, in the set of screens {"Screen 1", "Screen 1"}, the second screen would be suppressed. However, in the set {"Screen 1", "Screen 2", "Screen 1"}, no duplicate suppression would occur.
LLLocalytics.tagScreen('Item List');
Tracking revenue
There are two ways to think about Lifetime Value (LTV) in Localytics: monetary and non-monetary. If your app allows real currency transactions, our Dashboard can show LTV in USD. If your app uses virtual currencies like coins or tokens, you can configure your app to report LTV as the raw data you pass in.
You can configure each Mobile App in Localytics to have either a monetary value or raw data for Lifetime Value:
Tracking Monetary LTV
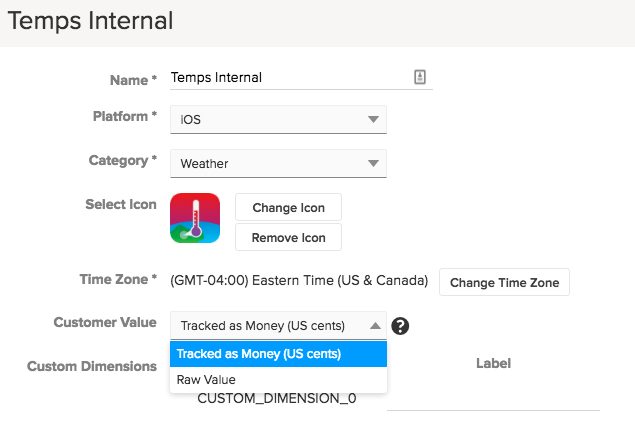
If you'd like to track LTV as monetary-based revenue, you should increment the value upon the completion of a purchase by the purchase amount. Make sure to configure your app in Localytics to show LTV as "Tracked as Money (US cents)".
LTV must be an integer amount, and the Localytics system requires you pass the number of USD cents as the LTV value in order to track money. For example, if the purchase amount is "USD $2.99", you should pass the integer "299" as the LTV. If the cents don't matter to you, feel free to round up to whole dollar values, but continue to pass the value as cents. If you want to track the rounded value of "USD $3.00", you should pass "300" as the value.
Currently, Localyics only allows LTV tracking in USD. If you want to track other currencies, you could convert the monetary amount to USD on the device before sending to Localytics.
Tracking Non-Monetary LTV
Another way to measure LTV is to track a non-monetary value important to your app. Examples include the number seconds spent engaged with content, or the amount of virtual currency earned. To track these values, send the corresponding integer value to Localytics. Make sure to configure your app in Localytics to show LTV as "Raw Value". Otherwise, Localytics will automatically divide your values by 100 and display a "$" in front of the values in the Dashboard.
LTV Examples
Increment user lifetime value (LTV) on any event using the optional LTV incrementer parameter as seen below.
You can increment LTV with our standard purchased and completed checkout events as follows. The item price and total price values will be used respectively.
LLLocalytics.tagPurchased({'itemName': 'Shirt', 'itemId': 'sku-123', 'itemType': 'Apparel', 'itemPrice': 15, 'attributes': {'extraAttributeKey': 'extraAttributeValue'}});
LLLocalytics.tagCompletedCheckout({'itemCount': 50, 'totalPrice': 2, 'attributes': {'extraAttributeKey': 'extraAttributeValue'}});
You can also increment LTV using a custom event by including a customer value increase value.
LLLocalytics.tagEvent({'name': 'Item Purchased', 'attributes': {'Item Name': 'Stickers', 'Aisle': 'Knick-Knacks'}, 'customerValueIncrease': 499});
Setting custom dimensions
Custom dimensions are special fields that are used for splitting and filtering data within the Localytics Dashboard and are useful for storing user-level information. Custom dimensions are like sticky event attributes in the sense that once their value is set, it remains set until the value is changed again. Unlike event attributes, custom dimension values are attached to all three types of datapoints (session start, session close, and event) the same way that standard dimensions are which makes their values available within almost every report in the Localytics Dashboard.
Your app can have up to 20 custom dimensions, and they will be indexed between 0 and 19. Name all of your custom dimensions in the Localytics Dashboard > Settings > Apps > (find app) > Gear icon > Custom Dimensions.
Whenever a datapoint is created, all custom dimension values are attached to the datapoint. Therefore, it is ideal to set custom dimensions as soon as their value is known in all code paths in your app. It is not uncommon to use an analytics callback to set custom dimension values before the start of a session (and the creation of a "session start" datapoint).
Setting a value
LLLocalytics.setCustomDimension({'dimension': 0, 'value': 'Trial'});
Clearing a value
Though it may be more appropriate to set a custom dimension value back to an initial state, sometimes you may need to completely clear the value.
LLLocalytics.setCustomDimension({'dimension': 0, 'value': ''});
Tracking user acquisition source
Use Localytics to track the origin of your new users and attribute them to a specific acquisition source. Localytics employs a variety of attribution methods, but at the core, all methods work by matching a shared identifier from both before and after app installation.
iOS
In order for your app to be able to access the device identifiers that are required for most iOS acquisition tracking to work, you must include AdSupport.framework as discussed elsewhere in this guide. You've likely already done this via CocoaPods, Carthage, or the manual installation approach, but it's worth checking just to be sure.
Android
In order for your app to be able to access the INSTALL_REFERRER Intent that is required for most Android acquisition tracking to work, be sure that you have made the proper modifications to your AndroidManifest.xml as discussed at the beginning of this guide. You've likely already made this modification, but it's worth checking just to be sure.
If your app or another SDK in your app are already listening for the INSTALL_REFERRER Intent that Localytics uses, in part, to track user acquistion source on Android, follow our instructions for using Localytics in addition to another attribution provider.
Before you release
Before releasing your app with Localytics, you'll want to ensure all features of the integration are configured properly.1. Setup a production app key
In order to run the Localytics SDK, you must initialize the SDK using your Localytics app key. You can find your app key in the Localytics Dashboard.2. Disable Localytics logging
Logging is disabled by default, but you'll want to make sure it is not enabled in your production build.
LLLocalytics.setLoggingEnabled(false);
3. Ensure test mode is setup on production build
iOS
To configure test mode, you'll need to setup a URL scheme. The URL scheme is defined as "amp" followed by your Localytics app key, as demonstrated below. You can find your app key in the Localytics Dashboard. If you switch between multiple Localytics app keys, as when you have separate testing and production app keys, there's no harm in registering both URL schemes.
- Enter Project Navigator view and click on your project icon. It should be at the top of the Project Navigator.
- Select your target from the sidebar or from the dropdown menu, then select the Info tab.
- Open the URL Types expander and click +.
- In the URL Schemes field, enter "amp" followed by your Localytics app key.
Android
In order to test in-app messages and push notifications on your production build, you'll need the test mode intent added in your AndroidManifest.xml.
Add the Test mode intent-filter within your MainActivity activity element under the existing intent-filter (i.e. the one for android.intent.action.MAIN). Replace YOUR-LOCALYTICS-APP-KEY with your Localytics app key and be sure to prepend YOUR-LOCALYTICS-APP-KEY with amp as shown below.<intent-filter>
<data android:scheme="ampYOUR-LOCALYTICS-APP-KEY" />
<action android:name="android.intent.action.VIEW" />
<category android:name="android.intent.category.DEFAULT" />
<category android:name="android.intent.category.BROWSABLE" />
</intent-filter>
4. Ensure push notifications work on production build
If you have integrated SDK version 4.1 or later, use the Rapid Push Verification page to confirm that you have integrated push correctly. Be sure to select the correct app in the dropdown at the top of the page.
5. QA analytics on production build
Use a utility such as Charles Proxy to watch the data transmit from your device to Localytics. You should check all analytics tags, such as Events and Customer ID, are being sent with the correct values.
Advanced
Privacy
To support privacy regulations such as the EU’s General Data Protection Regulation (GDPR), as well as our customers’ unique privacy policy requirements, Localytics provides various methods, tools, or controls to assist our customers in meeting their obligations.
There are additional considerations to take into account to ensure proper handling across devices, applications, and digital properties. Please be sure to reference all documentation, and consult with your product, privacy, and legal teams to ensure your implementation of our products meets your unique privacy and regulatory requirements. Localytics Support and Services teams may be engaged to assist, and you can refer to Localytics Privacy Approach documentation for additional context.
Opting users out
Many apps may allow their users the ability to opt out of data collection. In order to stop the Localytics SDK from collecting any additional data, customers can call:
LLLocalytics.setOptedOut(true);
Any device that has opted out in Localytics will immediately close the current session (if there is one) and tag an opt out event indicating that the device is no longer reporting any future data. Any subsequent calls that would generate a datapoint (tagEvent and setProfileAttribute for example) will be dropped. Additional detail is available in this Localytics Help article.
The opt out setting in Localytics is device specific, so if your app supports multiple users, you may want to trigger a call to setOptedOut every time a user logs in or out to update the Localytics SDK based on their previous preference.
Suppress data collection until end-user opt in
For some apps, it may be preferable to not collect any data until a user explicitly opts into data collection, or end-user consent is verified. In order to accomplish this, the app will need to update its integration such as the following:
LLLocalytics.autoIntegrate(this);
// The following method should reference a boolean value in your app that determines if the user has opted into
// data collection or not. The default (if never asked) should be false.
if (!isUserOptedIntoDataCollection()) {
  LLLocalytics.setOptedOut(true);
}
This effectively suppresses the integration until consent is verified.
GDPR
The Localytics SDK provides the following API's in SDK v2.1+:
- LLLocalytics.setPrivacyOptedOut(true) This API will delete all of the end user's data in addition to preventing any further data from being collected. This method differs from setOptedOut in that it will additionally cause Localytics to trigger a user's Right To Be Forgotten request in accordance with GDPR. This method is intended to support end user requests to be forgotten and will cease data collection.
- LLLocalytics.pauseDataUploading(true) This API will pause any data uploading to Localytics while still collecting information about the end user. It is particularly important to prevent data from being uploaded while the data collection opt-in status of an end user is still unknown. You might want to use this method if your app is configured to solicit user consent on first launch. In this case, you'd want to pause data upload until consent is granted. Once granted, the application can commence with uploads as normal. If consent is declined, you'll want to configure the app to opt-out of data collection as appropriate.
- LLLocalytics.setCustomerIdWithPrivacyOptedOut("CID", true) This API will update the current customer ID and immediately update the data collection opt-out status. This method may be used to support scenarios such as an application that, during login will verify consent via your back-end, and determine their 'forgotten' status. In that scenario this API may be called to set that user’s consent status as appropriate. We recommend you verify the the opt-in status of every user who can sign in to your application.
Getting Started
Because many customers allow their end users to grant/revoke consent through other services outside the client-side application, such as a web page Localytics expects customers to manage data collection opt-out settings for all client-side integrations. As a result, there are additional steps required during the integration process to ensure proper data handling.
While determining the opt-out status of an end user, it is expected that all data uploading should be paused. If the end-user has opted out, then all of the data will be deleted and no upload will occur. If the end-user is not opted out, then all of the data collected will be uploaded and the Localytics SDK can continue to function as normal.
A sample can be found demonstrating a proper integration in our samples repo.
Authentication
Customers who have authentication in their apps should ensure the privacy opt-out status of end users when they log in.
To log an end user in you should pause all data uploads until you determine data collection opt-out settings for the new user. Additionally, to ensure privacy, we encourage customers to use a new API introduced in SDK v2.1+ that accepts the privacy opt-out status of the user being logged in:
var optOutStatus = true; //request user information from your servers
LLLocalytics.setCustomerIdWithPrivacyOptedOut("customerId", optOutStatus)
Similarly, to log an end user out you can continue to set the customer ID to null. If the new user should resume collecting data, make sure to opt back into data collection:
LLLocalytics.setCustomerIdWithPrivacyOptedOut("", false);
Implications for messaging
Forgetting about an end user via the setPrivacyOptedOut API implies that the end user will no longer receive targeted messaging based on their behavior, profile, or personalization data, etc. Therefore, forgetting an end user will initiate the following behavior:
- Forgotten end users will not be targetable by campaigns with an audience criteria. Localytics will begin filtering out forgotten end users from any future campaigns within 8 hours of their request to be forgotten.
- Forgotten end users will no longer be sent Push campaigns. All data for forgotten end users will have been deleted, including their push tokens, so they will become untargetable.
- Forgotten end users will still be able to see messaging campaigns they had previously been sent.
- Historical behavioral data will be deleted for forgotten users so no future sends or conversions will be generated for these users.
- No customer data should be reported to any external services from In-App or Inbox campaigns that are broadcast to all users. In accordance with this, the ADID collected by the Localytics SDK will never be appended to call to action URLs for forgotten users.
- A forgotten user can opt back into being remembered using setPrivacyOptedOut. In this case, all data collected prior to opting in remains forgotten and data collection will start from scratch.
- Once a user opts back into being remembered using setPrivacyOptedOut, a new customer ID must be assigned to the user.
Places
Localytics Places takes advantage of location services provided by the OS to display notifications. While this doesn't break any agreement made about data collection (because geofencing is handled by Play Services), end users may feel that location tracking is a breach of their privacy. As such, Localytics SDK will, by default, disable Places monitoring when an end user is privacy opted-out. Localytics expects our customers to determine if Places should continue to be enabled when a user is opted out of data collection. If so, we expect that this is explicitly communicated to that end user.
By default, when opting an end user out of data collection, the Localytics SDK will turn off Places monitoring. As a result, it is expected that any customer who uses Places only does so if the customer is opted into data collection.
If the customer prefers to enable Places, location-based messaging, even when the end user has opted out of data collection, then this should be explicitly communicated to the end user, and Places should be re-enabled after any call to LLLocalytics.setPrivacyOptedOut.
Callbacks
Localytics provides a path to receive callbacks from the SDK in both Javascript and native code. This section will go into how to register callbacks in Javascript. To learn how to integrate callbacks in native code, please refer to the respective sections in the Android and iOS docs.
Analytics callbacks
Analytics callbacks are useful for responding to session lifecycle and analytics events. Some potential use cases may be firing an event at the beginning or end of a session, or taking action in your app based on an auto-tagged campaign performance event in the Localytics SDK. All Localytics analytics callbacks are called on an internal background thread in the SDK, and queued onto the React main thread.
To start receiving Analytics Callbacks, you must first register for callbacks with Localytics:
var analyticsEventListener;
LLLocalytics.setAnalyticsEventsEnabled(true);
if (Platform.OS === "ios") {
  analyticsEventListener = new NativeEventEmitter(NativeModules.LLAnalyticsEmitter);
} else {
  analyticsEventListener = DeviceEventEmitter;
}
Then simply begin listening for emitted events:
analyticsEventListener.addListener('localyticsSessionWillOpen', (arg) => {
  // args = { isFirst: BOOLEAN, isUpgrade: BOOLEAN, isResume: BOOLEAN }
  // ... do something ...
});

analyticsEventListener.addListener('localyticsSessionDidOpen', (arg) => {
  // args = { isFirst: BOOLEAN, isUpgrade: BOOLEAN, isResume: BOOLEAN }
  // ... do something ...
});

analyticsEventListener.addListener('localyticsDidTagEvent', (arg) => {
  // args = {"name": STRING, "attributes": OBJECT, "customerValueIncrease": NUMBER};
  // ... do something ...
});

analyticsEventListener.addListener('localyticsSessionWillClose', (arg) => {
  // args = { }
  // ... do something ...
});
Messaging callbacks
Messaging callbacks are useful for understanding when Localytics will display messaging campaigns. This can help you prevent conflicts with other views in your app, as well as potentially suppress the Localytics display. All Localytics messaging callbacks are called on the main thread.
There are two ways to register for Messaging Callbacks with Localytics. The first will allow you to receive updates from Localytics in Javascript. The second will allow you to modify the behavior of messaging campaigns before they are displayed.
-
Receiving callbacks in Javascript
To start receiving Messaging Callbacks, you must first register for callbacks with Localytics:
var messagingEventListener;
LLLocalytics.setAnalyticsEventsEnabled(true);
if (Platform.OS === "ios") {
  messagingEventListener = new NativeEventEmitter(NativeModules.LLMessagingEmitter);
} else {
  messagingEventListener = DeviceEventEmitter;
}
Then simply begin listening for emitted events:
messagingEventListener.addListener('localyticsShouldShowInAppMessage', (arg) => {
  // args = { "campaign": OBJECT, "shouldShow": BOOLEAN }
  // ... do something ...
});

messagingEventListener.addListener('localyticsShouldDelaySessionStartInAppMessages', (arg) => {
  // args = { "shouldDelay": BOOLEAN }
  // ... do something ...
});

messagingEventListener.addListener('localyticsWillDisplayInAppMessage', (arg) => {
  // args = { "campaign": OBJECT }
  // ... do something ...
});

messagingEventListener.addListener('localyticsWillDismissInAppMessage', (arg) => {
  // args = { }
  // ... do something ...
});

messagingEventListener.addListener('localyticsDidDismissInAppMessage', (arg) => {
  // args = { }
  // ... do something ...
});

messagingEventListener.addListener('localyticsShouldDisplayPlacesCampaign', (arg) => {
  // args = { "campaign": OBJECT, "shouldShow": BOOLEAN }
  // ... do something ...
});

messagingEventListener.addListener('localyticsWillShowPlacesPushNotification', (arg) => {
  // args = { "campaign": OBJECT }
  // ... do something ...
});

messagingEventListener.addListener('localyticsShouldShowPushNotification', (arg) => {
  // args = { "campaign": OBJECT, "shouldShow": BOOLEAN }
  // ANDROID ONLY
  // ... do something ...
});

messagingEventListener.addListener('localyticsWillShowPushNotification', (arg) => {
  // args = { "campaign": OBJECT }
  // ANDROID ONLY
  // ... do something ...
});

messagingEventListener.addListener('localyticsDiyInAppMessage', (arg) => {
  // args = { "campaign": OBJECT }
  // ... Handle the rendering of your own In App campaign. This should be paired with the next section on Modifying Messaging Behavior ...
});

messagingEventListener.addListener('localyticsDiyPlacesPushNotification', (arg) => {
  // args = { "campaign": OBJECT }
  // ... Handle the rendering of your own Places campaign. This should be paired with the next section on Modifying Messaging Behavior ...
});

messagingEventListener.addListener('localyticsDiyPushNotification', (arg) => {
  // args = { "campaign": OBJECT }
  // ANDROID ONLY
  // ... Handle the rendering of your own Push campaign. This should be paired with the next section on Modifying Messaging Behavior ...
});
-
Modifying messaging behavior
Localytics provides a way to modify Places, In-App, and Push campaigns:
-
In-App Campaigns can be modified as follows:
LLLocalytics.setInAppMessageConfiguration({
  "shouldShow": BOOLEAN // if set to false, this will suppress all In-App messages.
  "diy": BOOLEAN // if set to false, Localytics will not render the In-App and will call localyticsDiyInAppMessage
  "aspectRatio": NUMBER // The Aspect Ratio for a Centered In App Campaign
  "backgroundAlpha": NUMBER // The transparency for a Full Screen In App Campaign between 0 (transparent) and 1 (opaque)
  "bannerOffsetDps": NUMBER // The pixel offset for Banner In App campaigns
  "dismissButtonLocation": STRING // Location of the In-App Dismiss Button ("left" or "right")
  "dismissButtonHidden": BOOLEAN // Indicate if the Localytics SDK should show a dismiss button
});
-
Places Campaigns can be modified as follows:
LLLocalytics.setPlacesMessageConfiguration({
  "shouldShow": BOOLEAN // if set to false, this will suppress all Places messages.
  "diy": BOOLEAN // if set to false, Localytics will not render the Places message and will call localyticsDiyPlacesPushNotification

  // Android only keys

  "category": STRING // the notification category that should be attached to this message.
  "color": NUMBER // the color of the notification
  "contentInfo": STRING // the content info of the notification
  "contentTitle": STRING // the title of the notification
  "defaults": OBJECT // the defaults for notification interruption.  Possible object values include "lights", "sound", "vibrate", and "all"
  "priority": NUMBER // the priority of the notification
  "sound": STRING // the sound as a URI to a sound file on your device
  "vibrate": ARRAY // the vibration pattern for this notification

  // iOS only keys

  "title": STRING // the title of the notification
  "subtitle": STRING // the subtitle of the notification
  "badge": NUMBER // the badge number this notification should update the app with.
  "sound": STRING // iOS 10+ ONLY - the name of a sound in your App Bundle
  "launchImageName": STRING // The launch image name
});
-
Push Campaigns can be modified on Android as follows:
LLLocalytics.setPushMessageConfiguration({
  "shouldShow": BOOLEAN // if set to false, this will suppress all Places messages.
  "diy": BOOLEAN // if set to false, Localytics will not render the Places message and will call localyticsDiyPlacesPushNotification

  "category": STRING // the notification category that should be attached to this message.
  "color": NUMBER // the color of the notification
  "contentInfo": STRING // the content info of the notification
  "contentTitle": STRING // the title of the notification
  "defaults": OBJECT // the defaults for notification interruption.  Possible object values include "lights", "sound", "vibrate", and "all"
  "priority": NUMBER // the priority of the notification
  "sound": STRING // the sound as a URI to a sound file on your device
  "vibrate": ARRAY // the vibration pattern for this notification
});
-
Location Callbacks
Location callbacks are useful for understanding when Localytics responds location changes. localyticsDidUpdateLocation is called on an internal background thread; the others are called on the main thread.
To start receiving Location Callbacks, you must first register for callbacks with Localytics:
var locationEventListener;
LLLocalytics.setLocationEventsEnabled(true);
if (Platform.OS === "ios") {
  locationEventListener = new NativeEventEmitter(NativeModules.LLLocationEmitter);
} else {
  locationEventListener = DeviceEventEmitter;
}
Then simply begin listening for emitted events:
locationEventListener.addListener('localyticsDidUpdateLocation', (arg) => {
  // args = { "location": {
    "latitude": NUMBER,
    "longitude": NUMBER,
    "altitude": NUMBER (iOS ONLY)
    "time": NUMBER (iOS ONLY)
    "horizontalAccuracy": NUMBER (iOS ONLY)
    "verticalAccuracy": NUMBER (iOS ONLY)
    "uniqueId": STRING (ANDROID ONLY)
    "name": STRING (ANDROID ONLY)
    "type": STRING (ANDROID ONLY)
    "attributes": OBJECT (ANDROID ONLY)
    "originLocation": STRING (ANDROID ONLY)
    "radius": NUMBER (ANDROID ONLY)
  }}
  // ... do something ...
});

locationEventListener.addListener('localyticsDidTriggerRegions', (arg) => {
  // args = {
    "event": STRING ("enter" or "exit"),
    regions": ARRAY (Of Objects) [ {
      "uniqueId": STRING
      "latitude": NUMBER
      "longitude": NUMBER
      "name": STRING
      "type": STRING (ANDROID ONLY)
      "originLocation": STRING (ANDROID ONLY)
      "radius": NUMBER (ANDROID ONLY)
      "attributes": OBJECT
    } ... ]
  }
  // ... do something ...
});

locationEventListener.addListener('localyticsDidUpdateMonitoredGeofences', (arg) => {
  // args = {
    "added": ARRAY [ {
      "uniqueId": STRING
      "latitude": NUMBER
      "longitude": NUMBER
      "name": STRING
      "type": STRING (ANDROID ONLY)
      "originLocation": STRING (ANDROID ONLY)
      "radius": NUMBER (ANDROID ONLY)
      "attributes": OBJECT
    }, ... ],
    "removed": [ {
      "uniqueId": STRING
      "latitude": NUMBER
      "longitude": NUMBER
      "name": STRING
      "type": STRING (ANDROID ONLY)
      "originLocation": STRING (ANDROID ONLY)
      "radius": NUMBER (ANDROID ONLY)
      "attributes": OBJECT
    }, ...]
  };
  // ... do something ...
});
Call To Action Callbacks
Added in SDK 2.2, Call To Action callbacks are useful for understanding when Localytics has triggered a deeplink or internal event through a javascript API.
To start receiving CallToAction Callbacks, you must first register for callbacks with Localytics:
var ctaEventListener;
LLLocalytics.setCallToActionEventsEnabled(true);
if (Platform.OS === "ios") {
  ctaEventListener = new NativeEventEmitter(NativeModules.LLCallToActionEmitter);
} else {
  ctaEventListener = DeviceEventEmitter;
}
Then simply begin listening for emitted events:
ctaEventListener.addListener('localyticsShouldDeeplink', (arg) => {
  // args = { url: STRING, campaign: OBJECT }
  // ... do something ...
});

ctaEventListener.addListener('localyticsDidOptOut', (arg) => {
  // args = { optedOut: BOOLEAN, campaign: OBJECT }
  // ... do something ...
});

ctaEventListener.addListener('localyticsDidPrivacyOptOut', (arg) => {
  // args = { optedOut: BOOLEAN, campaign: OBJECT }
  // ... do something ...
});

ctaEventListener.addListener('localyticsShouldPromptForLocationWhenInUsePermissions', (arg) => {
  // args = { campaign: OBJECT }
  // iOS ONLY
  // ... do something ...
});

ctaEventListener.addListener('localyticsShouldPromptForLocationAlwaysPermissions', (arg) => {
  // args = { campaign: OBJECT }
  // iOS ONLY
  // ... do something ...
});

ctaEventListener.addListener('localyticsShouldPromptForNotificationPermissions', (arg) => {
  // args = { campaign: OBJECT }
  // iOS ONLY
  // ... do something ...
});

ctaEventListener.addListener('localyticsShouldPromptForLocationPermissions', (arg) => {
  // args = { campaign: OBJECT }
  // ANDROID ONLY
  // ... do something ...
});
Troubleshooting
Enabling logging
To gain more insights into whether your Localytics tagging is occurring when expected, you can use the live monitor (requiring SDK 5.5 and later) and make sure that all analytics tags, such as Events and Customer ID, are being sent with the correct values.
You can also enable logging in your app using the code below. When looking at logs, a 202 response code indicates that an upload was successful. Be sure to disable logging in production builds. Localytics log output is required when contacting support.
LLLocalytics.setLoggingEnabled(true);
You can also save logs to your device in order to test devices on the go and view the logs afterward.
LLLocalytics.redirectLogsToDisk({'external': true});
Viewing iOS Logs
$ react-native log-ios
Viewing Android Logs
$ react-native log-android