WebApps Custom Address Book
An address book is a database used for storing contact data. Each contact can consist of various fields; for example, first name, last name, company name, address, telephone number, e-mail address, fax number, or mobile phone number.
Administrators can integrate their custom Address Book database with
-
Create Distributions that can include email, fax, and printer destinations
-
Search Address Book
-
View Address Book (50 entries at a time and load more, if necessary)
-
Add Address Book entries
-
Remove Address Book entries
-
Edit Address Book entries
Before you begin
The
Administrators must complete the following tasks.
-
Determine which database and fields will be used for the
-
Add Address Book to
-
Add an Address Book provider
Adding Address Book to WebApps profile
You can add the Address Book feature to the
To add the Address Book feature
-
Start the Server Administrator.
-
-
Expand the Server Administrator tree, if necessary.
-
Expand Configuration and select WebApps. The
-
Select Default. The Default Profile Properties dialog box appears.
-
Select the Features tab.
-
Click Add.
-
Select Address Book on the Feature drop-down list. The Address Book Features Properties dialog box appears.
-
Click Add. The New Database Address Book Provider dialog box appears.
See the

Adding an Address Book provider
The Address Book provider is used to connect and identify the database
table and fields
-
Name
-
Connection String
-
Table
-
Column Properties
-
ID
-
Order by
-
Direction
-
Address book entry display name
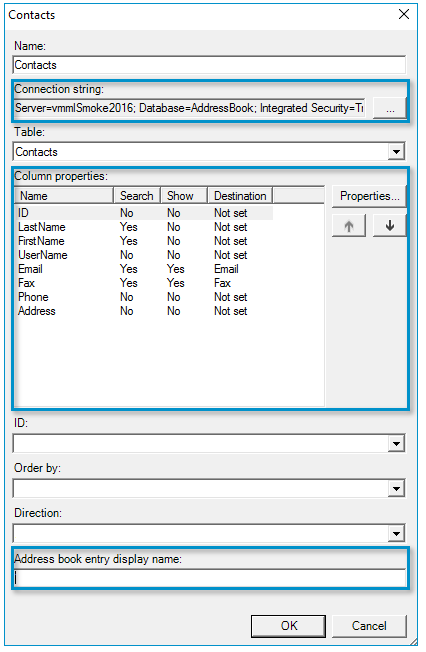
To add an Address Book provider
-
Complete the Adding Address Book to WebApps profile steps, if necessary. The New Database Address Book Provider dialog box appears.
-
Type a descriptive name in the Name box; for example, Company ABC Address Book Contacts.
-
Specify the database connection string in the Connection String box.
-
Specify the database table in the Table box. The database fields (columns) appear in the Column properties area.
The following properties are displayed.
-
Name
-
Search
-
Show
-
Destination includes Email, Fax, and Printer.
Note: Use the Search, Show,
and Destination properties to specify which fields
-
Choose a column property and select the Properties button. The Column Properties dialog box appears.
-
Specify the Search, Display, and Destination properties, if necessary.
-
Repeat steps 5 through 6 until you are done.
Use the arrows below the Properties button to rearrange the fields displayed in the Address Book, if necessary.
-
Click OK.
-
Choose an ID on the ID drop-down list.
-
Choose a field to sort the entries; for example, Last Name on the Order by drop-down list.
-
Choose how the entries are displayed; for example, Ascending on the Direction drop-down list.
-
Type additional fields you want to display in the Address book entry display name box; for example, %FirstName% %LastName%. The Percent symbol is used before and after a field name and a space between fields.
Note: Do not use fields selected
in the Column properties > Show column in the Address book entry display
name box.
See the New DataBase Address Book Provider dialog box example below.
-
Click OK on the Properties dialog box.
-
Click OK on the Address Book Feature Properties dialog box.
-
Click OK on the Default Profile Properties dialog box.
See also
Using WebApps Custom Address Book