You can use the QuickFlow Wizard to configure workflows based on your company’s requirements. The wizard is also used to edit QuickFlows. See Edit a QuickFlow for more information.
See the QuickFlows Wizard below.
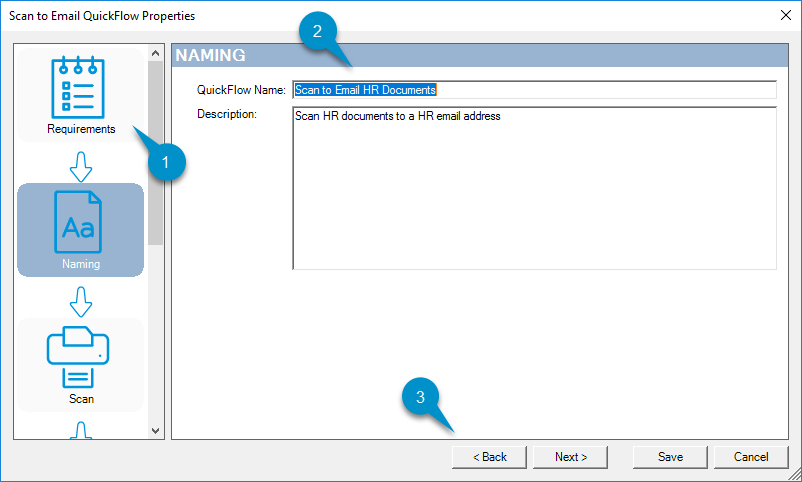
QuickFlows Wizard at a Glance
|
QuickFlows Wizard Legend |
Description |
|---|---|
|
1. QuickFlows Wizard navigation pane with icons |
Use the icons to go back or to the next step in the wizard. |
|
2. QuickFlows Wizard step pane |
Use the QuickFlows Wizard step pane to:
|
|
3. QuickFlows Wizard navigation buttons |
Use the buttons to:
|
To create a QuickFlow using the wizard
-
Go to the Server Administrator pane.
-
Right-click QuickFlows. The QuickFlows menu appears.
-
Click New. The QuickFlows templates menu appears.
-
Select a QuickFlow template. The QuickFlows wizard appears.
Note: The QuickFlows templates labeled user interactive are for workflows that require users to navigate, select, and create folders on a device.
-
In the Requirements pane, ensure the minimum requirements have been met.
Note: If the minimum requirements are not met, cancel the QuickFlow, configure the appropriate connectors or devices, and select the appropriate QuickFlow template to start over. You will not be able to save the QuickFlow if you choose to continue without configuring the connectors or devices.
-
Click Next. The Naming pane appears.
-
In the Naming pane, type a unique name in the QuickFlowName box and type a description in the Description box. (optional).
-
Click Next. The Scan pane appears.
-
In the Scan pane, specify the following details.
-
Type a button text label in the Button Text box.
-
In the Authentication list, choose whether authentication is required or not required.
-
In the Apply button to Device Group list, select a device group if there is more than one.
-
Click Advanced to specify additional button properties, if necessary. (optional)
Note: New QuickFlows saved on
the server for the first time require an
-
Click Next. The Deliver to pane appears.
-
In the Deliver to pane, specify or choose the Delivery details, if necessary.
-
Click Next. The Job Properties pane with a default set of job properties appears based on the QuickFlow selected.
-
In the Job Properties pane, specify the job property details.
-
Edit a default job property
-
Click to choose a default job property. The selected job property is highlighted.
-
Click Properties. The Property Configuration dialog box appears.
-
Edit the property configuration, if necessary.
-
Click Advanced to specify additional job properties, if necessary. (optional)
-
Add a new job property
-
Click Add. The Property Configuration dialog box appears.
-
Specify the property configuration details.
-
Click Advanced to specify additional job properties, if necessary. (optional)
-
Remove a job property
-
In the Job Properties pane, click to choose a job property.
-
Click Remove.
Note: Ensure you have selected the correct job property before removing it. You will need to start over and add the job property if it was mistakenly removed.
-
Move job properties up or down
-
In the Job Properties pane, click to choose a job property.
-
Use the arrows to move the job properties up or down specifically for jobs related to prompting users to interact with buttons in a specific order.
-
Click Next. The Notifications pane appears.
-
In the Notifications list, select a notification type. On Failure is the default.
Note: If you selected Never as a notification type, then the following Notification steps are not applicable.
-
In the Notify the following area, ensure The sending user if authenticated check box is set correctly.
-
If Authentication in the Scan pane is set to Not-required, then The sending user if authenticated check box is dim and inactive.
-
If Authentication in the Scan pane is set to Required, then The sending user if authenticated check box is selected and active.
-
In the Additional emails box, type the email addresses separated by commas (,) or semicolons (;) for other recipients of the notification, if necessary. (optional)
-
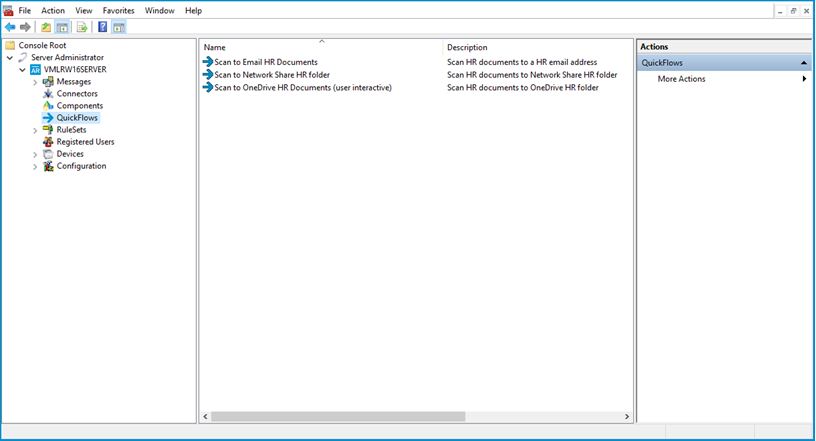
Click Save. The QuickFlows appear in the Server Administrator Console.
See saved QuickFlows below.
Note: QuickFlow rules are also saved in the Server Administrator Console and can be accessed by selecting RuleSets on the Server Administrator tree. See About RuleSets and Routing Rules for more information.
Edit a QuickFlow
You can use the QuickFlow wizard to edit QuickFlows and make changes to your workflow configurations.
To edit a QuickFlow
-
Open (right-click) QuickFlows in the Server Administrator tree. The QuickFlows window appears.
-
Select the QuickFlow you want to edit. The QuickFlow wizard appears.
-
Use the QuickFlow wizard icons or buttons to go to any details or properties that requires editing.
-
Edit the details and properties as needed.
-
Click Save.
Note: Updated QuickFlows saved
on the server require an
See also