About AccuRoute and MEDITECH Integration
The AccuRoute Healthcare Suite connector gathers patient information from MEDITECH and routes this information to the ObjectArchive database or other database for storage and retrieval on demand. Patient information is usually gathered during patient registration. Information gathered includes billing, lab modules and other related information.
The MEDITECH validator allows the server to validate the existence of a patient record in MEDITECH based on specific property values (Medical Record number and the Account number) provided in the routing information.
When a medical report or a medical bill is scanned and sent to the server for processing, the MEDITECH validator matches the Medical Record number and the Account number and validates that the information provided is for the same patient in MEDITECH. By validating the existence of the patient, it ensures that the documents are being routed and stored for the correct patient.
Not only does this validation protect data integrity, but it also eliminates irregularities and inconsistent billing issues.
Requirements
-
Property Dictionary Items (PDI) must be created for all fields that need to be queried for data collection. For information on how to create Property Dictionary Items, see Creating a Message Property.
-
A preconfigured AccuRoute connector for MEDITECH, defined with the following properties: AccountNo and MedRecNo.
Note: Any other option properties can be defined if necessary.
MEDITECH Administrators can now set multiple environments for validation. In addition, Administrators can choose which environment should be used first for validation. Setting of the multiple environments is done at the job property level configured for the MEDITECH connector.
Expand to view more information.
-
Click Start > All Programs > Upland AccuRoute > AccuRoute Server Administrator.
-
Expand the Server Administrator tree and right-click Connectors.
-
Select New AccuRoute Server connector for > MEDITECH. The Create New connector wizard opens.
-
Click Next. The Display Name page opens.
-
To install the connector on a remote system, click the Remote server option and enter the name or IP address of the remote system in the text box beside the Remote server option.
-
In the Name field, enter a descriptive name for the connector, the default is MEDITECH on the Server.
-
Click Next and Finish to close the wizard.
The AccuRoute Healthcare Suite connector for MEDITECH is created and listed in the Connector details pane.
You can configure a MEDITECH validator by using the Server Administrator > Configuration node.
To configure a MEDITECH validator
-
Click Start > All Programs > Upland AccuRoute > AccuRoute Server Administrator.
-
In the console tree, expand the AccuRoute Server Administrator and navigate to Configuration.
-
To modify an existing property, click Properties and then double-click the property name.
-
Or, to create a new property, right-click Properties and select New > Property Dictionary. Enter information for the new property on the General tab.
-
Click the Validation tab.
-
Select the Validate option.
-
Select Use Server Validation and click the Configure Server Validation button.
-
From the drop-down list, select MEDITECH Magic Validator and click OK. The Validation Properties page opens.
-
Click the MEDITECH tab.
The Connector drop-down list is populated with the name of a configured Upland AccuRoute Healthcare Suite Connector for MEDITECH.
Note: If there is more than one connector, they will all be listed in the drop-down.
-
For the Environment drop-down list, the contents depend on the connector selection in Step 7.
-
A typical MEDITECH connector is configured with both a Test and Live (Production) environment.
-
For the Account Number, select the corresponding property from the drop-down list.
-
For the Medical Record No, select the corresponding property from the drop-down list.
Note: Account Number and Medical Record No must be selected.
-
Optionally, go to the Additional Properties section and select other relevant patient information properties. The available options include patient name and patient date of birth.
Note: Additional properties are only used as return values and may be omitted.
-
If you do not want to map any additional property, click the Property text box and delete the contents.
-
To test the configuration, click Test. This enables you to enter Account and Medical Record values to query. Results displayed will include any configured return values.
-
Click OK to save your changes.
You can set multiple validation environments by assigning the MEDITECH connector and environments to each job property.
To set multiple validation environments
-
Start the Server Administrator, if necessary.
-
Select Configuration > Job Properties > User. The User job properties appear in the details pane.
-
Select the appropriate job property. The Job Property dialog box appears.
-
Select the Qualify tab.
-
Ensure MEDITECH is selected in the Validation drop-down list.
-
Select Configure. The Validation Properties dialog box appears.
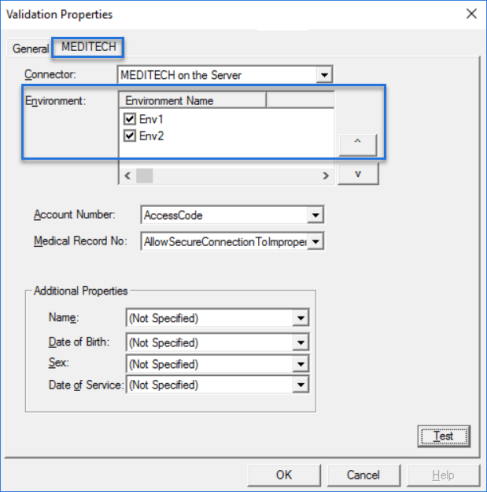
See the Validation Properties dialog box example below.

Note: Env1 and Env2 are generic labels used in the example. The actual names of your environments are shown in the Environment drop-down list.
-
Select the MEDITECH tab.
-
Select the appropriate environments on the Environment drop-down list.
-
Use the Up or Down arrow to choose which environment should be used first for validation.
-
Select OK on the Validation Properties dialog box.
-
Select OK on the Job Property dialog box.