The Scan to Email button provides Device Client users with the ability to scan documents to one or more email recipients at supported devices. Users can search and look up email addresses by using a company’s Address Book. In addition, the Scan to Email functionality can be enabled to work with other buttons on a device by using the Server Administrator.
Before you begin
Administrators must complete the following tasks.
Setting up Scan to Email button
You can set up the Scan to Email button and its properties after setting up the device group in the Server Administrator.
To set up Scan to Email
-
Start the Server Administrator.
-
Expand Devices on the Server Administrator tree.
-
Right-click the appropriate device group. The Properties shortcut menu appears.
-
Select Properties. The Device Group Properties dialog box appears.
-
Select the Buttons tab.
-
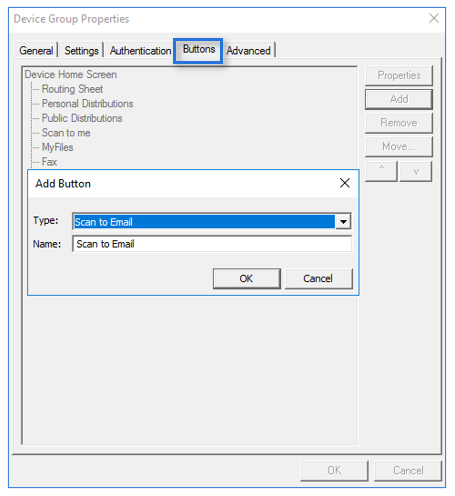
Select Add. The Add Button dialog box appears.
See the Device Group Properties > Buttons dialog box example below.
-
Select OK. The Scan to Email button appears on the Device Home Screen tree.
-
Select the Properties button. The Button Properties dialog box appears.
-
Ensure the Enable the button for use on the device check box is selected.
-
Select the Prompts tab.
-
Ensure the Delivered Document Name and Final Form Code prompts are listed in the table.
Note: Device Client users can use these prompts to specify a new document name and document format; for example, PDF before they scan the document to their recipients.
-
Select OK on the Button Properties dialog box.
-
Select OK on the Device Group Properties dialog box.
Enhanced Fax
The Fax button can be enhanced to work with the Scan to Email functionality.
To enable enhanced fax
-
Start the Server Administrator.
-
Expand Devices on the Server Administrator tree.
-
Right-click the appropriate device group. The Properties shortcut menu appears.
-
Select Properties. The Device Group Properties dialog box appears.
-
Select the Buttons tab.
-
Select Fax on the Device Home Screen tree.
-
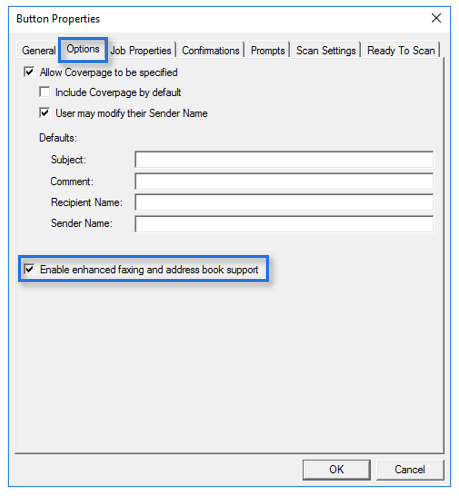
Select Properties.
See the Fax Button Properties dialog box example below.
-
Select Enable enhanced faxing and address book support.
-
Select OK on the Button Properties dialog box.
-
Select OK on the Device Group Properties dialog box.
Enhanced Routing Sheet
The Routing Sheet button can be enhanced to work with the Scan to Email functionality.
To enable enhanced routing sheet
-
Start the Server Administrator.
-
Expand Devices on the Server Administrator tree.
-
Right-click the appropriate device group. The Properties shortcut menu appears.
-
Select Properties. The Device Group Properties dialog box appears.
-
Select the Buttons tab.
-
Select Routing Sheet on the Device Home Screen tree.
-
Select Properties.
-
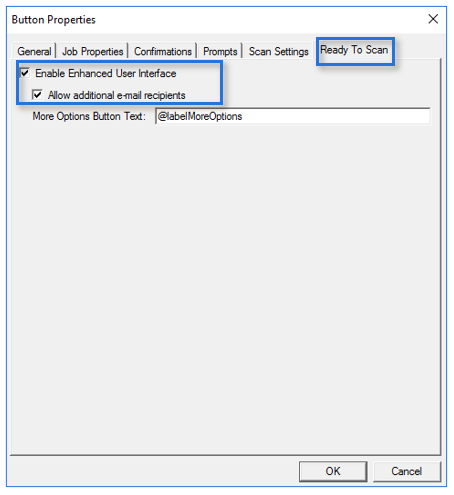
Select the Ready to Scan tab on the Button Properties dialog box.
-
Select Enable Enhanced User Interface and Allow additional email recipients.
-
Select OK on the Button Properties dialog box.
-
Select OK on the Device Group Properties dialog box.
Note: The Ready to Scan tab can be used to enable Scan to Email functionality with other buttons that require scanning on your device. The Ready to Scan steps listed above can also be used for other Scan-related button setup.
See also
Embedded Device Client Installation Guide for Administrators
AccuRoute Embedded Device Client Quick Start Guide