Administrators can add a variety of buttons to supported devices for their Device Client users. Each button has it's own unique functionality to meet a company's document workflow requirements. The following buttons and respective properties can be added to supported devices.
-
Device Information
-
Hold, Release or Send a Fax
-
Personal Distribution
-
Print from Folder
-
Public Distribution
-
Routing Sheet
-
Scan to Email
-
Scan to Folder
-
Scan to Me
-
Scan to MyFiles
-
View Job Queue
-
View MyMessages
-
View MyPrints
Device Buttons at a Glance
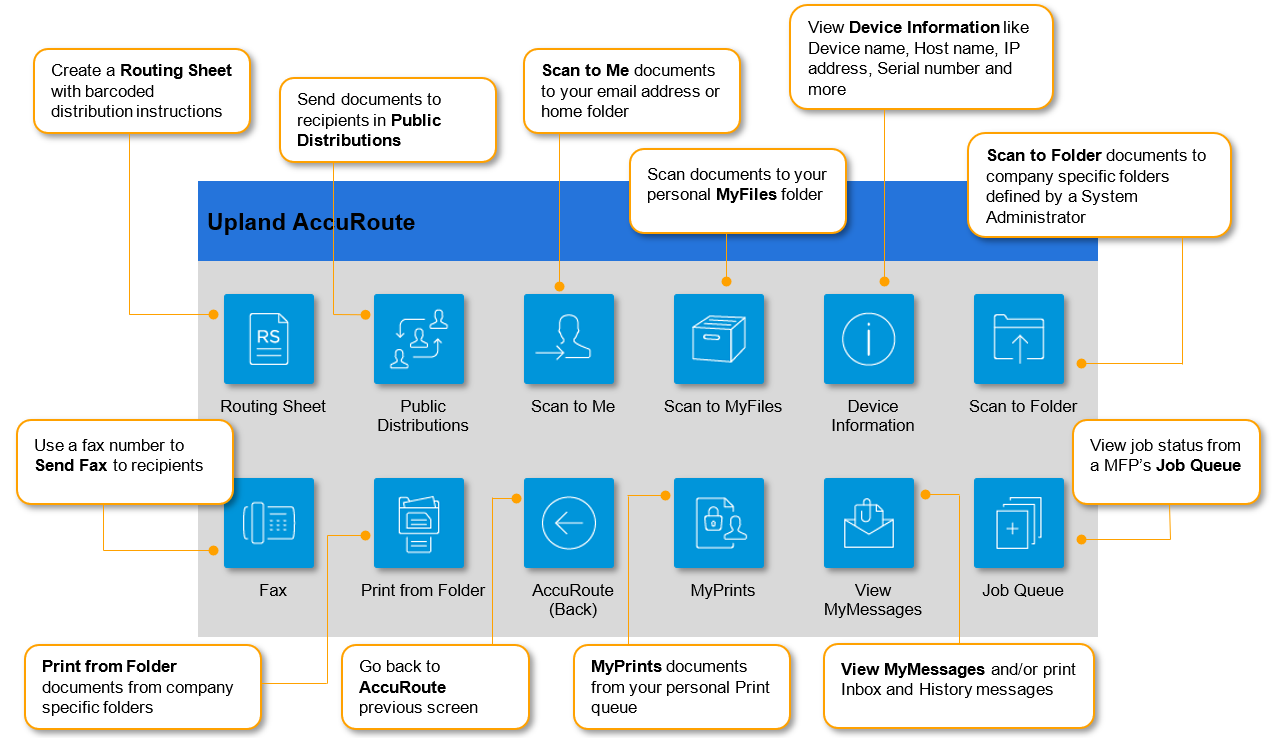
Note: This is an example. The buttons on your device may appear differently.
Before you begin
Administrators must complete the following tasks.
-
Add device buttons
Adding device buttons
Device buttons can be added to a device after you have successfully installed the Embedded Device Client and set up a device group. The following default buttons are added to your device group.
-
Routing Sheet
-
Personal Distributions
-
Public Distributions
-
Scan to Me
-
MyFiles
To add more device buttons
-
Start the Server Administrator, if necessary.
-
Expand Devices on the Server Administrator tree.
-
Right-click the appropriate device group. The Properties shortcut menu appears.
-
Select Properties. The Device Group Properties dialog box appears.
-
Select the Buttons tab. The Device Home Screen tree with default buttons appears.
-
Select Add. The Add Button dialog box appears.
-
Select a button on the Type drop-down list.
-
Use the default button name or type a new label in the Name box.
-
Select OK on the Add Button dialog box. The button appears on the Device Home Screen tree.
-
Select the button on the tree.
-
Select Properties. The Button Properties dialog box appears.
-
Specify any of the following additional properties by selecting the appropriate tab.
-
General
-
Job Properties
-
Confirmations
-
Prompts
-
Scan Settings
-
Ready to Scan
-
-
Select OK on the Button Properties dialog box.
Tip: Use the Move Up or Down arrow to move the buttons up or down as you want them to appear on the Home screen.
-
Select OK. on the Device Group Properties dialog box.
Note: These steps can be used for any button you want to add to your device group.
More about button properties
Administrators can enable the following button properties and take advantage of the Scan to Email functionality. Scan to Email can be used with the Routing Sheet, Fax, and other Scan-related buttons and provide device client users the ability to scan documents to one or more email recipients.
See also
Embedded Device Client Installation Guide for Administrators