You can set up and configure a FTP server for FTP/FTPS support.
Setting up and configuring FTP server for FTP/FTPS support
To set up and configure a FTP server for FTP/FTPS support
-
Launch the server manager.
-
Navigate to Roles > Web server(IIS).
-
Click on Add Role Services.
-
Select the FTP server and click Install.
The FTP server is installed on the
Creating a FTPS site
To create a FTPS site
-
Launch Internet Information Services (IIS) Manager.
-
Double-click on the Server Certificates and create the “Self-assigned” certificate.
-
Expand the tree view and, in the Connections pane, expand the tree for the server name. Select Sites.
-
From the Actions pane, select Add FTP Site.
-
Complete the Add FTP Site wizard:
-
In the FTP site name field, enter a name for this FTP site.
-
In the Physical path field, enter the location of your site or where you want the FTP site files to go.
-
Click Next.
-
Set the IP address that you want to use for FTP.
-
Select Allow SSL.
-
Select the created “Self-assigned” certificate from the SSL Certificate drop-down list.
-
Click Next.
-
Select Basic authentication.
-
Select All users on the Allow access to drop-down.
-
Select Read and Write from Permissions.
-
Click Finish.
-
You should see the name of your FTP site under the main Sites pane.
-
Double-click on the FTP site that you set up from the main pane, or expand Sites from the tree view and select the FTP site that you set up.
-
Check folder permissions on the folder to which you pointed the FTP site:
-
Click Edit Permissions under the Actions pane.
-
Click the Security tab. Add Everyone and give all permissions to it.
-
Make sure the user that you created above has modify rights to the folder.
-
-
With the FTP site that you created above selected in the IIS Manager, launch the FTP User Isolation module by clicking on the FTP User Isolation icon.
-
Change the isolation method from FTP root directory to User name directory (disable global virtual directories).
-
Click Apply under the Actions pane.
-
Go back to the root of your FTP Site.
-
Create a virtual directory named Local User (for example: User A):
-
Right-click on Test FTP Site from the tree view and select Add Virtual Directory.
-
Enter the Alias as LocalUser (for example: User A). This name is case-sensitive.
-
Enter the Physical path as the path given for FTP site. For example: C:\inetpub\ftproot
-
Click OK.
-
-
Authorize the domain users in FTP:
-
In IIS Manager, select your FTP Site and then the FTP Authorization Rules module.
-
You can authorize users to access the FTP site using one of these options.
- Add the individual users or groups.
- Allow all authenticated users. By default, individual users or a user group are added when setting up isolated users.
-
Testing the FTPS connection
To test the FTPS connection
-
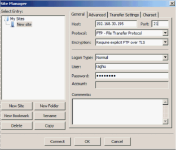
Install FileZilla(3.5.3).
-
Launch FileZilla.
-
Provide the details for the respective fields and click Connect.
FTPS site will be connected to the specified path.
FTPS support configuration on the server
FTP support is installed, by default, on the server. To verify that FTP support is properly installed, complete the procedure in Creating Folders > Network Folder Share, if you have not already done so.
