Note: Using auto detect minimizes the need to set up multiple source languages. However, target languages must be set up to ensure your documents are translated appropriately.
How does it work
Documents sent as email attachments or scanned at a device can be translated before reaching their final destination with the use of rules, job properties, and/or device buttons and prompts.
Before you begin
Administrators must complete the following tasks.
-
Obtain and set up a Translation license.
-
Obtain an Upland Intelligent Capture account username and password.
Contact your Account Manager for further assistance.
Note: Internet access is required.
Source and target translations can be set up by using Components > Compose in the Server Administrator. The Compose component is used to manage the composition of messages and their final format upon delivery.
Note: Setting up the target language is required. Use “auto” as the source language if you do not know all the source languages that may be used in your company’s document workflows. Each language that you want the server to translate to must have an appropriate language code set up as a TargetLanguage.
-
In the Server Administrator, select Components. The Components details pane appears.
-
Select Compose. The Compose Properties dialog box appears.
-
Select the Translations tab.
-
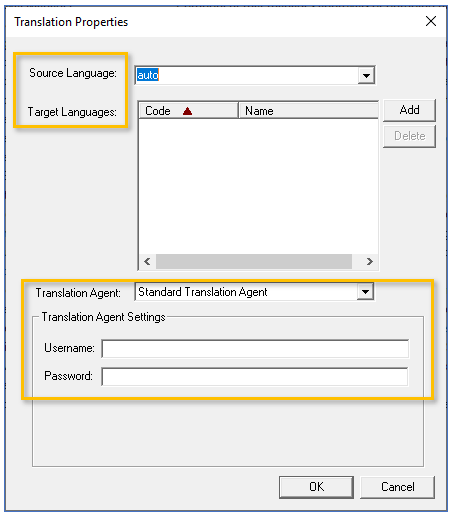
Select New. The Translation Properties dialog box appears.
See the Translation Properties dialog box example below.
-
Select a source language on the Source Language drop-down list or use the default setting, auto.
-
Select Add. The Add Target Language dialog box appears.
-
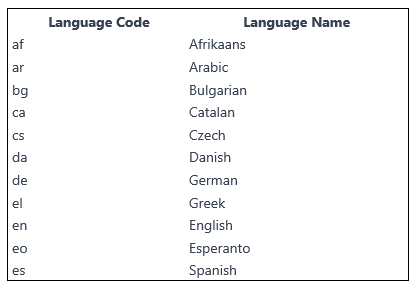
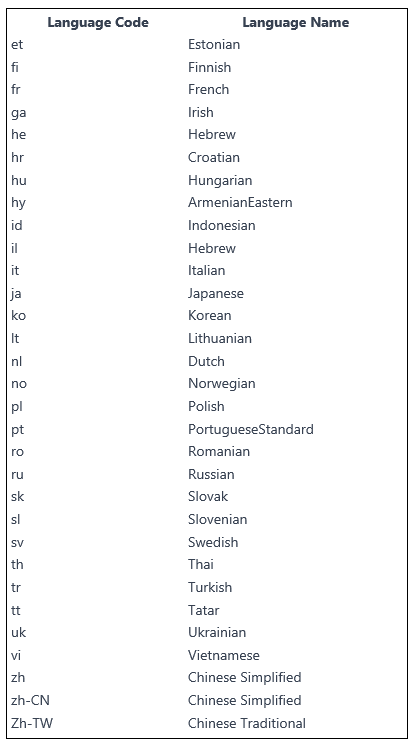
Select the target language on the Language Code drop-down list, for example, es. This is the ISO-639 language code for Spanish. An ISO-639 language code is used for all languages that appear on the drop-down list.
Tip: You can also type an ISO-639 code instead of selecting it from the drop-down list. The current list only contains the most popular codes. See the Google translate language code list for more codes.
-
Select OK.
-
Use the Standard Translation Agent default.
-
Specify the Upland Intelligent Capture account username and password in the appropriate boxes.
-
Select OK on the Translations Properties dialog box. The source and target language settings appear in the Source/Target table.
See the Compose Properties dialog box example below.
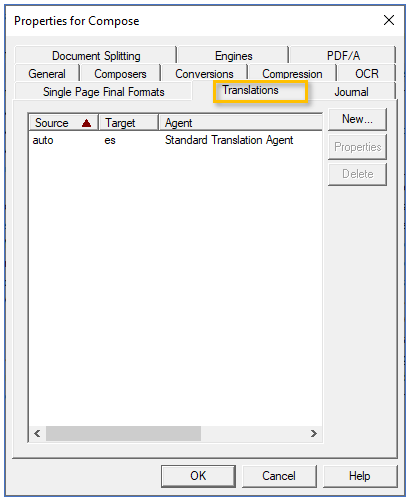
12. Select OK on the Compose Properties dialog box.
Tip: You can select any language configuration in the table and use the Properties button to edit the Translation properties if necessary.
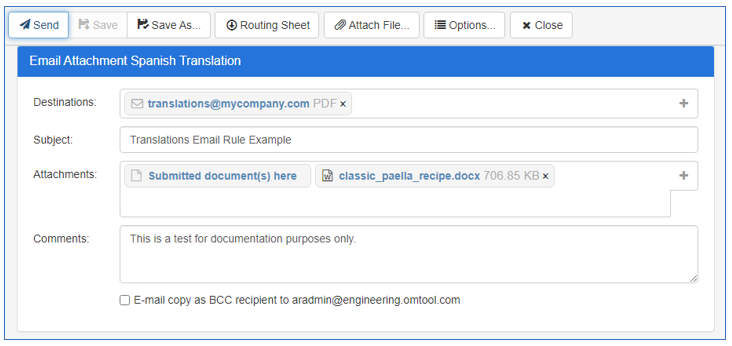
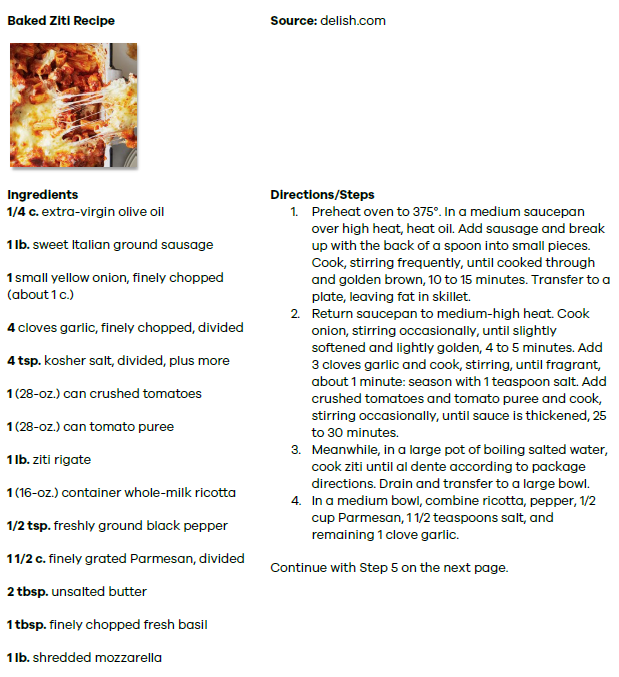
An international food company’s marketing department works with different vendors and various printing services to produce recipe cards in different languages for their customers when shopping at local markets. The recipe card includes an image of the meal with English instructions on the front and the target language on the back of the card.
The following example shows you how to set up an email rule that translates an attachment and delivers it to a specific folder.
Note: This example is for illustrative purposes only and may not reflect your company’s unique configurations.
Creating a Route to Connector rule
-
In the Server Administrator, select RuleSets.
-
Right-click Users. The Properties shortcut menu appears.
-
Select New > Route to Connector. The Route to Connector > Criteria wizard page appears.
-
Use the default, Email, as the destination type.
-
In the Matches box, type an email address, for example, translations@mycompany.com.
-
Select Next. The Route to Connector > Deliver wizard page appears.
-
Select a connector on the Connector list, for example, Filescan on the Server.
-
Specify a format, for example, PDF.
Note: Do not use the Deliver Original Format option. You must specify a different format.
-
Select Allow sender to override format.
-
Set Include Template to Never.
Note: In this example, templates are not used. You can use templates (cover sheets) to send with your attachments. However, they are not translated.
-
Set Include Document(s) to Always.
-
Select Override Destination.
-
Specify an override destination folder on the server, for example, c:\dtemp.
Note: This folder is where the translated documents will be delivered to.
14. Select Next. The Route to Connector > Complete wizard page appears. The completed rule and its name appear on the wizard page.
15. Select Finish. The rule appears in the RuleSets > User details pane.
Applying the Translation email rule to the Deliver action
You apply the email rule to the Deliver action by using the Rules Properties dialog box.
-
In the Server Administrator, select RuleSets > User if necessary.
-
In the RuleSets > User details pane, select the appropriate email rule, for example, “If email is translations@mycompany.com” then route to connector {PDF via Filescan on the Server [c:\dtemp]}. The Rule Properties dialog box appears.
-
Select the Actions tab.
-
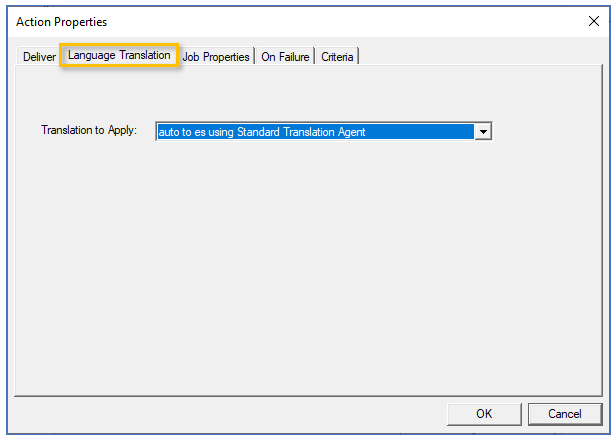
Select the Deliver action. The Action Properties dialog box appears.
-
Select the Language Translation tab.
See the Action Properties > Language Translation dialog box example below.
-
Select a translation on the Translation to Apply drop-down list.
-
Select OK on the Action Properties dialog box.
-
Select OK on the Rule Properties dialog box.
The
See workflow example below.
The attachment is sent via
Messages > In History
The message’s delivery can be tracked by using Messages > In History in the Server Administrator.
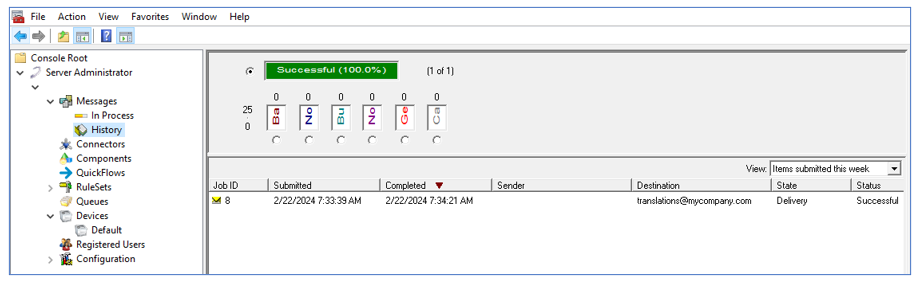
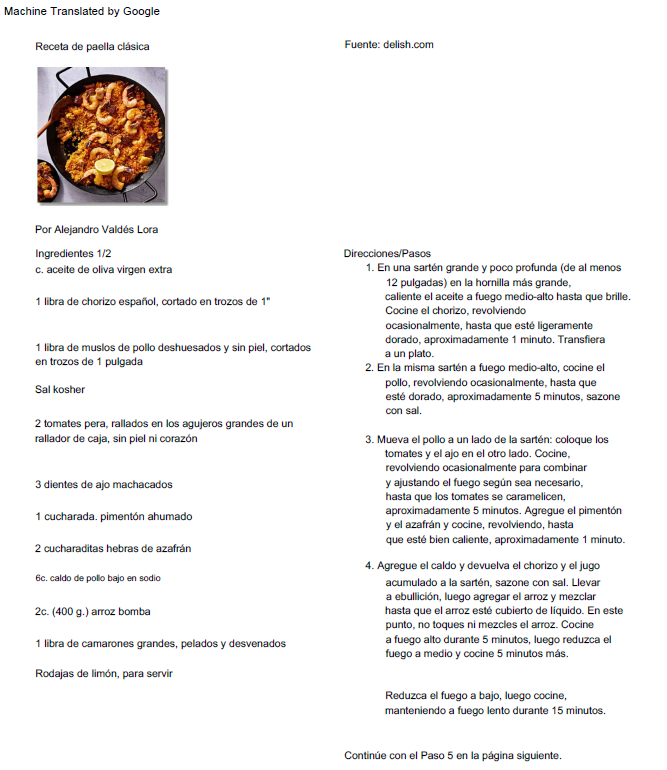
Translated Document Delivery to Folder c:\dtemp
| English (Attachment) | Spanish (Translated Attachment) |

|
|
Note: The “Machine Translated by Google” message is shown at the top of the translated document indicating that it was translated by Google’s translation machine service. Translated documents should be reviewed for accuracy.
Translation jobs using source and target language job properties
Source and target language job properties can be applied to the rule as an alternative workflow method for your translation.
-
The SourceLanguage and TargetLanguage job properties can be used in a number of ways, for example, added to a rule, used in a prompt, or specified in a control file.
-
The values of the SourceLanguage and TargetLanguage job properties must be language codes that Google translate supports and any target path, for example, auto to es must be set up in Compose > Translations.
-
The Language Translation tab in the UI used in conjunction with the Deliver > Action of a rule was added for ease of use. However, adding the SourceLanguage and TargetLanguage properties to a job may provide more flexibility with certain workflows.
The following example shows you how to set up a device button with a prompt rule that translates documents when scanned at a device and delivers it to a specific folder.
Note: This example is for illustrative purposes only and may not reflect your company’s unique configurations.
Creating a Route to Connector rule
-
In the Server Administrator, select RuleSets.
-
Right-click Users. The Properties shortcut menu appears.
-
Select New > Route to Connector. The Route to Connector > Criteria wizard page appears.
-
Use the default, Email, as the destination type.
-
In the Matches box, type an email address, for example, translationsbutton@mycompany.com.
-
Select Next. The Route to Connector > Deliver wizard page appears.
-
Select a connector on the Connector list, for example, Filescan on the Server.
-
Specify a format, for example, PDF.
Note: Do not use the Deliver Original Format option. You must specify a different format.
-
Select Allow sender to override format.
-
Set Include Template to Never.
Note: In this example, templates are not used. You can use templates (cover sheets) to send with your attachments. However, they are not translated.
-
Set Include Document(s) to Always.
-
Select Override Destination.
-
Specify an override destination folder on the server, for example, c:\dtemp.
Note: This folder is where the translated documents will be delivered to.
-
Select Next. The Route to Connector > Complete wizard page appears. The completed rule and its name appear on the wizard page.
-
Select Finish. The rule appears in the RuleSets > User details pane.
Setting up SourceLanguage and TargetLanguage job properties as prompts
You can use the SourceLanguage and TargetLanguage job properties as prompts by using Configuration > Job Properties > System in the Server Administrator.
Device users will use these prompts at a device to specify source and target languages.
SourceLanguage job property prompt
-
In the Server Administrator, select Configuration > Job Properties > System.
-
Find and select the SourceLanguage job property. The Job Property SourceLanguage dialog box appears.
-
Select the Prompt UI tab.
-
Select Generic List on the Type drop-down list.
-
Use the default label or specify a different label in the Label box.
-
Specify instructions for the device user in the Instructions box. (optional)
-
Select New. The List Item Properties dialog box.
Note: This is where the source languages are created as list items for the list displayed at the device.
-
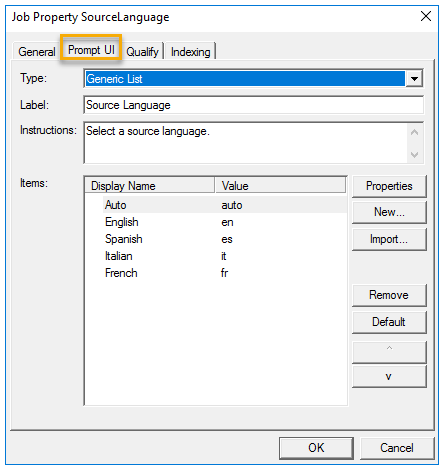
Specify a display name for the source language in the Display Name box, for example, English.
-
Specify a value (ISO-639 language code) in the Value box, for example, en.
-
Select OK on the List Item Properties dialog box.
-
Repeat Steps 7 through 10 until you are done creating new source languages.
Note: The source languages appear in the Display Name/Value table.
See the Job Property SourceLanguage dialog box example below.
-
Select OK on the Job Property SourceLanguage dialog box.
TargetLanguage job property prompt
Create a new TargetLanguage job property as a prompt by using Configuration > Job Properties > System in the Server Administrator.
-
In the Server Administrator, select Configuration > Job Properties > System.
-
Find and select the TargetLanguage job property. The Job Property Target Language dialog box appears.
-
Select the Prompt UI tab.
-
Select Generic List on the Type drop-down list.
-
Use the default label or specify a different label in the Label box.
-
Specify instructions for the device user in the Instructions box. (optional)
-
Select New. The List Item Properties dialog box.
Note: This is where the target languages are created as list items for the list displayed at the device.
-
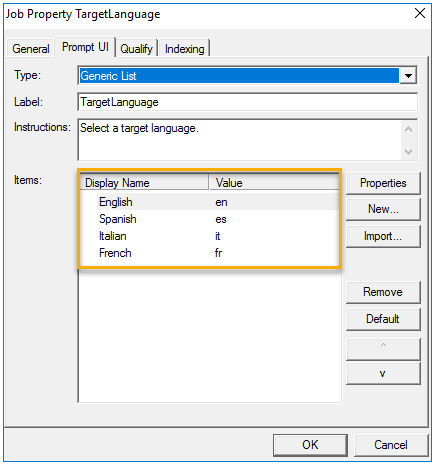
Specify a display name for the source language in the Display Name box, for example, Spanish.
-
Specify a value (ISO-639 language code) in the Value box, for example, es.
-
Select OK on the List Item Properties dialog box.
-
Repeat Steps 7 through 10 until you are done creating new target languages.
Note: The target languages appear in the Display Name/Value table.
See the Job Property TargetLanguage dialog box example below.
Setting up the Translation button
You can set up a Scan to Destination button to a new or existing device or device group. In this example, we will use the Default device group and add the Scan to Destination button.
-
In the Server Administrator, select Devices > Default. The Device Group Properties dialog box appears.
-
Select Add. The Add Button dialog box appears.
-
Find and select the Scan to Destination button on the Type drop-down list.
-
Change the button name to Translate in the Name box.
-
Select OK. Translate appears on the Device Home Screen list.
-
Select Translate. The Button Properties dialog box appears.
-
Type the display text, for example, Translation in the Display Text box.
-
Type a description, for example, @Translation in the Description box.
-
Use the remaining default settings as is.
-
Continue with Setting the Job Property destination.
Setting the Job Property destination
-
Select the Job Properties tab.
-
Select Destination on the Job Property/Value table. The Set Job Property dialog box appears.
-
Type the email address you created in the rule, for example, translationsbutton@mycompany.com in the Value box.
-
Select OK on the Set Job Property dialog box.
-
Continue with Adding the Source and Target Language prompts.
Adding the Source and Target Language prompts
-
Select the Prompts tab.
-
Select Add. The Select Prompt Job Property dialog box appears.
-
Select the Property Ellipsis (…) button. The Select Job Property dialog box appears.
-
Find and select the SourceLanguage job property.
-
Select OK on the Select Job Property dialog box.
-
Use the default Display on Page setting, for example, Workflow – Individual pages.
-
Select OK on the Select Prompt Job Property dialog box.
-
Repeat Steps 17 through 22 to add the TargetLanguage job property prompt. The prompts appear on the Name/Location table.
-
Select OK on the Button Properties dialog box.
-
Select OK on the Device Group Properties dialog box.
-
Test the button configuration: go to the device, scan, and translate a document.
See the Source and Target language prompts in action at a device.
Note: A device simulator is used to show how the prompts appear on the device for illustrative purposes and do not reflect your device's actual display.
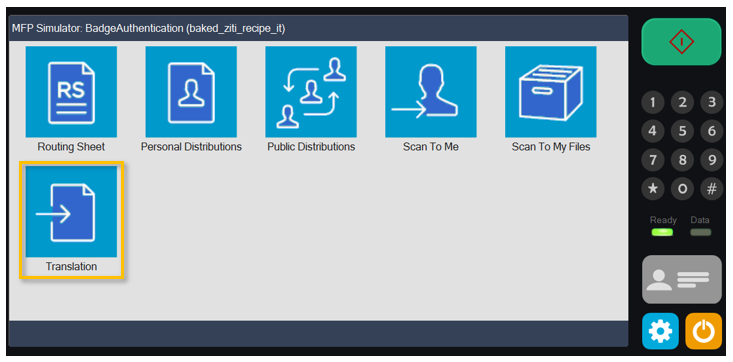
Translation button on the device
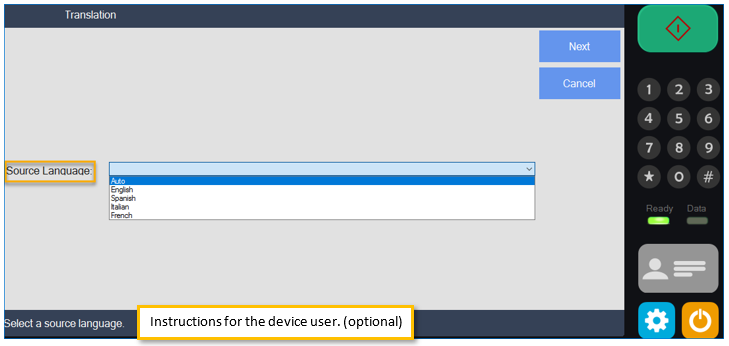
Source Language list prompt
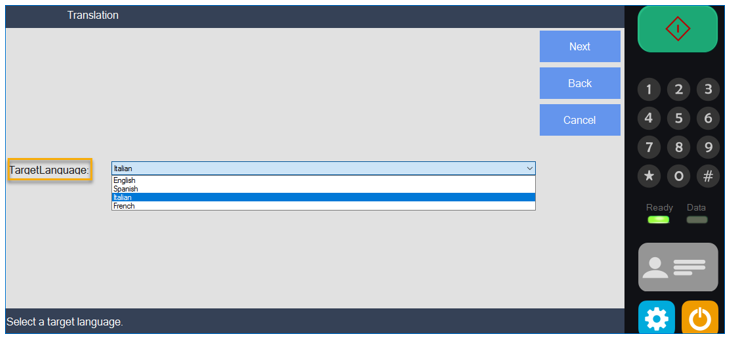
Target Language list prompt
Translated Document Delivery to Folder c:\dtemp
| English (Scan) | Italian (Translated Scan) |
|

|
Microsoft Office documents and ABBYY engine OCR limitation
When
The following Microsoft Office final formats, if selected, OCR.DOC, OCR.DOCX, OCR.XLSX, OCR.XLS, OCR.RTF, OCR.TXT are limited to the following language codes.
See valid source and target language codes for non-Microsoft Office OCR final file formats.
See also