Each person who uses the platform will need a 'User' created for them. This is an easy process (that can be undertaken by Account Admin users) and this is a step by step guide to walk you through it.
More detailed information can be found in the User Management topic.
Note: there are many setting variations, which will be discussed.
Step 1: Begin User Creation
To create a new user you will need to go to:
Admin>Users
Once here, you can click the 'Create User' button in the administration page, this will then display the 'Create User' form.
Step 2: Provide Full Name
Enter the full name of the new user.
Step 3: Give a Username
Give the new user a Username, which will be used for Logging in. We recommend using the first initial and surname. For example, John Smith becomes jsmith; you can however choose any acceptable username.
Note: only alphanumeric characters are accepted, with a limit of 32 characters.
Step 4: Provide Email address
Provide the new user's email address; this will be used to send notifications, communications or password reset requests to.
Step 5: Select Time zone
Select the time zone the user will be using the platform in. This will make the dates and times localised to the user on the platform.
Step 6: Set Password Expiry
This is an On Demand feature. If you would like more information about this feature, contact your customer success manager.
You can set a password expiry for your user to ensure data and platform security. You can specify any number of hours, days, weeks, months or years.
Step 7: Select Admin Rights
If the new user you are creating is also an Admin user, you need to select what privileges they will have. You can view the Admin Rights table for what each type of user can do.
Step 8: Activate the User
Checking 'Activate User' will send a link to the email address provided to the user, asking them to set a password and activate their account.
Note: if you require the user to have further custom settings enabled (such as disabling launch), then uncheck and complete the form. So these can be enabled—before the user can access the platform, contact Adestra Customer Support (adestra-support@uplandsoftware.com).
Step 9: Choose Mailing Preferences
Decide the user's mailing preferences, including whether they opt in for system updates and maintenance communications as well as information about new products and services.
Step 10: Choose Access Restrictions
This controls the locations from which the user can access Adestra.
You must select the IP access the new user will have. Whether it's from all IPs, authenticated IPs only or a specified set of IPs. More information is available in the Access Restrictions topic.
If you select Authenticated access or Restricting to a set of IPs, you will also be shown the options to 'Enable Data Download' and 'Require OTP Token'.
- Enable Data Download: allows a user to download contact data
- Require OTP Token: user will require an OTP token to sign on
You can also choose to enable single sign-on for the user, should you wish.
Step 11: Review Creation Form
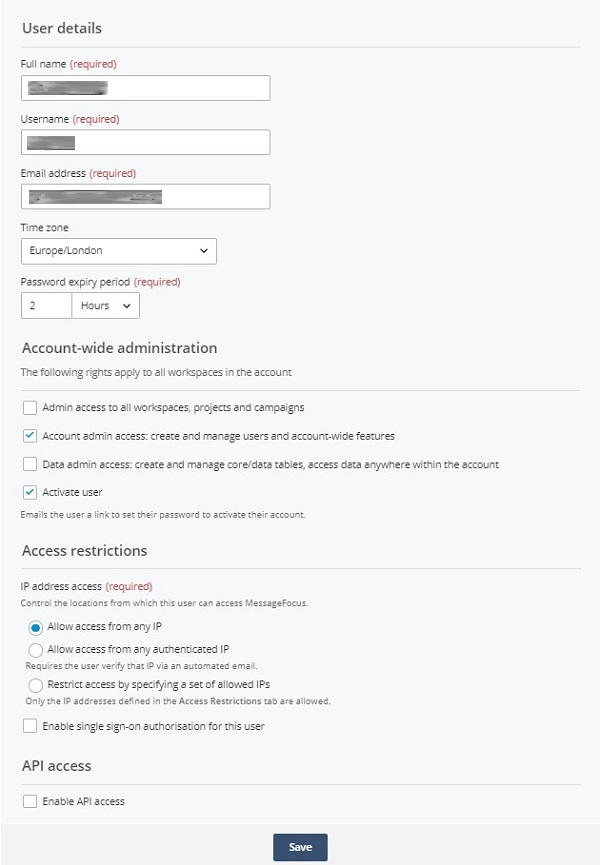
Here is an example of a completed User form.
- Their basic user information has been provided.
- A password expiry has been set.
- No Admin Rights have been set for the user.
- The user will be activated when the form is completed and saved.
- Mailing preferences have been applied.
- Access Restrictions have been to a specific set of IP addresses (explained in Step 13) and OTP will be required.
Step 12: Save and Set Permissions
Click save and your user will have been created. You will also now be shown the 'Permissions' section where you can apply workspace permissions to your new user. Each type of permission allows different degrees of access and management.
Note: Permissions of are often configured alongside further custom settings, if you need these applied to your user, contact Adestra Customer Support (adestra-support@uplandsoftware.com).
Step 13: Additional Information Required
After creating your user and setting their permissions, if you chose to restrict the user's IP access to the platform you will be notified that these IPs need to be provided. Users will not be able to log in until these are provided.
Selecting the Grant data download access from this IP (or IP range) check box lets users download contact data from approved IP addresses.
Step 14: Setting API Access
This is an On Demand feature. If you would like more information about this feature, contact your customer success manager.
To access to the Adestra API, you need to contact Adestra so we can apply the necessary settings.
Tab Information
When a user has been created, you will be able to view a set of different tabs. These are discussed in the User Management topic.