Saving and Exporting an Audience
When you save an audience, it will be saved within the Audiences platform.
To use the audience in another application, e.g. Adestra, you will need to either configure sync settings for a connected app or download your audience.
Saving an audience
-
Open the function menu and press the Save button or Save As button.
-
Enter a name for your audience selection.
- Enter a description.
-
Select a location to save the selection within Audiences.
Tip: create folders and subfolders to organise your saved elements.
-
Press the Save button.
Tip: you can also enter a description in the audience properties pane. This description will pre-populate the field when saving
Note: if you have configured your sync settings, pressing the save or save as buttons will affect your data in both Audiences and your selected export channel.
Syncing an audience
To use your audience in a connected app, e.g. Adestra, you will need to sync your audience.
Note: on the designer tab, you will first need to select the canvas background to open the audience properties in the properties pane.
Tip: if you start your list in Adestra, some of the sync settings will already be populated based on the selections made in Adestra.
-
Expand the sync settings menu in the audience properties.
-
Select an export channel.
-
AD Direct Regular - sync your audience with Adestra as a regular list.
-
AD Direct Remote - sync your audience with Adestra as a remote list.
-
-
Select a workspace and core table.
-
For regular and remote list exports, select an owner.
-
After you have defined your sync settings, save your audience.
Note: pressing the save or save as buttons will affect your data in both Audiences and Adestra.
When you first save your audience (using the save or save as button):
-
An audience will be created in the selected folder within Audiences, and
-
A list with the associated contacts will be created in Adestra.
-
If your Audience includes calculated fields, you need to map your fields in Adestra.
When you press the save button on an already saved and synced audience, you will be notified that continuing with this action will update your list in Adestra. If you continue:
-
The audience will be updated in Audiences.
-
The list in Adestra will be updated with the new audience data.
-
If your Audience includes calculated fields, you need to map your fields in Adestra.
When you press the save as button on an already saved and synced audience, this will function as a new save, i.e.:
-
An audience will be created in the selected folder within Audiences, and
-
A list with the associated contacts will be created in Adestra.
-
If your Audience includes calculated fields, you need to map your fields in Adestra.
-
Syncing an audience with a calculated field
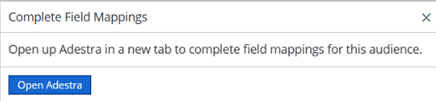
When syncing an audience that includes one or more calculated fields, Audiences will prompt you to map these fields in Adestra
-
In the prompt box, press the Open Adestra button.
-
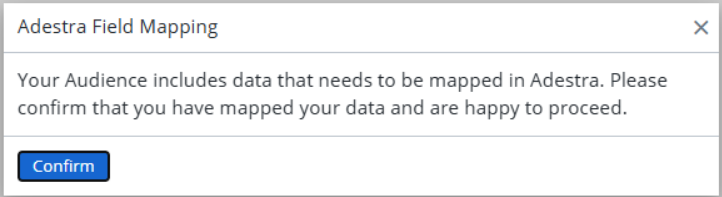
In Adestra, map your audience fields to the corresponding fields in Adestra.
-
Press the Save button to save the mapping configuration.
-
Return to your Audiences session.
-
Upon returning to Audiences, you will need to confirm you are happy to proceed.
Viewing your audience in Adestra
When you save a synced audience,Audiences presents a notification that the sync has been successful. Within this notification, you have the option to view the data in Adestra.
If you proceed, you will exit Audiences and go to the Adestra app.
To continue working in Audiences, press the not now button or close the popup using the x in the corner.
You can view a synced audience at any time by pressing the View audience in Adestra button in your sync settings.
Note: this button is unavailable until the audience is synced and saved.
Attention: if you edit an already synced audience but do not save it, pressing this button will take you to Adestra with the synced version of your audience, i.e. without your changes.
Downloading an audience
To make your audience available for manual import into another app:
-
Go to the editor tab of your audience.
-
Open the function menu.
-
Press the Download button.