Query Element
Use the query element node to pull data from your database into an audience selection. This data can be from any data-set in your system.
Adding a query element
On the designer tab:
-
Drag the query icon onto your canvas to create an empty query node.
-
Open your database using the data stack icon in the main navigation menu.
-
Search or browse the data tree to locate the data you want to add to your query, e.g. contacts for a given country.
-
Drag the data set onto the query node. Your node should automatically update to display the name of the data set.
Note: if you drag a valid data set onto an empty space on the canvas, it will default to a query node with that data set.
Adding multiple data sets to a query
If you drag a second set of data into a query it will default to treating the data sets as an AND step, i.e. the query node will calculate as if it were two query nodes feeding into an AND element.
If you drag and hover the second set of data over the query node, you will get the option to:
-
Add the second data set to the query as an AND operation, i.e. output all contacts meeting condition 1 and condition 2.
-
Add the second data set to the query as an OR operation. i.e. output all contacts meeting condition 1 or condition 2.
-
Replace the previous data set with the new data set in the query.
Although this can be used to replicate an audience that uses an AND operation or an OR operation, it does obscure the counts for each step, making it harder to spot errors.
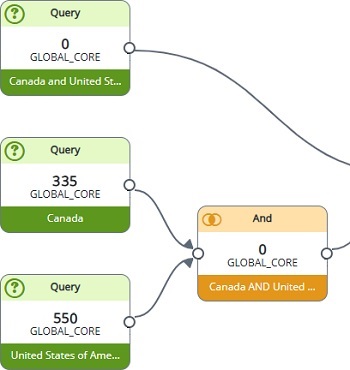
Example: you drag a data set for customers in the United States into a query that already contains customers in Canada.
Since a customer cannot simultaneously be in Canada and the United States, the query will give an output of zero.
If this same audience used two query nodes, one for Canada and one for the US, connected to an AND operation, you would see:
-
A count for Canadian customers.
-
A count for US customers.
-
Zero results on the AND node since the two queries are mutually exclusive.
Editing query properties
The properties pane to the right of the canvas changes based on the selected element.
-
Select the query node to view the query properties.
-
Change the name of your element to make it easier to identify the data in the query.
-
The table is automatically completed based on your selected data set. Confirm that the table displayed is the one you want.
Note: calculating an audience at the wrong table level can result in errors.
-
Confirm your query has the expected syntax.
For example, if you dragged data for customers in Canada into your query, you should see syntax similar to [TABLE].[COUNTRY] = 'Canada'.
If you have yet to add data to your query, the syntax will be empty.
-
Enter or update a query by:
-
Typing into the syntax field.
-
Dragging a data set from your database into the syntax field.
-
Dragging from the search bar if you have searched for a field.
-