Calculated Field
The Calculated Field option takes you to the field builder, where you can create data that you do not have but for which you do have the source data.
Example: your source data contains an individual's date of birth. Use a calculated field to find their age.
To get started:
-
Open the create menu by pressing the + icon in the main navigation menu.
-
Select the Calculated Field option from the list of functions.
-
The builder will open on the editor tab.
Tip: the field builder also includes a notes tab where you can add comments after saving your calculated field.
Building a calculated field
Tip: if your data is in a different format to that needed for the calculation, e.g. a date stored as a text string, use the CONVERT syntax function to convert your data into the correct format for the calculation.
Use the syntax field to enter the syntax for your calculated field.
The order you perform the following steps will depend on the field being built and the required syntax structure for that calculation.
-
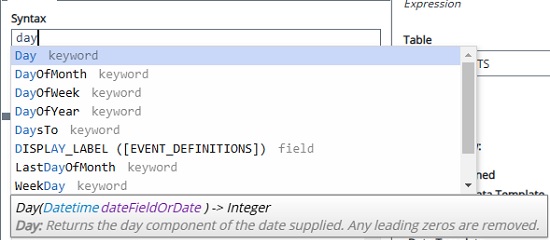
Enter a function to perform, e.g. DaysTo.
Note: when you start typing, Audiences provides a list of suggested functions.
-
Enter the criteria required by the function, e.g. the table and field of your source data in the format [TABLE].[FIELD].
Example: syntax to create a calculate field showing how long a customer has been a member using the 'Created' field in the 'Contacts' table.
DaysTo ([CONTACTS].[CREATED] , currenttimestamp)
-
In the calculated field properties pane, change the table the field is calculated against to suit your syntax entry.
Note: calculating a field at the wrong table level can result in errors.
-
(Optional) use operators such as AND and OR to add additional criteria.
-
In the function menu, refresh your count.
Results will appear in a table below the syntax field.
-
When you are happy with your syntax, save your calculated field by pressing the Save or Save as button.
-
Enter a name for your calculated field.
-
Enter a description.
Tip: you can also enter a description in the properties pane. This description will pre-populate the field when saving.
-
Select a location to save the calculated field within Audiences.
Tip: create folders and subfolders to organise your saved elements.
-
Press the Save button.
Edit calculated field properties
Located to the right of the syntax field and record numbers table, the properties pane allows you to refine your calculated field settings.
Fields
The 'fields to show' options allow you to customise the record number table.
-
Use the radio buttons to select the type of data template you wish to apply to the results of your calculated field.
-
User defined - allows you to drag and drop the fields you want to see in your results table.
-
Default data template - uses a default data template if one has been set up in your settings.
-
Specific Data Template - allows you to select a data template. Once selected, the fields from that template will show in the record view.
-
-
For the specific data template option, select a data template using the dropdown menu.
The table will automatically update to reflect your selection.
The 'syntax fields' option allows you to display fields related to your syntax in the results table.
-
Use the radio buttons to select if you want to display syntax fields before or after the other fields in your results table.
The table will automatically update with your selection.