You can add up to three extra tabs to Opportunity Manager. Each of these can be configured to show for all opportunities in Opportunity Manager, or can be configured to show depending on the opportunity plan type.
In custom settings, there are six fields in the Altify Opportunity Manager Settings to facilitate this - two for each custom tab. These enable you to specify a tab label and a 'source' (a Visualforce page that determines what the tab will display).
The fields are also available on each Altify Opportunity Plan Type List Detail that you save for an additional OM plan type.
To create a custom tab, do the following:
The contents of a custom tab come from a Visualforce page.
Note: If your Visualforce page references a non-standard controller class, you will first need to create the Apex Class that defines the controller class.
-
In Setup, go to Visualforce Pages.
-
Click New.
-
On the Visualforce Page, enter the following details:
-
Label: The label that will be displayed on the custom tab in an account plan.
-
Name: The name by which the Visualforce page will be identified in a plan type.
-
Visualforce Markup: The markup for this page. This references the controller class. See the sample code below for an example.
-
-
After you have entered the markup and other details, click Save.
-
Repeat steps 1-4 for each custom tab that you wish to add to Opportunity Manager.
-
In Setup, go to Custom Settings.
-
Do either of the following as appropriate:
-
If you are adding a custom tab to the default display of Opportunity Manager in your organization, click Manage next to Altify Opportunity Manager Settings and then click the Edit button.
-
If you are adding a custom tab to a particular OM plan type, click Manage next to Altify Opportunity Plan Type List and then click Edit for the relevant plan type.
-
- Enter the label in the Tab One Label field - this label is displayed on the tile on the launchpad and on the tab in Opportunity Manager.
-
Enter the Visualforce page that your tile/tab links to in the Tab One Src field.
Example: '/apex/namespace__pagename' is an example of a page source. If the page is not in a namespaced package and instead refers to a page built in your org, then the namespace is 'c' so the full source would be '/apex/c__pagename'.
-
Select a Salesforce lightning icon for the custom tab if required. Do this by entering the address of the icon, 'sldsico-action-new-contact' for example, in the Tab One Icon Class field.
See Available Icons for Custom Tabs for previews and addresses of all icon options.
-
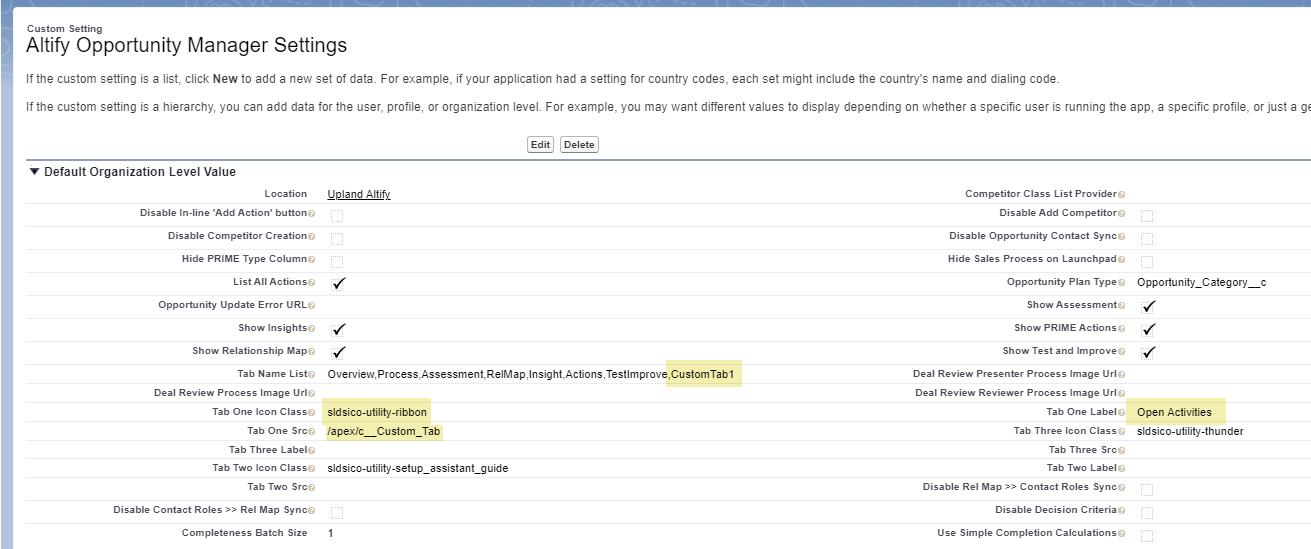
Add 'CustomTab1' to the Tab Name List field. This is a comma-separated list field. Tabs are displayed in the order that they are entered in this field.
An example of how these fields might appear is shown below.
-
Repeat steps 3 to 6 for a second and third custom tab if required.
-
For a second custom tab, populate the Tab Two Label, Tab Two Src and Tab Two Icon Class fields, and enter 'CustomTab2' at the required location in the Tab Name List.
-
For a third (and final) custom tab, populate the Tab Three Label, Tab Three Src and Tab Three Icon Class fields, and enter 'CustomTab3' at the required location in the Tab Name List.
Note: custom tabs are always referred to as 'CustomTab1', 'CustomTab2' and 'CustomTab3' in the Tab Name List field - regardless of the labels that you apply to your custom tabs.
-
-
Click Save.
To ensure your users have access to the Visualforce page you created for the custom tab, you need to update the Altify Permission Set.
-
In Setup, go to Permission Sets.
-
Click Altify Permission Set.
-
In the Apps section, select Visualforce Page Access.
-
Click Edit in the Visualforce Page Access section.
-
Add the Visualforce Page that you created to the list of Enabled Visualforce Pages.
-
Click Save.
Note: Similarly, you need to enable access if your custom tab requires the creation of an Apex Class. This is done in the Apex Class Access section of the Altify Permission Set.
The following is an example of a Visualforce page that displays open activities associated with the relevant opportunity.
<apex:page standardController="Opportunity" >
    <apex:pageBlock >
    You're looking at some related lists for {!opportunity.name}:
    </apex:pageBlock>
    <apex:relatedList list="OpenActivities"/>
</apex:page>
Highlighted below are the fields that configure the custom tab in Altify Opportunity Manager Settings:

All the above enable the following custom tab in Opportunity Manager:
