Opportunity Plan Types
By setting up opportunity plan types, you can control the visibility of:
- Opportunity Manager tabs and launchpad tiles
- Custom tabs and tiles
- Assessment questions
Setting up opportunity plan types is a three-stage process.
In the first stage, you set up an Opportunity custom field that defines the plan types you need. The field's outputs must be the names of the plan types:
- If you want users to be able to manually assign an opportunity's plan type, you typically use a Picklist field.
- If you want the plan type to be automatically assigned to each opportunity, use a Formula field with Text output.
Let's look at a Formula field example.
Suppose that you have a business rule that distinguishes between ‘Enterprise/Strategic’, ‘Mid-Market’, and 'SMB' opportunities, based on the opportunity value.
Opportunities valued $250,000 and more are Enterprise/Strategic.
Those between $100,000 and $250,000 are Mid-Market.
Those below $100,000 are SMB.
You want to your custom field to have three possible plan type outputs: Enterprise/Strategic, Mid-Market, and SMB.
- In Setup, open the Opportunity object.
- Open the Fields page.
- Click New.
- For the Data Type, select Formula.
- Click Next.
- Specify the field label and field name.
- Set the return type to Text.
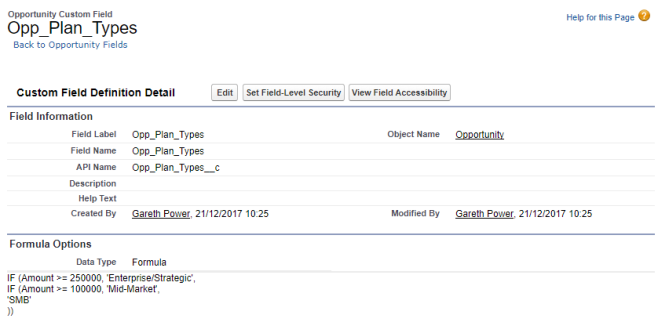
- Now specify the formula that implements the business rule set out above. The image below shows an example.
- Click Next.
- Click Next.
- Click Save.
The formula has three possible values: ‘Enterprise/Strategic’, ‘Mid-Market’, and ‘SMB’.

You have created a new custom field that implements the business rule. The next step is to specify its API name in custom settings.
For the software to recognize the Opportunity Plan Types you've defined, you need to specify the custom field's API name in custom settings.
- In Setup, open the Opportunity object.
- Make a note of the API name of the Opportunity Plan Type custom field you created in the previous stage.
- In Setup, go to Custom Settings.
- Click Manage beside Altify Opportunity Manager Settings.
- Click Edit.
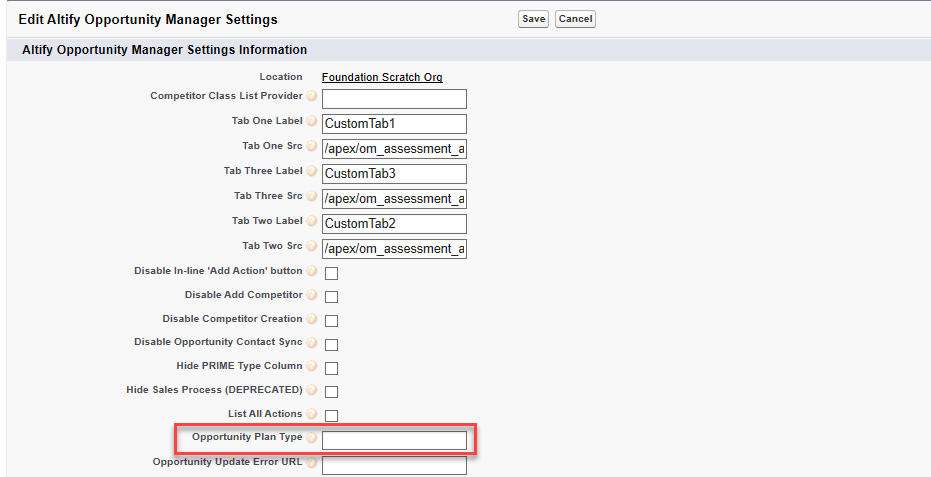
- In the Opportunity Plan Type field, specify the API name of the custom field.
- Click Save.

You’ve specified the API name of the Opportunity Plan Type field. The software now recognizes the opportunity plan types you've defined.
Note: Opportunity record types can also be used as opportunity plan types. In this case, you must use the record type ID rather than its name.
The next step is to create an ‘Altify Opportunity Plan Type Fields’ custom settings record for each plan type. This record determines the standard Opportunity Manager and custom tabs that are displayed on opportunities of the relevant plan type. Custom tabs navigate users to a Visualforce page.
In our example, these plan types are Enterprise/Strategic, Mid-Market, and SMB.
- In Setup, go to Custom Settings.
- Click Manage beside Altify Opportunity Plan Type List.
- Click New.
- Specify the Name of the relevant plan type. This must exactly match the relevant value defined in the Opportunity Plan Type custom field. For instance, SMB, as per our example.
-
In the Tab Name List field, list the tabs that should be visible for the plan type. Separate them with commas, and make sure not to add any spaces between them.
The order in which you list them determines the order in which they are presented, both within Opportunity Manager and as tiles on the launchpad.
For the list to work correctly, specific names are required:
- 'Overview' for the Overview tab
- 'Process' for the Process tab
- 'Assessment' for the Assessment tab
- 'RelMap' for the Relationships tab
- 'Insight' for the Insight tab
- 'Actions' for the Actions tab
- TestImprove for the Test & Improve tab
A list that includes every OM tab might look like this:
Overview,Process,Assessment,RelMap,Insight,Actions,TestImproveNote: For help with adding a custom tab to your Opportunity Manager plan type, see Adding Custom Tabs to Opportunity Manager.
- In the AssessmentQuestionIds field, you can optionally list the names of the Assessment Questions you want to be shown in SMB opportunities.
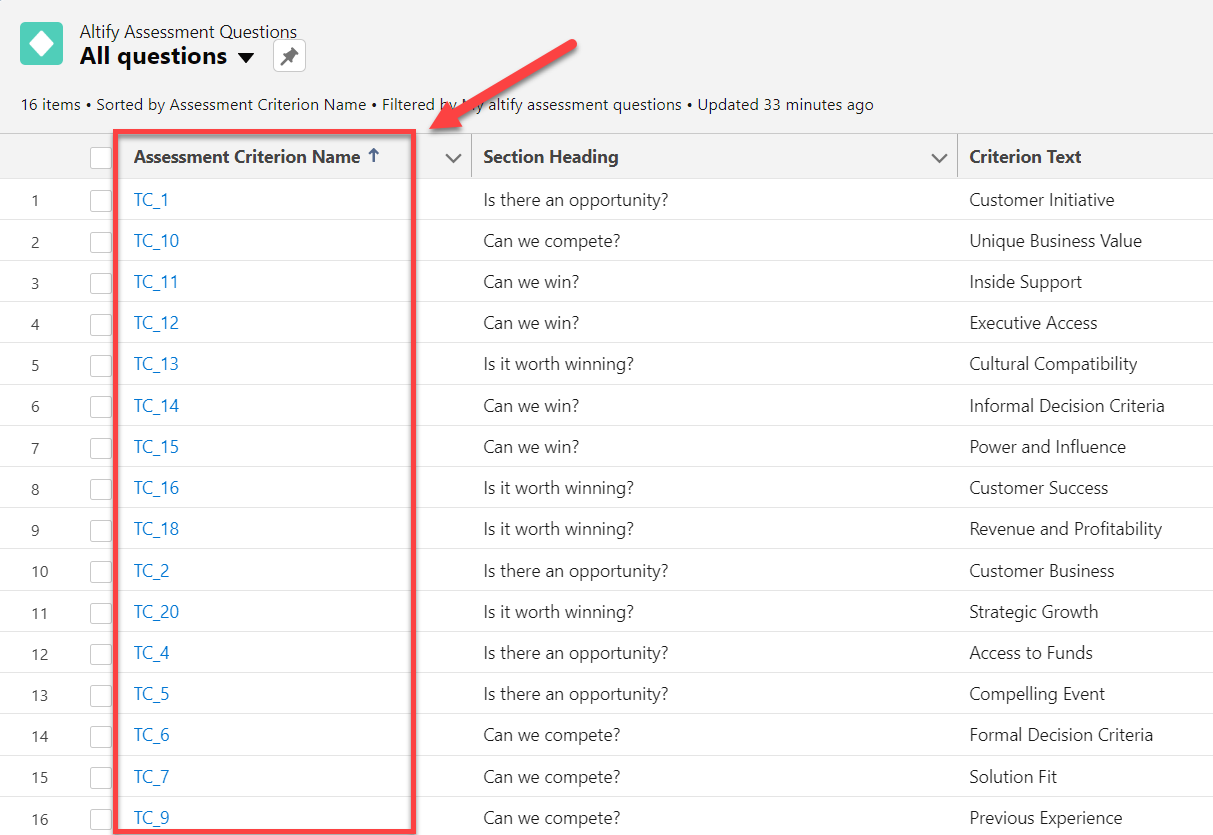
- Open the Altify Assessment Questions tab. (This may need to be enabled on your user profile.)
- The names are listed in the Assessment Criterion Name column.
- Click Save.
To find the assessment question names:

The assessment question names must be comma-separated in the AssessmentQuestionIds field. (The Assessment tab must also be enabled.) If you leave the field blank, all 16 questions are shown in SMB opportunities.
Note: The fields 'TC_6' and 'TC_14' are hard-coded to (respectively) display formal and informal decision criteria. They should be included in your plan if you want decision criteria to be assessed. For more information, see Modifying Assessment Questions.
Repeat the process for all your opportunity plan types.
In an opportunity that doesn't have a plan type, the set of tabs shown is determined by the Tab Name List on the Altify Opportunity Manager Settings.
If you are not employing a default Opportunity Manager tab, such as the Assessment tab, you need to switch off any TeamView signals that depend on the function. In the case of the Assessment tab, for instance, you should disable Show Signal 1, Show Signal 2 and Show Signal 3 for the same plan type. For more information, see
Team View's Plan Status icons are affected by your opportunity plan type configuration. Whenever you make changes to this configuration, you need to go to the Altify Batch Jobs tab and run the Recalculate Altify Opportunity FSM Signals batch job. This recalculates all Plan Status "signals", ensuring that the Plan Status icons display the correct colors.