iManage AppBus Plug-in for AutoClassifier
About
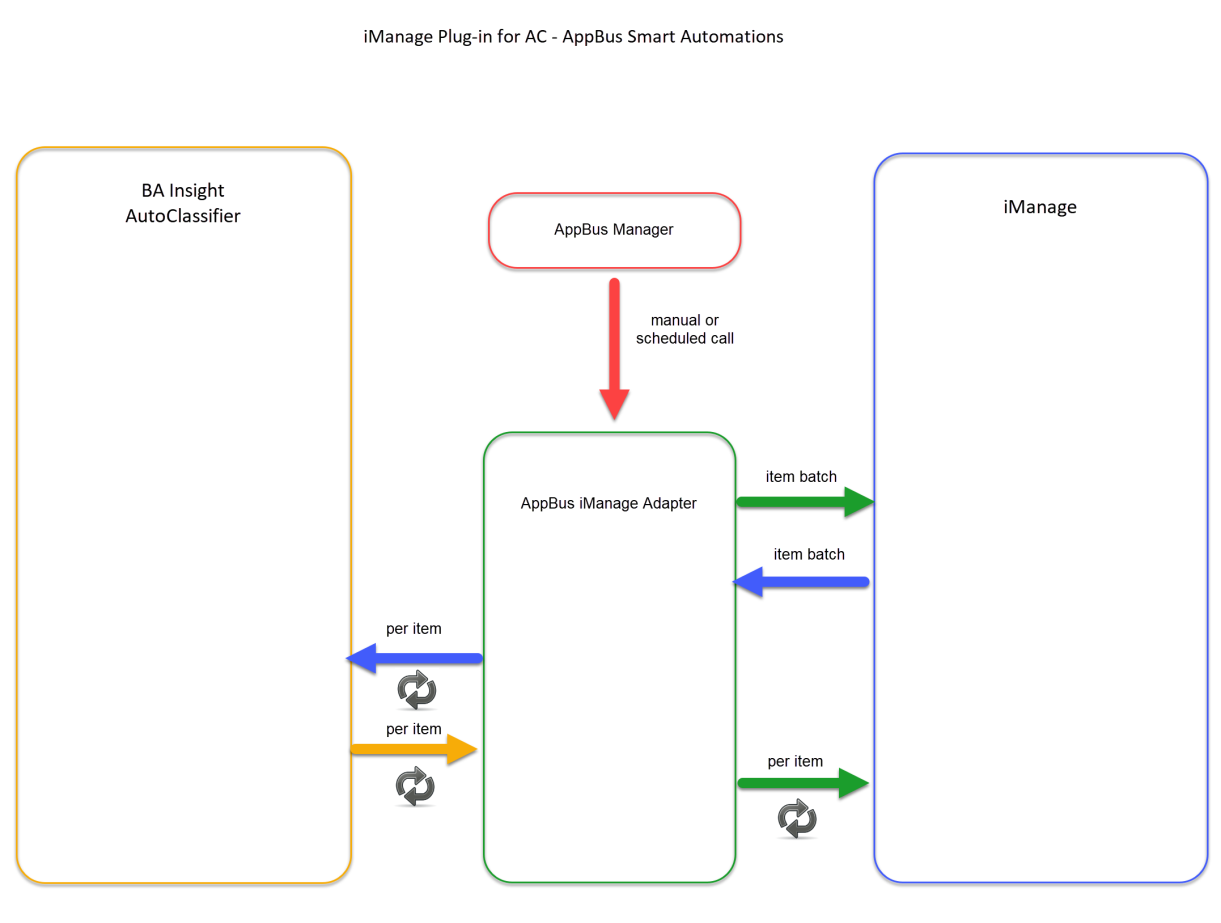
The iManage AppBus Plug-in for AutoClassifier integrates the AutoClassifier processing pipeline capabilities with the iManage source system.
Metadata created via an AutoClassifier processing pipeline is pushed directly into iManage documents' properties.
Prerequisites
- AutoClassifier iManage Plug-in
- Download the BA Insight iManage Plug-in for AutoClassifier .zip file from the Upland Right Answers Portal (requires login).
- Save the .zip file to a location accessible by AppBus Studio
How to Publish the iManage Plug-in
- Open AppBus Studio.
- Select File → Open.
- Select the iManageACPlugin project folder and open the asln file.
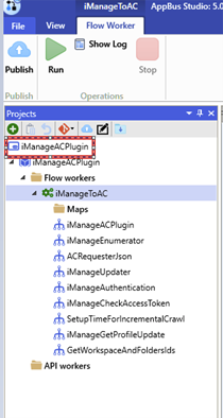
- From the left side, from Projects, select iManageACPlugin.See below.
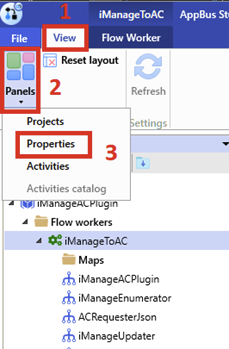
- From the above menu, select View → Panels → Properties.
- On the right side, a properties dialogue box appears.
- Enter a name in the Environments field, and press the '+' button.
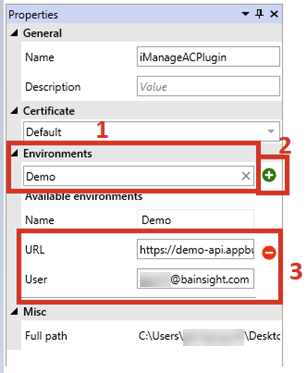
- Enter
- URL:
- Enter the URL of your AppBus Server API Endpoint. To find this:
- Login to the AppBus Server UI.
- Go to the "Management API" in the left navigation.
- Find the "Computed URL".
- Use this value. For example: https://appbus-api.test.local/v1
- Enter the URL of your AppBus Server API Endpoint. To find this:
- User:
- Enter the AppBus Cloud Tenant access user in the format name@domain.com.
- See the example above.
- Acquire this information from BA Insight Support team.
- URL:
- From the left side, right-click on iManageACPlugin and select Publish from the sub-menu that appears.
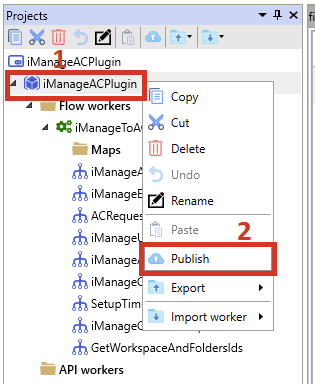
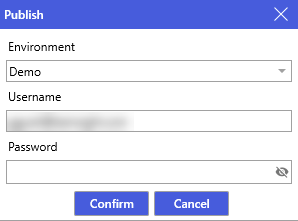
- A pop-up appears.
- From the drop-down menu, select your Environment, add a Password into the field shown, and click Confirm.
- Access your AppBus Server Tenant in your browser.
For example: https://demo.appbuscloud.com/ - Select Projects.
- Search for your published Project
- This is the name from AppBus Studio - iManageACPlugin
- This is the name from AppBus Studio - iManageACPlugin
- Select the Project.
- Click the Deploy button and wait for a few seconds.
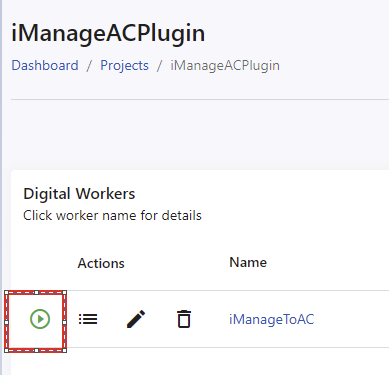
- Now you are ready to use the plug-in.
- Use the steps below for more information about how to use the iManage plug-in for AutoClassifier.
How to Use the iManage Plug-in
- From the Appbus Cloud address go to Projects:
- Example: https://demo.appbuscloud.com/projects
- Search for and click on iManageACPlugin.
- Select SECRETS button from the right side.

- Select and edit each option from the menu:
- clientId
- clientSecret
- password
- username
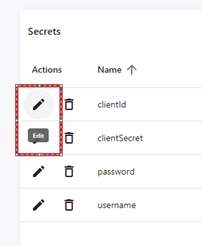
- The values from each field must be completed with the values received from iManage.
- After each option from Secret has been updated, go back to iManageACPlugin.

- Select API SPEC.
- Select /api/101/153/iManageACPlugin

- Select "Try it out."
- Complete all parameters.
- Click Execute.
Optional
Schedule
This option can be used in order to schedule an incremental crawl.
- Select /api/101/153/iManageACPlugin
- Select Schedule.

- Complete all the requested parameters and set the
isIncrementalCrawlparameter to true - Complete the parameters and the scheduled time when the plug-in is to run.

- Click Add.

Set Timeout
Default timeout is set to 600 seconds.
The timeout can be changed from AppBus Cloud.
- Click the Edit button near the logs button.
- API Timeout (in seconds) appears.
- Set this value as you desire.
Parameters
- RequestUrl
- iManage address.
- Example: https://cloudimanage.com
- LibraryId
- iManage library used to get the documents.
- Example: Active
- AutoClassifierAdress
- AC installation address
- Example: http://localhost:1967
- Filter
- iManage filter for documents:
- Example: type=ACROBAT
- Check the list with the filterable properties.
- PageSize
- Represents how many items receive pre-requests from iManage.
- Default value: 25
- Token ExpirationTime
- How many minutes must remain until access_token is refreshed
- Default value: 20
- isIncrementalCrawl
- If set to true:
- A filter is added to the request
- The items returned are only those files changed since the last crawl
- Default value: false
- If set to true:
- ContentFilter
- Using this field, choose which Workspace/Folder from the iManage source system to update
- Workspaces must be separated by the character ';'
- Workspaces and Folders must be separated by the character '/'
- Folders must be separated by the character '#'
- Note: To update all of the folders inside a workspace,
- Add only Workspaces
- Example:
- WorkspaceName;WorkspaceName2;WorkspaceName3
- Note ContentFilter
- If you want (some) specific workspaces and (some) specific folders from a workspace:
- Use the format:
- WorkspaceName/FolderName#FolderName;WorspaceName2/FolderName;WorkspaceName3;
- Use the format:
- If you want (some) specific workspaces and (some) specific folders from a workspace:
- CallerId
- Represents an identifier that is passed to AC as one of the properties in order to use as filter in AC configuration.
- See Example 3 below
- Output property: iManageCallerId
Metadata
- AutoClassifier can push processed values to the properties available in the iManage search schema.
- The names of the properties in iManage are standard types.
- You must configure AutoClassifier to return metadata with the same exact property name to be populated.
- Example: "custom10"
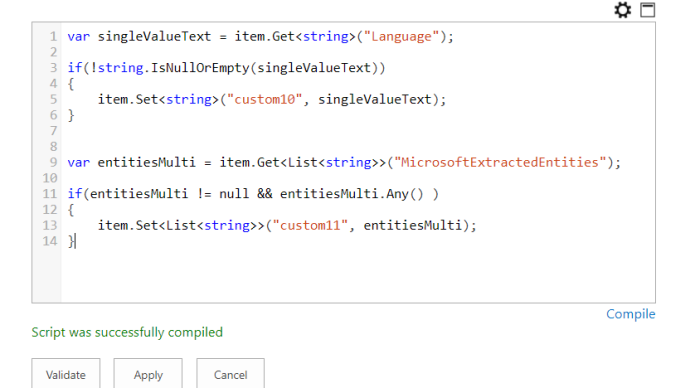
To re-name AutoClassifier output properties to match the iManage search schema, use the scripting stage with scripts as in the examples below.
- The scripting stage must be the last stage in your processing pipeline.
Example 1: For single-value text properties
var singleValueText = item.Get<string>("Language");

if(!string.IsNullOrEmpty(singleValueText))
{
     item.Set<string>("custom10", singleValueText);
}
Example 2: For multi-valued text properties
var entitiesMulti = item.Get<List<string>>("MicrosoftExtractedEntities");

if(entitiesMulti != null && entitiesMulti.Any() )
{
     item.Set<List<string>>("custom11", entitiesMulti);
}
Example 3: Setup trigger based on the iManageCallerId
var callerId = item.Get<string>("iManageCallerId");

if(callerId.Equals("ExpectedValue")){
    return true;
}
else {
    return false;
}
}
See the screenshot below:
Scheduling Requests via Windows Task Scheduler
If you need a basic task scheduler to invoke some operations served by your web API, use the following methodology for recurrent tasks by using both:
-
RESTful API (ASP.Net WebApi application)
-
Windows Task Scheduler
Use the following steps:
- Create the PowerShell script file (file type is ps1).
-
Add invoke code such as:
CopyInvoke-WebRequest -Headers @{"Authorization" = "Basic ???"} -ContentType application/json -Method POST -Uri https://???/task/sample -
Create a basic scheduled task and to the program field call the script file like this:
Copypowershell -command "C:\_Task\Sample_Hourly.ps1"
powershell.exe -command set-executionpolicy unrestrictedLimitations
Due to iManage limitations:
- If you need to assign a multi-value property from AutoClassifier to a property from iManage:
- The plug-in takes each value from the mult-value property and consolidates them into a string using the “;” character as a deliminator.
Also note the following:
- Following items cannot be updated:
- Two workspaces of the same name.
- Two folders with the same name from the same workspace.
- To update properties from AutoClassifier:
- AutoClassifier properties must have the same name as the properties from iManage.
- For example:
- To update property “custom10” from iManage, AutoClassifier must also return the property “custom10”.
- NOTE: Properties are case-sensitive.
Metadata Limitations
- custom1-12:
- 32 characters
- custom13-16:
- 96 characters
- custom29-30:
- 32 characters
Managing Document Properties
The following fields are read only:
- Document Type
- Document number
- Document size
- Version number
- Created
- Modified
- Status
- Checkout Location
- Location
- Related Documents
The following fields can be edited depending on the permissions granted to you:
- Document name
- Author
- Comments
- Class
- Operator
- Security Details
- Any additional document properties displayed
Note: When AutoClassifier updates iManage documents, the document Modified date does not change.