Add-In Schedule Annotation
When you installed AutoClassifier, you added the AutoClassifier Add-In to the site collection where you annotate your documents.
- The rules that define membership for each of the taxonomy nodes are used to annotate each document in your site.
- When you specify auto-tagging, your documents are automatically tagged.
- You can choose to enable annotation scheduling and select which document sites are/are not annotated using this process.
- Set up more than one scheduling job in order to annotate documents from different locations using different inclusion/exclusion rules and annotation schedules.
See the following example: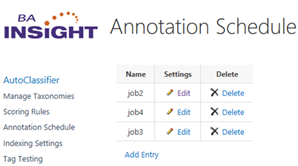
When you specify annotation settings for your site collection, you can inherit these settings in all of your document libraries depending on how you also specify your tagging settings.
Add annotation jobs to specify annotation scheduling for specific groups of documents and choose how these documents are annotated or re-annotated.
How to Annotate Documents in a Site Collection
Once a schedule has been created, new List/Libraries are not automatically added to the schedule.
-
To include new List/Libraries the schedule must be modified.
-
To have all Lists/Libraries scheduled see Include All Content Mode below.
Procedure:
- Go to the site collection where you installed the AutoClassifier Add-In.
-
 : Click and the Annotation Schedule page appears:
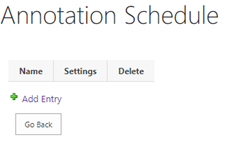
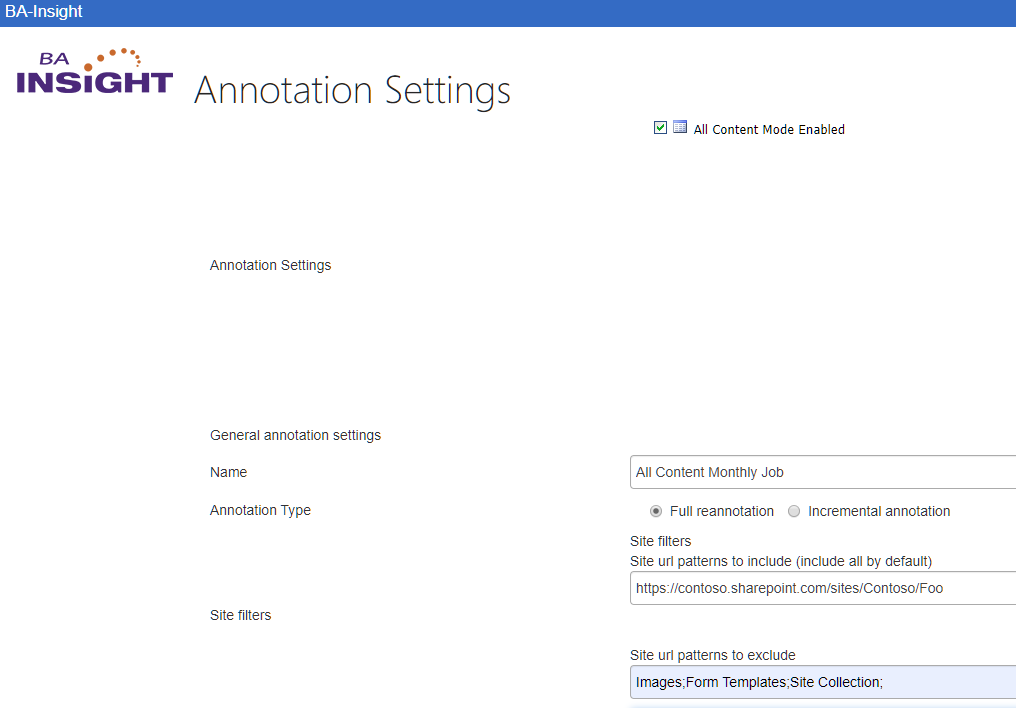
- Add Entry: Click and the Annotation Settings page appears:
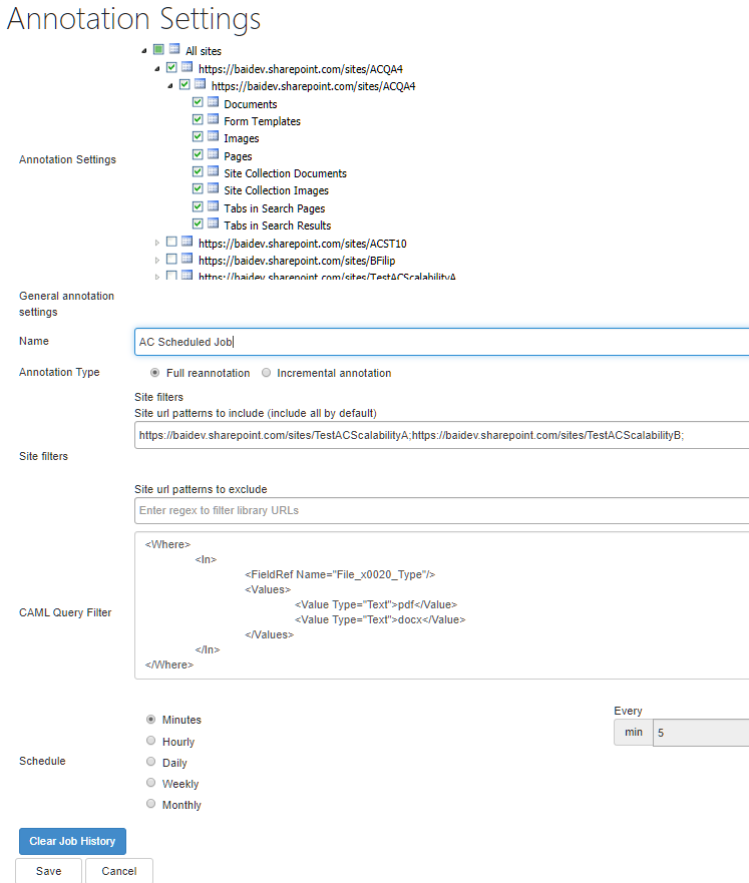
- Name: Enter the name of your scheduled job.
- Annotation Type:
- Full reannotation: This operation re-annotates all of the documents regardless of whether they were annotated at upload time. For more information, go to Specify Document Tagging.
- Incremental annotation: Auto tag only the changed documents in the site collection/document library.
- Site filters > Site url patterns to include (include all by default): Specify the URLs to include using REGEX patterns. By default, all URLs are included if you do not specify any URLs here.
- Site filters > Site / library url patterns to include / exclude: Specify the URLs to exclude using REGEX patterns. Specify multiple REGEX expressions separated by semicolon ' ; ' .
-
CAML Query Filter:
-
Specify a CAML Query WHERE Clause to filter specific items in your SharePoint lists or Document Libraries.
-
Example of a CAML Query filter that processes only PDF and DOCX files:
Copy<Where>
<In>
<FieldRef Name="File_x0020_Type"/>
<Values>
<Value Type="Text">pdf</Value>
<Value Type="Text">docx</Value>
</Values>
</In>
</Where> -
- Schedule:
- Click a check box to specify the annotation schedule.
- By default,
Minutesis selected.
- Clear Job History:
- For every 100 items annotated, the job progress is stored so that in case of failure the job can pick up where the job left off on the last run.
- Select this option if you want annotation to start fresh in the event of a failure, with no saved starting point.
- Click Save to see your job in the Annotation Schedule page.
How to Automatically Tag Large Amounts of Data
-
If the number of site collections and sites that you want to tag numbers in the hundreds or higher, managing the sites to be annotated via the site hierarchy tree is difficult.
-
In this scenario we recommend you use the "All Content Mode" configuration option.
All Content Mode
"All Content Mode" always includes all the site collections and sites where the AutoClassifier App was deployed/configured (manually from Site Contents or using the SideLoader tool) in your scheduled annotation jobs.
So, after you define a Job Schedule and Filters, all the sites and site content the AutoClassifier App is deployed to (now and in the future), will be included in Scheduled Annotation Jobs.
- To enable the "All Content Mode" for Scheduled Annotation, check the "Enable All Content Mode for Scheduled Annotation" under the "Common Settings" section of the Add-In Configuration page.
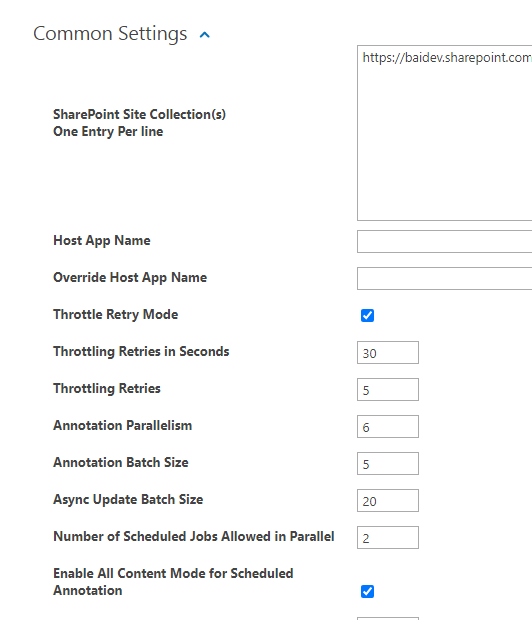
- When All Content Mode is enabled, the site's hierarchy is no longer displayed in the scheduled jobs page "Annotation Settings":
Configuring the Number of Jobs That Run in Parallel
The number of jobs that can run by default in parallel is 2.
-
Changing this is possible via the ScheduledJobsAllowedInParallel option from the AutoClassifier for SharePoint Add-In web.config file:
<add key="ScheduledJobsAllowedInParallel" value="2" />
-
It is not recommended this value be increased without justification as each job does parallel processing itself.
-
Changing the setting could throttle the system and degrade performance.
SharePoint Lists and Library Priority in Scheduled Annotation Jobs
From one job run to another, new sites, libraries or lists might appear to the total number to be processed.
- Each run of the Scheduled Annotation job first processes libraries and lists that were not completely processed in the previous run (in an eventual unhandled exception or server downtime, etc.).
- Next it processes the newly added libraries or lists (that were never processed by the job).
- After that, during the same job run it will be processed the ones that were processed in the past in previous job runs.
Distributing Load Across Multiple Scheduled Jobs in "All Content" Mode
-
In "All Content Mode" all the site collections, sites, and sub-sites where the AutoClassifier App is deployed are processed.
-
When a thousand or more site collections exist, there might be hundreds of thousands of libraries and lists to be processed by one job.
-
To prevent a single job from processing all the content in your tenant where the app was deployed, we recommend spreading the load among multiple jobs by using Site Filters.
Site Filter Examples
For example, you can build a filter to process all content that belongs to site collections alphabetically:
- Site collections that start with letters A, B, or C are assigned to one job,
- Site collections that start with the letters D, E, or F to a second job..
- and so on...
Determine the best way to spread the load between multiple jobs based on your naming conventions.
Examples of site filters for such alphabetical order scenario:
Job1: Site url patterns to include: https://contoso.sharepoint.com/sites/Contoso/A;https://contoso.sharepoint.com/sites/Contoso/B;https://contoso.sharepoint.com/sites/Contoso/C;
Job2: Site url patterns to include: https://contoso.sharepoint.com/sites/Contoso/D;https://contoso.sharepoint.com/sites/Contoso/E;https://contoso.sharepoint.com/sites/Contoso/F;
...
How to Use Site Exclusion Filters to Improve Performance
In general there are lists or libraries that you don't want to process in the scheduled annotation, for example the out of the box lists and libraries that are created when a new site is created: ("Form Templates", "Style Library", "Images", etc.).
-
To completely skip these libraries across all sites and improve overall scheduled job performance, site exclusion filters should be used, as shown in the example below:
-
Site URL patterns to exclude: Form Templates;Style Library;Images
Advanced User Configuration Settings
ListRetrievalPageSize is an option in the AutoClassifier Engine web.config file that controls the number of lists and libraries collected in one batch during the scheduled job run process.
Only change this setting in case you experience timeouts during query execution:
<add key="ListsRetrievalPageSize" value="10000" />