How to Install and Configure Connectivity Hub
The instructions below apply to Connectivity Hub regardless of the search engine you use.
Tip: Video Walk-Through: To see a basic walk-through of the installation process, watch this video by BA Insight Director of Systems Engineering, Mike Gregory.
How to Install Connectivity Hub
To install Connectivity Hub, use the following procedure:
-
To install the Connectivity Hub, download the "BA Insight ConnectivityHub-2.x.x-xx" .zip file from the Upland Right Answers portal under BA Insight>Product Downloads.
Tip: Make sure to unblock the .zip file by right-clicking on the file, selecting Properties and clicking the "Unblock" button.
- Extract the "BA Insight ConnectivityHub-2.x.x-xx" .msi installer package from the downloaded zip file.
- Run the downloaded .msi with Administrator privileges.
Use the steps here or perform a silent installation described in the topic below.- Run a command prompt as an Administrator.
- Navigate to your Connectivity Hub installation directory.
- Enter the following command:
msiexec /i "BA Insight Connectivity Hub-2.x.x-xx.msi" - Press Enter.

- Follow the instructions in the installation wizard.
-
When you are prompted to select an installation folder, note the path of the folder.
Note: Typically, the program is installed in either the default path - C:\Program Files\BA Insight\ConnectivityHub\ - or to a path on an alternate local disk drive such as the D:\ drive.
- When you are prompted to specify a service account, be sure to include the user account domain in the "User Name" field. For example, "DomainName\Username."
Caution: Note the default port number: 55001
If you specified a different port number, record this number for later use.
How to Perform a Silent Install
-
To perform a silent installation, open a command prompt with Administrator privileges and enter the commands in the example below.
-
Use the parameters listed below.
Parameters
- INSTALLDIR:
- Directory in which to install Connectivity Hub.
- AUTHORIZEDROLE:
- Security group allowed to access the web admin.
- Default: Administrators.
- Optional.
- SERVICELOGIN:
- Service account that Connectivity Hub runs under.
- SERVICEPASS:
- Password for the account.
- WEBPORT:
- Port number for the admin website.
- Default is 55001.
- Optional.
- SERVICEPORT:
- Port number for the job scheduler service.
- Default is 555.
- Optional.
Silent Install Example
Example Code
Msiexec  /i "BA Insight Connectivity Hub-2.0.0.0-10255.msi"
INSTALLDIR="c:\CH" SERVICELOGON="baitest\svc_sharepoint"
SERVICEPASS="xx" WEBPORT=5555 SERVICEPORT=556 AUTHORIZEDROLE=Administrators /qn
How to Automate the Connection to the Connectivity Hub Configuration Database
You can automate the process of connecting to the Connectivity Hub configuration database by running a PowerShell script.
Navigate here for the necessary steps.
How to Configure Your Database
Use the following instructions to configure your database and complete your Connectivity Hub installation.
Connection Mode: Basic
- Open a web browser and enter the URL to your Connectivity Hub.
- On your local server, the address would be http://localhost:<port>
- Default port: 55001
- If prompted, enter your user name (domain/username) and password.
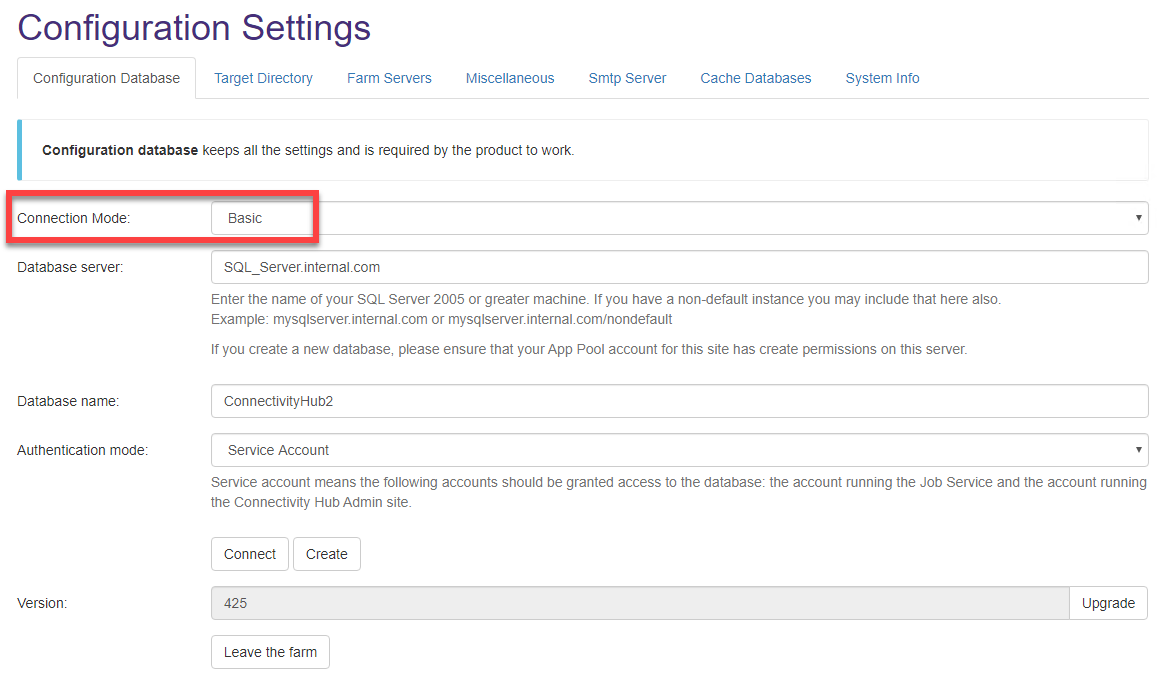
- From the BA Insight Connectivity Hub, select Tools > Configuration. The Configuration Database tab contains the settings that are required by the Connectivity Hub.
- The Configuration Database tab is shown below.
-
Connection Mode: Select Basic.
-
This enables the fields shown in the graphic below for simple configuration database setup.
-
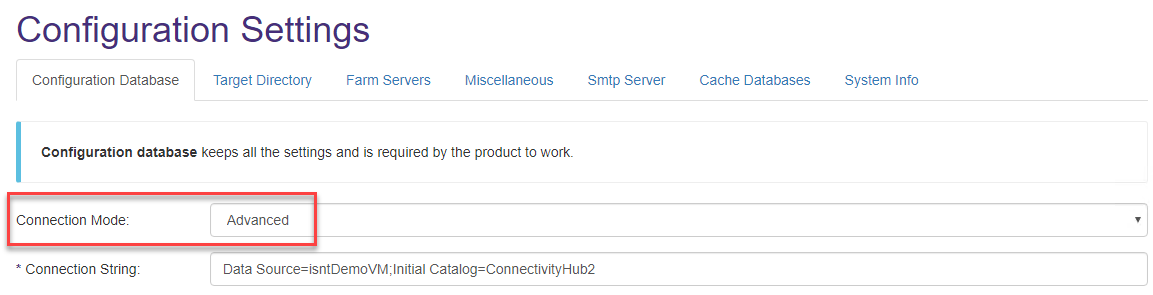
To enter a database connection string, select Advanced from the Connection Mode menu.
-
See "Connection Mode: Advanced," below.
Note:
Override default SQL command timeout
To override the default SQL command timeout, add Command Timeout parameter to the connection string.
Example:
Data Source=<DB Server>;Initial Catalog=<ConnectivityHub_Db>;Integrated Security=True;Command Timeout=300In this case the default timeout of 30 seconds will be replaced with 300 seconds.
-
- Enter the appropriate values in the fields as described in the following steps.
- Database server: Enter the name of your SQL server.
- Database name: Enter the name of your SQL database.
- Authentication mode: Select either Service Account or SQL Account.
- If you selected SQL Account, enter your SQL credentials.
- Click the Connect button.
- Version: Click the Upgrade button to update the configuration database to the latest version.
- Leave the farm: Click to remove the current Connectivity Hub server from the farm.
Note: To remove a different server from the farm, use the Farm Servers > Remove from farm option
Connection Mode: Advanced
Select Advanced from the Connection Mode menu to enable the "Connection String" field, shown below.
The Connection String field enables you to enter the information needed in SQL string syntax. See the graphic below.
All other fields shown on this page are the same as those shown in the Basic Connection Mode (shown above).
Note: You must still select your Authentication mode (Service Account or SQL), and in the case of SQL Authentication, your SQL log in and password.
You must clean up the Connection String field to match Connectivity Hub requirements.
Multiple Active Result Sets, and Trust Server Certificate parameters should be removed, if present.
How to Configure Connectivity Hub to Run on FIPS-Compliant Servers
If the Administrator-enabled FIPS policy on the servers where you installed Connectivity Hub, go here to configure Connectivity Hub to run successfully on these servers.