How to Set Up and Configure the Veeva Vault Connector
All BA Insight connectors can be downloaded from the Upland Right Answers Portal under Knowledge > BA Insight > Product Downloads > Connectors. This connector is installed with the same generic steps as any BA Insight connector. You must satisfy the Prerequisites for your connector before installing. The configuration specifics are detailed below.
Install the Connector Using the Wizard
To install the Veeva Vault connector, use the following steps:
- Download the connector from the Upland Community Portal (requires login).
- Extract the files and double-click the .msi file to initiate the installation wizard.
- Click Next.
- Select your installation folder.
- Set your web service information, including
- Web Service Port (default 4567)
- Domain Service account for the API WebService.
- Click Next and finish the installation wizard to completely install the connector.
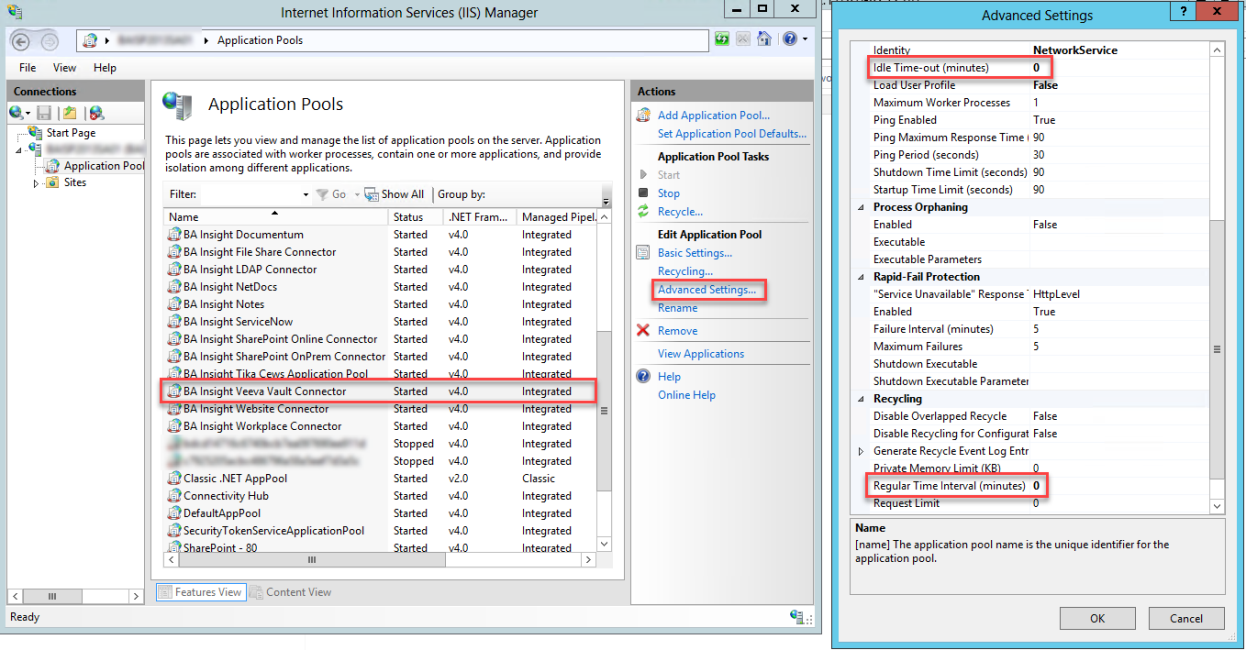
Modify Your Application Pool for Optimum Performance
Use the following instructions to apply changes to your IIS Application Pool for optimal performance:
- Set the “Idle Time-out (minutes)” parameter to 0.
- Set the Regular Time Interval (minutes)” parameter to 0.
Connection Configuration Specifics
To configure your connection Connection defines the how Connectivity Hub connects to your Source System (which contains your documents, graphics, etc.,). Your Connection includes identifying elements such as: URL of the BA Insight web service connector you are using, (File Share connector, SharePoint Online connector, etc.), Authentication mode, User Accounts and Credentials, Database information (for database connectors), navigate the Connector configuration page and fill in the following fields:
- Login: Enter the credentials of a Veeva Vault account with full READ access to interrogate the API and retrieve the list of documents and metadata Provides context with details such as the source, type, owner, and relationships to other data sets. Metadata provides details around the item being crawled by Connectivity Hub..
- Veeva Vault domain: Enter the Veeva Vault domain name to be used to create sessions and query the Veeva Vault API.
- Relationships names: Enter a comma separated list of relation field. Values from those relations will be returned by the connector as metadata.
- Enable attachments: Enabling this checkbox allows extra API calls to retrieve attachments for each Veeva document.
- Related document relationship names: Specify data look-up relationships to provide translated values for data values.
- Archives behavior: Enable this checkbox to report previously indexed Veeva documents as "deleted" that are currently marked as "archives" in the Veeva System during the next incremental crawl Scanning and capturing only new data from all of your content sources. This data did not exist when the last crawl was run..
-
Enable electronic signature details: Enable this checkbox to fetch details of the users that have electronic signed the documents.
How to Index Vaults
Run the Datastore Load Collects the logical division of your data (data stores) from the source system. Runs on a schedule Logs information according to log level set task to index all the vaults your account can access.
Content Configuration Specifics
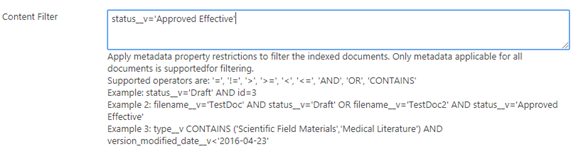
- There is an optional content setting that enables you to filter by metadata which documents to crawl.
- In your filtering query, use metadata applicable to all documents.
- See the examples under the Content Filter field in the user interface.
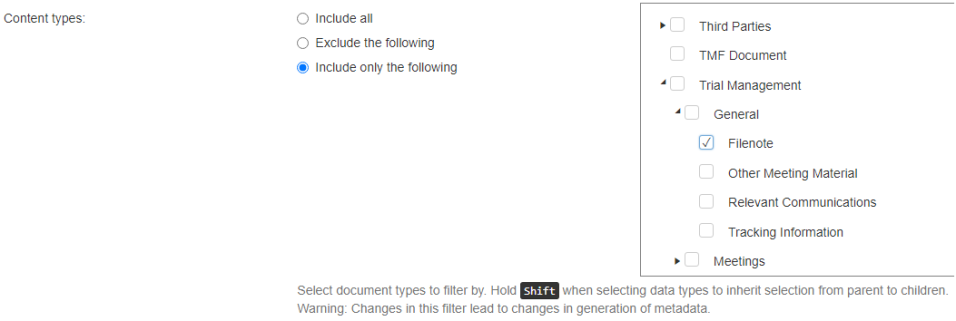
How to Create Filtered Requests
You can filter using the Content Type filter.
Documents in Veeva Vault are classified by:
- Type
- Sub-type
- Classification
- In the Content Type filter tree, find the document types hierarchy.
- By default, the "Include All" option is enabled.
- Include or exclude types, sub-types or classifications as you desire.
- Check the values you desire in the tree shown on the right side.
-
To include or exclude a sub-type, or a classification, check only the options you want.
-
You do not need to select the parent of your selected option.
-
When a type is checked, the connector will include/exclude all documents that have that type, regardless of what sub-type or classification children are selected.
-
To avoid redundancies, BA Insight recommends you all requests be made as optimal as possible,