How to Set Up and Configure the Website Connector
All BA Insight connectors can be downloaded from the Upland Right Answers Portal under Knowledge > BA Insight > Product Downloads > Connectors. This connector is installed with the same generic steps as any BA Insight connector. You must satisfy the Prerequisites for your connector before installing. The configuration specifics are detailed below.
Post-Installation Configuration
After installation, the Website Connector can be configured to crawl:
- Public websites
- Websites with basic username/password authentication
- Websites with trusted certificate authentication
To configure the connector use the topics below.
If you are an advanced user, use caution to configure your connector with the web.config file.
The Website Connector can be configured to crawl:
- Public websites
- Websites with basic username/password authentication
- Websites with OAuth Specifies a process for resource owners to authorize third-party access to their server resources without providing credentials. certificate authentication
Connection Configuration Specifics
- Select "Connections" from the top navigation menu to open the Connections page.
- Select New>Web service connection Connection defines the how Connectivity Hub connects to your Source System (which contains your documents, graphics, etc.,).
Your Connection includes identifying elements such as: URL of the BA Insight web service connector you are using, (File Share connector, SharePoint Online connector, etc.), Authentication mode, User Accounts and Credentials, Database information (for database connectors).
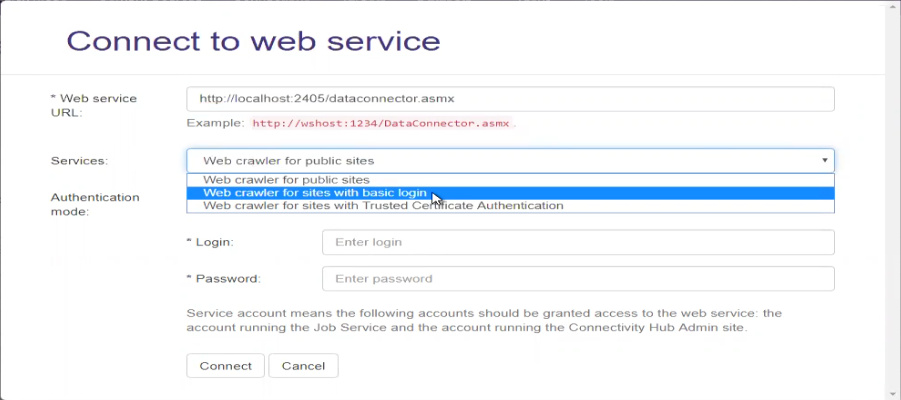
- The Connect to web service dialog appears.
- Enter your Website connector URL into the Web service URL field.
- You can retrieve your website service URL from IIS.
- You can retrieve your website service URL from IIS.
- After you enter your Web service URL, click the Connect button.
- The Services field appears. See the graphic below.
- Web crawler for public sites: Select this option to use no authentication.
- Web crawler for sites with basic login: Select this option to use basic authentication.
- Web crawler for sites with Trusted Certificate Authentication: Select this option to authenticate using a trusted certificate.
- Select your Authentication mode. Note that your Service account should be used, unless you require special considerations, and this account DOES NOT REQUIRE you enter a Login or Password.
- The following accounts must be granted access to the web service:
- The account used to run the Job service.
- The account running the ConnectivityHub Admin site.

- The following accounts must be granted access to the web service:
- Click the Connect button at the bottom of the dialogue box.
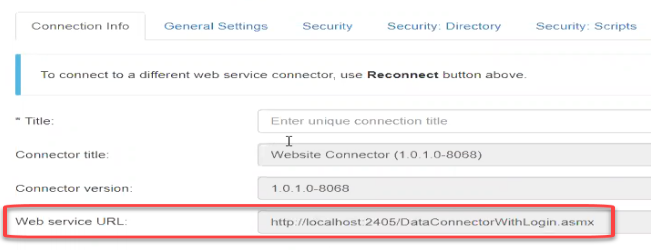
- Note that Web service URL field in the Connection Info tab is now populated to reflect your authentication mode:

- Before proceeding, enter a name for your connection in the Title field.
Content Configuration Specifics
General Settings
- Select the General Settings tab.
- Note that the fields you see are based on the Authentication mode you selected earlier.
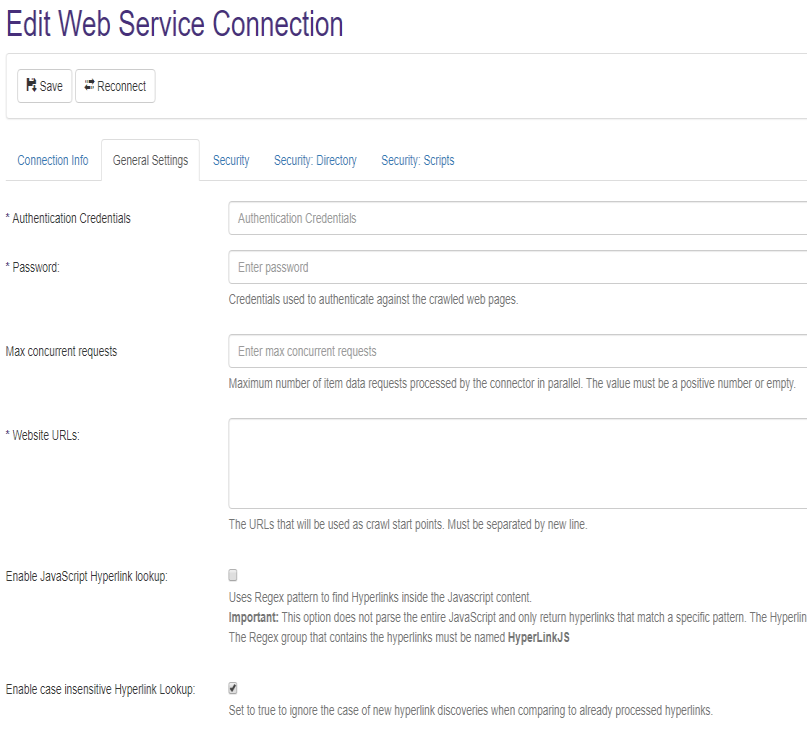
- The General Settings tab shown below reflects the service "Web crawler for sites with basic login."

Basic Authentication Websites
These credentials are used to authenticate with the web pages your web connector crawls.
- Login: Enter the login credentials of the account with FULLREAD permissions

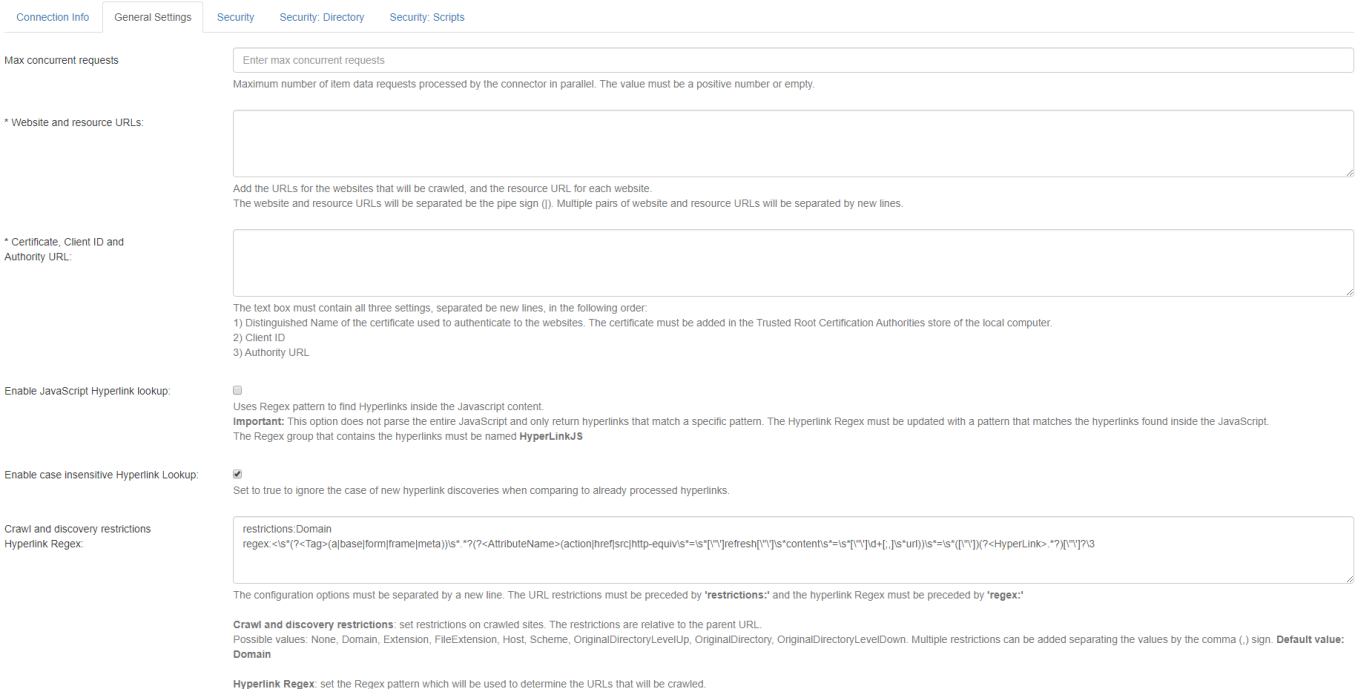
Trusted Certificate Authentication
- Website and resource URLs: The crawled website and the resource URL, must be added on the same line separated by the pipe (
|) sign.- When crawling multiple websites, each crawl start point along with its resource URL must be added on separate lines.
- When crawling multiple websites, each crawl start point along with its resource URL must be added on separate lines.
- Certificate, Client ID, and tenant name: All 3 of these settings must be added on new lines in the following order:
-
-
Certificate: Distinguished Name of the certificate used to authenticate to the websites.
Important: The user account running the Website Connector application pool, must have READ access to the Trusted Root Certificate store on the local computer. This user account cannot be "Network Service Local account used by the service control manager. Not recognized by the security subsystem, so you cannot specify its name in a call to the LookupAccountName function. Has minimum privileges on the local computer and acts as the computer on the network.".
- Client ID: Application ID of the client service.
- Tenant Name: The tenant name used in the authority URL. For example:
https://login.microsoftonline.com/<tenant>.onmicrosoft.com

-
Common Configuration Options
Use the following configuration options for all three available web services:
- Website URLs: Represent the crawl starting points. Multiple URLs can be added, separated by a new line.
- Enable case insensitive Hyperlink Lookup: Specify if URL case should be ignored during the crawl when new hyperlink discoveries are found.
- Crawl and discovery restrictions / Hyperlink Regex: The two configuration options must be separated by a new line.
- The Hyperlink Regex pattern is applied to web page content to discover crawlable URLs. The value must be preceded by ‘regex:’
The default pattern can be applied from the beginning and can also be found in the web.config file.
If the pattern is changed, it must contain the following groups for tag-based discoveries:- <Tag>
- <AttributeName>
- <Hyperlink>
In cases where the hyperlink is located in JavaScript code, used for client side redirect, the pattern must also contain the
<HyperlinkJS>group and the ‘Enable JavaScript Hyperlink lookup’ option must be enabled.The connector does not execute JavaScript code. It can only be configured to search for URL patterns inside JavaScript code using Regex.
- Restrictions that apply to the crawled URLs: These restrictions are relative to the specified starting points (that is, if the Host restriction is applied it only crawls pages that have the same Host as the specified URL).
Multiple restrictions can be applied by separating the values by the comma sign (,).
For example, if you want to crawl only web pages that have the same file extension (.aspx) and are in the same domain as the configured URL, you would add the following restrictions:Domain,FileExtension.
The value must be preceded by ‘restrictions’. See the following section on Available Restriction Values.
Available Restriction Values- None
- Domain
Crawls URLs from the same domain as the site URL specified in "Website and resource URLs"
Will include sub-domains.
i.e.: specified URL is https://www.bainsight.com
the following sub-domains would also be included:https://documentation.bainsight.com
https://support.uplandsoftware.com
- Extension
- FileExtension
- Host
Crawls URLs from the same sub-domain as the site URL specified in "Website and resource URLs"
Will NOT include sub-domains.
i.e.: specified URL is https://www.bainsight.com
the following sites would NOT be included:
- Scheme
- OriginalDirectory
- Crawls URLs in the same directory as the specified URL
- OriginalDirectoryLevelUp
- Used only in combination with OriginalDirectory
- Crawls URLs in the same directory and above
- OriginalDirectoryLevelDown
- Used only in combination with OriginalDirectory
- Crawls URLs in the same directory and bellow
- The Hyperlink Regex pattern is applied to web page content to discover crawlable URLs. The value must be preceded by ‘regex:’
- Custom error configuration: You can specify multiple lines of rules that represent patterns for when a page that is being crawled should be considered an error and retried. This allows you to configure patterns so that if at crawl time the connector runs into a custom error page it can identify it's an error even though the response message from the server is 200 OK
- The rules are one per line
- Each rule has to begin either with url: or body:
- Each rule is represented by a regex
- If the rule is for URL then the regex will be applied to the URL
- If the rule is for the body then the regex will be applied to the downloaded HTML of the page
- If any of the rule regex match the current page being crawled the page is requeued for crawling to try and move past the error
- Include files and images: You can choose if you want the connector to also crawl links to files and images or if it should ignore them
- Force secure (https) URLs: You can choose to forcefully change the schema of the discovered URLs to be https even if the page points to HTTP. This is useful in scenarios where your website is actually fully migrated to https but not all the pages point to the new URL and instead you rely on URL redirection to move the user from HTTP to https. This way the crawler will always force https and avoid the extra call to HTTP which then redirects to https
Make sure that when using OriginalDirectory, OriginalDirectoryLevelUp and OriginalDirectoryLevelDown restrictions you are including/using the page name in the Website URL used as a starting point. For example, http://www.yoursite.com/folder
Extracting HTML Text and Metadata from Documents
You can extract HTML text and metadata Provides context with details such as the source, type, owner, and relationships to other data sets. Metadata provides details around the item being crawled by Connectivity Hub. from your source system Your Source System is the repository where your data is stored (data to be indexed). This repository is managed by applications such as: - SharePoint O365 - SharePoint 2013/16/19 - Documentum - File Share - OpenText - Lotus Notes - etc. Your Source System repository can also be a database such as SQL or Oracle..
See How to Extract HTML Text and Metadata from Documents.
Extracted information includes:
- Available text and metadata which can be mapped to metadata properties.
- HTML metadata tags from HTML pages.
- Available HTML tags and links for use as metadata from HTML documents