How to Enable Previews in a Tabular View
About SmartHub Tabular Views
To enable the Previews in a tabular view, specific code (at bottom of the page) must be added to your page's custom settings file (which is loaded at runtime).
See the example below and for information about creating and using a custom settings file, see How to Customize Your SmartHub User Interface.
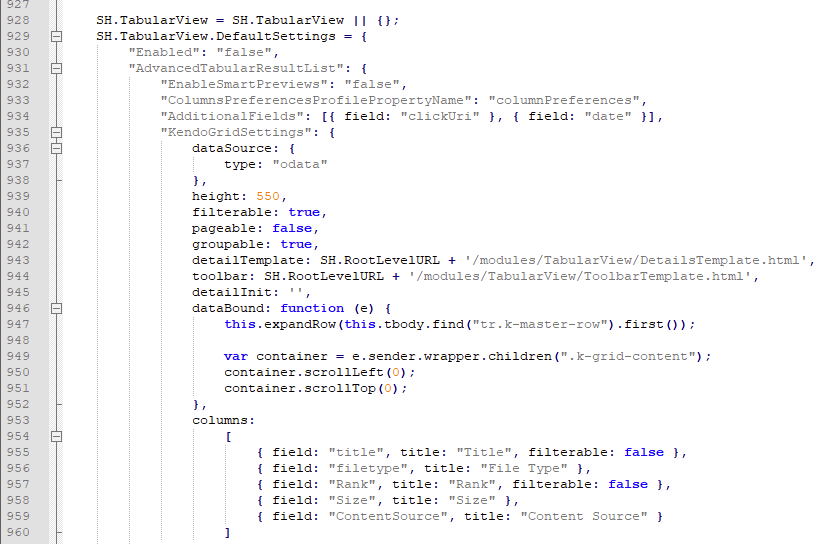
- SmartHub Tabular View settings are located in the settings file DefaultModuleSettings.js (around line 928). See the screenshot below.
- The DefaultModuleSettings.js file is in your local installation directory under <SmartHub_root>\modules\SmartHubResourceLoader:
\modules\SmartHubResourceLoader\DefaultModuleSettings.js
DefaultModuleSettings.js: Tabular View Settings Section

Tabular View in a Custom Index Page
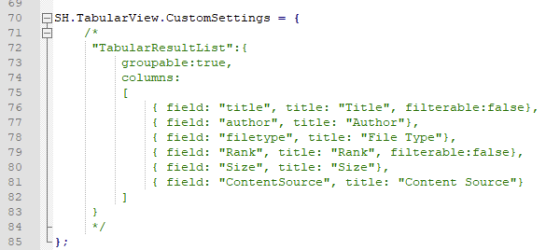
- Below is a capture of the custom settings file IndexCopyCustomSettings.js.
- This settings file controls the custom Index page IndexCopy.html.
- Both pages are provided by default with SmartHub in the directory <SmartHub_root>\CustomerCustomization\.
Note: Make a copy of this directory and rename it before using the files it contains. The directory is overwritten at upgrade time. - The Tabular view settings section is located around line 70 in the file IndexCopyCustomSettings.js. See the screenshot below.
- Add the code at the bottom of this page to your custom settings file (such as IndexCopyCustomSettings.js).
- Note that your custom settings file must contain the tabular view settings from the file DefaultModuleSettings.js.
- If your custom settings file does not contain the tabular view settings, add the settings from the file DefaultModuleSettings and set "Enabled" to "true" (line 930 in the screenshot above).

Modify Your Custom Settings File
-
In order to see the preview button in the tabular view, add the code below to the
SH.TabularView.CustomSettingssection of the custom settings file for your site's page (Index.html, Results.html, and so on).- See the Custom Settings Index Page example above.
-
For more information, see How to Customize Your SmartHub User Interface.
-
Ensure your page points to the custom index file you are using.
- For example, in the case of provided IndexCopy.html page, the path to its custom settings file IndexCopyCustomSettings.js is set on line 21:

- For example, in the case of provided IndexCopy.html page, the path to its custom settings file IndexCopyCustomSettings.js is set on line 21:
- Save your custom settings file when you are finished.
{ field: "", title: "", template: function(dataItem)
    {
       var result = JSON.parse(dataItem.SmartHubResult)[0];
       var newUri = result['clickUri'];
       if (result['escbasecrawlurl'] && result['escbasecrawlurl'] !== '')
       {
       newUri = result['escbasecrawlurl'];
       }

       var el = document.querySelector(".CoveoSearchInterface");
       var searchInterface = Coveo.get(el, "SearchInterface");
       var keywords = searchInterface.queryStateModel.attributes.q ;
       var title = result['title'];
       var originalPath = result['clickUri'];
       return "<div class='CoveoOpenPreviewAction' title='Open preview' style='display:none' data-onclick=\"" + 'if(typeof BAInsight.DocumentViewer !== \'undefined\' && BAInsight.DocumentViewer._isMobile) {clearTimeout(BAInsight.LongitudePreview.HoverTimeoutId);} BAInsight.LongitudePreview.ShowPreview(\'' + encodeURI(newUri) + '\', { Mode: 1, Keywords: \'' + keywords + '\',exportFileHandler:    ControlHelper._exportFileHandler, pageContentHandler: ControlHelper._handlePageContent, cssContentHandler: ControlHelper._handleCSSLoad , startPageType : 2, Title: \'' + title + '\', OriginalPath: \'' + originalPath + '\' }, id );return false;' + "\" data-previewurl='" + newUri + "'>SmartPreviews</div>";
    }
}