Secure Your Content Using the Advanced Security Module
- See the Elasticsearch or Azure Cognitive Search topic in How to Configure Your Target.
About
- ASM = Advanced Security Module
- ASM is used by:
- SmartHub
- Connectivity Hub
- For a video walk-thru of the ASM see BA Insight ASM walk-thru.
Overview
For a high-level conceptual explanation of the Advanced Security Module, with graphics, see Security Trimming in SmartHub and Connectivity Hub.
Configuration Options
Any combination of the following authentication modes are valid:
- SmartHub Authentication Modes:
- Azure AD
- Windows authentication
- Connectivity Hub Target Directories:
- Azure AD
- Active Directory
- Must be on-premise AD if you use a connector with no security sync, such as FileShare
Configuration Examples
Option 1: Azure AD in SmartHub and Connectivity Hub
Configuration:
- UPN is the default value for
userPrincipalNameProperty.- For
userPrincipalNameProperty, specify:upn, id,or leave it empty
- For
-
- No domain remapping required

User claims in Smart Hub
- SmartHub extracts only the On-Premise ID and UPN for the current user
- The user property
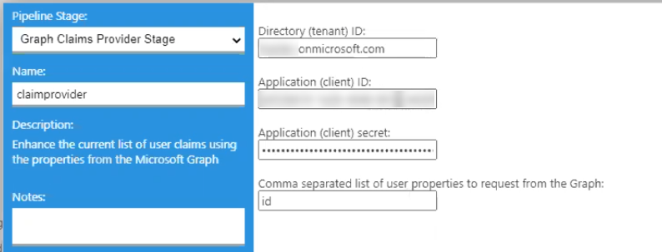
idis not be present by default. To retrieve it use the Graph Claims Provider Stage, shown below.
-
- Graph Claims Provider Stage
- Use to extract any user property from graph, such as
id
- Use to extract any user property from graph, such as
- Graph Claims Provider Stage
Option 2: Azure Active Directory in SmartHub/Local AD in Connectivity Hub
- Configuration:
- UPN is the default value for
userPrincipalNameProperty.- For
userPrincipalNameProperty, specify:upn, onprem_sid,or leave it empty
- For
- Domain remapping required
- MyDomain.com=MyOtherDomain.local
(SmartHub)=(ConnectivityHub)
- MyDomain.com=MyOtherDomain.local
- UPN is the default value for
Option 3: Windows Authentication in SmartHub*/Local AD in Connectivity Hub
- *Windows Authentication in SmartHub uses local AD
- Configuration:
- This option works out-of-the-box.
- UPN is the default value for
userPrincipalNameProperty.- For
userPrincipalNameProperty, specify:upn, onprem_sid,or leave it empty
- For
- UPN is the default value for
- No domain remapping required if SmartHub and ConnectivityHub are connected to the same domain.
- This option works out-of-the-box.
Option 4: Windows Authentication in SmartHub*/Azure AD in Connectivity Hub
- *Windows Authentication in SmartHub uses local AD
- Configuration:
- For
userPrincipalNameProperty, specify:upn, onprem_sid,or leave it empty
- Domain remapping required
- MyDomain.com=MyOtherDomain.local
(SmartHub)=(ConnectivityHub)
- MyDomain.com=MyOtherDomain.local
- For
ASM User Format Based on Connectivity Hub Target Directory
Azure AD Target Directory
- UPN:
- user@domain
- domain\user: Somesite.local\a_sharepoint_user
- ID: ########-####-####-####-############
Active Directory Target Directory
- Distinguished name:
- full_domain\user
- UPN: user@full_domain
- SID: S-1-5-32-573
To find out the user format, check the SmartHub log for these entries and make sure the requirements listed above are met:
DEBUG - GetGroupInfo Started
DEBUG - User: a_sharepoint_user@azuredomain.com
DEBUG - Complete list of users, including domain remapping
DEBUG - Remapped user: a_sharepoint_user@azuredomain.com
DEBUG - Remapped user: a_sharepoint_user@localdomain.local
DEBUG - Retrieving Security Map
DEBUG - GetGroupsList Started
How to Install the Advanced Security Module (ASM)
Use the following steps to install the Advanced Security Module (ASM).
- Download the ASM package for your environment from the Upland Community Support Portal.
- Add the Advanced Security Module (ASM) package (DLL files) to the SmartHub /bin directory.
- Navigate to the SmartHub administration page >Registered Pipeline Stages
- Click Federator Settings.
- The Properties for Federator SSA page appears.
- Click Register New Pipeline Stage.

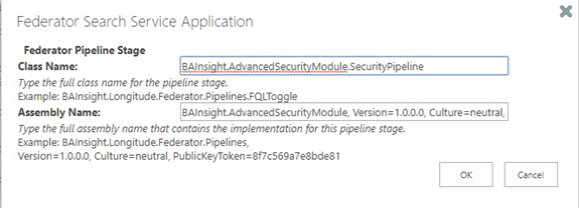
- In the Federator Search Service Application screen, add the following values:
- Class Name:
BAInsight.AdvancedSecurityModule.SecurityPipeline - Assembly Name:
BAInsight.AdvancedSecurityModule, Version=1.0.0.0, Culture=neutral, PublicKeyToken=8b346c7a0df406fd
- Class Name:
- Click OK.
Add the Advanced Security Module Pipeline Stage
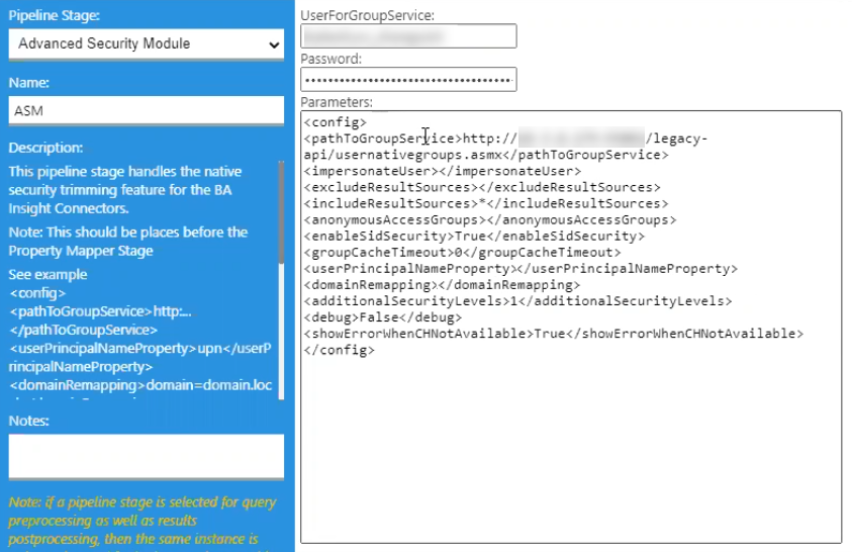
To use the Advanced Security Module, you must add a pipeline stage. Use the following steps to add the ASM pipeline stage.
Caution: This stage must be the first stage executed in the backend The search engine your SmartHub instance uses to perform queries. SmartHub can be configured to use more than one search engine. pipeline.
You can change the order of the stages by using the up and down arrows.
Caution: Applies to content secured with Active Directory users and groups
-
If you're using Advanced Security Module to secure content from a Connector which relies on Active Directory for users and groups, such as (FileShare, FileNet, SharePoint), you must set "enableSidSecurity" to "true".
-
See more details in the configuration table below.
- Navigate to the SmartHub Administration page at http(s)://[web-app-url]/_admin. For example: http://smarthub.azurewebsites.net/_admin.
- Click on the Backend which should be secured: typically, Main Backend
- Click Add New Query Stage.
- Pipeline Stage: Use the down arrow to select
Longitude Security Trimmer. - Name: Complete a name for your stage.
-
Parameters: Copy and paste the following code, replacing the sample values with the appropriate values.
Copy<config>
<pathToGroupService>http:...</pathToGroupService>
<domainRemapping>domain=domain.local</domainRemapping>
<userPrincipalNameProperty></userPrincipalNameProperty>
<groupCacheTimeout>5</groupCacheTimeout>
<additionalSecurityLevels>0</additionalSecurityLevels>
<enableSidSecurity>false</enableSidSecurity>
<includeResultSources>*</includeResultSources>
<excludeResultSources></excludeResultSources>
<impersonateUser>domain\uA=domain\uB</impersonateUser>
<debug>false</debug>
<userForGroupService>user</userForGroupService>
<passForGroupService>password</passForGroupService>
</config>
|
Parameter |
Required |
Description and Value |
|---|---|---|
|
|
X |
This URL must point to the
|
|
|
X |
|
|
|
X |
|
userPrincipalNameProperty
|
(optional) |
Note: Security validation using SID is supported
|
|
|
(optional) |
Default value is an empty string (no domain remapping).
|
|
|
(optional) |
Default value is an empty string (in other words, no impersonation).
In the first example, the security level for this user is applied to all users. This specification overrides the current user security level so that all users have the same access as this user. In the second case, if mapping is found for the user under which the request is performed, the target user security is applied. |
|
|
(optional) |
Default value is 5 minutes. Specify the time in minutes for the group cache expiration time. |
|
|
(optional) |
Default value is
|
|
|
(optional) |
Default value is
|
|
|
(optional) |
Default value is
|
|
|
(optional) |
Default value is an empty string (in other words, no source is excluded)
|
|
|
(optional) |
Default value is
|