How to Enable Previews in a Tabular View
About SmartHub Tabular Views
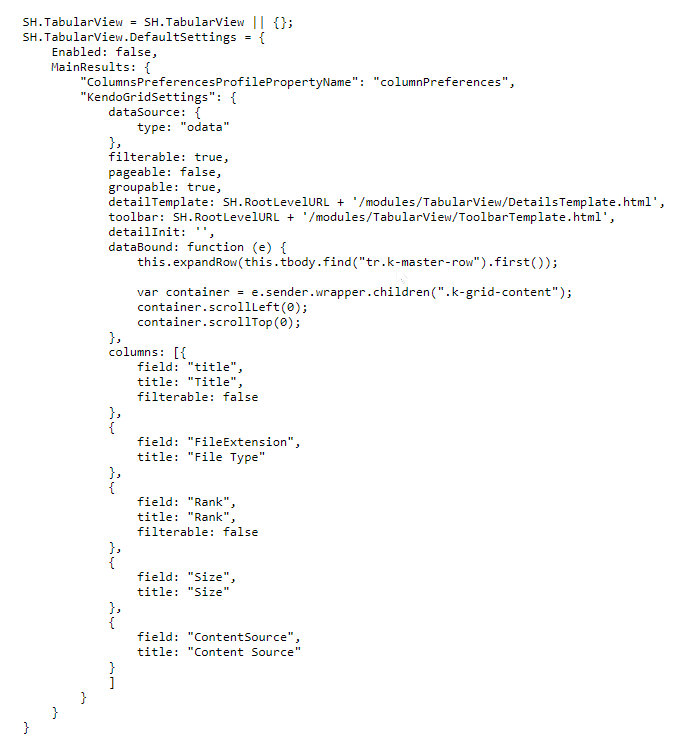
To enable the Previews in a tabular view, specific code (at bottom of the page) must be added to your page's custom settings file (which is loaded at run-time).
See the example below and for information about creating and using a custom settings file, see How to Use the UI Builder.
- SmartHub Tabular View settings are accessible through the UI builder
Tabular View Settings Section

How to Enable Previews in a Tabular View
To configure the TabularView component, edit the custom settings file that you are using for your SmartHub HTML pages.
-
For more information about using Custom Settings, see How to Use the UI Builder.
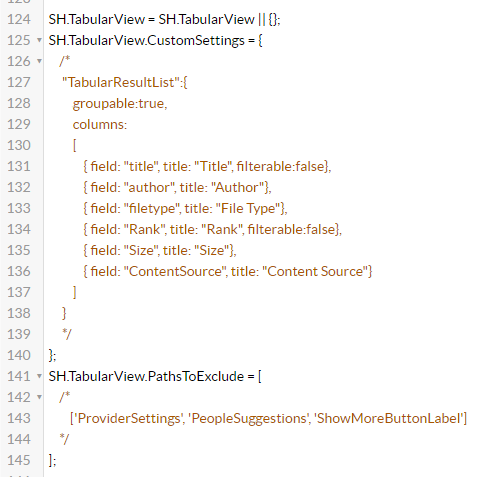
- You can change the TabularView options by editing the TabularView code in your custom settings file.
- You can override any setting by adding it to the
SH.TabularView.CustomSettingsnamespace.
UI Builder
The easiest and fastest way to work with the TabularView component is via the SmartHub UI Builder.
For information about how to access the UI Builder as well as who can access it, see How to Use the UI Builder.
-
SmartHub administrators can simply click the UI Editor link from the SmartHub ADMINISTRATION page.
-
Select (double-click) the page (Index.html, landing.html, etc.) you wish to modify.
-
Below, the Index.html page is shown for sample purposes.
-
BA Insight recommends you create your own custom page (within its own folder) to modify. Leave the default files as templates.
-
Example: Customizations/MyResultsPage.html
-
-
-
Click the Advanced link at the top right of the window to enter Advanced mode.
-
Select the Advanced settings edit link at the top center of the page.
-
Scroll down to around line 124 of the Advanced settings edit link from the top of the page.

-
To access the available Personalization settings, click the See Default Settings link in the top right corner.
-
A new browser tab opens with all available SmartHub module settings.
-
Search for the word "UserPreferences" on the page to quickly navigate to the User Preferences settings, shown below
-
Copy the personalization settings you want to use.
-
Paste the settings into the settings file for your HTML page in the former browser tab.
-
Use the parameters in the "Personalization Sections Settings" table below to customize the code in this section..
-
-
Click Save changes.
-
Click the link Preview <html file>.html to view your updated HTML page in a new browser tab.
-
Review the page and make any changes back in the code editor.
-
Save changes and preview again until satisfied.
Tabular View Template
{ field: "", title: "", template: function(dataItem)
    {
       var result = JSON.parse(dataItem.SmartHubResult)[0];
       var newUri = result['clickUri'];
       if (result['escbasecrawlurl'] && result['escbasecrawlurl'] !== '')
       {
       newUri = result['escbasecrawlurl'];
       }

       var el = document.querySelector(".CoveoSearchInterface");
       var searchInterface = Coveo.get(el, "SearchInterface");
       var keywords = searchInterface.queryStateModel.attributes.q ;
       var title = result['title'];
       var originalPath = result['clickUri'];
       return "<div class='CoveoOpenPreviewAction' title='Open preview' style='display:none' data-onclick=\"" + 'if(typeof BAInsight.DocumentViewer !== \'undefined\' && BAInsight.DocumentViewer._isMobile) {clearTimeout(BAInsight.LongitudePreview.HoverTimeoutId);} BAInsight.LongitudePreview.ShowPreview(\'' + encodeURI(newUri) + '\', { Mode: 1, Keywords: \'' + keywords + '\',exportFileHandler:    ControlHelper._exportFileHandler, pageContentHandler: ControlHelper._handlePageContent, cssContentHandler: ControlHelper._handleCSSLoad , startPageType : 2, Title: \'' + title + '\', OriginalPath: \'' + originalPath + '\' }, id );return false;' + "\" data-previewurl='" + newUri + "'>SmartPreviews</div>";
    }
}