How Users Can Rate Search Results
Ratings Example: Embedding Ratings in Your Index Page
About Ratings
The Ratings feature enables users to rate items such as documents, graphics, videos, etc., and see the average ratings for that item.
Ratings can be shown in the SmartHub site pages such as:
- Landing (landing.html) page
- Results (Results.html) page
Customizing Ratings
- To customize these files, open and modify the provided versions for customization located in the SmartHub directory below on the Windows server that hosts your SmartHub site:
- C:\Program Files\BA Insight\SmartHub-version\CustomerCustomization\pages\
- IndexCopy.html
- ResultsCopy.html
- Modify these files directly or, as BA Insight recommends, copy the entire CustomerCustomization directory and rename it as desired before you modify the files within it.
For more information, see How to Use the UI Builder.
- C:\Program Files\BA Insight\SmartHub-version\CustomerCustomization\pages\
Two templates are available:
- Stars/grades
and - Likes
Stars
- Users can rate documents with a number of stars.
- The value is then registered by SmartHub Analytics.
- Score averages are computed.
- When the user runs a query, the Results page that appears displays the average rating of the items returned (if the items have been rated).
- Grades go from 1 to a maximum grade value which is specified in the settings file (see below).
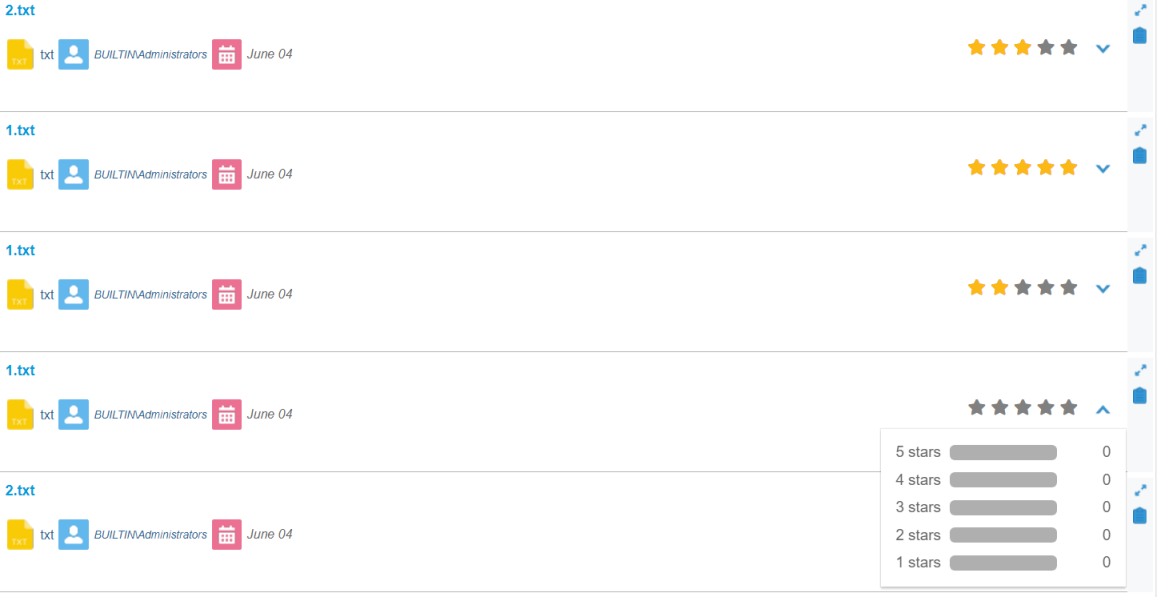
- The Stars template also contains a detailed view with the count for each grade.
Likes
The "like" templates enables users to like or dislike documents.
The document later displays likes and dislike statistics.
- A "like" is equivalent to the maximum defined grade from the settings file.
- A "dislike" is equivalent to a value of "1".
Like/Dislike Ratings Example
An example rating of documents, complete with Likes/Dislikes, is shown below:

Stars Ratings Example
An example rating of documents, complete with Stars, is shown below:

Restrictions
The items users rate must come from a writable search engine.
Currently, the only writable search engines are Elastic and Azure.
Attention! When using Ratings with an "Azure" search engine make sure that the search engine is writable
How to Configure Ratings
The "escbasecrawlurl" and "ContentSource" metadata are required for this feature to work.
When using Ratings make sure that ContentSource is the index name and is all lowercase.
Note: When using Ratings with an "Azure" search engine, make sure that the "Ratings Sort Field" from the search engine settings is correctly configured.
The used metadata must be sortable.
By default, the "Ratings Sort Field" has the value "escbase_lastupdateutc"
Before continuing, familiarize yourself with the information in the topic How to Use the UI Builder.
UI Builder
-
The easiest and fastest way to insert and customize Ratings is via the SmartHub UI Builder.
-
For more information, see How to Use the UI Builder.
Procedure:
-
SmartHub administrators can simply click the UI Editor link from the SmartHub Administration page.
-
Click the Select a page link from the top menu.
-
Select (double-click) an HTML page such as Results.html page.
-
Below, the Results.html page is shown for sample purposes.
-
BA Insight recommends you use page and folder to modify. Leave the default files as templates.
-
Example: Customizations/CustomResults.html. Default Results.html is under the top most SmartHub directory.
-
-
-
Select the Advanced mode from the top right of the page.
-
Select Advanced settings edit.
-
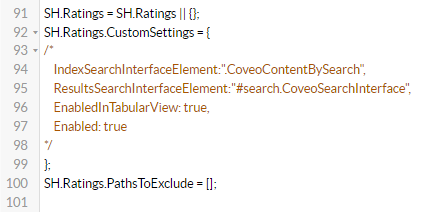
Scroll down to line 92 (this may vary), which contains the text
SH.Ratings.CustomSettings
-
Click the link Default Settings at the top right.
-
A new browser tab opens with all available SmartHub module settings.
- Search for the word "Ratings" on the page to quickly navigate to the Ratings default settings, shown below:
- Copy the Ratings settings section from SH.Ratings.DefaultSettings.
- Go back to your Advanced settings edit tab.
- Paste the copied settings inside section SH.Ratings.CustomSettings.
Note: The
Enabledvalue is commented out by default.
-
Modify settings as desired. Refer to the "Ratings Parameters" table below.
-
Click Save changes.
-
Click the link Preview <html> file.html at the top of the code editor.
-
Review your HTML page in the new tab that opens.
-
Make any necessary changes back in the code editor. Repeat steps 14-18 as necessary.
-
Click Save changes.
    SH.Ratings = SH.Ratings || {};
    SH.Ratings.DefaultSettings = {
        SearchInterfaceElements: "#search.CoveoSearchInterface,.CoveoContentBySearch",
        EnabledInTabularView: false,
        EnabledInResultFeedback: false,
        ListTemplateParent: ".widgets-placeholder",
        CardTemplateParent: ".card-front",
        ExpanderTemplate: SH.RootLevelURL + "/modules/Ratings/Templates/Expander.html",
        TabularViewColumnName: "Ratings",
        GradingTemplate: SH.RootLevelURL + "/modules/Ratings/Templates/Ratings-Stars.html",
        LikesTemplate: SH.RootLevelURL + "/modules/Ratings/Templates/Ratings-Like.html",
        ActiveTemplate: "GradingTemplate",
        MaximumGrade: 5,
        VoteNotification: "Your vote has been registered and it will be processed soon.".toLocaleString(),
        EscbasecrawurlMetadata: "escbasecrawlurl",
        ContentSourceMetadata: "ContentSource",
        RequiresTracking: true
}Ratings Code Example
SH.Ratings = SH.Ratings || {};
SH.Ratings.CustomSettings =
{
    IndexSearchInterfaceElement:".CoveoContentBySearch",
    ResultsSearchInterfaceElement:"#search.CoveoSearchInterface",
    EnabledInTabularView: true,
    Enabled: true
    SearchInterfaceElements: "#search.CoveoSearchInterface,.CoveoContentBySearch",
    EnabledInResultFeedback: false,
    ListTemplateParent: ".widgets-placeholder",
    CardTemplateParent: ".card-front",
    ExpanderTemplate: SH.RootLevelURL + "/modules/Ratings/Templates/Expander.html",
    TabularViewColumnName: "Ratings",
    GradingTemplate: SH.RootLevelURL + "/modules/Ratings/Templates/Ratings-Stars.html",
    LikesTemplate: SH.RootLevelURL + "/modules/Ratings/Templates/Ratings-Like.html",
    ActiveTemplate: "GradingTemplate",
    MaximumGrade: 5,
    VoteNotification: "Your vote has been registered and it will be processed soon.".toLocaleString(),
    EscbasecrawurlMetadata: "escbasecrawlurl",
    ContentSourceMetadata: "ContentSource",
    RequiresTracking: true
}
Ratings Parameters
| Setting Name | Default Value | Description |
|---|---|---|
| IndexSearchInterfaceElement | .CoveoContentBySearch |
|
| ResultsSearchInterfaceElement | search.CoveoSearchInterface |
|
| Enabled | false | Enables the rating widget for the list and card layouts |
| EnabledInTabularView | false | Enables the rating widget for the tabular view layout |
| EnabledInResultFeedback | false | Enables the rating widget in the result feedback modal window |
| ListTemplateParent | list-info-wrapper .list-info:last-child | The CSS class for the parent element when using the list layout |
| CardTemplateParent | .card-front | The CSS class for the parent element when using the card layout |
| ExpanderTemplate | /modules/Ratings/Templates/Expander.html | The path for the expanded view used with the grading template |
| TabularViewColumnName | Ratings | The name of the column that contains the Rating widget when using the tabular view layout |
| GradingTemplate | /modules/Ratings/Templates/Ratings-Stars.html | The path for the grading template (star system) |
| LikesTemplate | /modules/Ratings/Templates/Ratings-Like.html | The path for the like template (like/dislike system) |
| ActiveTemplate | GradingTemplate |
The template that is used. Options are:
|
| MaximumGrade | 5 | The maximum grade used. |
| VoteNotification | Your vote has been registered and it will be processed soon. | The message the user sees when he rates a document |
| EscbasecrawurlMetadata | escbasecrawlurl |
The metadata used for the crawl url |
| ContentSourceMetadata | ContentSource | The metadata used for ContentSource |
How to Enable Ratings
Enable Ratings in a ContentContainer
You can enable ratings in a Content Container by using one of the following methods:
-
Basic method:
-
Select the Basic mode from the top right of the page.
-
Select Customize ContentContainers.
-
Select the content containers that you want to edit.
-
Check the EnableRatings checkbox to set it to true.
-
-
Advanced method:
-
Select the Advanced mode from the top right of the page.
-
In your custom page's settings file, search for the SH.ContentContainer.CustomSettings section and set the EnableRatings parameter to true. Refer to the following sample for the main results ContentContainer.
-
SH.ContentContainers.CustomSettings = {
    ContentContainers: {
        MainResults: {
            EnableRatings: true
        }
    }
}
Enable Ratings in a Tabular View
-
Enabling Ratings in a Tabular View is done via the SH.Ratings.CustomSettings section from your custom page's settings file.
Sample:
SH.Ratings.CustomSettings = {
 EnabledInTabularView:true,
 SearchInterfaceElements: "#search.CoveoSearchInterface" // use this to specify the SearchInterface component that uses TabularView to display the results
 TabularViewColumnName: "Ratings",
}
Enable Ratings in the Result Feedback Component
-
Enabling Ratings in the Result Feedback component is done via the SH.Ratings.CustomSettings section from your custom page's settings file.
Sample:
SH.Ratings.CustomSettings = {
 EnabledInResultFeedback:true
}
Ratings Example: Embedding Ratings in Your Index Page
-
The SmartHub Index page file is Index.html, which is located on the server that hosts your SmartHub site at <SmartHub_Install_Dir>\BA Insight\SmartHub-version-xxxx\
-
Index.html is the default index file; the file is overwritten at upgrade time.
-
To use a custom Index file, BA Insight recommends using the IndexCopy.html in the <SmartHub_Install_Dir>\BA Insight\SmartHub-version-xxxx\CustomerCustomization/pages directory.
-
For more information about using custom files see How to Use the UI Builder.
Use the following steps to embed Ratings into your Index page:
- Make a copy of the directory: <SmartHub_Install_Dir>\BA Insight\SmartHub-version-xxxx\CustomerCustomization/.
- Rename the new copy of the directory as you see fit.
- Open the new directory, and then the pages folder.
- Rename the file IndexCopy.html, if desired. Example: CustomIndex.html, CustomLandingPage.html, IndexCustom.html, etc.
- Open your custom Index page HTML file for editing.
- For more information, see How to Use the UI Builder.
- For more information, see How to Use the UI Builder.
- Insert the Ratings code from "Ratings Code Example" above inside the Body tags, as desired.
-
Configure the following Ratings parameters:
-
Enabled: true
-
IndexSearchInterfaceElement: The class or the ID of the search interface to be used to render the results which show the ratings.
-
A ResultList or a TabularView must be used in order to show the Ratings feature on the page.
-
Example: By default, Index.html contains multiple ContentBySearch elements.
-
To enable ratings only on the “Interests” element, the Ratings code would be inserted and the parameter IndexSearchInterfaceElement would be set to “#InterestsCBS”
-
The element - InterestsCBS in this case - can be whatever ID or class the element has. It is an identifier for the HTML element you are targeting.
-
-
-
- Use the "Ratings Parameters" table above to further configure your Ratings feature.
- Save your custom Index HTML file.
- Set IIS to load your new custom Index page file instead of the default Index page. See "How to Load Your Custom Index Page in IIS" in How to Use the UI Builder.
Sorting
-
Sorting can be done based on rating.
-
In the example below, the data sort criteria WilsonsScore is used.
-
To enable sorting based on rating, the sort section from the page's HTML is updated with the following line:
Sorting in a ContentContainer
Sorting by rating when using a ContentContainer is done via the SH.ContentContainer.CustomSettings section from your CustomSettings file.
SH.ContentContainers.CustomSettings = {
    ContentContainers: {
        MainResults: {
            EnableRatings: true,
            SortProperties: 'WilsonsScore'
        }
    }
}
Sorting in TabularView
To enable sorting based on rating, the sort section from the page's HTML is updated with the following line:
-
<span class="CoveoSort" data-sort-criteria="@WilsonsScore descending,@WilsonsScore ascending" data-caption="Rating"></span>
<div class="coveo-sort-section">
    <span class="CoveoSort" data-sort-criteria="relevancy" data-caption="Relevance"></span>
    <span class="CoveoSort" data-sort-criteria="date descending,date ascending" data-caption="Date"></span>
    <span class="CoveoSort" data-sort-criteria="@WilsonsScore descending,@WilsonsScore ascending"  data-caption="Rating"></span>
</div>
Facets
To filter the results based on the ratings the following metadata is available: AvgGrade
The facet can be added to the page as a Range Facet or as a Slider Facet.
In order to use the ratings refiner as a Range Facet the Range Facets Pipeline must be configured.
Example
<RangeFacetsConfig>
  <Facet name="AvgGrade" isDateInterval = "false">
    <Intervals minLabel="No Stars" maxLabel = "5 Stars">
      <Interval startPoint="1" endPoint="1.99">1 Star</Interval>
      <Interval startPoint="1.99" endPoint="2.99">2 Stars</Interval>
      <Interval startPoint="2.99" endPoint="3.99">3 Stars</Interval>
      <Interval startPoint="3.99" endPoint="4.99">4 Stars</Interval>
    </Intervals>
  </Facet>
</RangeFacetsConfig>
The facets section from the page's HTML must be updated with the following line:
<div class="CoveoFacet" data-default-state="expanded" data-title="AvgGrade" data-field="@AvgGrade" data-lookup-field="@AvgGrade" data-available-sorts="alphadescending" data-use-and="true"></div>
In order to use the ratings refiner as a Slider the facets section from the page's HTML must be updated with the following line:
<div class="CoveoFacetSlider" data-default-state="expanded" data-title="AvgGrade" data-field="@AvgGrade" data-lookup-field="@AvgGrade" data-steps="5" data-range-slider="true" data-date-field="false" data-start="0" data-end="5"></div>If an Elastic search engine is used, make sure that AvgGrade is declared as a NumericProperties in the Elastic Translator Stage.