How to Enable Multilingual Support
About
The configuration file must be used only as an example and it should not be modified because it will be overwritten at upgrade time.
- The configuration settings for multilingual support can be found in the file \modules\SmartHubResourceLoader\DefaultModuleSettings.js around line 635.
- The setting for custom Multi-language support in the provided custom Index and Results settings files (.js) is around line 170-180.
- For more information see How to Use the UI Builder.
How to Configure the Multi-language Component
- Open the file DefaultModuleSettings.js.
- Open your page's custom settings file. See How to Use the UI Builder.
- Copy the configuration settings from the file DefaultModuleSettings.js around line 635 the into the custom settings file for your page.
- Modify the settings as desired.
- Custom settings files are stored (by default) in <SmartHub_Install_dir>\CustomerCustomization\settings.
- Make a copy of this directory before modifying its contents as the original directory is overwritten at upgrade time.
- Make a copy of this directory before modifying its contents as the original directory is overwritten at upgrade time.
- All the changes to the settings must be done by way of the custom settings file created for the page, such as ResultsCopyCustomSettings.js.
Settings
|
Setting Name |
Default Value |
Description |
|---|---|---|
| EnableLanguage | true |
true - Multi-Language is enabled false - Multi-Language is disabled |
| DefaultLanguage | en-US | A string value representing the main language of the SH configuration |
| LanguageRedirects | "/" |
A list of mappings key:value where:
|
| LanguagePickerParentContent | ".coveo-header-zone" | system setting |
| TemplatePath | SH.RootLevelURL + '/modules/MultiLanguage/template/LanguagePickerTemplate.html' | Path to multi-language HTML template |
Example
module.exports = {
        EnableLanguage: true,
        DefaultLanguage: "en-US",
        LanguageRedirects: {
            "en-US": "/",
            "de-DE": "/de",
            "fr-FR": "/fr"        },
        LanguagePickerParentContent: ".coveo-header-zone",
        TemplatePath: SH.RootLevelURL + '/modules/MultiLanguage/template/LanguagePickerTemplate.html',
    }
How to Create a Dictionary
- Go to the directory <SmartHub_install_dir>/js/cultures/.
- Make a copy of file en.smarthub.js.
- Change the first two letters (en) with you language.
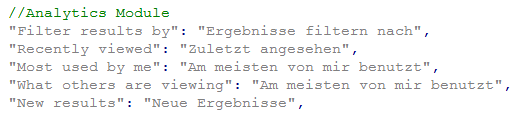
For example, de.smarthub.js. - Open your new file and translate every label from the file.
- Save the file in the directory <SmartHub_install_dir>/js/cultures/.
Example:
How to Create Your Site for a Specific Language
There are two ways to archive this. If you want to have different sites for each language, follow these steps:
- Make a copy of your SmartHub site.
- Open IIS.
- Go to your SmartHub site and right click on it.
- Select Add Application.
- In the pop-up window:
- Set the Alias as the Key of the language. For example: de.
- Set the physical path as the path to the copy of SmartHub you created in Step 1.
- Click OK.
How to Organize Language Files
If you want to keep all language js files in the same folder in your SmartHub, follow these steps:
- Open IIS.
- Go to your SmartHub site and right click on it.
- Select Add Virtual Directory.
- In the pop-up window:
- Set the Alias as the Key of the language. For example: de.
- Set the physical path as the path to your SmartHub.
- Click OK.
- Right click on the newly created Virtual Directory (de).
- Click on Convert to Application.
How to Redirect SmartHub to a Specific Language
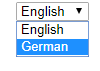
- Go to Landing page.
- From the drop-down menu, select the language:
How to Add a New Language in Language Picker
- Go to the directory /modules/LanguagePicker/template
- Using a text editor, open LanguagePickerTemplate.html file
- Add the new language option (for example <option value="fr-FR">France</option>)
How to Add a Dictionary for Spell Check
The spellchecker functionality is based on the file dictionaries stored in the Dictionary sub-folder in your SmartHub installation directory.
By default, only the English dictionary is delivered.
- Additional ones can be downloaded fromhttps://github.com/hermitdave/FrequencyWords/tree/master/content/2018
- Copy all the values for your specific language in a text file.
- Rename the file to the specific language configured in the Multi-Language module (Example: for Germany - de-DE).
- Place the file in the Dictionary folder to provide multi-language spell checking.