Interact with AppBus via Smart Automations
What Are Smart Automations?
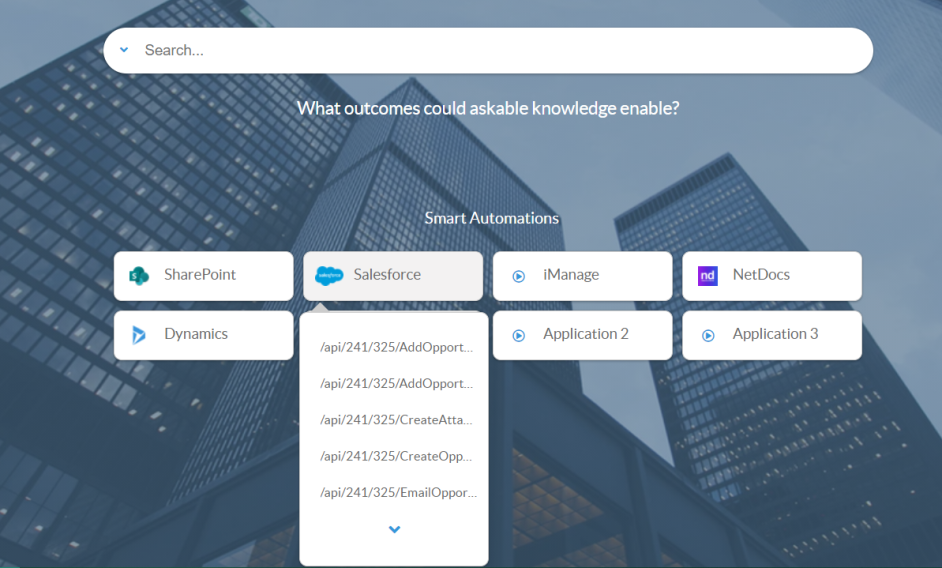
Smart Automations is a component capable of displaying applications from your AppBus system into your SmartHub interface.
- Within SmartHub, these executable applications can be called Smart Actions.
- Users can interact with Smart Actions directly from the SmartHub search center.
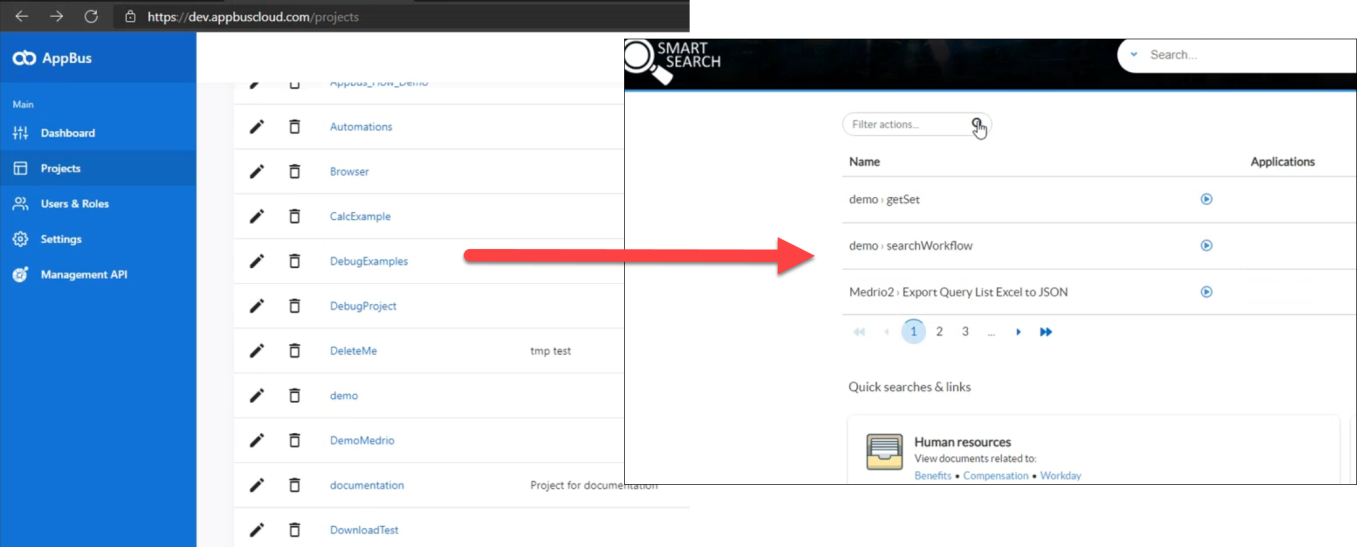
- In the image below SmartHub shows Smart Actions as:
- <AppBus Project>: <action to trigger>
User Interaction
Users can interact with Smart Automations from your search center in 3 different ways:
- By navigating to the out-of-the-box index or landing page of your SmartHub search center.
- If you customized those pages then you must add code to the applicable page:
- A DIV tag with the class "smartAutomations" must be inserted into the page: the component is displayed in that container
- If you customized those pages then you must add code to the applicable page:
- By navigating to the SmartAutomations SmartHub page located at: https://<web-app-url>/SmartAutomations.html
- By using the "Smart Automations" button found in the Ribbon or Banner at the top of the page, when selecting your user picture
Make sure you have first configured your AppBus integration.
Example Smart Actions
Smart Actions are created in BA Insight AppBus, configured, and displayed within SmartHub. Smart Actions can include such things as:
- Uploading file attachments (to an application such as SharePoint, Egnyte, NetDocs)
- Auto-generating new e-mails
- Retrieving user or customer account details
- Synchronize third-party apps with BA Insight applications
- more...
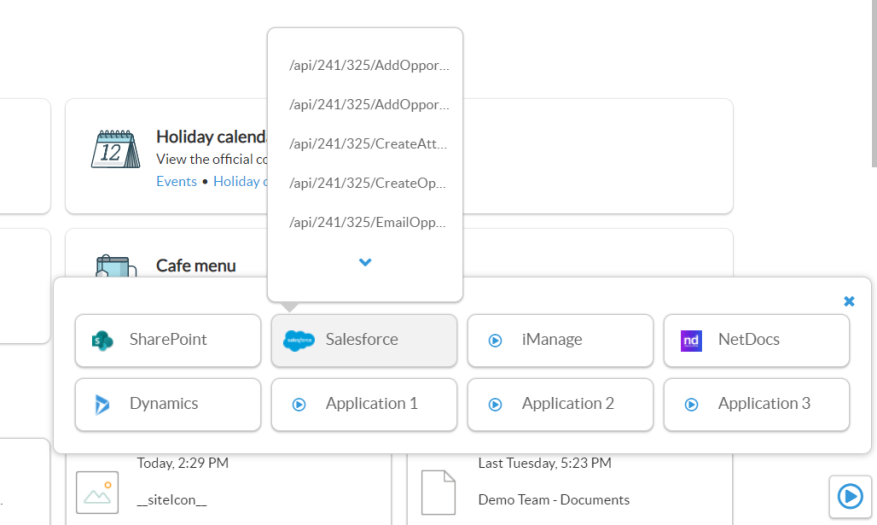
Smart Action APIs from AppBus are shown below.
Smart Actions Search and Upload
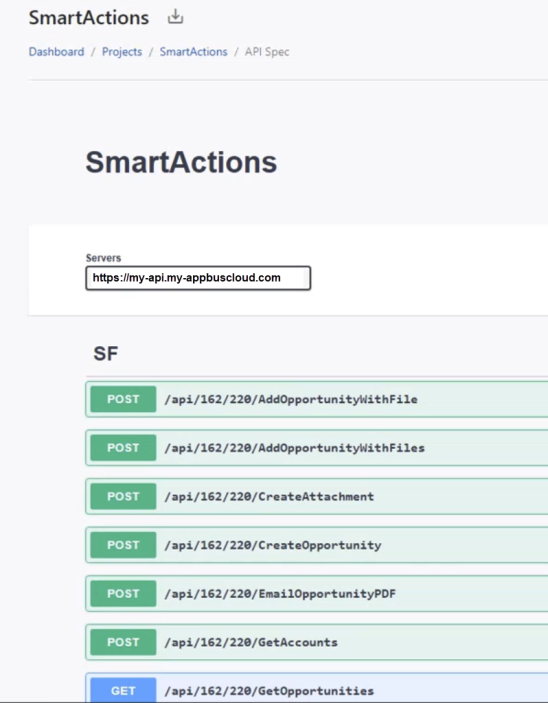
In the example below, an action called "SearchAndUpload" is selected. This action runs a query and uploads the documents returned to the NetDocuments directory "Documents" in the "legal" site.
- The "SearchAndUpload" action "run" button
 is selected.
 - A window opens that enables you to select the parameters for the action.
- In this example the parameters include:
- Query - Term to query in Egnyte
- Sp Site - Site in which to store the uploaded file
- Sp Folder - Folder in which to store the uploaded file
AppBus API for Smart Actions
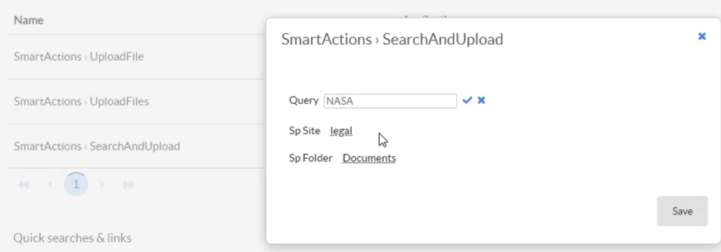
A Smart Action similar to the one in the example above that uploads files to SharePoint is shown below in AppBus.
-
The API POST and Request body are shown for example purposes.

Features
This component enables you to:
- Navigate through the list of automations that you have access to in AppBus and see what application they rely on behind the scenes, such as Salesforce, SharePoint, NetDocuments, etc.
- Create categories for automations based on different tags.
- Trigger (run) an automation by asking users for the necessary information and running the AppBus flow automatically.
How to Edit the SmartAutomations Configuration
You can edit the configuration of your SmartAutomations component by editing the Custom Settings file that you are using for your SmartHub pages. For more information about using Custom Settings, see How to Use the UI Builder.
- You can change the SmartAutomations options by editing the SmartAutomations code in your custom settings file.
- You can override any setting by adding it to the SH.SmartAutomations.CustomSettings namespace.
See the screenshot below.

The available options are:
| Option | Value | Comment |
|---|---|---|
| Enabled |
Boolean Default: true |
If this is set to "false" the component doesn't make any changes to SmartHub and doesn't load any dependency |
| AddRibbonButton |
Boolean Default: true |
If this is set to "false" then the button in the ribbon is not added and the only way to navigate to the SmartAutomations page will be via a direct link. |
| ShowAsFlyover |
Boolean Default: false |
Example below. |
| RibbonButtonText |
Text Default: Smart Automations |
The label for the button when it's shown in the ribbon |
| RibbonButtonLink |
Text Default: SH.RootLevelURL + "/SmartAutomations.html" |
|
| RibbonTemplatePath |
Text Default: SH.RootLevelURL + "/modules/SmartAutomations/templates/ribbonButtonTemplate.html" |
The path to the underscore template to be used to render the button in the ribbon |
|
ModuleTemplatePath |
Text Default: SH.RootLevelURL + "/modules/SmartAutomations/templates/moduleTemplate.html" |
The path to the underscore template to be used to render the component |
|
CategoryTemplatePath |
Text Default: SH.RootLevelURL + "/modules/SmartAutomations/templates/categoryTemplate.html" |
The path to the underscore template to be used to render the configured categories |
|
ActionTemplatePath |
Text Default: SH.RootLevelURL + "/modules/SmartAutomations/templates/actionTemplate.html" |
The path to the underscore template to be used to render the smart actions |
| ActionModalTemplatePath |
Text Default: SHRootLevelURL + "/modules/SmartAutomations/templates/actionModalTemplate.html" |
The path to the underscore template to be used to render the modal with the input required for that AppBus action |
|
ActionModalMetadataTemplatePath |
Text Default: SHRootLevelURL + "/modules/SmartAutomations/templates/actionModalMetadataTemplate.html" |
The path to the underscore template to be used to render the modal metadata |
| ShowMoreTemplatePath |
Text Default: SHRootLevelURL + "/modules/SmartAutomations/templates/showMoreMetadataTemplate.html" |
The path to the underscore template to be used to render the "Show more" button |
| ActionModalSelector |
Text Default: ".smartAutomationsModal" |
The class that will be added to the modal that is displayed when running an action. Usually this would be used for styling purposes |
|
ActionListSelector |
Text Default: ".smartAutomationsList" |
The class that will be added to the parent container for all the actions |
|
CategoryListSelector |
Text Default: ".smartAutomationsCategoryList" |
The class that will be added to the parent container for all the categories |
| ParentSelector |
Text Default: .smartAutomations |
The CSS selector that represents the container where the SmartAutomations grid should be displayed |
| CategoryTemplateClass |
Text Default: category-template |
The CSS rule that decides the grid layout |
|
NumberOfActions |
Text Default: 5 |
The number of actions that are requested from AppBus at a time |
|
ShowMore |
Boolean Default: true |
Enables the Show More button when there are more available actions |
|
Categories |
Array Default: unset |
It contains the category definitions Example: Copy
|
| Applications |
JSON Default: unset |
|
| DocumentPickerSettings → EnableCondition |
Text Default: "actionMetadata.indexOf('FileName') !== -1" |
|
| DocumentPickerSettings → PlaceHolder |
Text Default: "Search for a document" |
The placeholder used by the document picker searchbox. |
| DocumentPickerSettings → MaxDocumentToReturn |
Integer Default: 50 |
The max number of documents to be returned when the user does a search. |
| DocumentPickerSettings → QueryTemplate |
Text Default: "{searchboxquery}" |
|
| DocumentPickerSettings → SourceId |
Text Default: "b29924a9-ec32-4c10-8892-a544b69ee121" |
|
| DocumentPickerSettings → MetadataMappings | JSON Default: {
|
|
Example: Set Smart Actions Categories
The following snippet, when added to the SmartAutomations setting, creates three categories:
- "NetDocs"
- "SalesForce"
- "FileNet"
Each category contains only actions that are tagged with the specified tags:
-
NetDocs,SF, andFileNetCrawlerToAC.
Categories: [
            {
                Name:"NetDocs",
                Tags:"NetDocs"            },
            {
                Name:"SalesForce",
                Tags:"SF"            },
            {
                Name:"FileNet",
                Tags:"FileNetCrawlerToAC"            }
        ]
How to use smart actions in carousel style
If there is no category defined, a carousel with all the available actions is shown:
How to Add Smart Actions to a Search Results Page
The Smart Automation module can also be displayed as a flyover by changing the ShowAsFlyover setting to true.
- BA Insight recommends you set Smart Automations as a flyover if you want to add the module on a search results page.
