How to Display SmartHub Results in a SharePoint Page
Scope
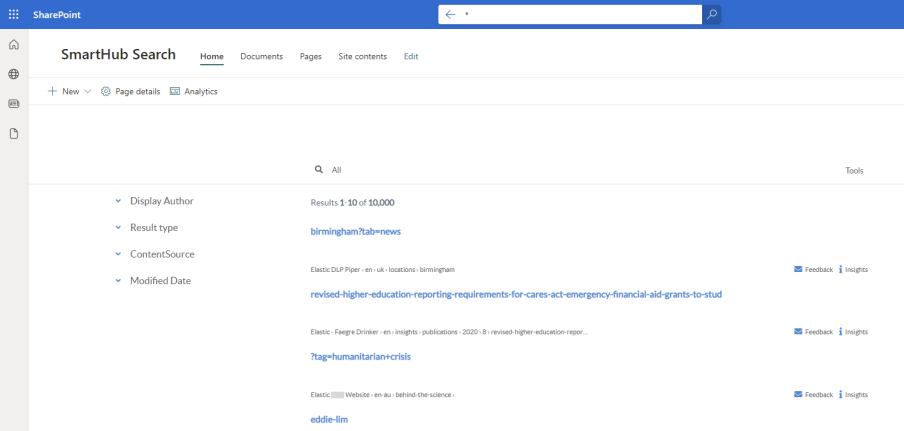
This page explains how to configure SharePoint to display the SmartHub pages within a SharePoint page.
Note: If you are planning to also use the SmartHub Searchbox integration check this page as well.

Requirements
-
Modern pages only: The BA Insight Content Editor web part must be installed at the tenant level.
-
This is done by deploying the SharePoint package available under your SmartHub installation directory. See below.
-
- SmartHub must be accessible from the internet via HTTPS
- SmartHub must be secured with Azure Active Directory
- Users must be able to log in to both SharePoint Online and SmartHub using the same account
- Access to the Azure Portal App Registration
- You must edit the URLs that are allowed to use the App Registration
Procedure
-
Open the file web.config located in the SmartHub root installation directory.
-
Remove the X-Frame-Options and Content-Security-Policy headers.

-
Navigate to the SmartHub installation directory and copy the file Login.aspx to a different directory (for editing).
-
Open the copy of the file Login.aspx for editing.
-
Remove the first line (that starts with the <%@ Page directive).
- Update the src attribute for all the script tags: prefix the path with the full address to your SmartHub site (https://yoursite.com) as shown in the example below, (which uses the sample site https://smarthub.contoso.com):

- Save and close the edited file.
- Upload the edited Login.aspx page to a SharePoint Online web site that everyone has access to:
- This is usually the root site:
- https://customer.sharepoint.com
- This page is used by the integration in case the session expires, and seamless authentication is not possible for various reasons.
- Because any user might be redirected to this page, ensure the location where you upload the file is available to any user who might access the SharePoint Online page with SmartHub embedded in it.
- This is usually the root site:
- Navigate to the directory where you have your custom Results HTML page.
- Note: You can only use the default, out-of-the-box page, Results.html when using the SmartHub page in a standalone configuration (without integrated SearchBox).
- Create a copy of the custom Results page and its custom settings file and give it another name, such as "SPOEmbed-Results.html".
- In SmartHub, open the UI Editor to edit your results page. For more information, see how to use the UI builder.
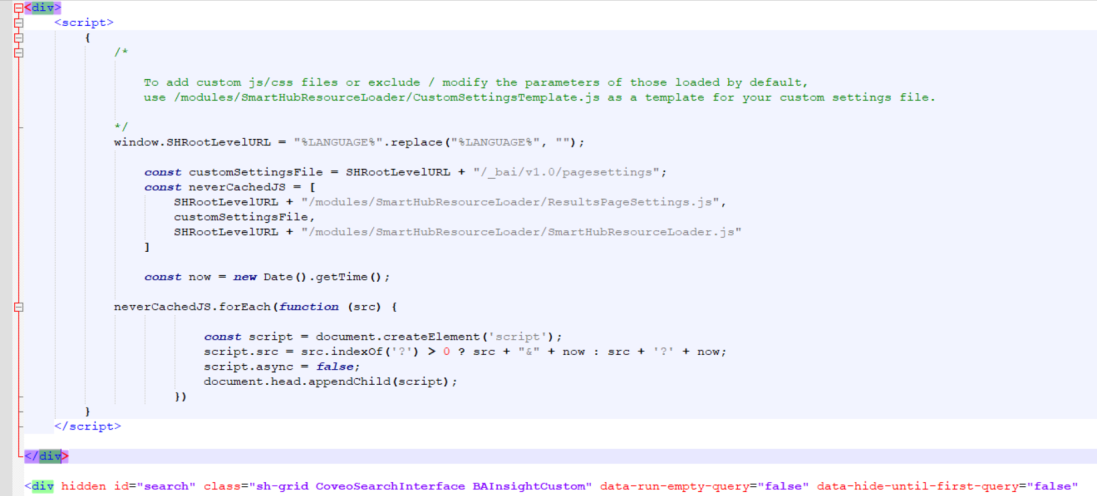
- Edit the file SPOEmbed-Results.html and make the following changes:
- Remove all the non-script tags from the head and everything above the <head> tag.
- Replace the
<head></head>and<body></body>tags with<div>and</div>while keeping the inner contents of those tags:
- For the DIV with ID "search" add a new attribute data-main="true"
- Replace the src attribute of logo with absolute URL.

- Change the
SHRootLevelURLvalue to your SmartHub root address, as shown below:
- When using a custom settings file:
From your Results.html page remove the line for
CustomSettingsFileAdd the following line of code in its place:
Copyconst customSettingsFile = SHRootLevelURL + "/_bai/v1.0/pagesettings" + "/?page=" + encodeURIComponent("/customer/CustomResultsPage.html");The SPOEmbed-Results.html page should be reassembled as follows:
 Info: Notice that "/customer/CustomResultsPage.html" is the relative URL of your custom results page.
-
In the UI Editor, open and edit the page settings file that is used by the custom results page.
- Change the URL to any custom CSS or JavaScript file that was added to it to use the full SmartHub URL instead of the relative URL (or to use the
SHRootLevelURLas shown below):
- In the custom settings file add the following code to the
SH.Loader.FilesToLoadsection.- Add the URL to point to the location of custom style for content editor and other JavaScript/CSS files that you want.
- Add the URL to point to the location of the Login.aspx page that you uploaded to SharePoint in step 4, above:CopyLoginSnippet + ContentEditorStyle
"https://smarthub.contoso.com/integrations/spo/contentEditor.css": {},
"https://smarthub.contoso.com/modules/Authentication/OAuth.js": {
    "params": {
        "data-login-redirect-uri": "https://customer.sharepoint.com/SitePages/Login.aspx"
        }
}
The complete, final settings file resembles the code shown below:
-
In the custom settings file, search for SH.AuthDialog.CustomSettings section
-
Change the ParentContainer selector to "#search" for example.
-
This AuthDialog is used when the authentication token expires and it needs an user action to refresh the authentication token.
-
Changing from body to "#search" in SPO integration, will know where in page to displayed the refresh button when authentication token expires.
CopySH.AuthDialog.CustomSettings = {
ParentContainer: "#search"
}; -
- To make "edit page" functionality work properly, add your relative path to custom results page as a new line:

-
Navigate to the Azure Portal App registration used by SmartHub authentication.
-
Edit the list of Single-page applications (under Authentication).
-
Add the URL to the Login.aspx page you uploaded to SharePoint, such as https://customer.sharepoint.com/SitePages/Login.aspx

-
-
Navigate to the page where you want to make SmartHub available.
-
Edit the page and add the Content Editor web part to it.
-
Edit the properties of the web part.
-
In the case of a modern page installation the BA-Insight Content Editor web part since there is no SharePoint Modern Content Editor web part available out of the box
-
Navigate to your SharePoint Online Admin Center.
-
For example: https://contoso-admin.sharepoint.com
-
-
Open the App Catalog.
-
Click "upload a new app."
-
Navigate to the "Content Editor" directory from your local SmartHub installation: <SmartHub_Root>/integrations/spo/web parts/Content Editor
-
Select the bai-content-editor-v6.sppkg file to upload.
-
Before clicking "Enable app" make sure you enable the "Enable this app and add it to all sites" check box.
-
Click Enable app
-
-
-
-
In the web part properties enter the full URL to your custom SPOEmbed-Results.html page
-
Example: such as https://smarthub.contoso.com/customer/SPOEmbed-Results.html
-
In the case of a modern page, ensure you check the option "Make _spPageContextInfo available" in the BA Insight Content Editor web part options.
-
-
Save the web part changes and publish the page.